Evenflo Momentum 65 Car Booster Seat User Guide | Installation
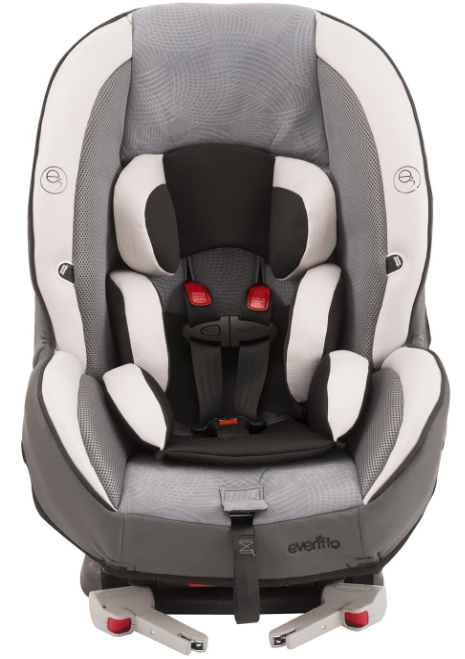
Content
Evenflo Momentum 65 Car Booster Seat Introduction
The Evenflo Momentum 65 Car Booster Seat is designed to provide superior safety and comfort for children weighing between 5 to 65 pounds. This versatile car seat features a 5-point harness system and an adjustable headrest, ensuring a secure fit as your child grows. Its side-impact protection and energy-absorbing foam enhance safety during travel. Additionally, the seat can easily transition to a booster seat for older children. The Evenflo Momentum 65 is priced at approximately $199.99.
Visual Glossary
Your vehicle components may be significantly different than pictured. Consult your owner’s manual to help you identify your vehicle components.
Back Seat
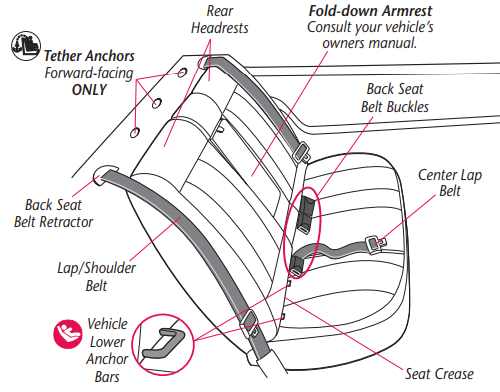
IMPORTANT: If your vehicle has side air bags, please refer to the warnings on page 2.
Front Seat
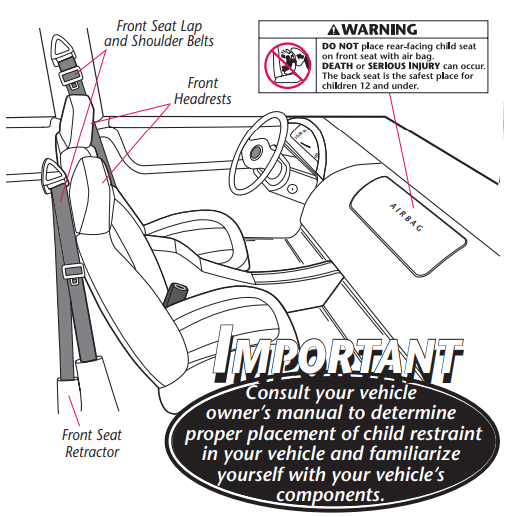
Front
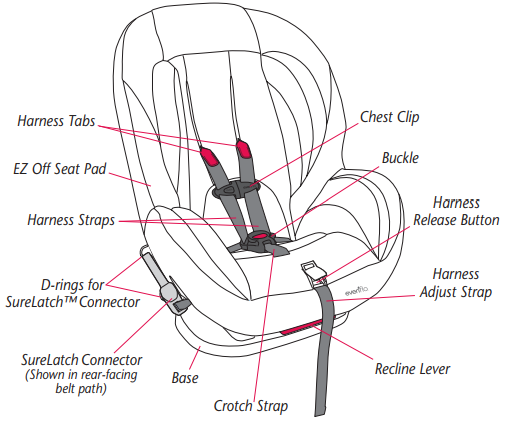
Back
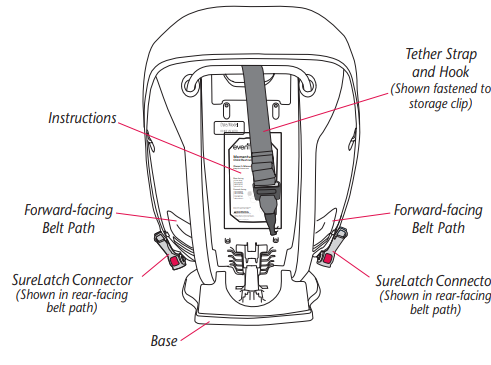
Detailed Specifications
The Evenflo Momentum 65 boasts several key features that make it stand out in the market:
- Weight Range: 25-65 pounds in harness mode, 40-110 pounds in booster mode.
- Height Range: 30-50 inches in harness mode, 44-57 inches in booster mode.
- Materials: Durable and easy-to-clean fabric.
- Installation: Easy installation with SureSafe technology and QuickConnect latch system.
- Safety Features: Impact-absorbing foam, side impact protection, and multiple harness positions.
How to Secure Your Child
Securing the Child in the Child Restraint
- Loosen harness.
Press the harness release button on the front of the seat, then pull up on the harness strap behind the fastened chest clip. - Position harness straps.
Unfasten chest clip and place the child in the child restraint. Bring each harness strap over each of the child’s shoulders.
IMPORTANT: The baby’s back and bottom should be flat against the restraint. If there is a gap, the baby will not be comfortable. - Adjust harness straps.
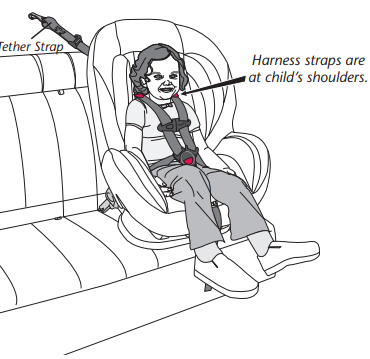
Grasping both red harness tabs, slide downward until the harness straps are at the child’s shoulders. Buckle the harness.
Insert both buckle tongues into the buckle.
Note: Pull up on the harness straps to ensure that the buckle tongues are fastened securely.
- Remove all slack in harness.
Pull upward on the harness straps near the hips, as shown, to ensure that all slack is removed. - Tighten harness.
Pull the harness adjuster strap to tighten the harness. The harness straps must be snug against the child. A snug strap should not allow any slack. It lies in a relatively straight line without sagging. It does not press on the child’s flesh or push the child’s body into an unnatural position.
Check the harness straps near the shoulders for slack. You should NOT be able to pinch the harness (see illustration). Adjust as needed. Fasten and adjust chest clip.
Snap the two halves of the chest clip together, as shown, and slide to armpit level.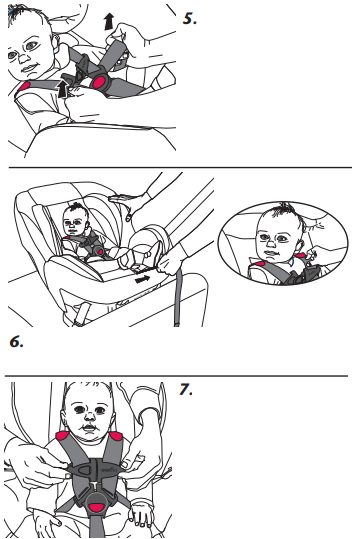
Removing the Child from the Child Restraint
- Loosen harness straps.
Press the harness release button on the front of the seat while pulling up on the harness strap behind the fastened chest clip. - Disconnect chest clip.
Push the release button and pull the chest clip apart. - Unbuckle harness.
Press the red button on the buckle and release both buckle tongues. You may now remove your child.

Description
The Evenflo Momentum 65 is designed with both safety and comfort in mind. The seat features a sturdy build with impact-absorbing foam that helps protect your child during collisions. The adjustable harness ensures a snug fit as your child grows, while the side impact protection adds an extra layer of security. The seat also includes multiple recline positions, allowing your child to stay comfortable during long car rides.
The fabric is easy to clean and maintain, making it a practical choice for busy families. The seat's design ensures that it fits well in most vehicles, providing a secure and stable installation every time.
Rear-facing Use
Using Momentum in the Rear-facing Position
Child Requirements
- Weight: 2.3 to 18 kg (5 to 40 lbs)
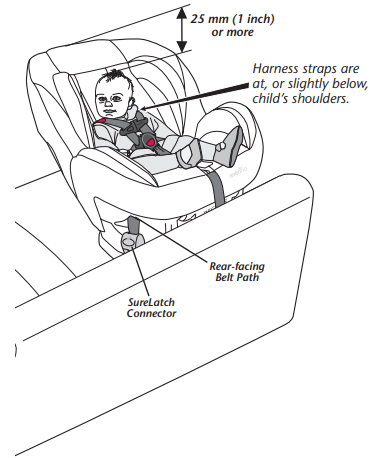
- Height: 48 to 94 cm (19 to 37 inches) tall AND the top of the child’s head is at least 25 mm (1 inch) below the top of the child restraint seat back.
Rear-facing Installation Checklist
- Secure child restraint to the vehicle seat.
Restraint is securely locked into Recline Position #1 (p. 46).
Locking clip is installed, if necessary (p. 28).
Level line is level with ground (p. 24 or 29).
A towel/small blanket is rolled up and placed beneath the front edge of the base, if necessary (p. 24 or 29).
The child restraint is securely installed with one of the following methods using the rear-facing belt path:- SureLatch Connectors (p. 23)
- Quick Connectors (p. 23)
- Vehicle Seat Belts (p. 26)
Note: To determine which type of lower anchor connector is on your child restraint, go to page 20.
- Place the child in the child restraint.
Child’s back and bottom are flat against the back and bottom surfaces of the child restraint.
Top of child’s head is at least 25 mm (1 inch) below the top of the child restraint seat back. - Make necessary adjustments.
Red harness tabs MUST be at, or slightly below, shoulder level (p. 14). - Fasten both buckle tongues. Refer to page 14.
- Tighten Harness - Position and connect chest clip.
Harness straps are snug against the child’s shoulders, with no slack (p. 15).
Chest clip MUST be placed at armpit level (p. 15). - Check your work.
Harness straps are snug against the child’s shoulders, with no slack (p. 15).
To properly secure this child restraint, it MUST NOT move more than 25 mm (1 inch) from sideto- side or from front-to-back at the rear-facing belt path (p. 25 and 29).
Which Type of Lower Anchor Connector Is on Your Child Restraint?
Your child restraint will have one of the two types of lower anchor connectors shown below. Follow the instructions on the following pages to properly install the lower anchor connector assembly on your child restraint.

Moving Lower Anchor Connector Assembly to Rear-facing Belt Path
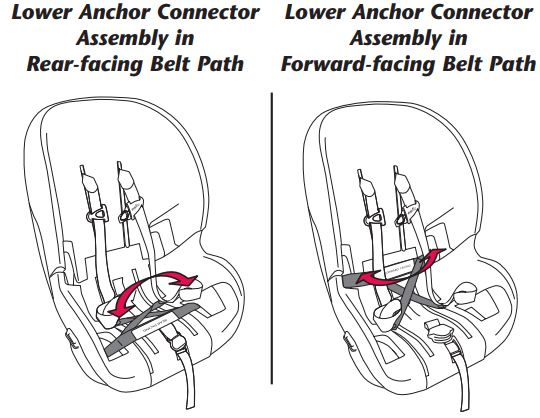
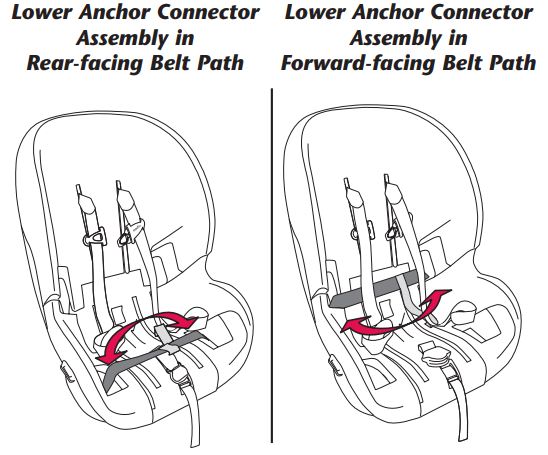
To install this child restraint properly in the rear-facing position, the lower anchor connector assembly MUST be in the rear-facing belt path, as shown on the next page (seat pad has been removed for clarity). If the lower anchor connector assembly is in the forward-facing belt path (shown on next page), use the following procedures to move it to the rear-facing belt path.
To access the lower anchor connector assembly, you will first need to:
- Loosen internal harness straps (p. 16);
- Disconnect SureLatch lower anchor connectors (p. 44) or Quick Connector lower anchor connectors (p. 45);
- Remove the seat pad (p. 46).
Moving Lower Anchor Connector Assembly to Rear-facing Belt Path
SureLatch
Quick Connector
Moving Lower Anchor Connector Assembly to Rear-facing Belt Path
- Remove lower anchor connectors from the forward-facing belt path.
Reach through the harness straps and remove each lower anchor connector, one at a time. - Place each lower anchor connector in the rear-facing belt path.
IMPORTANT: Make sure the lower anchor connector assembly does not interfere with the internal harness straps. - Make sure the buckle and crotch strap is positioned in front of the lower anchor connector assembly, as shown.
IMPORTANT: Make sure the harness straps and the lower anchor connector assembly are not tangled.
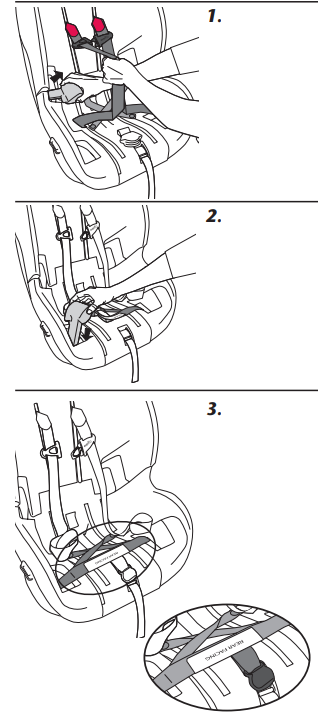
Note: Don’t forget to install the seat pad before installing the child restraint in your vehicle.
Rear-facing Installation with Lower Anchor Connectors
IMPORTANT
- If you are using the vehicle seat belt to secure the child restraint, DO NOT use lower anchor connectors.
- DO NOT use the tether strap when the child restraint is in the rear-facing position.
- Place the child restraint in position.
Adjust the child restraint to the most reclined position (Recline Position #1, p. 46), then place it on vehicle seat in the rear- facing position, as shown. Attach lower anchor connectors.
Push a lower anchor connector onto each vehicle lower anchor bar.
Note: You may need to vary the angle of the lower anchor connectors, as shown above, to attach to the lower anchor bars. Also, make sure the lower anchor connector assembly is in the rear-facing belt path (p. 21).
IMPORTANT: Make sure both SureLatch connectors or Quick Connectors are facing upward and the straps are not twisted.Increase recline angle, if necessary.
If level line is not parallel to the ground, disconnect lower anchor connectors and place a tightly rolled towel/small blanket beneath the front edge of the child restraint. Repeat Step 2.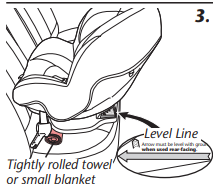
IMPORTANT: Infants may have difficulty breathing when in a sitting position. Make sure they recline enough for their head to lie back comfortably and safely. Failure to properly recline the child restraint could increase the child’s risk of serious injury or death.
- Ensure child restraint is secure.
To secure a child restraint that has SureLatch connectors, go to Step 4a. To secure a child restraint that has Quick Connectors, go to Step 4b.- 4a. Secure the child restraint SureLatch Connector.
Using your full weight, push the child restraint firmly into the vehicle seat, as shown, to lock in place.
Note: In some vehicles, you may need to prop up the connector while pushing downward on the seat to secure it tightly. Repeat for the other connector.
IMPORTANT: To properly secure this child restraint, it MUST NOT move more than 25 mm (1 inch) from side-to-side or from front-to-back at the rear-facing belt path. If you cannot tightly secure the child restraint, try again or move it to another location. 4b. Secure the child restraint Quick Connector.
Using your full weight, push the child restraint firmly into the vehicle seat while pulling up on the lower anchor strap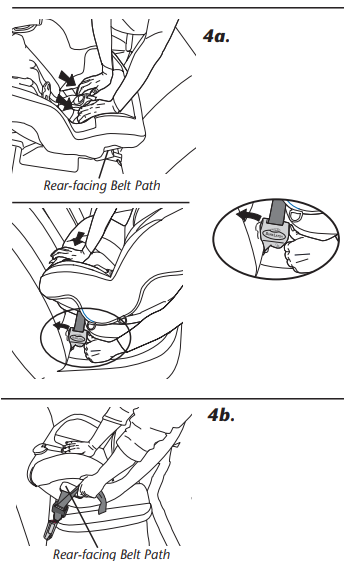
- 4a. Secure the child restraint SureLatch Connector.
IMPORTANT: To properly secure this child restraint, it MUST NOT move more than 25 mm (1 inch) from side-to-side or from front-to-back at the rear-facing belt path. If you cannot tightly secure the child restraint, try again or move it to another location.
Rear-facing Installation with Vehicle Seat Belt
IMPORTANT:
- If you are using lower anchor connectors to secure the child restraint, DO NOT use the vehicle seat belt.
- Before installing this child restraint rear-facing with the vehicle seat belt, you MUST move the lower anchor connector assembly to the forward-facing belt path so that it does not interfere with the vehicle seat belt. Refer to pages 32 to 34 for instructions on moving the SureLatch connectors or Quick Connectors to the forward-facing belt path.
- Make sure the SureLatch connectors or Quick Connectors are attached to the storage D-rings on the seat pad.
- Check your vehicle owner's manual to determine how to lock your seat belt for child restraint installation. The seat belt must be locked to properly secure the child restraint.
- DO NOT use the tether strap when the child restraint is in the rear-facing position.
- Place the child restraint in position.
Adjust the child restraint to the most reclined position (Recline Position #1, p. 46), then place it on vehicle seat in the rear-facing position, as shown. Route seat belt through rear-facing belt path.
Unhook the front of the seat pad and move it out of the way, as shown.
- Buckle seat belt.
Remove all slack from the seat belt.
Using your full weight, push the child restraint firmly onto the vehicle seat while tightening the vehicle seat belt to remove excess slack.
Install Locking Clip (not included), if necessary. If your vehicle was built prior to model year 1996, and has a lap/shoulder belt that is equipped with an emergency locking retractor (ELR) AND sliding latch plate, you MUST use a Locking Clip. Check your vehicle owner’s manual to identify which vehicle belt system is in your vehicle.
If your vehicle is model year 1996 or newer, it likely has a vehicle belt system that can be locked when tightened, and will not require use of a Locking Clip.
Consult your vehicle owner’s manual before installing a locking clip.
WARNING
Remove Locking Clip from vehicle seat belt when not used with a child restraint, or the vehicle seat belt will not properly restrain an adult or child. Serious injury could occur.- Connect seat pad to the front of the child restraint.
- Increase recline angle, if necessary.
If the level line is not parallel to the ground, disconnect the seat belt and place a tightly rolled towel/small blanket beneath the front edge of the child restraint. Repeat Step 2.
IMPORTANT: Infants may have difficulty breathing when in a sitting position. Make sure they recline enough for their head to lie back comfortably and safely. Failure to properly recline the child restraint could increase the child’s risk of serious injury or death. Ensure child restraint is secure. Try to move the child restraint in all directions.

IMPORTANT: To properly secure this child restraint, it MUST NOT move more than 25 mm (1 inch) from side-to-side or from front-to-back at the rear-facing belt path. If you cannot tightly secure the child restraint, try again or move it to another location.
Forward-facing Use
Using Momentum in the Forward-facing Position
Child Requirements
- Weight: 10 to 29.4 kg (22 to 65 lbs) Height: 71 to 127 cm (28 to 50 inches) tall AND the tops of the child’s ears are below the top of the child restraint seat back.
- Age: At least one year old
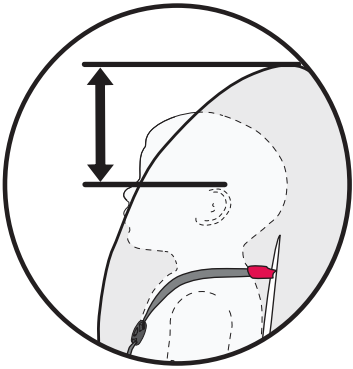
IMPORTANT
You must use the top anchorage (tether) strap when securing a child in this child restraint forward facing. Using the tether strap will improve the stability of this child restraint and may reduce the risk of injury.
WARNING
If the child weighs more than 29.4 kg (65 lbs) OR their shoulders are above the highest harness level, you MUST use a booster seat.
Forward-facing Installation Checklist
Secure child restraint to the vehicle seat.
Restraint is securely locked into Recline Position #2 or #3 (p. 46).
Locking clip is installed, if necessary (p. 42).
If the child weighs 22.6 kg (50 lbs) or less, the child restraint is securely installed with one of the following methods through the forward-facing belt path:- SureLatch Connectors (p. 35)
- Quick Connectors (p. 35)
- Vehicle Seat Belts (p. 40)
- Note: To determine which type of lower anchor connector is on your child restraint, go to page 32.
If the child weighs more than 22.6 kg (50 lbs), the child restraint is securely installed with the vehicle seat belt (not the LATCH system) through the forward-facing belt path (p. 40).
Tether strap is attached and tightened (p. 39 or 43).- Place the child in the child restraint.
The child’s back and bottom are flat against the back and bottom surfaces of the child restraint.
The tops of the child’s ears MUST be below the top of the child restraint seat back. - Make necessary adjustments.
Red harness tabs MUST be at shoulder level (p. 14). - Fasten both buckle tongues. Refer to page 14.
- Tighten Harness - Position and connect chest clip.
Harness straps are snug against the child’s shoulders, with no slack (p. 15).
Chest clip MUST be placed at armpit level (p. 15). - Check your work.
Harness straps are snug against the child’s shoulders, with no slack (p. 15).
To properly secure this child restraint, it MUST NOT move more than 25 mm (1 inch) from side-to-side or from front-to-back at the forward-facing belt path (p. 38 and 43). To make installation easier, watch the installation video of this child restraint at https://www.evenflo.com
Which Type of Lower Anchor Connector Is on Your Child Restraint?
Your child restraint will have one of the two types of lower anchor connectors shown below. Follow the instructions on the following pages to properly install the lower anchor connector assembly on your child restraint.

Moving Lower Anchor Connector Assembly to Forward-facing Belt Path
To install this child restraint properly in the forward-facing position, the lower anchor connector assembly MUST be in the forward-facing belt path, as shown on the next page (seat pad has been removed for clarity). If the lower anchor connector assembly is in the rear-facing belt path (shown on the next page), use the following procedures to move it to the forward-facing belt path.
To access the lower anchor connector assembly, you will first need to:
- Loosen internal harness straps (p. 16);
- Disconnect SureLatch lower anchor connectors (p. 44) or Quick Connector lower anchor connectors (p. 45);
- Remove the seat pad (p. 46).
Moving Lower Anchor Connector Assembly to Forward-facing Belt Path
SureLatch
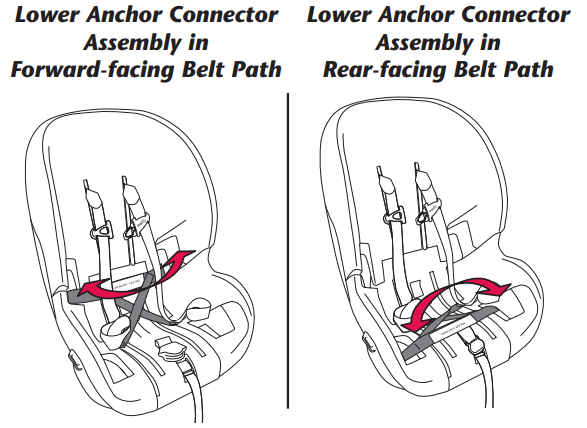
Quick Connector
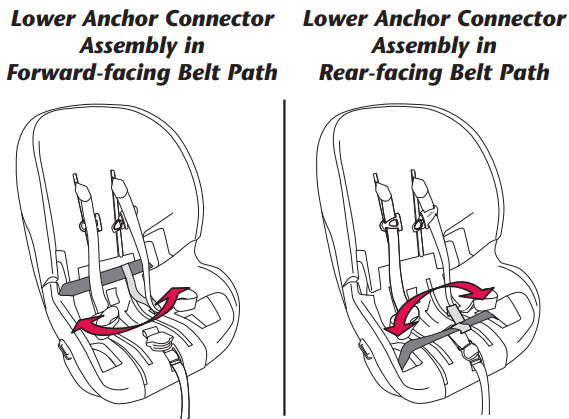
Moving Lower Anchor Connector Assembly to Forward-facing Belt Path
- Remove lower anchor connectors from the rear-facing belt path.
Place each lower anchor connector in the forward- facing belt path.
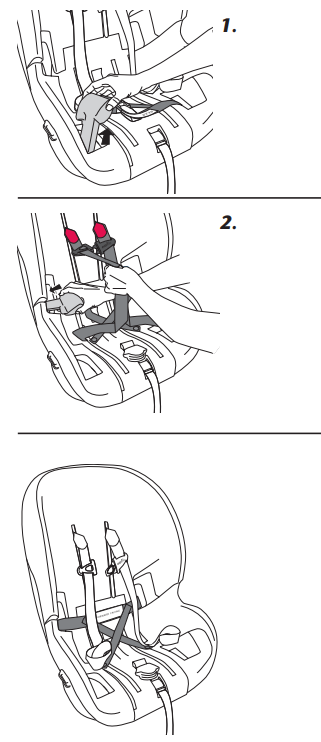
Pull the harness strap out of the way and insert a lower anchor connector, behind the straps, into the forward-facing belt path opening, as shown. Repeat on the other side.
IMPORTANT: Make sure the lower anchor connector assembly does not interfere with the internal harness straps.
Note: Don’t forget to install the seat pad before installing the child restraint in your vehicle.
Forward-facing Installation with Lower Anchor Connectors
LATCH is a system for attaching the child restraint to your vehicle seat. It is to be used in place of your vehicle’s seat belts and can be used in vehicles with LATCH anchors. Your vehicle owner’s manual may refer to this system as ISOFIX, Universal Anchorage System (UAS), or Lower Universal Anchorage System.
DO NOT install by this method for a child weighing more than 22.6 kg (50 lbs).
WARNING
- ONLY use for securing child restraint to lower anchor bars.
- ALWAYS read and follow exactly the instructions which accompany your vehicle and child restraint.
- NEVER attach two hooks to one vehicle lower anchor bar.
- DO NOT use the vehicle seat belts to install a child restraint when using the Lower Anchor Connector Assembly.
- This Lower Anchor Connector Assembly is intended to be used ONLY as described in these instructions. Serious injury or death may result from misuse.
- ALWAYS be sure that the Lower Anchor Connector hook is fully engaged onto the Vehicle Lower Anchor Bar by pulling hard on the Lower Anchor Connector strap. If it is not totally engaged, the Lower Anchor Connector Assembly will not secure your child restraint. Serious injury or death may result.
- To avoid a strangulation hazard, you MUST store the unused lower anchor connector assembly, with all slack removed, in storage area on the back of the seat. Roll or fold excess lower anchor connector strap and secure with a rubber band to prevent serious injury to vehicle occupants.
- In addition to these instructions, read and follow your vehicle owner’s manual regarding installation of child restraints and LATCH. If there is a discrepancy, follow your vehicle owner’s manual.
Forward-facing Installation with Lower Anchor Connectors
IMPORTANT
- If you are using the vehicle seat belt to secure the child restraint, DO NOT use lower anchor connectors.
- DO NOT use the lower anchors of the child restraint anchorage system (LATCH system) to attach this child restraint when restraining a child weighing more than 22.6 kg (50 lbs) with the internal harnesses of the child restraint.
- Install this child restraint with the vehicle seat belt (NOT lower anchor connectors) if the child weighs more than 22.6 kg (50 lbs).
- Some vehicle manufacturers have lower maximum weight ratings for vehicle lower anchor bars. Consult your vehicle owner’s manual, or call the vehicle manufacturer, to confirm the limits on your vehicle’s lower anchor bars.
- Disconnect tether hook from the back of the child restraint.
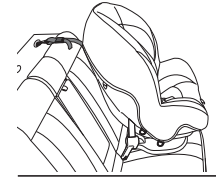
Place the child restraint in position. Make sure child restraint is in Recline Position #2 or #3 (p. 46).
Set child restraint on vehicle seat in forward-facing position, as shown. Lay the tether strap over the back of the vehicle seat.
IMPORTANT: NEVER use Recline Position #1 for forward-facing, AND NEVER use Recline Position #2 with children who weigh more than 18 kg (40 lbs).
Attach lower anchor connectors.
Push a lower anchor connector onto each vehicle lower anchor bar.
Note: You may need to vary the angle of the lower anchor connectors, as shown above, to attach to the lower anchor bars. Also, make sure the lower anchor connector assembly is in the forward-facing belt path (p. 33).
IMPORTANT: Make sure both SureLatch connectors or Quick Connectors are facing upward and the straps are not twisted.- Ensure child restraint is secure.
To secure a child restraint that has SureLatch connectors, go to Step 4a. To secure a child restraint that has Quick Connectors, go to Step 4b.- 4a. Secure the child restraint
SureLatch Connector.
Using your full weight, push the child restraint firmly into the vehicle seat, as shown, to set it in place.
Note: In some vehicles, you may need to prop up the connector while pushing downward on the seat to secure it tightly. Repeat for the other connector.
IMPORTANT: To properly secure this child restraint, it MUST NOT move more than 25 mm (1 inch) from sideto- side or from front-to-back at the forward-facing belt path. If you cannot tightly secure the child restraint, try again or move it to another location. 4b. Secure the child restraint
Quick Connector.
Using your full weight, push the child restraint firmly into the vehicle seat while pulling up on the lower anchor strap to tighten, as shown.
IMPORTANT: To properly secure this child restraint, it MUST NOT move more than 25 mm (1 inch) from sideto- side or from front-to-back at the forward-facing belt path. If you cannot tightly secure the child restraint, try again or move it to another location.
- 4a. Secure the child restraint
Connect and tighten tether strap.
Connect the tether hook to the vehicle tether anchor behind the vehicle seat, as shown.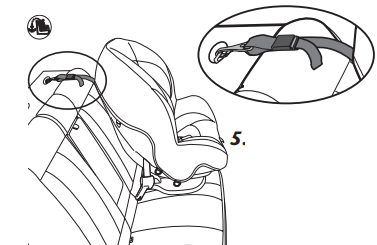
(Please consult your vehicle owner’s manual, as tether anchor locations may vary.) Pull the strap and tighten the tether securely.
IMPORTANT: If your tether strap is too short to reach from your child restraint to your vehicle tether anchor, you will need a Tether Extender.
Forward-facing Installation with Vehicle Seat Belt
IMPORTANT:
- If you are using lower anchor connectors to secure the child restraint, DO NOT use the vehicle seat belt.
- Before installing this child restraint forward-facing with the vehicle seat belt, you MUST move the lower anchor connector assembly to the rear-facing belt path so that it does not interfere with the vehicle seat belt. Refer to pages 20 to 22 for instructions on moving the SureLatch connectors or Quick Connectors to the rear-facing belt path.
- Make sure the SureLatch or Quick Connectors are attached to the storage D-rings on the seat pad.
- Check your vehicle owner's manual to determine how to lock your seat belt for child restraint installation. The seat belt must be locked to properly secure the child restraint.
- Disconnect tether hook from the back of the child restraint.
Place the child restraint in position. Make sure child restraint is in Recline Position #2 or #3 (p. 46).
Set child restraint on vehicle seat in forward-facing position, as shown. Lay the tether strap over the back of the vehicle seat.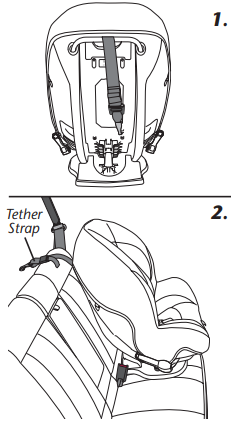
IMPORTANT: NEVER use Recline Position #1 for forwardfacing, AND NEVER use Recline Position #2 with children who weigh more than 18 kg (40 lbs).- Route seat belt through forward-facing belt path.
Move the harness out of the way and raise the access flap. Route the seat belt buckle tongue through the forward-facing belt path, as shown. Buckle seat belt.

- Remove all slack from the seat belt. Using your full weight, push the child restraint firmly onto the vehicle seat while tightening seat belt to remove excess slack.
Install Locking Clip (not included), if necessary.
If your vehicle was built prior to model year 1996, and has a lap/shoulder belt that is equipped with an emergency locking retractor (ELR) AND sliding latch plate, you MUST use a Locking Clip. Check your vehicle owner’s manual to identify which vehicle belt system is in your vehicle.
If your vehicle is model year 1996 or newer, it likely has a vehicle belt system that can be locked when tightened, and will not require use of a Locking Clip.
Consult your vehicle owner’s manual before installing a locking clip.
If your vehicle requires a Locking Clip to obtain a Locking Clip and instructions on how to install and use it.
Remove Locking Clip from vehicle seat belt when not used with a child restraint, or the vehicle seat belt will not properly restrain an adult or child. Serious injury could occur.
- Ensure child restraint is secure.
Try to move the child restraint in all directions.
IMPORTANT: To properly secure this child restraint, it MUST NOT move more than 25 mm (1 inch) from side-toside or from front-to-back at the vehicle belt path.
If you cannot tightly secure the child restraint, try again or move it to another location. Connect and tighten tether strap.
Connect the tether hook to the vehicle tether anchor behind the vehicle seat, as shown.
(Please consult your vehicle owner’s manual, as tether anchor locations may vary.) Pull the strap and tighten the tether securely.
Setup Guide
Setting up the Evenflo Momentum 65 is straightforward and user-friendly:
- Unpack and Inspect: Carefully unpack the car seat and inspect it for any damage.
- Choose Mode: Decide whether to use the harness or booster mode based on your child's weight and height.
- Install Base: Use the SureSafe technology and QuickConnect latch system to secure the base of the car seat to your vehicle.
- Position Harness/Booster: Adjust the harness or booster settings according to your child's size and position them comfortably in the seat.
- Check Fit: Make sure the car seat is properly installed and your child fits securely within it.
Care and Cleaning
- DO NOT lubricate or immerse in water the lower anchor connector assembly, the buckle, or any other part of this child restraint, unless rinsing is permitted, as stated on the back of the buckle for your restraint.
- Plastic and metal parts may be wiped clean with mild soap and water and dried with a soft cloth. Do not use abrasive cleaners or solvents.
- Take care not to damage any labels.
- The harness can be wiped clean with mild soap and water. Allow harness to air dry.
- Machine wash the seat pad separately in cold water, delicate cycle. Tumble dry 10 to 15 minutes on low heat.
- NEVER use child restraint without the seat pad.
TIP: To help protect the vehicle upholstery, place a towel beneath and behind the child restraint.
Proper Disposal of This Child Restraint
At the end of this child restraint’s useful life, Evenflo encourages you to dispose of it properly. Most of the components in this child restraint are recyclable.
- Remove all fabric and padding.
- Remove all screws and disassemble the restraint.
- Recycle all plastic/foam parts and discard the rest.
If your local recycling center won’t accept the padding, you may dispose of it in the landfill.
Note: Evenflo uses recycled materials in the manufacturing process whenever possible but never for components that are critical for safety.
To prevent injury due to hidden damage, lost instructions, outdated technology, etc., discontinue use of this restraint after the expiration date on the label or if it has been involved in a crash
Replacement Parts
You can order replacement parts online at https://www.evenflo.com or call Evenflo. When you contact us, please have the product model number and date of manufacture (found on the back of the child restraint).
Troubleshooting
Common issues and their solutions include:
- Difficult Installation: Ensure all parts are correctly aligned and follow the installation manual step-by-step.
- Harness Not Adjusting: Check if the harness is tangled or if there are any obstructions; refer to the manual for adjustment instructions.
- Warning Labels: Always read and follow safety warnings and instructions provided with the product.
Evenflo Momentum 65 Car Booster Seat Warranty
For a period of 90 days from the original purchase of this Product, Evenflo warrants to the original end-user (“Purchaser”) this Product (including any accessories) against defects in material or workmanship. Evenflo’s sole obligation under this express limited warranty shall be, at Evenflo’s option, to repair or replace any Product that is determined to be defective by Evenflo and determined to be covered by this warranty
Pros & Cons
Pros
- Versatile Use: Can be used in both harness and booster modes.
- Ease of Installation: SureSafe technology and QuickConnect latch system make installation easy.
- Comfortable Design: Multiple recline positions and soft fabric ensure comfort for long car rides.
- Advanced Safety Features: Impact-absorbing foam and side impact protection enhance safety.
Cons
- Bulkiness: The seat can be bulky, making it less ideal for smaller vehicles or multiple car seats.
- Cleaning Challenges: While the fabric is easy to clean, some users find it challenging to remove stubborn stains.
Customer Reviews
Many parents have praised the Evenflo Momentum 65 for its ease of use and robust safety features. Here are some common customer comments:
- "This car seat has been a lifesaver It's so easy to install and adjust for my growing child."
- "The comfort level of this seat is top-notch. My child loves riding in it."
- "While it's a bit bulky, the safety features far outweigh any minor inconveniences."
Common complaints
Include difficulty with cleaning certain parts of the seat and its bulkiness in smaller vehicles.
Faqs
What is the weight range for the Evenflo Momentum 65 Car Booster Seat?
How do I install the Evenflo Momentum 65?
Is the Evenflo Momentum 65 easy to clean?
What safety features does the Evenflo Momentum 65 offer?
Can I use this car seat in different vehicles?
How do I know if my child fits securely in the Evenflo Momentum 65?
What if my child outgrows one mode before transitioning fully?
Does this car seat come with any warranties or guarantees?
How long will this car seat last my child?
Are there any specific safety certifications this seat has received?
Leave a Comment
