Farm Innovators Pro Incubator 4250 Instruction Manual
Content
Introducing Farm Innovators Pro Incubator 4250
Farm Innovators Pro Incubator 4250 is a state-of-the-art incubator designed to provide a conducive environment for hatching poultry eggs. This product is ideal for both small-scale and commercial poultry farmers who want to increase their production and profitability. The Farm Innovators Pro Incubator 4250 is estimated to cost around $400 and is set to be launched in the market in the next few weeks.
Please read all instructions carefully before attempting to install and operate your unit. Know the unit’s application, limitations, and potential hazards. Protect yourself and others by observing all safety information.
Detailed Specifications
The Farm Innovators Pro Incubator 4250 comes with the following key features:
- Automatic turning of eggs every two hours
- Digital thermometer and hygrometer for temperature and humidity control
- LED display for easy monitoring of incubation progress
- Fan-forced air ventilation for proper air circulation
- Capacity to hold up to 48 chicken eggs or 120 quail eggs
- Exterior fan for cooling and temperature regulation
- Removable and washable egg trays for easy cleaning
- Power consumption of 60 watts
- Dimensions of 23 x 18 x 15 inches
- Weighs 15 pounds
Select Incubator Location
It is important to select a safe and stable location for your incubator. Avoid places where direct sunlight may come into contact with your incubator. Also, choose a location where the temperature is around 68-72 degrees F consistently without any drafts.
Getting Started with your Incubator
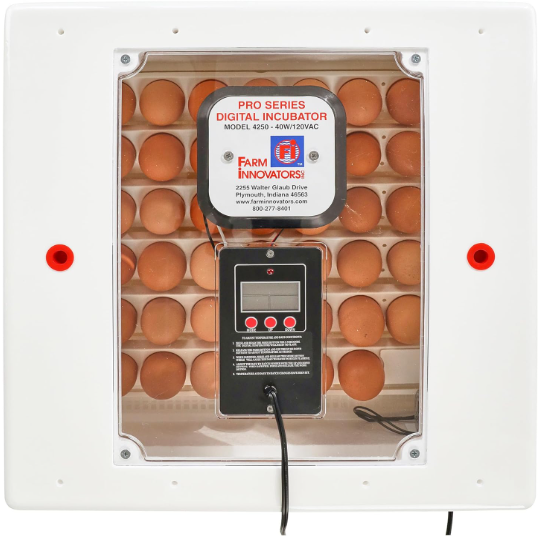
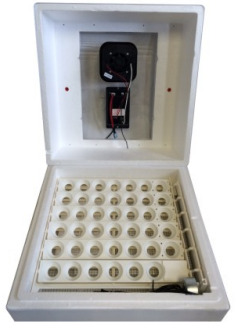
Remove the incubator from the packaging. The incubator comes in two parts (top and bottom). The BOTTOM of the incubator is the cover without the large observation window and power supply cord. The TOP of the incubator is the cover with the large observation window, power supply cord, heating element, and the LCD display panel with indicator lights. Plug both the power supply cord and the automatic egg turner power cord into a recommended GFCI outlet.
Incubator Temperature and LCD Settings
- The Pro Series Model 4250 Incubator comes with a built in LCD display panel that displays the internal temperature and humidity inside the incubator.
- Attached to the underside of the LCD display is a black wire that measures the incubator’s temperature. Make sure this wire is not touching anything during incubation. The temperature for the incubator is preset to 100 degrees F from the factory.
- Using an auxiliary thermometer is recommended to give an additional temperature readout. Due to various factors you may need to adjust the LCD panel temperature with the additional auxiliary thermometer to more accurately measure the temperature inside the incubator.
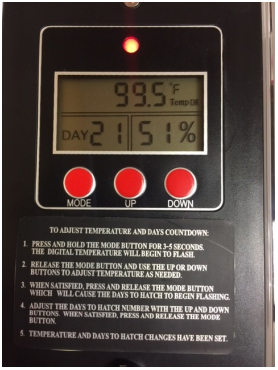
- To adjust the temperature inside your incubator, press and hold the MODE button for 3-5 seconds.
The TEMP display will begin to flash. Next press the UP or DOWN red button as needed to adjust the temperature accordingly. - Once you have finished adjusting the temperature press the MODE button again to adjust the days to hatch if necessary.
- To finish, simply press the MODE button to exit. The set up is complete. The ideal temperature for incubation is between 99.5 and 100.5 degrees F.
Humidity Control and Proper Ventilation
- The LCD display panel provides a humidity sensor through a red wire located on the underside of the LCD display.
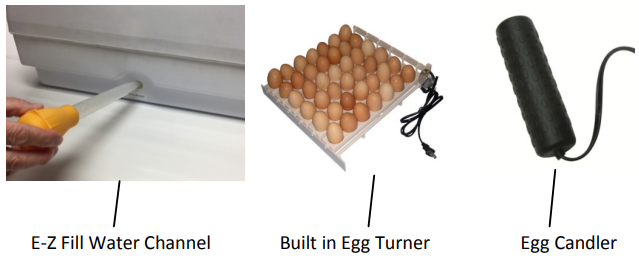
- Ensure this wire is not touching anything inside the incubator. Use a turkey baster to add 1/4 to 1/2 cup of water, preferably warm and distilled, to the large Primary E-Z Fill Water Channel (1) .
- The hygrometer should have a relative humidity level between 50-60% during incubation. Monitor and fill the large Primary E-Z Fill Water Channel (1) as needed to reach and maintain this percentage.
- The 3 days prior to hatching, the humidity level should increase to 65-75%. Add water to the small Secondary E-Z Fill Water Channel (2) to reach relative humidity to this range, if necessary.
CAUTION: Monitor humidity levels carefully as too much moisture may affect electronic circuitry. Farm Innovators Inc. is not responsible for damage due to excess humidity. - Proper ventilation is paramount during embryo development and should increase during the hatching process. We suggest you remove one RED ventilation plug located on the TOP cover when the chicks start to hatch.
- The RED ventilation plugs are located on opposite ends of the large observation window. After hatching, remove both RED ventilation plugs to help dry the chicks.
Insert and Monitor Eggs
- Once the incubator has been tested for 6-8 hours and the temperature is 100 degrees F while the humidity is between 50-60%, insert your eggs with the small end of the egg facing down. The Model 4250 Pro Series comes with a built in automatic egg turner that turns each egg 30 degrees on both sides. The automatic egg turner tilts each egg and makes a complete cycle once every 3-4 hours (six cycles a day). Before placing the eggs inside the incubator ensure that both your hands and the eggs are sanitized.
- Note: Egg Turner motor will be hot during the incubation period.
- Continue to monitor your eggs throughout the 21 day process. If you are incubating other bird species such as duck or turkey, adjust your DAY setting from 21 days to the required amount. It is important that while monitoring your incubated eggs avoid opening the incubator as much as possible unless it is to refill water to change humidity levels.
An egg CANDLER has been provided so that embryos may be monitored during the process. We recommend candling 3 times during the incubation process– Day 7 or 10, day 14, and day 18. If you don’t see anything at day 7 or day 10, do not discard those eggs immediately.
Description of Farm Innovators Pro Incubator 4250
The Farm Innovators Pro Incubator 4250 is designed to provide the optimal environment for hatching poultry eggs. Its automatic egg turning feature ensures that the eggs are properly positioned for even heat distribution, resulting in a higher hatch rate. The digital thermometer and hygrometer allow for precise temperature and humidity control, ensuring that the eggs are in the ideal condition for hatching. The LED display provides a clear view of the incubation progress, making it easy to monitor the development of the embryos.
The fan-forced air ventilation ensures that there is proper air circulation inside the incubator, preventing the build-up of harmful gases that can affect the hatching process. The exterior fan helps to regulate the temperature of the incubator, preventing it from overheating and causing damage to the eggs. The removable and washable egg trays make cleaning the incubator easy and hassle-free, ensuring that it remains hygienic and free from bacteria.
Getting Ready to Hatch
- It is important to unplug the EGG TURNER power cord when there are approximately three days left of incubation.
- Once the egg turner is unplugged, remove the automatic egg turner and add more water to increase the humidity level between 65-75% .
- Next, gently place the eggs on the metal screen located below the egg turner. As the eggs begin to hatch, remove one RED ventilation plug located on the TOP cover.
- The RED ventilation plugs are located on opposite ends of the large observation window.
- After more eggs begin to hatch remove both RED ventilation plugs to provide the chicks with more oxygen and to help the drying process. Remember, different bird species have different hatching days, so make sure you have adjusted your DAYS using the MODE button.
- Once all the eggs have hatched remove them from the incubator.
- Make sure the baby chicks are kept in a warm and dry place.
- To clean your incubator use soap and water. Allow the incubator to air dry for several days.
- Turkey: 28 days
Duck: 28 days
Muscovy Duck: 33-35 days
Goose: 29-31 days
Guinea: 26-28 days
Pigeon: 16-18 days
Ring Neck Pheasant: 23-24 days
Mongolian Pheasant: 24-25 days
Bobwhite Quail: 23 days
Japanese Quail: 17-18 days
Chukar Partridge: 22-23 days
Peafowl: 28 days
Setup Guide
Setting up the Farm Innovators Pro Incubator 4250 is a straightforward process. Simply follow these steps:
- Clean the incubator thoroughly before use.
- Place the egg trays in the incubator and add water to the humidity reservoir.
- Set the desired temperature and humidity levels using the digital controls.
- Place the eggs in the egg trays, ensuring that they are positioned with the pointed end down.
- Close the lid and allow the incubator to run for 24 hours before adding any more eggs.
- Monitor the incubation progress regularly using the LED display.
Farm Innovators Pro Incubator 4250 Warranty
Farm Innovators, Incorporated has carefully inspected, tested, and packaged this unit to insure safe and reliable operation. When you receive your incubator, examine it carefully to determine there is no damage that may have occurred in shipment. If damage has occurred, notify the company from which you purchased the incubator. They will assist you in replacing the unit.
The Model 4250 Pro Series is guaranteed for 30 days, under normal conditions and intended use of service, from the original date of consumer purchase or date stamped on the unit against defects due to materials and the company’s workmanship only. The sole obligation shall be to replace the defective unit with replacement parts or a replacement unit. Units should be “checked for proper operation” prior to returning as defective. Units must be returned prepaid. No liability for loss or damage of any nature or kind, whether arising out of or from the use of the product, whether or not defective, is assumed by Farm Innovators, Incorporated and/or their employees.
Farm Innovators, Incorporated implies no warranty whatsoever to any factors relating to the successful hatching of any eggs. There are numerous factors that can lead to a successful and unsuccessful hatching of eggs. See the following website for further incubation information: http://msucares.com/poultry/reproductions/index
Troubleshooting
Here are some common problems and solutions when using the Farm Innovators Pro Incubator 4250:
- Problem: The incubator is overheating.
Solution: Check the temperature settings and ensure that the exterior fan is functioning correctly. - Problem: The eggs are not hatching.
Solution: Check the temperature and humidity settings and ensure that the eggs are positioned correctly. - Problem: The incubator is making strange noises.
Solution: Check the fan and other mechanical components for any signs of damage or wear and tear.
Pros & Cons
Pros
- Automatic egg turning feature for even heat distribution
- Digital thermometer and hygrometer for precise temperature and humidity control
- Fan-forced air ventilation for proper air circulation
- Exterior fan for cooling and temperature regulation
- Removable and washable egg trays for easy cleaning
Cons
- May be expensive for some farmers
- Requires regular monitoring and maintenance
Customer Reviews about Farm Innovators Pro Incubator 4250
Customers who have used the Farm Innovators Pro Incubator 4250 have praised its ease of use, precision temperature and humidity control, and high hatch rate. However, some have expressed concerns about its high price point and the need for regular monitoring and maintenance.
Faqs
What is the Farm Innovators Pro Incubator 4250 designed for?
How many eggs can the Farm Innovators Pro Incubator 4250 incubate at once?
How do I set up the Farm Innovators Pro Incubator 4250 for first-time use?
What is the correct humidity level for the Farm Innovators Pro Incubator 4250?
How do I clean the Farm Innovators Pro Incubator 4250 after hatching is complete?
How do I know if the automatic turner in my Farm Innovators Pro Incubator 4250 is working?
What should I do if the temperature in my Farm Innovators Pro Incubator 4250 fluctuates?
Is the Farm Innovators Pro Incubator 4250 energy-efficient?
Does the Farm Innovators Pro Incubator 4250 have a warranty?
How do I monitor the humidity inside the Farm Innovators Pro Incubator 4250?
Leave a Comment