Fidelity Audio Compact Hi-Fi Stereo Speaker User Guide | Specs & Features
Content
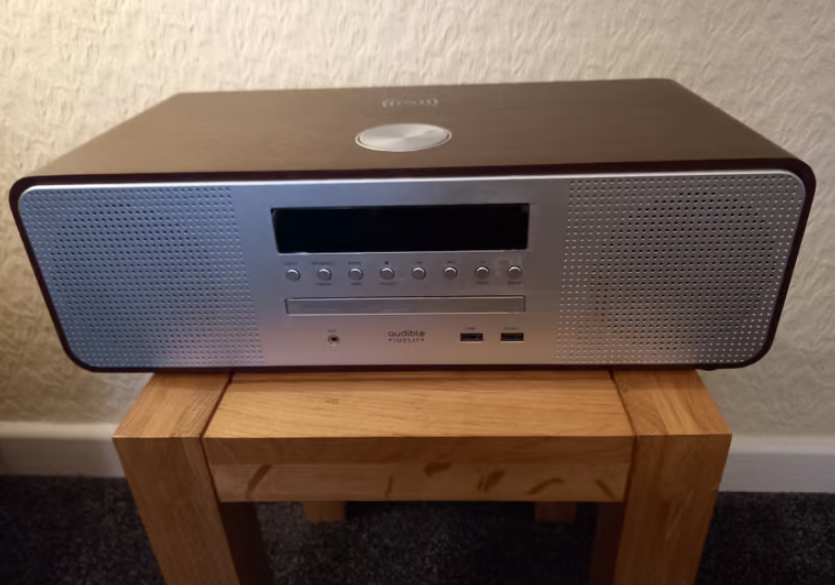
Introducing the Fidelity Audio Compact Hi-Fi Stereo Speaker
Experience crystal clear audio with the Hi-Fi Stereo Speaker, perfect for any music lover or audiophile. With its sleek and compact design, this Fidelity Audio Compact Hi-Fi Stereo Speaker is perfect for any room in your home or office. The estimated price range for this product is $100 - $150, and it is set to launch in the upcoming month.
Specifications
| Property | Specification |
|---|---|
| DAB frequency range | 174MHz (5A) - 239MHz (13F), supports DAB and DAB+ |
| FM frequency range | 87.5-108MHz |
| Power input | 100-240V ~ 50/60Hz |
| Wireless charger | 7.5W, 9V::800mA |
| USB charger output | 5V::1A |
| Speaker output | 2 x 10W |
| Dimensions | 428 x 134 x 215mm (L x H x D) |
Product Details
The Fidelity Audio Compact Hi-Fi Stereo Speaker boasts a powerful 2.1-channel system, delivering rich and full sound. The speaker is equipped with Bluetooth technology, allowing you to easily connect to your smartphone, tablet, or other Bluetooth-enabled device. The speaker also features a built-in USB port, making it easy to charge your devices while you listen. The speaker has a frequency response of 50Hz-20kHz and a signal-to-noise ratio of >80dBA.
Warnings and Advice
- Do not place naked flame sources, such as lighted candles on or near the turntable.
- Keep away from dripping or splashed liquids do not place drinks on the unit.
- The unit should not be exposed to direct sunlight, very high or low temperatures, moisture, strong magnetic fields high frequencies and dusty environments.
- Always leave sufficient space around the unit for ventilation.
- Do not use abrasives, benzene, thinner or other solvents to clean the unit. To clean, wipe with a clean soft cloth. Follow the advice on the care and use of CDs in this user guide.
- Never attempt to insert wires, pins or other such objects into the vents or opening of the unit.
- Do not disassemble or modify the unit, there are no user serviceable parts.
- If the unit is damaged or malfunctions do not use. Consult a qualified service engineer.
- When removing the power plug from the wall outlet, always pull directly on the plug. Do not pull on the cord.
Box contents
- 1x Compact Hi-Fi Stereo System
- 1x Remote Control (CR2025 battery fitted)
- 1x User Guide
Functions and features
- Bluetooth function
- Digital FM tuner with auto scan
- DAB, DAB+ tuner
- Up to 20 station presets
- CD MP3 player
- USB charging port (cable not included)
- AUX-IN 3.5mm port (cable not included)
- Wireless charging up to 7.5W
- Alarm function with snooze and sleep timer
- Remote control 1x CR2025 (battery included)
- Speaker output 2x 1 OW (2x 6W RMS)
- Power supply AC 220-240V-50/60Hz
Main features
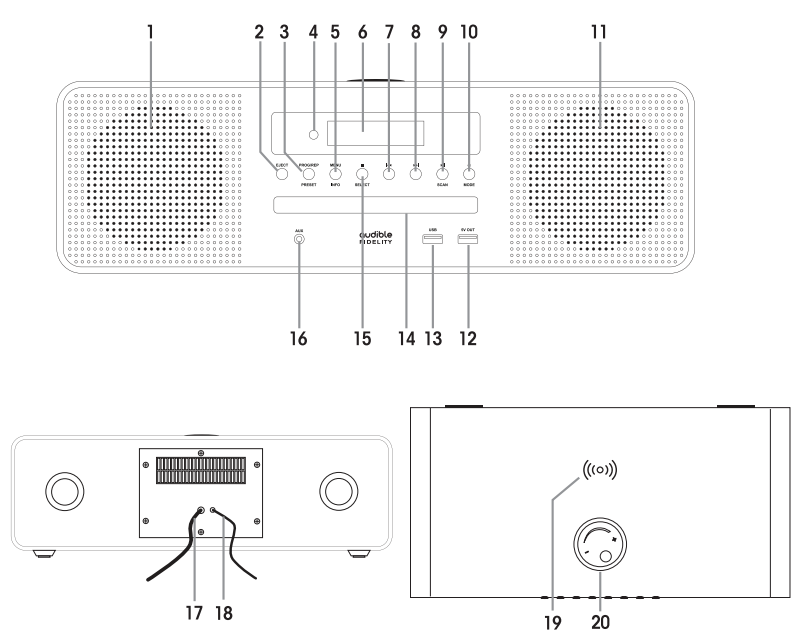
- Left speaker
- EJECT button
- PROG/REP/PRESET button
- Remote Control Sensor
- MENU/INFO button
- LCD Display
 PREV
PREV  NEXT button
  PLAY/PAUSE/SCAN button
 POWER/MODE button
- Right speaker
- 5V Out USB port
- USB playback port
- CD tray
 STOP/SELECT button
- AUX JACK
- AC Power cord
- FM Wire antenna
- Wireless charging area
- Volume knob
Remote control keys
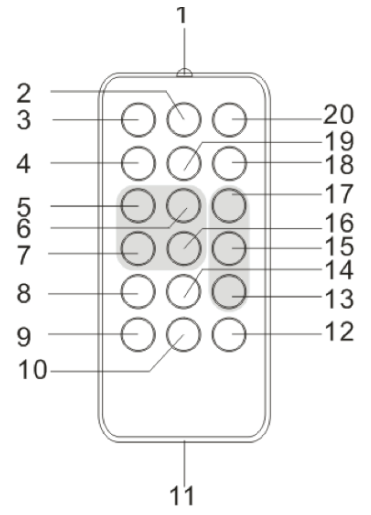
- Transmitter
- MODE button
- Power button
- Alarm button
- STOP button
- PLAY/PAUSE button
- PREV button
- PROG/PRESET button
- MENU/INFO button
- Select button
- Battery door
- 1 o+ Button
- MUTE button
- EQ equalizer button
- VOL- button
- NEXT button
- VOL+ button
- SLEEP/SNOOZE button
- Clock button
- EJECT button
Operation
- Plug the mains plug into a power socket.
Press and hold the POWER/MODE button for 2 seconds to turn the unit ON/OFF. - Adjusting the volume
Turn the Volume knob clockwise to increase the volume anti-clockwise to reduce the volume. The LCD display will confirm the volume setting. - Mute function
Press the MUTE button on the remote control to mute the volume, a "Volume Muted" message will appear on the LCD display. Press the MUTE button again to cancel the mute function.
DAB Radio mode
Check that your Radio is in DAB mode. If you are not already in DAB mode, press and release the POWER/MODE button repeatedly to enter DAB mode (check the display).
The first time you use the Radio or if the station list is empty, your radio will automatically begin to scan for DAB radio stations. A progress bar will show the progress of the scan and the number of stations found during the scan will also be displayed.
If you were listening to a DAB station when you switched the radio off, then this station will automatically be selected when you switch the radio back on.
Changing DAB stations
- Press the NEXT/PREV button to scroll through the available stations.
- When the station that you would like to listen to is displayed, press the STOP/SELECT button. There will be a short delay whilst your radio tunes to your selected station.
Scanning for DAB stations
With DAB radio, additional stations and services regularly become available so it's a good idea to carry out a manual scan from time to time to update the listing stored in the Radio's memory. If you have moved your Radio to another location, e.g.: if you go on holiday, then it's also a good idea to carry out a manual scan.
In DAB mode
- Press and release the PLAY/PAUSE/SCAN button to begin a search for stations. The display will change to 'Scanning .. .'. A progress bar will show the progress of the scan and the number of stations found during the scan will also be displayed.
Prune/Edit the DAB radio station list
You can remove any DAB stations that cannot be received in your area from the station list using the Prune function.
In DAB mode
- Press and hold the MENU/INFO button until <FULL SCAN> is displayed
- Use the NEXT/PREV button to scroll to <PRUNE>. Press and release the STOP/SELECT button.
- PRUNE < No> Yes is displayed. Use the NEXT/PREV to scroll to Yes. Press and release the STOP/SELECT button to confirm and edit the station list.
Storing a DAB station preset
Your Radio can store up to 1 O DAB radio stations in its preset memories for instant access to your favourite stations.
- Tune the Radio to the DAB radio station that you wish to preset.
- Press and hold the PROG/REP/PRESET button for approximately 2 seconds until Preset Store < 1: (Empty)> is displayed.
- Use the NEXT/PREV button to move to the preset location that you would like to store the radio station to (1-10).
- Press and release the STOP/SELECT button, the display will confirm Preset X stored, where 'X' is the number of the preset (1-10).
Note: If there is already an existing DAB station stored under a preset, it will be over written when you store the new station.
Tune to a DAB station preset
In DAB mod
- Press and release the PROG/REP/PRESET button. Preset Recall < 1: > is displayed together with the name or frequency of the station stored there, or (Empty) if no previous station has been stored.
- Use the NEXT/PREV button to move to the Preset station that you would like to listen to (1-10).
- Press and release the STOP/SELECT button. The radio will instantly tune to that station and begin to play.
Note: If no DAB station has been stored under the PROG/REP/PRESET button, 'Preset Empty' will be displayed, then the radio will revert to the previously selected radio station.
- Tune to a DAB station preset
When listening to a DAB station you can change the information that will appear on the display.
The following types of information are sent by the broadcaster- Dynamic Label Segment (DLS)
This is scrolling text information supplied by the broadcaster. Information could be the name of an artist or music title, DJ's name, contact details for the radio station etc. - Signal Strength: An empty will appear on the display to indicate the minimum signal strength for acceptable listening. The row of solid rectangles indicate the actual signal strength that you are receiving. The stronger the signal, the further to the right the row of solid rectangles will be.
- Program Type (PTY): such as 'Rock', 'Pop', Talk' or 'News'
- Multiplex Name: displays the broadcasting area and collection of radio stations on this frequency e.g.: BBC National DAB, Digital 1 Network.
- Channel and Frequency: e.g.: 12B 225.648 MHz
- Signal error: This is displayed as a number between 0-99. Try adjusting the aerial or relocating your radio to improve reception if you see a signal error rate of 30 or above.
- Signal information: The data rate at which the signal is being transmitted.
- Time and date: supplied by the broadcaster.
Repeatedly press and release the MENU/INFO button to cycle through the information options
- Dynamic Label Segment (DLS)
DAB Radio mode
Dynamic range control {DRC)
- In DAB mode
- DRC: Dynamic Range Control can make quieter sounds easier to hear when your radio is used in a noisy environment. This function is only available for some DAB stations.
- There are 3 levels of compression
- DRC off: no compression. This is the default setting.
- DRC low: medium compression.
- DRC high: maximum compression (best for noisy environments).
- In DAB mode, Press and hold the Menu/Info button until the DAB menu is shown.
- Press the NEXT/PREV button to select DRC menu and short press STOP/SELECT button to confirm
- In DRC , Use the NEXT/PREV button to select DRC off, DRC low and DRC high then short press the STOP/SELECT button to confirm.
FM Radio mode
- If you are not already in FM mode, press and release the POWER/MODE button repeatedly to go to
- FM mode (check the display).
- If you were listening to an FM station when you switched the Radio off then this station will be automatically selected when you switch the Radio back on.
Tuning to an FM station
- Press and hold the NEXT button for 2 seconds to scan up the frequency band.
- Press and hold the PREV button for 2 seconds to scan down the frequency band.
- Press the NEXT/PREV button to fine-tune each frequency in 0.05MHz steps.
Note: If reception is still poor try moving the radio to another location.
Changing the Scan setting
In FM mode
- Press and hold the Menu/Info button until FM <Scan setting> is displayed. Press and release the STOP/SELECT button. The current Scan setting will show an '*' in the top right of the display. There are two different options to choose from
- Strong stations
The scan will only stop when a strong signal strength is received which should also result in a better audio quality. It is possible that the station you are scanning for may be missed using this option. - All stations
The scan will stop for every station it receives, even if the signal strength is poor.
- Strong stations
- Use the NEXT/PREV button to choose from the two options available and press and release the STOP/SELECT button to confirm.
Audio mode
The radio will automatically switch between Stereo and Mono, depending on the quality of the signal being received but you can override this function and manually switch between Stereo and Mono.
- Press and hold the Menu/Info button until FM <Scan setting> is displayed.
- Use the NEXT/PREV to scroll to <Audio setting>. Press and release the STOP/SELECT button. There are now two different options of 'Forced mono' and 'Stereo allowed' and the current setting will have an '*' in the top right of the display.
- Use the NEXT/PREV button to choose from the two options available. Press and release the STOP/ SELECT button to confirm.
Storing an FM station preset
Your Radio can store up to 10 FM radio stations in its preset list.
- Tune the Radio to the FM radio station that you wish to preset.
- Press and hold the PROG/REP/PRESET button for approximately 2 seconds until Preset Store < 1: (Empty)> is displayed.
- Use the NEXT/PREV button to move to the pre-set location to where would like to store the radio station (1-10).
- Press and release the STOP/SELECT button, the display will confirm Preset X stored, where 'X' is the number of the preset (1-10).
Note: If there is already an existing FM station stored under a preset, it will be over written when you store the new station.
Tune to an FM station preset
In FM mode
- Press and release the PROG/REP/PRESET button. Preset Recall < 1: > is displayed together with the name or frequency of the station stored there, or (Empty) if no previous station has been stored.
- Use the NEXT/PREV button to move to the Preset location and station that you would like to listen to
- Press and release the STOP/SELECT button. The radio will instantly tune to that station and begin to play.
Note: If no FM station has been stored under the PROG/REP/PRESET button, Preset Empty will be displayed, then the radio will revert to the previously selected radio station.
FM display information
When listening to an FM station you can change the information that will appear on the second line of the display.
- Radiotext (RT): This is scrolling text information supplied by the broadcaster. Information could be the name of an artist or music title, DJ's name, contact details for the radio station etc.
- Program Type (PTY): Such as 'Rock', 'Pop', Talk' or 'News'
- Station name or frequency: Such as BBC R4 or 93.30MHz
- Audio mode: Stereo or Mono
- Time and date:M Supplied by the broadcaster.
- Repeatedly press and release the Menu/Info button to cycle through the information options.
Bluetooth mode
Connecting to a Bluetooth-enabled device
- Activate Bluetooth on your device (e.g. smartphone, tablet etc.)
- Press and hold the POWER/MODE button for 2 seconds to turn on the Hi-Fi system then press the POWER/MODE button repeatedly until "Bluetooth" appears on the LCD display. The system is now ready to pair.
- On your device search for and connect to "AF-1 O" in the Bluetooth listing. Enter the password "0000" (if one is required). When you have successfully connected, "BT connected" will appear on the LCD display.
Note: Once paired your AF-10 and Bluetooth device will automatically connect when the unit is on and Bluetooth is activated on your device. The next time you power on, the unit will automatically connect to the last device connected.
Playback from your Bluetooth device
Once connected, press the PLAY/PAUSE/SCAN button to play, press the PREV or NEXT button to play the previous or next tracks. To pause or resume play, press PLAY/PAUSE/SCAN button again. Press and hold PLAY/PAUSE/SCAN button for 2 seconds to break the Bluetooth connection.
Time and date
The first time you listen to DAB radio, the time in 24 hour mode and the date will be set automatically (including daylight saving).
If you prefer to set the time and date manually, turn on the radio and follow the steps below
- Press and hold the Menu/Info button until <Full scan> is displayed.
- Use the NEXT/PREV button to scroll to <System>. Press and release the STOP/SELECT button.
- Use the NEXT/PREV button to scroll to <Time>. Press and release the STOP/SELECT button. <Set Time/Date> is displayed. Press and release the STOP/SELECT button.
- Set time is displayed and the hour digits will flash. Use the NEXT/PREV button to scroll to the correct hour. Press the STOP/SELECT button.
- The minutes will now flash. Use the NEXT/PREV button to scroll to the correct minutes. Press the STOP/SELECT button.
- Set date is displayed and the day will flash. Use the NEXT/PREV button, together with the STOP/SELECT button, to select and confirm the day, month and year, using the same method as you used to set the time. When you confirm the correct date. 'Time Saved' is displayed and the display returns to <Set Time/Date>. You can now use the NEXT/PREV button to scroll and the STOP/SELECT button to select, as you did to set the time and date to change the settings for : 12/24 hour clock display. The date format, DD-MM-YYYY or MM-DD-YYYY and to auto-update the time from the DAB signal, FM signal, DAB or FM signal or no update.
Alarm function
Setting the Alarm
Note: Check that the radio has the correct time and date before you set an alarm. With your unit switched on (not in Standby mode)
- Press and hold the 'Menu/Info' button to enter the menu options ..
- Use the NEXT/PREV button to scroll to '<System>'. Press the STOP/SELECT button to select.
- Use the NEXT/PREV button to scroll to '<Alarm>'. Press the STOP/SELECT button to select.
- 'Alarm 1 (or 2) Setup' is displayed. Press the STOP/SELECT button to select.
- 'Alarm 1 (or 2) Wizard On time' is displayed and the hour digits for the alarm will flash
- Use the NEXT/PREV button to set the hour and press the STOP/SELECT button to select.
- The minutes will now flash. Use the NEXT/PREV button to scroll to the minutes for the alarm and press the STOP/SELECT button to select. The duration time will now flash.
- Use the NEXT/PREV button to scroll to the duration for the alarm. You can choose from 15, 30, 45, 60, 90 and 120 minutes. Press the STOP/SELECT button to select. The alarm source will now flash.
- Use the NEXT/PREV button to choose the source from Buzzer, DAB, FM,CD or USB. Press the STOP/SELECT button to select.
Note: If you select DAB or FM radio for the alarm source, 'Last listened' will flash in the display. Press the STOP/SELECT button to select and the last listened to radio station in DAB or FM as appropriate, will be used for your alarm. - 10. Use the NEXT /PREV button to scroll to the frequency for the alarm. You can choose from Daily, Once, Weekends or Weekdays. Press the STOP/SELECT button to select.
Note: If you select 'Once', you will then be prompted to set the date for your alarm. - Use the NEXT/PREV button to set the alarm volume. Press STOP/SELECT button to select.
Note: Remember to set the alarm radio volume to one that will wake you. The alarm volume will increase progressively until it reaches the alarm volume you have set. - 'Alarm 1 Wizard' is displayed again, together with 'Alarm Off (or On)'. Use the NEXT/PREV button to choose 'Alarm On' or 'Off and press the STOP/SELECT button to select. 'Alarm Saved' is displayed.
- A bell symbol in the top right of the display, together with the digit '1' or '2' as appropriate, will confirm when an alarm has been set.
Note: If the time is not set or has failed to update from the radio signal, 'Time is not set' will be displayed when you try to set the alarm. The radio will then prompt you to set the time. An alarm can only be set once the time has been set.
- Stop the Alarm
When the alarm sounds, press and release the POWER/MODE button, 'Alarm off is displayed. Alternatively, you can press and release the 'SLEEP/SNOOZE' button on the remote control (see Snooze function below).
Note: If you press the POWER/MODE button to stop the alarm, the alarm symbol will remain in the display and the alarm will sound again at the same time the next day, unless it was set for 'Once' only. - Snooze
When the alarm sounds you can press and release the 'SLEEP/SNOOZE' button on the remote control. 'Snooze 9 minutes' will be displayed, followed by the snooze time countdown, until the alarm sounds again. - Turn off the Alarm
Follow the steps for 'Setting an Alarm' and select 'Off in step 12. - Sleep timer
You can set your radio to turn off automatically using the sleep timer. You can choose from Sleep off, 15, 30, 45, 60 and 90 minutes.
With your unit switched on (not in Standby mode)
- Press and hold the Menu/Info button to enter the menu options .
- Use the NEXT/PREV button to scroll to <System > then press the STOP/SELECT button.
- In the System menu, use the NEXT/PREV button to scroll to <Sleep> then press the STOP/SELECT button.
- Use the NEXT/PREV button to cycle through the different sleep time options. Press the STOP/SELECT button to confirm.
CD mode
1. Press and hold the POWER/MODE button for 2 seconds to turn on the system
2. Press the POWER/MODE button repeatedly to select CD function.
3. Press the EJECT button to open the CD tray and insert a CD into the tray.
4. Press the EJECT button again to close the CD tray and, the disc will rotate for a few seconds and then play the 1st track automatically.
5. To pause, press PLAY/PAUSE/SCAN button, to resume, press it again.
6. Press the STOP/SELECT button to STOP play.
NOTE: Never touch the laser lens inside the CD compartment. Clean the laser lens with a CD cleaner disc if it becomes dirty. Use a soft dry cloth to clean discs.
To change or scan tracks
- Press the button once to return to the beginning of the current track. Press it two or more times to hear previous tracks on the disc.
- Press the button to hear the next tracks on the disc.
- Press and hold the or button, to scan the current track and then move to the previous or to the next track. When you find the section of track you are looking for release the button and normal play will resume.
Repeat function
- Press the PROG/REP/PRESET button once during playback, "REPEAT ONE" will show on the LCD display for about 2 seconds. The same track will be repeated over and over.
- Press the REPEAT button a second time to repeat all tracks. The "REPEAT ALL'.' sign will show on the LCD display for about 2 seconds.
- To cancel REPEAT PLAY, Press the REPEAT button repeatedly until "NORMAL'.' appears on the LCD.
Random play
Press the REPEAT button 3 times during play until "shuffle" appears on the display to play random tracks on your CD.
Program function
The Program feature can be used to program up to 20 tracks to play in a selected order.
- While in the Stop mode only (CD is not playing), press and hold the PROG/REP/PRESET Button for 2 seconds, the LCD Display will show "P 01" and "T 01" and start to flash.
- Press theandbuttons to allocate the desired track.
- Press the STOP/SELECT button to select and store the track into memory.
- Repeat step 2 to 3 to select up to 20 tracks.
- To play the selected tracks (in the program mode); press the PLAY/PAUSE/SCAN button.
- Press thebutton to hear the previous or press thebutton to hear next programmed track. Note: After all of the programmed tracks have played, the CD player will return to Stop mode.
- To clear the programmed tracks from memory, press and hold the STOP/SELECT button.
MP3 disc playback
MP3 discs can be played in the same way as CD discs when CD mode is selected but with a few minor differences
In addition to using the ![]() and
and ![]() buttons to navigate the tracks on your disc you can also use the + 10 button on the remote control to skip forward 10 tracks at a time. In the Repeat function if you press the Repeat button twice the display will show "Repeat Folder" and the current folder will be repeated. Press the Repeat button three times and the display will show "Repeat All" and all the tracks on the disc will be repeated.
buttons to navigate the tracks on your disc you can also use the + 10 button on the remote control to skip forward 10 tracks at a time. In the Repeat function if you press the Repeat button twice the display will show "Repeat Folder" and the current folder will be repeated. Press the Repeat button three times and the display will show "Repeat All" and all the tracks on the disc will be repeated.
USB MP3 playback mode
There are two USB ports on the front of your Hi-Fi system, the one marked "USB" is for playback from a USB device with MP3 tracks stored on it and the other marked "5V OUT" is for charging USB rechargeable devices such as smartphones.
For MP3 playback
- Press the POWER/MODE button repeatedly until 'USB' is shown on the display
- Connect a USB storage device directly into the USB port. The display will briefly show the number of folders and then the total number of tracks. Playback will start automatically after a few seconds
- For operation use the same control buttons as for MP3/CD playback.
- Always connect USB storage devices directly to the port marked "USB".
- The "USB" port is not designed for charging external devices, for charging use the "5V OUT" port.
- Important: To prevent possible data loss switch the device to a different operating mode before you disconnect the USB storage device.
Equalizer function
With your unit switched on (not in Standby mode
- Press the EQ button (14) on the remote control.
- Use the NEXT/PREV button to select an one of the equaliser functions listed below and press the STOP/SELECT button to confirm.
Note: Equaliser functions to choose from include Normal, Classic, Jazz, Pop, Rock, Speech or my EQ (which can be set to Treble or Bass).
Wireless charger function
Simply place your wireless charging compatible device on the wireless charger area indicated on the top of your Hi-Fi system housing. Charging will begin on contact. PLEASE NOTE wireless charging may interfere with the radio signal if the radio is played during charging.
USB "SV OUT" charging function
The "5V OUT" USB port is designed to charge USB rechargeable devices such as smartphones. Connect your USB device using the original cable supplied with your USB device. Disconnect when your device has charged. Do not leave your device charging unattended.
AUX In mode
- Press and hold the POWER/MODE button for 2 seconds to turn on the unit.
- Press the POWER/MODE button repeatedly to select the AUX In mode. ''Aux In" will appear on the LCD display.
- Connect an AUX connection lead (not supplied) from the output socket of your Personal Player such as a portable MP3 player to the AUX input socket.
- Use the controls on your Personal Player to play and select tracks. Set the volume on your personal player high and the volume on your Hi-Fi system to low and then gradually increase the volume on your Hi-Fi system to the desired level.
Display adjustments
Display backlight timeout
You can adjust the display backlight timeout. Options of permanently On, 10, 20, 30, 45, 60, 90, 120, and 180 seconds are available. An '*' will be displayed next to the current setting.
With your unit switched on (not in Standby mode)
- Press and hold the Menu/Info button to enter the menu options.
- Use the NEXT/PREV button to scroll to <System>. Press and release the STOP/SELECT button.
- Use the NEXT/PREV button to scroll to <Backlight>. Press and release the STOP/SELECT button.
- <Timeout> is displayed. Press and release the STOP/SELECT button. Use the NEXT/PREV button to scroll through the available backlight timeout options. Stop when the backlight timeout you would like is displayed and press and release the STOP/SELECT button. <Timeout> will be displayed. You can now use the NEXT/PREV to scroll and the STOP/SELECT button to select, as you did to set the Backlight timeout, to change the settings for the backlight brightness for the <Dim level> and <On level>. There are 3 options available, High, Medium and Low.
Display language
You can change the display language of your radio, there are 4 options available; English, French, German and Italian. An '*' will be displayed next to the current setting.
With your unit switched on (not in Standby mode)
- Press and hold the Menu/Info button to enter the menu options.
- Use the NEXT/PREV button to scroll to <System>. Press and release the STOP/SELECT button
- Use the NEXT/PREV button to scroll to <Language>. Press and release the STOP/SELECT button.
- Use the NEXT/PREV button to scroll to the language you would like. Press and release the STOP/SELECT button to confirm.
Software version
You can check the software version of your radio. With your unit switched on (not in Standby mode)
- Press and hold the Menu/Info button to enter the menu options .
- Use the NEXT/PREV button to scroll to <System > then press the STOP/SELECT button.
- In the System menu use the NEXT/PREV button to scroll to <SW version> then press the STOP/SELECT button.
The software version will be displayed
Factory reset
You can reset your radio and restore all of the original factory settings.
Note: Factory Reset can be used to clear the station list, the presets and sleep settings. This is useful if you move the UNIT to a different location (when you move house for instance) as some stations may not be available in the new area.
With your unit switched on (not in Standby mode)
- Press and hold the Menu/Info button to enter the menu options .
- Use the NEXT/PREV button to scroll to <System > then press the STOP/SELECT button.
- Use the NEXT/PREV button to scroll to <Factory Reset> then press STOP/SELECT button .
- Use the NEXT/PREV button to scroll to <Yes>.
- Press the STOP/SELECT button again.
- Restarting ... will be displayed. After a few seconds the display will then go to Standby mode. When you next power on your radio from Standby mode, it will automatically scan for DAB stations.
Troubleshooting
If you're having trouble connecting your device to the speaker via Bluetooth, first make sure that the speaker is turned on and in pairing mode. If the problem persists, try resetting the speaker by unplugging it and plugging it back in. If you're experiencing issues with the sound quality, check to make sure that the speaker is not placed near any potential sources of interference, such as other electronic devices or large metal objects.
Pros & Cons of Hi-Fi Stereo Speaker
Pros
- Powerful 2.1 channel system delivers rich and full sound
- Bluetooth technology for easy device connectivity
- Built-in USB port for charging devices
- Sleek and compact design
Cons
- May experience some connectivity or sound quality issues
- May not be compatible with all devices
Customer Reviews of Audio Compact Hi-Fi Stereo Speaker
"I love my Fidelity Audio Compact Hi-Fi Stereo Speaker! It delivers amazing sound and the Bluetooth connectivity is super convenient. I would highly recommend this speaker to anyone looking for high-quality audio in a compact package." - John D.
"I've had some issues with the speaker cutting out during use, but the sound quality is great when it's working. I just wish it was more reliable." - Sarah K.
Faqs
Is it possible to connect the Fidelity Audio Compact Hi-Fi Stereo Speaker to more than one device?
If there's no sound coming from my Fidelity Audio Compact Hi-Fi Stereo Speaker, what should I do?
Which smart home devices are compatible with the Fidelity Audio Compact Hi-Fi Stereo Speaker?
How can I fix my Fidelity Audio Compact Hi-Fi Stereo Speaker's Bluetooth connectivity problems?
For compact settings, why is the Fidelity Audio Compact Hi-Fi Stereo Speaker a great option?
Which musical genres are most compatible with the Fidelity Audio Compact Hi-Fi Stereo Speaker?
How can I make my Fidelity Audio Compact Hi-Fi Stereo Speaker's bass more robust?
Is it possible to place the Fidelity Audio Compact Hi-Fi Stereo Speaker on the wall?
Does the Fidelity Audio Compact Hi-Fi Stereo Speaker come with any accessories?
Regarding the Fidelity Audio Compact Hi-Fi Stereo Speaker, what warranty is included?
Leave a Comment