Freshtech Ball Jam & Jelly Maker FTJM-AU-15-01 User Manual
Content

Introducing the Freshtech Ball Jam & Jelly Maker FTJM-AU-15-01
The Freshtech Ball Jam & Jelly Maker FTJM-AU-15-01 is an innovative kitchen appliance designed to simplify the process of making homemade preserves. With its automatic stirring paddle and nonstick interior, this device allows users to create delicious jams and jellies in just 30 minutes, without the need for constant monitoring. It features two settings for jam and jelly, making it versatile for various recipes. The cooker can produce about four half-pints of preserves per batch and includes a recipe book for inspiration. Priced at $99.99, the Freshtech Jam & Jelly Maker is perfect for anyone looking to enjoy fresh, homemade fruit spreads with ease.
Detailed Specifications
The Freshtech Ball Jam & Jelly Maker FTJM-AU-15-01 boasts several key features that set it apart from other jam and jelly makers on the market.
These include:
- 15-cup capacity for making large batches of jam or jelly
- Automatic stirring system for even cooking and reduced risk of burning
- Adjustable temperature control for precise cooking
- Digital timer with auto shut-off for perfect results every time
- Cool-touch handles and non-slip feet for safe and easy handling
- Durable stainless steel construction for long-lasting use
PARTS DIAGRAM
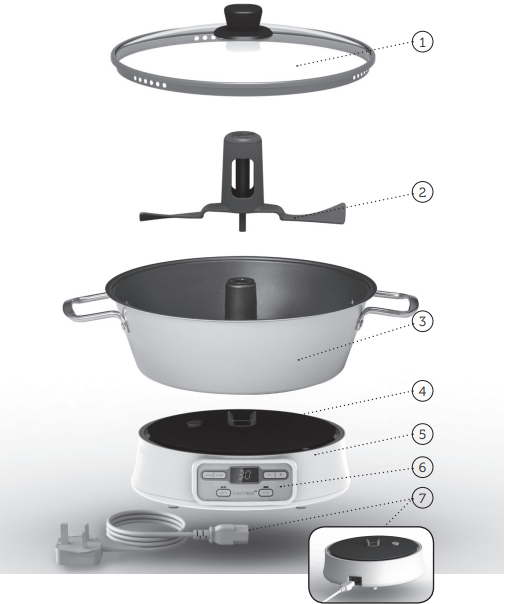
- Glass Lid
- Stirrer
- Pot
- Heating Surface
- Base
- Control Panel
- Removable Cord
CONTROL PANEL DIAGRAM
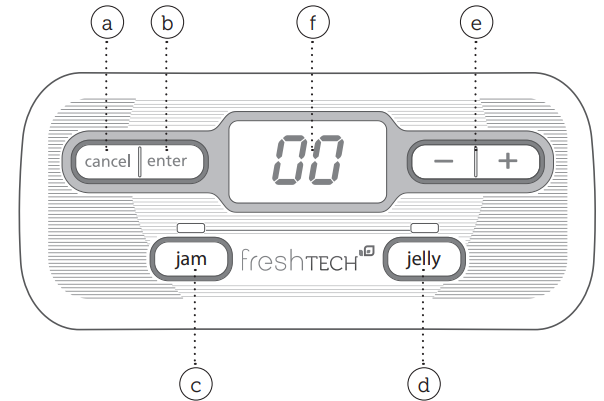
- Cancel button
- Enter button
- Jam button
- Jelly button
- Increase / Decrease Time
- LED Display
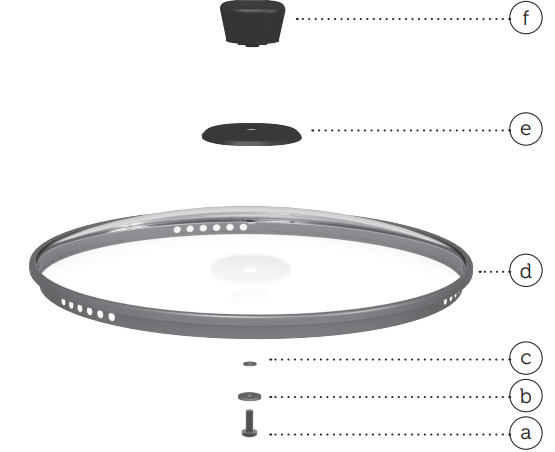
GLASS LID KNOB ASSEMBLY
YOU WILL NEED:
- Phillips head screwdriver
- Glass Lid (included in box)
- Bag containing Knob components (located on the side of the Styrofoam insert)
ASSEMBLY INSTRUCTIONS
Be sure to follow these instructions to prevent glass from breaking.
- LAYOUT Knob pieces are included in the bag.
- PLACE large stainless steel washer (b) onto screw (a).
Place silicone washer (c) on top of steel washer (b). - INSERT washer-assembled screw through the bottom of the Glass Lid (d).
- PLACE knob sleeve (e) onto the top of the Glass Lid, making sure the bottom of the knob sleeve sits flush with the glass and is centered over the screw.
- SCREW knob (f) down onto Glass Lid until attached. Flip the lid over and using your screwdriver, tighten the screw down until resistance is met.
Description
The Freshtech Ball Jam & Jelly Maker FTJM-AU-15-01 is a must-have for anyone who loves making their own jam or jelly. With its large capacity, automatic stirring system, and adjustable temperature control, this appliance makes it easy to create delicious homemade preserves in no time. Simply add your fruit, sugar, and pectin, select your desired setting, and let the machine do the rest. The cool-touch handles and non-slip feet make it safe and easy to handle, while the digital timer ensures perfect results every time. Plus, the stainless steel construction ensures that this appliance will last for years to come.
USING YOUR JAM & JELLY MAKER
CLEAN YOUR APPLIANCE BEFORE USING THE FIRST TIME
Carefully clean your freshTECH Automatic Jam & Jelly Maker before its first use. Just follow these simple steps:
- Wash the Glass Lid, Stirrer,, and Pot in warm soapy water, rinse,, and dry thoroughly.
- The base may be wiped down with a slightly damp cloth. Make certain it is not plugged into the power supply before cleaning.
- The connector must be removed before cleaning''
- The appliance inlet must be dried before the appliance is used again
- The base must not be immersed
- Your appliance is now ready for use.
Enjoy using your new Jam & Jelly Maker!
ABOUT JAMS AND JELLIES
- Jams are made by cooking crushed or finely chopped fruit combined with pectin and sugar. The end product is firm yet spreadable and contains fruit pieces.
- Jellies are made by using fruit juice. This juice is used in place of crushed or finely chopped fruit which is then combined with pectin and sugar to make jelly.
- Jelly is a bit firmer than jam and does not contain fruit pieces. Pectin is a natural gelling ingredient derived from apple and citrus fruits. When used in the preparation of homemade jams and jellies, pectin produces a more natural fresh fruit flavor.
- Using pectin also makes the process of preparing homemade jams and jellies easier because less cooking is required to achieve the proper set.
We recommend Ball Jam Setting Mix with Pectin for the most accurate results when using your Automatic Jam & Jelly Maker.
PREPARING FOR USE
Parts Needed:
- Base
- Pot
- Stirrer
- Removable Cord
- Glass Lid
Glass Lid is not required for the Rosemary Balsamic Jelly recipe.
ASSEMBLING THE UNIT FOR JAM & JELLY MAKING
For best results, the unit must be placed on a level cooking surface.
- Place the Base on a level surface such as a countertop or sturdy table.
Hold the Pot by the handles. Place the Pot on the Base with the handles aligned with the sides of the Base, aligning the hole in the bottom of the Pot (Figure 1) with the metal prongs in the center of the Base (Figure 2). Make certain that the Pot is firmly seated on the Base before proceeding.
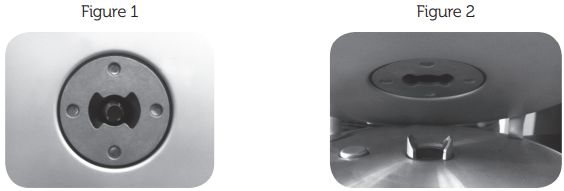
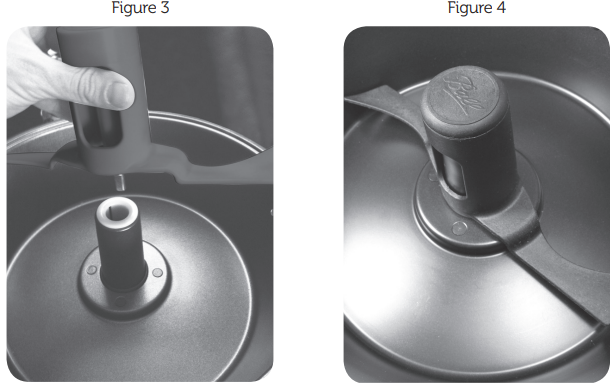
Insert the Stirrer into the Pot with the blades towards the bottom (Figure 3). The post in the center of the Stirrer should align with the hole in the bottom of the Pot. Once the Stirrer locks into place, you will not be able to rotate it manually (Figure 4).
HOW TO MAKE JAM
The following steps are general directions for jam making – please refer to the Recipe Book for a variety of recipes. Recipes have been created specific to this machine, the size of the pot,, and the nature of the ingredients. Other recipes are not guaranteed to work with this appliance.
- Prepare ingredients as described in the Recipe Book.
- Insert the Stirrer into the Pot with the blades towards the bottom. The post in the center of the Stirrer should align with the hole in the bottom of the Pot. Once the Stirrer locks into place, you will not be able to rotate it manually. (See Figures 3 & 4, page 8)
WARNING! To protect the internal motor, always be sure to insert the Stirrer before adding any liquids – this ensures that essential parts of the appliance are protected from damage. - Plug in the unit.
- Add ingredients based on your chosen recipe.
- Press the jam button – the cooking time will automatically default to 21 minutes.
If necessary, use the + / - buttons to increase or decrease cooking time in one-minute intervals, depending on your chosen recipe. Press enter and the Jam & Jelly Maker will now start stirring. - Stay close to the appliance; at 4 minutes, the Jam & Jelly Maker will sound 4 short beeps indicating that it is time to add sugar. Gradually add sugar while the Stirrer continues running. Place the Glass Lid on the Pot after adding sugar. Note: Adding sugar at this specific time is important for yielding the best results.
WARNING! To avoid the risk of serious burns and splattering the jam, the Glass Lid must be in place from the time the sugar is added until the unit shuts off. - The Jam & Jelly Maker will continue to automatically stir your ingredients while it cooks. Stay within earshot of the Jam & Jelly Maker so you can hear the beep that indicates the jam-making process is complete.
- At the end of the cooking process, the Jam & Jelly Maker will beep again to indicate the process is complete. After the beep, press the cancel button and unplug the power cord to turn off the unit.
- Remove the Stirrer, taking care not to touch any metal parts or glass surfaces. Set aside either in the sink or on an oven-safe plate, as the metal rod inside the Stirrer will be hot.
WARNING! To reduce the risk of serious burns, use extreme caution when handling parts after use. As with any cooking appliance, metal parts, glass surfaces, and even certain plastic parts can become extremely hot to the touch. Oven mitts should be used when handling the appliance immediately after or during use. - If necessary, skim foam from the top of the jam and preserve, following the steps on Preserving Instructions in the Recipe Book. Never attempt to pour jam from the Pot into another container – always use a non-metal spoon or ladle (such as wood, bamboo, plastic,, or silicone) to remove the jam from the Pot.
You must wait 30 minutes between making batches of jam or jelly with this unit.
COOL TIME
The unit is programmed to cool for 30 minutes between batches. The display will show “CO” when in the cooling mode and is not ready for the next batch. When “00” appears in the display the appliance is ready for the next batch.
HOW TO MAKE JELLY
The following steps are general directions for jelly making – please refer to the Recipe Book for a variety of recipes. Recipes have been created specific to this machine, the size of the pot,, and the nature of the ingredients. Other recipes are not guaranteed to work with this appliance.
- Prepare ingredients as described in the Recipe Book.
- Insert the Stirrer into the Pot with the blades towards the bottom. The post in the center of the Stirrer should align with the hole in the bottom of the Pot. Once the Stirrer locks into place, you will not be able to rotate it manually. (See Figures 3 & 4, page 8)
WARNING! To protect the internal motor, always be sure to insert the Stirrer before adding any liquids – this ensures that essential parts of the appliance are protected from damage. - Plug in the unit.
- Add your ingredients into the Pot as instructed in the Recipe Book.
DO NOT place the Lid on the Jam & Jelly Maker if the recipe does not call for it; the Lid is not needed for every recipe and will produce unsatisfactory results if used incorrectly. - Press the jelly button – the cooking time will automatically default to 25 minutes.
If necessary, use the + / - buttons to increase or decrease cooking time in one-minute intervals, depending on your chosen recipe. Press enter and the Jam & Jelly Maker will now start stirring. - Stay close to the appliance; at 4 minutes, the Jam & Jelly Maker will sound 4 short beeps indicating that it is time to add sugar. Gradually add sugar while the Stirrer continues running.
Note: Adding sugar at this specific time is important for yielding the best results. - The Jam & Jelly Maker will continue to automatically stir your ingredients while it cooks. Stay within earshot of the Jam & Jelly Maker so you can hear the beep that indicates the jelly-making process is complete.
- At the end of the cooking process, the Jam & Jelly Maker will beep again to indicate the process is complete. After the beep, press the cancel button and unplug the power cord to turn off the unit.
- Remove the Stirrer, taking care not to touch any metal parts or glass surfaces. Set aside either in the sink or on an oven-safe plate, as the metal rod inside the Stirrer will be hot.
WARNING! To reduce the risk of serious burns, use extreme caution when handling parts after use. As with any cooking appliance, metal parts, glass surfaces, and even certain plastic parts can become extremely hot to the touch. Oven mitts should be used when handling the appliance immediately after or during use. - If necessary, skim foam from the top of the jelly and preserve, following the steps on Preserving Instructions in the Recipe Book. Never attempt to pour jelly from the Pot into another container – always use a non-metal spoon or ladle (such as wood, bamboo, plastic,, or silicone) to remove the jelly from the Pot.
You must wait 30 minutes between making batches of jam or jelly with this unit.
COOL TIME
The unit is programmed to cool for 30 minutes between batches. The display will show “CO” when in the cooling mode and is not ready for the next batch. When “00” appears in the display the appliance is ready for the next batch.
HELPFUL HINTS
Here are a few simple tips to help you get the most out of your new Jam & Jelly Maker:
- If a mistake is made in programming or if you need to stop the entire jam or jelly process, pressing the cancel button allows you to clear the recipe program and to restart from 00.
- As with most kitchen tools, hand washing the parts of this appliance with hot soapy water and non-abrasive cleaning materials will help the longevity of the product life.
- In practice, the best care of the pot is not to immerse the underside of the Pot in liquid.
NOTE: This manual does not contain full information for recipes on jam and jelly making. For full details and information on preserving jams and jellies, please consult your Recipe Book.
CLEANING YOUR JAM & JELLY MAKER AFTER USE
Note: It is recommended that you clean the appliance in between uses.
WARNING! As with any cooking appliance, metal parts – and even some plastic parts – can become extremely hot to the touch. Always let the appliance cool completely – usually 20-30 minutes – before cleaning.
- ALWAYS turn your Jam & Jelly Maker off by pressing the cancel button and unplugging the power cord from the power source; allow it to cool completely before cleaning.
- The Glass Lid, Stirrer,, and Pot can all be washed in the dishwasher or with hot soapy water.
- Do not use abrasive cleaning compounds or scouring pads. A cloth, sponge,, or rubber spatula will usually remove more stubborn residue.
- The Glass Lid will not withstand sudden temperature changes. DO NOT wash a hot lid in cold water.
- The appliance Base may be cleaned with a soft cloth and warm soapy water. Wipe dry. Do not use abrasive cleaners.
CAUTION! Never immerse the appliance Base in water, in other liquids,, or place it in the dishwasher.
Setup Guide
To use the Freshtech Ball Jam & Jelly Maker FTJM-AU-15-01, follow these steps:
- Wash and dry the appliance thoroughly before use.
- Add your fruit, sugar, and pectin to the appliance according to your recipe.
- Close the lid and select your desired setting.
- The appliance will automatically stir and cook the mixture until it reaches the desired consistency.
- Once the cooking cycle is complete, use the cool-touch handles to remove the appliance from the heat.
- Carefully remove the lid and use a spoon to skim off any foam from the top of the mixture.
- Pour the jam or jelly into sterilized jars and seal according to your recipe. 8. Allow the jam or jelly to cool before storing it in a cool, dark place.
SERVICE AND MAINTENANCE
Replacement Parts
Replaceable parts for the freshTECH Jam & Jelly Maker include: Glass Lid, knob assembly, Stirrer, Pot, power cord, Recipe Book, and user manual/warranty information. Please have the freshTECH Jam & Jelly Maker model number and date of purchase available when you call for a replacement part. The model number is located on the bottom of the appliance base.
STOP! If you are missing a part, this is a simple fix. For missing parts, contact us online at https://FreshPreservingUK.co.uk/contact-us
WARNING! freshTECH replacement parts are intended for use only on specific freshTECH products. Any other use of freshTECH parts is strictly prohibited. Use of freshTECH parts on the wrong freshTECH product, or for non-approved applications, may cause poor product performance and can cause serious personal injury, property damage,, or death.
IMPORTANT SAFEGUARDS
Failure to follow these instructions and warnings may cause death, personal injury,, and/or property damage. Safety precautions should always be followed when using electrical appliances, including the following:
- READ ALL INSTRUCTIONS, PRODUCT LABELS & WARNINGS BEFORE USE.
- Do not lift or move the unit during operation.
- Do not leave the appliance unattended.
- Turn the appliance off and unplug the power cord from the power source when the appliance is not in use and before cleaning. Allow the appliance parts to cool before putting on or taking off parts and before cleaning the appliance.
- Do not touch the appliance’s hot surfaces. Use handles or knobs.
- The appliance gives off steam which can cause burns.
- Do not let the power cord hang over the edge of the table, or counter, or allow it to come into contact with hot surfaces.
- To protect against electrical shock, do not immerse the power cord, power plug,, or appliance Base in water or any other liquids.
- The Base power supply cord must be removed before cleaning.
- Following the cleaning, the appliance power cord inlet must be dried before using the appliance.
- Extreme caution must be used when moving an appliance containing hot oil or other hot liquids.
- Children shall not play with the appliance
- Keep the appliance and its cord out of reach of children.
- Close adult supervision is necessary when this appliance is used near children.
- This appliance can be used by persons with reduced physical, sensory,, or mental capabilities or lack of experience and knowledge only if they have been given supervision or instruction concerning the use of the appliance in a safe manner and consistent with the instructions and understand the hazards involved.
- Cleaning and user maintenance shall not be done by children.
- Do not operate any appliance with a damaged power cord or power plug, or operate any appliance after it malfunctions or has been damaged in any manner. Contact FreshPreservingUK.co.uk for customer service.
- Do not use attachments not recommended by the manufacturer; they may cause hazard or injury.
- Do not use the appliance outdoors or for commercial purposes.
- The appliance is not intended to be operated using an external timer or a separate remote-control system.
- Do not place this appliance on or near a hot gas stove or electric burner or in a heated oven.
- Always attach the plug to the appliance first, then plug the cord into the wall outlet.
- To disconnect the appliance press “cancel” then remove the power plug from the power supply.
- Place the appliance on a hard, flat-level surface to avoid interruption of the airflow underneath the appliance.
- Always clean the Pot and Base surfaces before use to remove any debris to ensure efficient heat conduction.
- Avoid contact with any moving parts. Keep utensils out of the Pot while the stirrer is moving to prevent personal injury or damage to the appliance.
- Do not run the appliance without the Pot in place.
- The metal Pot gets hot. Lift the Pot by the handles only and check to make sure the appliance is off before removing it it.
- Do not pour liquids into the Pot without the Stirrer securely in place. See Recipe Book for details.
- Do not dry heat the Pot.
- Do not touch the heater located on the Base as it becomes very hot.
- Avoid sudden temperature changes to the Glass Lid.
- Do not pour jelly or jam from the Pot. Keep the Pot on the appliance Base and ladle it into a suitable heat-proof container.
- Do not overfill the Pot. If overfilled, jam may spill over.
- Do not use the appliance or individual parts for other than intended use.
- Use only the Pot provided with the Base provided.
- To avoid jam boilovers, always follow instructions from the provided Recipe Book.
- Users must wait 30 minutes between making batches of jam or jelly with this unit.
- Save These Instructions.
Please read ALL of the instructions in this manual carefully before you begin to use this appliance. Proper care and maintenance will ensure a long life and trouble-free operation for this appliance. Please save these instructions and refer to them for cleaning and care tips.
This appliance can be used by children aged from 8 years and above and persons with reduced physical, sensory, or mental capabilities or lack of experience and knowledge if they have been given supervision or instruction concerning the use of the appliance in a safe way and understand the
hazards involved. Children shall not play with the appliance. Cleaning and user maintenance shall not be made by children unless they are older than 8 and supervised. Keep the appliance and its cord out of reach of children less than 8 years old.
This appliance is not intended for use by persons (including children) with reduced physical, sensory, or mental capabilities, or lack of experience and knowledge, unless they have been given supervision or instruction concerning the use of the appliance by a person responsible for their safety. Children should be supervised to ensure that they do not play with the appliance.
SAVE THESE INSTRUCTIONS FOR HOUSEHOLD USE ONLY
Your new Jam & Jelly Maker will provide you and your family with fresh, delicious homemade jams and jellies for toast, bagels, waffles, crêpes, or anything else you can cook up. Creating fresh jams and jellies has never been easier – how you enjoy them is up to you!
Electrical Specifications: 220 – 240 V ~, 50 Hz, 1000 W
SPECIAL CORD SET INSTRUCTIONS
- A short power supply cord has been provided to reduce the risk resulting from a person or pet becoming entangled in or tripping over a longer cord.
- Never use an extension cord.
- Do not modify the plug in any way. Always attach the plug to the appliance first, then plug the cord into the wall outlet. To disconnect the appliance, press cancel. Remove the power plug from the power supply.
- Always plug the appliance into an earthed socket.
STOP! If you are missing a part, this is a simple fix. For missing parts, contact us online at https://FreshPreservingUK.co.uk/contact-us
When unpacking your Jam & Jelly Maker from the box, please ensure to remove the knob from the upper right-hand corner of the insert.
NOTE: The knob may be in another section of foam packaging.
WARNING! To reduce the risk of fire or electric shock, do not remove any service covers. There are no user-serviceable parts inside the jam maker. Only authorized personnel should repair the jam maker.
DISPOSAL
In the European Union, the symbol of a crossed-out wheelie bin means that the product must be disposed of at a separate waste collection point. This applies to this product and to all accessories marked with this symbol. Products labeled in this way must not be disposed of with normal household waste, but should be taken to a collection point for recycling electric and electronic equipment.
Troubleshooting
If you experience any issues with your Freshtech Ball Jam & Jelly Maker FTJM-AU-15-01, try these troubleshooting tips:
- If the appliance is not turning on, check that it is properly plugged in and that the power switch is in the "on" position.
- If the mixture is not cooking properly, make sure that the lid is properly closed and that the temperature setting is correct for your recipe.
- If the appliance is making strange noises, check that all parts are securely attached and that there is nothing obstructing the blades.
WARRANTY INFORMATION
1-YEAR LIMITED WARRANTY
Hearthmark, LLC doing business as Jarden Home Brands warrants that for a period of one year from the date of purchase, this product will be free from defects in material and workmanship. Jarden Home Brands, at its option, will repair or replace this product or any component of the product found to be defective during the warranty period. Replacement will be made with a new or remanufactured product or component. If the product is no longer available, a replacement may be made with a similar product of equal or greater value. This is your exclusive warranty. DO NOT attempt to repair or adjust any electrical or mechanical functions on this product. Doing so will void its warranty.
What are the limits on Jarden Home Brands’ Liability?
Jarden Home Brands shall not be liable for any incidental or consequential damages caused by the breach of any express, implied or statutory warranty or condition. Except to the extent prohibited by applicable law, any implied warranty or condition of merchantability or fitness for a particular purpose is limited in duration to the duration of the above warranty.
WARRANTY REGISTRATION
Register your freshTECH Jam & Jelly Maker for warranty coverage online at FreshPreservingUK.co.uk. You will need proof of purchase along with the product ID found on the bottom of the appliance to register.
Pros & Cons
Pros
- Large capacity for making large batches of jam or jelly
- Automatic stirring system for even cooking and reduced risk of burning
- Adjustable temperature control for precise cooking
- Digital timer with auto shut-off for perfect results every time
- Cool-touch handles and non-slip feet for safe and easy handling
- Durable stainless steel construction for long-lasting use
Cons
- Higher price point compared to other jam and jelly makers on the market
- May be too large for some kitchens
- Some users may prefer to stir their mixtures manually for more control over the cooking process
Faqs
What is the Jelly Maker & Ball Jam from Freshtech?
In what quantity can I produce a batch of jam or jelly?
Which materials work with the Jam & Jelly Maker?
Is the Freshtech Ball Jam & Jelly Maker simple to clean?
Should I keep an eye on the machine while it's running?
Does a recipe book accompany the Jam & Jelly Maker?
Is canning using the Freshtech Ball Jam & Jelly Maker FTJM-AU-15-01 safe?
Can I use this machine to make other kinds of preserves, like fruit butters or marmalades?
Leave a Comment
