Geeni Home Security Indoor Camera GN-CW-PARENT Owners Manual
Content
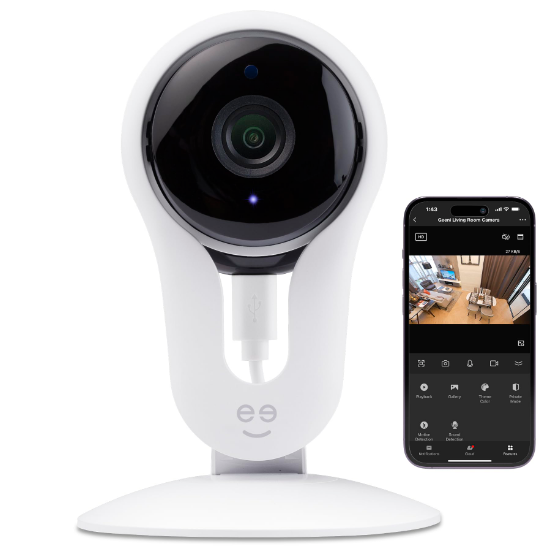
Introduction of Geeni Home Security Indoor Camera GN-CW-PARENT
Get started using your new devices by downloading Geeni, one convenient app that manages everything straight from your phone or tablet. Easily connect to your home Wi-Fi and control multiple devices from the touch of your fingertips.
Technical Specifications
- Camera: up to 1080HD (1920x1080P) at 15 frames / sec. H.264 encoding
- Field of View: 135º diagonal
- Audio: Internal Speaker and Microphone
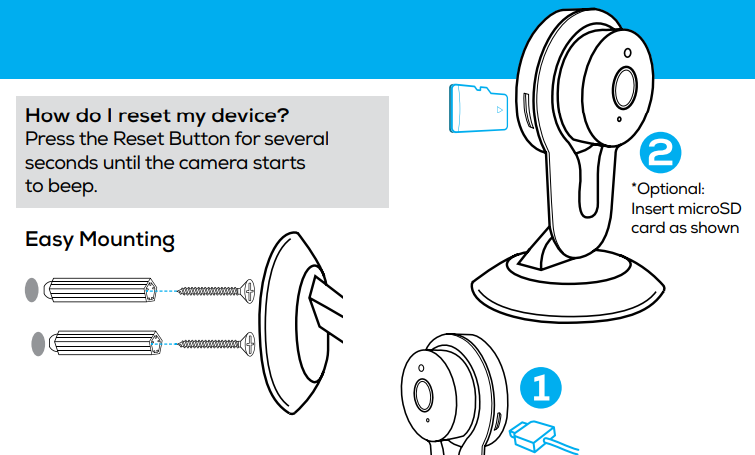
- Storage: supports up to 128GB microSD card (not included)
- Wi-Fi: IEEE 802.11n, 2.4GHz (not compatible with 5GHz Wi-Fi networks)
What’s in the Box
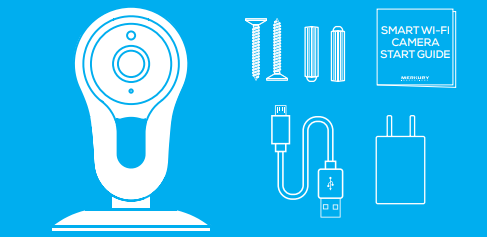
- Smart Wi-Fi Camera
- Mounting Screws
- USB Cable
- Power Adapter
- User Manual
Get Ready
- Know your Wi-Fi network and password:
- Make sure your mobile device is running iOS 9 or higher or Android™ 5.0 or higher.
- Make sure you’re connecting to a 2.4GHz Wi-Fi network (Geeni can’t connect to 5GHz networks).
Download the Geeni app from the App Store or Google Play.

Register an account on your Geeni app.
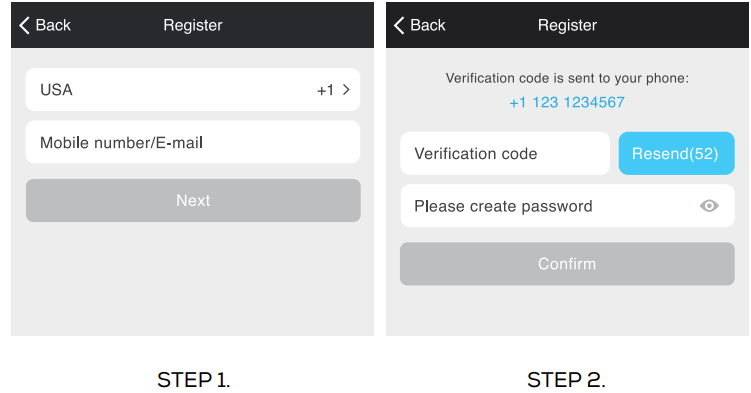
- STEP 1: Enter your mobile phone number or email address.
- STEP 2: Enter the verification code and create a password.
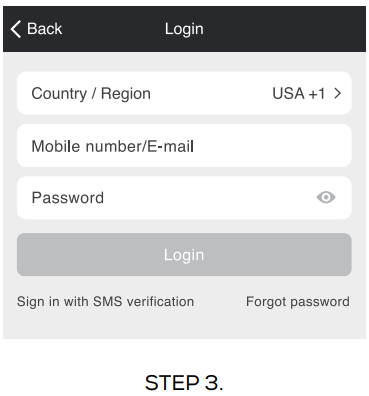
STEP 3: Login to the Geeni App.
Plug In
How do I reset my device?
Press the Reset Button for several seconds until the camera starts to beep.
Important: Set up and connect the camera before mounting. Set up works best near your home router. If the camera is disconnected from power after setup, it will automatically reconnect when plugged in again.
Note: The camera will appear inactive while booting up—allow two minutes for the light to activate.
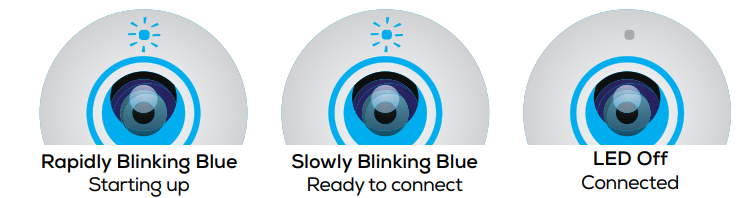
What does the blinking light mean?
Add Device
Method 1: Easy Mode
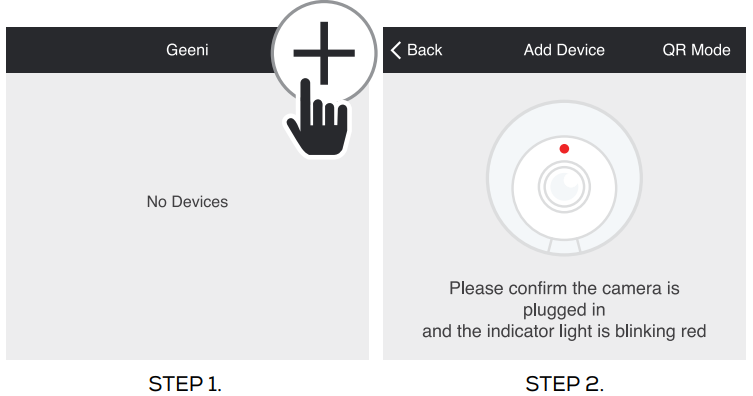
- STEP 1 In the Geeni app, on the top corner of the Devices screen, click (+). Choose “Wifi Camera“.
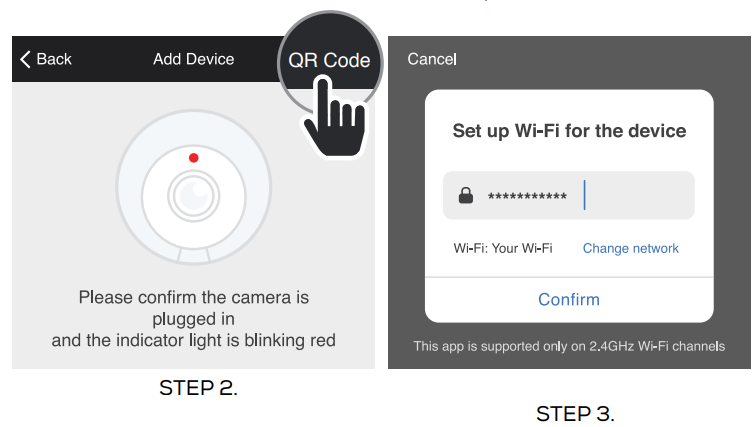
STEP 2 Make sure the indicator light on the device is blinking Red, indicating the device is ready to connect. If not, follow instructions to Reset the device so that indicator light is blinking red, then press “Next Step”.
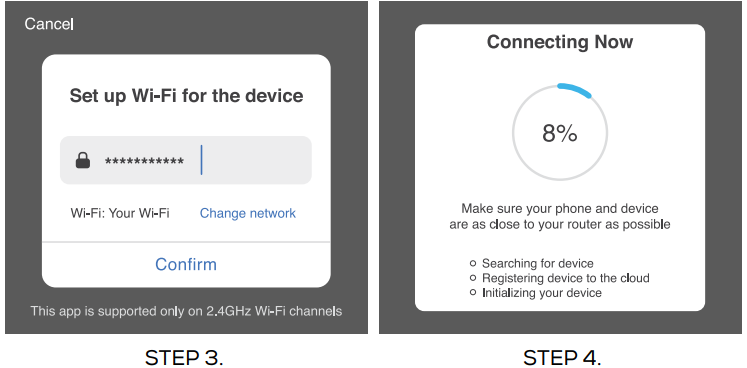
- STEP 3 Enter your Wi-Fi network and password.
STEP 4 The Geeni app will try to connect your device. During this time, the camera will beep, continue blinking Red, and then turn solid Blue.
*If the connection fails, try to reset and connect directly using QR Code Mode.
NOTE: Geeni can’t connect to 5GHz networks.
Method 2: Backup QR Code Mode
- STEP 1 Make sure the device is blinking red.
- STEP 2 In the Geeni app, on the top corner of the Devices screen, click (+). Choose “Video Camera“. Choose “QR Code” in the top corner.
STEP 3 Click Next and enter your Wi-Fi details.
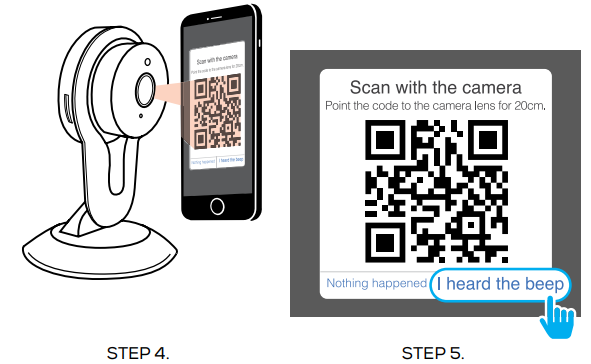
- STEP 4 Scan the QR Code with the camera.
STEP 5 If you heard the camera beep, press “I heard the beep“ and it will add your camera.
NOTE: Geeni can’t connect to 5GHz networks
Description
The Geeni Home Security Indoor Camera is a high-quality home security solution that offers 1080p Full HD resolution, allowing you to see every detail in crystal clear quality. With night vision up to 15 feet, you can monitor your home even in low light conditions. The camera's motion detection feature sends alerts to your phone, so you can stay informed about what's happening in your home. The two-way audio feature allows you to communicate with family members or pets while you're away.
The camera also comes with cloud storage for recorded videos, so you can review footage at any time. The Geeni Home Security Indoor Camera works with both Alexa and Google Assistant, making it easy to integrate with your existing smart home devices. With its compact size and sleek design, this camera is a great addition to any room in your home.
Setup Guide
- Download the Geeni app from the App Store or Google Play
- Create an account and sign in
- Plug in the camera and wait for it to power on
- Follow the instructions in the app to connect the camera to your Wi-Fi network
- Once connected, you can start monitoring your home from the app
Settings
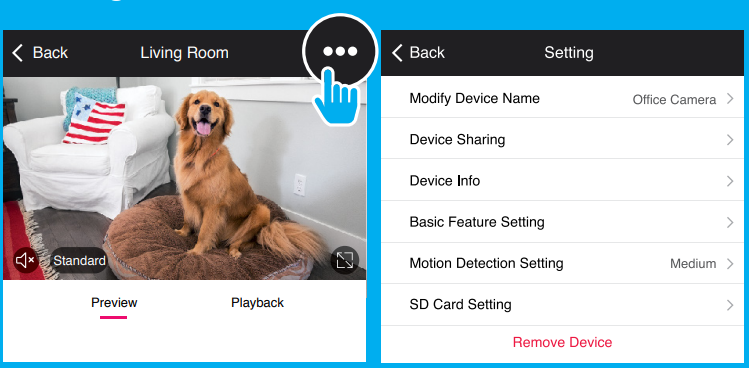
Access Camera Settings: From your main device list, click on the camera you want to edit, then press “ “ button on the top right for advanced settings.
Device Name: Press to rename your device to something like “Bedroom” or “Kids’ Room”.
Device Sharing: let friends, spouse, roommates, or family keep an eye on what your cameras see. Whether it’s a baby’s crib or the family dog, you can decide who gets to check in, access the camera, and set notifications.
Remove Device: Delete the camera from your account. Until it’s deleted, it will always be linked to your account.
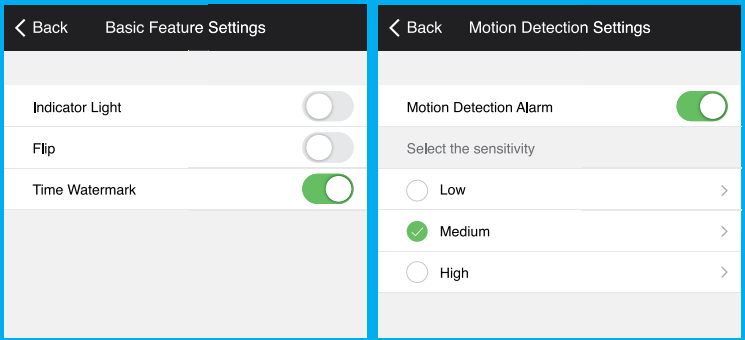
Indicator Light: By default, the camera’s LED is off. Switch “Indicator Light” on to activate the LED.
Flip: If you mount your camera upside down, toggling the “Flip” function will rotate the image so that it’s right side up.
Time Watermark: Turn thae time watermark on to always see a time stamp of when video is taking place.
Motion Detection: When turned on, you’ll receive notifications to your phone whenever the camera senses motion. Press to turn Motion Detection off or set how sensitive you want it to be.
Format SD Card: Press to erase your microSD Card.
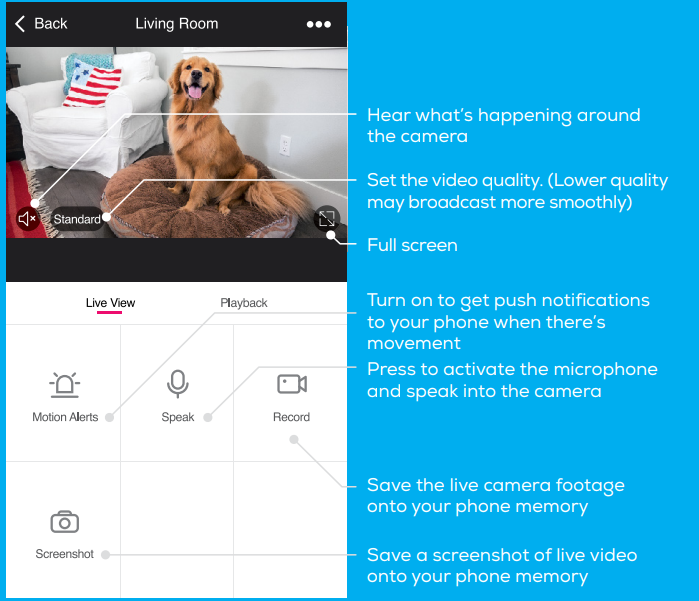
Live View
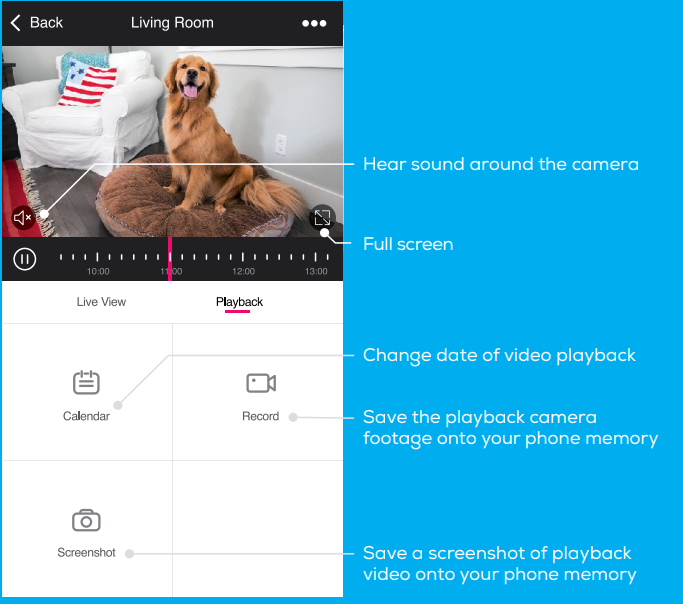
Geeni Home Security Indoor Camera GN-CW-PARENT Playback
Troubleshooting
If you're having trouble with the Geeni Home Security Indoor Camera, here are some common issues and solutions:
- Camera not connecting to Wi-Fi: Make sure your Wi-Fi network is working properly and that you've entered the correct password.
- Camera not responding: Try resetting the camera by pressing and holding the reset button for 10 seconds.
- Poor video quality: Make sure the camera is in a well-lit area and that there is no obstruction between the camera and the object you're trying to monitor.
- Motion detection not working: Check to make sure the motion detection feature is turned on in the app.
- Cannot connect to your Wi-Fi network: Make sure you entered the correct Wi-Fi password during the Wi-Fi setup. Check whether there are any Internet connection problems. If the Wi-Fi signal is too weak, reset your Wi-Fi router and try again.
System Requirements
- Mobile device running iOS 9 or higher or Android 5.0 or higher
- Existing Wi-Fi Network
Pros & Cons
- Pros:
- 1080p Full HD resolution
- Night vision up to 15 feet
- Motion detection with alerts
- Two-way audio
- Cloud storage for recorded videos
- Affordable price
- Cons:
- No local storage option
- May have some connectivity issues
Customer Reviews
Customers love the Geeni Home Security Indoor Camera for its high-quality video, easy setup, and affordable price. However, some customers have reported issues with connectivity and the lack of a local storage option.
Faqs
Can I share with family and friends?
Recording and microSD Card Usage?
How Much Video Can The Geeni Home Security Indoor Camera GN-CW-PARENT Record?
How Many Cameras Can I Control?
My Geeni device has a funny name. How do I rename it?
The device appears offline or unreachable, what should I do?
What’s the Wireless Range Of Geeni Home Security Indoor Camera GN-CW-PARENT?
If my Wi-Fi/Internet goes down, will Geeni still work?
Does the Geeni Home Security Indoor Camera have waterproof capabilities?
Is the Geeni Home Security Indoor Camera GN-CW-PARENT capable of pan and tilt functionality?
Leave a Comment