Geeni GN-CW233-199 Smart Wi-Fi Outdoor Camera Owner Manual

Content
Geeni GN-CW233-199 Smart Wi-Fi Outdoor Camera
For use in outdoor settings, the high-resolution Geeni GN-CW233-199 Smart Wi-Fi Outdoor Camera is an excellent choice. It has night vision, motion detection, and 1080p Full HD video recording. It can endure a wide range of outside circumstances because to its weatherproof design and IP66 rating. With the Geeni app, you can remotely operate the camera and enjoy two-way audio for real-time communication. You may also use your voice to operate it through integration with Google Assistant and Amazon Alexa. Safe and dependable outside house monitoring is available with the Geeni GN-CW233-199.
Detailed Specifications
- 1080p Full HD video
- Night vision up to 30 feet
- Motion detection with adjustable sensitivity
- Camera: up to 1080p (1920x1080P) at 10 frames / sec. H.264 encoding
- Field of View: 95˚
- Weatherproof: IP66
- Storage: supports up to 128gb microSD card (16GB microSD card is included, and is replaceable)
- Wi-Fi: IEEE 802.11 B/G/N, 2.4GHz (not compatible with 5GHz Wi-Fi networks)
System Requirements
- Mobile device running iOS 9 or higher or Android 5.0 or higher
- Existing Wi-Fi Network
What’s in the Box

- Smart Outdoor Camera
- Mounting Screws
- Camera Antenna
- 16GB MicroSD Card (pre-installed)
- Power Adapter
- User Manual
Get Ready
Know your Wi-Fi network and password:
- Locate a suitable mounting location, but do NOT mount until setup is complete.
- Make sure your mobile device is running iOS 9 or higher or Android™ 5.0 or higher.
- Make sure you’re connecting to a 2.4GHz Wi-Fi network (Geeni can’t connect to 5GHz networks).
Download the Geeni app from the App Store or Google Play.

Register an account on your Geeni app.
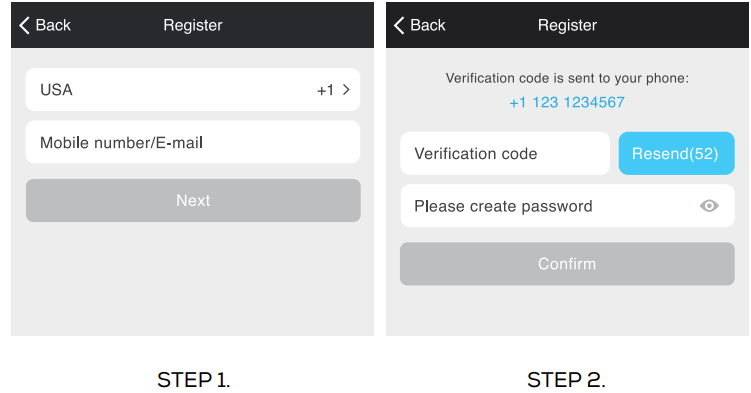
- STEP 1: Enter your mobile phone number or email address.
- STEP 2: Enter the verification code and create a password.
STEP 3: Login to the Geeni App.
Plug In
How do I reset my device?
A reset button is located on the cord connected to the camera. Reset the camera by holding down the button for several seconds.

Important: Set up and connect the camera before mounting. Set up works best near your home router. If the camera is disconnected from power after setup, it will automatically reconnect when plugged in again.
Note: The camera will appear inactive while booting up—allow two minutes for the light to activate.
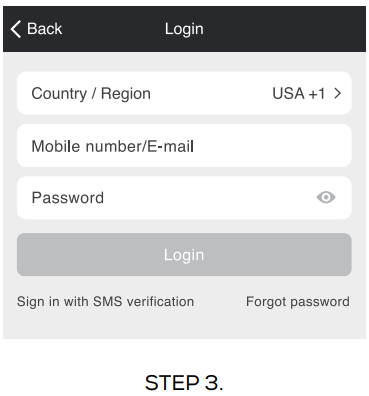
What does the blinking light mean?
Add Device
Method 1: Easy Mode
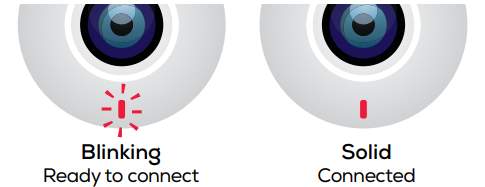
- STEP 1 In the Geeni app, on the top corner of the Devices screen, click (+). Choose “Wifi Camera“.
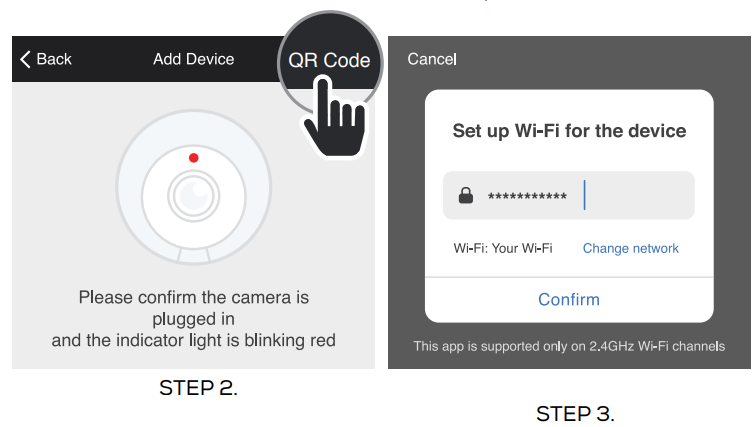
STEP 2 Make sure the indicator light on the device is blinking Red, indicating the device is ready to connect. If not, follow instructions to Reset the device so that indicator light is blinking red, then press “Next Step”.
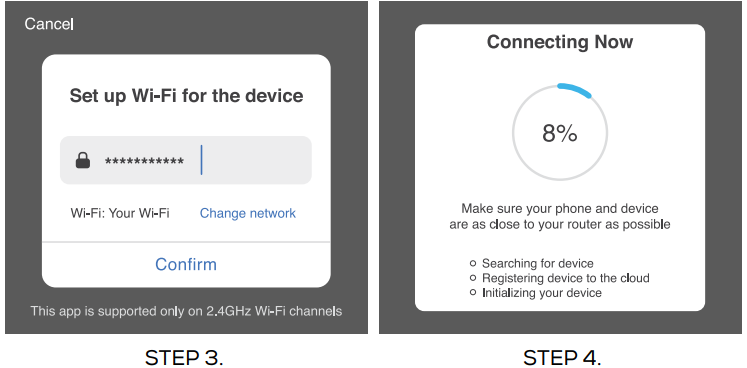
- STEP 3 Enter your Wi-Fi network and password.
STEP 4 The Geeni app will try to connect your device. During this time, the camera will beep, continue blinking Red, and then turn solid.
NOTE: Geeni can’t connect to 5GHz networks.
*If the connection fails, try to reset and connect directly using QR Code Mode.
Method 2: Backup QR Code Mode
- STEP 1 Make sure the device is blinking red.
- STEP 2 In the Geeni app, on the top corner of the Devices screen, click (+). Choose “Video Camera“. Choose “QR Code” in the top corner.
STEP 3 Click Next and enter your Wi-Fi details.
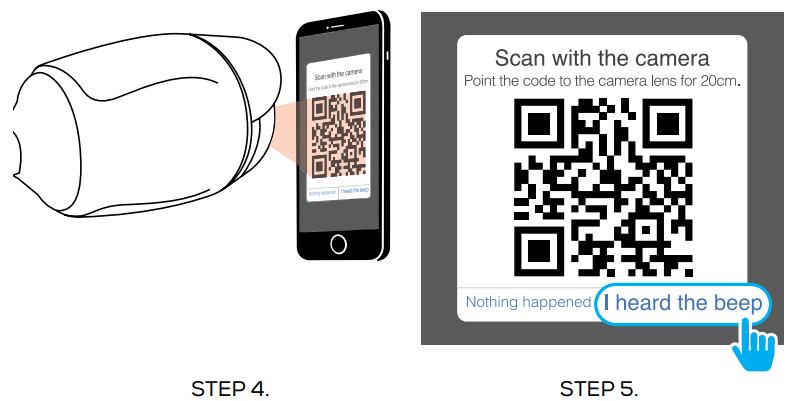
- STEP 4 Scan the QR Code with the camera.
STEP 5 If you heard the camera beep, press “I heard the beep“ and it will add your camera.
Description
A dependable home security system is what the Geeni Smart Wi-Fi Outdoor Camera is all about. It may be used for monitoring in low-light situations because to its night vision capability and 1080p video resolution. With two-way audio, you can talk to visitors or intruders, and motion detection and configurable sensitivity let you customize alerts.
Ideal for usage outside, this camera boasts a weather-resistant design (IP55 certified) that guarantees longevity in a wide range of weather situations. You can keep an eye on your house from anywhere using Wi-Fi and a smart app that works with both Android and iOS.
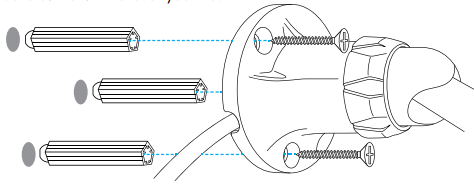
Mount the Camera
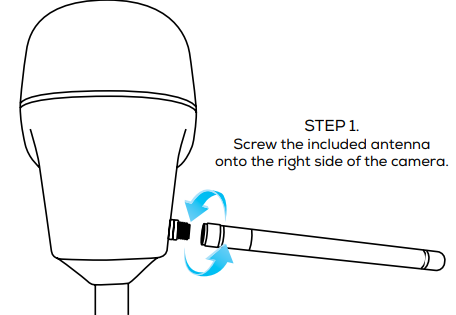
STEP 1 Screw the included antenna onto the right side of the camera.
NOTE: If you unplug the camera, you do not need to repeat the setup steps—the camera will automatically reconnect to your Wi-Fi network.- STEP 2 Use the included 3 screws and 3 wall anchors to mount the camera wherever you like.
STEP 3 Use the adjustment knob to angle the camera in the desired direction. Make sure the knob is fully secured before letting go of the camera.
Settings
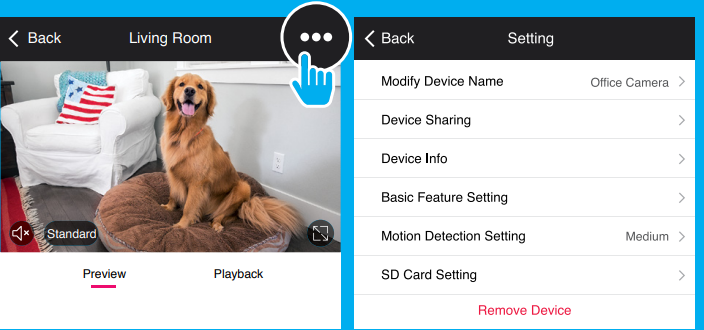
Access Camera Settings
From your main device list, click on the camera you want to edit, then press the “•••“ button on the top right for advanced settings.
- Device Name: Press to rename your camera to something like “Porch” or “Backyard”.
- Device Sharing: Let friends, spouse, roommates, or family keep an eye on what your cameras see. Whether it’s the backyard or the family dog, you can decide who gets to check in, access the camera, and set notifications.
- Remove Device: Delete the camera from your account. Until it’s deleted, it will always be linked to your account.
Format SD Card: Press to erase your microSD Card.
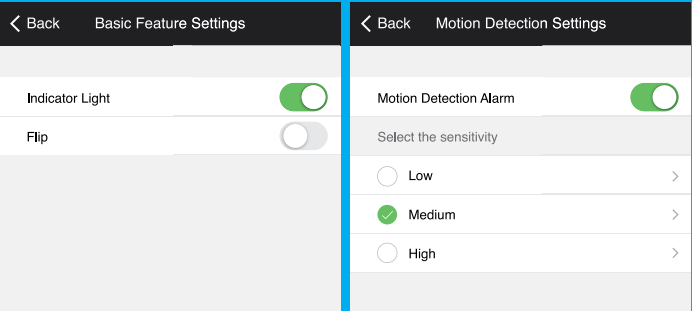
- Indicator Light: By default, the camera’s light is set to remain lit to indicate power. Switch “Indicator Light” off to hide the light.
- Flip: If you mount your camera upside down, toggling the “Flip” function will rotate the image so that it’s right side up.
- Motion Detection: When turned on, you’ll receive notifications to your phone whenever the camera senses motion. Press to turn Motion Detection off or adjust sensitivity.
Night Vision: The camera is set to automatically activate night vision in the dark. Toggle here to manually turn night vision on or off.
Setup Guide
- Download and install the Geeni app on your iOS or Android device.
- Create a Geeni account and log in.
- Power on the camera and connect it to Wi-Fi using the WPS button or manual setup through the Geeni app.
- Mount the camera outdoors using the included mounting kit and adjust the angle for optimal coverage.
- Customize settings such as motion detection sensitivity and notification preferences through the Geeni app.
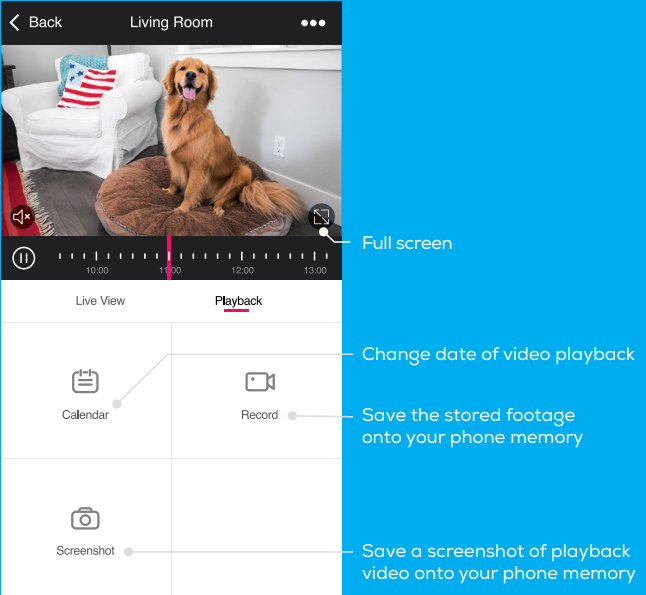
Live View
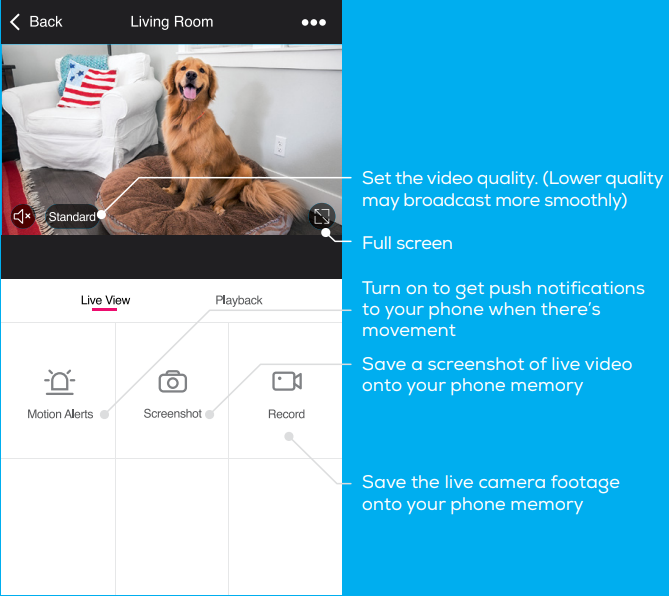
Playback
Troubleshooting
If you experience any issues with the Geeni Smart Wi-Fi Outdoor Camera, try the following steps:
- Check the camera's power source and ensure it's properly connected.
- Ensure the camera is within range of your Wi-Fi network.
- Restart the camera and perform a Wi-Fi reset if necessary.
- Update the Geeni app to the latest version.
- Contact Geeni support for further assistance.
- Cannot connect to your Wi-Fi network:
Make sure you entered the correct Wi-Fi password during the Wi-Fi setup. Check whether there are any Internet connection problems. If the Wi-Fi signal is too weak, reset your Wi-Fi router and try again.
Geeni GN-CW233-199 Smart Wi-Fi Outdoor Camera Pros & Cons
- Pro: High-quality 1080p video and night vision
- Pro: Motion detection with adjustable sensitivity
- Pro: Weather-resistant design
- Pro: Two-way audio
- Con: No local storage option without a subscription
Customer Reviews
"I love the clear video quality and the ease of setup. It's perfect for monitoring my front porch." - John S.
"I wish there was a local storage option without a subscription, but otherwise it's a great camera." - Sarah L.
Faqs
Can I share with family and friends?
How does the pre-installed microSD card work:
How much video can the camera record?
How many cameras can I control?
My Geeni device has a funny name. How do I rename it?
The device appears offline or unreachable, what should I do?
What’s the wireless range?
If my Wi-Fi/Internet goes down, will Geeni still work?
The Geeni GN-CW233-199 Smart Wi-Fi Outdoor Camera, can it connect to the cloud?
How do I reset the Geeni GN-CW233-199 Smart Wi-Fi Outdoor Camera?
Leave a Comment