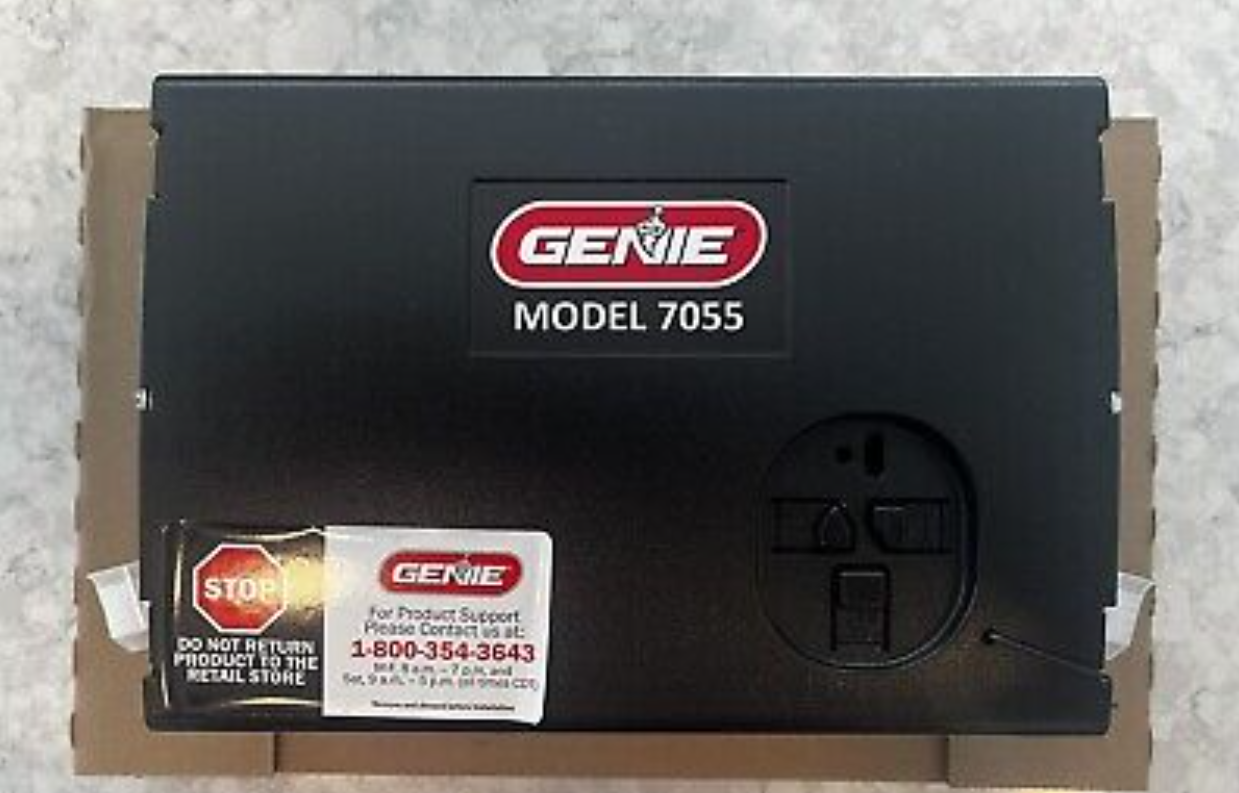
Genie Garage Door Opener 7055 Instruction Manual | Features & Adjustments
Content

Introduction of Genie Garage Door Opener 7055
The Garage Door Opener 7055 is a powerful and reliable solution for all your garage door needs. This innovative product boasts a quiet and efficient operation, perfect for both residential and commercial settings. With an estimated price range of $250 to $300 and a launch date of January 2021, the 7055 model offers an unmatched blend of quality and convenience.
Detailed Specifications of Garage Door Opener 7055
The Genie 7055 features a 1/2 HPc DC motor, providing smooth and quiet operation. The intelliCode access security system ensures secure and convenient access to your garage. With a dual-frequency (315/390 MHz) and a maximum door height of 14 feet, this opener is compatible with a wide range of garage doors. The product also includes a Safe-T-Beam non-contact reversing system for added safety.
Description of Garage Door Opener 7055
The Genie 7055 is designed to deliver a seamless and quiet garage door experience. The DC motor ensures energy efficiency and reduces noise during operation. The intelliCode system offers enhanced security by changing the access code each time the remote control is used, preventing code theft and unauthorized access. Additionally, the Safe-T-Beam system protects against accidents by reversing the door if an obstacle is detected.
Features of Garage Door Opener 7055
SAFETY FEATURES
- Safe-T-Beam (STB) Non-Contact Reversing System
Puts an invisible beam across the door opening. The door stops and reverses to the full open position if anything passes through the beam. LED indicator lights on the powerhead and on the STBs provide self-diagnostics if an operational problems exists.
Safe-T-ReverseContact Reversing System Automatically stops and reverses a closing door within two seconds of contact with an object. - Door Detect™ Monitoring System
Monitors the Safe-T-Beamsystem to ensure proper functionality and will automatically stop and reverse a closing door if a problem is detected. - Manual Emergency Release
Manually releases door from door opener. Used during a power failure or other emergency to allow manual opening and closing of door. - SmartSetElectronic Programming
Easily adjust the programming to set limits and program new remotes. - Automatic Lighting System
Single or Dual-bulb lighting system supplies light for safer evening exits and entries. Turn ON when door is activated and automatically turn OFF 4 minutes later. - Safe-T-Beam(STB) FUNCTION
- The Safe-T-Beam has no effect on the door during an opening cycle.
- If the Safe-T-Beam detects an obstruction when trying to close the door, it will not allow the door to close.
- When the garage door is closing, if Safe-T- Beam is interrupted by a person or obstacle, the garage door will stop its downward travel and reverse automatically to its fully opened position.
- If the Safe-T-BeamSystem fails, loses power, or is installed improperly, press and hold the wall console “open/close” button until the door reaches its fully closed position. If you release the “open/close” button on the wall console during the closing movement, the door will reverse automatically to its fully opened position.
Setup Guide of Garage Door Opener
To operate the Garage Door Opener 7055, follow these steps
- Install the opener according to the user manual.
- Program the remote control by pressing and holding the Learn button on the motor head until the LED light turns off.
- Press and release the desired button on the remote control to program it.
- Test the garage door opener by using the remote control to ensure proper function.
OPENER FEATURES
- Intellicode
An encryption system that enhances the security of the door opener by continuously changing the access code each time the remote is used. The door opener responds to each new code only once. An access code copied from a working system and tried again, will not control the door opener. - Wall Console (With selected models)
Operates door opener from inside garage. The wall console has an indicator light with
Open/Close, Sure-lock, and independent light control buttons. - Home Linkand Car2Ucompatible. See page 12 in this manual, refer to the motor vehicle manual, or visit https://www.geniecompany.com/ for instructions.
- Pre-Programmed Remote Control
For ease and speed of installation, the remote included with this opener comes from the factory, pre-programmed. No additional steps are required to activate the door using the remote. - Genie Battery Backup (BBU)
Available on some models. Provides power to opener in the event of a power failure.
NOTE
- Genie Battery Backup will only operate after operator installation is completed and Travel Limits have been set.
- Use this manual ONLY after completing the assembly and installation of the opener. Review the Assembly and Installation Instructions poster. Check that all steps have been completed.
Wall Control Features
One of the following wall controls will be included.
NOTE: Wall consoles from other manufactures may not work with this new opener. Use only the wall control provided with this unit. See warning.
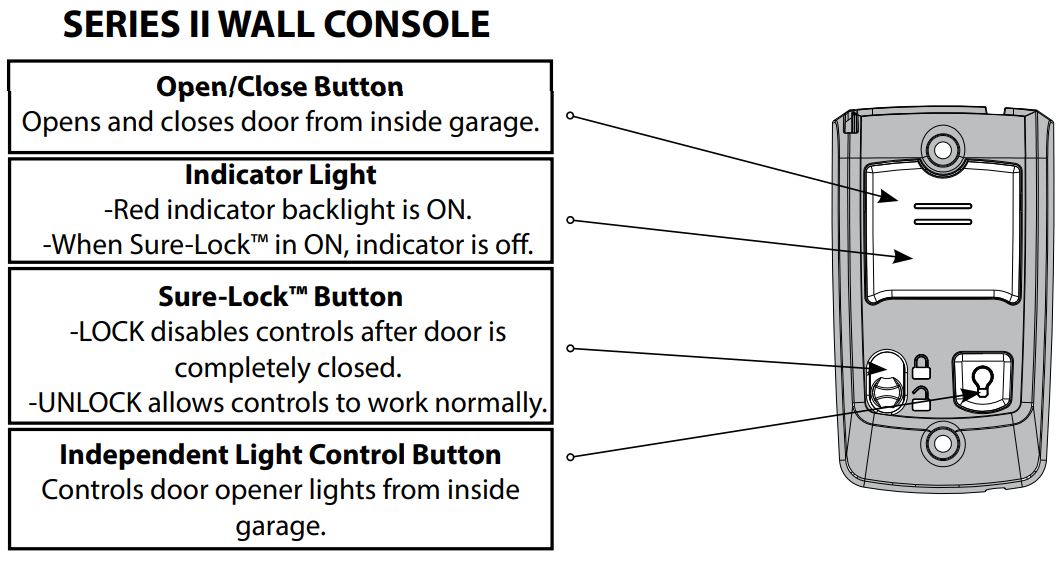
CONSOLE FEATURES
- Indicator Light
The large white button will display Red when wall console is properly wired and Sure-Lock™ is OFF. When Sure-Lock™ is ON, this light is off. - Open/Close Button
Use this button to open or close the garage door. When Sure-Lock is ON the Open/Close button will CLOSE the door only.
NOTE: Constant button pressure in the CLOSE direction will override STB fault in the powerhead and close the door. - Independent Light Control Button
Use this button to turn the powerhead lights ON. Powerhead lighting will remain ON until this button is pressed again or a door action has been completed. - Sure-Lock Button
When Sure-Lockis ON, and the door is closed, the powerhead cannot be activated by the wall console or a remote. WALL BUTTON
This is a lighted wall button. Press once to move the door. If the button is not lighted, check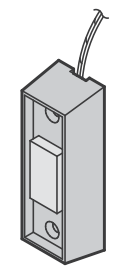
- White wire connected to terminal “W”
- Striped wire connected to terminal “B”
WARNING
Use of any other wall control can cause unexpected operation of the door and loss of lighting feature. Locate wall console within sight of door but far enough from door to prevent contacting it while operating the console. Control must be at least 5 feet above the floor to prevent small children from operating it.
Programming Overview
NOTE: Before programming the operator, check to make sure there are no objects in the garage door opening.
INTRODUCTION
Now that the Genie garage door opener is installed, follow the steps in this manual to program the opener so that the door opens and closes properly and all remote devices operate correctly. The following steps are a guide to setting opener so it functions properly.
The following steps list the order of programming the opener’s functional settings for use.
- “TRAVEL LIMITS”
- “FORCE CONTROL”
- “REMOTE PROGRAMMING”
Term Definitions
- Travel Limits Programmable setting to adjust how far the door travels up or down.
- Force Control refers to how much power is needed to move (open/close) a particular door and does NOT require programming.
- Remote Programming synchronizes remote devices (remote, wall console, and keypad) with the powerhead.
OVERVIEW OF POWERHEAD CONTROLS
This section describes the programming functions of the opener. Use the following information to understand the buttons and LED indicators used to program functions.
Powerhead: There are 3 programming buttons and 2 LED lights on the powerhead. Each of the buttons are used to enter and complete the setup programming. The LED lights indicate status or a function change by illuminating ON, OFF, or ON FLASHING.
There are 3 programs
- Door Travel Limits.
This program is used to set how far the door travels up and down. - Force Setting Program.
This program controls the force applied during the closing and opening of the door. They are factory set and will rarely require adjustment. - Remote Programs (default menu)–only required for added remote control transmitters.
Describes how to program remotes to sync with additional remote control devices, wall consoles, keypads and the powerhead.
NOTE: The 3 programming buttons are for programming ONLY. These buttons can NOT be used to operate the opener once the Required Programming section has been successfully completed.
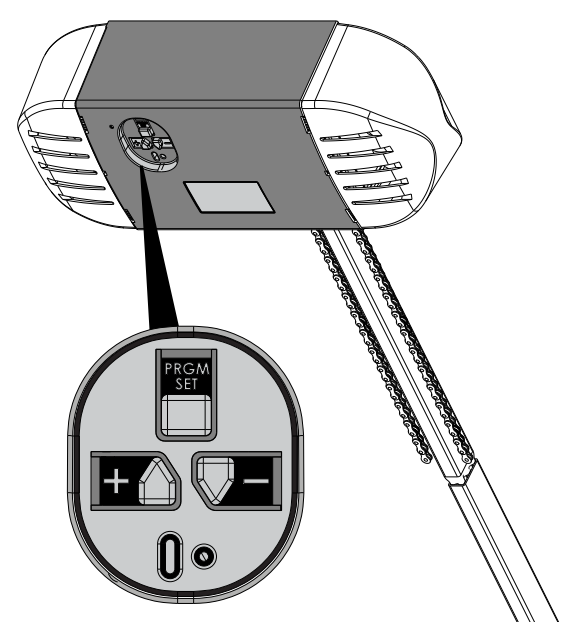
ORIENTATION
Standing under the opener’s powerhead – facing the door – looking up – this is the view you will see of the programming buttons and LEDs.
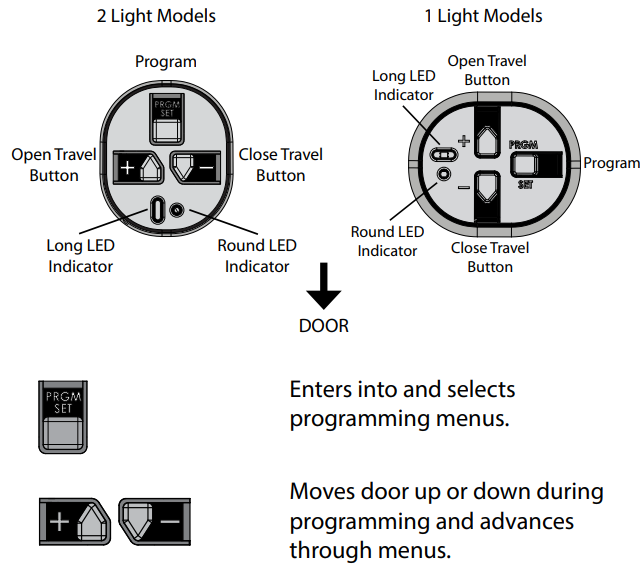
NOTE: Each programming step has a 30 second time limit for completion after the function is initiated. After 30 seconds, two LED’s will illuminate RED indicating time has expired and the step must be re-started. Restart the step as many times as necessary to complete the programming.
Just remember the pointed end of the button (like an arrowhead) points in the direction the carriage will move when that button is pushed.
Programming Information
TRAVEL LIMITS
WARNING
- Make sure doorway is in full view and clear of obstacles and people to avoid injury or property damage.
- DO NOT operate this unit from the wall control before LIMITS are set. Severe damage to the opener could occur.
- DO NOT set limits with Battery Backup attached. AC power MUST be connected to the opener while setting limits for proper operation.
NOTE: If turnbuckle has NOT been engaged to carriage, do so now.
Before setting limits: Confirm wall console red indicator
backlight is ON. If not illuminated, See page 19 for troubleshooting. Check STB LED’s: Confirm both LED’s are Illuminated solid. If not Illuminated solid, see page 18 for troubleshooting.
Closing Garage Door (Down Limit)
NOTE: Beginning with garage door in mid travel is recommended but not necessary.
Lift door by hand until carriage engages the turnbuckle on the chain/belt.

READ AND UNDERSTAND STEPS 2-5 BEFORE PROCEEDINGPress and hold the down arrow button (–) for two seconds or until the long LED comes on blue. (The round LED stays off.)

Release down arrow button (–) and the long LED will begin flashing blue. (Round LED still off.)

Press and hold the down arrow button (–) to begin closing the garage door. When the garage door is fully closed, release the down button (–). If it has gone too far press and release the up button (+) to move the door up slightly. The door can be moved up or down with the arrow buttons. The door should rest tightly on the floor.
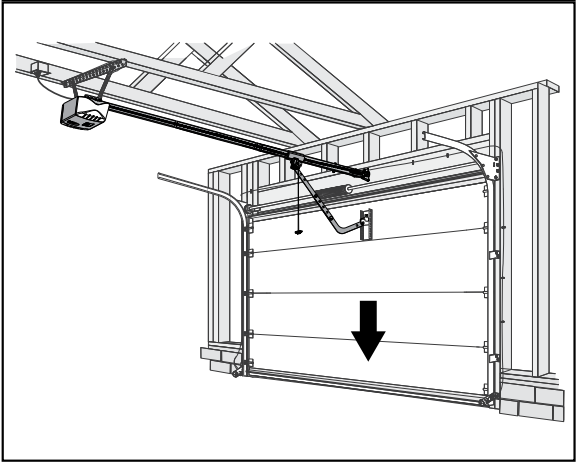
Press and release the program/set button—both LEDs flash blue and then go off.

The DOWN (CLOSED) TRAVEL LIMIT IS NOW PROGRAMMED.Press and hold the UP arrow button (+) for two seconds or until the long LED comes on blue. (The round LED stays off.)

Release UP arrow button (+) and the round LED will begin flashing blue. (the long LED will go off).

Press and hold the up arrow button (+) to begin opening the garage door. When the garage door is fully opened, release the up button (+). If it has gone too far press and release the down button (–) to move the door down slightly. The door can be moved up or down with the arrow buttons. Stop the carriage short of the opener powerhead. It is important for the red cord to be clear of the powerhead to allow for manual door operation.
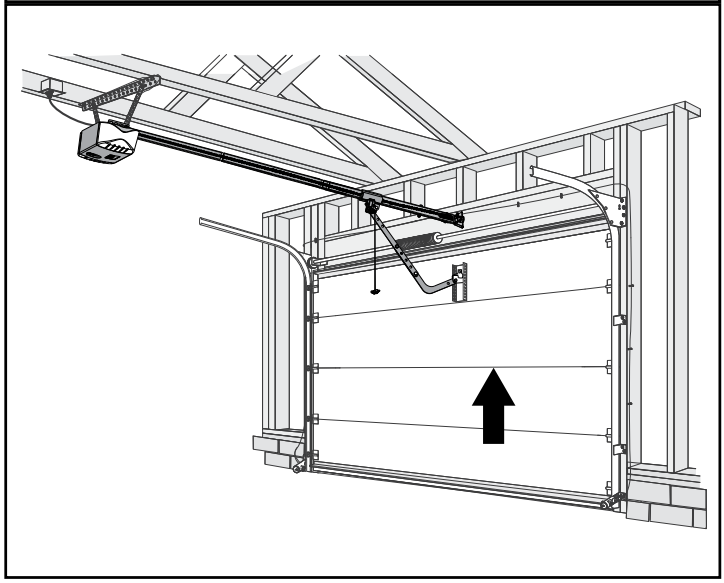
Press and release the program/set button—both LEDs flash blue and then go off.

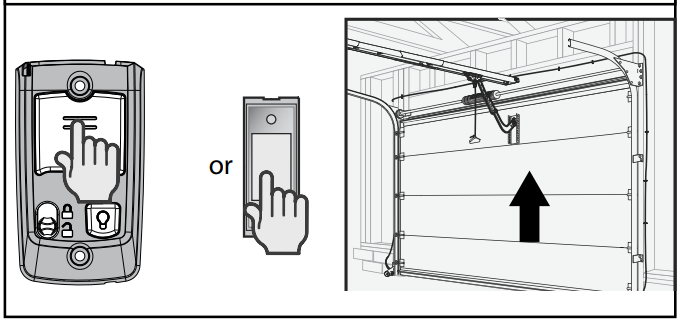
The UP (OPEN) TRAVEL LIMIT IS NOW PROGRAMMED.Press and release the wall console Open/Close button and allow the garage door to travel and stop at the down (closed) limit.
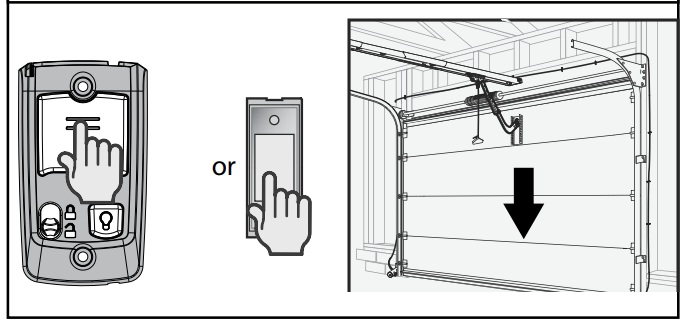
Press and release the wall console Open/Close button and allow your garage door to travel and stop at the up (open) limit.
NOTE: Force controls DO NOT require programming. Force limits are factory-set and rarely require adjustments.With the garage door open, lay a 2” x 4” board flat on 12. With the garage door open, lay a 2” x 4” board flat on
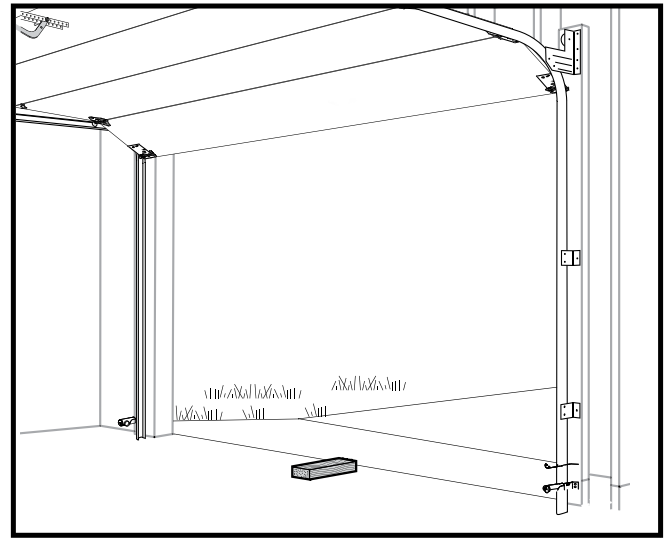
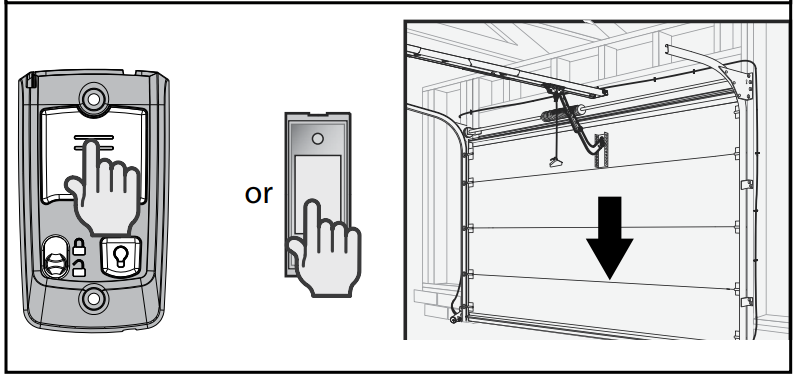
Close the garage door using the Open/Close button on the wall control. When the door contacts the board, it should stop and reverse direction within 2 seconds to the fully open position. Long LED light on the powerhead will begin to flash RED with the reversal of the door. Remove the 2" x 4" board after a successful contact reversal test. The next cycle will clear the flashing red LEDs.
Contact Reverse Adjustment
If the door stops before contacting the board or if it does not reverse direction to fully open after contact with the board, it may be due to an improperly set DOWN limit. Verify settings by
- Repeat the “Down Travel Limit” section (page 6) to make certain the door is closing tight against the floor.
- Repeat the “Force Control” section on the left to set force limits.
- Repeat the “Contact Reverse Test” above.
Repeat this process as needed until the door passes the Contact Reverse Test. For further help, refer to the “Maintenance and Adjustment” section/Regular Maintenance. (Pages 14-18).
Remote Control Programming
REMOTES
NOTE
- THE REMOTE CONTROLS INCLUDED WITH THIS OPENER, HAVE BEEN PRE-PROGRAMMED AT THE FACTORY FOR YOUR CONVENIENCE.
- The following instructions are for remote control transmitters purchased separately in addition to those provided with this opener, but can also be used if any remote(s) may require re-programming.
- Each programming step has a 30 second time limit for completion after the function is initiated. After 30 seconds, two LED’s will illuminate RED indicating time has expired and the step must be re-started. Restart the step as many times as necessary to complete the programming.
- Do NOT hold Remote too close to the Powerhead when programming Remote buttons.
Each button on each Remote must be programmed separately, following these steps.
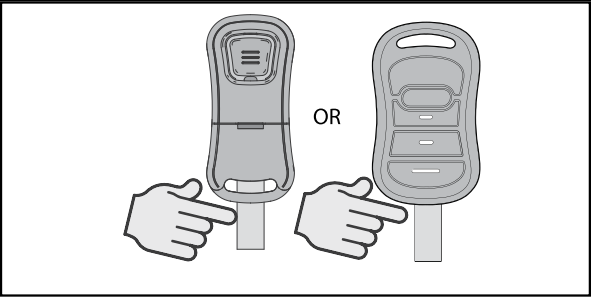
Remove the battery’s protective film from the remote by pulling it straight out.
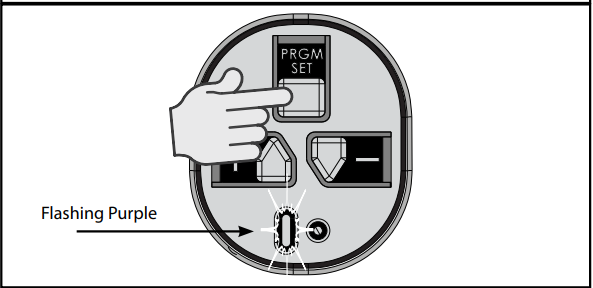
Press and hold the program button on the opener for two seconds until the round LED turns blue, then release. The long purple LED will flash.
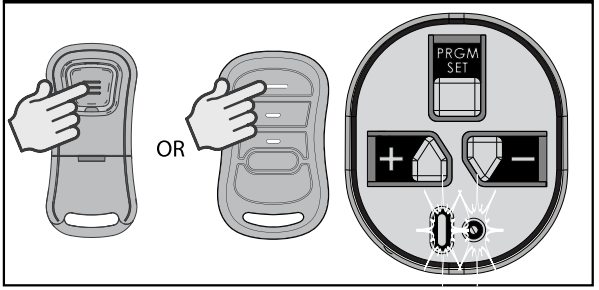
Slowly press and release the remote button two times. The opener LEDs will flash and go off, indicating it has been successfully programmed to the remote.
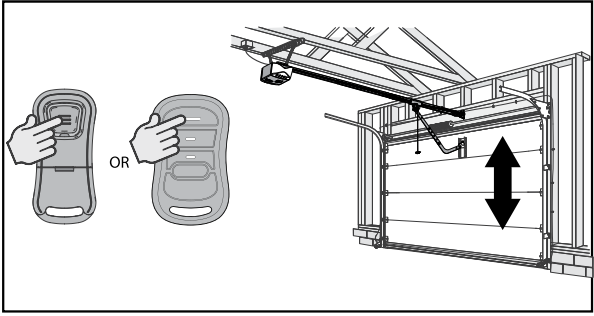
NOTE: While programming remote buttons, stand at least 5 feet away from the powerhead. This ensures you have proper communication between the remote and the powerhead.Press and release the same button a third time and the door will open or close.
To program the same remote for other garage door openers, repeat the steps above using one of the other remaining remote buttons.
REPEAT STEPS 1 TO 4 FOR EACH OPENER AND REMOTE
NOTE: It is possible to press the remote button too quickly or lightly. If the LEDs do not go off, press the remote button several more times to achieve confirmation.
BASIC PROGRAMMING IS COMPLETE AND YOUR GARAGE DOOR OPENER IS READY TO USE.
Programming Wireless Keypad
Tip: Program the Keypad before mounting.
Keypad Overview
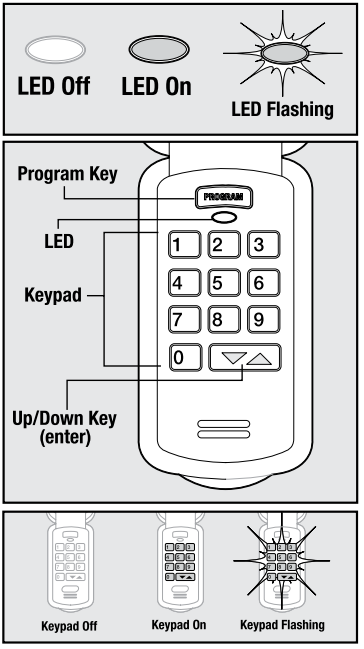
OPEN BATTERY COVER AND PULL TAB TO ALLOW OPERATION
Setting the PIN for the First Time
- Press in order the numbers 3-5-7
- Press the PROGRAM key
- Type a new PIN (3-8 digits)
- Press the PROGRAM key again
The keypad is ready to program to an opener. For use on a Single Door, continue to Synchronizing Keypad to Door.
NOTE: If the keypad lights do not flash and go OFF after setting PIN, clear the keypad and repeat Step 1; see page 11 for Resetting a PIN.
Locate the Opener’s Programming Buttons and LED
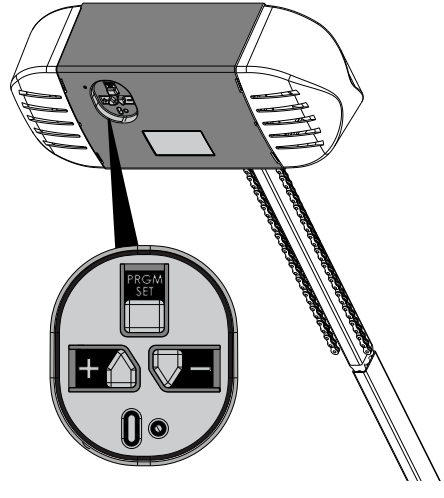
Synchronizing Keypad to Door
Press PROGRAM SET button two seconds until the round LED turns blue, then release. The long purple LED will blink.
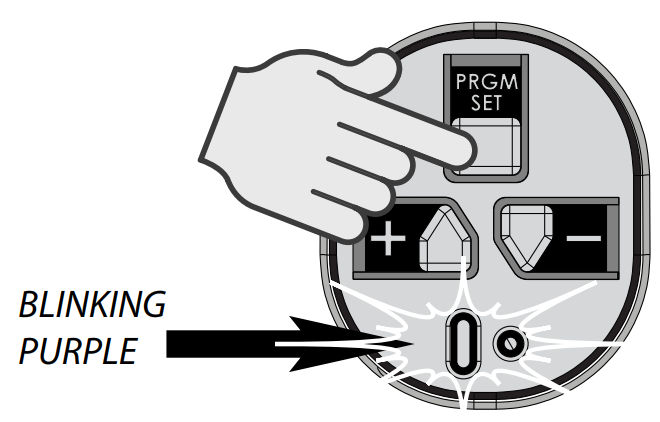
- Key in the new PIN on the keypad.
- Press Up/Down key and opener LEDs will stay on steady.
- Press Up/Down key again and opener LEDs turn off.
- Press Up/Down key a third time and the opener runs.
The process of programming ONE keypad to ONE opener is complete.
Multiple Door Section
- Key in the new PIN on the keypad. (3-8 digits).
- Press the PROGRAM key two times.
- Enter how many total doors the keypad will control (press 2 or 3 accordingly).
- Press the PROGRAM key.
The keypad is now programmed to receive multiple opener signals. - Locate the opener’s programming buttons and LED. Press the PROGRAM SET button for two seconds until the round LED turns blue; then release. The long purple LED will flash.
- Type the new PIN (3-8 digits).
- Press the Up/Down key one time.
- Assign a number to the door that the keypad will operate by pressing 1-2 or 3.
- Press that door number a second time.
- Press that same door number a third time and the door will operate.
Wait 30 seconds for the keypad to go dark and then start with step 5 for the additional door/keypad combination as needed. To add another opener to a keypad that is already programmed to an opener, follow all the steps in the“Multiple Door Section”. Please note in Step 8, that the keypad assumes the original opener programmed to the keypad is opener #1. Keypads can accept up to three openers.
Door Operation with Wireless Keypad
To open and close a single door with the Keyless Entry Pad, enter the PIN number and press Up/Down Key (enter). For multiple doors enter the PIN number, press the UP/Down Key once and enter the door number (1,2 or 3).
NOTE: The Keyless Entry Pad will stay active for 30 seconds and will stop or start the door with each touch of any button on the keypad.
Changing an Existing PIN
- Enter the current PIN
- Press the Program key one time
- Key in the new PIN (3-8 digits)
- Press the Program key one time
NOTE: Unlike “Resetting PIN,” there is no need to reprogram your opener after changing the PIN.
Resetting a PIN
Press and hold both the PROGRAM key and the Up/Down key for about five seconds. The LED’s will slowly blink and then go out. When the LED stops blinking, the old programming has been successfully erased. To create a new PIN, start with “Setting the PIN for the First Time”
Mounting Keypad
The keypad MUST be mounted within sight of the garage door(s) at least five feet above the floor and clear of any moving door part.
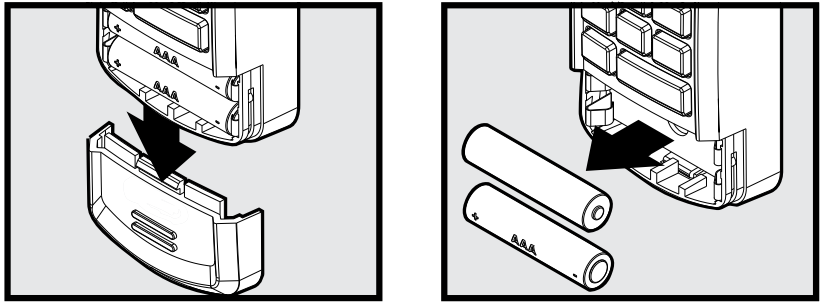
- Remove battery cover and batteries.
Drill 3/32” pilot hole for the top mounting screw (included).
- Install a screw into the pilot hole, leaving a 1/8” gap between the screw head and wall.
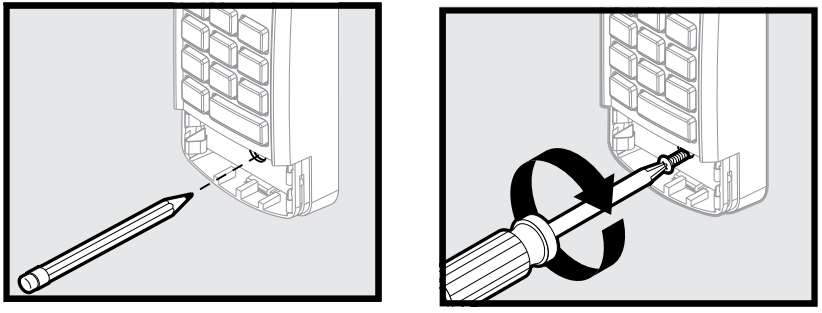
Hook the slotted mount, on back of keypad, over the screw.
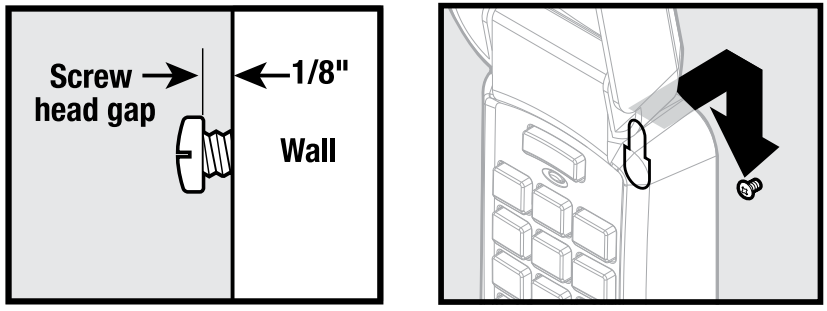
- Mark and drill a pilot hole for the bottom screw (included) and secure keypad to wall (DO NOT overtighten).
Reinstall batteries and cover.
Programming Vehicle Remotes
Programming HomeLinkSystem
Clear HomeLink
Clear HomeLink by pressing and holding down the first and third buttons until the indicator on the HomeLink blinks slow and then fast for 20 seconds; then release both buttons.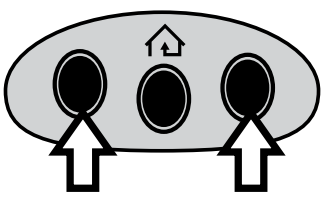
NOTE: Clearing the HomeLink will remove all previously programmed garage door openers.Train HomeLink to the Genie Remote Choose the button on the HomeLink that will be used to open the door.
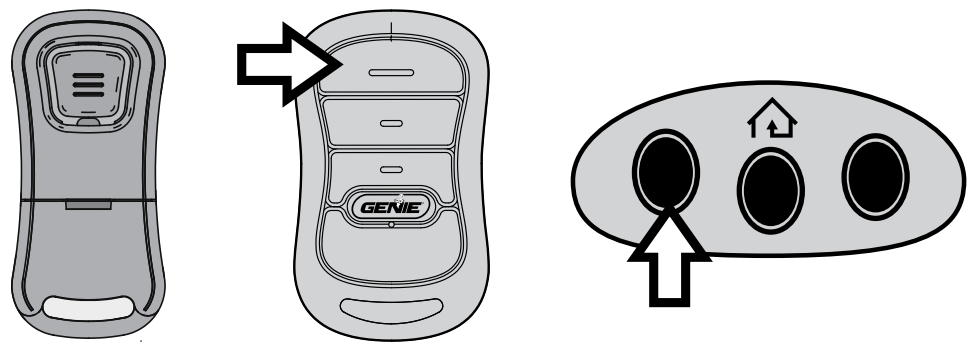
NOTE: Hold the Genie Remote two inches from the HomeLink button.- Hold down the Genie remote button. While holding, press and hold the chosen HomeLink button.
- Hold down both buttons until the indicator on the HomeLink blinks slow then fast. Once it blinks, release both buttons.
- Program HomeLink to the Genie Opener
Press and hold the PROGRAM button on the opener until the round blue LED is ON. Release the button. The long purple LED will begin flashing.
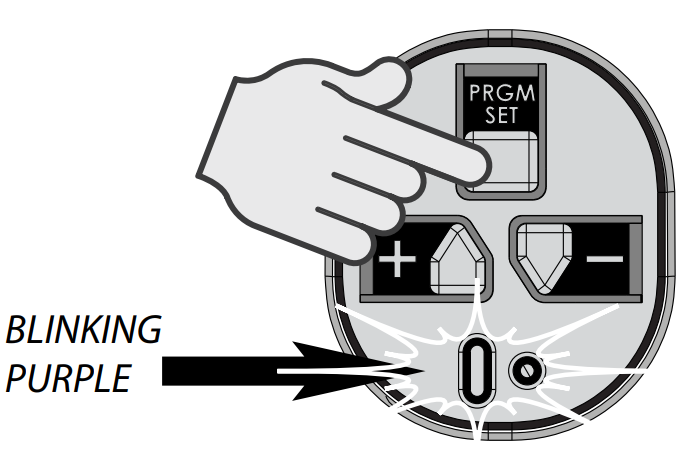
Press the chosen HomeLink button for two seconds and release. Press that same button again for two seconds and release. The long LED will flash blue and then turn off.
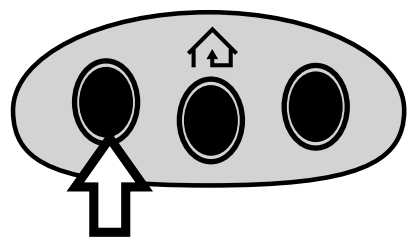
- Press the HomeLink button a few more times until door moves.
Programming Car2U® System
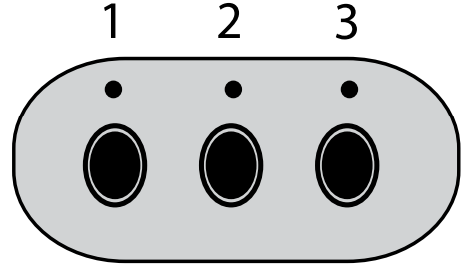
Clear Car2U to default settings The default setting for the Car2U system is
- Button 1 = Genie® Manufactured Openers
- Button 2 = LiftMaster® Manufactured Openers
- Button 3 = Wayne Dalton® Manufactured Openers
- Press and hold buttons 1 and 3 for 20 seconds or until all three LEDs begin to flash.
- Release both buttons. The Car2U system is now set to the Factory Default settings
NOTE: Clearing the Car2U remote will remove all previously programmed garage door openers.
Program Car2U to the Genie Opener
Press and hold the PROGRAM button on the opener until the round blue LED is ON—release the button. The long purple LED will begin flashing.
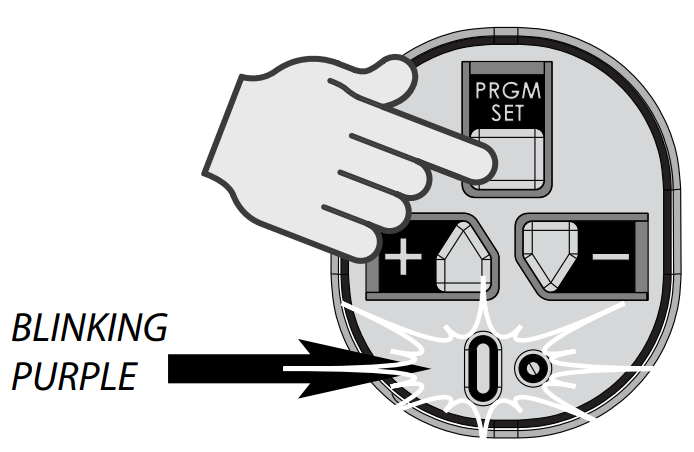
Press the designated Genie Car2U button for two seconds and release. Press that same button again for two seconds and release. The long LED will flash blue and then turn off.
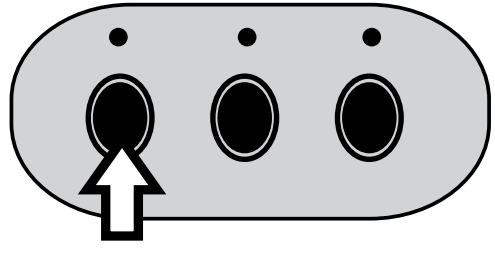
- Press the Car2U button a few times more until door moves.
Changing Factory Default Button for a Genie Opener
- Press and hold buttons 1 & 3 for ONE SECOND and release—all three LEDs will light solid red.
- Press and hold the button (2 or 3) to change it to Genie—the corresponding LED will flash. While continuing to hold that button, press and release button 1. Press and release button 1 again.
- Release the button being held in step B and wait for the LED to stop flashing. This button is now set for Genie. Repeat Step 2 for second Genie Opener.
Clearing Remotes
CLEARING MEMORY OF REMOTES
NOTE: Clearing memory of remotes from the powerhead will clear ALL programmed remotes and wireless keypads. The opener will no longer recognize any signal from any remote device, including a missing remote device.
All remaining (or recovered) remotes and wireless keypads MUST be reprogrammed as shown in pages 9,10,12.
NOTE: The garage door opener will operate normally using the wall console.
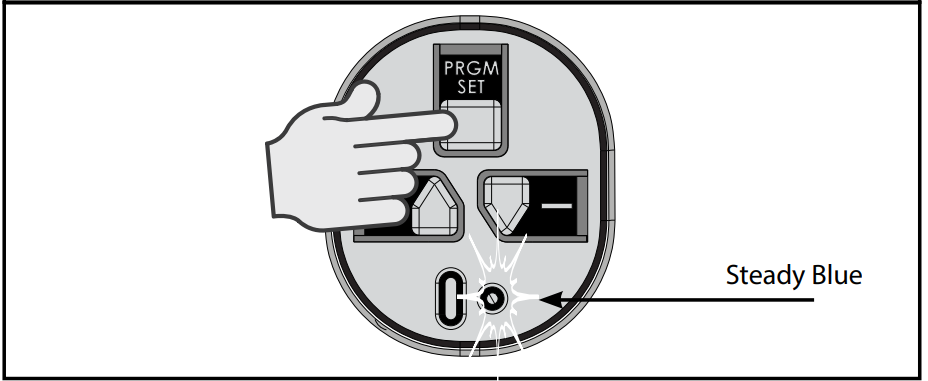
Press the PROGRAM/SET button on the powerhead and hold for two seconds or until the round LED turns blue.
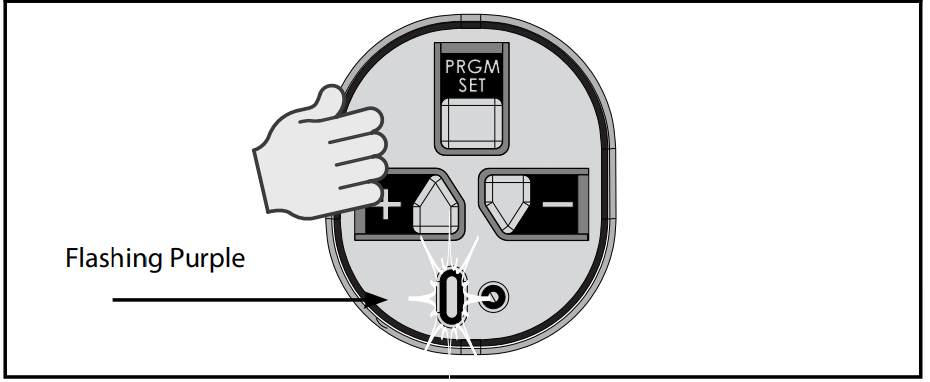
Release the PROGRAM/SET button—round LED goes off and the long LED flashes purple.
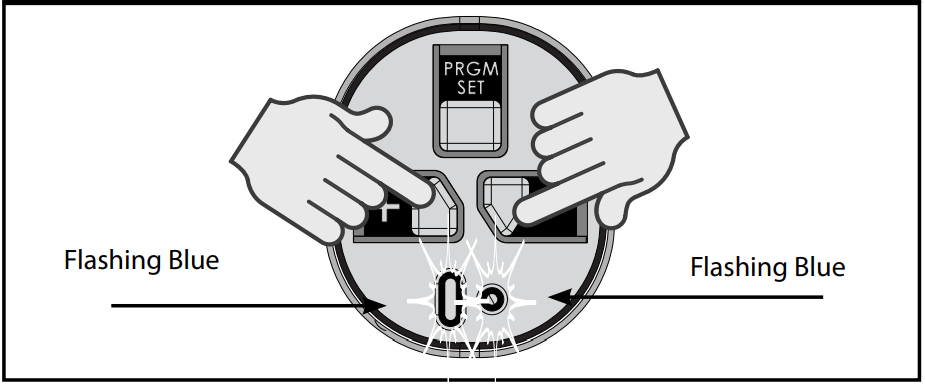
Press and hold the UP (+) and DOWN (–) button at the same time, until both LEDs flash blue and go off.
To verify that the memory is cleared, press the remote key that was previously programmed to the opener. If the memory has been cleared the opener will NOT run.
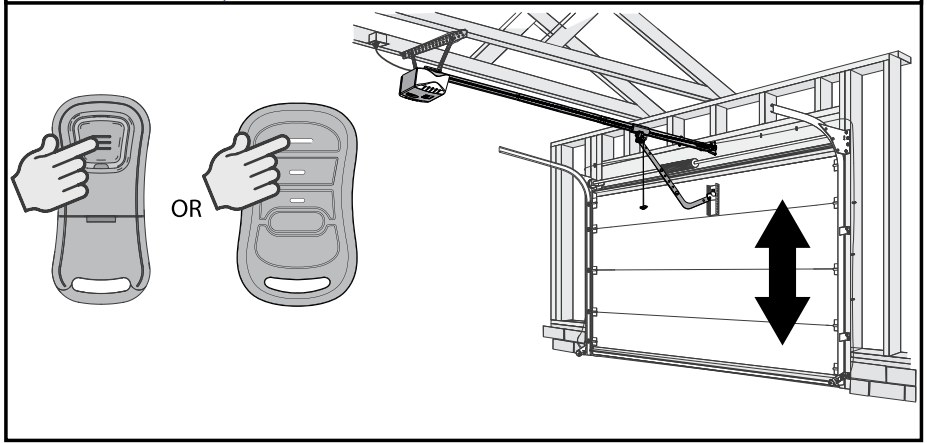
If the remote is successfully cleared, the round powerhead LED will flash blue when the remote button is pressed and the opener will not operate.
Maintenance and Adjustments
IMPORTANT SAFETY INSTRUCTIONS
WARNING
- NEVER let children operate or play with the door controls.
- Keep remote away from children.
- ALWAYS keep the moving door in sight and away from people and objects until door is completely closed. NO ONE SHOULD CROSS THE PATH OF THE MOVING DOOR.
- NEVER GO UNDER A STOPPED, PARTIALLY OPEN DOOR.
- Test opener monthly. The door MUST reverse on contact with a 1-1/2” high object (or 2” x 4” board laid flat) at the center of the doorway on the floor. After adjusting either the force or limit of travel, retest door opener. Failure to adjust the opener properly may cause severe injury or death.
- When possible, use emergency release only when door is closed. Use caution when using this release with the door open. Weak or broken springs are capable of increasing the rate of door closing and increasing the risk of severe injury or death.
- KEEP DOORS PROPERLY BALANCED. See your garage door Owner’s Manual. An improperly balanced door increases the risk of severe injury or death. Have a trained door system technician make repairs to cables, spring assemblies, and other hardware.
WARNING
- Garage door hardware (springs, cables, brackets, pulleys, etc.) are under extreme pressure and tension.
- DO NOT attempt to repair or adjust door springs or any hardware, and DO NOT OPERATE garage door automatically or manually if door is improperly balanced or springs are broken.
- CONTACT A TRAINED DOOR SYSTEM TECHNICIAN.
Regular Maintenance
Basic monthly maintenance tasks include
- Contact Reverse Test
- Lubricate door hardware
- Safe-T-BeamSystem check
- Door balance
- Remote Battery Replacement (As needed)
- Light Bulb Replacement (As needed)
- Chain/Belt Tension
Contact Reverse Test
Lubricate Door Hardware
Inspect door rollers and hinges and lubricate as needed using a light weight general purpose grease.
Safe-T-Beam(STB) System Check
Check that both the RED and GREEN LEDs are ON steady. This indicates the system is working properly. If both LEDs are not ON steady, check the appropriate items below
- STB red LED flashes.
- Check for obstruction.
- Check alignment. (See page 18)
- Verify wire routing from STBs to STB connection in powerhead
- Check for signal interference from another Safe-T-Beam® unit (for multiple door installations).
- No STB red or green LED displayed.
- Check wiring and wire connections
If system appears to be working properly, perform check as follows
- Start the door closing.
- Pass an object through the beam. The door should stop and reverse to the fully open position.
Door Balance (Spring Tension)
Perform the check as follows:
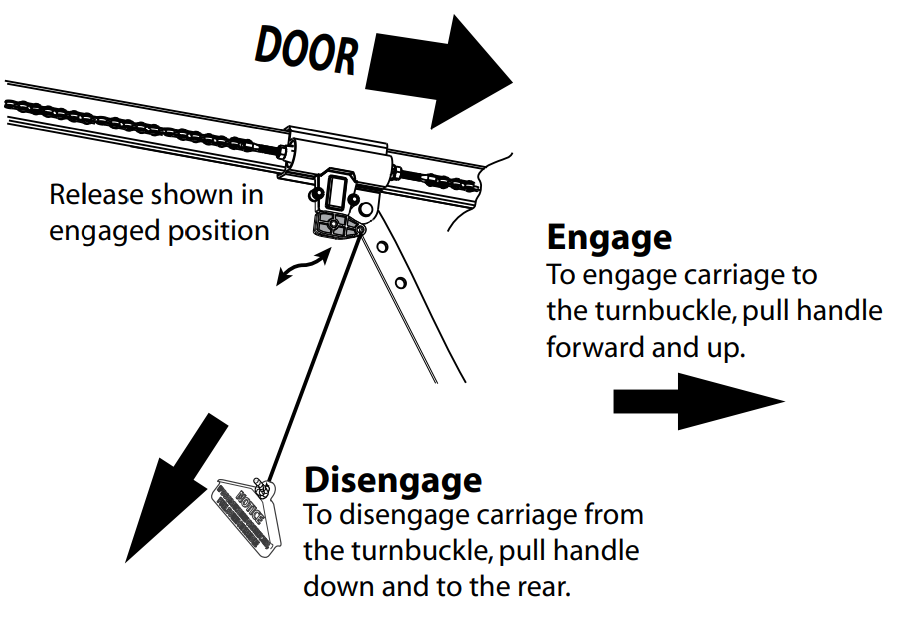
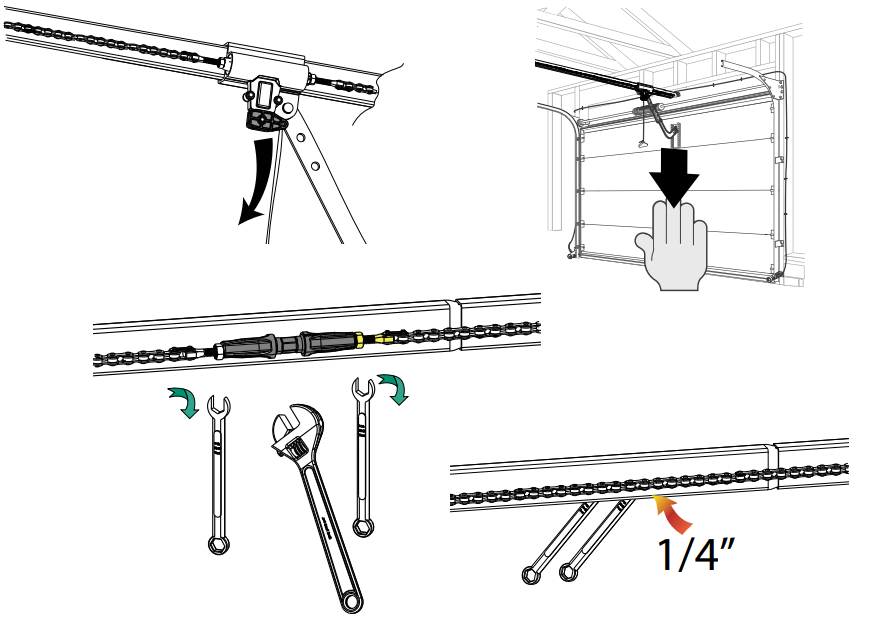
With the door closed, pull manual emergency release handle DOWN and away from door and let go to disengage the carriage from the drive chain or belt (see illustration).
- Raise and lower the door manually — it should move freely and smoothly.
Raise door manually about 3’ to 4’ feet and let go.

- Door should remain stationary or move very slowly.
- If door moves quickly, CONTACT A TRAINED DOOR SYSTEM TECHNICIAN to have your door springs serviced.
- Close the door.
- Place the carriage in the “engage” position (see illustration).
- Operate door using remote or wall control. The carriage will reattach itself to the drive chain/belt.
Remote Battery Replacement (As needed)
Remote Battery Replacement (1-button)
Replace remote battery with a CR2032 coin cell battery.
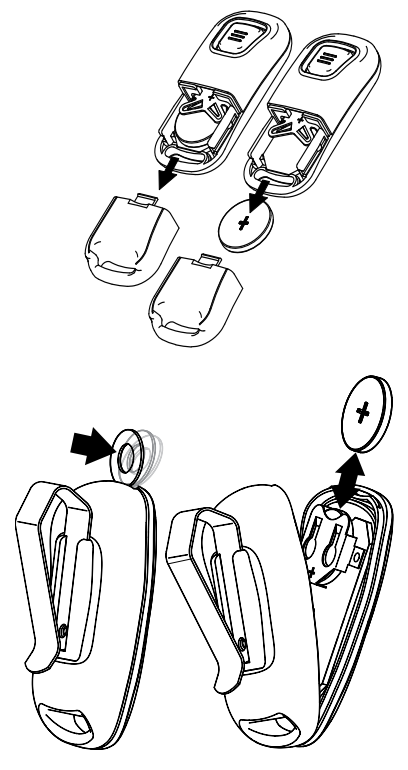
- Slide the battery cover off (it’s the lower half of the remote’s case) by pressing on the case just below the indentation at the top of the cover and sliding it down. Alternately, insert a coin or small washer into the indentation in the front of the case and pry to unlatch the battery cover in order to slide it off.
- Slide out the old battery and slide in the new. Be sure positive side (+) is UP.
- Slide the battery cover on until it snaps into place.
Remote Battery Replacement (3-button)
Replace remote battery with a CR2032 coin cell battery.
- Open remote case using a washer or coin that fits into the slot on the top of the remote.
- Replace battery. Be sure positive side (+) is UP.
- Align components and snap case closed.
Light Bulb Replacement
WARNING
- Use extreme caution when working from a ladder or step stool or serious injury can occur.
- When replacing light cover, make sure wires are not pinched or near moving parts.
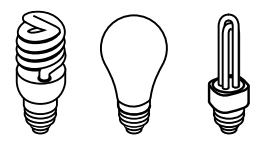
- Use only properly rated incandescent, LED or CFL light bulbs.
- DO NOT use bulbs with a rating greater than 60 Watts.
- Use A19 size light bulbs. DO NOT use bulbs having a short neck.
Changing Light Bulbs
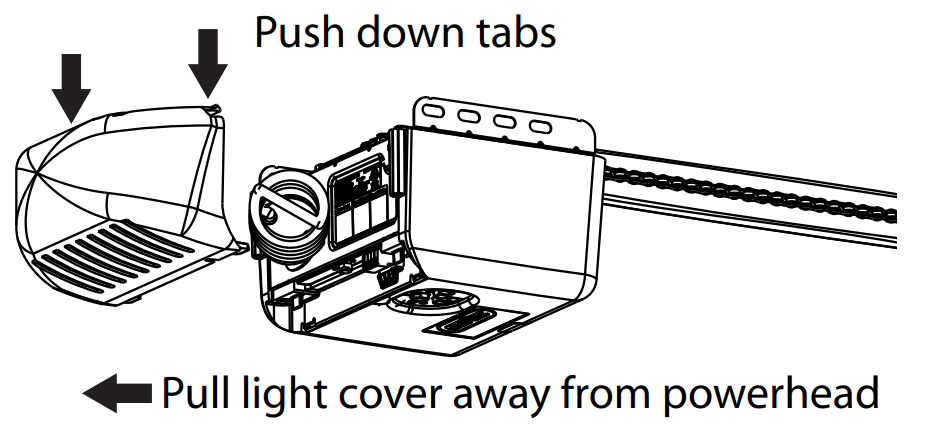
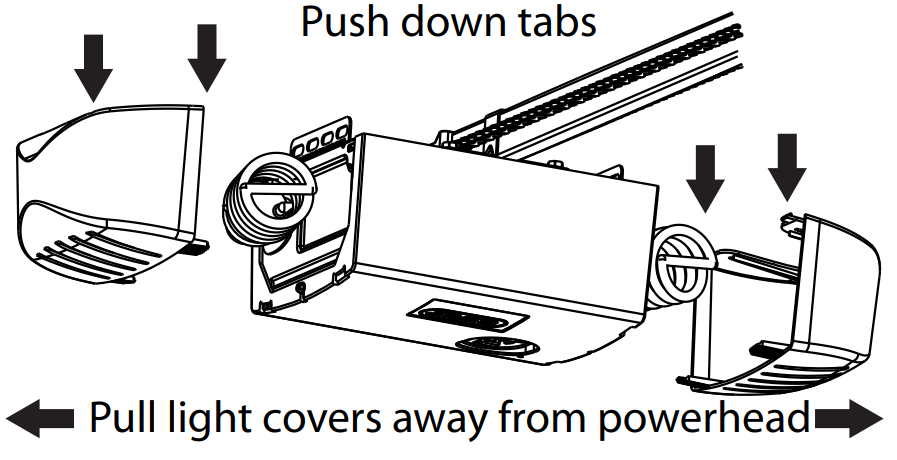
- Disconnect power to door opener. Open powerhead light cover(s) by pressing down on upper locking tabs.
- Replace old light bulb(s) with new.
- Use 60 Watt MAX. incandescent bulbs or the CFL or LED equivalent. Close powerhead light cover(s).
- Reconnect power to door opener.
- Test light operation.
1 Light Models
2 Light Models
Chain/Belt Tension
If excessive chain/belt sag is noticed below the rail
- Open the door until carriage is about mid travel and stop.
- Disengage the carriage and manually close the door.
- Loosen nuts on turnbuckle using 7/16” wrenches.
- Rotate turnbuckle counter-clockwise until slack is removed from chain/belt.
- When measured on the opposite side of the rail from the turnbuckle, a properly adjusted chain will have a 1/4” gap to the bottom of the rail.
- Tighten nuts to secure turnbuckle.
- Be sure that chain/belt is not twisted or bound.
- Manually open door to re-engage carriage to turnbuckle.
Adjust Carriage for (optional) Emergency Release System
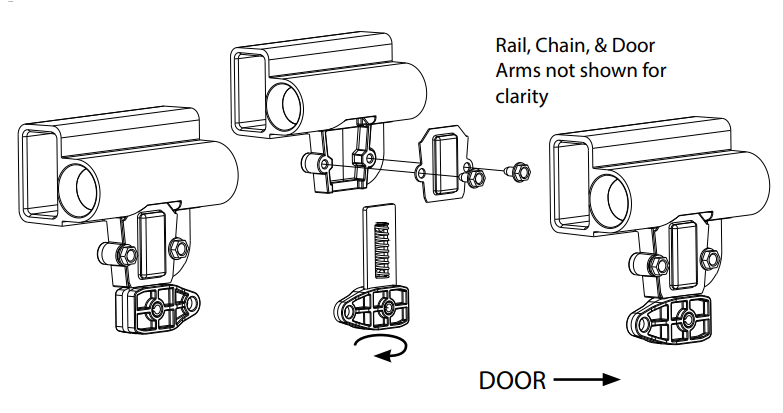
The carriage on this opener can be adjusted to work with the Emergency Release Cable Lock System (available at your local Genie® Retailer).
- Operate door to mid position.
- Pull emergency release cord and manually close door
- Make sure carriage latch is in the upright (engaged) position.
- Remove (2) 5/16” machine screws and cap.
- Pull spring assembly out and reverse direction.
- Install cap and machine screws.
Emergency Release cable can now be assembled to the carriage assembly.
Force Settings
Force settings are pre-programmed at the factory and applied during the Open/Closed Limit settings steps (see page 8). For normal use, these settings should not need adjustments with this unit.
Conditions possibly requiring adjustments are
- Doors with very stiff weather seals.
- Doors that start down, STOP, and reverse before closing.
- Doors that start up, but STOP before they completely open.
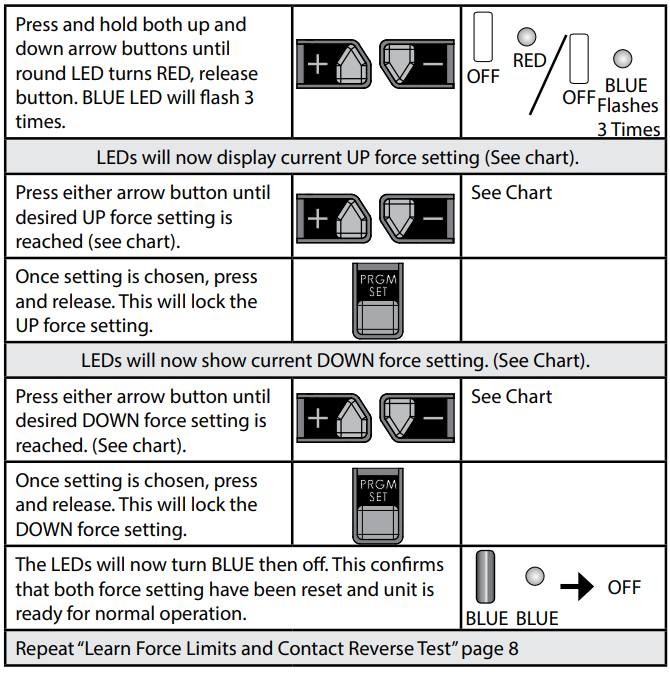
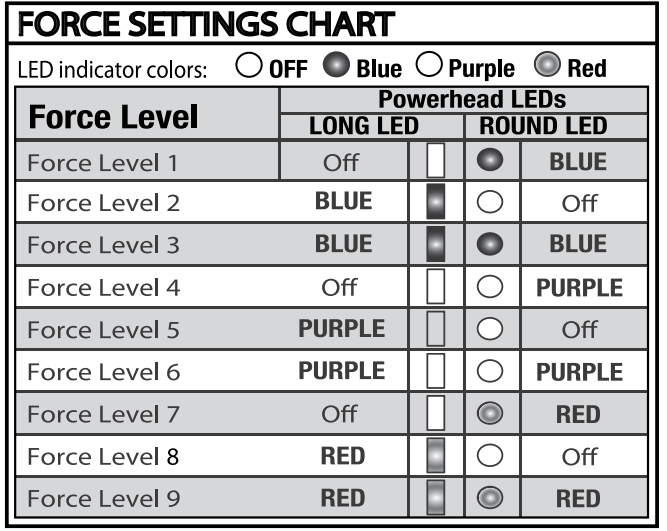
Resetting Travel Limits
See pages 6-7-8 to reset travel limits. Force setting and contact reverse test must be performed in the event of a travel limit change.
NOTE: The opener will not close automatically unless the
Safe-T-Beam® System is installed and Limits are programmed.
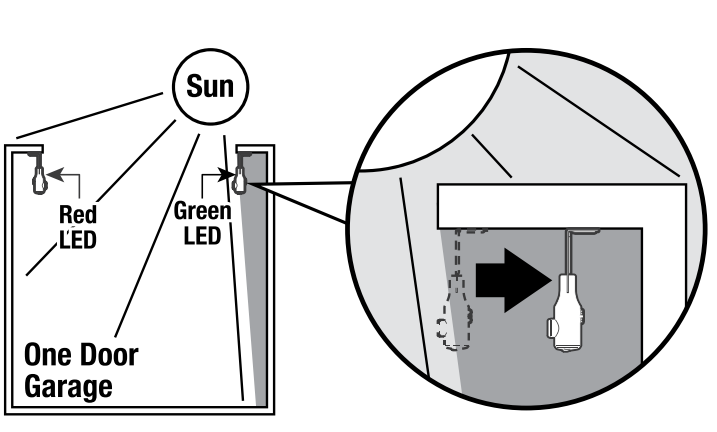
- Single Garage Door
- Determine which side of the garage receives direct sunlight.
Position the Transmitter (Red LED) on the direct sunlight side.
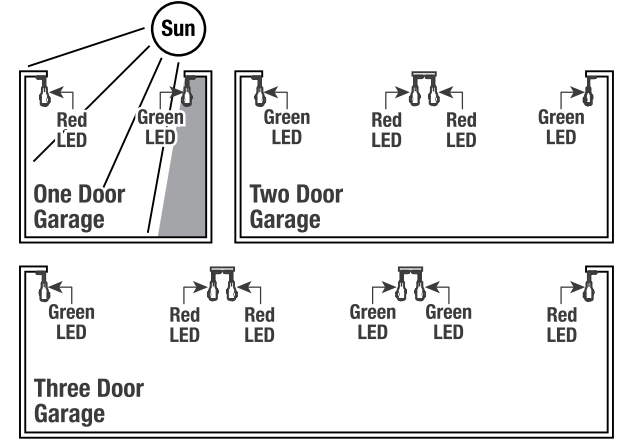
- Multiple Garage Doors
- NEVER position Safe-T-Beam® modules where signals will cross.
- Place the Transmitter (Red LED) Safe-T-Beams on adjacent doors facing in opposite directions.
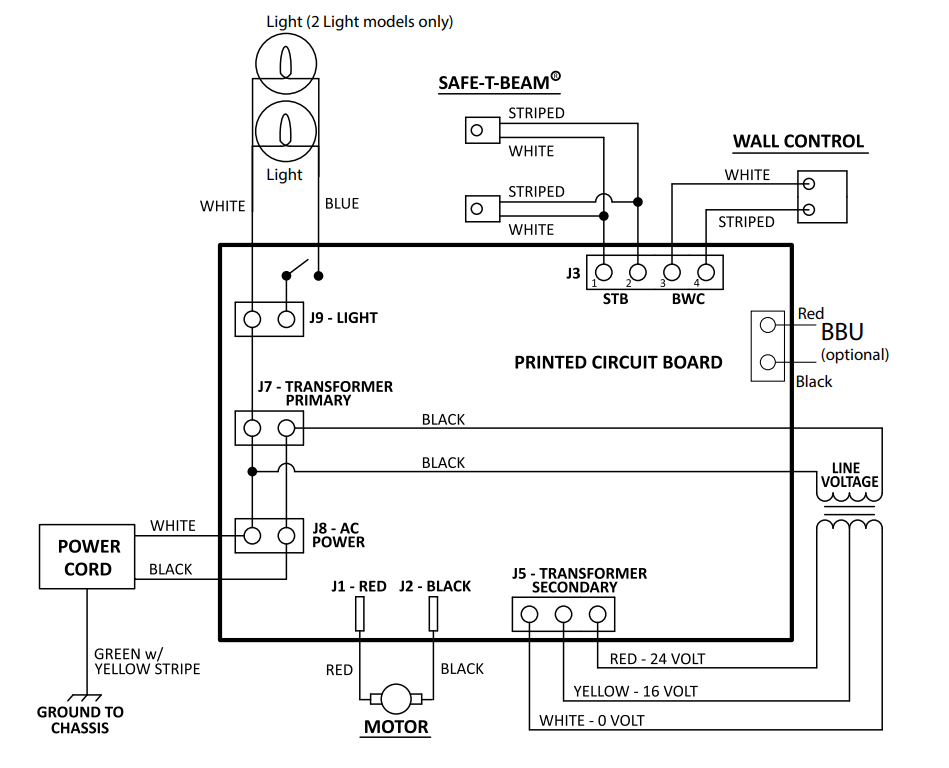
Wiring Diagram
Troubleshooting
PROBLEM: | WHAT TO DO: |
Opener does NOT operator when wall control is pressed. |
|
Opener runs, but door does not move. |
poster or download posterfrom www.GenieCompany.com
|
Opener worksfrom wall control, but NOT from remote. |
|
Remote has less than 25 feet operating range or no operation. |
|
Door starts down, then STOPS and goes back up. OR Safe-T-Beam® System malfunction. |
and hold the wall control button until door is completely closed.
|
Door starts down, then STOPS before it is closed. OR Door willonly open. |
|
Door starts up, but STOPS before it is completely open. |
and use the “dealer locator” to hirea local doorservice professional. NEVER try to repair doorhardware or springs yourself. |
Door will only run closed. |
and use the“dealer locator” to hire a local doorservice professional. NEVER try to repairdoor hardware or springs yourself. |
Door opener starts for no reason. |
|
PROBLEM | WHAT TO DO |
Noisy operation. |
|
Door opener runs slow. |
|
Powerhead LED | Possible Problem | Solution | |
Round LED | Long LED | ||
OFF |
OFF | Normal operation. | None required. |
No response from unit. | Check power supply. Contact a trained door system professional. | ||
ON/RED/ STEADY | ON/RED/ STEADY | Limits NOT set properly. | Re-program limits,see pages6-7. |
ON/RED/ FLASHING | ON/RED/ FLASHING | Program error. | Unplug unit, wait 5 seconds, plug in. |
Component failure. | Contact a trained door system technician. | ||
ON/BLUE/ FLASHING | OFF | Remote NOT programmed. | Program remote, see page 9. |
ON/PURPLE/ FLASHING | OFF | Remote NOT programmed. | Program remote, see page 9. |
ON/RED/ FLASHING |
OFF | Safe-T-Beam® physical obstruction. | Remote obstruction, recheck unit. |
Safe-T-Beam® signal interference. | Check alignment of Safe-T-Beam® pair and nearest other Safe-T-Beam® pair, see page 15. | ||
OFF |
ON/RED/ FLASHING | Door contact in UP or DOWNtravel. | Remove obstruction. |
Door component failure detected. | Check door spring, track, rollers, hinges and fixtures. | ||
OFF | ON/RED/ STEADY | Thermal cutout. | DO NOT unplug unit. Wait until LED clears before operating. |
ON/PURPLE/ STEADY | ON/PURPLE/ STEADY | Component error. | Contact a trained door system technician. |
OFF | ON/BLUE/ FLASHING | Door will not open. | Check Sure-Lock™. Sure-Lock™ shouldbe OFF for normal operation (seepage 4). |
ON/PURPLE/ FLASHING | ON/PURPLE/ FLASHING | Radio receiver error. | Unplug the unit.Wait 5 secondsand plug the unit back in. If problems persist, contacta trained door system technician. |
ON/GREEN STEADY | ON/GREEN STEADY | OK=Charged, Battery Back Up | None Required |
ON/GREEN FLASHING | ON/GREEN FLASHING | Discharging, Battery Back Up | Power is out. Battery in use. |
ON/YELLOW FLASHING | ON/YELLOW FLASHING | Charging, Battery Back Up | None Required |
ON/RED TO YELLOW FLASHING | ON/RED TO YELLOW FLASHING | Dead Battery, Battery BackUp | Allow to charge48 hours. If charging fails, Replace Battery. |
ON/WHITE STEADY | ON/WHITE STEADY | Battery Backup in Operation | No Fault. Courtesy light while in battery backup mode. Light willturn off after4 minutes. |
Troubleshooting of Garage Door Opener 7055
Common problems with the Genie Garage Door Opener may include
- Remote control not working: Replace the battery or reprogram the remote control.
- Door not closing completely: Adjust the limit switch according to the user manual.
- Unusual noise during operation: Lubricate the moving parts or tighten any loose components.
Pros & Cons of Genie Garage Door Opener 7055
Pros
- Quiet and energy-efficient DC motor.
- Enhanced security with intelliCode access security system.
- Safe-T-Beam non-contact reversing system for added safety.
- Dual frequency compatibility.
Cons
- May require professional installation.
- Limited compatibility with certain garage door types.
Customer Reviews about Genie Garage Door Opener
Customers have praised the Garage Door Opener for its quiet and efficient operation, as well as its easy-to-program remote control. However, some users have reported difficulty with installation and compatibility issues with specific garage door types.
Faqs
What distinguishing qualities does the Genie Garage Door Opener 7055 offer?
How is the Genie 7055 Garage Door Opener installed?
Is it possible to combine the Genie 7055 with smart home systems?
What security features are available with the Genie Garage Door Opener 7055?
How can I set up the remote control on my Genie 7055?
How can the 7055 Genie Garage Door Opener be reset?
Can I swap out my Genie 7055's LED light?
How can I enhance my Genie 7055's Aladdin Connect Wi-Fi connection?
How can I get assistance with my 7055 opener from Genie customer service?
How long is the Genie Garage Door Opener 7055's warranty valid?
Leave a Comment
