Genmistu CNC Laser Machine 3018-PROVer User Manual
Content
Introduction
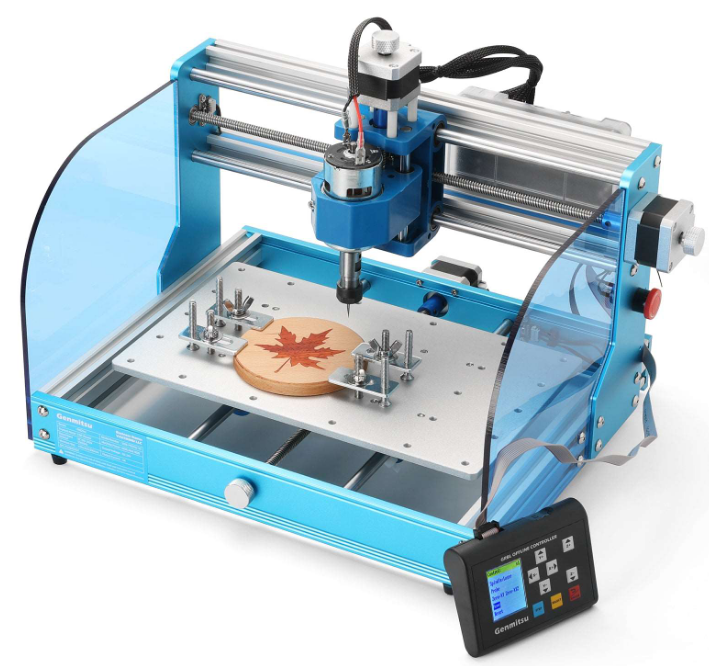
For do-it-yourselfers and small-scale projects, the Genmitsu CNC Laser Machine 3018-PROVer is a multipurpose desktop CNC engraving and cutting device. It has a small design and a working surface of 300 x 180 mm. It uses a 5.5W laser module to precisely cut and engrave a variety of materials, including leather, acrylic, and wood. With its tremendous capabilities and user-friendly design, the 3018-PROVer is a popular choice for creative and personalized work, making it an ideal choice for small businesses and hobbyists alike.
Detailed Specifications
The Genmistu CNC Laser Machine 3018-PROVer has the following specifications:
- Laser wavelength: 445nm
- Laser power: 5.5W
- Cutting area: 300 x 180mm
- Maximum engraving depth: 2mm
- Engraving speed: up to 1000mm/s
- Control method: USB connection to computer or via SD card
- Supported file formats: AI, DXF, BMP, JPG, PNG, and SVG
- Power supply: DC 12V/2A
- Dimensions: 425 x 310 x 130mm
- Weight: 6.5kg
Unboxing
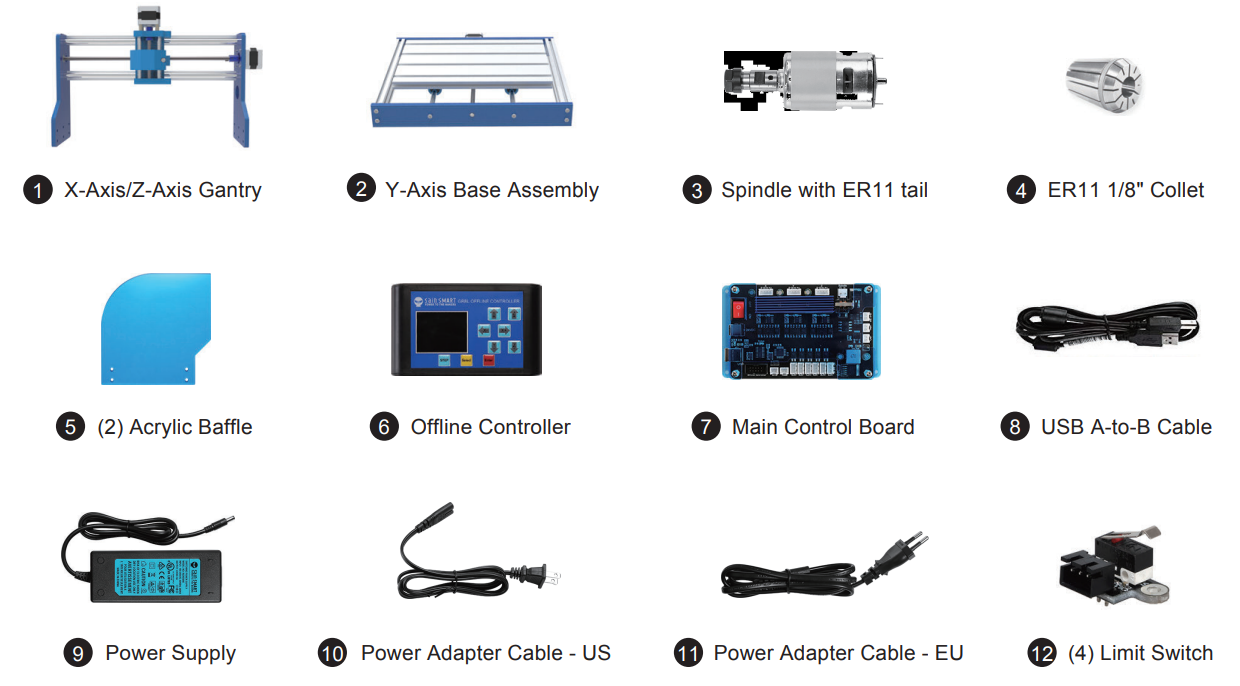
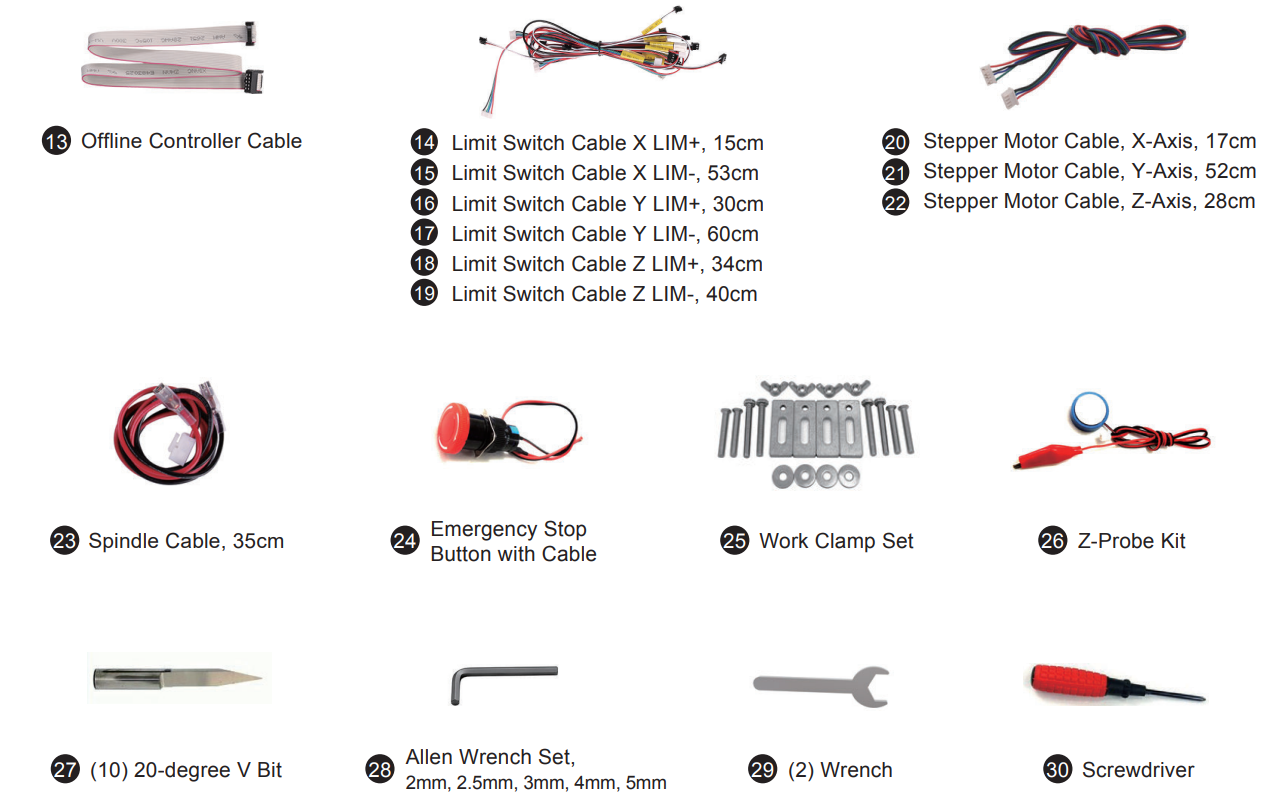
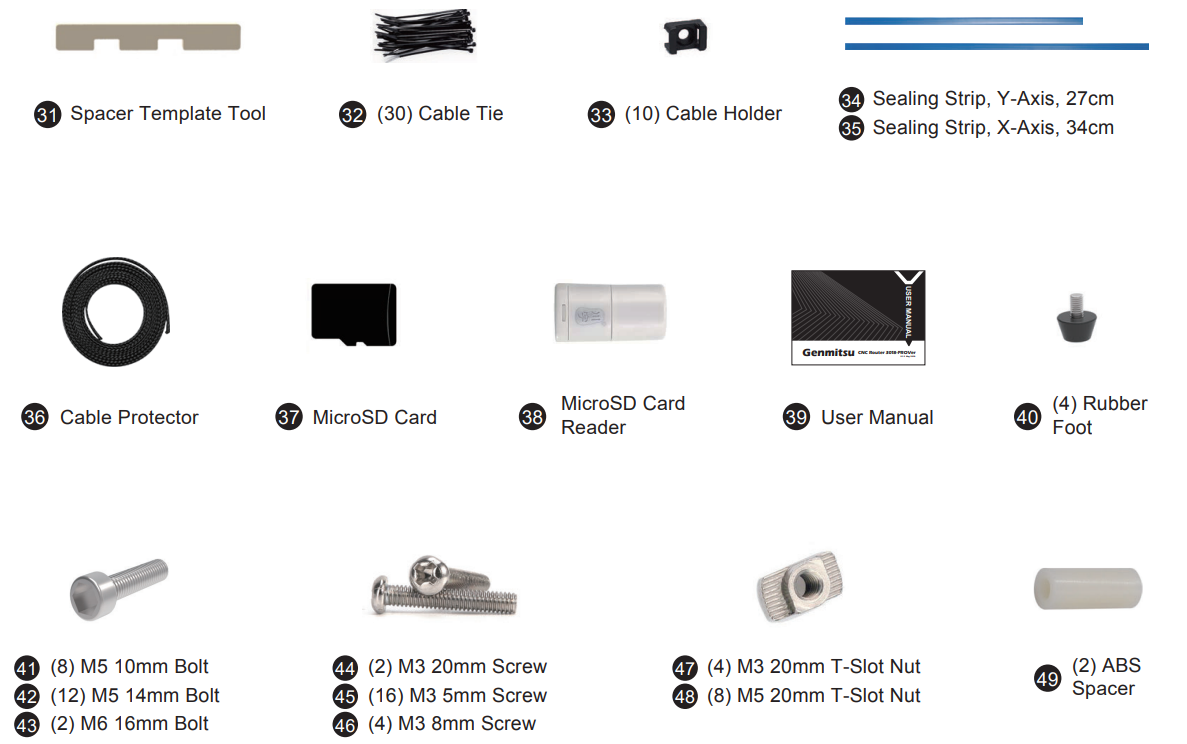
Optional Accessories (Not Included)
Consider following optional upgrades or accessories to make your CNC experience better!You can find them on https://www.sainsmart.com
Save 10% with discount code PROVER10
_genmitsu_cnc_laser_machine_3018-prover.png)
Description
An intuitive and multipurpose CNC laser cutter and engraver, the Genmistu 3018-PROVer is a breeze to operate. The laser head may be smoothly and precisely moved thanks to the system of high-precision linear guide rails. You can adjust the focus lenses on the machine to make the laser beam cut or etch exactly what you want it to. Because of its small size and light weight, the Genmistu CNC Laser Machine 3018-PROVer is easy to move around your workstation. The included software is easy to use and lets you create, tweak, and store designs. You can't go wrong with the Genmistu CNC Laser Machine 3018-PROVe whether you're looking to make personalized presents, test out new ideas, or exercise your imagination.
Wiring
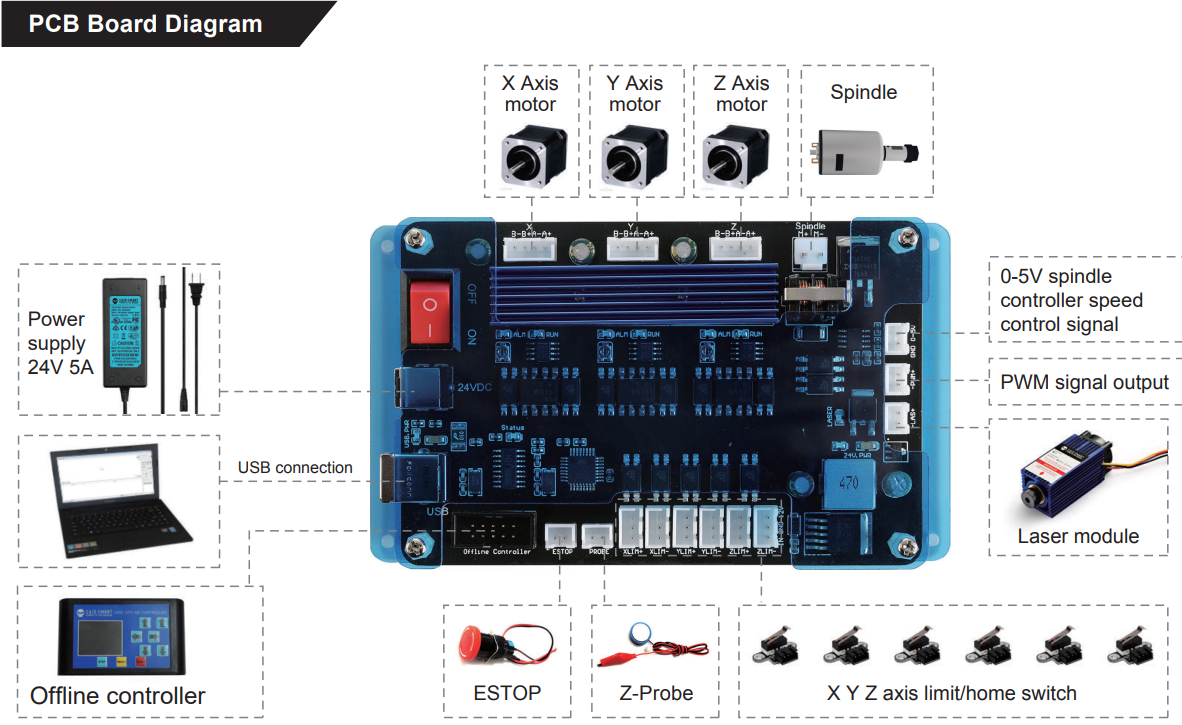
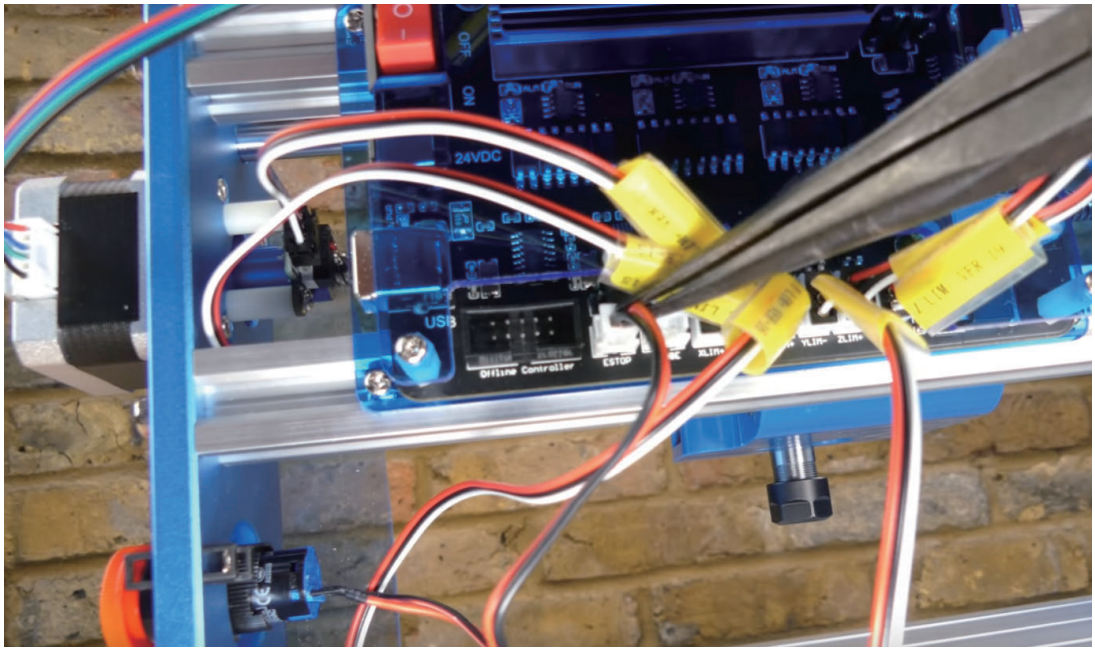
PCB Label Description
Here's the table formatted as you requested:
| Mark | Description |
|---|---|
| USB | USB interface |
| 24VDC | 24V power interface |
| ON | Power ON |
| OFF | Power OFF |
| Offline controller | Offline controller (Note: Only connect to our offline controller) |
| ESTOP | Emergency stop switch interface |
| Z-Probe | Z Zero Tool interface |
| XLIM+ | X limit switch + |
| XLIM- | X limit switch - |
| YLIM+ | Y limit switch + |
| YLIM- | Y limit switch - |
| ZLIM+ | Z limit switch + |
| ZLIM- | Z limit switch - |
| LAS+ | Laser module interface |
| PWM+ | PWM signal output interface |
| GND | 0-5V spindle controller speed control signal |
| Spindle | Spindle motor interface |
| X | X Axis motor interface |
| Y | Y Axis motor interface |
| Z | Z Axis motor interface |
| USB.PWR | USB power indicator LED |
| 24V.PWR | 24V power indicator LED |
| Status | Communication LED |
| SPINDLE | Spindle working indicator LED |
| LASER | Laser working indicator LED |
| ALM | Stepper motor driver circuit alarm indicator LED |
| RUN | Stepper motor driver circuit working indicator LED |
Setup Guide
Setting up the Genmistu CNC Laser Machine 3018-PROVer is easy. Here are the steps:
- Unpack the machine and its accessories from the box.
- Install the laser head and adjust the focus lens.
- Connect the machine to your computer via USB cable or insert an SD card with your design file.
- Install the Genmistu software on your computer and open it.
- Follow the instructions on the software to set up the machine and load your design file.
- Set the cutting parameters such as speed, power, and layering according to your project requirements.
- Start the machine and monitor it while it's working.
Cable Management
Please refer to the video for cable management options.
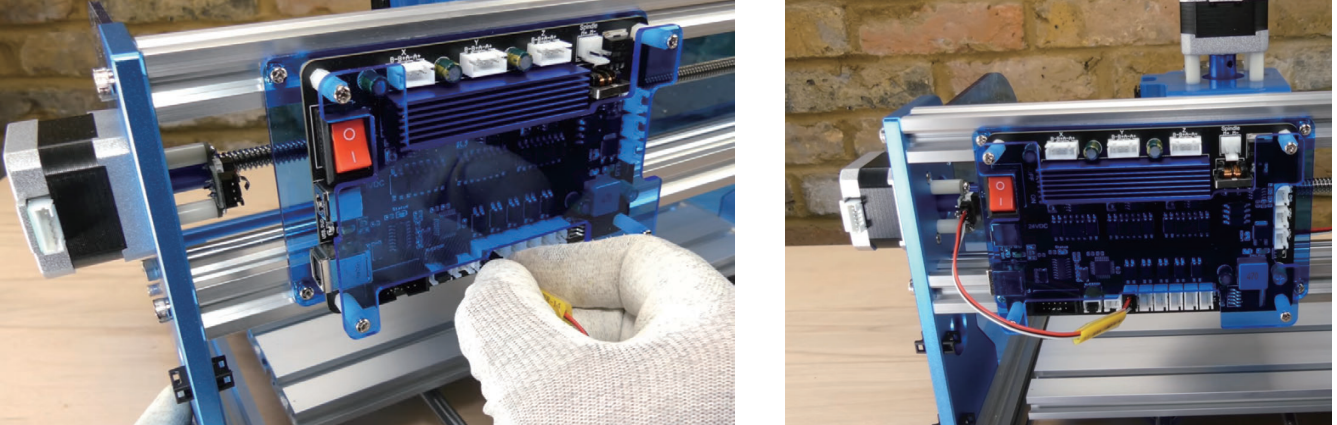
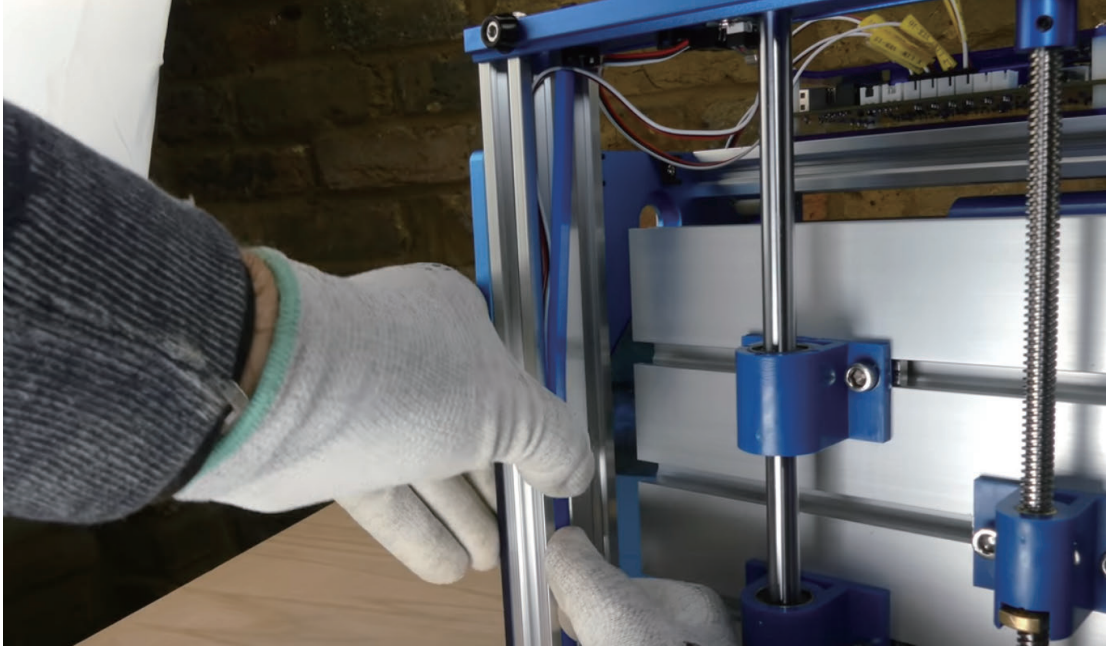
Install the Main Control Board
What you will need

- Step 1: Locate the four pre-drilled holes in the corners on the control board. Put on the M3 T-Slot nuts trough the holes into M4 8mm bolts. One turn only. Keep the nut loose and in horizontal position so that they can be inserted into the beams in step 2.
Step 2: Position the frame so that the back of the machine is facing you. Install the board by inserting (4) M3 20mm T-Slot nuts onto the top and bottom beams on the frame, like shown in the figure below.
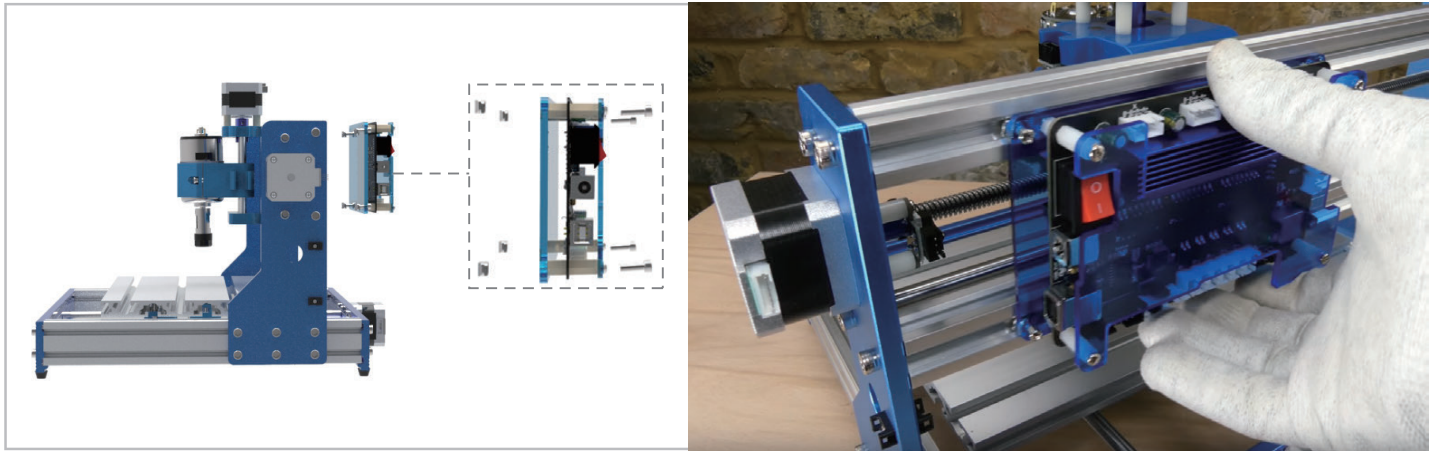
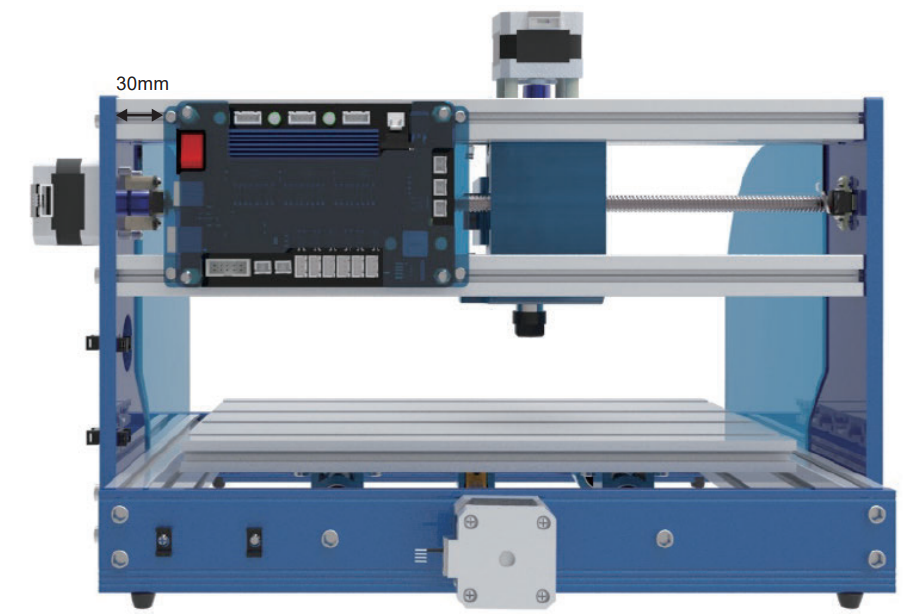
- Step 3: Slide the board horizontally to leave about 30mm of space between the board and the left edge of the machine as shown below.
Step 4: Now you can tighten all (4) 8mm bolts so the T-Slot nuts lock the board into the frame.
Connecting X-Axis Limit Switches
What you will need
Position the machine so that the main control board is facing you.
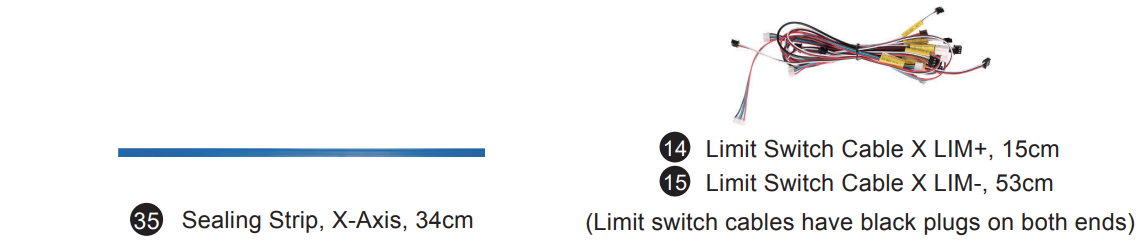
Step 1: Connect one end of the Limit Switch Cable X-LIM (+) (+ is near the stepper motor) to the X+ limit switch near the stepper motor, and connect the other end to the socket marked X-LIM (+) to the main control board (There are six white sockets toward the bottom of the board).
Step 2: Connect Limit Switch Cable X-LIM (-) to the X- limit switch on the right side. Run the cable behind the control board, along the top channel of the bottom beam, then loop around the control board. Plug the other end of the cable to the control board X-LIM(-) socket.
Step 3: Press the sealing strip (flat side out) over the cable into the top channel of the bottom beam.

Connecting Y-Axis Limit Switches
What you will need
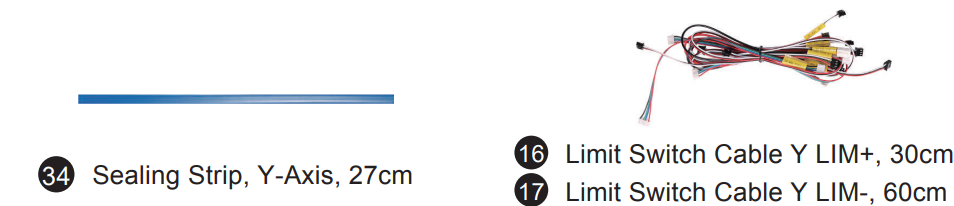
- Step 1: Connect one end of the Limit Switch Cable Y-LIM (+) to the Y+ limit switch (the one on the step motor side)
Step 2: Connect one end of the Limit Switch Cable Y-LIM (-) to the Y- limit switch
- Step 3: Connect both cables to the corresponding sockets on the control board
Step 4: Press the sealing strip (flat side out) over the Y- limit switch cable into the side beam.
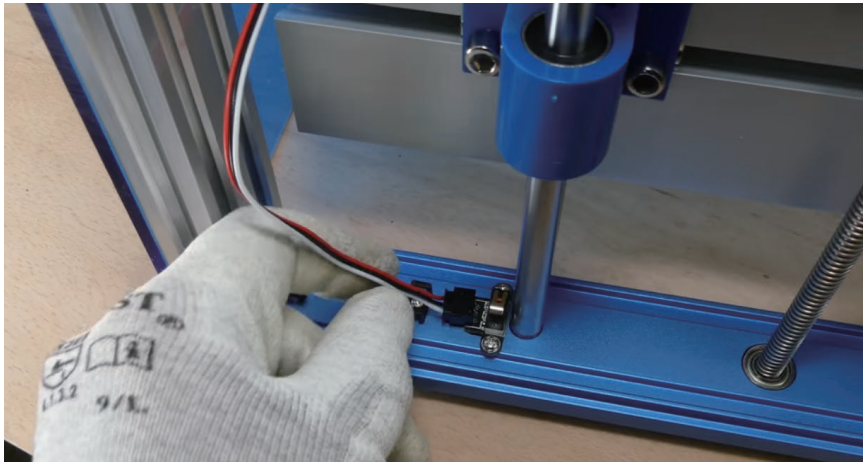
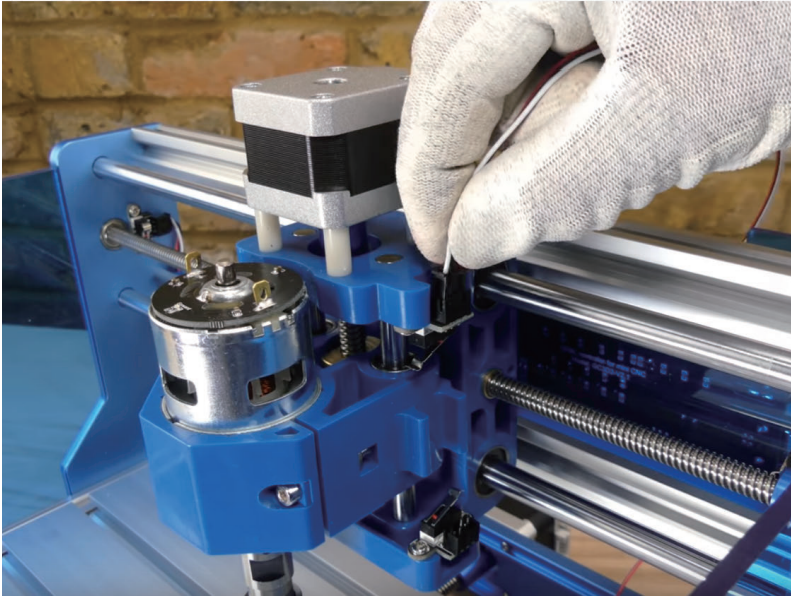
Connecting Z-Axis Limit Switches
What you will need
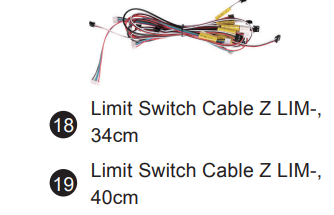
- Step 1: Insert the short Limit Switch Cable Z-LIM (+) into Z+ limit switch (on top, near the stepper motor). Connect the other end to main control board.
Step 2: Insert the long Limit Switch Cable Z-LIM (-) into Z- limit switch (toward the spindle holder). Connect the other end to main control board.
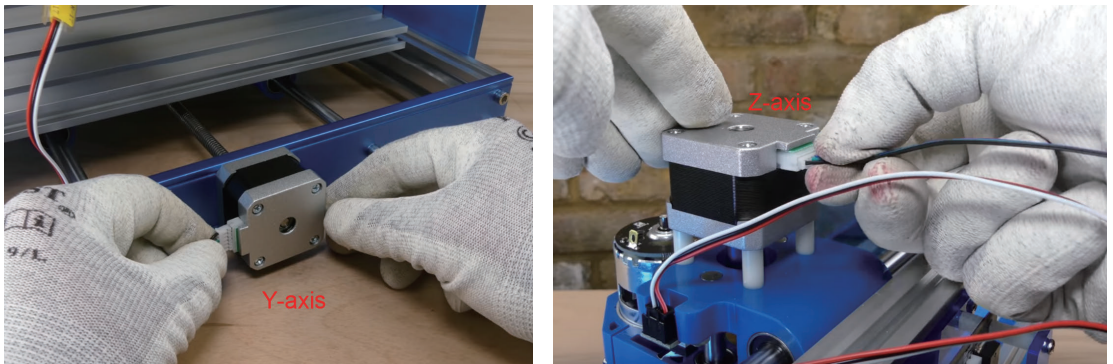
Connecting the Stepper Motor cables
What you will need

(Stepper Motor Cables are cables with white plugs on both ends)
Step 1: Locate all three stepper motors. X-Axis stepper motor is on the side of the machine. Y-Axis stepper motor is on the bottom of the machine in the back. Z-Axis stepper motor is on top of the machine. As shown in the photos below.

Step 2: Connect each stepper motor with the labeled cable to the main control board. Note that the end of 4-pin plug goes to the main board.
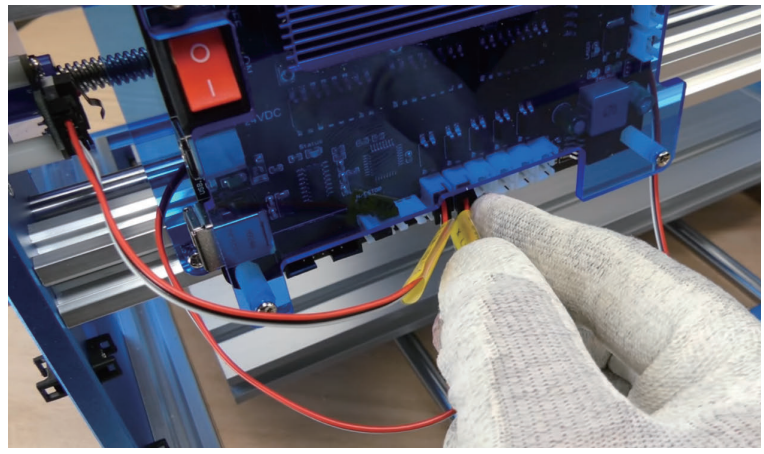
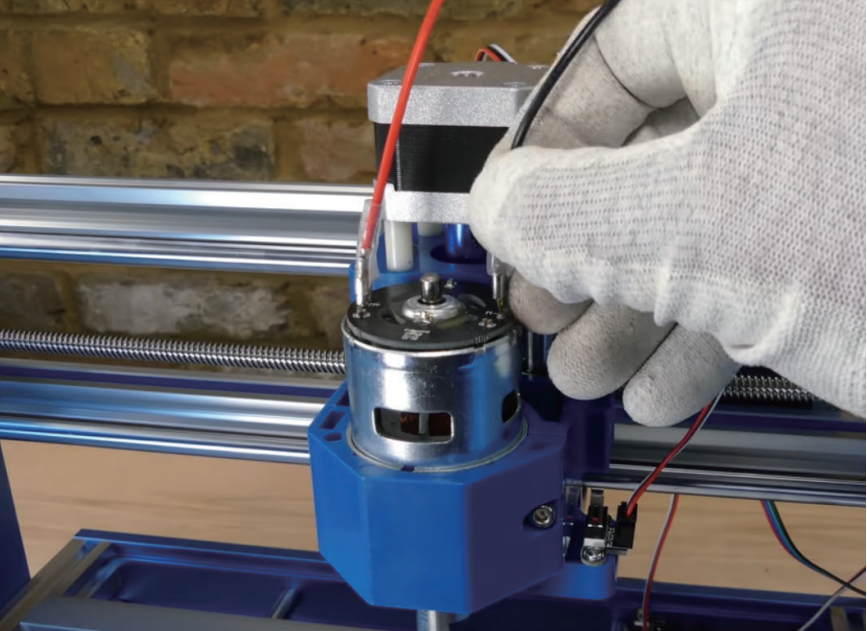
Connecting the Spindle cables
What you will need
- Step 1: Connect spindle cable to the top of the spindle, RED to M+ and BLACK to M-.
Step 2: Connect the other end of the spindle cable to the main control board.
Install the Emergency Stop button
What you will need

- Step 1: Remove black plastic nut and the square lock washer on the back side of the button.
Step 2: Insert Emergency button into the pre-cut hole underneath the X-Axis Stepper Motor. See Picture A.
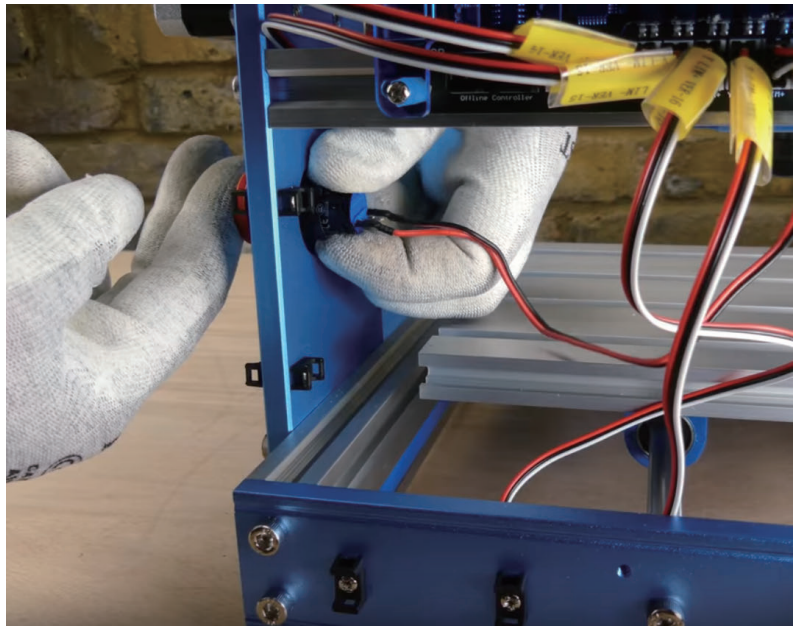
- Step 3: From the other side of the metal plate(inside), Install the square lock washer (with pointy corners facing the metal plate) then black plastic nut back onto the Emergency button and tighten down.
Step 4: Connect the cable to the main control board. See position show below.
Usage: Pushing the button will trigger emergency stop. The button will stay engaged once pushed. The button can only released when twisted clockwise. This prevents double pushing the button from releasing the trigger.
Troubleshooting
Hopefully everything works as expected, but if not:
| Symptom | Check |
|---|---|
| Candle shows a Serial port error message in the Console window | The USB cable is inserted correctly. The USB Driver has been installed correctly. The correct COM Port and a baud rate of 115200 are set in Candle. |
| Candle can communicate with the router but nothing moves. | The Offline Controller is not connected. Ensure the On/Off switch on the motherboard is ON. Verify the 24V external power supply is connected correctly. The Emergency Stop Button is in the Out position. |
| Router is totally unresponsive to Candle | The Stepper motor wiring is correct. The Stepper motors are connected to the correct motherboard ports. |
| An Axis does not move | The Stepper motor wiring is correct. The Stepper motors are connected to the correct motherboard ports. |
| The wrong Axis moves | The cable connections for the limit switch. The cable connections for the spindle motor. |
| Limit switch does not work | Limit switch connections and cabling. |
| Spindle motor does not turn | The Spindle motor cable Red wire is connected to M+ on the spindle motor and the Black wire to the M-. |
| Spindle motor turns but the LED does not light | The spindle is not too close to the edge of the axis. |
| Limit switch LED stays on | Limit switch connections and cabling. |
| Homing Cycle fails | The bit is conductive and clean. |
| Z-Probe fails | The Z-Probe connection to the motherboard is correct. Adjust the Z-Probe base height in the Z-Probe code accordingly. |
| After running a Z-Probe the tip of the bit is not level with the top of the bed | Adjust the Z-Probe base height in the Z-Probe code accordingly. |
Genmistu CNC Laser Machine 3018-PROVer Pros & Cons
Pros
- High precision and accuracy
- Easy to use and set up
- Compact and lightweight design
- User-friendly software
- Versatile and can handle a wide range of materials
Cons
- Laser power may not be sufficient for thicker materials
- Not suitable for heavy-duty or industrial use
- May require some technical knowledge to operate at an advanced level
Customer Reviews
Customers have praised the Genmistu CNC Laser Machine 3018-PROVer for its high precision and accuracy, easy setup and use, and compact design. They also appreciate the user-friendly software and the machine's versatility. However, some have noted that the laser power may not be sufficient for thicker materials and that it's not suitable for heavy-duty or industrial use. Overall, the Genmistu CNC Laser Machine 3018-PROVe has received positive feedback from its users.
Common Complaints
Some users have reported issues with the laser not cutting or engraving properly, but these can often be resolved by checking the focus lens, laser head, and power supply. Others have noted that the machine may require some technical knowledge to operate at an advanced level, but this is to be expected with any CNC laser machine.
Faqs
What is the 3018-PROVer Genmitsu CNC Laser Machine?
What supplies work well with this Genmistu CNC Laser Machine 3018-PROVer?
Does using the machine require any specific software?
How should I clean and maintain the machine?
Is it possible to engrave intricate designs with the machine?
If the machine is not cutting or engraving correctly, what should I do?
Leave a Comment