Hamilton Beach 2-Way Brewer Coffee Maker 7650 User Guide

Content
Introduction of Hamilton Beach Coffee Maker
Brewer Coffee Maker 7650 is a versatile coffee machine that allows you to brew a single cup or a full pot, catering to different needs and preferences. With its programmable features, users can set it up to brew coffee in advance, ensuring a fresh cup awaits them in the morning. The machine also offers customizable brew strength options for a personalized taste experience. Priced at approximately $59.99, it’s an excellent choice for coffee lovers.
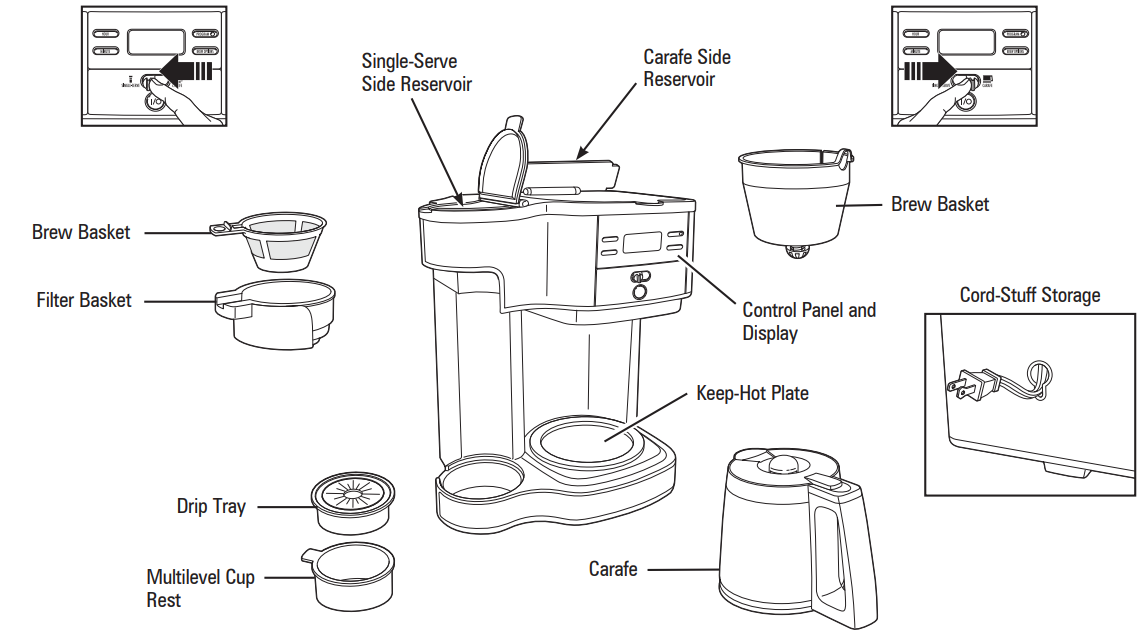
Single-Serve Side Parts and Features

Specifications
- 2-way brewing: Single-serve or full pot
- Programmable timer for automatic brewing
- Adjustable brew strength: Regular or bold
- Single-serve side: Uses standard K-cup pods or ground coffee
- Full pot side: 10-cup carafe with stainless steel thermal carafe option
- Easy-to-use interface with LED display
- Dishwasher-safe parts for easy cleaning
Description
The Hamilton Beach 2-Way combines the best of both worlds by offering the convenience of single-serve brewing alongside the traditional full pot method. The single-serve side can use either K-cup pods or ground coffee, allowing users to choose their preferred method. The full pot side features a 10-cup carafe that can also be replaced with a stainless steel thermal carafe for better heat retention. The programmable timer and adjustable brew strength settings add to its versatility, ensuring that users can customize their coffee to their liking.
How to Use Coffee Maker 7650
Single-Serve Side
NOTES
- The unit will only brew on one side at a time.
- To avoid overflow, use slightly less grounds when brewing decaf or flavored coffees.
WARNING: Burn Hazard.
To avoid contact with hot coffee or water:
- Do not use more than 14 ounces (414 ml) of water.
- Fill single-serve reservoir with mug or cup into which the coffee will be brewed.
- Fully insert mug or cup under filter basket.
AUTOMATIC SHUTOFF: The coffeemaker will automatically shut off after brew cycle is complete.

2. Push lever left to select Single- Serve.


- 7A-1 GROUNDS
For regular coffee, use a maximum of two level table-spoons of grounds. To avoid overflow, use slightly less grounds when brewing decaf or flavored coffees. WARNING! Keep ground coffee below MAX fill line to prevent overflow. - 7A-2 GROUNDS
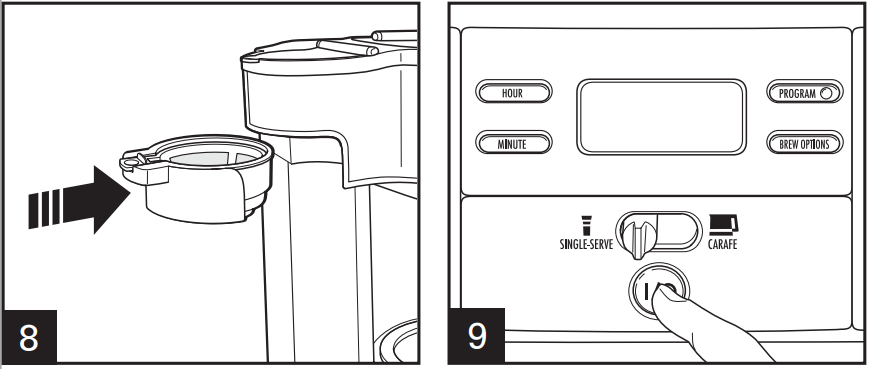
Single-serve brew basket has two markings: the lower level marking if making 8 oz. (237 ml) of coffee, and the higher level mark if making 14 oz. (414 ml) of coffee. DO NOT fill scoop to top or this will cause overflow. 9. Press the I/
 (ON/OFF) button to begin the flow of coffee. Coffeemaker will shut off when brew cycle is complete. To stop flow of coffee midcycle, press I/ (ON/OFF) button.
Carafe Side
AUTOMATIC SHUTOFF: The coffeemaker will automatically shut off 2 hours after brew cycle is complete.
NOTE: The unit will only brew on one side at a time.
- 2. Push lever right to select Carafe.
4. Lift lid and pour water from carafe into reservoir.

NOTE: Do not fill past the 12-cup mark (60 ounces [1.8 L]).
- 5. Place carafe, with carafe lid attached, on keep-hot plate.
- 7. Place a cupcake-style paper filter in brew basket. A permanent filter may also be used.
8. For each cup of coffee being made, place one level Tablespoon (15 ml) of coffee into filter.

- 9. Place brew basket in brew basket well. Ensure brew basket is fully seated.
- 10. For enhanced full/strong-flavored coffee, press BREW OPTIONS button until BOLD is displayed.
11. Press I/
 (ON/OFF) button to start. Press I/
 (ON/OFF) button again to turn off.
NOTE: If the coffeemaker is not turned off manually, it will auto-matically shut off in 2 hours.
NOTE: BOLD mode will require additional time to complete a brewing cycle. If Brew Option is not selected, the coffeemaker will automatically brew on the regular/default setting.
Programming
(For Either the Single-Serve OR Carafe Side)
NOTE: The unit will only brew on one side at a time.
- Press HOUR and then MINUTE to set clock.
- Hold PROGRAM until clock flashes.
- Continue holding PROGRAM button, press HOUR and MINUTE until the desired brewing start time is reached, and then release PROGRAM button.
Press PROGRAM to activate automatic brewing. A green LED will illuminate to indicate the unit is programmed.

Tips for Best-Tasting Coffee
- All coffees are made from either arabica beans or robusta beans, or some combination of both. Arabica beans are slightly more expensive, but tend to produce better-tasting coffee.
- Ground coffee will become stale much faster than whole beans. If buying preground coffee, choose a package with the latest expiration date or a smaller quantity.
- If grinding whole beans, set your coffee grinder on a fine/medium grind. This will yield the best-tasting grounds. Try to use freshly ground coffee within about a week of grinding.
- Using a water filter, filtered water, or bottled water will yield better-tasting coffee than tap water.
- Use approximately 1 Tablespoon of grounds for each cup of coffee being made. To avoid overflow, use slightly less grounds (3/4 Tablespoon [11.1 ml]) when brewing decaf or flavored coffees. Also, be aware that using coffee that is ground too finely may also cause the filter basket to overflow.
- Make sure your coffeemaker is clean.
Setup Guide
To set up your Hamilton Beach 2-Way Brewer,
- Start by unwrapping and assembling the parts. Place the carafe on the full pot side and ensure all other parts are securely in place.
- For single-serve brewing, insert your chosen K-cup or ground coffee into the single-serve basket.
- For full pot brewing, add ground coffee to the filter basket. Use the LED display to set your desired brewing time and strength.
- Plug in the coffee maker and follow on-screen instructions to complete any initial setup steps.
Care and Cleaning
Single-Serve Side
All coffeemakers should be cleaned at least once a month (once a week for areas with hard water).
- 1-2-3 Pour 1/2 cup (118 ml) of plain white vinegar and 1/2 cup (118 ml) of cold water into single-serve side reservoir.
4- Press I (ON) button. Press (OFF) button after 30 seconds and wait 30 minutes. Press I (ON) button. Press (OFF) button when finished.

5-6 Run 2–3 more brew cycles with CLEAN WATER only. Allow to cool between cycles.
DISHWASHER-SAFE
DO NOT use the “SANI” setting when washing in the dishwasher. “SANI” cycle temperatures could damage your product.
Carafe Side
All coffeemakers should be cleaned at least once a month (once a week for areas with hard water).
- 1-2-3 Pour 1 pint (2 cups/473 ml) vinegar into carafe side reservoir.
4- Press I (ON) button. Press (OFF) button after 30 seconds and wait 30 minutes. Press I (ON) button. Press (OFF) button when finished.

5-6 Run 2–3 more brew cycles with CLEAN WATER only. Allow to cool between cycles.

DISHWASHER-SAFE
DO NOT use the “SANI” setting when washing in the dishwasher. “SANI” cycle temperatures could damage your product.
IMPORTANT SAFEGUARDS
When using electrical appliances, basic safety precautions should always be followed to reduce the risk of fire, electric shock, and/or injury to persons, including the following:
- Read all instructions.
- This appliance is not intended for use by persons (including chil-dren) with reduced physical, sensory, or mental capabilities, or lack of experience and knowledge, unless they are closely super-vised and instructed concerning use of the appliance by a person responsible for their safety.
- Close supervision is necessary when any appliance is used by or near children. Cleaning and user maintenance shall not be made by children without supervision. Children should be supervised to ensure that they do not play with the appliance.
- Do not touch hot surfaces. Use handles or knobs. Care must be taken, as burns can occur from touching hot parts or from spilled, hot liquid.
- To protect against electric shock, do not place cord, plug, or coffeemaker in water or other liquid.
- Unplug from outlet when either the coffee maker or clock is not in use and before cleaning. Allow to cool before putting on or taking off parts and before cleaning the appliance.
- Coffeemaker must be operated on a flat surface away from the edge of counter to prevent accidental tipping.
- The use of accessory attachments not recommended by the appliance manufacturer may cause injuries.
- Do not operate any appliance with a damaged supply cord or plug, or after the appliance malfunctions or has been dropped or damaged in any manner. Supply cord replacement and repairs must be conducted by the manufacturer, its service agent, or similarly qualified persons in order to avoid a hazard. Contact Customer Service for information on examination, repair, or adjustment as set forth in the Limited Warranty.
- Do not use outdoors.
- Do not let cord hang over edge of table or counter or touch hot surfaces, including stove.
- Do not place on or near a hot gas or electric burner, or in a heated oven.
- Use only the carafe provided with the appliance.
- The carafe is designed for use with this coffeemaker. It must never be used on a range top or in a microwave oven.
- Do not set a hot carafe on a wet or cold surface.
- Do not use a cracked carafe or one with a loose or weakened handle.
- Do not clean carafe with cleansers, steel wool pads, or other abrasive materials.
- Do not use appliance for other than intended use.
- WARNING! To reduce the risk of fire or electric shock, do not remove the bottom cover of the coffeemaker. There are no user-serviceable parts inside. Repair should be done by authorized service personnel only.
- To disconnect, turn any control to the OFF ( ) position and then remove plug from wall outlet. To unplug, grasp the plug and pull from the outlet. Never pull from the power cord.
- Be certain carafe lid is securely in place during brew cycle and when pouring coffee. Do not use force when placing lid on carafe.
- Keep-Hot plate may remain hot after the coffee maker is turned off.
SAVE THESE INSTRUCTION
Other Consumer Safety Information
This appliance is intended for household use only.
WARNING Shock Hazard: This appliance has a polarized plug (one wide blade) that reduces the risk of electric shock. The plug fits only one way into a polarized outlet. Do not defeat the safety purpose of the plug by modifying the plug in any way or by using an adapter. If the plug does not fit fully into the outlet, reverse the plug. If it still does not fit, have an electrician replace the outlet.
The length of the cord used on this appliance was selected to reduce the hazards of becoming tangled in or tripping over a longer cord. If a longer cord is necessary, an approved extension cord may be used. The electrical rating of the extension cord must be equal to or greater than the rating of the appliance. Care must be taken to arrange the extension cord so that it will not drape over the countertop or tabletop where it can be pulled on by children or accidentally tripped over. To avoid an electrical circuit overload, do not use another high-wattage appliance on the same circuit with this appliance.
Troubleshooting
(Single-Serve Side)
| PROBLEM | PROBABLE CAUSE |
|---|---|
| Weak coffee | - Not enough ground coffee used. See "How to Use Single-Serve Side." |
| Coffee overflows from brew basket, travel mug, or regular mug | - Excessive amount of water in single-serve reservoir. Use a travel mug or mug into which coffee will be brewed to fill the reservoir. Use slightly less grounds when brewing decaffeinated or flavored coffees. Set coffee grinder to automatic drip grind. |
| Coffee tastes bad | - Coffeemaker needs cleaning. - Coffee ground too coarsely or too finely. Set coffee grinder to automatic drip grind. - Poor coffee quality and freshness. - Poor water quality (use filtered or bottled water). |
| Brew basket overflows or coffee brews slowly | - Excessive amounts of ground coffee. - Decaffeinated and/or coffee ground too finely can cause overflow. Set coffee grinder to automatic drip grind and use slightly less grounds. - Coffeemaker needs cleaning. If using a paper filter: - Coffee grounds between paper filter and brew basket. - Paper filter not open and in proper position. - Poor-quality paper filter. |
| Coffee leaks onto base | - Carafe removed from keep-hot plate for more than 20 seconds during the brewing cycle. |
| Coffee tastes bad | - Coffeemaker needs cleaning. - Coffee ground too coarsely or too finely. Set coffee grinder to automatic drip grind. - Coffee-to-water ratio unbalanced. Adjust for personal preference. - Poor coffee quality and freshness. - Poor water quality (use filtered or bottled water). |
| Coffee sediment in cup | - Use a high-quality, basket-style paper filter instead of optional permanent coffee filter. |
| Coffee not brewing or unit will not turn on | - Carafe not positioned on keep-hot plate. - Water reservoir is empty. - Unit is unplugged. - Power outage. - Power surge. Unplug, then plug the unit back in. - Clock requires reset after power outage. |
| Longer than normal brew time | - Mineral deposits can build up in the pump of your coffeemaker. Periodic cleaning of the inside of the unit is recommended. More frequent cleaning may be necessary, depending on the hardness of your water. See "Care and Cleaning – Carafe Side" section. NOTE: Do not disassemble the unit. |
Pros & Cons
Pros
- Flexible brewing options (single serve and full pot)
- Compact design suitable for small spaces
- Programmable timer and adjustable brew strength
- Easy-to-use interface with LED display
- Dishwasher-safe parts for easy cleaning
Cons
- No built-in grinder for fresh beans
- Some users find it noisy during operation
- Limited capacity on single-serve side compared to other models
Customer Reviews
Customers generally praise the Hamilton for its versatility and ease of use. Many appreciate the ability to switch between single-serve and full pot brewing, making it a great option for households with varying coffee needs. However, some users have noted that it can be noisy during operation and that there is no built-in grinder for fresh beans.
The most common complaints include issues with the machine's longevity and occasional problems with coffee leakage from the carafe.
Hamilton Beach 2-Way Brewer Coffee Maker 7650 Warranty
This product is warranted to be free from defects in material and workmanship for a period of five (5) years from the date of original purchase in Canada and one (1) year from the date of original purchase in the U.S. During this period, your exclusive remedy is repair or replacement of this product or any component found to be defective, at our option; however, you are responsible for all costs associated with returning the product to us and our returning a product or component under this warranty to you. If the product or component is no longer available, we will replace with a similar one of equal or greater value.
Faqs
How do I clean the Hamilton Beach?
Can I use ground coffee in the single-serve side?
Why does my coffee not taste as strong as I like?
Is the Hamilton Beach 2-Way Brewer Coffee Maker 7650 compatible with all K-cup pods?
How much counter space does the coffee maker require?
Can I program my coffee to brew at a specific time?
What type of carafe comes with this coffee maker?
How often should I descale my coffee maker?
Does this coffee maker come with any additional accessories?
Leave a Comment
