Hamilton Beach Automatic Pasta Maker 86650 User Manual | Feature
Content
Hamilton Beach Automatic Pasta Maker 86650 Introduction
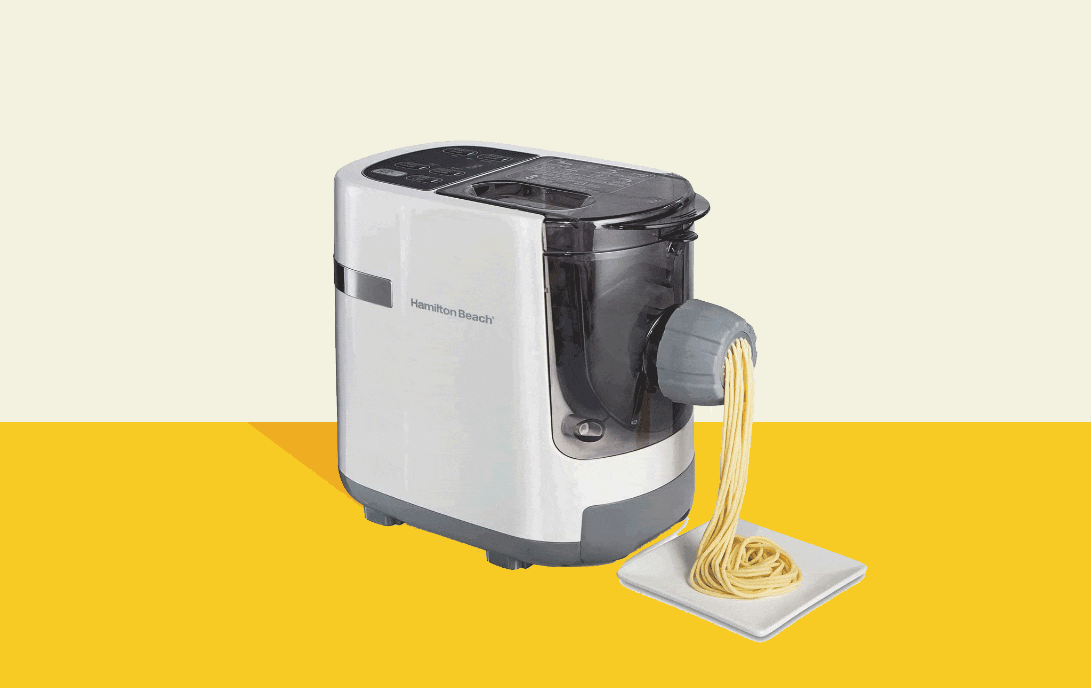
The Hamilton Beach Automatic Pasta Maker 86650 is a revolutionary kitchen appliance designed to make pasta making a breeze. Launched in recent years, this product has quickly gained popularity among home cooks and pasta enthusiasts alike. With an estimated price ranging from $100 to $200, it offers an affordable solution for those who want to create fresh, homemade pasta without the hassle of manual rolling and cutting.
This pasta maker is engineered to simplify the pasta-making process, allowing users to focus on other aspects of cooking. Its automatic features ensure consistent results, making it ideal for both beginners and experienced cooks. Whether you're looking to create spaghetti, fettuccine, or any other type of pasta, the Hamilton Beach Automatic Pasta Maker 86650 is your go-to tool.
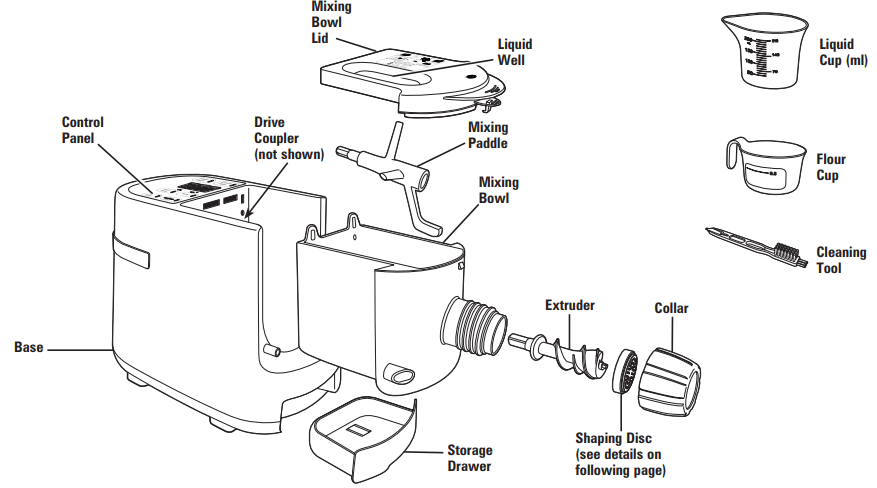
Parts and Features
BEFORE FIRST USE: Wash all removable parts in hot, soapy water. Rinse and dry. Wipe base clean with a damp, soft towel. Do not immerse base in water or other liquid.
Shaping Discs

Control Panel

Manual Modes
- Knead Dough – Use to mix ingredients.
- Extrude Pasta – Use to extrude noodles through Shaping Disc.
Status Indicators
- Progress Bar – The progress bar will illuminate according to the stage.
- Digital Display – Displays weight of dry ingredients, amount of liquid to be added, and kneading time remaining.
- Flour (g), Water (ml) – The light below the word will illuminate to indicate which ingredient’s measurement is being displayed.
Preset Programs
- Quick Pasta – Automatically mixes/kneads the ingredients before extruding, then stops when program is complete. Program takes 15–18 minutes.
- Pasta – Automatically mixes/kneads the ingredients and provides a rest period before extruding, then stops when program is complete. Program takes 20–30 minutes.
Command Buttons
- Zero Scale – Tares (zeros) the integrated scale used to weigh the flour or other dry ingredients. NOTE: Scale measures in grams only.
- Start/Stop – Press to start or stop the Pasta Maker.
Specifications
The Hamilton Beach Automatic Pasta Maker 86650 boasts several key features that make it a standout in its category:
- Automatic Operation: The machine automatically kneads, rolls, and cuts the dough into perfect pasta shapes.
- Multiple Settings: Choose from various settings to create different types of pasta, including spaghetti, angel hair, and fettuccine.
- Ergonomic Design: The compact and lightweight design makes it easy to store and use in any kitchen.
- Easy Cleanup: Detachable parts are dishwasher safe for convenient cleaning.
- High-Quality Materials: Constructed with durable materials to ensure long-lasting performance.
Before You Start
With this Pasta Maker, you can create homemade pasta quicker, easier, and with less mess. Using the Pasta Maker is different from making pasta dough by hand, specifically when it comes to dough consistency. The pasta may be a little dry at the beginning of extrusion. As the Mixing Paddle continues to work the ingredients, the dough will become more pliable. If desired, simply trim off the first inch and discard.
The best part of making your own pasta is the ability to experiment; you can add spinach juice or purée, olive oil, chili peppers, ginger…the list is endless. This guide includes several recipes where the liquid-to-flour ratio may vary from the Simple Pasta Recipe below. This will happen when you use ingredients other than all-purpose flour, water, or eggs. Remember that the ratios below are only a guide when branching out to different ingredients; use the dough consistency tips below to help you find the right ratio for your recipe.
Simple Pasta Recipe
Ratios below use all-purpose flour and water. Ratio may vary if other types of flours and liquids are used.
Pasta Amount | Flour Weight | Liquid Volume |
Approx. 1 lb | 400 g | 135 ml |
Approx. 1.5 lbs | 600 g | 200 ml |
TIPS
- See page 7 for pasta recipes using eggs. Eggs provide liquid, as well as helping to give pasta a smooth texture and enriching the flavor.
- You may wish to lightly flour the pasta as it extrudes to prevent sticking.
- For smoother pasta, add 3–5 ml oil with liquid.
- For chewier pasta, add 3–5 g salt.
Identifying the Correct Dough Consistency

- Too dry
Add 5–10 ml liquid and continue to mix. Press KNEAD DOUGH button, if necessary. - Just right
Dough should be moist and crumbly, not a soLid mass. Dough will look dry compared to handmade dough, but will form a tight consistency when extruded. - Too wet
Press START/STOP button and unplug. Remove Lid and break up any clumps or balls of dough with your hands. Add 2 tablespoons (30 ml) of flour to dough. Replace Lid and plug back in. Press KNEAD DOUGH, then START/STOP button. Repeat as necessary for desired consistency.
Hamilton Beach Automatic Pasta Maker 86650 Recipes
Spinach Pasta
Yield: 1 pound pasta
- 425 g all-purpose flour
- 1/2 cup (120 ml) spinach purée (see recipe below)
- 1 large egg, beaten
- 1 tablespoon (15 ml) water
Instructions
- Follow directions to assemble and tare the Pasta Maker. Add flour and spinach purée to the Pasta Maker Mixing Bowl.
- Attach the Lid and snap to close. Select PASTA and press START/STOP.
- Combine egg and water in a Liquid Measuring Cup. Pour the egg mixture into the Pasta Maker Liquid Well. Use a small rubber spatula to assist in draining the egg mixture through the Liquid Well.
- If the mixture appears dry during kneading, add 5 to 10 ml of water.
- Cut pasta to the desired length. Cook the pasta in salted boiling water for 3–4 minutes or until tender. Wrap and store unused pasta in the freezer.
To make spinach purée:
Add 8 oz. (250 ml) fresh baby spinach to a microwave-safe bowl and sprinkle with 2 tablespoons (30 ml) of water. Cover and cook on High in the microwave until the spinach is wilted and bright green. Blend in a food processor or food chopper until smooth. Allow it to cool before using to make pasta.
Whole Wheat Pasta
Yield: 1 pound pasta
- 400 g whole wheat flour
- 2 large eggs, beaten
- 1/4 cup (60 ml) water
Instructions
- Follow directions to assemble and tare the Pasta Maker. Add flour to the Pasta Maker Mixing Bowl.
- Attach the Lid and snap to close. Select PASTA and press START/STOP.
- Combine eggs and water in a Liquid Measuring Cup. Pour the egg mixture into the Pasta Maker Liquid Well. Use a small rubber spatula to assist in draining the egg mixture through the Liquid Well.
- If the mixture appears dry during kneading, add 5 to 10 ml of water.
- Cut pasta to the desired length. Cook the pasta in salted boiling water for 3–4 minutes or until tender. Wrap and store unused pasta in the freezer.
Simple Egg Pasta
Pasta Amount | Flour Weight | Liquid Volume Water mixed with egg (one large egg = 50 ml) |
1 pound | 400 g | 140 ml (90 ml water+ 50 ml egg) |
1.5 pounds | 600 g | 210 ml (160 ml water+ 50 ml egg) |
Gluten-Free Beet Pasta
Yield: 1 pound pasta
- 400 g gluten-free flour or brown rice flour
- 1 tablespoon (15 ml) xanthan gum
- 2 large eggs, beaten
- 6 tablespoons (89 ml) beet juice
Instructions
- Follow directions to assemble and tare the Pasta Maker. Add flour and xanthan gum to the Pasta Maker Mixing Bowl.
- Attach the Lid and snap to close. Select PASTA and press START/STOP.
- Combine eggs and beet juice in a Liquid Measuring Cup. Pour the egg mixture into the Pasta Maker Liquid Well. Use a small rubber spatula to assist in draining the egg mixture through the Liquid Well.
- If the mixture appears dry during kneading, add 5 to 10 ml of beet juice.
- Cut pasta to the desired length. Cook the pasta in salted boiling water for about 3 minutes or until tender. Wrap and store unused pasta in the freezer.
Description
The Hamilton Beach Automatic Pasta Maker 86650 is a modern kitchen appliance that combines functionality with ease of use. Its sleek design fits well in any kitchen, making it a versatile tool for pasta lovers. The machine comes with multiple attachments and settings, allowing users to experiment with various types of pasta. The automatic kneading and rolling functions ensure that the dough is perfectly prepared, while the cutting mechanism delivers uniform cuts every time.
This product is perfect for those who value convenience without compromising on quality. It's an excellent addition to any kitchen, whether you're a novice cook or an experienced chef.
Using the Pasta Maker
- With the Mixing Bowl removed from the base, insert the Mixing Paddle into the bowl, extending the metal end through the opening at the rear of the bowl.
- SLide the Mixing Bowl onto the base, aligning the Mixing Paddle with the Drive Coupler. You may need to slightly rotate the Mixing Paddle for the Mixing Bowl to sLide in flush against the base.
- Insert Extruder, small end first, into the barrel end of the Mixing Bowl. Align the Extruder so that it fits into the end of the Mixing Paddle.
Select a Shaping Disc and position it on the barrel end, aligning the ribs on the barrel with the features on the disc. The ribs on the barrel prevent rotation of the disc during extrusion.

- Hold the Shaping Disc in place while securing the Collar by rotating it clockwise.
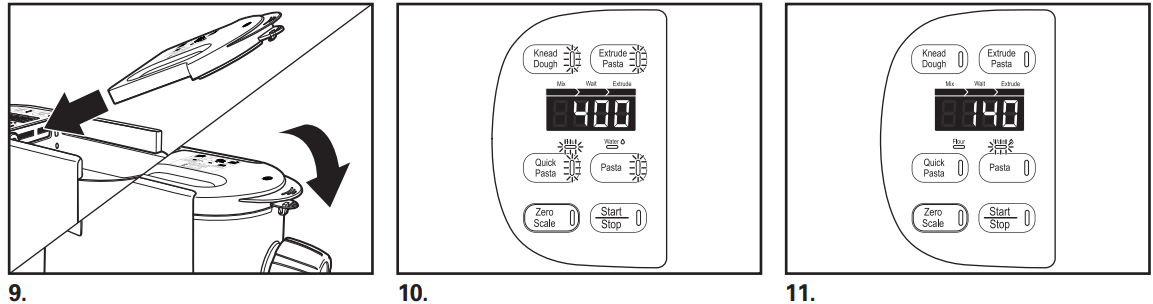
- Plug into outlet; the Pasta Maker will chime once plugged in, and the Control Panel will light up.3
- Press the ZERO SCALE button to tare the scale. The display will show “0” when taring is complete. Keep hands clear of Pasta Maker while zeroing the scale and adding dry ingredients.
Add flour or other dry ingredients to the Mixing Bowl according to your selected recipe. The weight (in grams) of the ingredients will be displayed.

- With the Mixing Bowl Lid at an angle, align the tabs at the end of the Lid with the slots on the base. Push down on the Lid until it snaps into place.
- Select the desired program: Quick Pasta or Pasta.
The display will indicate the amount of liquid in milliliters (ml) to add to the Mixing Bowl.
To measure the liquid amount using the provided measuring cup:- Break any eggs into the cup and beat the eggs until smooth.
- Add water, juice, or purée to the measuring cup until the amount indicated on the display is reached.
NOTE: The liquid volume measurement displayed on the scale will NOT change as the liquid is poured into the Pasta Maker.
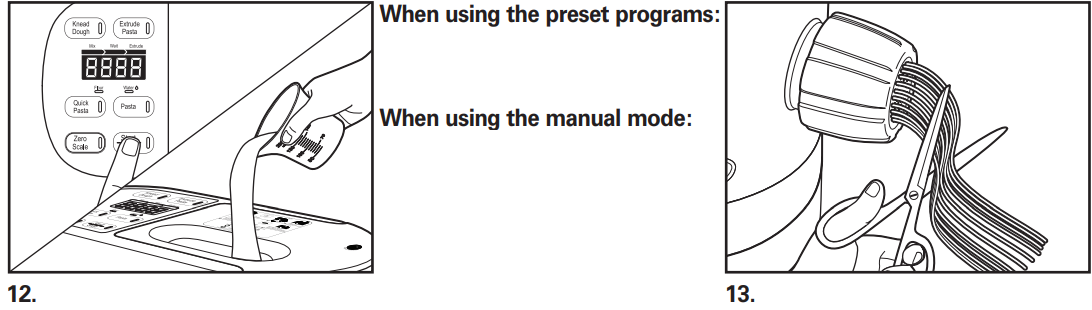
- Press the START/STOP button. Slowly pour the liquid from the measuring cup through the Liquid Well in the Lid. Use a spatula to push any remaining egg through Liquid Well.
When using the preset programs: The Pasta Maker will automatically extrude the pasta through the Shaping Disc.
When using the manual mode: Kneading will stop automatically after 5 minutes. You can stop kneading at any time by pressing the Start/Stop button. Press the EXTRUDE PASTA button when ready to extrude. Cut pasta to desired length as it extrudes. After all pasta is extruded, the Pasta Maker will stop automatically. Unplug from outlet before removing or cleaning parts.
NOTES
- Once pasta is extruded, either cook pasta immediately, store in an airtight container in refrigerator for up to 3 days, or store in a freezer-safe container in the freezer for up to 3 months.
- To cook pasta, cook in salted boiling water until it floats, then check for doneness.
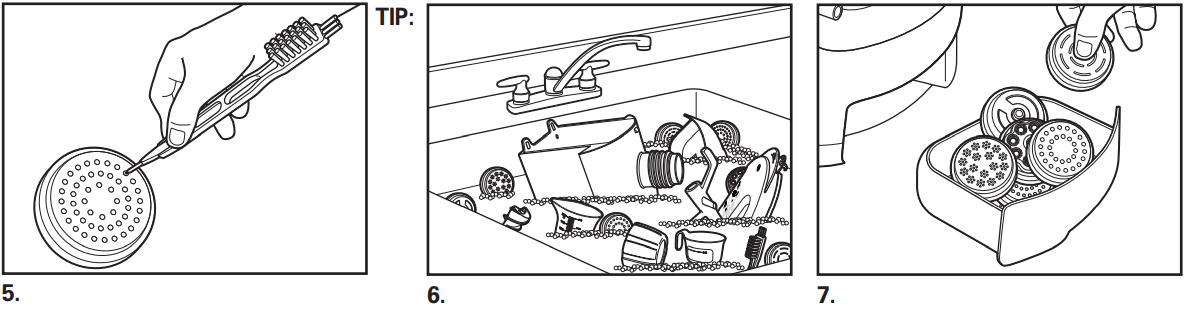
Care and Cleaning
- Unplug. Remove Collar by turning counterclockwise, then remove Shaping Disc.
- Open Lid and remove.
TIP: For easier cleaning, allow the dough to dry before using the cleaning tool. If dough will not come out easily, place disc in the freezer for 30–60 minutes, then try again. - Remove Extruder by pushing it out of the barrel with your thumb, then pulling it out the rest of the way from the front of the bowl.
SLide Mixing Bowl away from base, then remove Mixing Paddle.

- Use the cleaning tool to poke out any remaining pieces of dough from the Shaping Disc.
- Wash the removable parts in hot, soapy water. Rinse and dry thoroughly before storing, or wash in the top rack of the dishwasher. Wipe base with a soft damp cloth, then dry.
Store the Shaping Discs in the Storage Drawer located at the bottom of the base.
Setup Guide
To operate the Hamilton Beach Automatic Pasta Maker 86650, follow these steps:
- Assembly: Attach the kneading and cutting attachments according to the user manual.
- Configuration: Select the desired pasta type and thickness setting.
- Operation: Feed the dough into the machine, and it will automatically knead and cut it into perfect pasta shapes.
- Clean Up: Detach the parts and wash them in a dishwasher or by hand for easy maintenance.
IMPORTANT SAFEGUARDS
When using electrical appliances, basic safety precautions should always be followed to reduce the risk of fire, electric shock, and/or injury to persons, including the following:
- Read all instructions.
- This appliance is not intended for use by children or by persons with reduced physical, sensory, or mental capabilities, or lack of experience and knowledge, unless they are closely supervised and instructed concerning use of the appliance by a person responsible for their safety.
- Close supervision is necessary when any appliance is used near children. Children should be supervised to ensure that they do not play with the appliance.
- To protect against risk of electric shock, do not immerse cord, plug, or motor base in water or other liquid.
- Turn the appliance OFF, then unplug from the outlet when not in use, before assembling or disassembling parts, and before cleaning. To unplug, grasp the plug and pull from the outlet. Never pull from the power cord.
- Avoid contacting moving parts. Do not operate without a Shaping Disc in position.
- Always make sure the pasta maker is properly and completely assembled before the motor is turned ON.
- Do not operate any appliance with a damaged supply cord or plug, or after the appliance malfunctions or has been dropped or damaged in any manner. Supply cord replacement and repairs must be conducted by the manufacturer, its service agent, or similarly qualified persons in order to avoid a hazard. Call the provided customer service number for information on examination, repair, or adjustment.
- The use of attachments not recommended or sold by the appliance manufacturer may cause fire, electric shock, or injury.
- Do not use outdoors.
- Do not let cord hang over edge of table or counter, or touch hot surfaces, including stove.
- Do not place on or near a hot gas or electric burner, or in a heated oven.
- Do not leave the pasta maker unattended while it is operating.
- Do not use the appliance if the mixing paddle, extruder, shaping disc, collar, or any part of the mixing bowl is damaged.
- Always use the pasta maker on a dry, level surface.
- Do not attempt to defeat the cover interlock mechanism.
SAVE THESE INSTRUCTIONS
Other Consumer Safety Information
This appliance is intended for household use only.
WARNING Electrical Shock Hazard: This appliance is provided with a polarized plug (one wide blade) to reduce the risk of electric shock. The plug fits only one way into a polarized outlet. Do not defeat the safety purpose of the plug by modifying the plug in any way or by using an adapter. If the plug does not fit fully into the outlet, reverse the plug. If it still does not fit, have an electrician replace the outlet.
The length of the cord used on this appliance was selected to reduce the hazards of becoming tangled in or tripping over a longer cord. If a longer cord is necessary, an approved extension cord may be used. The electrical rating of the extension cord must be equal to or greater than the rating of the appliance. Care must be taken to arrange the extension cord so that it will not drape over the countertop or tabletop where it can be pulled on by children or accidentally tripped over.
Troubleshooting
The Pasta Maker may display an error message from time to time. Use the table below to quickly resolve the issue.
Error Code | Situation | Solution |
E02 | Mixing bowl Lid is not in place. | Make sure Lid is snapped ontoMixing Bowl. |
E14 | Too much flour in the Mixing Bowl. | Remove some flour from Mixing Bowl. |
E16 | No liquid in the Mixing Bowl. | Add correct amount of liquid. |
E04, E05, E09, E15, E17 | Call Customer Service at 1.800.851.8900. | |
none | Dough is too wet. |
|
none | Dough is too dry. | Add 5–10 ml liquid and continue to mix. Press KNEAD DOUGH button, if necessary. |
If the Pasta Maker stops working:
- Unplug.
- Wait 5 seconds, and then plug back into outlet.
- Use Manual Mode to finish kneading or extruding pasta.
Warranty
This warranty applies to products purchased and used in the U.S. and Canada. This is the only express warranty for this product and is in lieu of any other warranty or condition. This product is warranted to be free from defects in material and workmanship for a period of five (5) years from the date of original purchase in Canada and one (1) year from the date of original purchase in the U.S. During this period, your exclusive remedy is repair or replacement of this product or any component found to be defective, at our option; however, you are responsible for all costs associated with returning the product to us and our returning a product or component under this warranty to you. If the product or component is no longer available, we will replace with a similar one of equal or greater value.
Hamilton Beach Automatic Pasta Maker 86650 Pros & Cons
Pros
- Easy to Use: Automatic features make pasta making simple and hassle-free.
- Versatile: Multiple settings for different types of pasta.
- Compact Design: Perfect for kitchens with limited space.
- Easy Cleanup: Detachable parts are dishwasher safe.
Cons
- Noisy Operation: Some users find the machine to be quite loud during operation.
- Dependence on Quality Dough: The machine works best with high-quality dough.
- Additional Cost for Attachments: Some attachments may need to be purchased separately.
Customer Reviews
Customers have generally praised the Hamilton Beach Automatic Pasta Maker 86650 for its ease of use and consistent results. However, some have noted that it can be noisy and requires high-quality dough to function optimally.
A common complaint is the need for occasional cleaning to prevent clogging, but overall, users appreciate the convenience and quality of homemade pasta it provides.
Faqs
How do I assemble the Hamilton Beach Automatic Pasta Maker 86650?
What types of pasta can I make with this machine?
How do I clean the machine after use?
Why is my pasta not coming out consistently?
Is it safe to use this machine?
Can I use this machine for gluten-free pasta?
How long does it take to make pasta with this machine?
Do I need any additional tools or attachments?
Is there a warranty on this product?
Can I use this machine for other kitchen tasks?
Leave a Comment