Hobart Welding Helmets Pro Series User Manual | How to Wear
Content
Introduction
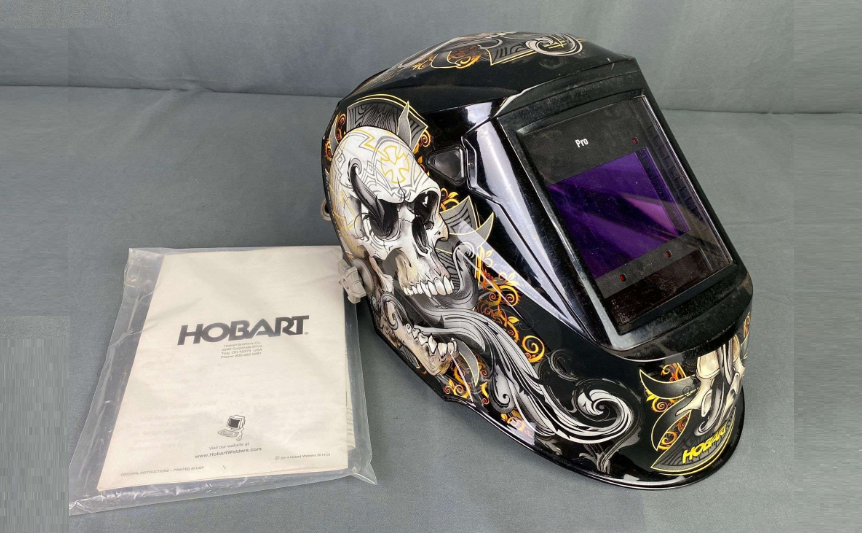
The Hobart Welding Helmets Pro Series is a high-quality line of welding helmets designed for professional welders and hobbyists alike. These helmets offer advanced features such as auto-darkening technology, adjustable sensitivity controls, and a wide viewing area for maximum visibility. The estimated price range for the Pro Series is $200 to $400, making it a mid- to high-end investment for welders. The exact launching date is not specified, but it is currently available for purchase on the Hobart website and through various retailers.
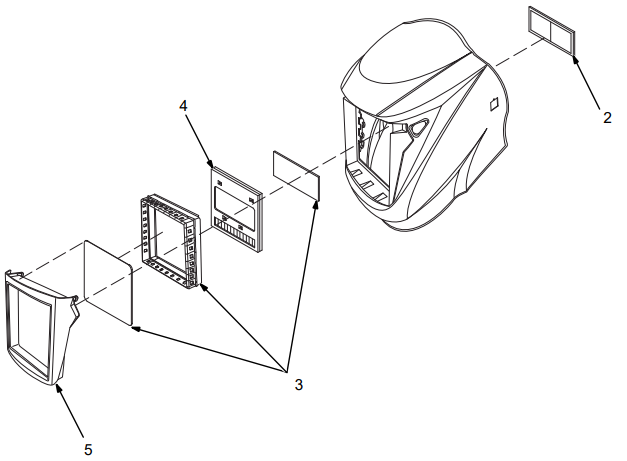
Hobart Welding Parts List
| Number | Part Number | Description | Quantity |
|---|---|---|---|
| 1 | 770759 | Headgear, Gray | 1 |
| 2 | 770274 | Diopter Lens 150X | 1 |
| 770275 | Diopter Lens 175X | 1 | |
| 770276 | Diopter Lens 200X | 1 | |
| 770277 | Diopter Lens 250X | 1 | |
| 3 | 770612 | Cover Lens (Includes Front Lens Cover Gasket, Front Lens Covers, 2 Inside Lens Covers) | 1 |
| 4 | 770764 | Auto-Darkening Lens | 1 |
| Battery, Lithium CR2450 (Not Shown) | 2 | ||
| 5 | 770615 | Front Lens Holder | 1 |

Specifications of Hobart Welding Helmets Pro Series
| Viewing Field | 3.82 x 2.36 in. (97 x 60mm) |
| Reaction Time | 0.0000333sec (1/30,000) |
| Available Shades | Darkened State: No.8 − No. 13 / Light State: No. 3 provides continuous UV and IR protection |
| Sensitivity/Grind Mode Control | Adjusts for varying ambient light and welding arc |
| Delay Control | Slows lens dark-to-light state between 0.1 and 1.0 seconds |
| Automatic Power Off | Shuts lens Off 15−20minutes after last arc is struck |
| Low Battery Indicator | Red LED light illuminates to indicate 2−3 days remaining battery life |
| Power Supply | CR2450 Lithium Batteries (Two Required) |
| Sensors | Independent/Redundant (Four) |
| Operating Temperature | 23°F to 131°F / −5°C to +55°C When stored in extremely cold temperatures, warm helmet to ambient temperature before welding. |
| Storage Temperature | −14°F to 158°F / −10°C to +70°C When stored in extremely cold temperatures, warm helmet to ambient temperature before welding. |
| Total Weight | 19.9 oz. (565 g) |
| Standards | ANSI Z87.1-2010 and DIN/CSA/TUV |
| Warranty | Two years from date of purchase (see Section 11) |
OPERATING INSTRUCTIONS
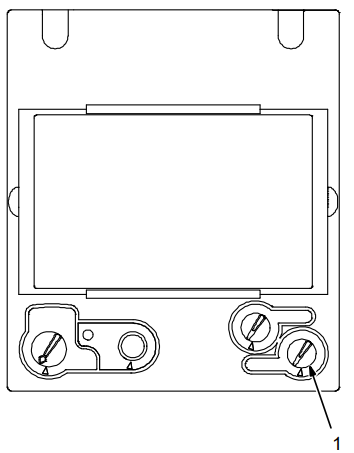
Hobart Welding Helmets Pro Series Controls
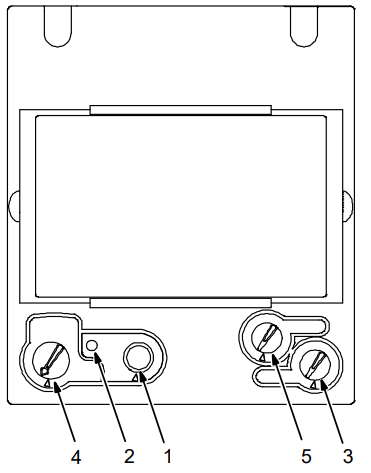
- Reset Button
- Low Battery Indicator
- Variable Shade Control
- Sensitivity/Grind Mode Control
- Lens Delay Control
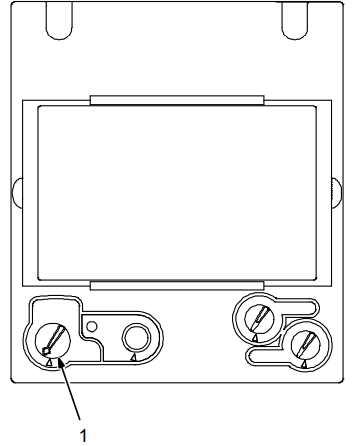
Reset Button And Low Battery Indicator

- Reset Button
Press Reset button to check if the lens is working properly.
When the Reset button is pressed, the lens should darken twice and return to the clear state. Do not use the helmet if the lens does not function as de-scribed. - Low Battery Indicator
The low battery indicator lights when 2−3 days of battery life re-main.
If battery power is low, install new CR2450 lithium batteries.
Lens Delay Control
The lens delay control is used to ad-just the time for the lens to switch to the clear state after welding. The delay is particularly useful in eliminating bright after-rays present in higher amperage applications where the molten puddle remains bright momentarily after welding. Lens delay adjusts from min (0.10 second) to max (1.0 second).
Variable Shade Control
Use the control to adjust the lens shade in the darkened state to select proper shade control setting based on your welding process. Start at shade 12 and adjust lighter to suit the welding application and your personal preference.
Sensitivity/Grind Mode Control
Weld Mode
Use control to make the lens more responsive to different light levels in various welding processes. Use a Mid-Range or 30−50% sensitivity setting for most applications. It may be necessary to adjust helmet sensitivity to accommodate different lighting conditions or if lens is flashing On and Off. Ad-just helmet sensitivity as follows:
Adjust helmet sensitivity in lighting conditions helmet will be used in.
- Turn sensitivity control to lowest setting.
- Press Reset button to turn helmet On. Helmet lens will darken twice and then clear.
- Face the helmet in the direction of use, exposing it to the surrounding light conditions.
- Gradually turn sensitivity setting clock- wise until the lens darkens, then turn sensitivity control counterclockwise until slightly past setting where lens clears. Helmet is ready for use. Slight readjustment may be necessary for certain applications or if lens is flashing on and off.
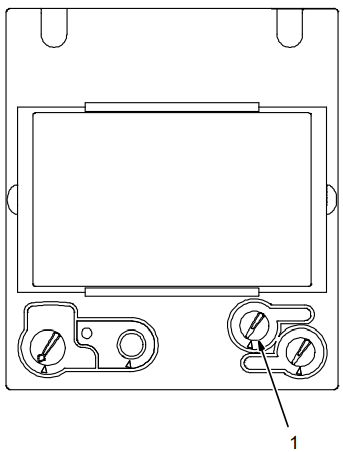
Grind Mode
Do not weld in the Grind mode; the lens will not darken. To use the Grind mode, turn the Sensitivity control clockwise to the far right position (Grind). To resume welding, return the con-trol to the desired sensitivity setting.
Recommended Sensitivity Settings
| Stick Electrode | Mid-Range |
| Short Circuiting (MIG) | Low/Mid-Range |
| Pulsed &Spray (MIG) | Mid-Range |
| Gas Tungsten Arc (TIG) | Mid/High-Range |
| Plasma Arc Cutting/Welding | Low/Mid-Range |
| Grind Mode | Grind Position − Far Right(Clockwise) |
Adjusting Headgear of Hobart Welding
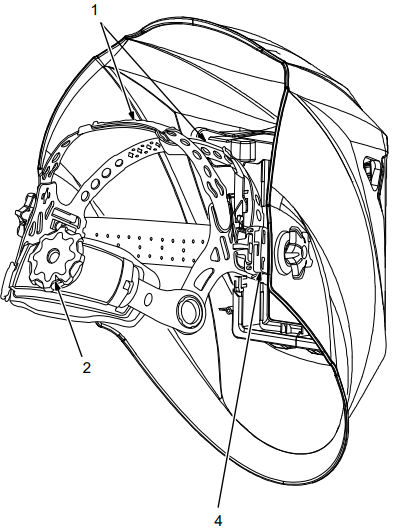
- Headgear Top
Adjusts headgear for proper depth on the head to ensure correct balance and stability. - Headgear Tightnes
To adjust, turn the adjusting knob located on the back of the headgear left or right to desired tightness. - Angle Adjustment (Not Shown)
Seven slots on the right side of the headband provide ad-justment for the forward tilt of the helmet. To adjust, lift and reposition the control arm to the desired position. - Distance Adjustment
Adjusts the distance be-tween the face and the lens. To adjust, press black tabs on the top and bottom of the pivot point and use other hand to slide headgear for-ward or backward. Release tabs. (Both sides must be equally positioned for proper vision.)
REPLACING THE LENS COVERS
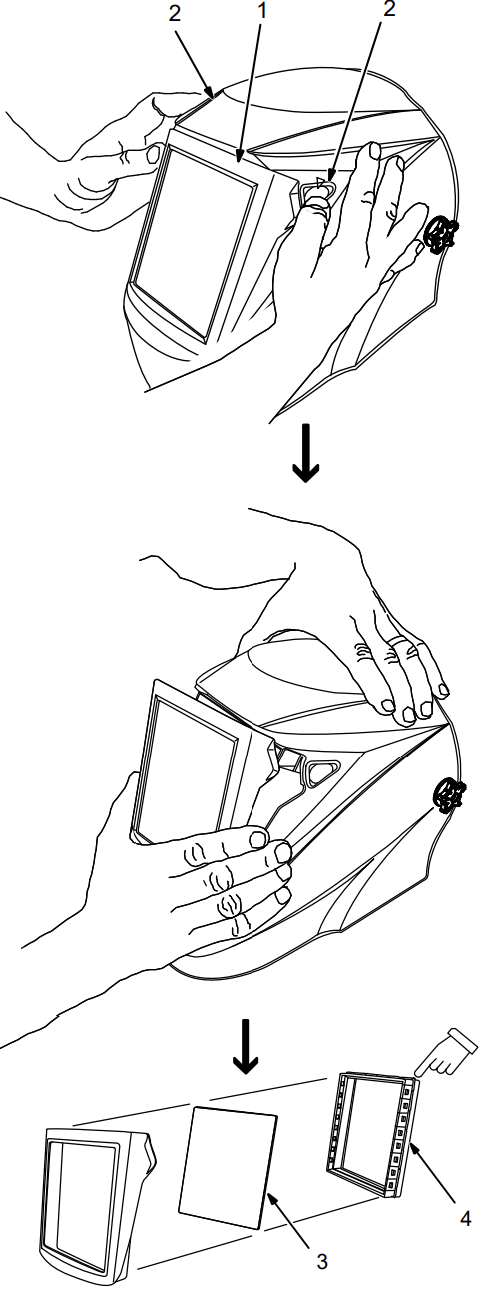
WARNING: Never use the auto-darkening lens without the inside and outside lens covers properly installed. Welding spatter will damage the auto-darkening lens and void the warranty.
- Front Lens Holder
- Release Points
- Lens Cover
- Gasket
- Remove front lens holder by press-ing release points and pulling the holder away from the helmet.
- Remove lens cover and gasket from the holder. Replace lens cover and reinstall gasket and lens in holder. Reinstall holder in helmet.
NOTE: Be sure the holed side of gasket faces the lens cover.
Replacing Inside Lens Cover
- Lens Assembly
- inside Lens Cover
- Remove the lens cover holder. Remove lens assembly.
- Remove the inside lens cover by prying the cover up at either thumbnail opening at each side of the cover.
- Slide cover it out of either side of frame.
- Replace lens cover and rein-stall the assembly in the helmet by re-versing the above procedure.
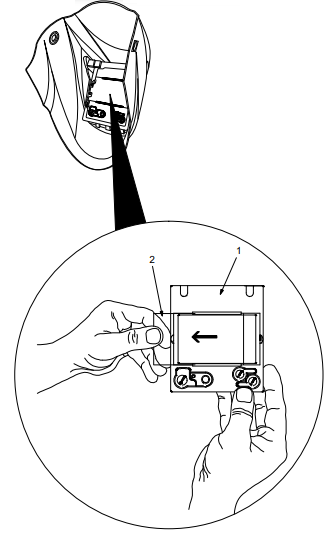
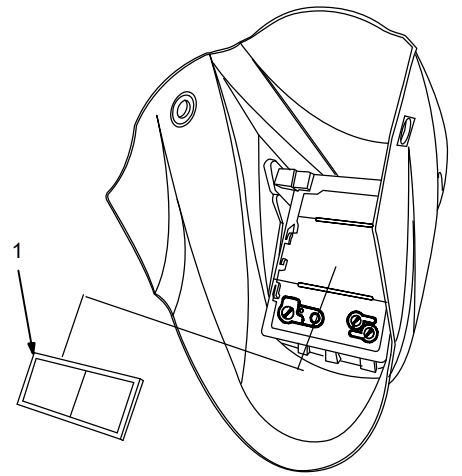
REPLACING THE BATTERY
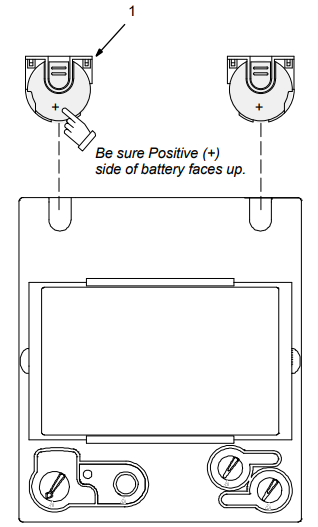
Battery Tray
- After removing the lens assembly, slide the battery holding trays out and remove the old batteries.
- Replace with CR2450 lithium bat-teries (two required).
NOTE: Be sure Positive (+) side of the battery faces up (toward inside of helmet). - Reinstall the battery trays. To test, press the Reset button. The lens should flash dark twice. Reinstall the lens assembly.
NOTE: Left and right battery trays are not interchangeable. The auto−darkening helmet will not work if battery trays are installed on the wrong sides.
NSTALLING OPTIONAL MAGNIFYING LENS
Optional Magnifying Lens
Starting at the bottom, slide magnifying lens into the helmet retaining brackets. Align the magnifying lens with the auto-darkening lens assembly.
- Remove lens holding frame (with auto-darkening lens) from helmet shell.
- Remove auto-darkening lens from lens holder.
- Position lens holder with magnifying lens holding tabs facing toward you. From the bottom up, slide magnifying lens into position. (Slide magnifying lens up or down slightly as desired.)
- Reinstall the auto-darkening lens in the lens holder.
- Reverse procedure to remove magnifying lens.
- To prevent lens fogging, install flat side of magnifying lens toward auto-darkening lens.
Description of Hobart Welding
Helmets Pro Series offers a variety of features that make it a top choice for welders. The auto-darkening technology allows the lens to adjust to the brightness of the welding arc, protecting the welder's eyes and reducing strain. The sensitivity controls allow the welder to adjust the lens to their specific needs, and the wide viewing area provides a clear and unobstructed view of the welding area. The helmet is also lightweight and comfortable to wear, with a adjustable headgear. Additionally, the helmet meets ANSI Z87.1+ standards for impact protection and is compatible with respirators.
Maintenance
NOTICE: Never use solvents or abrasive cleaning detergents.
NOTICE: Do not immerse the lens assembly in water.
The helmet requires little maintenance. However, for best performance clean after each use. Using a soft cloth dampened with a mild soap and water solution, wipe the cover lenses clean. Allow to air dry. Occasionally, the filter lens and sensors should be cleaned by gently wiping with a soft, dry cloth.
Troubleshooting of Helmets Pro Series
| Trouble | Remedy |
|---|---|
| Auto lens not ON – auto-lens will not darken momentarily when the Reset button is pressed. | Check batteries and verify they are in good condition and installed properly. Also, check battery surfaces and contacts and clean if necessary. Check battery for proper contact and gently adjust contact points if necessary. This is particularly important if the helmet has been dropped. Verify left and right battery trays are installed on the correct sides. |
| Not switching – auto-lens stays light and will not darken when welding. | Stop welding immediately. Press the Reset button if lens is Auto-On type. If lens if Manual-On type, make sure the lens is turned On. If power is on, review the sensitivity recommendations and adjust sensitivity. Clean lens cover and sensors of any obstructions. Make sure the sensors are facing the arc; angles of 45° or more may not allow the arc light to reach the sensors. |
| Not Switching – auto-lens stays dark after the weld arc is extinguished, or the auto-lens stays dark when no arc is present. | Fine-tune the sensitivity setting by making small adjustments to the control by turning it toward the “min” setting. In extreme light conditions, it may be necessary to reduce the surrounding light levels. |
| Sections of the auto-lens are not going dark, distinct lines separate the light and dark areas. | Stop welding immediately. The auto-lens may be cracked which can be caused by the impact of dropping the helmet. Weld spatter on the auto lens may also cause cracking. (The lens may need to be replaced; most cracked lenses are not covered by warranty). |
| Switching or Flickering – the auto-lens darkens then lightens when the welding arc is present. | Review the sensitivity setting recommendations and increase the sensitivity if possible. Be sure the arc sensors are not being blocked from direct access to the arc light. Check the lens cover for dirt and spatter that may be blocking the arc sensors. Increasing Lens Delay 0.1 – 0.3 second may also reduce switching. |
| Inconsistent or lighter auto-lens shading in the dark-state, noticeable on the outside edges and corners. | Referred to as an angle of view effect, auto-darkening lenses have an optimum viewing angle. The optimum viewing angle is perpendicular or 90° to the surface of the auto-lens. When that angle of view varies in the dark-state, welders may notice slightly lighter areas at the outside edges and the corners of the lens. This is normal and does not represent any health or safety hazard. This effect may also be more noticeable in applications where magnifying lenses are used. |
Hobart Warranty
Hobart auto-darkening lens helmets are warranted for two (2) years from the date of purchase. Proof of purchase is required for warranty transactions so it is imperative that a copy of the original invoice or sales receipt be retained.
Pros & Cons
Pros
- Auto-darkening technology for eye protection
- Adjustable sensitivity controls for customization
- Wide viewing area for improved visibility
- Lightweight and comfortable to wear
- Meets ANSI Z87.1+ standards for impact protection
Cons
- Mid- to high-end price range
- May not fit all head sizes comfortably
- Some users may prefer a fixed shade lens
Customer Reviews about Hobart Welding Helmets Pro Series
Customers have praised the Hobart Welding Helmets Pro Series for its advanced features and high-quality construction. Many users have commented on the auto-darkening technology, stating that it effectively protects their eyes and reduces strain. The adjustable sensitivity controls have also been well-received, as they allow users to customize the helmet to their specific needs. However, some customers have noted that the helmet may not fit all head sizes comfortably and have suggested that Hobart consider offering additional size options. Additionally, some users have noted that the auto-darkening lens may take a moment to adjust when first starting a weld, which can be inconvenient.
Faqs
What distinguishing qualities of the Pro Series Hobart Welding Helmets?
How can I change the Hobart Welding Helmets Pro Series' darkness settings?
What actions should I do to keep my Hobart Welding Helmets Pro Series lens clear?
Is it possible to use the Hobart Welding Helmets Pro Series for any kind of welding?
How do I properly fit the Hobart Welding Helmets Pro Series for maximum protection and comfort?
How long should a Hobart Welding Helmets Pro Series last?
Are the Pro Series Hobart Welding Helmets appropriate for novices?
What is the battery longevity of the Hobart Pro Series Welding Helmets?
What are the advantages for Hobart Welding Helmets Pro Series users of the grind mode function?
What is the price range for the Hobart Welding Helmets Pro Series?
Leave a Comment