Homelabs Window Air Conditioner HME030528N User Guide
Content
Homelabs Window Air Conditioner HME030528N Introduction
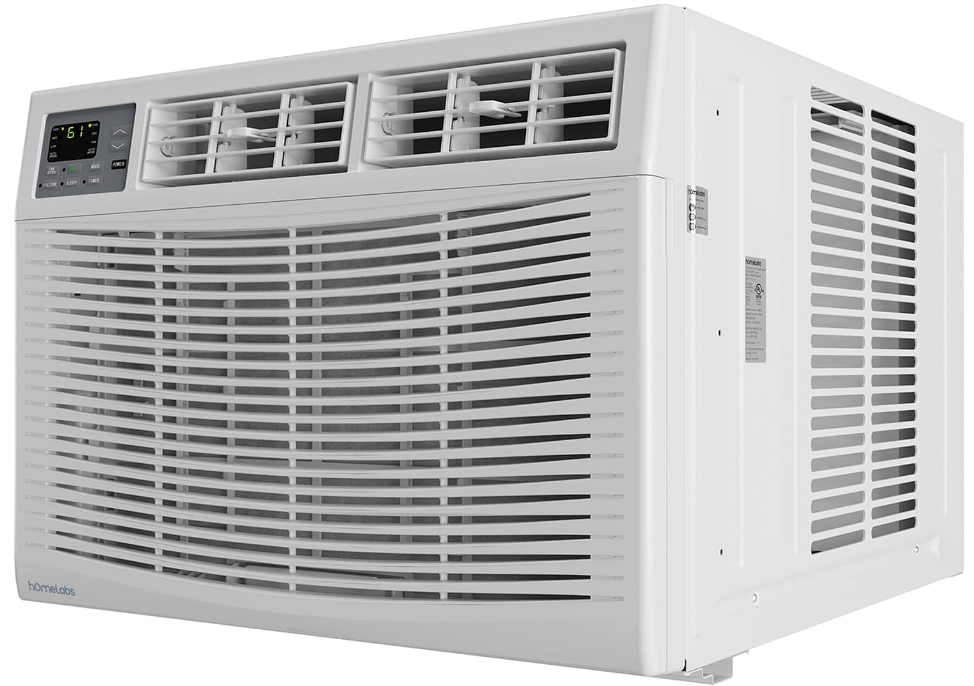
Air Conditioner offers a reliable cooling solution for small spaces, delivering 5,000 BTUs of cooling power. Ideal for rooms up to 150 square feet, it features easy mechanical controls, two cooling speeds, and a reusable washable filter for enhanced convenience. This compact unit operates quietly at 50 dB, ensuring a comfortable environment without disruptive noise. The cost of this air conditioner is approximately $239.99, making it an affordable choice for effective home cooling.
Specifications
- Temperature Range: 62°F ~ 86°F (17°C ~ 30°C)
- Voltage/Current: 115 V~
- Cooling capacity: 7,500 BTU
- Coverage area: up to 450 square feet
- Energy efficiency ratio (EER): 12.1
- Noise level: 58 dB (low), 62 dB (high)
- Cooling modes: Cool, Dehumidify, Fan
- Remote control included
- Washable filter
- 24-hour on/off timer
- Energy-saving mode
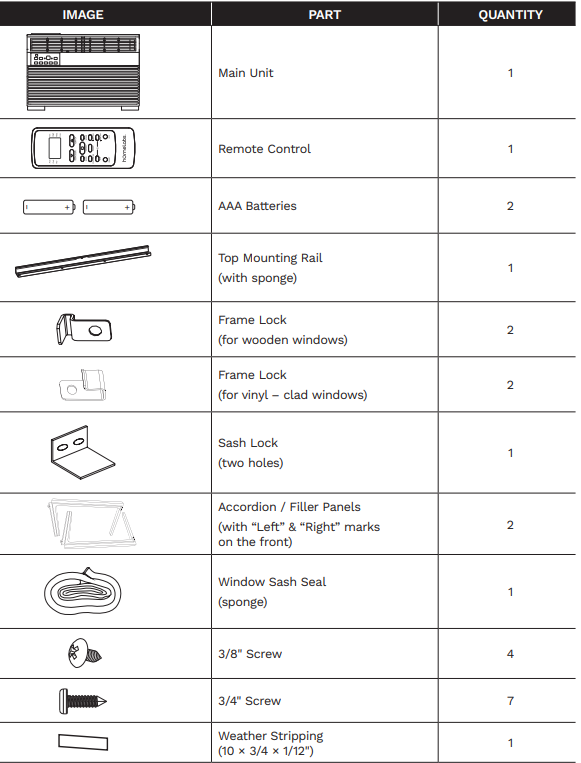
PARTS OVERVIEW
TOOLS NEEDED
(NOT SUPPLIED)
PRIOR TO INSTALLING THE AIR CONDITIONER
- Check for anything that could block the airflow. Check the area outside the window for things such as shrubs, trees, or awnings. Check the area inside the window to make sure curtains, drapes, or blinds will not block proper airflow.
- Check the available electrical outlet. The power cord must be the same as shown on the rating label of the unit. The outlet should be close enough to the power cord.
- Carefully unpack the Air Conditioner. Remove all packing material and make sure the floor is protected when unpacking your unit. Due to the large size of this Air Conditioner, two people are required to move the unit.
- Please read all instructions prior to installing your Air Conditioner. Two people are required to install this product. If a new electrical outlet is required, have the outlet installed by a qualified electrician before installing the unit.
WARNING
When handling the unit, be careful to avoid cuts from the sharp metal edges and aluminum fins on the front and rear coils.
Installation Instructions
WINDOW REQUIREMENTS
Before installing the unit, check the dimensions of your window to make sure the Air Conditioner will fit. This unit is made to fit inside a standard double-hung window with an opening width of 23 to 36 inches (584 mm to 914 mm). Make sure that the window is in good shape and able to hold the necessary screws firmly. If not, make the necessary repairs prior to installing the unit.
| BTU/h | in | out |
|---|---|---|
| 6000~8000 | 14" (356 mm) | 23–36" (584–914 mm) |
| 10000~14500 | 15–1/2" (394 mm) | |
| H | W |
Wooden Window

NOTE: Save the product packaging and installation instructions for future reference. Store the Air Conditioner in the product box when not in use for an extended period of time.
WARNING: Do not, under any circumstances, cut or remove the third (ground) prong from the power cord. Do not change the plug on the power cord of the Air Conditioner. Aluminum house wiring may present special problems – consult a qualified electrician.
Vinyl-Clad Window
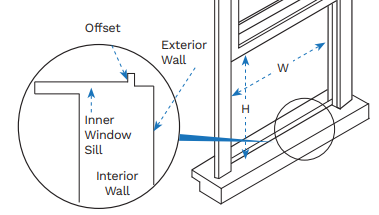
The lower sash must open sufficiently to allow a clear vertical opening of 13 inches (330 mm).
The side louvers and the rear of the AC must have clear air space to allow enough airflow through the condenser for heat removal.
WARNING: The rear of the unit must be outdoors. It should not be inside a building or garage.

PREPARE THE AIR CONDITIONER
The Top Rail must be assembled prior to installing the Air Conditioner in the window.
Tools Needed: Phillips Screwdriver

Attaching the Top Rail to the Air Conditioner
- Remove the Air Conditioner from the carton and place it on a flat surface.
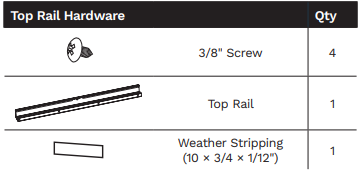
- Remove the Top Rail and Weather Stripping from the packaging material (See > Fig. A)
- Align the hole in the Top Rail with those in the top of the unit (See > Fig. B)
Secure the Top Rail to the unit with the 3/8” Screws (See > Fig. C)
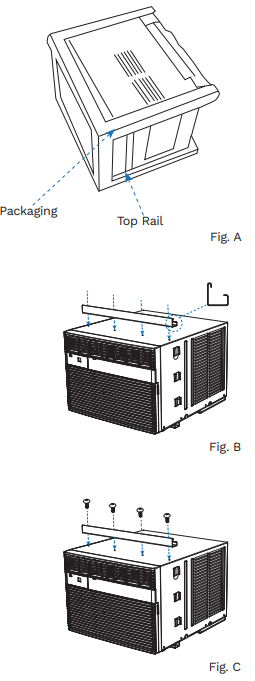
NOTE:
- For safety reasons, all the four (4) screws MUST be securely fastened.
- The Top Rail hardware is pre-installed for units more than 10000 BTU/h. Before installing this unit, the Top Rail must be assembled on the unit (For < 10000 BTU/h models only).
NOTE: For safety reasons, all 4 screws must be fastened to the Top Rail.
INSTALL THE ACCORDION PANELS
NOTE: The Top Rail and sliding panels on each side are there to provide the proper pitch to the rear of (5/16") this unit. This is necessary for proper condensed water utilization and drainage. If you are not using the side panels for any reason, this pitch to the rear should also be maintained.
Place the unit on a solid surface. Hold the Accordion Panel in one hand and gently pull the center back to free the open end.
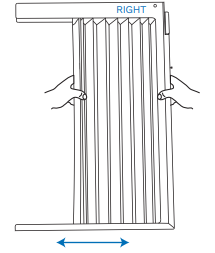
Slide the free end “I” section of the panel directly into the grooves on the side of the AC unit, as shown in the image below. Next, slide the panel down. Be sure to leave enough space to slip the top and bottom of the frame into the rails on the cabinet.
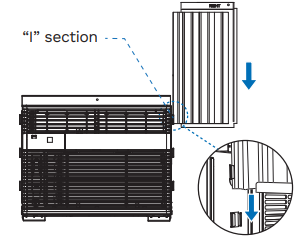
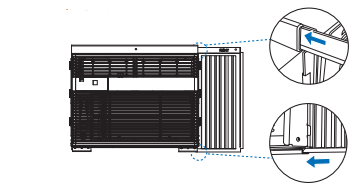
- Once the panel has been installed to the side of the cabinet, slightly adjust it to make sure it sits securely inside the frame channel. Slide the top and bottom ends of the frame into the top and bottom rails of the cabinet.
- Slide the panel all the way in and repeat these steps to assemble the other side.
INSTALL THE AC UNIT IN THE WINDOW
Keep a firm grip on the Air Conditioner, then carefully place the unit into the window opening so the bottom of the Air Conditioner frame is against the window sill. Carefully close the window behind the Top Rail of the unit.
NOTE: Check that the Air Conditioner is tilted about 3° to 4° downward to the outside for drainage. After installation, the condensate will not drain from the overflow drain hole.
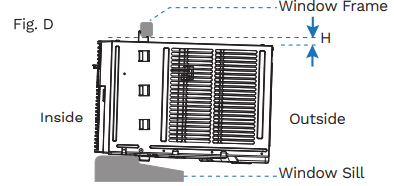
| BTU/h | H |
|---|---|
| 6000~8000 | About 3/4" to 1" |
| 10000~14500 | About 1" to 1–3/8" |
- Once the AC unit is installed, extend both Accordion Panels to the window frame.
CAUTION: We recommend 2 people for safer and easier installation.
INSTALL THE SUPPORT BRACKET
Based on your window type, install the support bracket.
For Wooden Windows:
Drive the 1/2" (12.7 mm) locking screws through the Frame Lock and into the windowsill.
NOTE: To prevent the windowsill from splitting, drill 1/8" (3 mm) pilot holes before driving.
Drive the 1/2" (12.7 mm) locking screws through the frame holes into the window sash.
For Vinyl-Clad Windows:
Drive the 1/2" (12.7 mm) locking screws through the Frame Lock and into the window sash.
NOTE: Before driving the screws, drill 5 pilot holes (through the holes in the Frame Lock and frame extensions) into the window sash as shown.3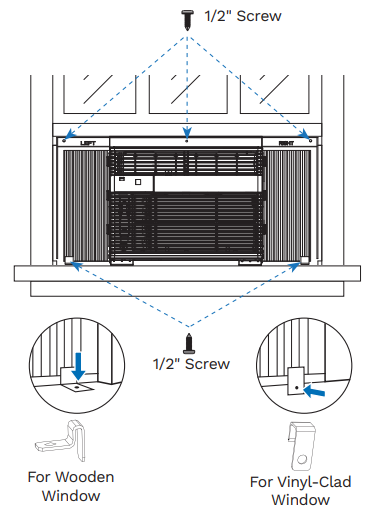
To secure the lower sash in place, attach the Sash Lock at right angle using the 3/4" (19 mm) or 1/2" (12.7 mm) screws as shown.
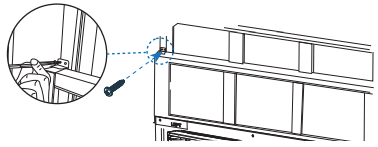
Cut the Window Sash Seal and insert it in the gap between the upper and lower sashes.
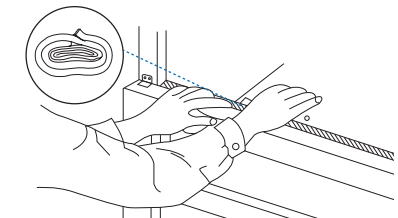
INSTALL THE WEATHER STRIPPING
(ONLY APPLICABLE TO MODELS WITH THE ENERGY STAR RATING)
In order to minimize air leaks between the Air Conditioner and the window opening, trim the Weather Stripping to a proper length, peel the protective backing off, and plug any gaps if needed.
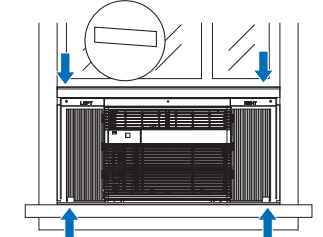
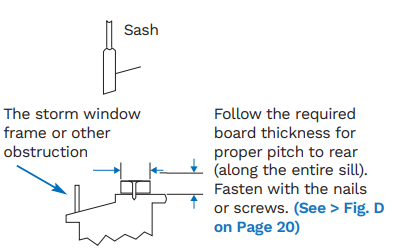
IF AC IS BLOCKED BY A STORM WINDOW
Add the wood as shown below, or remove thestorm window before the Air Conditioner is installed. If the Storm Window Frame must be kept, make sure the drain holes or slots are not caulked or painted shut, and the accumulated rain water or condensation can be drained out.
Removing the AC From the Window
- Turn the AC off and disconnect the power cord.
- Remove the Window Sash Seal from the windows, and unscrew the safety Sash Lock.
Remove the screws installed through the frameand Frame Lock. Slide the side panels into the frame. Keeping a firm grip on the Air Conditioner, raise and remove the sash carefully.
Description
The Homelabs Window Air Conditioner HME030528N is engineered with advanced technology to provide efficient cooling while minimizing energy consumption. The unit features a sleek and modern design that blends seamlessly with any home decor. It comes with a remote control, allowing you to adjust settings from across the room. The washable filter ensures easy maintenance, and the 24-hour on/off timer lets you schedule your cooling needs in advance.
The air conditioner also includes an energy-saving mode that optimizes performance while reducing power usage. With its dehumidify mode, it can remove excess moisture from the air, making it a versatile solution for various climate conditions.
Operation
CONTROL PANEL

Refer to the WINDOW AC PAIRING INSTRUCTIONS to pair your AC unit to the hOmeLabs smart app. You will need to download the app to your smart phone or a Wi-Fi connected device, such as a tablet.
- POWER button: Press to turn the Air Conditioner on or off.
- SMART button (some models): Press to pair the unit with your mobile phone, then you can operate the unit through an app on your mobile phone.
- MODE button: Press to cycle through the various modes: COOL, DRY, FAN, and AUTO.
- ECO button: Press this button to activate or deactivate the Energy Saving Mode. This feature is only available in COOL, DRY, and AUTO mode. When ECO mode is activated, the compressor will shut off, and the FAN will continue to run for 3 minutes. Then the FAN will cycle on for 2 minutes (in 10-minute intervals) until the room temperature exceeds the set temperature. The compressor will turn back on, and cooling will start.
- FILTER button: The indicator above this button will light up to remind you to clean the filter (See > Page 27). To turn off the indicator, press the FILTER button.
- UP and DOWN buttons:
- Temperature Operating Range: 62°F ~ 86°F (17°C ~ 30°C).
- Temperature Unit Conversion (°C/°F): Hold both the UP and DOWN buttons for 3 seconds.
- Timer Setting: Press repeatedly to set the time.
- SLEEP button: Press to activate or cancel the SLEEP feature.
- TIMER button: Press to activate or cancel the TIMER ON or TIMER OFF feature. When AUTO-ON is activated (or deactivated), the ON indicator above the TIMER button will light up (or turn off).
- When AUTI-OFF is activated (or deactivated), the OFF indicator above the TIMER button will
light up (or turn off).- To set the value of the TIMER, press the UP and DOWN buttons.
- To cancel the TIMER, set the time to 0 hour.
- SPEED button: Press to select the FAN speed: High, Medium, Low, or Auto.
NOTE: AUTO speed is not available in FAN mode. - Digital Display: When the TIMER is not in use, the operation mode and the set temperature will be displayed. Time will be displayed under the timer setting.
REMOTE CONTROL
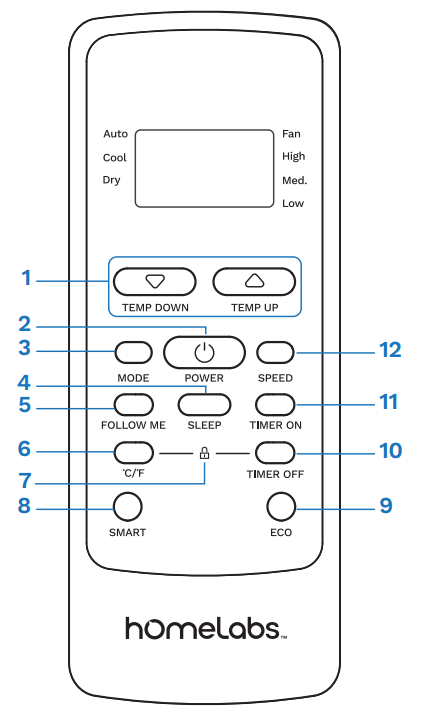
Battery Size: AAA
NOTE: Do not mix old and new batteries or different types of AAA batteries.
Inserting and Replacing Batteries
Your Remote Controller comes with two AAA batteries. Put the batteries in the Remote Control before use:
- Slide the back cover from the Remote Controller downward to open the battery compartment.
- Insert the batteries. Be careful to match the (+) and (-) ends of the batteries with the symbols inside the battery compartment.
- Slide the battery cover back to close.
Battery Notes
For optimum performance and safety, do not mix old and new batteries, or batteries of different types. Do not leave batteries in the Remote Controller if you don’t plan on using the device for more than 2 months.
- TEMP UP/DOWN △/▽
Use these buttons to set the temperature or TIMER. The temperature range is 62–86°F (17–30°C). If the room temperature is too high or too low, “HI” or “LO” will be displayed on the screen. - POWER
Press to turn the Air Conditioner on or off. - MODE
Press to cycle through the various modes: COOL, DRY, FAN, and AUTO. - SLEEP
Press to activate or cancel the SLEEP function. - FOLLOW ME
Press to access the FOLLOW ME feature. - °C/°F
Press to change the temperature display between Celsius (°C) and Fahrenheit (°F). - LOCK
Press both the °C/°F and TIMER OFF buttons for 5 seconds to lock the keypad. Press the two buttons for 2 seconds to unlock the keypad.
SMART (some models)
Press to pair the unit with your mobile phone, then you can operate the unit through an app on your mobile phone. To activate the SMART function (pairing), press and hold the SMART button for a few seconds. The display will flash and show “AP” and the unit will enter pairing mode. To turn on or turn off the display, press the SMART button once (See > “Window AC Paring Instructions” manual for details). - ECO
Press this button to activate or deactivate the energy saving feature. - TIMER OFF
Press to activate the AUTO-OFF feature. - TIMER ON
Press to activate the AUTO-ON feature. - FAN SPEED
Press the SPEED button for various fan speed options. You can choose from High, Medium, Low, and Auto.
Battery Diposal
Do not dispose of batteries as unsorted municipal waste. Refer to local laws for proper disposal of batteries.
HOW TO USE THE BASIC FUNCTIONS
POWER ON/OFF
Press the POWER button to turn the unit on or off. The unit will activate the Energy Saver function automatically under the COOL, DRY, and AUTO modes.
MODE SETTING
Press the MODE button to select the operating mode in the following options: AUTO, COOL, DRY, and FAN. The indicator will light up and remain on once the corresponding mode is selected. The unit will activate the Energy Saver function under the COOL, DRY, and AUTO modes automatically.
COOL Mode
- Press the POWER button to start the unit.
- Press the MODE button to select COOL Mode.
- Press the arrow buttons to set the temperature.
- When COOL Mode is selected, the fan speed can be adjusted by pressing the SPEED button.
AUTO Mode
In AUTO mode, the unit will select cooling, drying, or fan only operation automatically, depending on the set temperature and the room temperature. It will control the room temperature around the set temperature. In AUTO mode, the fan speed cannot be adjusted.
- Press the POWER button to start the unit
- Press the MODE button to select AUTO Mode.
- Press the arrow buttons to set the temperature.
FAN Mode
Use this function for room air circulation or to remove stale air. Remember to open the vent during this function, but close the vent during the cooling process for maximum cooling efficiency. You can choose any fan speed you prefer.
- Press the POWER button to start the unit.
- Press the MODE button to select FAN Mode.
- Press the SPEED button to select the FAN speed: Auto, Low, Medium or High.
In FAN mode, the display will show the actual room temperature, not the set temperature shown when in COOL mode. In FAN mode, the temperature cannot be adjusted.
DRY Mode
This function reduces humidity in the air to make the room more comfortable. Press the MODE button to set the unit to DRY mode. Since the space is a closed or sealed area, some degree of cooling will continue. In DRY mode, the fan speed is controlled at Low speed automatically.
- Press the POWER button to start the unit.
- Press the MODE button to select DRY Mode.
- Press the arrow buttons to set the temperature.
TIMER SETTING (with the Remote Control)
You can set the timer to AUTO-ON, AUTO-OFF, or both. Follow the instructions below to set the timer.
Programming Startup
- Press the TIMER ON button to activate this feature. The ON indicator (above the TIMER button) on the control panel will light up.
- Press the TEMP △/▽ buttons to set the time to turn the unit on automatically. Keep the remote pointed to the unit for 1 second until the timer is activated.
Programming Shutdown
- Press the TIMER OFF button to activate this feature. The OFF indicator (above the TIMER button) on the control panel will light up.
- Press the TEMP △/▽buttons to set the time to turn off the unit automatically. Keep the remote pointed to the unit for 1 second until the timer is activated.
Canceling a Timer
To cancel a timer, set the time to 0 hour.
NOTE:
- When setting the TIMER ON or TIMER OFF function with each press, the time will increase in 30-minute increments until it reaches to 10 hours. After 10 hours, it will increase in 1 hour increments until it reaches 24 hours. The timer will revert to 0 after 24 hours.
- You can also use the TIMER button and the arrows buttons on the control panel to set the timer. To set the timer, press the TIMER button to activate the TIMER ON or TIMER OFF function first, then use the arrow buttons to set the time. When AUTO-ON is activated (or deactivated), the ON indicator above the TIMER button will light up (or turn off). When
AUTO-OFF is activated (or deactivated), the OFF indicator above the TIMER button will light up (or turn off).
SLEEP SETTING
In SLEEP mode, the set temperature will increase by 2°F (1°C) in 30 minutes. Then it will increase by another 2°F (1°C) after an additional 30 minutes. The temperature will be maintained for 6 or 7 hours, then return to the originally set temperature. To cancel the SLEEP function, just press the SLEEP button.
FILTER CLEANING REMINDER
When the unit has operated for 250 hours, the LED indicator will light up to remind you that it’s time to clean the filter. Press the FILTER button to activate this feature. After cleaning, press the FILTER button to reset the setting. The LED indicator will turn off.
SMART BUTTON
See > “Window AC Paring Instructions” manual for detailed instructions.
FOLLOW ME SETTING
This feature can be activated through the Remote Control ONLY. When the FOLLOW ME feature is activated, the remote will then act as the thermostat instead of the unit, helping the unit to more accurately cool to your desired temperature by sensing the ambient temperature of the area where the remote is located.
- To activate the FOLLOW ME feature, point the Remote Control towards the unit and press the FOLLOW ME button. The Remote Control will display the actual temperature at its current location. The Remote Control will send this signal to the Air Conditioner every 3 minutes until the FOLLOW ME button is pressed again. If the unit does not receive the FOLLOW ME signal during any 7-minute interval, the unit will beep to indicate that the FOLLOW ME mode has ended.
- To deactivate this feature, just press the FOLLOW ME button again.
| Error Code | Description |
|---|---|
| AS | Room temperature sensor error |
| ES | Evaporator temperature sensor error |
| HS | Electric heating sensor error |
| CS | Condenser temperature sensor error |
| OS | Outside temperature sensor error |
| E7 | Unit malfunction |
NOTE: When an error code appears, unplug the unit and restart it. If the error code reappears, contact Customer Service.
FRESH AIR VENT CONTROL
NOTE: Only applicable to HME030524N (6K), HME030525N (8K), HME030544N (12K), HME030545N (12K), and HME030528N (14.5K)
The Fresh Air Vent allows the AC unit to regulate the flow of air, and to:
- Recirculate the inside air when the vent is closed. (See > Fig. A)
- Draw fresh air into the room when the vent is open. (See > Fig. B)
Exchange air from the room and draw fresh air into the room when the vent and the exhaust are open. (See > Fig. C)

Adjusting the Louvers:
Move the left and right louver levers to adjust air flow direction. You can also press the top or bottom of the louvers to tilt them. This adjusts the air flow up or down.
Setup Guide
To set up the Air Conditioner,
- Start by carefully unpacking the unit and all included accessories.
- Ensure your window is the correct size for the air conditioner; the kit includes adjustable side panels to fit most windows.
- Install the air conditioner into the window by following the provided instructions.
- Secure it using the included bracket and side panels.
- Plug in the unit and turn it on using the remote control or the control panel on the unit itself.
- Configure your desired settings such as cooling mode, fan speed, and timer using the intuitive interface.
Cleaning and Maintenance
Clean your Air Conditioner to keep it looking new and to minimize dust buildup. Always disconnect the appliance before doing any cleaning or maintenance.
AIR FILTER CLEANING
The air filter should be checked at least once every month to see if it needs cleaning. Trapped particles and dust can build up in the filter and may decrease airflow and cause the cooling coils to accumulate frost.
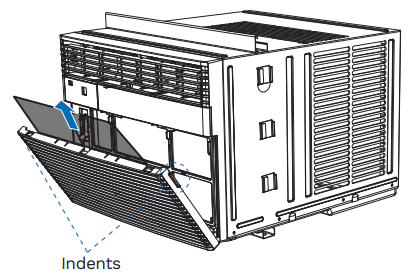
Clean the Air Filter:
- Push the vent handle to the vent closed position (where applicable). Open the front panel. Hold the middle of the filter and pull it out
- Wash the filter using liquid dish soap and warm water. Rinse the filter thoroughly. Gently shake the filter to remove excess water
- Let the filter dry completely before placing it back in the Air Conditioner
- If you do not wish to wash the filter, you may vacuum the filter to remove the dust and other particles
NOTE: Do not use hot water over 104°F (40°C) to clean the air filter. Do not attempt to operate the unit without the air filter.
WEAR AND TEAR
To minimize wear and tear on the Air Conditioner, always wait at least 3 minutes before changing modes. This will help prevent the compressor from overheating and the circuit breaker from tripping.
HOUSING CLEANING
Clean the AC Unit Housing
- Unplug the Air Conditioner to prevent shock or fire hazard. The housing and the front panel of the unit may be dusted with an oil-free cloth or wiped with a cloth dampened in a solution of warm water and mild liquid soap. Wipe the housing dry.
- Never use harsh cleaners, wax, or polish on the housing.
- Be sure to wring excess water from the cloth before wiping around the controls.
Excess water in or around the controls may cause damage to the Air Conditioner.
WINTER STORAGE
Store the Air Conditioner if it will not be used for an extended period of time. Remove the Air Conditioner carefully from the window according to the installation instructions, then cover it with plastic, or place it in the original box.
Homelabs Window Air Conditioner HME030528N Troubleshooting
| Problem | Possible Causes | Solutions |
|---|---|---|
| The unit does not start | - The unit is unplugged | - Make sure the power plug is inserted completely into the outlet. |
| - The fuse is blown or the circuit breaker is tripped | - Replace the fuse or reset the circuit breaker. | |
| - Power failure | - The unit will automatically restart with the previous setting when power is restored. | |
| - The current interrupter device is tripped | - Press the RESET button. | |
| - The room temperature is below 62°F (17°C). Cooling may not occur until the room temperature rises above 62°F (17°C). | - This is normal. | |
| The unit does not cool as it should | - The temperature sensor behind the air filter element touches the cold coil | - Keep the temperature sensor away from the cold coil. Contact Customer Service. |
| - The temperature control may not be set correctly | - Set to a lower temperature. | |
| - The compressor stops when the operating mode of the unit is changed | - Set the unit to COOL Mode and wait 3 minutes. | |
| - The outdoor temperature is below 64°F (18°C) | - Set the unit to FAN Mode to defrost the coil. | |
| - The air filter may be dirty | - Clean the filter (See Page 27). | |
| Poor cooling and ice forms on the cooling coil behind the decorative front | - The thermostat is set too cold when cooling at night | - To defrost the coil, set the unit to FAN Mode. Then set to a higher temperature. |
| - The air filter is dirty | - Clean the filter (See Page 27). | |
| - The temperature is set too high | - Set to a lower temperature. | |
| Poor cooling but no ice forms on the cooling coil behind the decorative front | - The air directional louvers are positioned improperly | - Reposition the louvers for better airflow. |
| - The front of the unit is blocked by drapes, blinds, or furniture | - Clear the blockage in front of the unit. | |
| - Open doors, windows, or registers may allow cold air to escape | - Close any doors, windows, or registers. | |
| - The room may be too warm | - Allow additional time to remove the "stored heat" from the walls, ceilings, floors, and furniture. | |
| - The air filter is dirty | - Clean the filter (See Page 27). | |
| The unit turns on and off rapidly | - The outside temperature is extremely hot | - Set the FAN speed to high mode to cool the cooling coils more quickly and easily. |
| The unit makes noises during cooling | - Air movement sound | - This is normal. |
| - Window vibration | - Poor installation. Refer to the installation instructions or check with the installer. | |
| The unit doesn’t work continuously | - The unit is preset with ECO mode for energy saving. It will shut off the compressor and fan when the preset temperature is reached. | - Press the ECO button to deactivate the energy-saving mode. |
| The room temperature is higher than the set temperature on the unit | - The temperature displayed on the unit is the SET temperature (not the room temperature). | - Check the room temperature on the app. |
| - The room thermometer is far away from the unit. The unit is on ECO Mode and the compressor is off when the temperature sensor reaches the set temperature. | - Turn off the ECO Mode. Use the FOLLOW ME function on the Remote Control (See Page 26). Place the Remote Control near the room thermometer and aim it at the unit. |
Warranty
HomeLabs offers a limited one-year warranty (“warranty period”) on all of our products purchased new and unused from hOme Technologies, LLC or an authorized reseller, with an original proof of purchase and where a defect has arisen, wholly or substantially, as a result of faulty manufacture, parts, or workmanship during the one-year warranty period.
Pros & Cons
Pros
- High cooling capacity for its size
- Energy-efficient with an EER of 12.1
- Multiple cooling modes including dehumidifying and fan
- Remote control for convenient operation
- Washable filter for easy maintenance
- Affordable pricing compared to similar models
Cons
- Noisy operation on high fan setting
- Installation can be challenging for some users
- No Wi-Fi connectivity or smart features
- Some users report issues with durability over time
Customer Reviews
Customers generally praise the Homelabs Window Air Conditioner HME030528N for its effective cooling performance and energy efficiency. Many appreciate its compact design and ease of use. However, some users have reported issues with noise levels and installation complexity.
Common complaints
Includes occasional leakage during heavy rain and minor cosmetic defects in some units. Despite these issues, the overall satisfaction rate remains high due to its robust cooling capabilities and value for money.
Faqs
How do I install the Homelabs Air Conditioner?
What is the cooling capacity of this air conditioner?
Is this air conditioner energy-efficient?
Does it come with a remote control?
How do I maintain this air conditioner?
What are some common issues with this Homelabs Window Air Conditioner HME030528N?
Can I use this air conditioner in larger rooms?
How loud is this HME030528N?
What safety precautions should I take when using this Window Air Conditioner?
Where can I purchase replacement parts for this Homelabs Window HME030528N?
Leave a Comment
