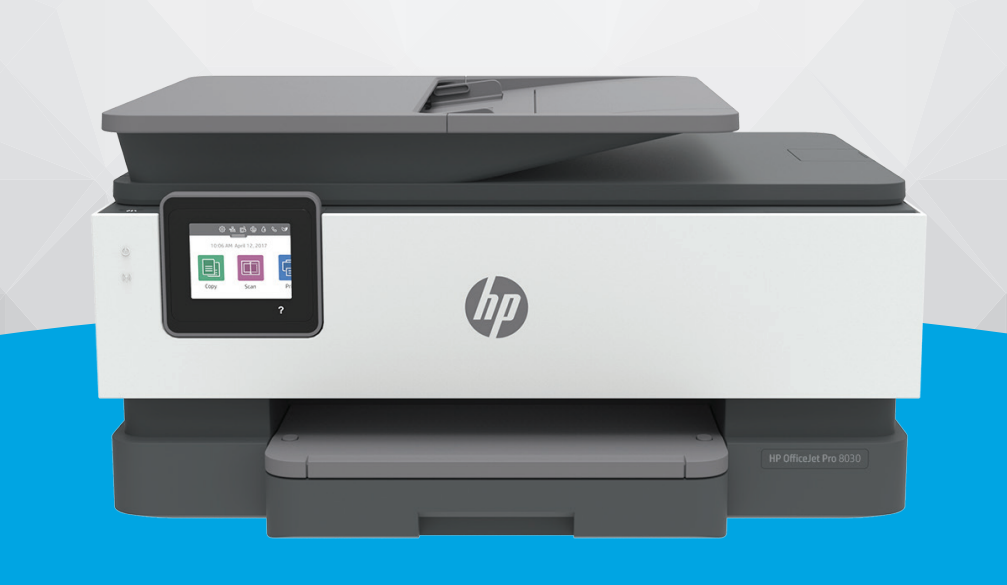
Hp Office Jet Pro 8030 All-in-One Printer User Manual
Content
Introduction
The HP OfficeJet Pro 8030 All-in-One Printer is a versatile and efficient device tailored for home and small office use. This multifunction printer combines printing, scanning, copying, and faxing capabilities, making it an all-in-one solution for various tasks. With wireless connectivity options, users can easily print from smartphones and tablets using mobile apps. The printer supports automatic duplex printing, enhancing productivity while saving paper. Its compact design fits seamlessly into any workspace. The HP OfficeJet Pro 8030 is priced at approximately $102.37.
Understand the printer parts
Top and front view
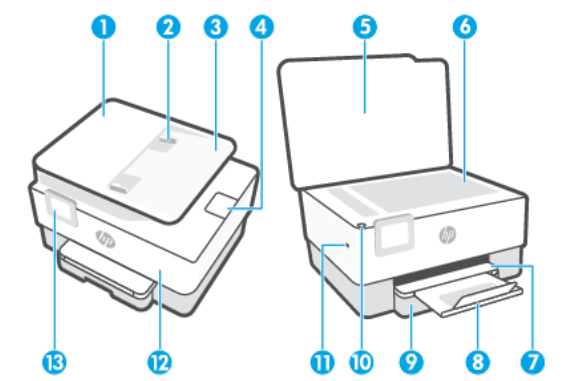
- Document feeder
- Document feeder paper-width guides
- Document feeder tray
- Document feeder output extension
- Scanner lid
- Scanner glass
- Output tray
- Output tray extension
- Input tray
- Power button
- Front USB port
- NOTE: This feature is available with some models of the printer.
- Front door
- Control panel display
Printing supplies area
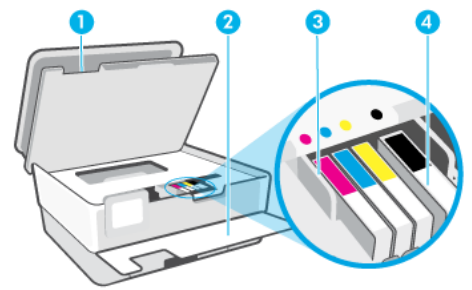
- Cartridge access door
- Front door
- Printhead
- Cartridges
NOTE: Cartridges should be kept in the printer to prevent possible print quality issues or printhead damage. Avoid removing supplies for extended periods of time. Do not turn the printer off when a cartridge is missing.
Back view
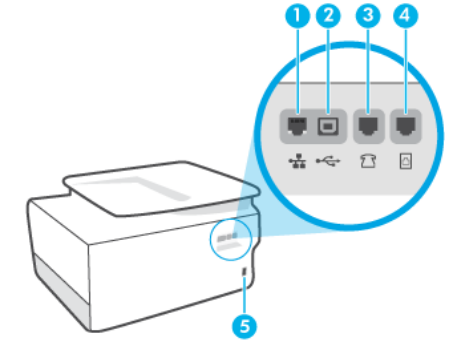
- Ethernet network port
- Rear USB port
- Fax port
 (Ext)
(Ext) - Fax port
 (Line)
 - Power input
Use the printer control panel
Lift the control panel
You can move the control panel for easier use.
- Push the upper part of the control panel to lift it.
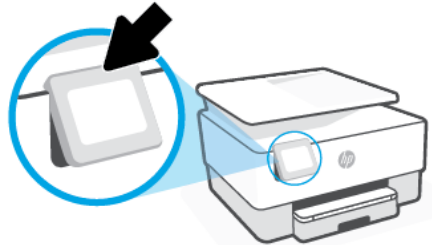
NOTE: Return the control panel to its original position by pushing down the bottom until it is back in place.
Overview of buttons and lights
The following diagram and related table provide a quick reference to the printer control panel features.

| Label | Name and Description |
|---|---|
| 1 | Wireless light: Indicates the status of the printer's wireless connection. |
| ● Solid blue light indicates that wireless connection has been established and you can print. | |
| ● Slow blinking light with clear pause indicates that wireless is on, but not configured. To connect your printer, see Set up the printer for wireless communication. | |
| ● Slow blinking light indicates that wireless is on, but the printer is not connected to a network. Make sure your printer is within the range of wireless signal. | |
| ● Fast blinking light indicates wireless error. Refer to the message on the printer display. | |
| ● If the wireless light is off, wireless is turned off. | |
| 2 | Back button: Returns to the previous menu. |
| 3 | Home button: Returns to the home screen from any other screen. |
| 4 | Help button: Opens the Help menu when on the Home screen, or shows contextual help content if it is available for the current operation when on other screens. |
Function buttons
| Function Button | Purpose |
|---|---|
| Copy | Copy document, ID card, or photo. |
| Scan | Scan document. |
| Photo | Print photo from USB flash drive. |
| Fax | Set up fax, send fax, or reprint received fax. |
| Apps | Access to the apps for your printer. |
Dashboard icons
The Dashboard on the printer control panel lets you access the icons on the display, check the status of the printer, or monitor and manage current and scheduled printer tasks.
To open the Dashboard, touch or swipe down the tab at the top of a screen on the control panel.
| Icon | Purpose |
|---|---|
| Displays the setup screen for changing preferences, network setup, Wi-Fi Direct, Web Services setup, fax setup, and other maintenance settings and generating reports. | |
| Displays wireless status and menu options. For more information, see Set up the printer for wireless communication. NOTE: (Ethernet) and (Wireless) will not be displayed at the same time. Showing the Ethernet icon or the wireless icon depends on the way your printer is connected to the network. If the network connection of the printer has not been set up, then the printer control panel display shows (Wireless) by default. | |
| Shows that an Ethernet network connection exists and also provides easy access to the network status screen. | |
| Displays the Web Services Summary menu, where you can check ePrint status details, change ePrint settings, or view the printer email address. For more information, see HP ePrint. | |
| Displays the status, name, and password for Wi-Fi Direct, and the number of devices connected. You can also change settings and print a guide. | |
| Displays the estimated ink levels. NOTE: Ink level alerts and indicators provide estimates for planning purposes only. When you receive a low-ink alert, consider having a replacement cartridge available to avoid possible printing delays. You do not have to replace the cartridges until prompted to do so. | |
| Displays status information for the Auto Answer function, fax logs, and the fax sound volume. | |
| Displays a screen where you can configure some of the printer's environmental features. |
Specifications
For more information, visit https://www.support.hp.com Select your country or region. Click Product Support & Troubleshooting. Enter the name shown on the front of the printer, and then select Search. Click Product Information, and then click Product Specifications.
System requirements
- For information about software and system requirements or future operating system releases and support.
Environmental specifications
- Operating temperature: 5° to 40° C (41° to 104° F)
- Operating humidity: 15 to 80% RH non-condensing
- Recommended operating conditions: 15° to 32° C (59° to 90° F)
- Recommended relative humidity: 20 to 80% non-condensing
Input tray capacity
- Plain paper sheets (60 to 105 g/m² [16 to 28 lb]): Up to 225
- Envelopes: Up to 10
- Index cards: Up to 60
- Photo paper sheets: Up to 60
Output tray capacity
- Plain paper sheets (60 to 105 g/m² [16 to 28 lb]): Up to 60 (text printing)
Document feeder capacity
- Plain paper sheets (60 to 90 g/m² [16 to 24 lb]): Up to 35
Paper size and weights
For the list of supported paper sizes, see the HP printer software.
- Plain paper: 60 to 105 g/m² (16 to 28 lb)
- Envelopes: 75 to 90 g/m² (20 to 24 lb)
- Cards: 163 to 200 g/m² (90 to 110 lb)
- Photo paper: Up to 280 g/m² (75 lb)
Print specifications
- Print speeds vary according to the complexity of the document and printer model
- Method: Drop-on-demand thermal inkjet
- Language: PCL3 GUI
Print resolution:
- For a list of supported print resolutions, visit the printer support website at www.support.hp.com.
Print margins:
- For margin settings of different media, visit the printer support website at www.support.hp.com.
Copy specifications
- Digital image processing
- Copy speeds vary according to the complexity of the document and printer model
Scan specifications
- Resolution: Up to 1200 x 1200 ppi optical
For more information about scan resolution, see the HP printer software.
- Color: 24-bit color, 8-bit grayscale (256 levels of gray)
Maximum scan size:
- Scanner glass: 216 x 297 mm (8.5 x 11.7 inches)
- Document feeder: 216 x 356 mm (8.5 x 14 inches)
Fax specifications
- Walk-up black-and-white and color fax capability
- Manual fax send and receive
- Automatic busy redial up to five times (varies by model)
- Automatic no-answer redial up to one time (varies by model)
- Confirmation and activity reports
- CCITT/ITU Group 3 fax with Error Correction Mode
- Up to 33.6 Kbps transmission
- 4 seconds per page speed at 33.6 Kbps (based on ITU-T Test Image #1 at standard resolution). More complicated pages or higher resolution takes longer and uses more memory.
- Ring detect with automatic fax/answering machine switching.
Fax resolution
Black:
- Photo: 203 x 196 dpi
- Very Fine: 300 x 300 dpi
- Fine: 203 x 196 dpi
- Standard: 203 x 98 dpi
Color:
- 200 x 200 dpi for all settings
Fax to PC specifications
- Supported file types: TIFF and PDF
- Supported fax types: Black-and-white faxes
Cartridge yield
- Visit www.hp.com/go/learnaboutsupplies for more information on estimated cartridge yields.
Change printer settings
Use the control panel to change the printer functions and settings, print reports, or get help for the printer.
TIP:If the printer is connected to a computer, you can also change the printer settings using the printer management tools in the software.
For more information about these tools, see Printer management tools.
To change settings for a function
The Home screen of the control panel display shows the available functions for the printer. Some features of the functions allows you to change settings.
- Select Copy or Scan and then select the desired option.
- After selecting a function, touch ( Settings ), scroll through the available settings, and then touch the setting you want to change.
- Follow the prompts on the control panel display to change the settings.
TIP: Touch (Home) to return to the Home screen.
To change the printer settings
To change the printer settings or print reports, use the options available on the Setup menu.
- From the printer control panel, touch or swipe down the tab at the top of the screen to open the Dashboard, and then touch ( Setup ).
- Touch and scroll through the screens.
- Touch the screen items to select screens or options.
TIP: Touch (Home) to return to the Home screen.
Description
The HP Office Jet Pro 8030 All-in-One Printer combines robust performance with advanced features to meet the demands of a busy office. Its sleek design makes it a space-saving addition, while the intuitive 2.7-inch touchscreen display simplifies operation. The printer supports various paper sizes and types, including envelopes and photo paper, making it versatile for different printing needs.
The printer also includes advanced security features such as HP Sure Start and run-time intrusion detection to protect your office network. Additionally, it supports HP Instant Ink subscription service, which helps save on ink costs and ensures you never run out of ink at critical moments.
Load paper
To load standard paper
- Pull out the input tray.
NOTE: If there is other paper in the input tray, remove the paper before loading a different paper type or size. Slide the paper-width guides to the edges of the input tray.
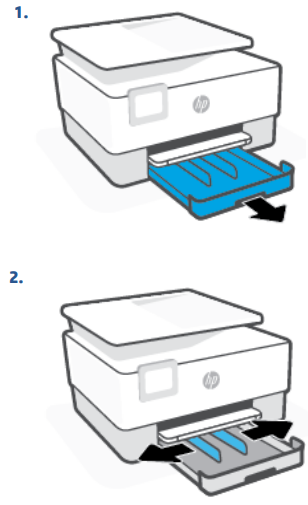
Insert the paper in portrait orientation and with the side to be printed facing down.
Make sure the stack of paper is aligned with the appropriate paper size lines on the front of the tray. Also, make sure the stack of paper does not exceed the stack height marking on the left edge of the tray.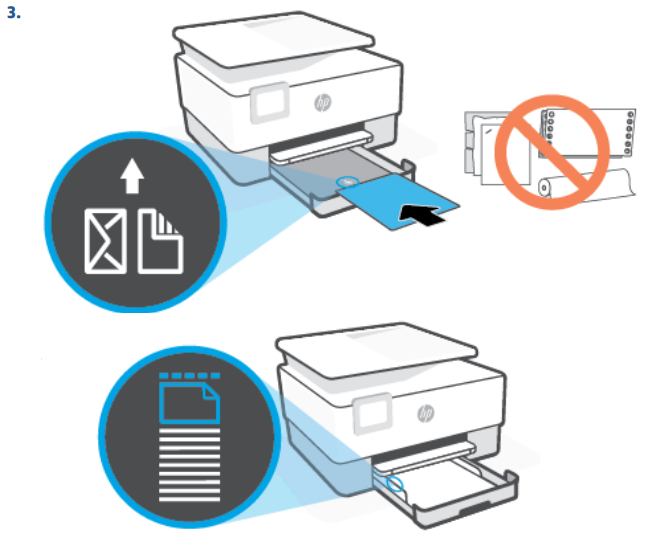
NOTE: Do not load paper while the printer is printing.
Adjust the paper-width guides until they touch the left and right edges of the stack of paper.
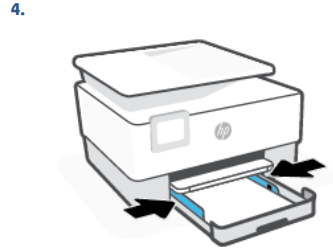
- Reinsert the input tray into the printer.
Pull out the output tray extension as shown.

To load legal paper
Pull out the input tray.
NOTE: If there is other paper in the input tray, remove the paper before loading a different paper type or size.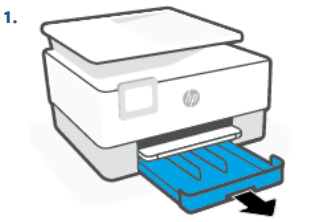
- Slide the paper-width guides to the edges of the input tray.
Press the button near the front left of the tray to extend the input tray.

Insert the paper in portrait orientation and with the side to be printed facing down.

Make sure the stack of paper is aligned with the appropriate paper size lines on the front of the tray. Also, make sure the stack of paper does not exceed the stack height marking on the left edge of the tray.
NOTE: Do not load paper while the printer is printing.Adjust the paper-width guides until they touch the left and right edges of the stack of paper.

- Reinsert the input tray into the printer.
NOTE: When you insert the input tray, the input tray extension remains outside of the printer. This is the expected result. Pull out the output tray extension as shown.

To load an envelope
Pull out the input tray.
NOTE: If there is other paper in the input tray, remove the paper before loading a different paper type or size.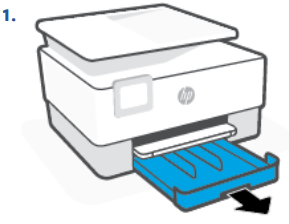
- Slide the paper-width guides to the edges of the input tray.
Insert the envelope in portrait orientation and with the side to be printed facing down.
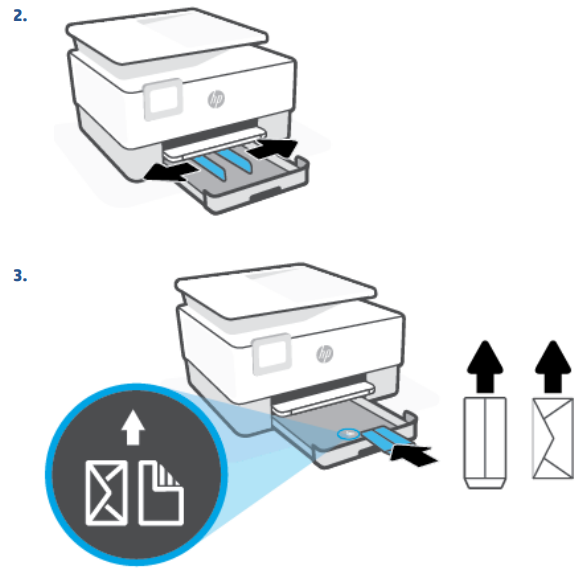
For information on the maximum number of envelope allowed in the tray, see Specifications.
NOTE: Do not load paper while the printer is printing.Adjust the paper-width guides until they touch the left and right edges of the stack of envelope.

- Reinsert the input tray into the printer.
Pull out the output tray extension as shown.

To load cards and photo paper
Pull out the input tray.
NOTE: If there is other paper in the input tray, remove the paper before loading a different paper type or size.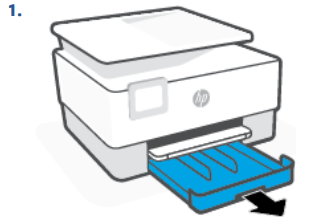
- Slide the paper-width guides to the edges of the input tray.
Insert the cards or photo paper in portrait orientation and with the side to be printed facing down.
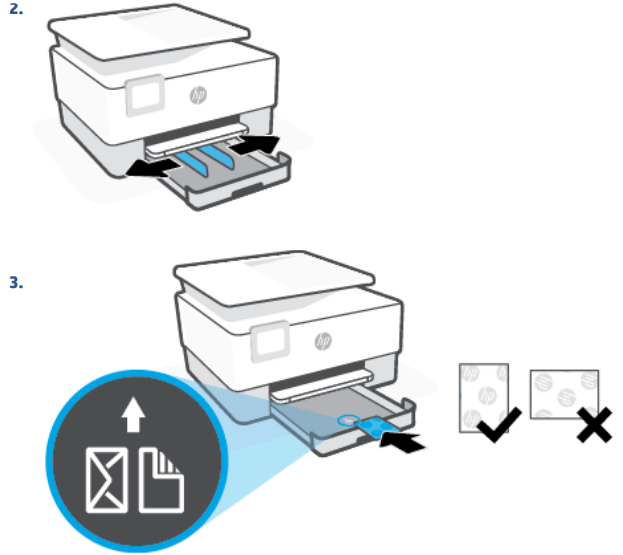
Make sure the stack of card or photo is aligned with the appropriate paper size lines on the front of the tray. Also, make sure the stack of card or photo does not exceed the stack height marking on the left edge of the tray.

NOTE: Do not load paper while the printer is printing.
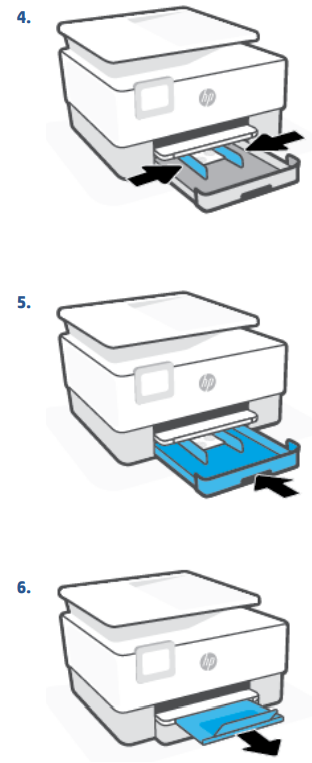
- Adjust the paper-width guides until they touch the left and right edges of the stack of paper.
- Reinsert the input tray into the printer.
Pull out the output tray extension as shown.
Setup Guide
To set up the HP Office Jet Pro 8030, start by unpacking the printer and removing all packaging materials.
- Connect the power cord to a wall outlet and turn on the printer.
- Follow the on-screen instructions on the touchscreen display to complete the initial setup, including language selection and network configuration.
- For wireless setup, you can use the HP Smart app on your mobile device or the touchscreen interface to connect the printer to your Wi-Fi network.
- Once connected, you can print, scan, and fax documents directly from your device or computer.
Troubleshooting
Get help with HP online troubleshooting
You can use an HP online troubleshooting tool to solve your printer issues. Use the table below to identify your problem and click the appropriate link.
NOTE: The HP online troubleshooting tools may not be available in all languages
| Tool/Issue | Description |
|---|---|
| Troubleshoot paper jam issues | Clear jammed paper from the printer and resolve paper or paper feed issues. |
| Troubleshoot a print carriage jam | Clear obstructions that are blocking the print carriage. |
| Troubleshoot issues with print job not printing | Resolve issues with printer responsiveness, pages not printing, or "Unable to print" errors. |
| Troubleshoot print quality issues | Improve the quality of your prints. |
| Troubleshoot copy and scan issues | Determine why the printer will not copy or scan, or improve the quality of your copies or scans. |
| Troubleshoot fax issues | Resolve problems with sending or receiving faxes, or faxing to your computer. |
| Troubleshoot wireless network connection issues | Resolve wireless networking issues, including issues with setting up a wireless connection for the first time or fixing a connection that is no longer working. |
| Troubleshoot a firewall or antivirus issue | Determine if a firewall or antivirus program is preventing your computer from connecting to the printer and resolve the issue. |
| Find network settings for a wireless connection | Find your wireless network name (SSID) and password. |
| Troubleshoot Wi-Fi Direct issues | Resolve Wi-Fi Direct problems or configure Wi-Fi Direct. |
| Troubleshoot mobile network issues | Resolve issues with connecting a mobile device to your printer. |
| HP Print and Scan Doctor | (For Windows operating systems only) Automatically diagnose and resolve printer issues. |
Pros & Cons
Pros
- High-Quality Printing: Produces crisp black text and vibrant color prints.
- Fast Print Speeds: Quickly prints documents with speeds up to 20 ppm in black.
- Wireless Connectivity: Supports Wi-Fi, Ethernet, and mobile printing through the HP Smart app.
- Advanced Security Features: Includes HP Sure Start and run-time intrusion detection for enhanced security.
- Cost-Effective: Compatible with HP Instant Ink subscription service to save on ink costs.
Cons
- Noisy Operation: Some users have reported that the printer can be noisy during operation.
- Limited Paper Capacity: The 225-sheet input tray may need frequent refills in high-volume environments.
- Slightly Bulky Design: While compact, it may still occupy significant desk space.
Customer Reviews
Customers have praised the HP Office Jet Pro 8030 for its reliability and ease of use. Many have noted its fast print speeds and high-quality output. However, some have mentioned that it can be noisy and that the paper capacity could be higher. Overall, it has received positive reviews for its performance and value for money.
Faqs
What are the key features of the HP?
How do I set up wireless printing on the HP 8030?
What is the monthly duty cycle of the HP Office Jet Pro 8030 All-in-One Printer?
Does the HP Office Jet Prosupport mobile printing?
How do I troubleshoot a paper jam issue on the HP Office?
Can I save on ink costs with the HP Office Jet Pro?
What advanced security features does the HP Office Jet Pro 8030 have?
How do I update the firmware of my HP Office Jet Pro 8030 All-in-One Printer?
Does the HP support faxing?
Leave a Comment
