Iball Claro CTV27 TV AV and FM Radio Tuner User Manual
Content

Introduction
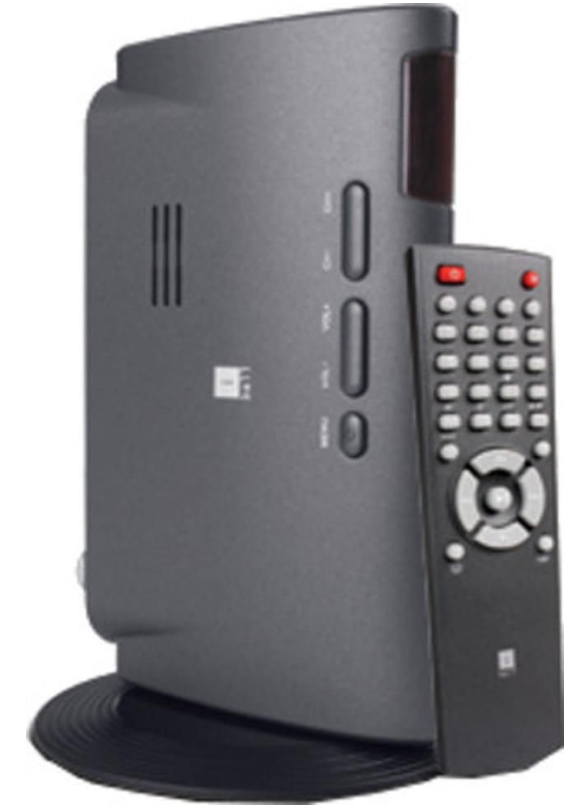
XGA TV BOX uses a professional progressive scanning TV (DPTV) chip, the refresh frequency is increased from original 50Hz to 60Hz. It supports signal output in multiple resolutions and can be fully compatible with CRT monitor and LCD/ LED monitor. In addition, it is stylish designed and equipped with a built-in speaker. Connecting it with an LCD monitor, you can easily get a fashionable and healthy LCD TV
Priced at $23.83, the iBall Claro CTV27 offers great functionality at an affordable price, making it a smart addition to any setup.
Accessories
- TV Box ................................................................ 1PC
- Stand .................................................................. 1PC
- Remote Control (Batteries included) .................. 1 PC
- Power Adapter .................................................... 1 PC
- VGA Cable ......................................................... 1 PC
- Stereo Audio Cable ............................................ 1 PC
- FM Antenna Cable ............................................. 1 PC
- AV Cable ............................................................ 1 PC
- User Manual. ...................................................... 1 PC
Specifications
- Power input: DC SV / 600mA
- RF input: 47-870MHz
- Video input: 1Vp-p (PAU NTSC)
- Resolution: 800*600/ 1024*768/ 1280*1024/ 1440*900/ 1680·1oso11920·108011920·1200
- RF output
Horizontal frequency: 37KHz - 75KHz,
Vertical frequency: 60Hz (refresh rate)
Features
- Watch TV on LCD / LED or CRT monitor
- Plug-n-play, No Software or PC require
- Full-band TV signals reception
- Enjoy TV programs for leisure entertainment while working on your PC
- Built-in FM
- High-resolution output delivers clear & stable picture without flicker
- 3D high efficiency noise reduction to suppress noise effectively
- Built-in speaker
- PIP function at PC mode allows you to adjust the size and position of the window
- Child Lock function to restrict children from watching certain channels
- Full-function remote control operating with OSD display
- AV interface for multi-media extension to DVD or Set-Top Box
- Supports 4:3, 16:9 and 16:10Aspect ratio
- Schedule On/Off function
Description
The iBall Claro CTV27 is a sleek and ompact device that fits seamlessly into any living room or office setup. Its primary function is to provide clear TV channel reception and high-quality FM radio playback. The device comes with multiple AV input ports, allowing users to connect various external devices such as DVD players, gaming consoles, and more. The digital tuner ensures crisp and clear reception of TV channels, while the FM radio feature includes preset channels for convenient access to favorite stations.
Hardware and Installation Instruction
Remote Control
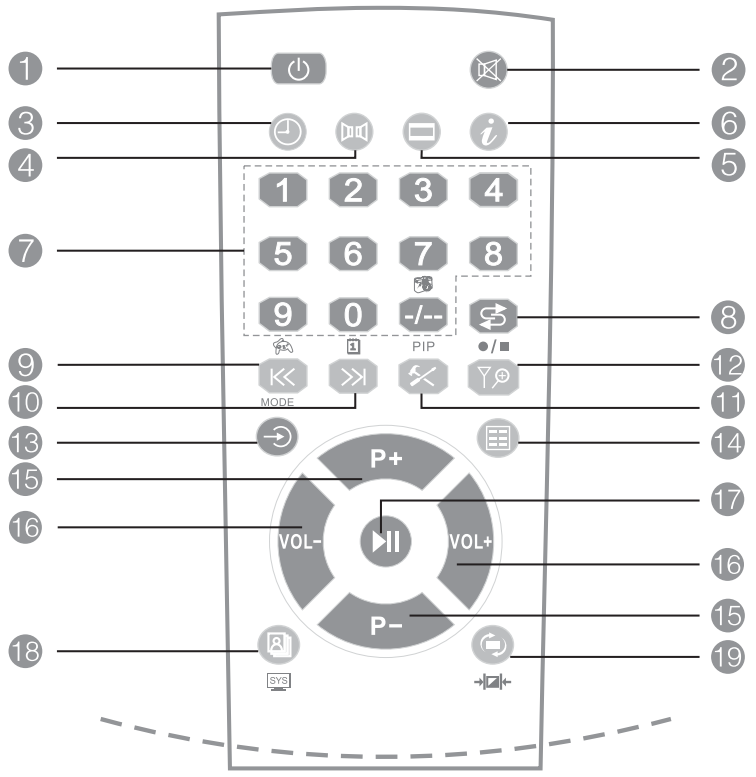
- POWER ON/ STANDBY [
 ]: Power on or standby button; standby is for PC mode.
 - MUTE [
 ]: Press to mute the sound, press again or [
 ] I [
] I [ ] to recover.
 - TIMER[
 ]: Press repeatedly to set the time in minutes (off, 15-180 min) that you want the device lo remain on before shutting off automatically.
  Invalid.
- ASPECT RATIO [
 ]: Switch aspect ratio among 4:3/ 16:9/ 16:10PS.
 - INFO [
 ]:Press briefly to display the current channel information; long press to display advertising message, and press again to exit.
  [
[ ]: Select a TV channel.
- RETURN [
 ]: Return to the last watched channel.
 - LEFT [
 ]: Move the position of window left when in PIP mode.
 - RIGHT [
 ]:
]:- Move the position of window right when in PIP mode;
- Long press to resume factory default setting. (Note: If no display on the monitor arising from false operation, long press this button to resume factory default setting)
- PIP [
 ]: Enter PIP function when in PC signal input. (Note: PIP function is also available when in PC output, refer menu 3.3)
 - [
 ]: Invalid.
 - SOURCE [
 ]: Switch between TV and Video.
 - MENU [
 ]: Enter and exit menu.
 - CH+/ CH- [
 ]: Go to the next upper or lower channel. In the Menu screen, move the cursor up or down.
 - VOL+ and VOL -
 : Increase or decrease the volume. In the Menu screen, move the cursor left or right.
 - STILL [
 ]: still the image from TV or video program.
 - OUTPUT MODE [
 ]: Adjust resolution and refresh rate of output picture.
(Note: To adjust resolution or refresh rate, press this button repeatedly, or press this button first, then select by and
and confirm by [
  ].
]. - MODE [
 ]: Press repeatedly to switch picture mode among Bright/ Standard/ Mild/ Custom.
Panel Illustration
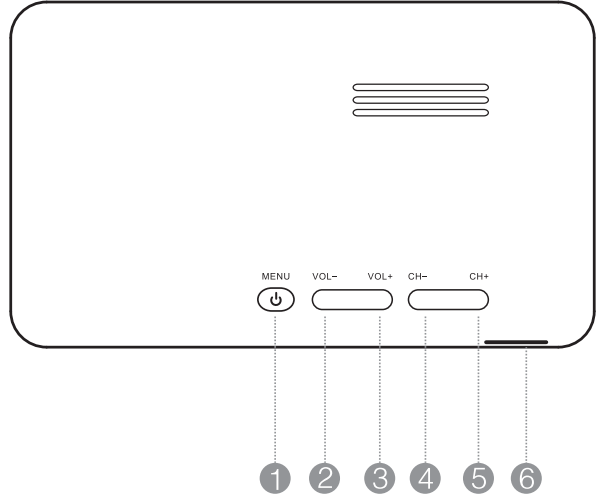
- [MENU] : Press briefly to pop up menu, long press to enter standby mode (PC).
- [VOL-] : VOL-
- [VOL+] : VOL+
- [CH-] : CH-
- [CH+] : CH+
- [
 ] : Remote sensor
Connecting Illustration
Rear Panel
Side Panel

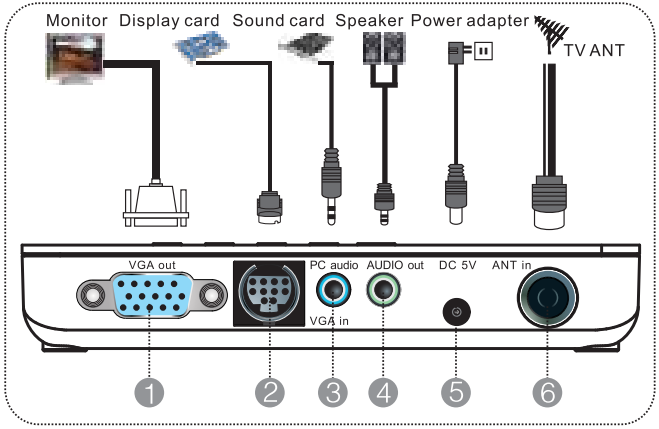
Note: To reduce the risk of electric shock or product damage, please power off the associated devices before connecting
- VGA out: Connect to a monitor.
- VGA in: Connect the 15-pin terminal of the supplied VGA cable to the computer's display card output.
- PC AUDIO: Connect to the computer's sound card output jack using the supplied stereo audio cable.
- AUDIO out: Connect to an active speaker.
- DC 5V: Connect with power input 5V.
- ANT in: Connect with an antenna.
- VIDEO in/Lin/ R in: Audio input jack.
Operating Instruction
Menu Display and Instruction
Menu I: Picture Setup
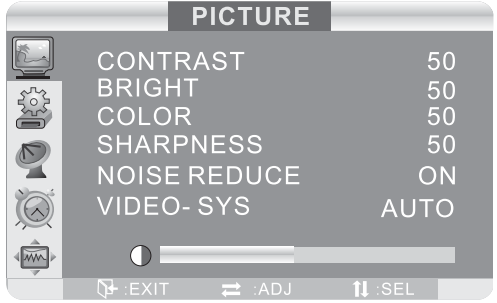
- Adjustable contrast/ brightness/ color/ Sharpness/ hue from O to 100.
(Note: Hue option is available only when in NTSC input) - Noise Reduction: There are ON and OFF for selection. Select On will reduce the noise waving points on picture.
- Video System: There are Auto, PAL, N3.58, N4.43, SECAM, PALM & PALN for selection.
Menu II: System Setup
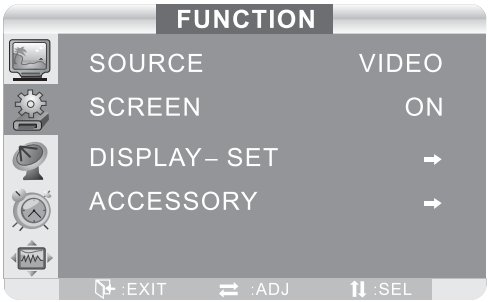
- Input Source: Switch between TV, Video & FM.
- Blue Screen: Select from ON and OFF to tum on/off the blue background when there is no signal input.
- Display Setup: Please refer to Menu Ill.
- Accessory: Includes four sub-menus, please refer to Menu IV.
Menu Ill: Display Setup
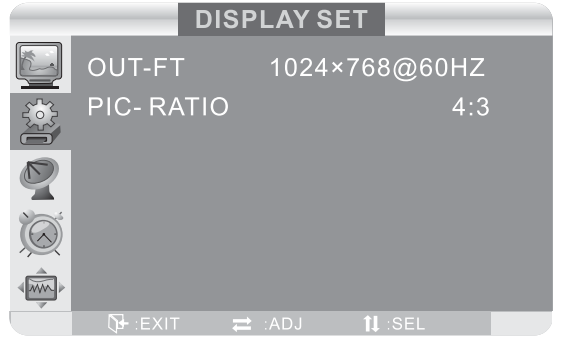
- Output Mode: Change the resolution and refresh rate of output picture.
- Aspect Ratio: There are 4:3, 16:9 and 16:10PS for selection.
Menu IV: Accessory
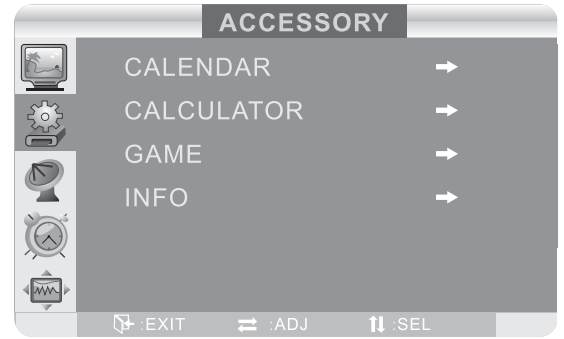
- Calendar: Display Year/ Month/ Day/Week, press[
 ] and [
 ] I [
] I [ ] to adjust the value of year and month.
 - Calculator: Offers simple calculation function.
- Game: Please refer to section 6 for instruction.
- Info: Display the model No. of this device, sofl/ firmware
Menu V: TV Tuning
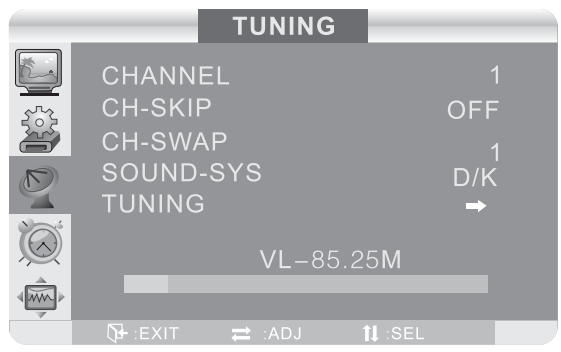
- Channel No.: Display the current channel number.
- Channel Skip: Skip the channels with no signal or poor signal.
- Channel Swap: Change the sequence of your favorite channels as you prefer.
- Sound System: Select the sound system according to your location. Wrong selection will result in noise or no sound.
- Tuning: Scan channels. Please refer to Menu VI.
Menu VI: Tuning
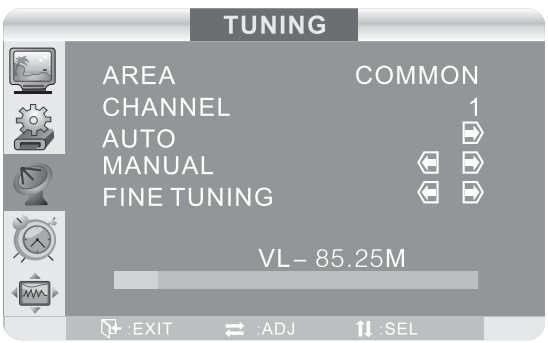
- Area: Set channel scanning options.
- Channel No.: Display the current channel number.
- Auto: Select this option, and then press
 to scan all the available channels automatically.
 - Manual: Select this option, and then press [
 ] or [
  ] to scan all the available channels manually.
 - Fine Tune: Select this option, and then press [
 ] or [
  ] to fine tune the frequency.
Menu VII: Timer
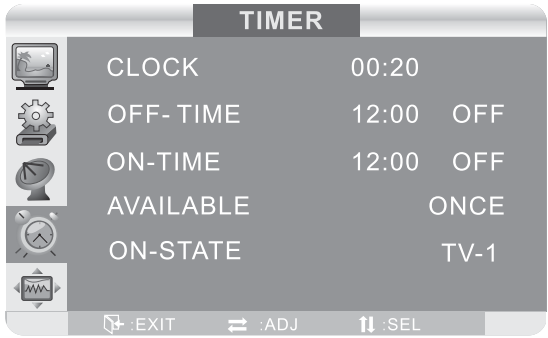
- Clock: Set the current time (unavailable when the device is power off.)
- OFF-Time: Set the lime to auto tum ofllhe device and select ON.
- ON-Time: Set the time to auto turn on the device and select ON.
- Available: Set the valid time of your setting be once or every day.
- ON-State: Set the mode for each startup, there are Video and TV to be selected.
Menu VIII: OSD
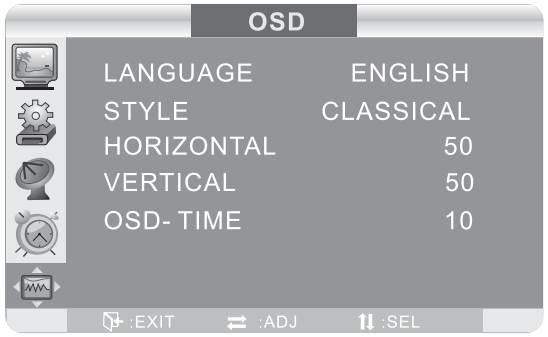
- Language: There are Chinese and English for selection.
- Style: Select the style of OS□ menu from Classic, Modern and Romantic.
- Horizontal Position: Move the menu on screen left or right.
- Vertical Position: Move the menu on screen up or down.
- OS Time: Adjust the display time of menu on screen.
Channel Scanning Operating Operation
- Connect the antenna plug of CATV or antenna lV to the ANT IN port on the device.
- In the Channel Tuning Menu, select Tuning and enter by [
 ]. Select Auto and then press
 to start auto scanning.
 - If you want to skip a channel which noise level is too high, you can enter Tuning menu and select CH. Skip, and then the channel will not appear.
- If you want to put the channels from a station in sequence, you can enter Tuning menu, and select CH. Swap. For example, CClV-1 and CCTV-2 are now located in channel 8 and channel 12 respectively. To put them in channel 1 and channel 2 respectively, you can conduct the following operations: select CClV-1, enter lV Tuning menu, select CH swap option, change the channel number from 8 to 1, and then press [
 ] to confirm. Similarly, you can change CClV-2 from Channel 12 to Channel 2 by the same way.
PIP Operating Instruction in PC Mode
- In lV or PC mode, press the [
 ] button on the remote control, a small window will be displayed on the upper left of the screen after 1-2 seconds, and the sound is also changed. Press [
 ] again to enlarge the window, and press for the third time to recover. For the fourth press, PIP is cancelled.
 - Press
 and
and  on the remote control to adjust the position of PIP window.
 - In PIP mode, press the Source button to switch between lV and Video.
(Note: In PC mode, volume can be adjusted without menu displayed.)
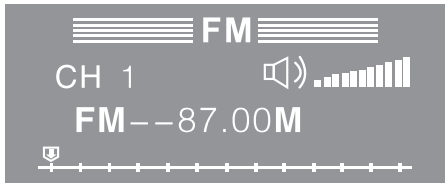
FM Operating Instruction
The FM menu is displayed on screen as below:
Press [
 ] on the remote control to enter FM tuning menu as below
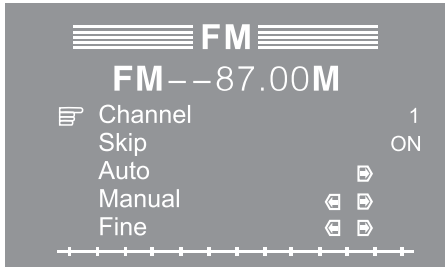
- Channel No.: Display the current channel number.
- Channel Skip: Select "ON"" to skip channels with no signal or poor signal
- Auto: Select and press
 to scan channels automatically.
 - Manual: Select and press
 to scan channels manually.
 - Fine Tune: Select and press [
 ] I [
] I [ ] to fine the frequency.
Note
- In PC (Standby) mode, press [
 ] on the remote control to switch to FM radio, then you can select FM channel and adjust volume; press [
 ] again to return to PC mode.
 - Long press the Menu button on the device to return to TV mode.
Game Operating Instruction
- How to start:
Open Main menu ► select Function menu► select Accessory ► select Game - How to play:
 box;
box; destination;
 wall; Move the box up/ down/ left/ right by pressing P+, P-, VOL+, VOL-. When all boxes are moved lo the destination, you pass the barrier.
 - Button Illustration:
 Move Upward
 Move Downward
 Move Leftward
 Move Rightward
 Exit
Exit
Setup Guide
To set up the iBall Claro CTV27, follow these steps:
- Connect the device to your TV using the provided AV cables.
- Plug in the power cord and turn on the device.
- Use the remote control to navigate through the menu and perform an auto-scan for available TV channels.
- For FM radio, simply select the FM mode and tune into your preferred station or save presets for easy access later.
Precautions
- Please read this manual carefully before operating the device.
- Do not remove the cover, it may cause electric shock or damage to the device.
- To reduce the risk of fire or electric shock, do not expose the device to dripping, splashing, rain or moisture and no objects filled with liquids, such as vases, shall be placed near the device.
- Do not place the device near any heat sources, or where it is exposed to direct sunlight. Never cover the slots and openings with a cloth or other materials.
- Please unplug the device in the thunderstorm weather or not been in use for a long time.
- To reduce the risk of electric shock or produce damage, please power off the associated devices before connecting
iBall Claro CTV27 TroubleShooting
TV
Failure | Cause and action |
No picture, no sound | No power connection or poor connection of plug. Receiver is in standby mode |
Picture displayed without sound | Speaker formultimedia is not connected proper1y. Volume is not turned on. Press VOL+ button. |
No color | Color is not turned on. Adjust color in PICTURE menu.Picture system is wrongly set.Set picture systemcorrectly in PICTURE menu. |
Normal soundbut no picture | Monitor is not connected well. Too strong interference in TV signalleads to protection state of monitor. |
No picture or abnormal color of picture from PC | Check if VGA cableis connected welland PC runsproperly. |
Remote control does not operate or has low sensitivity. | Check if batteries are installed correctly. Batteries areof weak power, or signal fromremote control is obstructed or disturbed. |
Snow spotsor oblique line/ vertical line in picture | Signal fromantenna is tooweak. Add antennaamplifier. Poor connection of antenna or the antenna is broken. Failure of TV station. |
PIP
Failure | Cause and action |
After PIP turned on, sound is normal but no picture display. | Check if the output modeof display card in PC is standard (Please refer to section 7.3). |
PIP invalid | Check if there is PC signal input. |
On what PC display modes PIP function properly
Resolution | Refresh rate | |
800 x600 | 60Hz | 75Hz |
1024 X 768 | 60Hz | 75Hz |
1280 X 1024 | 60Hz | 75Hz |
1440 X 900 | 60Hz | |
1680 X 1050 | 60Hz | |
1920 X 1080 | 60Hz | |
1920 X 1200 | 60Hz | |
Warranty
All iBan products are governed by iBan Warranty Terms. Refer https://www.iBall.co.in
Pros & Cons
Pros:
- Compact Design: Easy to fit in any space without clutter.
- Multiple AV Inputs: Versatile connectivity options for various devices.
- High-Quality Tuner: Clear reception of TV channels and FM radio stations.
- User-Friendly Interface: Simple navigation and easy setup process.
Cons:
- Limited Connectivity Options: No HDMI ports available.
- No Recording Feature: Cannot record TV programs or radio shows directly.
- Dependence on Antenna Quality: Signal quality may vary based on antenna performance.
Customer Reviews
Customers have generally praised the iBall Claro CTV27 for its ease of use and clear signal quality. Some users have noted that the lack of HDMI ports is a drawback but appreciate the multiple AV input options. Common complaints include issues with FM reception in areas with weak signals and the absence of a recording feature.
Faqs
What are the key features of the FM Radio Tuner?
How do I set up the iBall Claro?
Why am I not getting any signal on my iBall Claro CTV27 TV AV and FM Radio Tuner?
Can I connect external devices like DVD players or gaming consoles to the CTV27?
What should I do if my remote control is not working?
How do I save preset FM radio stations on my iBall Claro?
Is the iBall CTV27 compatible with all types of TVs?
Leave a Comment
