How to Use: Instant Pot COS9735 Pressure Cooker Duo SV User Manual
Content
Instant Pot COS9735 Pressure Cooker Duo SV
You can prepare nutritious and delectable meals in a short amount of time with the assistance of the Instant Pot Duo SV, which is a kitchen device that is both versatile and convenient. The slow cooking option allows you to simmer your favorite stews and soups to perfection, while the pressure cooking feature enables you to prepare foods up to seventy percent faster than you would be able to do so using traditional cooking methods. In addition, the Duo SV comes equipped with a sauté option, which enables you to brown your meat and veggies prior to pressure cooking. This results in a more robust flavor profile and a more satisfying texture.
What’s Included
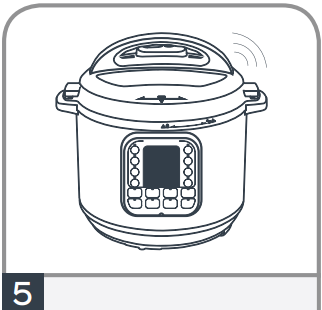
Before using the Instant Pot Duo SV, verify that all parts are accounted for. Remove all packaging material from in and around the cooker. Images are for reference only. The actual product may differ. Refer to the actual product.
Read instructions carefully, and pay attention to Important Safeguards and operation instructions. Do not remove safety warning stickers from the lid or the rating label from the back of the cooker base. Do not remove the serial number from the bottom of the cooker base.

INSTANT TIP: The Cooker Handles are also a Lid Holder. The lid has been designed with lid fins that fit perfectly inside the cooker handles on the left and right sides of the cooker base.
Product Specifications
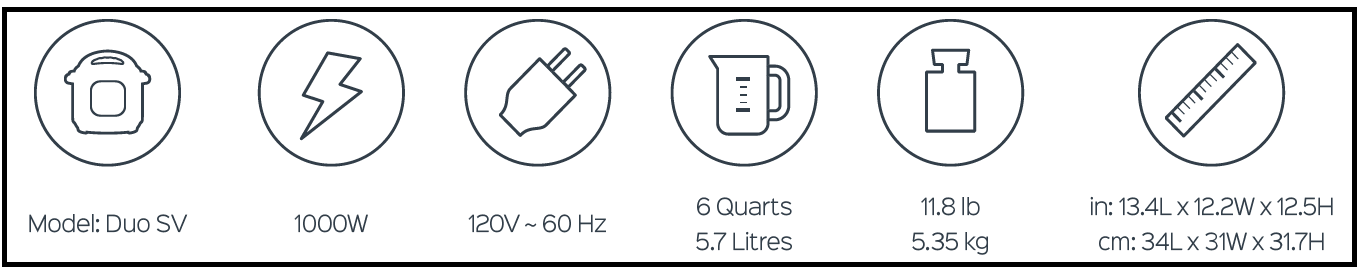
The models listed in this table are representative of all models in the Duo SV Series.
WARNING
Read this manual carefully and completely, and retain it for future reference. Failure to adhere to safety instructions may result in serious injury.
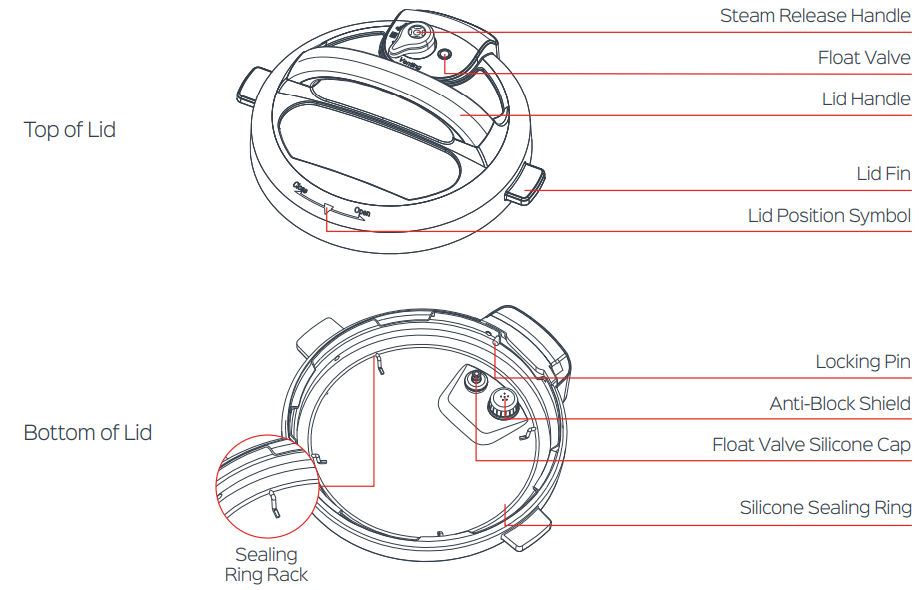
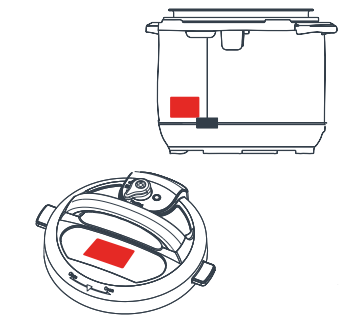
Lid Structure
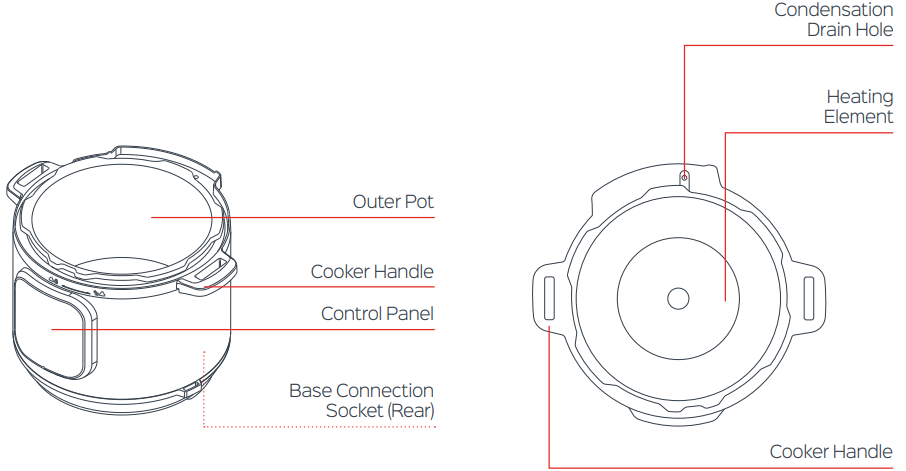
Cooker Base
Description
With the aid of the multipurpose and handy Instant Pot Duo SV, you can quickly prepare wholesome, delectable meals. With its pressure cooking feature, you can prepare meals up to 70% quicker than with conventional methods, and its slow cooking feature allows you to perfectly simmer your favorite soups and stews. Additionally, the Duo SV has a sauté setting that lets you brown your meat and veggies before pressure cooking them for superior texture and deeper tastes.
Getting Started
Read Manual & Place Cooker
Place the cooker on a stable surface.
CAUTION: Do not place the appliance on or in close proximity to a hot gas or electric burner, or a heated oven; heat from an external source will damage the appliance.
Open & Close Lid
If the sound is on, the cooker will jingle when the lid is opened and closed.
- Open: Grip the handle and turn the lid counter-clockwise until the symbol on the lid is aligned with the symbol on the rim of the cooker base. Lift the lid up and off the cooker base.
Close: Grip the handle and align the symbol on the lid with the symbol on the rim of the cooker base. Turn the lid clockwise until the symbol on the lid lines up with the symbol on the base.
Note: Always check the lid for damage prior to cooking.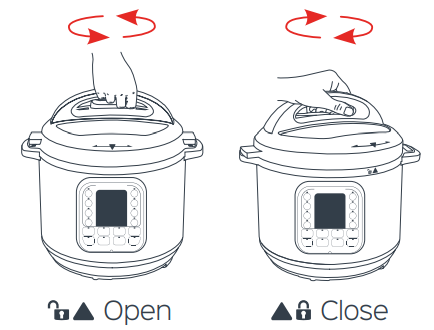
Remove & Clean Inner Pot
- Remove the inner pot from the cooker base and wash it with hot water and dish soap before first use. Wipe the outer surfaces of the inner pot and heating element to ensure they are dry and free of food debris. Failure to do so may damage the cooker.
- Place the inner pot into the cooker base before cooking. Food must be placed in the inner pot, not the cooker base.
The inner pot is an integral part of product safety. Always use an authorized Instant Pot inner pot when cooking. Failure to do so may cause personal injury or property damage.
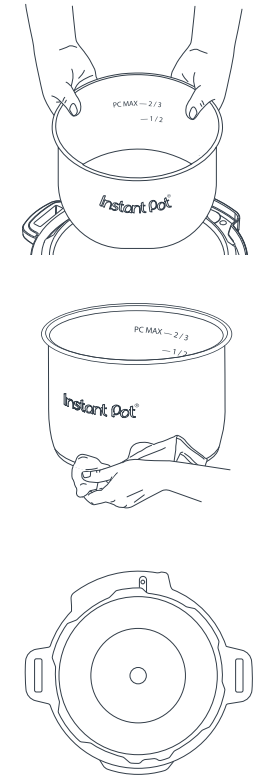
Note: Always check the inner pot for dents or deformations prior to cooking.
CAUTION
To avoid the risk of personal injury and/or property damage, do not pour food or liquid into the cooker base.
WARNING
Do not fill the inner pot higher than the “PC MAX — 2/3” line (Pressure Cooking Maximum), as indicated on the inner pot. Exercise extreme caution when cooking and venting food such as applesauce, cranberries, pearl barley, oatmeal, split peas, noodles, etc., as these foods may foam, froth, or spatter, and may clog the steam release pipe and/or steam release handle. Do not fill the inner pot higher than the “— 1/2” line when cooking these foods.
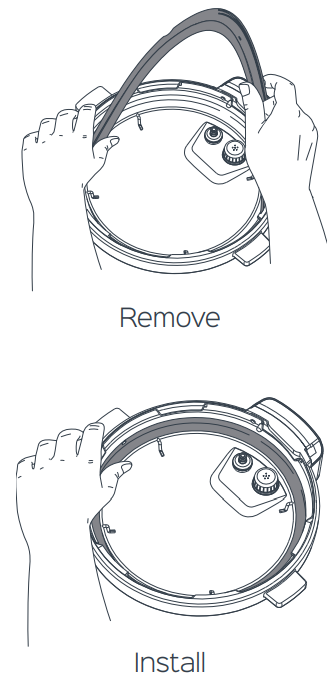
Check Sealing Ring & Sealing Ring Rack
Remove: Pull the sealing ring out from behind the sealing ring rack. Inspect the sealing ring rack. It should be centered in the lid and an even height all the way around. Do not attempt to repair a deformed ring rack.
The sealing ring must be installed before use.
Install: Place the sealing ring over the sealing ring rack and press it into place. Ensure the sealing ring is snug behind the sealing ring rack.
After closing the lid, the sealing ring creates an airtight seal between the lid and cooker base.
The sealing ring is an integral part of product safety. Replace your sealing ring every 12-18 months or when deformation or damage is noticed.
CAUTION: Always check for cuts or deformations in the sealing ring prior to cooking. Only use authorized Instant Pot sealing rings. Failure to follow these instructions may cause food to discharge, which may lead to personal injury or property damage.
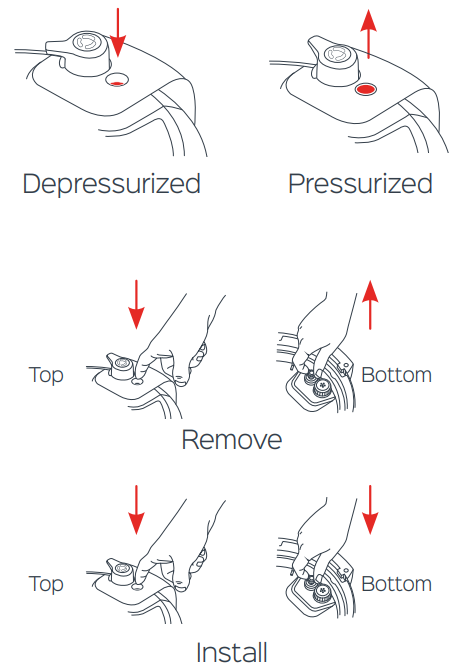
Remove & Install Float Valve
The float valve has 2 positions. It pops up to indicate when the cooker is pressurized, and lowers into the lid when the cooker is depressurized.
Remove: Place one finger on the flat top of the float valve. Turn the lid over. Detach the silicone cap from the bottom side of the float valve. Remove the float valve from the top of the lid. Do not discard the float valve or silicone cap.
The float valve and silicone cap must be installed before use to seal in pressurized steam.
Install: Drop the float valve into the float valve hole on top of the lid. Place one finger on the flat top of the float valve. Turn the lid over. Attach the silicone cap to the bottom of the float valve.
CAUTION: While the float valve is up, the contents of the cooker are pressurized. Do not attempt to remove the lid. Refer to the “Venting Methods” section in this manual for information on releasing pressure.
INSTANT TIP: Color Coding Your Sealing Rings. Silicone rubber may hold on to strong aromas. To reduce aroma transfer, try using different sealing rings for your various dishes! Instant Pot sealing rings come in a variety of colors. See the website for details.
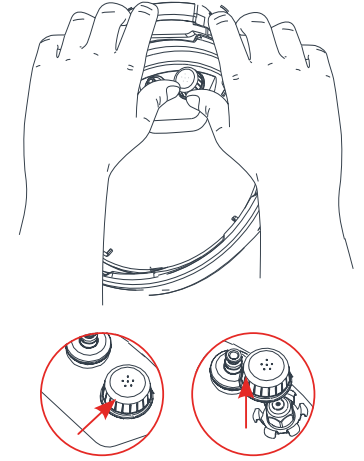
Remove & Install Anti-Block Shield
Remove: Grip the lid and press firmly against the side of the anti-block shield (pressing towards the side of the lid and up) until it pops off the prongs underneath.
The anti-block shield must be installed before use and cleaned frequently.
Install: Place the anti-block shield over the prongs and press down until it snaps into position.
The anti-block shield prevents food particles from coming up through the steam release pipe, assisting with pressure regulation.
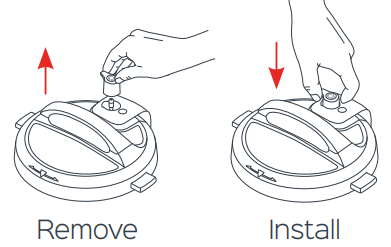
Remove & Install Steam Release Handle
Remove: Pull the steam release handle up and off the steam release pipe.
The steam release handle must be installed before use and cleaned frequently.
Install: Place the steam release handle on the steam release pipe. Press down. It fits loosely when installed properly, but will remain in place when the lid is turned over.
Install Condensation Collector
Install: On the back of the cooker base, align the grooves on the condensation collector over the tabs and push the condensation collector into place.
The condensation collector accumulates excess water and should be installed before cooking. It must be emptied after use.
Remove: Pull the condensation collector away from the cooker base. Do not pull down on the condensation collector.

Secure Power Cord
Secure the detachable power cord to the base power socket. Connect to a 120V power source. Ensure the connection is tight.
To disconnect, press Cancel. Remove the plug from the power source, then if applicable, remove the detachable power cord from the base power socket.

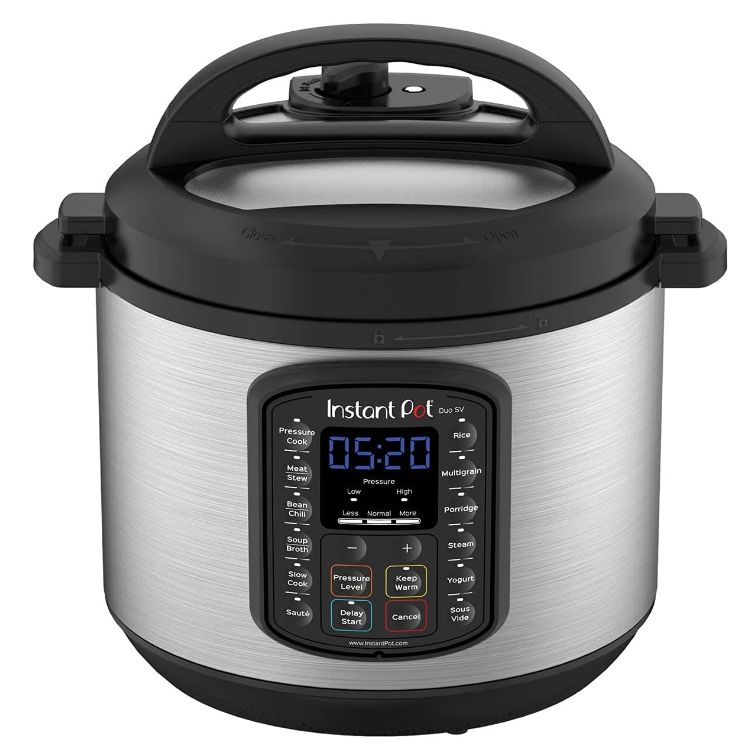
Control & Features
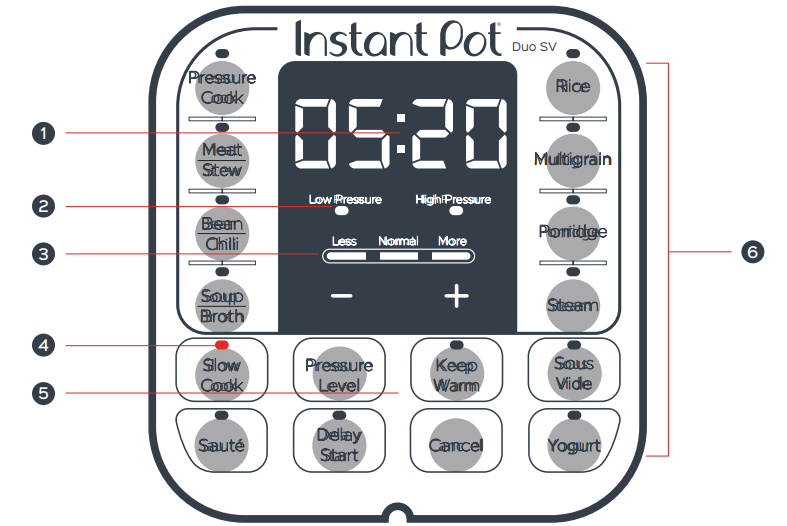
Cook Time Display
Shown in hour format: “05:20” is 5 hours, 20 minutes
Pressure Level Indicator
Indicators will illuminate to indicate Low or High pressure level
Less / Normal / More
Pressure Cooking: 3 Preset Time Options
Non-Pressure Cooking: 3 Temperature Levels
LED Indicators
The indicator will illuminate when the Smart Program is selected
Smart Program Settings
- + / – keys adjust time Press and hold the key to adjust the time quickly
- Pressure Level
- Keep Warm
- Delay Start
- Cancel
Smart Programs
Pressure Cooking
- Pressure Cook
- Meat/Stew
- Bean/Chili
- Broth
- Rice
- Multigrain
- Porridge
- Steam
Non-Pressure Cooking
- Slow Cook
- Sauté
- Sous Vide
- Yogurt
- Keep Warm
System Settings
Pressure Level
Select a pressure cooking Smart Program, then press Pressure Level to toggle between High (10.2 ~ 11.6 psi) and Low (5.8 ~ 7.2 psi). Higher pressure results in higher temperature.
Cancel Key & Standby Mode
When the cooker is plugged in but not in operation, the display will read “OFF” to indicate Standby. Press Cancel to stop a Smart Program at any time; the cooker will go to Standby.
Sound On/Off
Sound ON – When in Standby, press and hold the “+” key until the display indicates “S On”.
Sound OFF – When in Standby, press and hold the “–” key until the display indicates “SOFF”.
Note: Error code alerts cannot be silenced.
Adjust Temperature Display – Fahrenheit & Celsius
Press and hold + and – keys together for 5 seconds to toggle between °F and °C.
Note: Temperature is only displayed within the Sous Vide Program.
Memory Function & Default Reset
The Instant Pot remembers preferences within each Smart Program, allowing you to experiment and fine-tune settings for personalized cooking results.
Smart Program Reset
When in Standby, press and hold the Smart Program key until the cooker returns to Standby and displays “OFF”.
Full Default Reset
When in Standby, press and hold Cancel until the cooker beeps.
Note: Adjust the following at any time during cooking.
Pressure Cooking: Cook time, pressure level & Keep Warm on/off
Non-Pressure Cooking: Cook time, temperature & Keep Warm on/off
Venting Methods
There are 2 methods to release pressure:
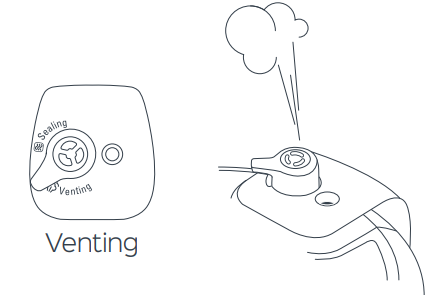
Natural Release (NR)
Leave the steam release handle in the “Sealing” position. The cooker dissipates heat so pressure releases naturally over time.
This method must be used when cooking food such as soups, stews, or chilis, as well as food that expands, such as beans and grains.
Note: Depressurization time will vary based upon the volume of food and liquid. It may take 10-40 minutes, or longer.
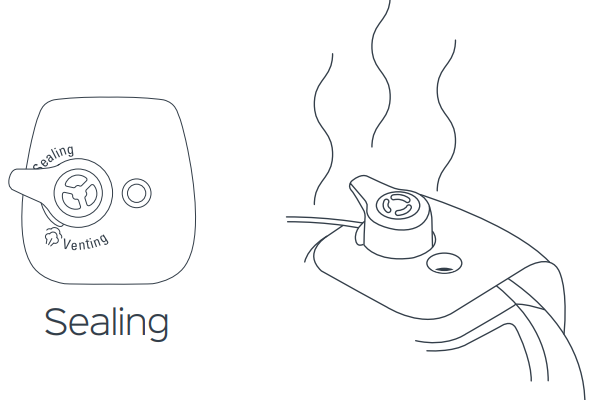
Quick Release (QR)
Turn the steam release handle from the “Sealing” position to the “Venting” position.
If spatter occurs, turn the steam release handle back to the “Sealing” position, and try again after a few minutes. If spatter continues, use NR to vent the remaining pressure.
CAUTION
The float valve will drop into the lid when the cooker has depressurized. Do not attempt to remove the lid while the float valve is still up.
WARNING

INSTANT TIP: 3 Stages of Pressure Cooking
- Pre-Heat & Pressurization
- Cook
- Keep Warm & Depressurization
Smart Program: Pressure Cook
Size Minimum Liquid*
3 Quart / 2.8 Litres 1 cup (8 oz / 250 mL)
6 Quart / 5.7 Litres 1 1/2 cups (12 oz / 375 mL)
8 Quart / 7.6 Litres 2 cups (16 oz / 500 mL)
Unless otherwise specified in the recipe
The following steps also apply to: Meat/Stew, Bean/Chili, Soup/Broth, Rice, Multigrain, Porridge & Steam.
- Add ingredients to the inner pot and insert the inner pot into the cooker base.
- Secure the power cord into the base power socket. Connect the power cord to a 120V power source.
- Place the lid on the cooker base and turn the lid clockwise to close.
- Turn the steam release handle to the “Sealing” position.
- Select the desired Smart Program.
- Optionally, press the Smart Program key again to toggle between “Less / Normal / More” preset cook times.
- Use + / – keys to adjust the cook time.
- Use Pressure Level to adjust between High and Low pressure.
- Press Keep Warm to toggle off or on.
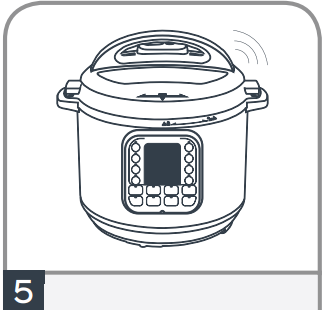
- After 10 seconds, the cooker beeps and begins heating. The display reads “On”.
- When cooking has completed, the display reads “End”. Follow recipe directions to select the venting method.
WARNING
- Do not fill the inner pot higher than the “PC MAX — 2/3” line indicated on the inner pot. When cooking foods that expand such as rice or beans, do not fill the appliance over the “— 1/2” line indicated on the inner pot.
- The lid will be removable until the cooker pressurizes, and the float valve pops up. Once pressurized, the lid will lock. To avoid scalding injury, do not attempt to force the lid open while the cooker is pressurized.
- Do not pour food or liquid into the cooker base. To avoid the risk of personal injury and/or property damage, always cook with the inner pot in place.
INSTANT TIP: Pressure Cook with the Steam Rack. When pressure cooking, use the steam rack to lift your food out of the cooking liquid. This will help distribute heat evenly and prevent the leeching of nutrients.
Pressure Cooking Program Options
| Smart Program Setting | Suggested Use | Note |
|---|---|---|
| Meat / Stew | Less: Soft texture Choose setting based on meat texture desired, or adjust cook time manually. Allow meat to “rest” for 5-30 minutes, depending on size. It will reabsorb cooking juices for tender, succulent meat. | Normal: Very soft texture More: Fall-off-the-bone texture |
| Bean / Chili | Less: Firmer texture Choose setting based on bean texture desired, or adjust cook time manually. When cooking beans or legumes, always use NR to release pressure. Ensure dry beans are completely submerged in water. | Normal: Soft texture More: Very soft texture |
| Soup/Broth | Less: Soup without meat Liquid remains clear due to lack of boiling motion. Always use NR to release pressure when cooking soup with a high starch content. | Normal: Soup with meat More: Rich bone broth |
| Rice | Less: Tender but firm to bite Automated cooking Smart Program. Displays “Auto” before cook time countdown. Depending on the volume of rice, cook time may range from 8-15 minutes. After cooking, wait 10 minutes then use QR to release pressure, or allow to depressurize with NR. | Normal: Normal texture white rice More: Softer texture white rice |
| Multigrain | Less: Brown rice, wild rice, black beans, chickpeas, etc. Select “Less” or “Normal” based on type of grain and desired texture. “More” begins with 45 minutes of warm water soaking time prior to 60 minutes of pressure cooking. | Normal: Brown rice, wild rice, mung beans, etc. More: Tough grains or a mixture of grains and beans |
| Porridge | Less: Oatmeal steel cut or rolled Adjust time as directed in the recipe. Always use NR to release pressure when cooking foods that expand. | Normal: White rice, porridge/congee More: Rice porridge/congee with a mixture of various grains |
| Steam | Less: Vegetables Use steam rack provided to elevate food from cooking liquid. Use QR to prevent food from overcooking. | Normal: Fish and Seafood More: Meat |
| Pressure Cook | Less: Manual programming Press Pressure Level to toggle between High and Low pressure. Use + / - keys to adjust the cook time. Adjust according to recipe or desired results. |
Smart Program: Slow Cook
Slow Cook is a non-pressure cooking Smart Program.
- Less – Corresponds to Low on common slow cookers
- Normal – Corresponds to Medium on common slow cookers
- More – Corresponds to High on common slow cookers
Steps to Slow Cook
- Add ingredients to the inner pot and insert the inner pot into the cooker base.
- Secure the power cord into the base power socket. Connect the power cord to a 120V power source.
- Place the lid on the cooker base and turn the lid clockwise to close.
Optional: Use an authorized Instant Pot glass lid. - Turn the steam release handle to the “Venting” position.
- Select Slow Cook.
- Press Slow Cook again to toggle between “Less / Normal / More” settings.
- Use + / – keys to adjust the cook time.
- Press Keep Warm to toggle automatic warming off or on after cooking completes.
- After 10 seconds, the cooker will beep 3 times and begin heating. The countdown will begin immediately.
Note: The float valve will not rise during non-pressure cooking Smart Programs – the lid is removable throughout the cook cycle.
Smart Program: Sauté
Sauté is a non-pressure cooking Smart Program and functions as a frying pan or flat-top grill.
- Less – Simmering and reducing liquid
- Normal – Pan searing or sautéing
- More – Stir-frying or browning meat
Steps to Sauté
- Insert the inner pot into the cooker base. Do not use the lid.
- Secure the power cord into the base power socket. Connect to a 120V power source.
- Select Sauté.
- Press Sauté again to toggle between “Less / Normal / More” temperature settings.
- After 10 seconds, the cooker will beep 3 times and begin heating. The display will read “On”.
- When the display switches from “On” to “Hot”, add recipe ingredients.
Note: If recipe ingredients are added before the “Hot” message appears, it may not appear at all. This is normal.
CAUTION
The Sauté Smart Program reaches high temperatures. If unmonitored, food may burn on this setting. Do not use the lid and do not leave your cooker unattended while using Sauté.
Sous Vide Cooking Table
| Food | Recommended Thickness | Expected Doneness | Cooking Temperature | Minimum Cooking Time | Maximum Cooking Time |
|---|---|---|---|---|---|
| Beef & Lamb | |||||
| Tender Cuts: | |||||
| Tenderloin, cutlets, | |||||
| sirloin, rib eye, rump, | |||||
| T-bone, chops | 2-5 cm / ½”- 2” | Rare | 122°F / 50°C | 1 hour | 4 hours |
| Medium-rare | 129°F / 54°C | 1.5 hours | 4 hours | ||
| Medium | 140°F / 60°C | 1.5 hours | 4 hours | ||
| Medium-well | 145°F / 63°C | 1.5 hours | 4 hours | ||
| Tougher Cuts: | |||||
| Blade, chuck, shoulder, | 4-6 cm / 1½“- 2½” | ||||
| shanks, game meats | |||||
| Poultry | |||||
| Chicken Breast | 3-5 cm / 1”- 2” | Soft and juicy | 145°F / 63°C | 1.5 hours | 4 hours |
| Traditionally firm | 155°F / 69°C | 1 hour | 4 hours | ||
| Chicken Thigh | 3-5 cm / 1”- 2” | Juicy and tender | 165°F / 74°C | 1 hour | 4 hours |
| Off-the-bone tender | 165°F / 74°C | 4 hours | 8 hours | ||
| Chicken Leg | 5-7 cm / 2 - 3” | Juicy and tender | 180°F / 82°C | 2 hours | 7 hours |
| Duck Breast | 3-5 cm / 1“- 2” | Soft and juicy | 146°F / 64°C | 2 hours | 4 hours |
| Pork | |||||
| Belly | 3-6 cm / 1”- 2½” | Traditionally firm | 180°F / 82°C | 10 hours | 22 hours |
| Ribs | 2-3 cm / ½”- 1½” | Off-the-bone tender | 138°F / 59°C | 10 hours | 22 hours |
| Chops | 2-4 cm / ½”- 2” | Pink and juicy | 135°F / 57°C | 1 hour | 4 hours |
| White throughout and juicy | 147°F / 64°C | 1 hour | 4 hours | ||
| Fish & Seafood | |||||
| Fish | 2-3 cm / ½”- 1” | Soft and buttery | 110°F / 43°C | 10 minutes | 30 minutes |
| Translucent/ starts to flake | 115°F / 46°C | 20 minutes | 45 minutes | ||
| Medium-rare | 125°F / 52°C | 20 minutes | 45 minutes | ||
| Medium, dry | 130°F / 54°C | 20 minutes | 45 minutes | ||
| Well done, crumbly | 135°F / 57°C | 20 minutes | 45 minutes | ||
| Shrimp | - | Traditionally firm | 140°F / 60°C | 30 minutes | 45 minutes |
| Lobster Tail | - | Soft and buttery | 140°F / 60°C | 1 hour | 1 hour |
| Scallops | - | Soft and buttery | 140°F / 60°C | 30 minutes | 30 minutes |
| Eggs | |||||
| Eggs Large / Extra Large | Runny | 140°F / 60°C | - | 45 minutes | |
| Soft boiled | 145°F / 62°C | - | 45 minutes | ||
| Medium boiled | 150°F / 65°C | - | 1 hour | ||
| Hard boiled | 165°F / 73.9°C | - | 1 hour | ||
| Fruits & Vegetables | |||||
| Fruits | - | - | 183°F / 83.9°C | 15 minutes | 2 hours |
| Vegetables | - | - | 183°F / 83.9°C | 45 minutes | 2.5 hours |
Keep Warm
Automatic Keep Warm is applicable to all Smart Programs except Sauté, Sous Vide, and Yogurt. When enabled, the setting will turn on after cooking completes, and remain on for up to 10:00 hours.
Automatic Keep Warm will be on by default. To turn it off, set the Smart Program, then press Keep Warm.
Keep Warm can also be turned on manually to reheat and warm dishes.
- Secure the power cord into the base power socket. Connect to a 120V power source.
- When in Standby, select Keep Warm.
- Press Keep Warm again to toggle between Less / Normal / More temperature settings.
Use + / – keys to set the warming timer. The cooker will keep warm for up to 99:50 hours.

Within 10 seconds, the cooker will beep 3 times and begin heating.
DELAY START
Delay Start offers the option to postpone the cooking start time for up to 24 hours. Delay Start can be applied to all Smart Programs except Sauté, Sous Vide, and Yogurt.
- Secure the power cord into the base power socket. Connect to a 120V power source.
Select the desired Smart Program and program it as outlined in the previous Smart Programs sections of this manual. - Select Delay Start.
Note: Cook time must be input before setting Delay Start. When the ‘hours’ section is flashing, use + / – keys to select the number of hours to delay cooking. For instance, “06:00” indicates that cooking will be delayed by 6 hours.
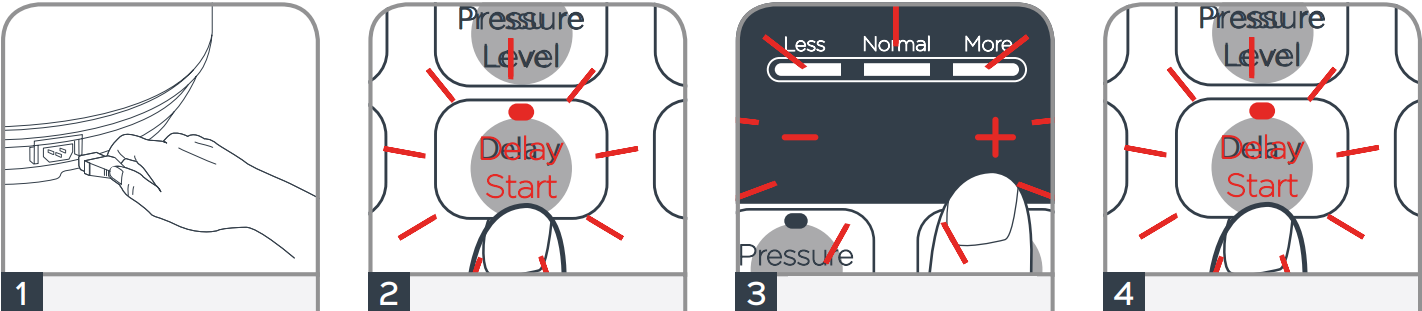
- Press Delay Start again to toggle to the ‘minutes’ section, and follow the same process as the previous step.
Within 10 seconds, the cooker will beep 3 times and the Delay Start timer will begin.
Note: Changes may not be made once the timer has started. To adjust the time or temperature, press Cancel and enter new selections.
Setup Guide
Setting up the Instant Pot Duo SV is easy and straightforward.
- Start by washing the inner pot and the lid with warm soapy water.
- Then, plug in the cooker and select the desired cooking program.
- Add your ingredients to the pot, close the lid, and make sure the steam release handle is set to the "sealing" position.
- Set the cooking time and pressure level, and press the start button.
- When the cooking cycle is complete, allow the pressure to release naturally for a few minutes before turning the steam release handle to the "venting" position.
Care & Cleaning
Unplug the Instant Pot and let it cool to room temperature before cleaning.
Part | Cleaning Method |
Cleaning Tip | ||
Dishwasher | Hand Wash | Wipe Clean | ||
Accessories
|
|
|
| |
Lid & Small Parts
Release Handle
|
|
|
and hold thelid vertically over asink, then turn it360°— suchas turning a steering wheel
(8 oz / 250 mL) water and 1 cup (8 oz / 250 mL) whitevinegar to inner pot,and run PressureCook for 5-10 minutes, then QR pressure. | |
Inner Pot |
|
| Use a barely-damp cloth to wipe any particles off power cord | |
Detachable Power Cord |
|
| ||
Cooker Base |
|
| ||

WARNING
Ensure the heating element remains dry at all times. Do not immerse the cooker base in water or attempt to cycle through the dishwasher. Do not submerge the power cord at any time. Do not wet the prongs of the power cord.

Troubleshooting
Problem | Possible Reason | Solution |
Difficulty closing lid | Sealing ring not properly installed |
Reposition sealing ring, ensure it is snug behind sealing ring rack |
Float valve in the popped-up position |
Gently press the float valve downward with a long utensil | |
Contents in cooker are still hot | Turn steam release handle towards “Vent” position, then lower lidonto cooker base slowly, allowing heat to dissipate | |
Difficulty opening lid |
Pressure inside the cooker | Release pressure according to recipe;only open lidafter float valve has dropped down CAUTION Contents may be under pressure; to avoid scalding injury, do not attempt to force lid open. |
Float valve stuck at the popped-up position due to food debris or residue | Ensure steam is completely released by quick releasing pressure, then press float valve gently with a long utensil. Open lidcautiously. Thoroughly clean float valve, surrounding area, and lidbefore nextuse | |
Inner pot is stuck to lid when cooker is opened | Cooling of inner pot may create suction, causing inner pot to adhereto the lid |
To release the vacuum,turn steam release handle towards “Vent” position |
Steam leaks from side of lid | Sealing ring damaged or not installed properly |
Replace sealing ring |
Lid not closed properly | Open then close lid | |
Sealing ring rack is warped or off-centre | Remove sealing ring from lid,check sealingring rack for bends or warps; contactCustomer Care | |
Food debris attached to sealing ring |
Remove sealing ring and clean thoroughly | |
Inner pot rim may be misshapen |
Check for deformation and contact Customer Care | |
Float valve does not rise | Food debris on float valve or float valve silicone cap | Remove float valve from lid and clean thoroughly; perform “Initial Test Run” to check for function; contact Customer Care |
Too little liquid in the inner pot | Check for scorching on bottomof inner pot; add 1 1/2 cups (12 oz / 325mL) liquid to innerpot | |
Float valve silicone cap worn, damaged or missing |
Install or replace float valve | |
Float valve obstructed by lid-locking mechanism | Tap float valve with a long utensil. If not resolved, turn cooker off and remove small partsfrom lid; clean thoroughly and re-install, then perform “Initial Test Run” to check for function; contact Customer Care | |
No heat in the inner pot | Perform “Initial Test Run” tocheck forfunction; contact Customer Care | |
Inner pot base may be damaged | Perform “Initial Test Run” tocheck forfunction; contact Customer Care |
Minor steam leaking/hissing from steam release handle during cook cycle | Steam release handle not in “Sealing” position | Turn steam release handle to “Seal” position | |
Cooker is regulating excess pressure | This is normal; no action required | ||
Steam gushes from steam release handle when in “Seal” position |
Not enough liquid in the inner pot | Add 1 1/2 cups (12 oz / 325mL) of a thin cooking liquid to innerpot | |
Pressure sensor control failure | Contact Customer Care | ||
Steam release handle not seated properly | Turn steam release handle to “Seal” position | ||
Display remains blank after connecting the power cord |
Bad power connection or no power | Inspect power cord; ensure detachable power cord is plugged tightly into base power socket;check outletto ensure it is powered | |
Cooker’s electrical fuse has blown |
Contact Customer Care | ||
Error code appears on display, cooker beeps and lights flash continuously | C1 C2 C6 C6H C6L |
Faulty sensor |
Contact Customer Care |
C5 |
Temperature is too high because inner pot is not placed in the cooker base | Press Cancel and wait for heating element to cool; ensure there are no foreign objects in cooker base; insert or reposition inner pot in cooker base and re-enter commands | |
Temperature is too highbecause there is nowater in innerpot | Add at least 1 1/2 cups (12 oz / 325mL) of cooking liquid to innerpot before reintroducing food | ||
C7 or NoPr | Heat element has failed | Contact Customer Care | |
Not enough liquid | Begin by adding1 1/2 cups (12 oz / 325mL) of a thincooking liquid to innerpot; add more liquid as required | ||
Steam release handle is in “Venting” position | Turn steam release handle to “Sealing” position | ||
Lid | Lid is not in the correct position for the selected Smart Program | Open and close lid; remove lid when using Sauté | |
OvHt, Burn or Food Burn | High temperature detected at bottom of inner pot; cooker automatically reduces temperature to avoid overheating Cooking will not resume until situation is resolved | Starch deposits at the bottom of the inner pot may be blocking heat dissipation. Press Cancel, thenrelease pressure according to the recipe, and inspect the bottomof the inner pot for scorching; add liquid if necessary | |
PrSE | Pressure has accumulated during a non-pressure cooking Smart Program | Turn steam release handle to “Seal” position | |
Occasional clicking or light cracking sound | The sound of powerswitching and expanding pressure board when changing temperatures |
This is normal; no action needed | |
Bottom of the inner pot is wet | Wipe bottom of inner pot, and ensure heating element is dry before cooking | ||
Pros & Cons
- Pros:
- Versatile and convenient
- Cooks meals quickly and evenly
- Easy to clean and maintain
- Large capacity
- Digital display and adjustable settings
- Cons:
- Can be noisy during operation
- May take some time to get used to the controls
- Can be expensive for some users
- Requires some counter space
- May not be suitable for very large quantities
Faqs
Is there a keep warm feature on the Instant Pot Duo SV?
What components goes into making the Instant Pot Duo SV?
What is the proper way to relieve pressure quickly?
In what way is the silicone sealing ring cleaned?
Is it possible to sauté food before applying pressure to the Duo SV?
What is the warranty on the Instant Pot Duo SV?
How can I utilize the Duo SV's yogurt feature?
What safety features does the Instant Pot Duo SV have?
How can I solve the Instant Pot Duo SV's error codes?
What security measures is the Instant Pot Duo SV equipped with?
Leave a Comment