Irobot Roomba Vacuum Cleaner 692 Owner Manual
Content
Introduction
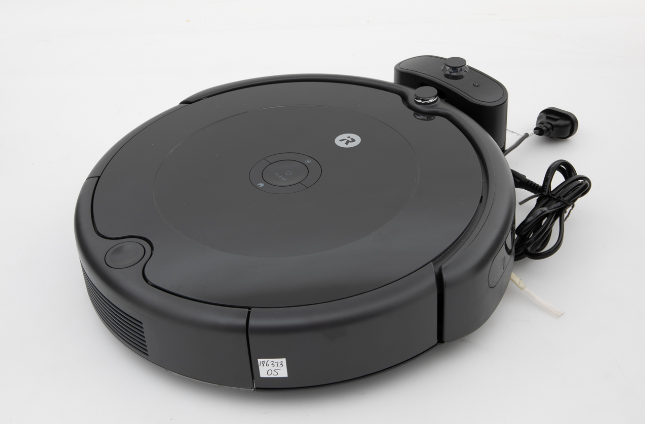
iRobot Roomba Vacuum Cleaner 692 is a powerful and efficient cleaning solution for your home. This robotic vacuum cleaner is designed to clean all floor types, including hardwood, tile, and carpet. The Roomba 692 uses iAdapt Navigation technology to navigate around your home and avoid obstacles while cleaning. It is equipped with a 3-stage cleaning system that uses dual multi-surface brushes, edge-sweeping brush, and powerful suction to pick up dirt, dust, and hair. The estimated price of the iRobot Roomba Vacuum Cleaner 692 is around $300, and it was launched in 2020.
Detailed Specifications
- 3-stage cleaning system
- Dual multi-surface brushes
- Edge-sweeping brush
- Powerful suction
- iAdapt Navigation technology
- Automatically recharges
- Schedule up to 7 cleaning times per week
- Run time up to 90 minutes
- Compatible with Amazon Alexa and Google Assistant
- Dimensions: 13.4 x 3.4 inches
- Weight: 7.8 pounds
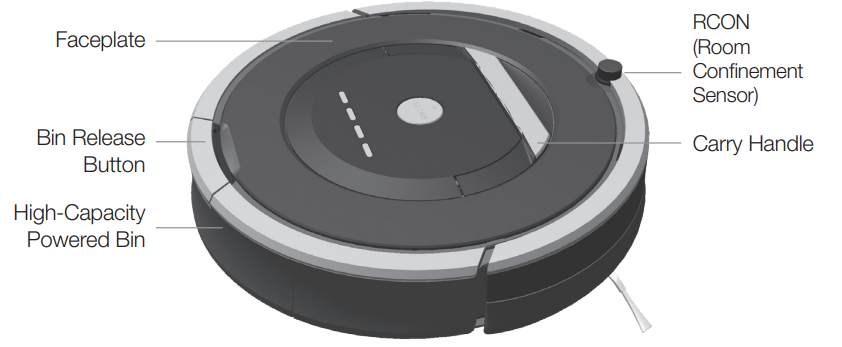
iRobot Roomba Anatomy
Top View
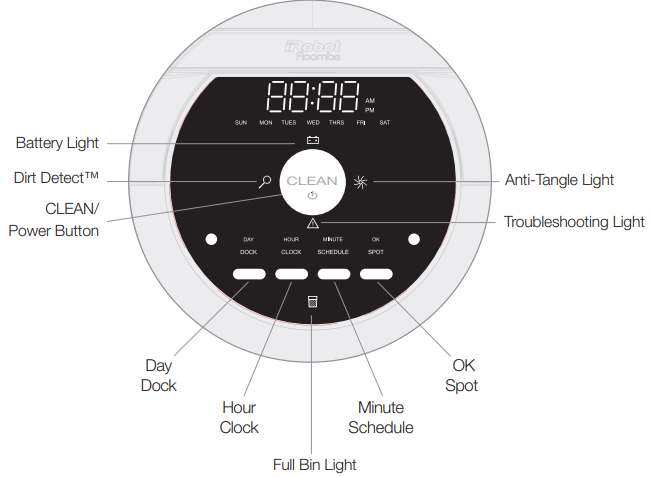
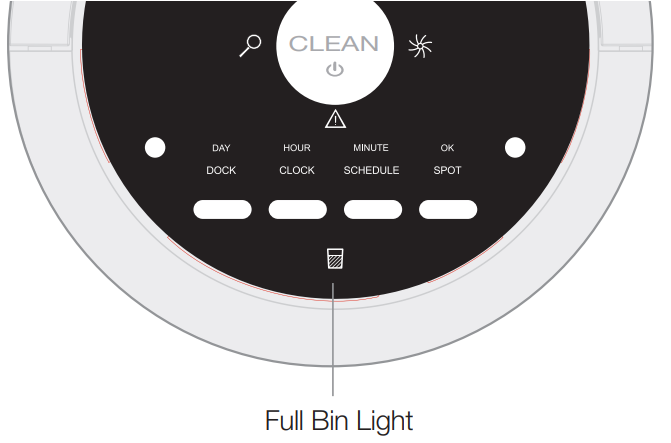
Buttons & Lights
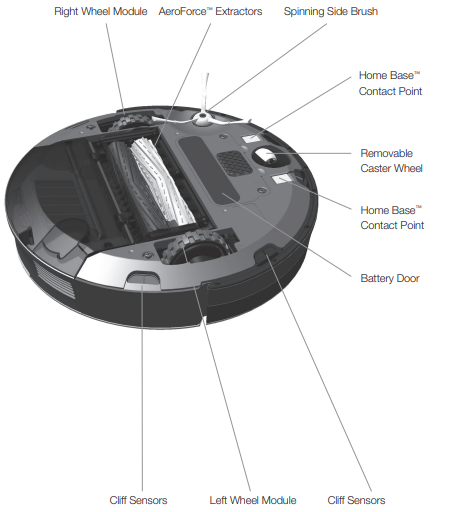
Bottom View of iRobot Roomba Vacuum Cleaner 692
Cleaning Head
High-Capacity Sealed Bin
Setting the Language
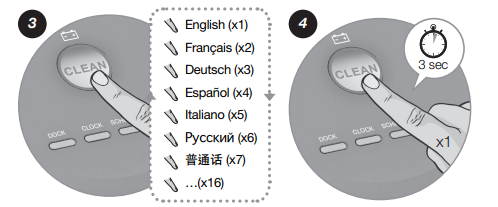
Roomba can provide troubleshooting messages in English, French, German, Spanish, Italian, Dutch, Danish, Swedish, Norwegian, Finnish, Polish, Russian, Portuguese, Japanese, Korean and Chinese. Roomba’s default language is English. To change the default language:
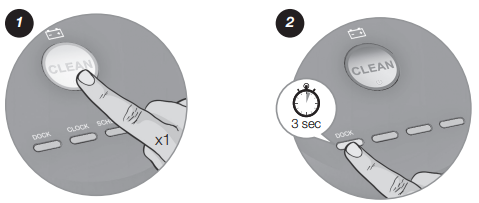
- Take Roomba off the Home Base.
- Turn on Roomba by pressing CLEAN, the lights will turn on.
- Press and hold DOCK until Roomba beeps and says the current language.
Release DOCK. Roomba is now in Language Selection Mode.
- Press CLEAN repeatedly until you hear the language you want.
Press and hold CLEAN to turn off Roomba and confirm your language choice.
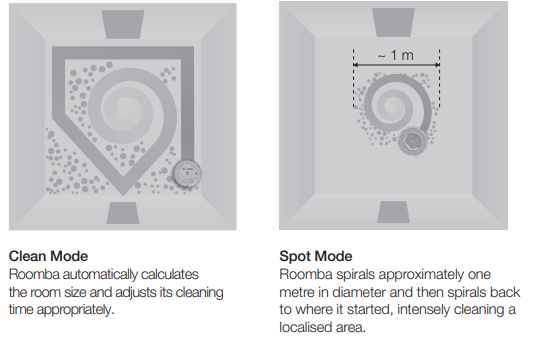
Cleaning Pattern
Roomba cleans floors differently than the way most people do, using its robot intelligence to efficiently clean the whole floor, under and around furniture and along walls. As it cleans, Roomba calculates the optimal cleaning path and determines when to use its various cleaning behaviours:

- Room Crossing: Roomba criss crosses the room to ensure full cleaning coverage.
- Dirt Detection: When Roomba senses dirt, the Dirt Detect light illuminates and Roomba cleans more intensely in that area using a back-and-forth motion, similar to a traditional vacuum.
Cleaning Modes
Roomba cleans based on the cleaning mode you select. Roomba has three cleaning modes:
Scheduled Cleaning Mode: When a future cleaning time is programmed, Roomba enters this mode. At the specified time, Roomba leaves its Home Base, cleans and then returns to the Home Base to recharge when it’s done.
iRobot Roomba Vacuum Cleaner 692 Cleaning System
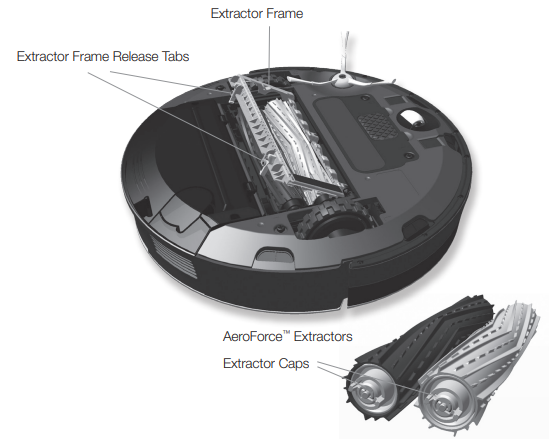
AeroForce Performance Cleaning System
The AeroForce™ System uses a combination of two breakthrough technologies, tangle-free AeroForce™ extractors and a high-powered vacuum channel, to deliver more cleaning power and less maintenance hassle.
- Tangle-Free AeroForce™ Extractors: Dual counter-rotating extractors incorporate durable rubber treads that grab dirt and debris from any floor type, eliminating the hassle of hair-tangled brushes.
- High-Powered Vacuum Channel: Accelerated airflow through a sealed channel dramatically increases suction at the floor to transfer dirt, debris and allergens through the extractors and into the HEPA-filtered, high-capacity bin.
- Spinning Side Brush: Cleans along wall edges and corners.
Floor Surfaces
Roomba works on wood, carpet, tile, vinyl and laminate, and adjusts automatically to different floor types. Roomba automatically senses stairs and other cliffs.
Anti-Tangle System
Roomba won’t get stuck on cords, carpet fringe or tassels. When Roomba senses it has picked up a cord or tassel, it will automatically stop its debris extractors or side brush and try to escape. Roomba may make a clicking noise when the anti-tangle system is activated. Roomba might stall when confronting rounded edges and might slide over particularly slippery surfaces. Extremely dark-coloured floors may contribute to Roomba’s cliff sensors working less effectively.
Description
The iRobot Roomba Vacuum Cleaner 692 is a smart and efficient cleaning solution for your home. It uses iAdapt Navigation technology to navigate around your home and avoid obstacles while cleaning. The Roomba 692 is equipped with a 3-stage cleaning system that uses dual multi-surface brushes, edge-sweeping brush, and powerful suction to pick up dirt, dust, and hair. It can clean all floor types, including hardwood, tile, and carpet. The Roomba 692 can be scheduled to clean up to 7 times per week, and it automatically recharges when the battery is low. It is compatible with Amazon Alexa and Google Assistant, allowing you to control it with voice commands.
Battery Storage and Charging
For best performance, charge Roomba’s battery overnight before using Roomba for the first time. Roomba is powered by a rechargeable battery. Roomba’s battery can last for hundreds of cleaning cycles if cared for properly.
Battery Life
To extend the battery life, iRobot recommends always keeping Roomba charged. For more details on how to maintain Roomba’s battery life, visit https://global.irobot.com/ Recharge Roomba as soon as possible following use; waiting several days can damage the battery. For storage off of the Home Base, remove the charged battery from Roomba and store in a cool, dry place.
Cleaning Time
You should fully charge Roomba’s battery before each cleaning cycle. When fully charged, the Battery light will be green and Roomba’s battery will last for at least one full clean cycle.
16-Hour Refresh Charge
If Roomba has been left off the Home Base for an extended period, it will initiate a special 16-hour charge cycle. This extensive charge refreshes Roomba’s battery and extends battery life. While charging, Roomba’s CLEAN button pulses quickly. Note: For best results, do not interrupt the refresh charge.
Charging Roomba
To charge Roomba, connect the line cord to the Home Base and then dock your robot. When Roomba is on the Home Base, always make sure that the Home Base power light is on.
Charging Lights
Roomba uses the battery icon light to indicate it is charging. Use this chart to determine the status of the battery.
| BATTERY ICON | BATTERY STATUS |
|---|---|
| Solid red | Battery empty |
| Amber pulse | Charging |
| Solid green | Fully charged |
| Quick amber pulse | 16-hour refresh charge |
Auto Virtual Wall
(optional accessory compatible with all models)
A Virtual Wall creates an invisible barrier that Roomba won’t cross. That makes it easy to confine Roomba to a particular room or area, and prevent it from getting too close to anything delicate or dangerous. You can set a Virtual Wall to block openings of up to two meters. It creates a cone-shaped barrier, so the beam gradually gets wider. The Virtual Wall also creates a halo of protection around itself, preventing Roomba from getting too close.
For best performance, place a Virtual Wall on the outside of the doorway you want to block. Point the arrows on top of the Virtual Wall towards the opening you want to block.
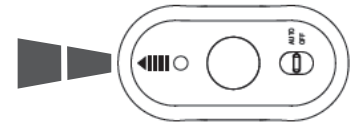
Auto Virtual Wall
When a Virtual Wall is set to Auto mode, the power light blinks continuously to indicate it is on. When battery levels are low, the Virtual Wall blinks twice repeatedly to indicate it needs new batteries. When in Auto mode, the batteries should last for around six months. To save battery power, turn the Virtual Wall off.
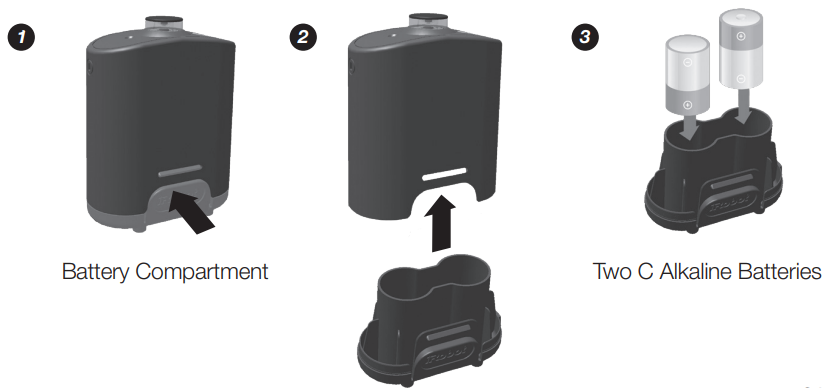
Battery Installation
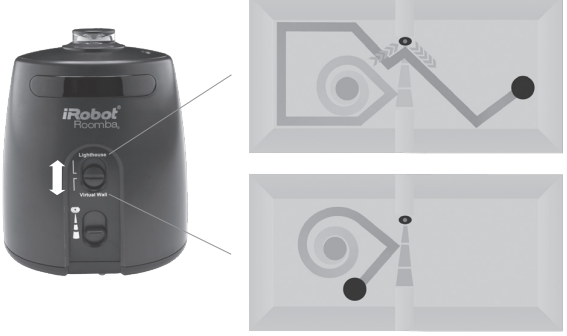
Virtual Wall Lighthouse
A Virtual Wall Lighthouse can act as both a Lighthouse and a Virtual Wall.
- In Lighthouse mode, it allows Roomba to efficiently clean multiple rooms before returning to the Home Base.
- In Virtual Wall mode, it blocks off areas you don’t want cleaned.
Simply use the Mode Selector to make your choice. Either way, the Lighthouse turns on and off automatically as you turn Roomba on and off. When on, the light on top is lit. Each Lighthouse runs on two C alkaline batteries. A flashing power light means the batteries need replacing soon.
How to use the Lighthouse mode
Simply place a Lighthouse in the doorway with the logo facing forward. When Roomba has completed the first room, the Lighthouse will help it navigate around your home, allowing it to clean room-to-room. When Roomba has completed cleaning, the Lighthouse will direct it back to its Home Base for recharging. You can use Lighthouses and Virtual Walls at the same time. However, please avoid placing them too close to each other, to the Home Base or to furniture that could block the invisible beams. Otherwise, Roomba might not recognize the Lighthouses or be able to return to its Home Base.
How to use the Virtual Wall mode
In Virtual Wall mode, the Lighthouse creates an invisible barrier that Roomba won’t cross. It automatically turns off when Roomba is turned off. Simply place the Lighthouse in the center of the doorframe. Unlike a Virtual Wall, a Lighthouse features a range selector that lets you adjust the length of the barrier — up to 2.4 meters. Please note: setting a longer range will drain the battery faster.
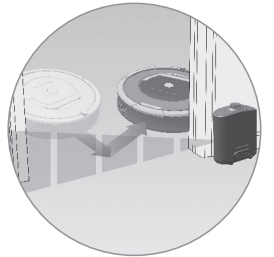
The Virtual Wall Halo makes Roomba perfect for homes with pets. By setting up a protective zone around the Virtual Wall the Halo prevents Roomba from bumping into and disturbing your pet’s food and water bowls. Follow these steps to set up the Virtual Wall Halo:
- Once you have installed batteries in the Virtual Wall, insert it all the way into the Halo. The circular lens of the Virtual Wall should be completely visible at the top.
- Place the Halo on the floor, level with Roomba and close to the bowls (as shown below).
- If you have one bowl, place it beside the Halo, almost touching the wall. If you have two bowls, place one on either side of the Halo.3
Virtual Wall Halo
The Virtual Wall Halo makes Roomba perfect for homes with pets. By setting up a protective zone around the Virtual WallTM, the Halo prevents Roomba from bumping into and disturbing your pet’s food and water bowls. Follow these steps to set up the Virtual Wall Halo:
- Once you have installed batteries in the Virtual Wall, insert it all the way into the Halo. The circular lens of the Virtual Wall should be completely visible at the top.
- Place the Halo on the floor, level with Roomba and close to the bowls (as shown below).
If you have one bowl, place it beside the Halo, almost touching the wall. If you have two bowls, place one on either side of the Halo.
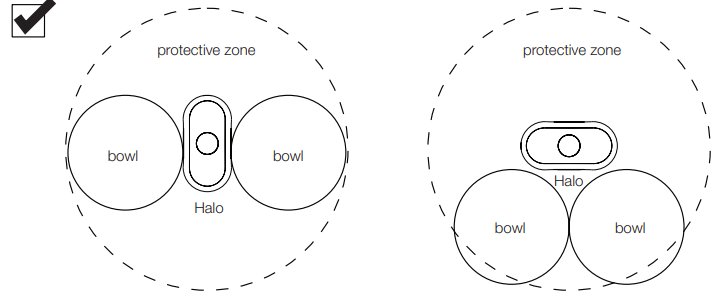
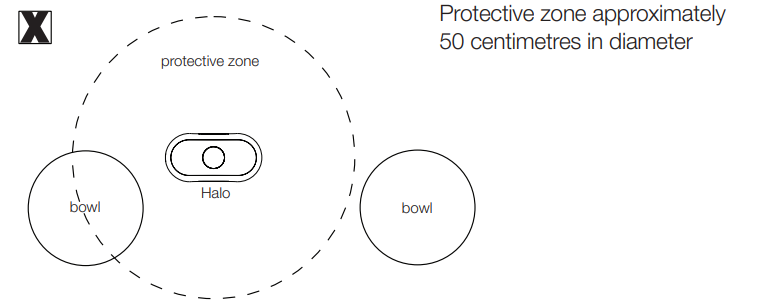
- The Virtual Wall Halo works on non-metal bowls less than 25 centimetres in diameter and up to 8.9 centimetres tall.
- As the Virtual Wall’s battery levels get low, the field may not be strong enough to protect your bowl(s). If that happens, change the batteries.
Home Base
At the end of a cleaning cycle or when Roomba’s battery is running low, it returns to the Home Base to charge. Roomba needs to find the infrared signal of the Home Base in order to return.
- Always keep the Home Base plugged in. When the Home Base is plugged in, its power light blinks to indicate the Home Base is connected to the power source.
- If Roomba returns to the Home Base and is unable to dock, it will try again until it docks successfully.
- When Roomba makes a connection and docks successfully, the Home Base power light stops blinking and turns solid green.
- Within a minute of docking, Roomba goes to sleep with just the battery light illuminated to show charging status.
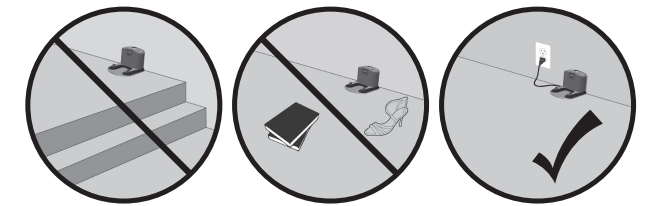
Home Base Location
Position the Home Base on a hard, level surface against a wall. Make sure it’s at least 1.2 meters from any stairs and that Roomba has a clear path to reach it.
Remote Control
(optional accessory for all models)
The Remote Control lets you conveniently control Roomba’s functions. You can use it to turn Roomba on and off and steer it around your room without bending down. It also gives you remote access to these commands:
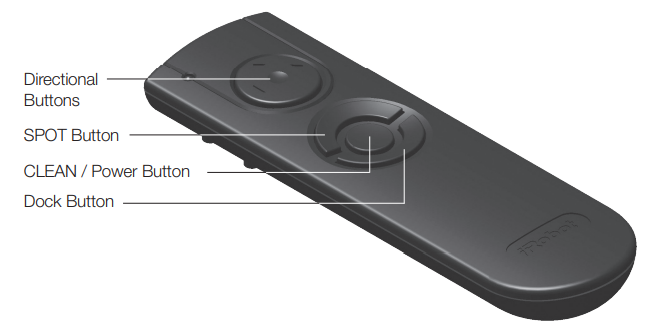
Before using your remote for the first time, install 2 AA batteries.
- SPOT: Roomba spirals approximately 1 meter in diameter and then spirals back to where it started, intensely cleaning a local area.
- CLEAN: Roomba automatically calculates the room size and adjusts its cleaning time appropriately.
- Dock: Roomba attempts to dock on the Home Base™, if present.
Make sure there is a direct line of sight from the remote control to Roomba and that the remote is pointed at Roomba. The remote control, Virtual Wall, Lighthouse, and Home Base operate using an invisible infrared beam. If they are all used in the same area, Roomba may see multiple infrared signals and will not operate. The remote WILL NOT work when Roomba is near a Virtual Wall.
Wireless Command Centre
(optional accessory for the 880 model)
The Wireless Command Centre lets you control all Roomba functions from up to 7.6 meters away. Use the Wireless Command Centre to turn Roomba on and off, schedule up to seven cleaning times a week, and steer Roomba around the room. To schedule Roomba to clean, use the buttons on the Wireless Command Centre as if they were on the robot itself. See page 27 for details on setting Roomba’s clock along with setting, changing, and deleting the cleaning schedule. Before using your Wireless Command Centre for the first time, install 4 AA batteries. If you purchase a Wireless Command Centre, visit global.irobot.com for details on setting up the Wireless Command Centre with Roomba.
Scheduling Roomba
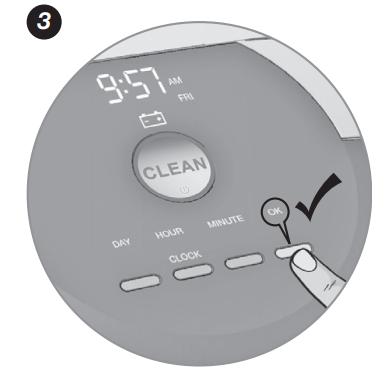
Setting the Time
You must set the time before scheduling Roomba to clean. To set the time:
Press CLOCK.
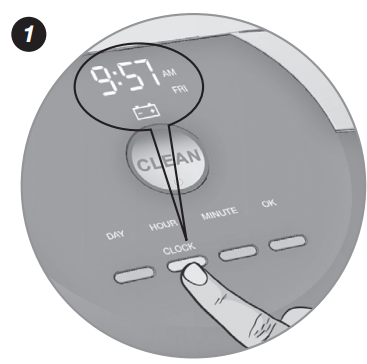
Use the DAY, HOUR, and MINUTE buttons individually to set the correct time.
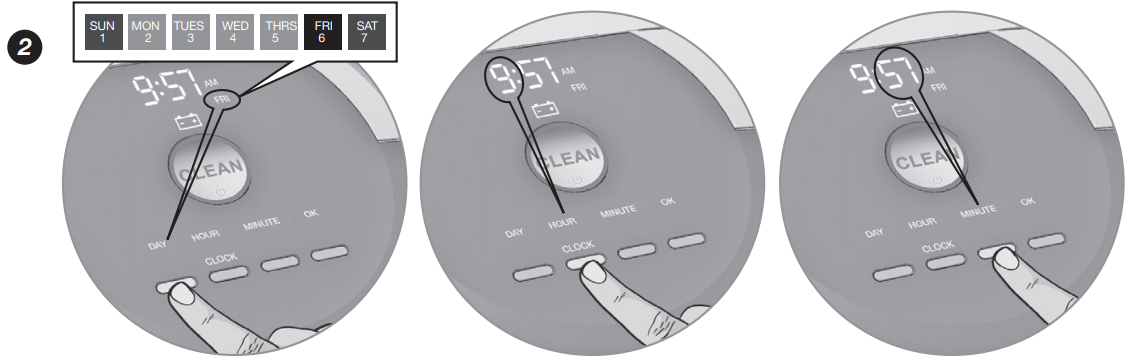
Press OK, Roomba will beep to indicate the time and date have been set.
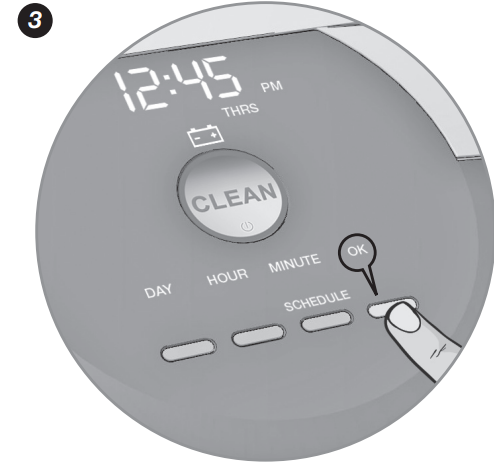
Setting a Schedule
You can schedule Roomba to clean once per day, up to seven times per week. You must set the time before setting a schedule. To set a schedule:
- Press SCHEDULE
Use the DAY, HOUR, and MINUTE buttons individually to set the schedule.
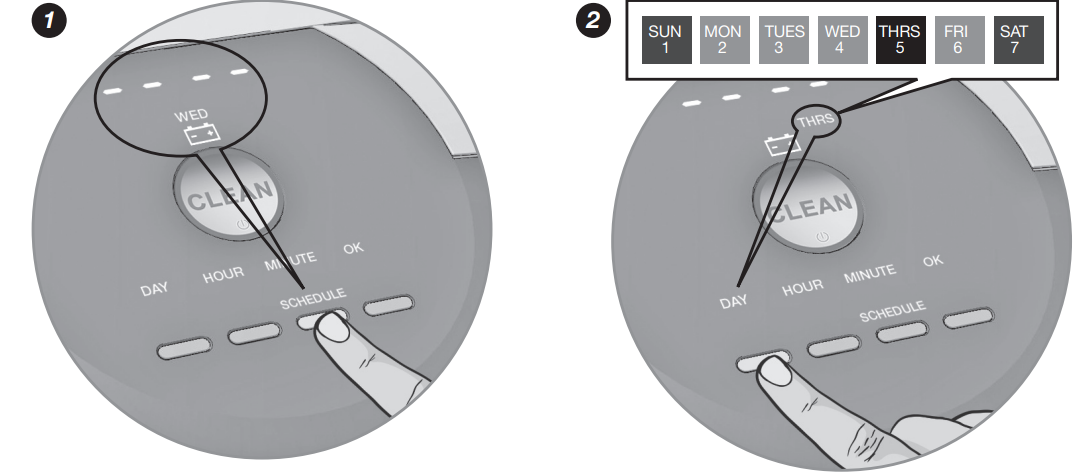
Press OK, Roomba will beep to indicate the schedule has been set.
Viewing Schedules
To view Roomba’s scheduled cleaning times:
- Press SCHEDULE.
- Press DAY to cycle through the scheduled cleaning times.
- Press OK.
Deleting a Schedule
To delete a scheduled cleaning time:
- Press SCHEDULE.
- Press DAY to cycle through the scheduled cleaning times.
- When Roomba displays the scheduled cleaning time you’d like to delete, press and hold DAY for five seconds. Roomba will beep to indicate the cleaning time has been deleted.
- Press OK.
Changing the Schedule
To change the cleaning schedule:
- Press SCHEDULE.
- Press DAY to cycle through the scheduled cleaning times.
- When Roomba displays the scheduled cleaning time you’d like to change, press and hold HOUR and MINUTE to make the change.
- Press OK, Roomba will beep to indicate the schedule has been set.
Roomba’s clock can be viewed in either the 12-hour (AM/PM) format or the 24-hour format. To toggle between the two views, press and hold CLOCK for 5 seconds. Toggle between 12-hour and 24-hour format using the CLOCK button. Press OK to save. Roomba beeps and the clock briefly illuminates to indicate the clock format has been switched. Roomba’s clock will switch back to the default 12-hour (AM/PM) format when the battery is disconnected or very low on power.
Setup Guide
Setting up the iRobot Roomba Vacuum Cleaner 692 is easy. Here are the steps to operate, assemble, configure, and pair it:
- Remove the Roomba from the box and charge it fully.
- Install the batteries in the virtual wall barrier that comes with the Roomba.
- Place the virtual wall barrier in the desired location to block off areas you don't want the Roomba to clean.
- Download the iRobot Home app on your smartphone and create an account.
- Connect the Roomba to your home Wi-Fi network using the app.
- Schedule cleaning times using the app.
Important Tips
Before using Roomba the first time, you must activate it by removing the battery pull tab. Charge Roomba overnight before first-time use.
Turning Roomba on and off
- To turn Roomba on, press CLEAN once. You will hear a beep, and the CLEAN button will light up.
- To start a cleaning cycle, press CLEAN again. Roomba will start a cleaning cycle.
- To pause Roomba, press CLEAN while Roomba is cleaning.
- To resume the cleaning cycle, press CLEAN again.
- To turn Roomba off, press and hold CLEAN until Roomba’s lights turn off.
For Best Performance
- Empty Roomba’s bin and clean its filter after every use.
- Use an Auto Virtual Wall or Virtual Wall Lighthouse (optional accessories) to keep Roomba cleaning where you want it.
- Wipe all sensors with a clean, dry, soft cloth every week.
- Use Roomba frequently.
Roomba contains electronic parts. DO NOT submerge Roomba or spray it with water. Clean with a dry cloth only.
Battery Life
To extend Roomba’s battery life and keep Roomba cleaning at peak performance:
- Always keep Roomba charged when not in use.
- Recharge Roomba as soon as possible following use; waiting several days can damage the battery.
- For storage off of the Home Base, remove the battery from Roomba and store in a cool, dry place.
Floor Conditioning Process for Homes with Heavily Shedding Pets
In homes with heavily shedding pets, Roomba’s bin may fill quickly with hair. In these environments, Roomba must go through a floor conditioning process. You can help Roomba along by scheduling it to clean frequently and emptying the bin when the Full Bin indicator lights – sometimes mid-session. After this conditioning process, you’ll enjoy consistent cleaning performance from your Roomba. For best performance, be sure to continue emptying Roomba’s bin and cleaning the filter when the full bin indicator lights.
Regular Maintenance
To keep Roomba running at peak performance, you should perform the following maintenance:
| Component | Maintain | Replace |
|---|---|---|
| Bin | After each use | Not applicable |
| Filter | Once per week (twice per week in homes with pets) | Every two months |
| AeroForce™ Extractors | Every four months (every three months in homes with pets) | Every twelve months |
| Sensors | Wipe once per week | Not applicable |
| Front Wheel | Once per week | As needed |
| Spinning Side Brush | Once per week | As needed |
| Roomba Contact Points | Once per week | Not applicable |
| Home Base™ Contact Points | Once per week | Not applicable |
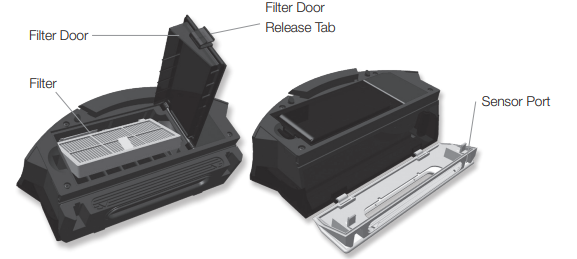
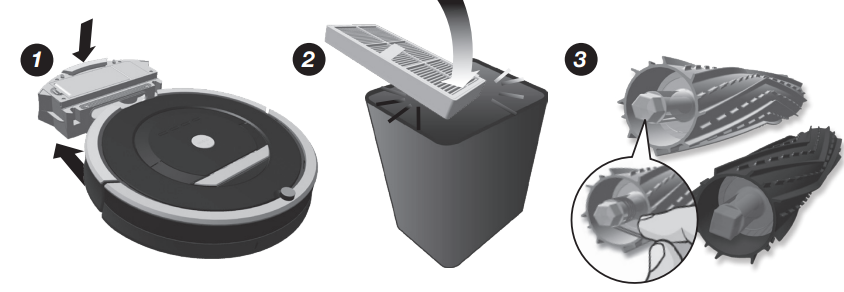
- Remove and empty Roomba’s bin after each use. Press the button and pull to remove the bin.
- Clean Roomba’s filter by tapping it against your rubbish bin. Remove the filter and shake off debris. Never wash the filter.
Clean Roomba’s extractors. Remove hair from Roomba’s yellow extractor caps (hair will pull out easily). Never wash the AeroForce extractors or extractor caps.
The filter door will NOT close unless a filter is reinserted.
If you notice Roomba picking up less debris from your floor, empty the bin, clean the filter, and clean the extractors. Do not attempt to run Roomba without the extractor caps. If you misplace Roomba’s extractor caps, contact iRobot Customer Care for replacement caps.
Clean Roomba’s sensors
Wipe the following items with a clean, dry cloth every week:
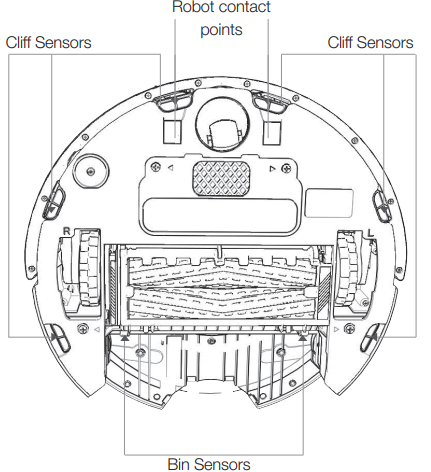
- Four front cliff sensors
- Two rear cliff sensors
- Two Home Base contact points
- Two robot contact points
- Two bin sensors
- Two inner bin sensor ports
- Two outer bin sensor ports
Clean Roomba’s front wheel
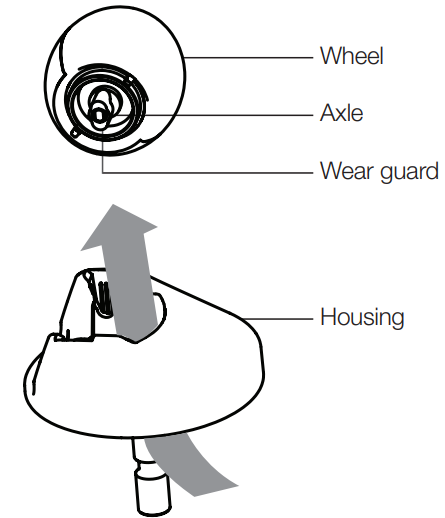
- Pull firmly on Roomba’s front wheel to remove it from the robot.
- Remove debris from inside the front wheel cavity.
- Remove the front wheel from its housing by pushing it through from underneath. Clear any hair wrapped around the wear guards.
- If the wheel rotation is still restricted, grab the wheel with one hand by placing your finger over one of the wear guards. Then, use your other hand to pull on the other wear guard to remove the axle from the wheel.
- Clear away any hair and debris from the axle and wheel assembly.
- Reinstall the wear guards and shaft assembly to the wheel, and the wheel to the housing.
Front wheels clogged with hair and debris could result in floor damage.
Clean spinning side brush
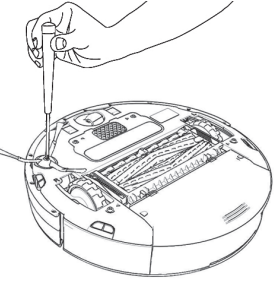
- Use a coin or small screwdriver to remove the screw. Then, remove the brush, clean it and reinstall it.
- When maintaining Roomba, look for the yellow parts. These parts are designed to be removed and cleaned every time you empty Roomba’s bin.
Troubleshooting
Roomba will tell you something is wrong with a two-tone “uh-oh” sound followed by a narrated voice. The troubleshooting light will also blink. Refer to the chart below to resolve Roomba’s problem. If the problem is not resolved, visit global.irobot.com.
Runtime Errors
To repeat Roomba’s error message, press CLEAN.
| Roomba blinks and says … | Likely cause | What to do |
|---|---|---|
| Error 1. Move Roomba to a new location, then press CLEAN to restart. | Roomba is stuck with a wheel hanging down. | Ensure Roomba’s wheels are firmly on the floor. If Roomba is stuck, start in a new location. If Roomba is not stuck, clean its side wheels of hair and debris. Push the wheels in and out, and check that they both turn freely. |
| Error 2. Open Roomba’s extractor frame and clean extractors. | Roomba’s extractors can’t turn. | Remove and clean Roomba’s extractors and caps. Clean Roomba’s side wheels of hair and debris. |
| Error 5. Spin Roomba’s side wheels to clean. | Roomba's side wheel is stuck. | Clean Roomba’s side wheels of hair and debris. Push the wheels in and out, and check that they both turn freely. Start Roomba in a new location. |
| Error 6. Move Roomba to a new location, then press CLEAN to restart. | Roomba’s cliff sensors are dirty, it is hanging over a drop or it is stuck on a dark surface. | If Roomba is stuck, start in a new location. If Roomba is not stuck, wipe its cliff sensors with a dry cloth. Start in a new location. |
| Error 7. Spin Roomba’s side wheels to clean. | Roomba’s side wheel is stuck. | Clean Roomba’s side wheels of hair and debris. Push the wheels in and out, and check that they both turn freely. Start Roomba in a new location. |
| Error 8. | Roomba’s fan is stuck. | Remove and empty Roomba’s bin. Then, briskly tap the bin to loosen any remaining trapped debris. |
| Error 9. Tap Roomba’s bumper to clean. | Roomba’s bumper is stuck, or the bumper sensor is dirty. | Briskly tap Roomba’s bumper several times to dislodge any debris that may be trapped underneath. |
| Error 10. Spin Roomba’s side wheels to clean. | Roomba’s side wheel is stuck, or its bumper isn’t detecting obstacles. | If Roomba is circling, clean its side wheels of hair and debris. Push the wheels in and out, and check that they both turn freely. If it's not circling, Roomba may be in a very large room. Use a Virtual Wall® to create a smaller cleaning area. |
| Error 11. | Roomba has an internal error. | Call iRobot Customer Service. |
Problems While Charging
| Roomba blinks… | Roomba displays… | Roomba says… | Likely cause | What to do |
|---|---|---|---|---|
| 1 time | Err 1 | Charging error 1 | Roomba’s battery isn’t connected. | Confirm Roomba’s battery pull tab is removed. Remove Roomba’s battery cover, then remove and reinstall battery (see page 35). |
| 2 times | Err 2 | Charging error 2 | Roomba has a charging error. | Let Roomba cool down for at least an hour and try charging again. |
| 3 times | Err 3 | Charging error 3 | Roomba has a charging error. | Contact customer support. |
| 5 times | Err 5 | Charging error 5 | Roomba has a charging error. | Confirm Roomba’s Home Base™ is installed properly (see page 24). Please wipe contact points clean on Roomba and Home Base™. |
| 6 times | Err 6 | Charging error 6 | Roomba’s battery is too warm. | Let Roomba cool down for at least an hour and try charging again. |
| 7 times | Err 7 | Charging error 7 | Roomba’s battery isn’t cooling. | Let Roomba cool down for at least an hour and try charging again. |
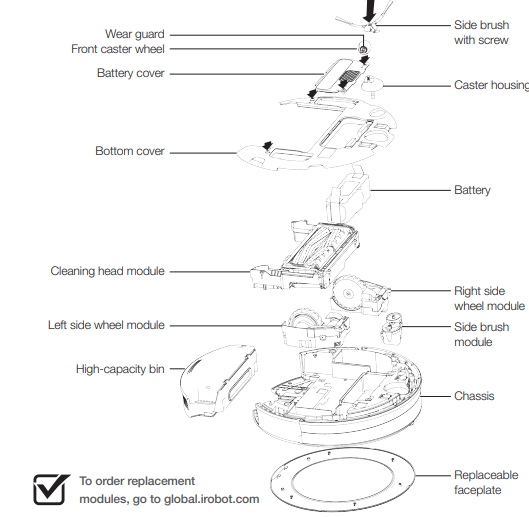
Replaceable Modules
Roomba has a number of modules that can be replaced, including its drive wheels, spinning side brush, main cleaning head, vacuum bin, caster wheel, and battery. To access Roomba’s replaceable modules, remove the following items in this order:
- The screw holding the side brush
- The two screws holding down the battery door
- The battery
The two screws holding down the bottom cover
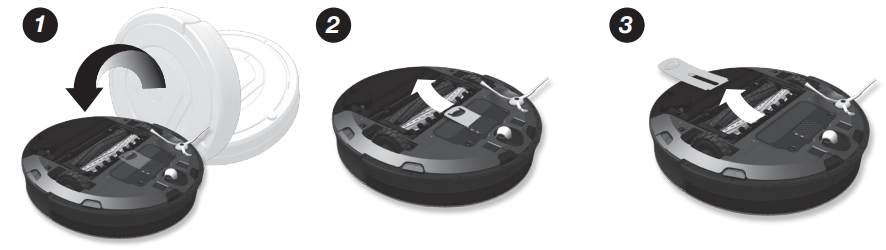
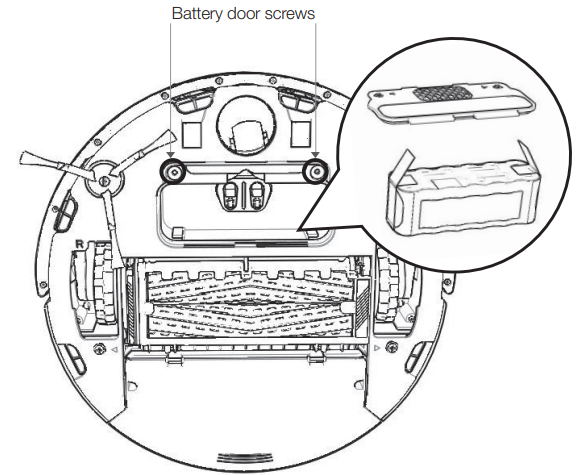
Battery Removal
Follow these instructions to remove and reinstall Roomba’s battery.
- Unscrew the two screws shown below and remove Roomba’s battery door and battery.
- Reinstall Roomba’s battery with the iRobot logo facing up.
Replace Roomba’s battery door and the two screws.
Pros & Cons
Pros
- Efficient cleaning
- Smart navigation
- Scheduling feature
- Voice control
Cons
- May get stuck on high-pile carpets
- App can be glitchy
- Expensive for some users
Customer Reviews about iRobot Roomba Vacuum Cleaner 692
Customers love the iRobot Roomba Vacuum Cleaner 692 for its efficient cleaning and smart navigation. However, some users have complained about the app being glitchy and the high price point. Overall, it has received positive reviews and is a great investment for a hassle-free cleaning experience.
Faqs
What type of surfaces can the iRobot Roomba Vacuum Cleaner 692 clean?
How long does the iRobot Roomba Vacuum Cleaner 692 run on a full charge?
Can the iRobot Roomba Vacuum Cleaner 692 be controlled via a smartphone app?
How does the iRobot Roomba Vacuum Cleaner 692 navigate and clean the house?
What is included in the box with the iRobot Roomba Vacuum Cleaner 692?
How do I clean and maintain the iRobot Roomba Vacuum Cleaner 692?
Is the iRobot Roomba Vacuum Cleaner 692 compatible with virtual walls?
How do I connect the iRobot Roomba Vacuum Cleaner 692 to my Wi-Fi network?
What should I do if my iRobot Roomba Vacuum Cleaner 692 is not charging?
How do I empty the dustbin on the iRobot Roomba Vacuum Cleaner 692?
Leave a Comment