
How to Use: Ivation DIGITAL FILM SCANNER IVAFS80 User Manual
Content
Introduction DIGITAL FILM SCANNER IVAFS80
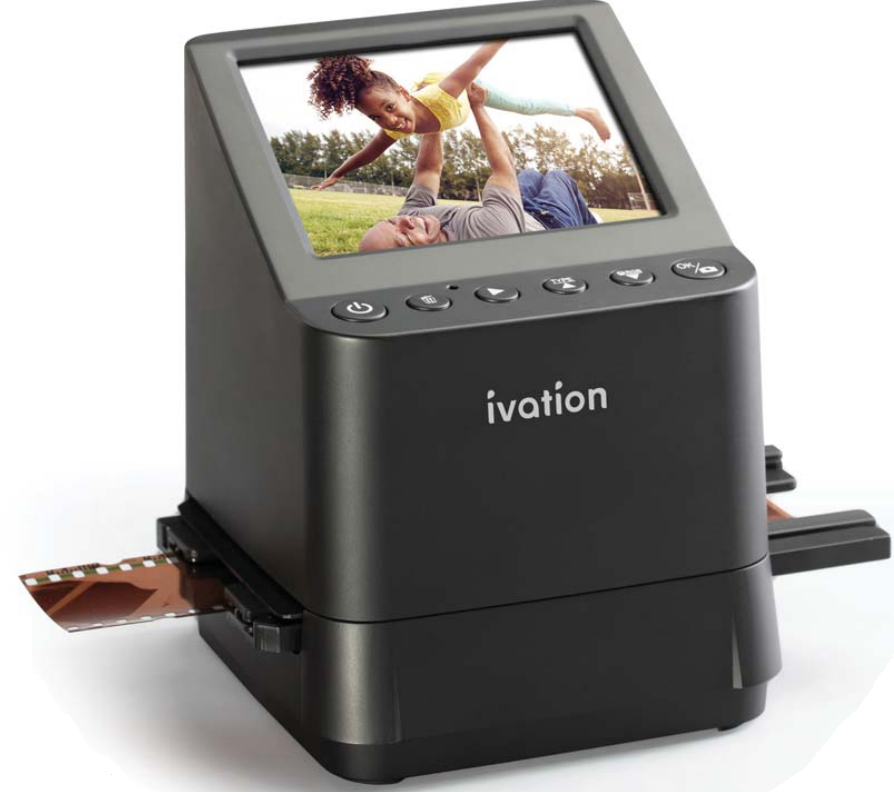
Introduction
Welcome to your comprehensive guide to the ivation DIGITAL FILM SCANNER IVAFS80—a compact, user-friendly device designed to breathe new life into your cherished photo negatives and slides. Whether you’re a photography enthusiast, a family historian, or a professional archivist, this film scanner offers a seamless solution for digitizing 35mm negatives, slides, and even black and white film with impressive clarity and ease.
The ivation DIGITAL FILM SCANNER IVAFS80 stands out for its plug-and-play simplicity, high-resolution scanning capabilities, and intuitive controls. No complex software installations are required; simply insert your film, adjust settings via the built-in LCD, and save your digital images directly to an SD card or transfer them to your computer. The scanner’s compact design makes it ideal for home use, while its robust construction ensures reliable performance for both occasional and frequent scanning tasks.
Key benefits include fast scanning speeds, adjustable exposure and color settings, and the ability to preview images before saving. The device is compatible with most computers and operating systems, and its estimated price range of $100–$150 makes it an affordable entry point for anyone looking to preserve and share analog memories in the digital age. The ivation DIGITAL FILM SCANNER IVAFS80 is widely available online and through major electronics retailers, ensuring easy access for customers worldwide.
Target users include amateur photographers, scrapbookers, genealogists, and small businesses needing to digitize archival materials. Its straightforward operation also makes it a great gift for older relatives wishing to revisit family history. With the ivation DIGITAL FILM SCANNER IVAFS80, transforming dusty boxes of negatives into vibrant, shareable digital photos has never been easier or more accessible.
Initial Setup
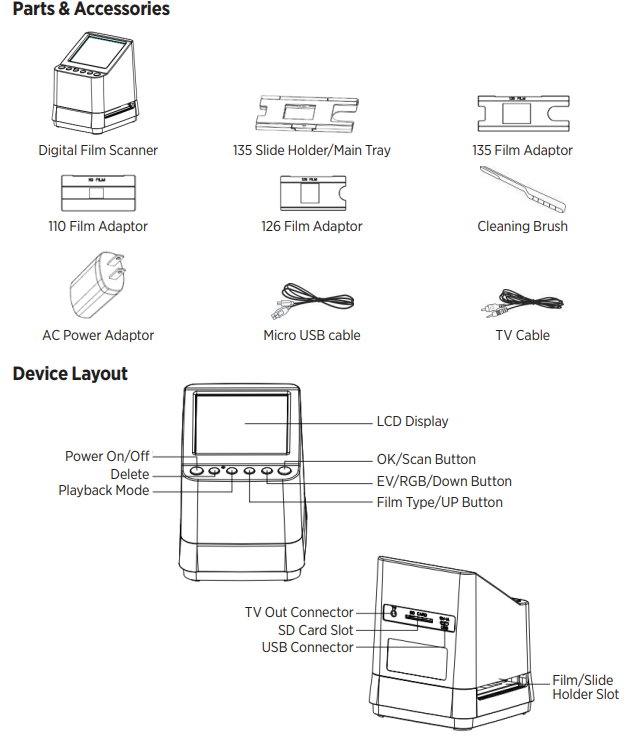
Getting Started Using your Digital Film Scanner
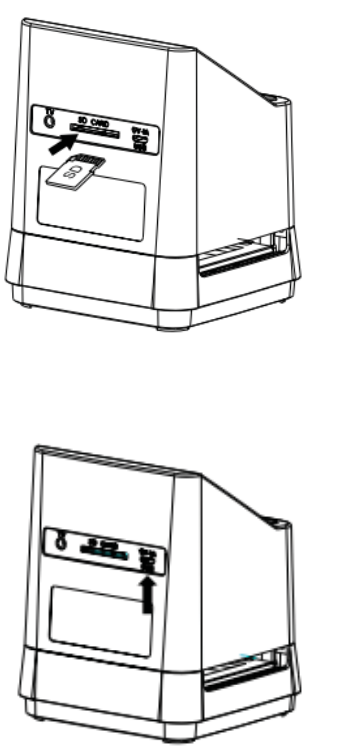
- Insert the SD card into the Digital Film Scanner. Making sure the golden connector pins are facing down, insert your SD card into the SD card slot, which can be found at the back of the Scanner between the TV-out connection and the micro USB port. The card will automatically lock into place if it is inserted properly. The scanner will not work without an inserted SD card.
Note: The Digital Film Scanner will only accept SD or SDHC cards up to a maximum of 32GB. XDHC cards are not compatible with this product. - Connect the included power cable to your Digital Film Scanner and power it on.
- Insert the small micro USB end of the included power cable into the micro USB port on the back of the Digital Film Scanner, located directly to the right of the SD card slot. If you encounter issues, do not force the connection, in case the connector is upside-down. Instead, turn the connector the opposite direction and try inserting it into the port again.
- Connect the larger end of the power cable into the USB port of the AC wall adaptor, or the USB port on your computer. Either of these options will supply the necessary power to the Digital Film Scanner. If you are trying to view or download the scanned images on your computer immediately after scanning them, plugging the device into your computer’s USB port is the best option.
- Turn on the Digital Film Scanner and select the correct Film Type.
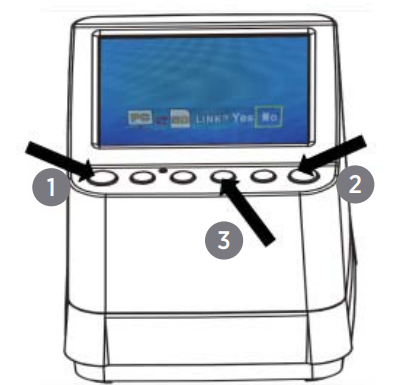
- Press the Power Button on your Digital Film Scanner (the leftmost button underneath the Liquid Crystal Display) to power the device on. You will see an introductory pop-up screen on the LCD as shown below, which prompts you to select whether or not to link your PC to view the images on the SD card.
Note: For further instructions about viewing images on your PC, refer to the section, “Downloading your Images from the SD Card to your Computer” in section 11. - To start out with viewing and scanning images from mounted slides or film negatives, use the ▲ or ▼ buttons to make sure “NO,” is highlighted by the yellow frame—this should be the default 1 option. If you are only attempting to view the 3 SD card images, use the ▲ or ▼ buttons to highlight “YES.” Finalize your selection by pressing the OK/
 button.
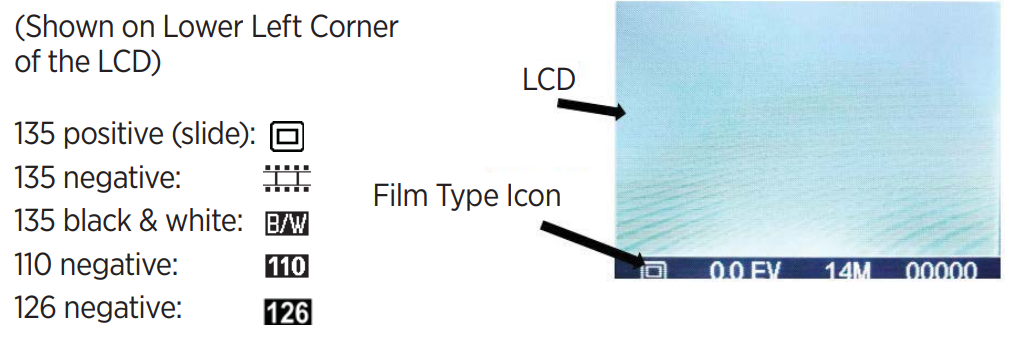
Note: You will always need to power the Digital Film Scanner off and back on to switch between viewing SD images on your PC and film/slide scanning modes. - The film type is automatically preset to 135 Transparent Slide Positive. If you are attempting to scan a different type of film, you can switch between film types by pressing the button marked TYPE/▲.
- Press the Power Button on your Digital Film Scanner (the leftmost button underneath the Liquid Crystal Display) to power the device on. You will see an introductory pop-up screen on the LCD as shown below, which prompts you to select whether or not to link your PC to view the images on the SD card.
Film Type Icons:
Specifications
Troubleshooting Common Issues with the ivation DIGITAL FILM SCANNER IVAFS80
Common Problems and Solutions
- Scanner Not Recognized by Computer: Try connecting to a different USB port, ensure your computer’s operating system is up to date, and check for driver updates. If the issue persists, test the scanner on another computer to isolate the problem
- Poor Image Quality: If scans appear too dark, light, or blurry, adjust the exposure, brightness, and focus settings on the scanner. Clean the film and scanner glass regularly to avoid dust artifacts.
- Device Not Powering On: Verify the power adapter is properly connected. If using USB power, ensure your computer provides enough power—disconnect other devices if necessary
- Error Codes or Malfunctions: Consult the user manual for specific error code meanings. For persistent hardware issues, contact iIvation customer support or seek service from an authorized repair center.
Preventive Measures
Handle film carefully to avoid scratches. Store the scanner in a dry, dust-free environment. Regularly update your device’s firmware (if available) and always use the recommended accessories.
Warranty and Support
The ivation DIGITAL FILM SCANNER IVAFS80 typically comes with a limited manufacturer’s warranty. For technical support, visit the official ivation website or contact their customer service team. Retain your purchase receipt for warranty claims.
For immediate assistance, refer to the troubleshooting section in your user manual or reach out to ivation all +1-800-XXX-XXXX during business hours.
Pros and Cons of the ivation DIGITAL FILM SCANNER IVAFS80
Advantages
- Ease of Use: Simple setup and operation, ideal for beginners and non-technical users.
- Portability: Compact size makes it easy to transport and store.
- Versatility: Scans 35mm negatives, slides, and black and white film.
- Direct Save Options: Save images directly to the SD card or transfer to a computer.
- Affordable: Competitive price point compared to professional-grade scanners.
Limitations
- Image Quality: While suitable for personal use, it may not match the resolution of high-end flatbed scanners.
- Manual Adjustments: Requires user input for exposure and focus, which may slow down batch scanning.
- Build Quality: Some users report that the device feels lightweight, potentially affecting long-term durability.
- Limited Format Support: Only compatible with standard 35mm film formats.
Overall, the ivation DIGITAL FILM SCANNER IVAFS80 offers excellent value for money for casual users and families, though professionals seeking archival-quality results may want to consider more advanced alternatives.
Customer Reviews and Testimonials
Users of the ivation DIGITAL FILM SCANNER IVAFS80 frequently praise its straightforward operation and the joy of rediscovering old photographs. Many highlight the device’s affordability and the ability to quickly digitize large collections without technical expertise. Common compliments include the intuitive interface and the convenience of saving scans directly to an SD card.
However, some customers note occasional issues with image sharpness and color accuracy, especially when scanning underexposed negatives. A few users have reported connectivity problems, though these are often resolved by updating drivers or switching USB ports[1][6]. Star ratings typically range from 3.5 to 4.5 out of 5, with most agreeing that the scanner is a worthwhile investment for personal use.
Testimonials often mention the emotional value of preserving family memories and the ease of sharing digital copies with relatives. For those seeking a budget-friendly, user-friendly film scanner, the ivation DIGITAL FILM SCANNER IVAFS80 is frequently recommended. If image perfection is critical, consider complementing your workflow with photo editing software.
Faqs
How do I properly set up the ivation DIGITAL FILM SCANNER IVAFS80 for first-time use?
What should I do if my ivation DIGITAL FILM SCANNER IVAFS80 fails to scan or save images?
Can the ivation DIGITAL FILM SCANNER IVAFS80 scan multiple film formats like 35mm, 110, and 126?
What are the main features of the ivation DIGITAL FILM SCANNER IVAFS80 that enhance film digitization?
How can I optimize the scanning quality on my ivation DIGITAL FILM SCANNER IVAFS80?
Is the ivation DIGITAL FILM SCANNER IVAFS80 compatible with Mac and Windows computers for transferring scanned images?
What maintenance steps should I follow to keep the ivation DIGITAL FILM SCANNER IVAFS80 in good working condition?
How do I troubleshoot image alignment or blurry scans on the ivation DIGITAL FILM SCANNER IVAFS80?
More ivation manuals
Leave a Comment