Setup & Use: Kenwood BM350 Bread Maker Machine User Manual | Recipe Booklet
Content

Introduction of Kenwood BM350 Bread Maker Machine
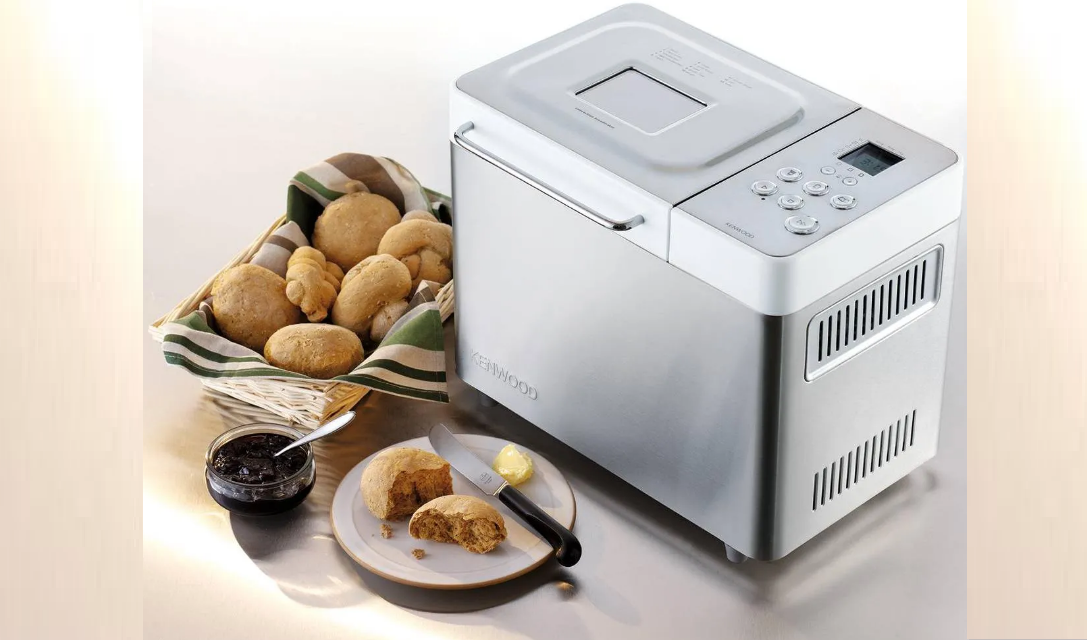
Introducing the Kenwood Bread Maker Machine, a fantastic addition to any kitchen that enables you to create fresh, delicious bread in the comfort of your own home. With an estimated price range of $180 to $220 and a launch date in early 2021, this bread maker is both accessible and cutting-edge.
Detailed Specifications of Kenwood BM350
The Kenwood BM350 Bread Maker Machine boasts several key features, including:
- 15 automatic programs, including gluten-free, French, whole wheat, and more
- 3 loaf sizes (1.0, 1.5, and 2.0 lbs)
- 3 crust colors (light, medium, and dark)
- Delayed start timer (up to 15 hours)
- Viewing window to monitor the baking process
- Automatic fruit and nut dispenser
- Non-stick, removable baking pan
- Cool-touch exterior and handle
- Recipe book and instruction manual included
Description of Kenwood Bread Maker Machine
The Kenwood BM350 Bread Maker Machine offers numerous benefits that make it a must-have for any bread lover. With 15 automatic programs, you can easily create a wide variety of bread types, tailoring your creations to your specific tastes. The three loaf sizes and crust colors allow for further customization, ensuring you achieve the perfect loaf every time. The delayed start timer is a convenient feature, allowing you to prepare dough ahead of time, so your bread is ready when you want it. The viewing window and automatic fruit and nut dispenser make the baking process both enjoyable and effortless.
key Features of Kenwood BM350
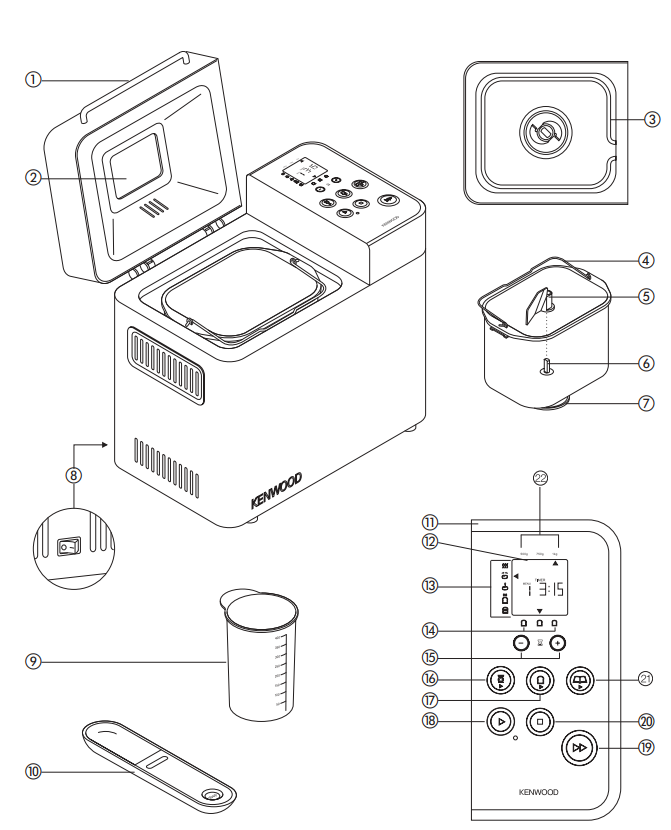
- lid handle
- viewing window
- heating element
- bread pan handle
- kneader
- drive shaft
- drive coupling
- on/off switch
- measuring cup
- dual measurng spoon 1tsp & 1tbsp
- control panel
- display window
- program status indicator
- crust colour indicators (light, medium, dark) delay timer buttons
- loaf size button
- crust colour button
- start button
- rapid bake button
- stop button
- menu button
- loaf size indicators
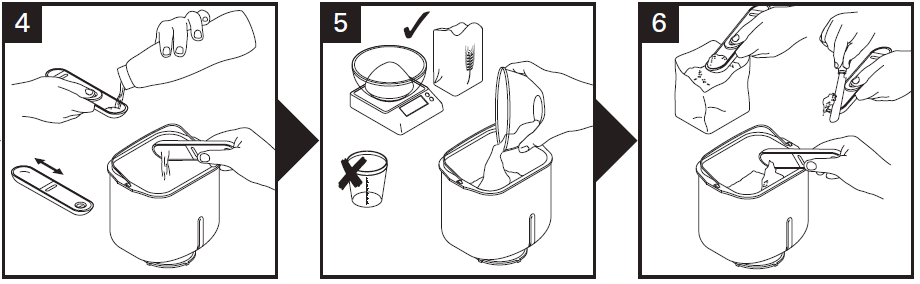
How to measure ingredients
It is extremely important to use the exact measure of ingredients for best results.
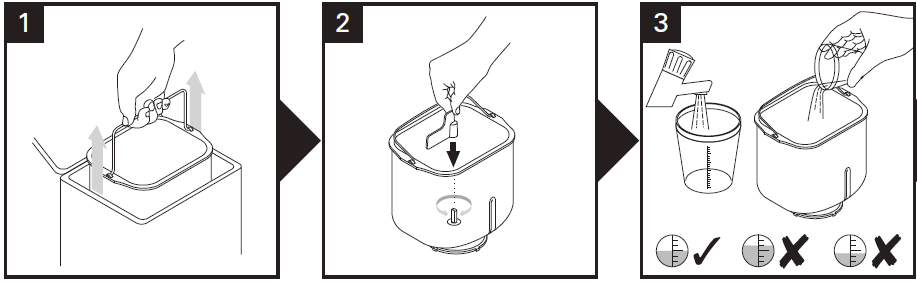
- Always measure liquid ingredients in the see-through measuring cup with graduated markings provided. Liquid should just reach marking on cup at eye level, not above or below (see 3).
- Always use liquids at room temperature, 20ºC/68ºF, unless making bread using the rapid 1 hour cycle. Follow the instructions given in the recipe section.
- Always use the measuring spoon provided to measure smaller quantities of dry and liquid ingredients. Use the slider to select between the following measure - 1⁄2 tsp, 1 tsp, 1⁄2 tbsp or 1 tbsp. Fill to the top and level off the spoon (see 6).
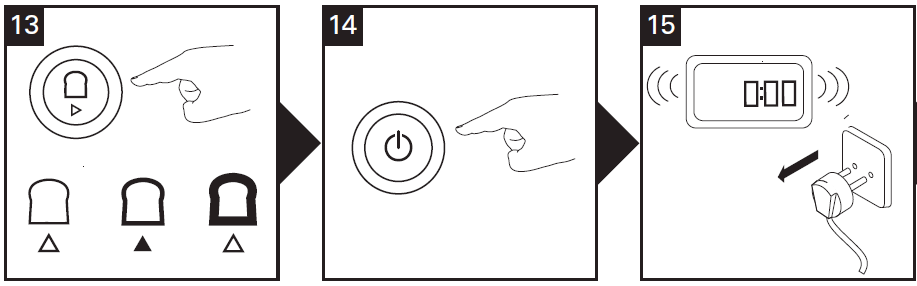
on/off switch
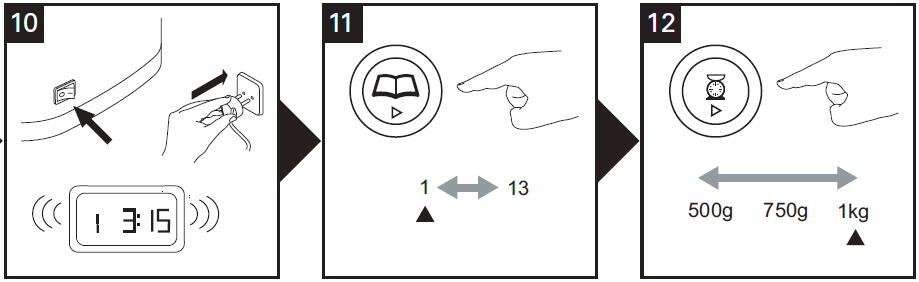
Your Kenwood breadmaker is fitted with an ON/OFF switch and will not operate until the “on” switch is pressed.
- Plug in and press the ON/OFF switch 8 situated at the back of the breadmaker - the unit will beep and 3:15 will appear in the display window.
- Always switch off and unplug your breadmaker after use.
program status indicator 13
- The program status indicator is situated in the display window and the indicator arrow will point to the stage of the cycle the breadmaker has reached as follows: -
- Pre-heat
 The pre-heat feature only operates at the start of the wholewheat (30 minutes), wholewheat rapid (5 minutes) and gluten-free (8 minutes) settings to warm the ingredients before the first kneading stage begins. There is no kneader action during this period.
 - Knead
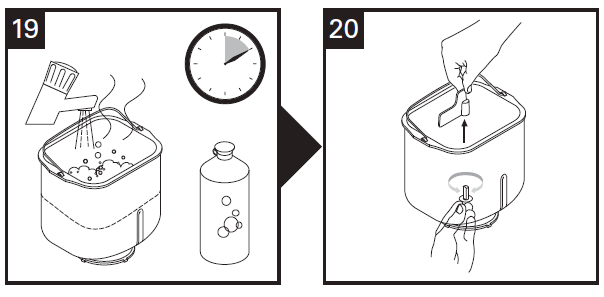
 The dough is either in the first or 2nd kneading stage or being knocked back between the rising cycles. During the last 20 minutes of the 2nd Kneading cycle on setting (1), (2), (3). (4). (5). (6). (10).(11) an alert will sound to tell you to add any additional ingredients manually.
 - Rise
 the dough is in either the 1st, 2nd or 3rd rising cycle.
 - Bake
 The loaf is in the final baking cycle.
 - Keep Warm
 The bread maker automatically goes into the Keep warm mode at the end of the baking cycle. It will stay on the keep warm mode for up to 1hour or until the machine is turned off, which ever is soonest.
Please note: the heating element will switch on and off and will glow intermittently during the keep warm cycle.
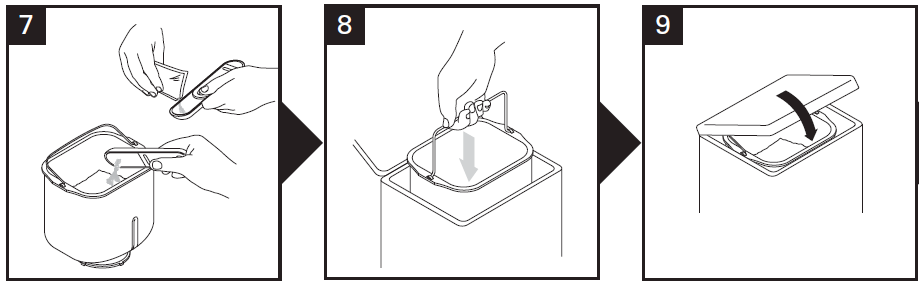
using your Bread Maker
(refer to illustration panel)
- Lift out the bread pan by the handle.
- Fit the kneader.
Pour the water into the bread pan.
- Add the rest of the ingredients to the pan in the order listed in the recipes.
- Ensure that all the ingredients are weighed accurately as incorrect measures will produce poor results.
Insert the bread pan into the oven chamber and push down to ensure it is locked in position.
- Lower the handle and close the lid.
- Plug in and switch on - the unit will beep and default to setting 1 (3:15).
Press the MENU button 21 until the required program is selected. The breadmaker will default to 1 kg & medium crust colour.
Note: If using the “RAPID BAKE” 19, just press the button and the program will start automatically.- Select the loaf size by pressing the LOAF SIZE button 17 until the indicator moves to the required loaf size.
- Select the crust colour by pressing the CRUST button 16 until the indicator moves to the required crust colour (light, medium or dark).
Press the START button 18. To stop or cancel the program press the STOP button 20 for 2 – 3 seconds.
- At the end of the baking cycle unplug the breadmaker.
- Lift out the bread pan by the handle. Always use oven gloves as the pan handle will be hot.
- Then turn out onto a wire rack to cool.
Leave the bread to cool for at least 30 minutes before slicing, to allow the steam to escape. The bread will be difficult to slice if hot.

Clean the bread pan and kneader immediately after use (see care and cleaning).
bread/dough program chart | ||||||||
program | Total Program Time Medium Crust Colour | Alert For AddingIngredients ✬ Medium Crust Colour | Keep Warm ✬✬ | |||||
500g | 750g | 1Kg | 500g | 750g | 1Kg | |||
1 basic | White or Brown Bread Flour recipes | 3:05 | 3:10 | 3:15 | 2:45 | 2:50 | 2:55 | 60 |
2 white rapid | Reduces the white cycleby approx. 30 minutes | 2:40 | 2:45 | 2:50 | 2:20 | 2:25 | 2:30 | 60 |
3 wholewheat | Wholewheat or wholemeal flour recipes: 30 minute preheat | 4:20 | 4:25 | 4:30 | 3:36 | 3:41 | 3:46 | 60 |
4 wholewheat rapid | For usewith granary flourand for a quicker wholewheat loaf. Not suitablefor 100% wholemeal loaves 5 minute preheat | 2:34 | 2:39 | 2:44 | 2:15 | 2:20 | 2:25 | 60 |
5 french | Produces a crisper crustand suited to loaves low in fat and sugar | 3:32 | 3:36 | 3:40 | 3:13 | 3:17 | 3:21 | 60 |
6 sweet | High sugar bread recipes | 3:19 | 3:22 | 3:25 | 2:59 | 3:02 | 3:05 | 60 |
7 quick bread | Non-yeast batter breads - 1Kg mix | 2:08 | - | 22 | ||||
8 cake | Cake mixes - 500gmix | 1:22 | - | 22 | ||||
9 gluten free | For use with gluten free flours andgluten free breadmixes. Max500g flour wt: 8 minutepreheat | - | 2:54 | 2:59 | - | 60 | ||
10 dough | Dough for hand shaping and baking in your own oven. | 1:30 | 1:14 | - | ||||
11Artisan dough | Long doughcycle for preparation of Artisan doughs | 5:15 | 4:39 | - | ||||
12 jam | For making jams | 1:25 | - | 20 | ||||
13 bake | Bake only feature. Can also be used to rewarm or crisp loaves already baked and cooled. Use timer buttons to change timerequired. | 0:10 - 1:30 | - | 60 | ||||
rapid bake button | Produces loavesof bread in under 1hour. Loaves require warm water, extra yeast and less salt. | 0:58 | - | 60 | ||||
An alert will sound before the end of the 2nd kneading cycle to add ingredients if the recipe recommends doing so. The Bread maker will automatically go in to the keep warm mode at the end of the baking cycle. It will stay in the keep warm mode for up to 1hour or until the machine is turned off, which ever is soonest.
delay timer
The Delay timer allows you to delay the bread making process up to 12 hours. The delayed start can not be used with the “RAPID BAKE” program and is not recommended for use with either the dough, jam or gluten free settings.
IMPORTANT: When using this delayed start function you must not use perishable ingredients – things that ‘go off’ easily at room temperature or above, such as milk, egg, cheese and yoghurt etc. To use the DELAY TIMER simply place the ingredients in the bread pan and lock the pan into the bread maker. Then
- Press the MENU pad to choose the required program – the program cycle time is displayed.
- Select the crust colour and size required.
- Then set the delay timer.
- Press the (+) TIMER pad and keep pressing until the total time required is displayed. If you go past the required time press the (-) TIMER pad to go back. The timer pad when pressed, moves in 10 minute increments.
- You do not need to work out the difference between the program time selected and the total hours required as the bread maker will automatically include the setting cycle time.
Example: Finished loaf required at 7am. If the breadmaker is set up with the required recipe ingredients at 10pm the evening before, total time to be set on the delayed timer is 9 hours. Press the MENU pad to choose your program e.g. 1 and use the (+) timer pad to scroll the time in 10 minute increments to display ‘9:00’. If you go past ‘9:00’, simply press the (-) timer pad until you return to ‘9:00’.

Press the start pad and the display colon (:) will flash. The timer will start to count down.

If you make a mistake or wish to change the time set, press the STOP pad until the screen clears. You can then reset the time.

Power interruption protection
Your Bread Maker has an 8-minute power interruption protection in case the unit is accidentally unplugged during operation. The unit will continue the program if plugged back in straight away.
Care and Cleaning
IMPORTANT: unplug the Bread Maker and allow to cool before cleaning.
- Do not immerse either the Bread Maker body or the outside base of the bread pan in water.
- Do not use a dishwasher to clean bread pan. Dishwashing can damage the non-stick properties of the bread pan allowing bread to stick during baking.
- Do not use abrasive scouring pads or metal implements.
- Clean the bread pan and the kneader immediately after each use by partially filling the pan with warm soapy water. Leave to soak for 5 to 10 minutes. To remove the kneader, turn clockwise and lift off. Finish cleaning with a soft cloth, rinse and dry. If the kneader cannot be removed after 10 minutes, hold the shaft from underneath the pan and twist back and forth until the kneader is released.
- Use a soft damp cloth to clean the outside and inside surfaces of the Bread Maker if necessary.
- The lid can be lifted off for cleaning.
Troubleshooting guide
Following are some typical problems that can occur when making bread in your bread maker. Please review the problems, their possible cause and the corrective action that should be taken to ensure successful bread-making
PROBLEM | POSSIBLE CAUSE | SOLUTION | |
LOAF SIZE AND SHAPE | |||
1. Bread does not riseenough |
|
| |
2. Flat loaves,no rising. |
|
| |
3. Top inflated - mushroom-like in appearance. |
|
| |
4.Top and sidescave in. |
|
| |
5. Gnarly, knotted top - not smooth. |
|
| |
PROBLEM | POSSIBLE CAUSE | SOLUTION | |
LOAF SIZE AND SHAPE | |||
6. Collapsed while baking. |
|
| |
7. Loaves uneven shorter on one end. |
|
| |
BREAD TEXTURE | |||
8.Heavy dense texture. |
|
| |
9. Open, course,holey texture. |
|
| |
10. Centre of loaf is raw, not baked enough. |
|
| |
11. Bread doesn’t slice well, very sticky. |
|
| |
CRUST COLOUR AND THICKNESS | |||
12. Dark crustcolour/ too thick. |
|
| |
13.Loaf of breadis burnt. |
|
| |
14.Crust too light. |
|
| |
PROBLEM | POSSIBLE CAUSE | SOLUTION | |
PAN PROBLEMS | |||
|
|
| |
MACHINE MECHANICS | |||
17. Breadmaker not operating/Kneader not moving. |
|
| |
18. Ingredients not mixed. |
|
| |
19. Burning odournoted during operation. |
|
| |
20. Machine unplugged by mistake or power lost during use. How can I save the bread?. |
| ||
21. E:01 appears on display and machine cannotbe turned on. |
|
| |
22. H:HH & E:EE appears in display and machine does not operate. |
|
| |
Pros & Cons of Kenwood Bread Maker Machine
Pros
- Wide variety of automatic programs
- Adjustable loaf sizes and crust colors
- Delayed start timer
- Automatic fruit and nut dispenser
- Easy-to-use LCD display and control panel
Cons
- Higher price point compared to some competing models
- Limited availability in brick-and-mortar stores
- Non-stick coating on the baking pan may wear down over time
Customer Reviews about BM350 Bread Maker Machine
Customers have expressed their satisfaction with the Kenwood Bread Maker Machine's ease of use, customization options, and overall performance. However, some have reported issues with the non-stick coating wearing down or flaking over time, as well as limited availability in physical stores. Despite these concerns, the BM350 has received overwhelmingly positive feedback and is considered a top choice for those seeking a high-quality bread maker.
Faqs
How much bread can be made with the Kenwood BM350 Bread Maker?
Does the Kenwood BM350 come with a timer that delays?
To what extent is the Kenwood BM350 easy to clean?
How does the 'Keep Warm' feature of the BM350 operate?
Can I use the Kenwood BM350 to create things other than bread?
How can I locate BM350 replacement parts?
Where can I locate more recipes for the Kenwood BM350?
What is the maximum amount of bread that the Kenwood BM350 Bread Maker is able to manufacture?
Inquiring about the delay timer, does the Kenwood BM350 have one?
Is the Kenwood BM350 Bread Maker covered by a warranty?
Leave a Comment