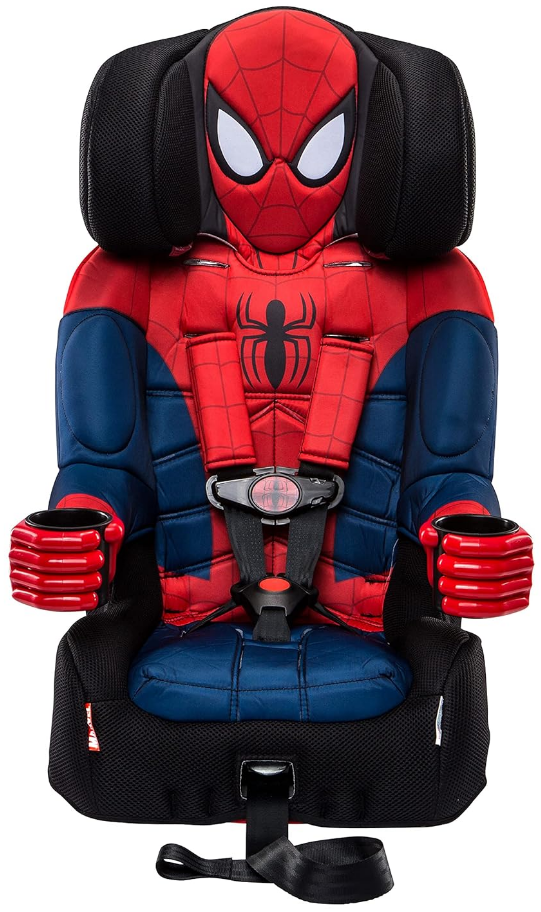
Kidsembrace 2-in-1 Positioning Seat Instruction Manual
Content
Introduction
The KidsEmbrace 2-in-1 Positioning Seat is a versatile and comfortable solution for children with special needs. Designed to provide proper positioning and support, it can be used as a car seat or a standalone seat. The seat features adjustable headrests, lateral supports, and a 5-point harness system to ensure a secure and customized fit. Its durable construction and easy-to-clean fabric make it a practical choice for caregivers. With a weight capacity of up to 65 pounds, the KidsEmbrace 2-in-1 Positioning Seat grows with your child, providing years of use. It is expected to be priced $146.99
Detailed Specifications
- Weight capacity: 5-40 pounds
- Rear-facing and forward-facing modes
- 5-point harness system
- Adjustable headrest and harness
- LATCH system for easy installation
- Side impact protection
- Machine washable and dryer safe cover
- Energy absorbing foam
- Approved for air travel
Child Requirements
- High Back Booster Seat Weight is: 40-100 lbs. (18-45 kg) Height is: 38-57 in. (97-145 cm)
- Backless Booster Seat Weight is: 40-100 lbs. (18-45 kg) Height is: 40-57 in. (101-145 cm)
2-in-1 Belt-Positioning Booster Seat Instruction Manual
This Restraint is NOT Certified for Use in Aircraft.
This Child Restraint System conforms to all applicable Federal Motor Vehicle Safety Standards.
WARNING!
Failure to follow the warnings on Booster Seat labels and in the Instruction Manual can result in death or serious injury to your child.
WARNING!
DEATH or SERIOUS INJURY can occur
- Failure to follow these instructions and Booster Seat labels can result in injury or death to a child from striking the vehicle’s interior during a sudden stop or crash.
- Proper use of this Booster Seat reduces the risk of serious injury or death to your child. No Booster Seat can guarantee protection from injury.
- Do NOT install or use this Booster Seat until you read and understand the instructions in this manual and in your vehicle owner’s manual.
Booster Seat Use
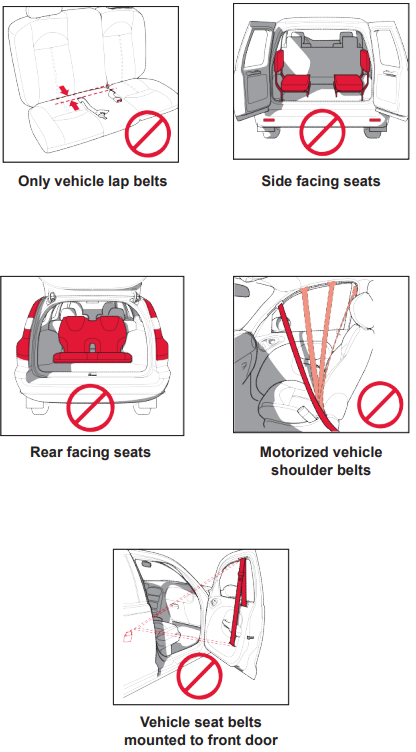
- ONLY use the vehicle's lap and shoulder belt system when restraining the child in this Booster Seat.
- Vehicle belts MUST lav flat against the child and
- NEVER use Booster Seat with only a vehicle lap belt. Using a Booster Seat with only a vehicle lap belt could result in serious injury or death to a child.
- ONLY use this Booster Seat only on vehicle seats that face forward.
High Back Booster Seat
- ONLY use with children who weigh between 40 and 100 pounds (18 and 45 kg) and whose height is between 38 and 57 inches (97 and 145 cm) and are over 4 years old.
- The mid-point of child’s head MUST be below the top of the Child Restraint Headrest.
Backless Booster Seat
- ONLY use with children who weigh between 40 and 100 pounds (18 and 45 kg) and whose height is between 40 and 57 inches (101 and 145 cm) and who are over 4 years old.
- The mid-point of child’s head MUST be below the top of the vehicle seat Headrest.
- KidsEmbrace does not recommend the use of any car seat accessories except those manufactured by KidsEmbrace. Use of accessories or parts from other manufacturers could alter the performance of the Booster Seat.
- Do NOT use a Booster Seat with damaged or missing parts.
- Do NOT substitute parts or try to modify the Booster Seat in any way.
- NEVER leave your child unattended.
- This Booster Seat should be securely belted in the vehicle even when not in use. In a crash or sudden stop, an unsecured Child Restraint could injure other occupants.
- Do NOT use this Booster Seat if it has been in a crash, it MUST be replaced. A crash can cause unseen damage, and continued use could result in serious injury or death.
- Avoid burns; Booster Seat surfaces can become hot inside a vehicle. ALWAYS check surfaces of Booster Seat before placing child in seat.
- Booster Seats are designed to raise the child up to properly position the vehicle lap and shoulder belt.
- How to determine if your child is ready to transition to a Booster Seat? Please consider the following conditions:
- The child is approaching the limit of their current car seat and meets the weight, height, and age requirements of this Booster Seat.
- The child is mature enough to ride correctly and does not put the vehicle shoulder belt under their arm or behind their back.
- If the child will not keep vehicle shoulder belt properly positioned, do NOT use this Booster Seat.
- ONLY use a Booster Seat in seating location with vehicle lap and shoulder belt.
- NEVER use a Booster Seat in seating location with only a vehicle lap belt.
NEVER put a Booster Seat in a front vehicle seating location, unless recommended by the vehicle owner’s manual.
- Snugly adjust the vehicle’s lap and shoulder belt around child according to the instructions in this Instruction Manual and the vehicle owner’s manual.
- Vehicle lap belt MUST be positioned low on the hips, contacting the thighs.
- Vehicle shoulder belt MUST be properly positioned over shoulder (NOT touching child’s neck and NOT off shoulder).
- NEVER use vehicle shoulder belt when loose, positioned under child’s arm, or behind child.
- Do NOT allow child to slide down in Booster Seat. This could position the vehicle lap belt across the child’s abdomen and vehicle shoulder belt over the child’s neck or face.
NEVER PLACE THIS BOOSTER SEAT IN A VEHICLE SEATING LOCATION THAT HAS AN AIR BAG. If an air bag inflates, it can hit the child and Booster Seat with great force and cause serious injury or death to your child. Refer to your vehicle owner’s manual for information about air bags and Booster Seat installation.
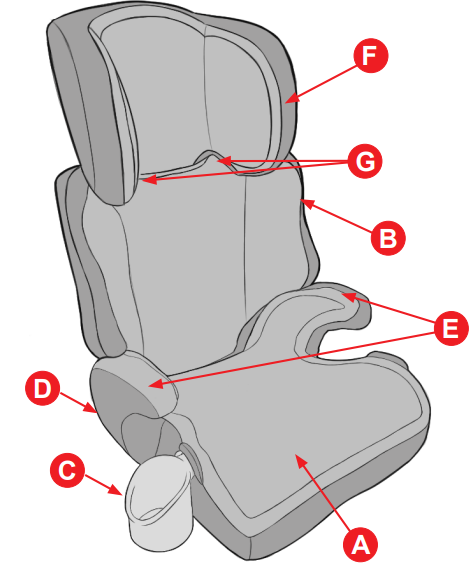
Booster Seat Features
- 2-in-1 Belt-Positioning Booster Seat
- Backrest
- Cup Holder (1 per Base)
(Can be used on either side of Base) - Belt Clip Storage
(Store under right Armrest of Trim Cover) - Armrests
- Headrest
Shoulder Belt Guides - Shoulder Belt Guides
- Base Attachment Bars
- Backrest Ventilation
- Headrest Adjustment Dial
- Belt Clip
(ONLY used in Backless Mode) - Backless Booster Seat
Trim Cover (Headrest, Backrest, and Base)
Description
The kidsembrace 2-in-1 Positioning Seat is a highly functional and safe car seat that offers superior protection for your child. Its adjustable headrest and harness system ensure a snug and secure fit, while the side impact protection provides added safety in the event of a collision. The LATCH system makes installation a breeze, and the energy absorbing foam helps to reduce the impact of a crash. The machine washable and dryer safe cover makes cleaning easy and convenient. This car seat is also approved for air travel, making it a great option for families who travel frequently.
kidsembrace 2-in-1 Positioning Seat Use Recommendations
High Back Booster Seat Use
This Booster Seat is designed for use by children who weigh between 40 and 100 pounds (18 and 45 kg) and whose height is between 38 and 57 inches (97 and 145 cm) and are at least 4 years old. Your child’s weight, height, and age determine how your Booster Seat should be used in the vehicle and how your child should be restrained. See information below:
MUST use vehicle lap and shoulder belt
Child MUST meet ALL of the following requirements:
- Child MUST weigh between 40 and 100 pounds (18 and 45 kg) and
- Child’s height MUST be between 38 and 57 inches (97 and 145 cm) and
- Child MUST be at least 4 years old.
WARNING! To avoid injuries from whiplash, the mid-point of the child’s head MUST be below top edge of Headrest on Child Restraint.
Use Recommendations
Backless Booster Seat Use
This Booster Seat is designed for use by children who weigh between 40 and 100 pounds (18 and 45 kg) and whose height is between 40 and 57 inches (101 and 145 cm) and are at least 4 years old. Your child’s weight, height, and age determine how your Booster Seat should be used in the vehicle and how your child should be restrained. See information below: MUST use vehicle lap and shoulder belt.
Child MUST meet ALL of the following requirements:
- Child MUST weigh between 40 and 100 pounds (18 and 45 kg) and
- Child’s height MUST be between 40 and 57 inches (101 and 145 cm) and
- Child MUST be at least 4 years old.
WARNING! To avoid injuries from whiplash, the mid-point of the child’s head MUST be below top edge of Headrest on vehicle seat.
Vehicle Seat Locations
According to accident statistics provided by the National Highway Traffic Safety Administration (NHTSA); children 12 years of age and younger are safer when properly restrained in the rear seating positions rather than in front seating positions. This Booster Seat can ONLY be used in the following classes of vehicles: multi-purpose passenger vehicles, passenger cars, or trucks. Refer to the vehicle owner’s manual for Booster Seat installation instructions for your vehicle.
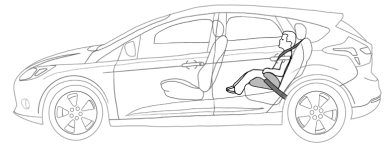
- ALWAYS use Booster Seat in a rear vehicle seat location whenever possible.
- NEVER put a Booster Seat in a front seat location, unless recommended by vehicle owner’s manual.
- For vehicles with air bags, refer to vehicle owner’s manual for Child Restraint installation information.
If a front vehicle seat location, with an air bag, MUST be used, follow the vehicle owner’s manual for Child Restraint use and move the vehicle seat back as far as possible.
Selecting Vehicle Seat Location
Do NOT use Booster Seat in seat locations that have:
High Back Installation and Use
Securing Child with Vehicle Lap and Shoulder Belt
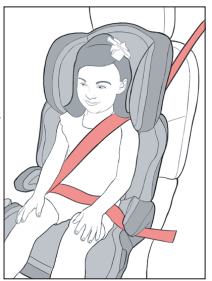
- Place Booster Seat forward-facing in a rear seat location which has a vehicle lap and shoulder belt (See Fig. 1).
If vehicle seat back is adjustable, adjust into most upright position.
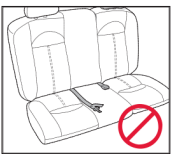
Do NOT place the Booster Seat in a seating position that has only a vehicle lap belt (See Fig. 2). - Position child in Booster Seat with the Backrest flat against vehicle seat back and then the child’s back flat against the Backrest (See Fig. 3).
Buckle vehicle seat belt placing the vehicle lap belt on child’s thighs and vehicle shoulder belt across the center of the child’s shoulder (See Fig. 4).
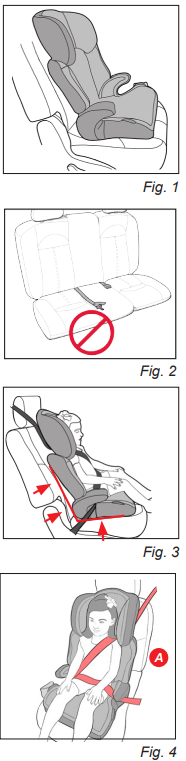
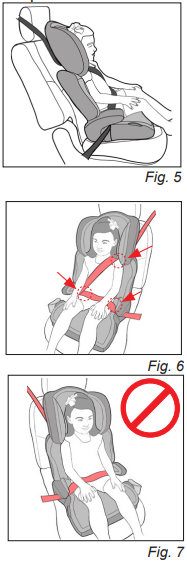
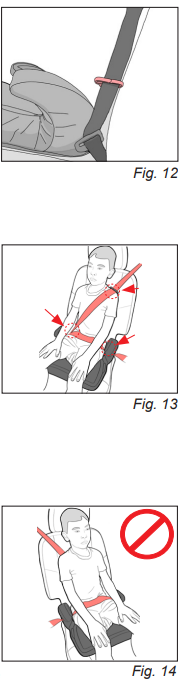
Note: The vehicle lap and shoulder belt near the vehicle buckle MUST be placed under the Armrests and vehicle shoulder belt MUST be across child’s shoulder in area noted A .- Place vehicle shoulder belt in Shoulder Belt Guide (See Fig. 5).
- Snugly adjust the vehicle lap and shoulder belt around the child according to the instructions in the vehicle owner’s manual.
- If necessary, adjust the Headrest so Shoulder Belt Guides are level with the top of the child’s shoulders. This will cause the vehicle shoulder belt to properly lay midway between the child’s shoulder and neck (See Page 19).
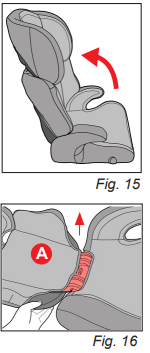
- Check fit of vehicle lap and shoulder belts (See Fig. 6).
- The vehicle lap belt MUST be low and snugly adjusted on child’s thighs.
- The vehicle lap and shoulder belt MUST be placed under Armrest.
- The vehicle shoulder belt MUST contact the child’s chest and be centered on the child’s shoulder.
- Use shoulder belt guide to locate the vehicle shoulder belt in the correct position.
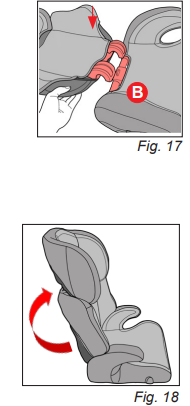
Do NOT place vehicle shoulder belt under child’s arm or behind child (See Fig. 7).
To Remove Child
- Unbuckle vehicle seat belt.
- Remove child.
Note: The Booster Seat MUST be securely belted in the vehicle even when not in use.
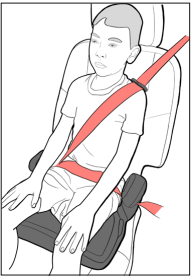
Backless Installation and Use
Securing Child with Vehicle Lap and Shoulder Belt
- Remove the Backrest for use as a Backless Booster Seat (See Page 18).
- Place Backless Booster Seat forward-facing in a rear seat location which has a vehicle lap and shoulder belt (See Fig. 8).
- If vehicle seat back is adjustable, adjust into most upright position.
- Do NOT place the Backless Booster Seat in a seating position that has only a vehicle lap belt (See Fig. 9).
- Position child in Backless Booster Seat with child’s back flat against vehicle seat back (See Fig. 10).
Buckle vehicle seat belt placing the vehicle lap belt on child’s thighs and vehicle shoulder belt across the center of the child’s shoulder (See Fig. 11).
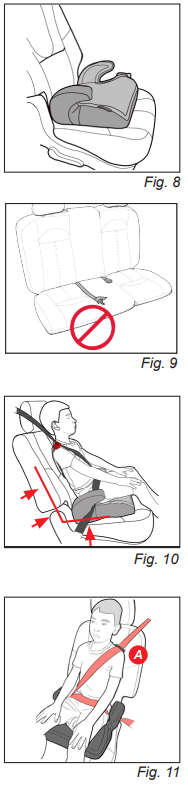
Note: The vehicle lap and shoulder belt near the vehicle buckle MUST be placed under the Armrests and vehicle shoulder belt MUST be across child’s shoulder in area noted A .- Place vehicle shoulder belt in the Belt Clip
- Snugly adjust the vehicle lap and shoulder belt around the child according to the instructions in the vehicle owner’s manual.
- Check fit of vehicle lap and shoulder belts (See Fig. 13).
- The vehicle lap belt MUST be low and snugly adjusted on the child’s thighs.
- The vehicle lap and shoulder belt MUST be placed under the Armrest.
- The vehicle shoulder belt MUST contact the child’s chest and be centered on the shoulder.
- Use the Belt Clip to locate the vehicle shoulder belt in the correct position.
Do NOT place vehicle shoulder belt under child’s arm or behind child (See Fig. 14).
To Remove Child
- Unbuckle vehicle seat belt.
- Remove child.
Note: The Booster Seat MUST be securely belted in the vehicle even when not in use.
Assembling & Removing Backrest
Removing the Backrest for Backless Installation
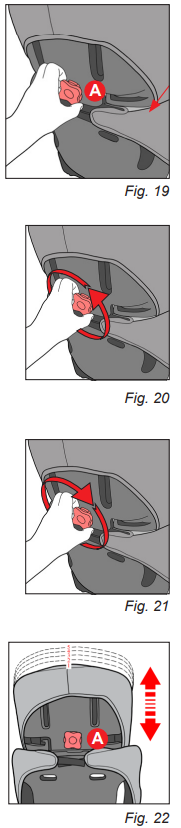
- Place Booster Seat on flat surface holding the top of Headrest and Armrest. Rotate easily backwards until the Backrest is flat against the surface (See Fig. 15).
- Lift Backrest removing Backrest Attachment Hooks A from Base Attachment Bars (See Fig. 16).
The Backless Booster Seat is ready to use (See Pages 16-17)
Note: Store Backrest properly when not in use.
Assembling the Backrest for High Back Installation
- Place Booster Seat Base on a flat surface and insert Backrest Attachment Hooks into Base Attachment Bars B (See Fig. 17).
Rotate Backrest upwards easily until it stops. You should feel a click and then the Backrest will rest on the back of the Armrest (See Fig. 18).
- The High Back Booster Seat is ready to use
Adjusting Headrest
Adjusting Headrest for High Back Installation
- On the back of High Back Booster Seat, locate the Headrest Adjustment Dial A (See Fig. 19).
- Pull HeadrestAdjustment Dial out and rotate counter clockwise to raise Headrest (See Fig. 20) or rotate clockwise to lower Headrest (See Fig. 21) properly positioning Shoulder Belt Guides. After properly positioning Shoulder Belt Guides push Headrest Adjustment Dial in.
Note: Do NOT force the Headrest Adjustment Dial A inward, rotate slightly until it clicks into one of the five positions (See Fig. 22).
Cup Holder Installation
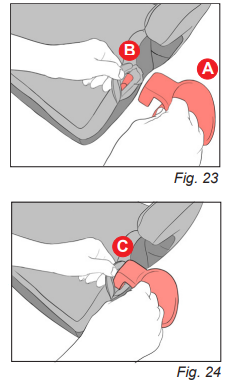
- One Cup Holder A is provided with each Booster Seat which can be used on either side of the Base. Select the side of the Base to install the Cup Holder lifting up the small flap B on the Trim Cover just in front of the Armrest (See Fig. 23).
Align the Cup Holder Support C with the Base slot and push down until the Cup Holder Support is pressed into the Base (See Fig. 24).
- To remove Cup Holder, hold Base pulling the Cup Holder upward.
Positioning of the Belt Clip
ONLY used for Backless Booster Seat Lengthen strap of Belt Clip
- Hold the black plastic adjuster with one hand and push the top strap with the other hand to create a loop A in the middle of the black plastic adjuster (See Fig. 25).
- Continue holding the sides of the black plastic adjuster pulling the bottom strap B (same side of red Belt Clip). The strap length from the Base to Belt Clip should be longer (See Fig. 25).
- Adjust the Belt Clip strap length A to ensure the Belt Clip rests on the top of the child’s shoulder. The vehicle shoulder B belt will lay across the child’s chest midway between their shoulder and neck. Remove all slack in the strap when complete.
Shorten strap of Belt Clip
- See step 1 above.
Continue holding the sides of the black plastic adjuster pulling the bottom strap C (opposite side of red Belt Clip) The strap length from the Base to Belt Clip should be shorter (See Fig. 26).
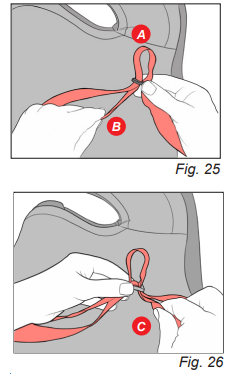
- Adjust the Belt Clip strap length to ensure the Belt Clip rests on the top of the child’s shoulder. The vehicle shoulder belt will lay across the child’s chest midway between their shoulder and neck. Remove all slack in the strap when complete.
Setup Guide
- Position the car seat on the vehicle seat and ensure it is secure.
- Adjust the harness system to fit your child's height and weight.
- Connect the LATCH system to your vehicle's anchors.
- Tighten the LATCH system until the car seat is secure.
- Adjust the headrest to ensure it is at the correct height for your child.
Care and Cleaning
- Trim Cover
Machine wash separately in cold water on a delicate cycle. NEVER use bleach or similiar abrasive products. ALWAYS drip dry Trim Cover after washing. - Base, Cup Holder & Belt Clip
Can be wiped clean with mild soap and water but ALWAYS air dry. NEVER use abrasive cleaners or solvents. - Labels
ALWAYS take care not to damage any labels while cleaning.
Keep this Instruction Manual safe for future reference. Store under Trim Cover behind the left Armrest.
Additional Information
- Certification
This Booster Seat meets or exceeds all applicable requirements of Federal Motor Vehicle Safety Standard 213 for use in motor vehicles. - Aircraft Use
This Restraint is Not Certified for Use in Aircraft.
Restraints without harness systems are NOT certified for use in aircraft because there are no shoulder belts available in aircraft. - Warm Weather Use
Booster Seat parts can get very hot in the sun or warm weather.
To avoid burns, ALWAYS check Booster Seat before putting child in Booster Seat. - Booster Seat Useful Life
Do NOT use after 7 years from manufactured date located on bottom of Booster Seat.
Vehicle Lap and Shoulder belts
Compatible Vehicle Lap and Shoulder Belts
Not all vehicle lap and shoulder belts will work with this Booster Seat (See Page 13). You MUST determine if your vehicle lap and shoulder belts are compatible with this Booster Seat. Three types of compatible vehicle lap and shoulder belts:
- ELR - Emergency Locking Retractor Belts Definition
This retractor belt only locks in a sudden stop or crash. To see if you have this type of retractor, pull the vehicle shoulder belt all the way out, let it return part way, then pull on it again. If it moves freely, it is an ELR vehicle shoulder belt. If it locks, then it is a switchable locking vehicle shoulder belt (See Para. 3 below). - ALR - Automatic Locking Retractor Belts Definition
This retractor belt locks when you pull the vehicle shoulder belt part way out then stop. To see if you have this type of retractor belt, pull the vehicle shoulder belt part way out, then pull on it again. If it locks, it is an ALR vehicle shoulder belt. - Switchable Locking Retractor Belts Definition
This retractor belt locks when you pull the vehicle shoulder belt all the way out (See Para. 1 above).
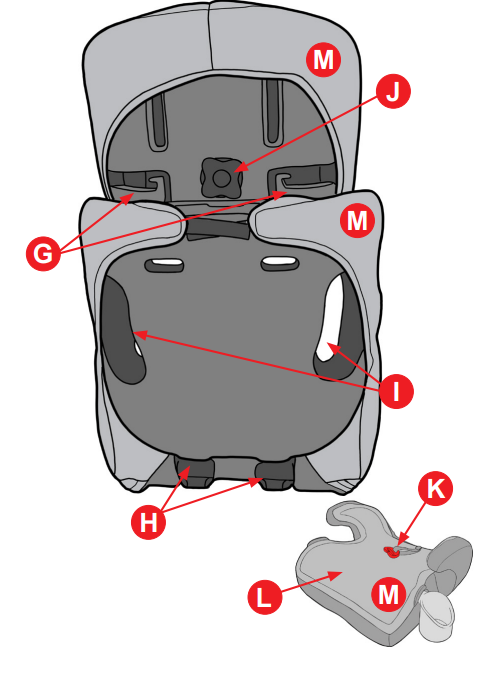
Trim Cover Removal
Do NOT use in either High Back or Backless mode without the complete Trim Cover.
Backrest
- Remove Backrest from the Base (See Page 18).
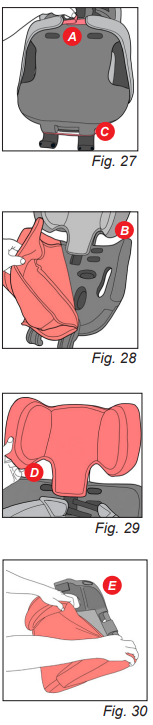
- Turn Backrest over and pull corner of Velcro A to release (See Fig. 27).
- Remove the Backrest Trim Cover starting from top corner B of the Backrest (See Fig. 28).
- The elastic strap C at the bottom of the Backrest Trim Cover needs to be unhooked to complete the removal of the Backrest Trim Cover (See Fig. 27).
Headrest - Remove Headrest Trim Cover pulling from the lower corner D (See Fig. 29).
Base Remove Base Trim Cover pulling from the back corner E over the Armrests of the Base, towards the front of the Base (See Fig. 30).
Trim Cover Attachment
Do NOT use in either High Back or Backless mode without the complete Trim Cover.
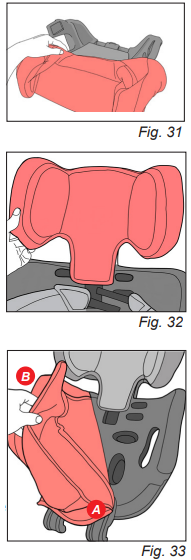
- Baserap Trim Cover over the front of the Base then fit over Armrests (See Fig. 31). Complete the installation of Base Trim Cover ensuring the elastic part of the Base Trim Cover is under the Base.
Headrest - Wrap Headrest Trim Cover over the top of the Headrest and around the sides. Headrest Trim Cover should rest flat against the Headrest (See Fig. 32).
Backrest - Attach elastic strap A on the bottom of the Backrest Trim Cover to the bottom of Backrest, then wrap Backrest Trim Cover over one top corner of Backrest B followed by the other top corner. Check to make sure Backrest Trim Cover is flat against Backrest and reattach the Velcro (See Fig. 33).
Reinstall the Backrest on the Base
About Us
Please make sure to carefully read through all the information in this Instruction Manual to properly use your new 2-in-1 Belt Positioning Booster Seat.
KidsEmbrace takes safety seriously and it is our #1 priority. Each product starts with a strict internal design evaluation to assure it is a premium product. Next, we begin the extensive government compliance testing program to assure it meets/exceeds all regulatory and internal standards. Only after the completion of this lengthy process we are proud to put the KidsEmbrace brand on the product along with the global brands of our key partners.
Registration
Child restraints could be recalled for safety reasons. You must register this restraint in order to be reached in a recall. Send your name, address, e-mail address if available, and the restraint’s model number and manufacturing date to: KidsEmbrace, LLC 6711 Odessa Ave Van Nuys, CA 91406-5747 or call 1-866-947-3287 or register online at http://www.KidsEmbrace.com/product-registration
Troubleshooting
- If the car seat is not secure, check the LATCH system and ensure it is properly connected to your vehicle's anchors.
- If the harness system is too loose, adjust the straps and ensure they are properly tightened.
- If the car seat is not reclining properly, adjust the angle of the seat until it is at the correct angle.
- Always refer to the user manual for specific instructions and warnings.
Warranty Information of kidsembrace 2-in-1 Positioning Seat
Limited One Year Warranty
This product is warranted against defective materials or workmanship for one year from the date of original purchase. Proof of purchase is required. The exclusive remedy for this warranty is that KidsEmbrace will at its option; provide, repair, or offer replacement components for this product or refund the original purchase price of the product. KidsEmbrace reserves the right to discontinue or change fabrics, parts, products, or to make substitutions. To make a claim under this warranty, contact KidsEmbrace Consumer Services at 1-866-947-3287.
Pros & Cons
Pros
- Versatile and can be used in both rear-facing and forward-facing positions
- Adjustable headrest and harness system for a snug and secure fit
- Side impact protection and energy absorbing foam for added safety
- LATCH system for easy installation
- Machine washable and dryer safe cover
Cons
- May be too expensive for some parents
- May be too heavy for some parents to easily move between vehicles
- May not fit in all vehicles due to its size
Customer Reviews
Customers have praised the kidsembrace 2-in-1 Positioning Seat for its safety features and ease of use. Many have commented on the adjustable headrest and harness system, noting that it makes the car seat suitable for their growing child. Some have mentioned that the LATCH system is easy to use and makes installation a breeze. However, some have noted that the car seat is heavy and may not be suitable for smaller vehicles.
Faqs
What should I do if my child’s Kidsembrace seatbelt is too tight or too loose?
How do I troubleshoot if the Kidsembrace 2-in-1 Positioning Seat won’t stay securely fastened?
How do I clean the Kidsembrace 2-in-1 Positioning Seat?
What should I do if the harness straps on my Kidsembrace seat are stuck?
Can I use the Kidsembrace 2-in-1 Positioning Seat in an airplane?
What is the warranty for the Kidsembrace 2-in-1 Positioning Seat?
Leave a Comment