How to Operate: Kitchenaid Food Processor KFP1466 Instruction Guide
Content
Introduction: KitchenAid Food Processor KFP1466
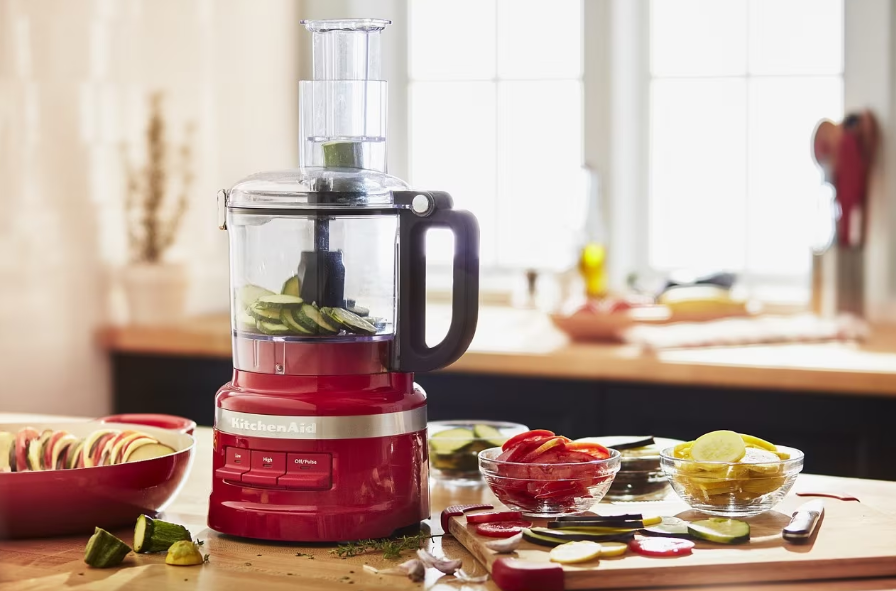
Introducing the KitchenAid Food Processor KFP1466, a versatile and powerful kitchen appliance designed to simplify your cooking experience. This food processor is perfect for a wide range of tasks, from chopping and slicing vegetables to mixing and kneading dough. With its 14-cup capacity, this food processor is ideal for large families or for preparing meals in bulk. The estimated price of this product is around $300, making it a mid-range option for those looking for a high-quality food processor. The KitchenAid Food Processor KFP1466 was launched in the market in 2021.
PARTS AND FEATURES
Parts and accessories
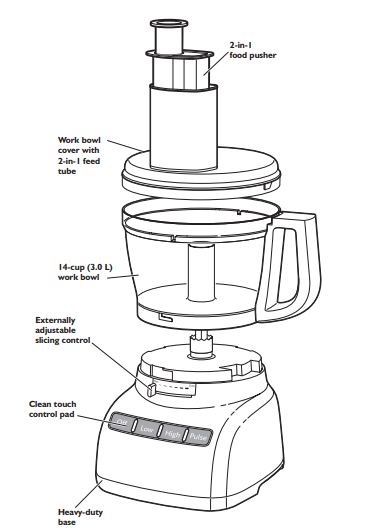
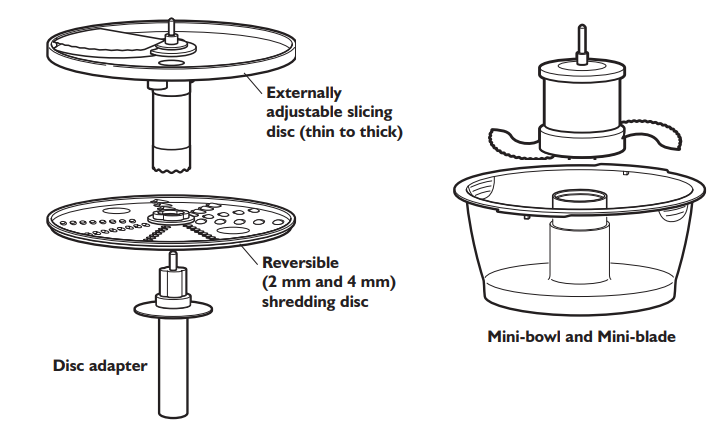
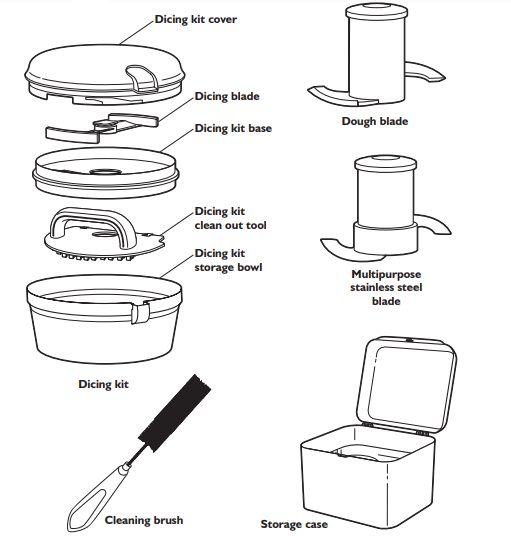
Accessories selection guide
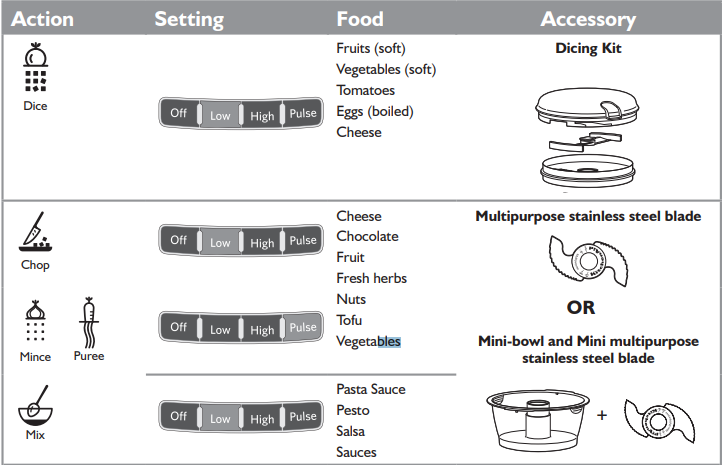
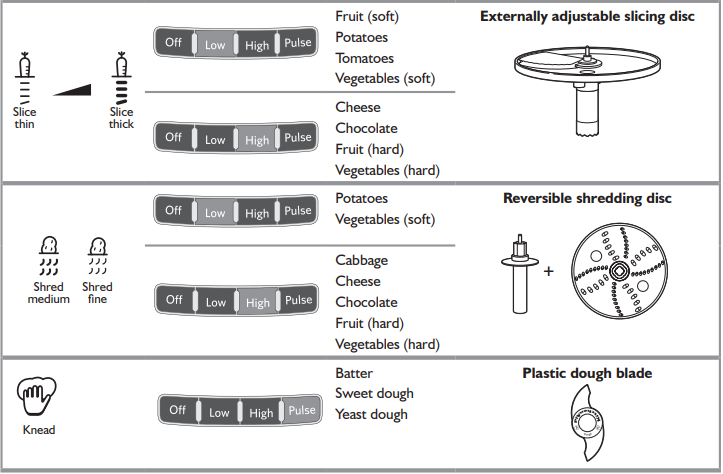
NOTE: Accessories shown are not all available with every model.
Detailed Specifications
The KitchenAid Food Processor KFP1466 comes with the following key features:
- 14-cup capacity
- Exact Slice System for uniform slicing
- Ultra Wide Mouth Feed Tube for easy ingredient addition
- High, Low, and Pulse speed options
- 300-watt motor
- DLC-2A 3-cup mini bowl for smaller tasks
- BPA-free parts
- Integrated handle for easy handling
- Dishwasher-safe parts
- 6 feet power cord
- Voltage: 120 VAC
- Frequency: 60 Hz
ASSEMBLING THE FOOD PROCESSOR
Before first use
Before using your Food Processor for the first time, wash all parts and accessories either by hand or in the dishwasher (see “Cleaning the Food Processor” section).
NOTE: Your Food Processor is shipped with the work bowl cover installed on the work bowl, with the mini-bowl inside the work bowl.
IMPORTANT: Place the Food Processor on a dry, level countertop with the controls facing forward. Do not plug in the Food Processor until it is completely assembled.
HELPFUL TIP: See the “Lid Interlock Instructions” for more information on the best way to attach the work bowl and work bowl cover for best results.

- Grasp the feed tube on the work bowl cover and turn it clockwise to remove it from the work bowl.
- Lift out the mini-bowl.
Attaching the work bowl
IMPORTANT: Your Food Processor will not operate unless the work bowl and work bowl cover are properly locked on the base, and the large pusher is inserted to the maximum fill line on the feed tube (approximately halfway down).

- Place the work bowl on the base, aligning the raised portion with the indentation on the base. The center hole should fit over the power shaft.
- Grasp the work bowl handle and turn the bowl counterclockwise to lock it on the base.
Attaching the work bowl cover

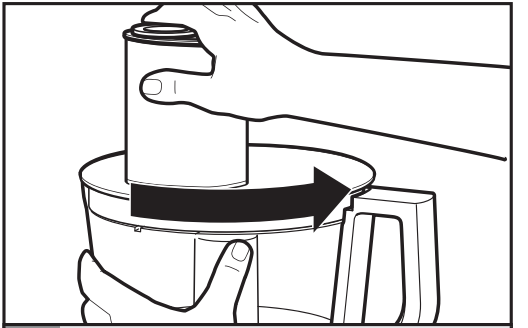
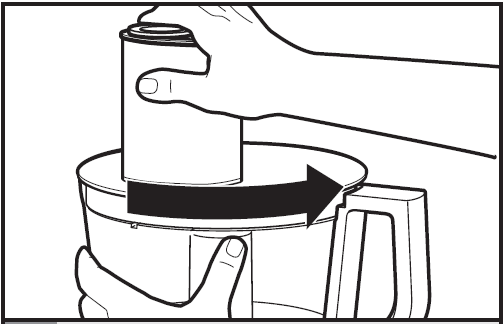
- Place the work bowl cover on the work bowl with the feed tube just to the left of the work bowl handle. Grasp the feed tube and turn the cover to the right until it locks into place.
- Fit the food pusher into the 2-in-1 feed tube. See “Using the 2-in-1 feed tube” for details on working with different sized foods.
Installing the dicing kit
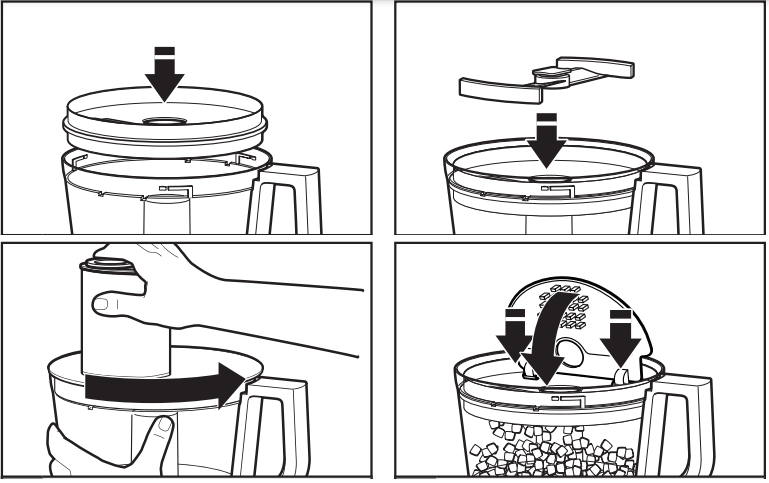
- Place the dicing kit base inside the work bowl.
- Insert the dicing blade into the dicing kit base.
- Place the work bowl cover on the work bowl with the feed tube just to the left of the work bowl handle. Grasp the feed tube and turn the cover to the right until it locks into place.
- After dicing, remove the work bowl cover and dicing blade, then insert the dicing kit clean out tool into the dicing kit base, and fold down to push any extra food through the grid.
Installing the adjustable slicing disc

- Hold the slicing disc by the finger grips and lower it onto the drive adapter.
- Install the work bowl cover, being sure it locks into place.
TIP: You may need to turn the disc/adapter until it drops down into place.
Adjusting the slicing thickness
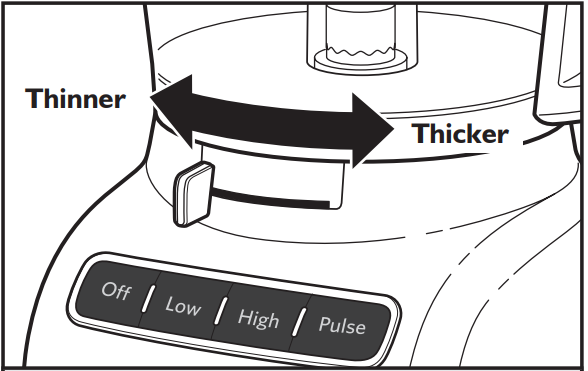
Set the desired thickness by moving the lever to the left for thinner slices and to the right for thicker slices.
NOTE: The lever only works with the externally adjustable slicing disc. Changing thickness settings with other discs or blades installed will have no effect on operation.
Installing the reversible shredding disc

- Hold the reversible shredding disc by the 2 finger grips with the desired shredding side facing UP. Insert the disc adapter into the hole in the bottom of the disc.
- With the work bowl installed, slide the drive adapter onto the power shaft.
TIP: You may need to turn the disc/adapter until it drops down into place. - Install the work bowl cover, being sure it locks into place.
Installing the multipurpose blade or dough blade
IMPORTANT: The multipurpose blade and dough blade can only be used with the work bowl.

- Place the blade on the power shaft. Rotate the blade so it falls into place on the power shaft.
- Push to lock: Press down firmly on the blade until it is down as far as it will go.
- Install the work bowl cover, being sure it locks into place.
NOTE: The multipurpose blade features an internal seal that fits tightly over the center of the work bowl.
Installing the mini-bowl and mini-blade
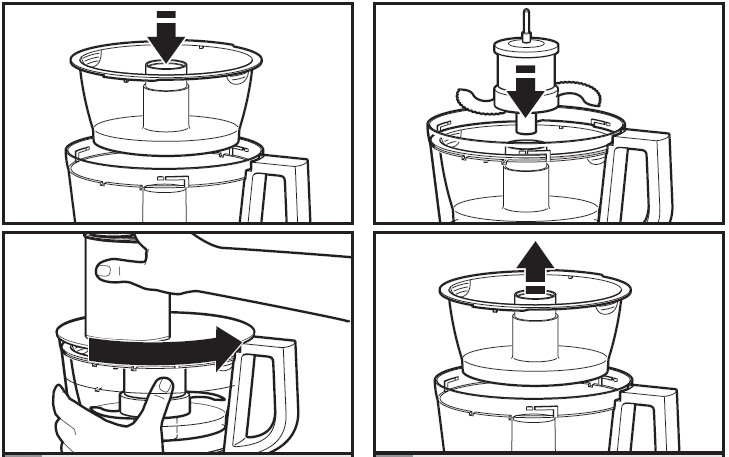
- Place the mini-bowl inside the work bowl over the power shaft. Rotate the mini-bowl until the tabs on the top edge of the bowl drop into the indents on the top of the work bowl.
- Insert the drive adapter into the mini-blade, and place on the power shaft. It may be necessary to rotate the blade until it falls into place. Press down firmly to lock it into place.
- Install the work bowl cover, being sure it locks into place.
- To remove the mini-bowl after processing, remove the mini-blade by pulling straight up on the cap. Then lift the bowl straight up and out, using the two finger grips located along the top edge of the bowl.
KitchenAid Food Processor Description
The KitchenAid Food Processor KFP1466 is designed to provide maximum versatility and convenience in the kitchen. Its 14-cup capacity makes it perfect for preparing large meals, while the Exact Slice System ensures uniform slicing for perfect results every time. The Ultra Wide Mouth Feed Tube allows for easy addition of ingredients, and the High, Low, and Pulse speed options provide maximum flexibility for a wide range of tasks. The 300-watt motor is powerful enough to handle even the toughest ingredients, and the DLC-2A 3-cup mini bowl is perfect for smaller tasks. The BPA-free parts are safe for food contact, and the dishwasher-safe design makes cleanup a breeze. The integrated handle and 6 feet power cord provide added convenience.
Food Processor KFP1466 Troubleshooting
Here are some common problems and solutions for the KitchenAid Food Processor KFP1466:
- Problem: Food processor won't turn on.
Solution: Check to make sure the power cord is plugged in and the switch is turned on. - Problem: Food processor is making strange noises.
Solution: Check to make sure all parts are securely attached and the lid is properly closed.
If your Food Processor should malfunction or fail to operate, check the following:
Food Processor doesn’t run
- Make sure that the bowl and lid are properly aligned and locked in place and the large food pusher is inserted in the feed tube.
- When using the large feed tube opening, make sure that food is not above the Max. Fill line on the feed tube.
- Press only one button at a time. The Food Processor will not operate if more than one button is pressed at the same time.
- Is the Food Processor plugged in?
- Is the fuse in the circuit to the Food Processor in working order? If you have a circuit breaker box, be sure the circuit is closed.
Unplug the Food Processor, then plug it back into the outlet. - If the Food Processor is not at room temperature, wait until it reaches room temperature and retry.
Food Processor not shredding or slicing properly
- Make sure the raised-blade side of the disc is positioned face up on the common adapter.
- If using the adjustable slicing or shredding blades, make sure it is set to the correct thickness.
- Make sure ingredients are suitable for slicing or shredding. See “Tips for Great Results” section.
If the work bowl cover won’t close when using the disc
- Make sure the disc is installed correctly, with the raised nub on top, and is positioned properly on the drive adapter.
- If the problem is not due to one of the above items, see the “Warranty” section. Do not return the Food Processor to the retailer. Retailers do not provide service.
Pros & Cons
Pros
- Large capacity
- Versatile and powerful
- ExactSlice System for uniform slicing
- Easy to clean
- Integrated handle for easy handling
Cons
- Higher price point than some other food processors
- May be too large for some kitchens
WARRANTY
This warranty extends to the purchaser and any succeeding owner for Food Processor operated in the 50 United States, the District of Columbia, Puerto Rico, and Canada.
- Length of Warranty: One Year Full Warranty from date of purchase.
- KitchenAid Will Pay for Your Choice of: Hassle-Free Replacement of your Food Processor. See the next page for details on how to arrange for service, or call the Customer experience Center toll-free at 1-800-541-6390. OR The replacement parts and repair labor costs to correct defects in materials and workmanship. Service must be provided by an Authorized KitchenAid Service Center.
Customer Reviews
Customers love the KitchenAid Food Processor KFP1466 for its large capacity, versatility, and powerful motor. The ExactSlice System is a standout feature, providing uniform slicing for perfect results every time. Some customers note that the food processor is on the larger side, making it less than ideal for smaller kitchens. However, the integrated handle and dishwasher-safe design make it easy to use and clean. The main complaint from customers is the higher price point compared to other food processors on the market. Overall, the KitchenAid Food Processor KFP1466 is a high-quality and versatile option for those looking for a powerful and convenient kitchen appliance.
Faqs
What is the capacity of the KitchenAid Food Processor KFP1466?
What is the ExactSlice System?
What is the wattage of the motor?
What is the Ultra Wide Mouth Feed Tube?
Can the parts be cleaned in the dishwasher?
What is the DLC-2A 3-cup mini bowl used for?
Is the KitchenAid Food Processor KFP1466 BPA-free?
What is the handle used for?
What is the length of the power cord?
How much does the KitchenAid Food Processor KFP1466 cost?
Leave a Comment
