Specifications: Kodak Digital Camera Pixpro AZ401 User Manual
Content
Introduction
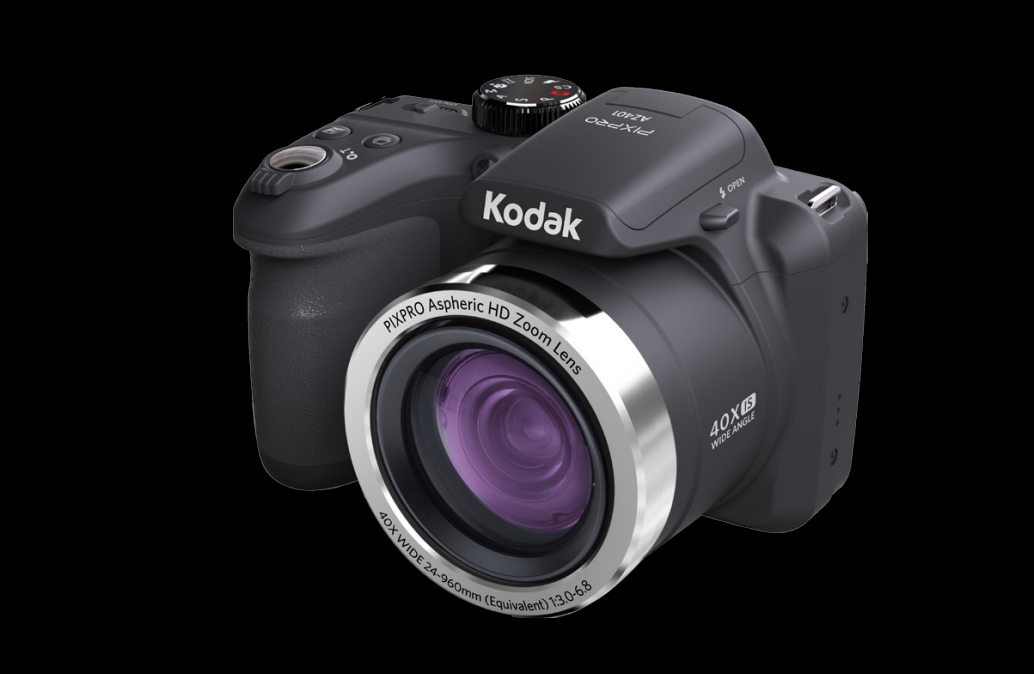
The Kodak Digital Camera Pixpro AZ401 is a versatile bridge camera designed for photography enthusiasts seeking an affordable yet powerful option. The Pixpro AZ401 is priced at approximately $199.99. With a 16MP BSI CMOS sensor and an impressive 40x optical zoom, it allows users to capture stunning images from a distance, making it ideal for various photography scenarios, including landscapes and wildlife. Its user-friendly interface and 3-inch LCD screen enhance the shooting experience.
Specifications
NOTE: Design and specifications are subject to change without notice.
Image Sensor | Type | 1/2.3"CCD | |
Effective Pixels | 16.15 Megapixels | ||
Total Pixels | 16.44 Megapixels | ||
Lens | Focal Length | 4.3mm (Wide) — 172mm (Tele) | |
35mm FilmEquivalent | 24mm (Wide)— 960mm (Tele) | ||
F Number | F3.0 (Wide) — F6.8(Tele) | ||
Lens Construction | 11 groups 15elements | ||
Optical Zoom | 40x | ||
Focusing Range | Normal: (Wide) 50cm ~ ∞, (Tele) 200cm ~ ∞; Macro: 1.6cm ~ ∞ (Wide Only) | ||
Autofocus System | TTL Autofocus | ||
Anti-Handshake | Optical ImageStabilization (OIS) | ||
Digital Zoom | 4x Digital Zoom (Combined Zoom: 160x) | ||
Number of Recording Pixels |
Still Image | (4:3) 16MP: 4608 × 3456 10MP: 3648 × 2736 5MP: 2592 × 1944 3MP: 2048 × 1536 0.3MP: 640 × 480 | (3:2) 14MP: 4608 × 3072 | (16:9) 12MP: 4608 × 2592 2MP: 1920 × 1080 |
Movie | 1280 × 720 (30fps),1280 × 720 (15fps), 640 × 480 (30fps) | |||
Image Compression | Best, Fine, Normal | |||
DCF, DPOF(Ver1.1) Support | Yes | |||
File Format | Still Image | Exif 2.3 (JPEG) | ||
Movie | MOV [Image: H.264; Audio: Linear PCM (Monaural)] | |||
Shooting Modes | Auto Mode, Program AE, Shutter Priority, Aperture Priority, Manual Mode, Face Beautifier, Panorama Mode, Scene Mode, Movie Mode, Custom Settings | |||
Scene Mode | Pet Mode, Sunset, Fireworks, Sport, NightPortrait, Landscape, Portrait, Snow, Children, Party, Night Landscape, Auto Scene | |||
Detection Features | Face, Smile, Blink, Cat, Dog | |||
Photo Touch-up | Red-Eye Reduction, Skin Soften, Eye Brightening, Eye Enlargement | |||
HDR | Yes |
Video Panorama | Up to 180° (Horizontal) |
LCD Display | 3.0 inch (460k Pixels) |
ISOSensitivity | Auto, ISO80/100/200/400/800/1600/3200(4M) |
AF Method | Single AF, Multi-AF (TTL 9-point), Object Tracking, Face-Detection |
Exposure Metering Method | Artificial Intelligence AE (AiAE), Center-Weighted Average, Spot (Fixed to Center of Frame), Face AE |
Exposure ControlMethod | Program AE (AE-Lock Available), Shutter Prior AE, Aperture Prior AE |
Exposure Compensation | ±2EV in 1/3 Step Increments |
Shutter Speed | 1/2000 ~ 30 Seconds |
Continuous Shooting | Yes |
Playback Modes | Single, Index (9/16 Thumbnails), Slide Show, Date, Zoom (Approx. ×2 ~ ×8) |
White Balance Control | AWB, Daylight, Cloudy, Fluorescent, Fluorescent CWF, Incandescent, Manual WB, Color Temp.(1900K ~ 10000K) |
Flash | Flash Method | Pop-Up (Manual) |
Flash Modes | Force Off, Flash Auto, Force Flash, Slow Sync., Slow Sync. + Red-Eye, Red-Eye Reduction | |
Recording Media | Internal Memory:Approx. 8MB | |
SD/SDHC Card (Up to 32GBSupport) [MMC Cardnot supported ] | ||
Multi-Language Support | 27 Languages | |
Jacks | AV-OUT/USB 2.0 (Micro 5 pin USB), HDMI (TypeD) | |
Eye-Fi Support | Yes | |
Power | AA Alkaline Battery (× 4), AA Ni-MH Battery (× 4) (Not Included) | |
Shooting Capability (Battery Performance) | Approx. 280 Shotswith AA Alkaline Batteries (Based on CIPA Standards) | |
Operation Environment | Temperature: 0 ~ 40oC, Humidity: 0 ~ 90% | |
Dimensions (W × H × D) | Approx. 114.3 × 81.6× 84.4 mm (Based on CIPA Standards) | |
Weight | Approx. 436 g (Body Only) | |
Safety Notes
Safety Notes for this Camera
- Do not drop the camera or allow it to hit solid objects.
- Do not attempt to disassemble or repair the camera.
- Do not use or store the camera in dusty places or on a beach to help prevent dust or sand from entering the camera, causing possible damage.
- Do not use or store the camera in a hot environment or in direct sunlight.
- Do not use or store the camera near powerful magnetic fields, such as a magnet or transformer.
- Avoid touching the lens of the camera. Do not expose the camera to direct sunlight for a long period of time.
- To prevent the camera from being damaged by moisture, do not use or store the camera in very humid environments, such as in rain or near bodies of water.
- If water accidentally comes in contact with the camera, turn the camera off immediately, remove the battery and the memory card and dry it completely within 24 hours.
- When you take the camera from a cold environment to a warmer environment, condensation may occur. Please wait for a reasonable period of time before you turn the camera on.
- Before you remove the battery and memory card, the camera should be turned off.
- When you clean the body of the camera, do not use abrasive, alcohol-based or organic cleansers or solvents. Use a professional lens cleaning cloth and appropriate cleaner to wipe and clean the lens.
- Download your photos and remove the memory card when you are going to store the camera for long periods of time.
- If this camera is not in use for a long period of time, please keep it in a dry and clean storage location.
- Our company will not pay compensation for any failure of playback including: pictures or videos damaged or unrecoverable by improper operation.
Safety Notes for Batteries
- If battery fluid leaks inside the camera, contact our customer service department immediately. If battery fluid leaks onto your skin, rinse your skin immediately with clean water and seek immediate medical attention. Disposal of used batteries should be carried out in accordance with your local (national or regional) regulations. To prevent batteries from being damaged, do not drop batteries or allow them to hit solid objects or to be scratched by foreign objects.
- Do not let batteries come in contact with metal objects (including coins) to avoid short circuiting, discharging, excessive heat or possible leakage. Do not attempt to disassemble batteries.
- Do not expose batteries to water. Always keep battery contacts dry.
- Do not heat batteries or throw them into a fire to avoid a possible explosion. Do not store batteries in a hot environment or in direct sunlight.
- When the camera is stored for a long period of time, remove the batteries and keep them in a safe, dry place that is not accessible to infants and children.
- In colder environments, the performance of the batteries could be noticeably reduced.
- When you install the batteries, align the battery markings according to the positive and negative markings inside the camera battery compartment. Never force batteries into the battery compartment.
Safety Notes for Memory Cards
- We highly suggest buying only well-known, name brand memory cards to ensure peak performance and reliability. Format the memory card using the camera before you use it or insert a new one.
- Do not drop the memory card or allow it to hit solid objects to avoid damaging it. Do not attempt to disassemble or repair the memory card.
- Do not expose the memory card to water. Always keep it dry.
- Do not remove the memory card when the camera is turned on. Otherwise, the memory card and photo/video files could be permanently damaged.
- Do not directly edit the data on the memory card. Copy the data to your computer before you edit the files. When the camera is stored for long periods of time, be sure to download your photos and remove the memory card. Store the memory card in a dry environment.
- Do not modify the name of the files or folders of the memory card using your computer. Modifying the file names may cause the files to not be recognized on the camera or a possible permanent error may occur.
- A photo taken with the camera will be stored in the folder that is automatically generated on the memory card. Do not store photos that are not taken using this camera in these folders as the pictures cannot be recognized during playback.
- When you insert the memory card, make sure the notch of the card matches the markings on the top of the camera card slot.
Other Safety Notes
- Do not disconnect the power or turn the product off during the update process. Doing so may cause incorrect data to be written and the product may not power on later.
- Do not hang the neck strap of the camera around the neck of a child. When using your camera on an airplane, observe the relevant rules specified by the airline and FAA regulations.
- Due to the limitations of manufacturing technology, the LCD may have a few dead or bright pixels. These pixels do no effect the quality of the photos or video.
- Do not expose the camera’s LCD to water. In a humid environment, only wipe it with a soft, dry, cleaning cloth. If the LCD is damaged, pay particular attention to the liquid crystal in the screen. If any of the following situations arise, take the recommended immediate action indicated below:
- If liquid crystal comes in contact with your skin, please wipe with a dry cloth, wash thoroughly with soap, and rinse with plenty of clean water.
- If liquid crystal gets into your eye, flush the eye immediately with plenty of clean water for at least 15 minutes and then seek medical assistance.
- If liquid crystal is swallowed, immediately flush your mouth thoroughly with clean water and induce vomiting. Seek medical assistance.
Accessories Included
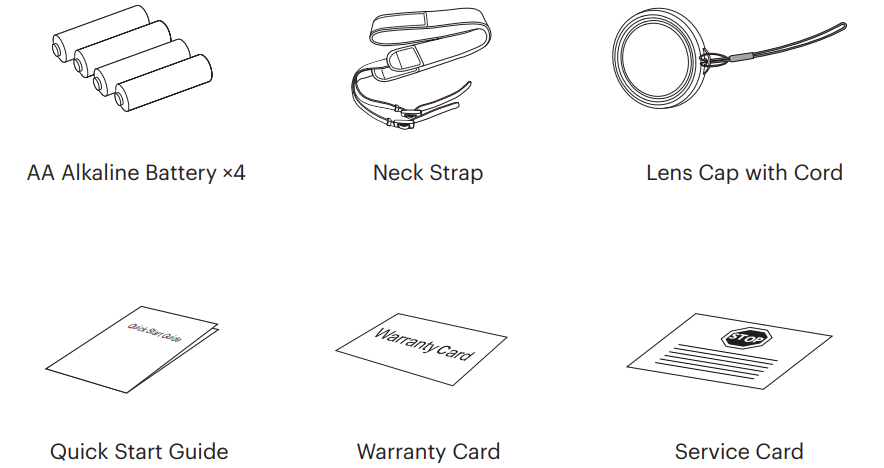
Your camera box should contain the camera model you purchased along with the following accessories. If anything is missing or appears to be damaged, please contact your retailer or our customer service center.
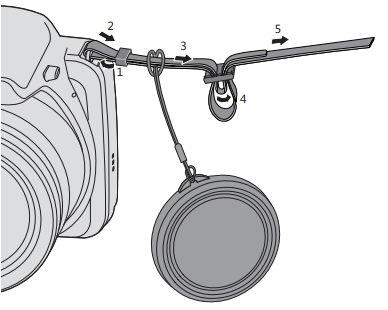
Installing Lens Cap and Neck Strap
Part Names
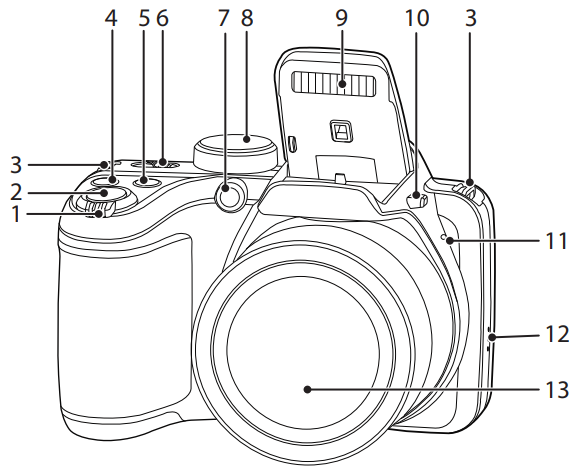
- Zoom Lever
- Shutter Button
- Strap Eyelet
- Exposure Compensation Button
- Continuous Shot Button
- Power Switch
- AF Assist Beam/Self-Timer Lamp
- Mode Dial
- Flash Lamp
- Flash Button
- Microphone
- Speaker
- Lens
- “i” Button
- Indicator Lamp
- Fast Video Recording Button
- Menu Button
- Micro USB/AV Port
- Micro HDMI Port
- AF Button/Up Button
- Flash Button/Right Button
- Delete Button/Self-Timer Button/Down Button
- Display Button
- Battery Cover Switch
- Battery Cover
- Playback Button
- Tripod Socket
- Macro Button/Left Button
- SET Button
LCD
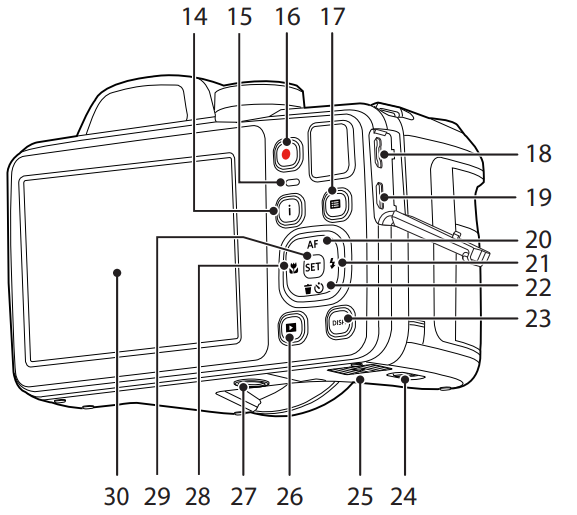
Description
The Kodak Pixpro AZ401 boasts a robust build with a comfortable grip, making it easy to hold and maneuver. The 3-inch LCD screen provides a clear view of your shots, and the menu system is straightforward, allowing quick access to various settings. The camera's 40x optical zoom lens is one of its standout features, enabling you to capture distant subjects with clarity.
The camera also includes features like face detection, smile detection, and built-in flash, which enhance the overall photography experience. For storage, it supports SD and SDHC cards up to 128GB, ensuring you have ample space for your photos and videos.
Installing AA Batteries and Memory Card
- Open the battery cover door according to diagram (①,②,③) below:
Insert 4 AA batteries into the battery slot in the correct direction as shown in the following diagram:
NOTE: Please use brand name batteries (such as Energizer® or Duracell®) for optimal performance. Do not mix new and old batteries or use different brands of batteries. When replacing batteries, please replace all 4 batteries at the same time.
NOTE: The performance and life expectancy of alkaline batteries will vary depending on the brand.
NOTE: Do not mix alkaline, standard (carbon-zinc), or rechargeable (ni-cad, ni-mh, etc.) batteries.
- Insert the memory card into the memory card slot as shown in the diagram below:
Close the battery cover door according to instructions ① and ② below:
NOTE: A standard SD memory card is not included in the camera packaging and needs to be purchased separately. This camera takes a standard (SD/SDHC) memory card. We recommend using a name brand memory card that is Class 4 or higher and has a capacity of 4GB to 32GB. The camera is not compatible with Micro SD, Ultra, Ultra Plus, Extreme, XC, or adapters for any of these other memory cards.
NOTE: To remove your memory card, open the battery cover door, gently press the memory card to eject it and remove carefully.
Turn the Camera On / Off
Slide the Power Switch to turn the camera on/off.
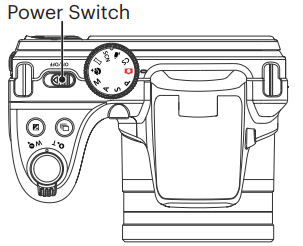
NOTE: When the power is off, press and hold the Playback![]() button to power on and enter Playback Mode.
button to power on and enter Playback Mode.
How to Take Pictures
- Hold the camera with both hands, being careful not to block the flash and lens with fingers.
- Point the lens toward the object you want to take a picture of, and then frame it with the LCD.
- Use the Zoom button to select Tele or the Wide position to zoom in or out on your subject.
- Press the Shutter button halfway down to focus on the subject. When the focus frame turns green, press the Shutter button down completely to take the picture.
Set your Language, Date/Time
Set your Language, Date/Time after the First Power-On
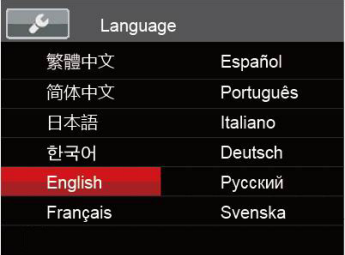
- When you turn the camera on for the first time, the language selection screen will appear.
- Press the arrow buttons to select your desired language.
- After you press the
 button to confirm your language selection, the Date/Time settings screen will appear.
 - Press the left/right arrow buttons to select the Date/Time to be adjusted: Time is displayed in YYYY.MM.DD/HH:MM.
- Press the up/down arrow buttons to adjust the value for the desired Date/Time.
- Press the
 button to confirm the time settings and the snapshot screen will appear.
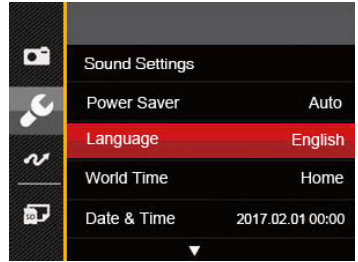
Resetting your Language
After you set your desired language for the first time, follow the instructions below to reset your language:
- Press the
 button, then press the up/down arrow buttons to select
  and press the
  button to enter the menu.
 - Press the up/down arrow buttons to select
 , and press the
 button or right arrow button to enter the menu.
 - Press the up/down arrow buttons to select [Language] and press the
 button or right arrow button to enter the menu.
 - Press the arrow buttons to select your desired language and press the
 button to confirm.
 - Press the
 button and the Snapshot screen will appear.
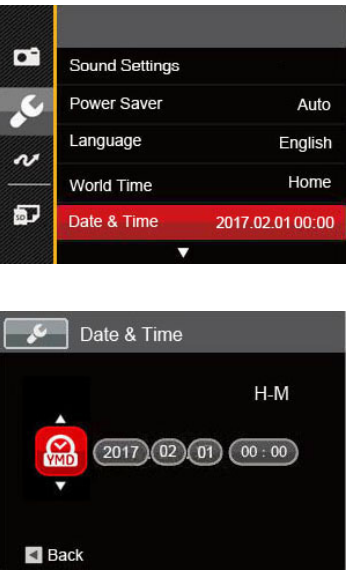
Resetting Date/Time
After you set your Date/Time for the first time, follow the instructions below to reset date and time.
- Press the
 button, then press the up/down arrow buttons to select
  and press the
  button to enter the menu.
 - Press the up/down arrow buttons to select
 , and press the button
  or right arrow button to enter the menu.
 - Press the up/down arrow buttons to select [Date & Time] and press the
 button or right arrow button to enter the menu.
 - Press the left/right arrow buttons to select the Date/Time to be adjusted: Time is displayed in YYYY.MM.DD/HH: MM.
- Press the up/down arrow buttons to press the value for your selected entry. After you finish entering your settings, press t
 he button to confirm.
 Press the
 button and the following snapshot screen will appear:
Setup Guide
To set up your Kodak Pixpro AZ401,
- Start by inserting the batteries and an SD card.
- Turn on the camera by pressing the power button.
- You will be prompted to set the date and time.
- Navigate through the menu using the directional buttons to configure settings such as image quality, white balance, and ISO.
- Once you've set your preferences, you can start taking photos or videos by pressing the shutter button or the video recording button.
- For pairing with other devices, you can use the USB cable provided to connect the camera to your computer or use the optional Wi-Fi adapter for wireless transfer.
Using the PICTBRIDGE Menu
After setting the USB Mode to Printer, the PICTBRIDGE Menu will appear.
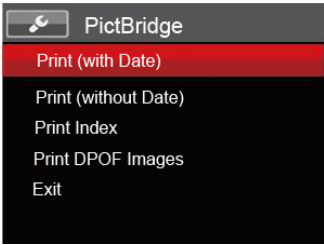
Press the up/down arrow buttons to select a menu item and press the![]() button or right arrow button to enter the item.
button or right arrow button to enter the item.
Refer to the following sections for more detailed information on each setting.
Print (with Date)
If you have set the date and time on your camera, the date and time will be recorded and saved with each photo you take.
In the PICTBRIDGE Menu, select [Print (with Date)] and the screen as shown below appears.
_kodak_digital_camera_pixpro_az401.png)
- Press the left/right arrow buttons to select a photo to be printed.
- Press the up/down arrow buttons to select the number of copies for the currently displayed photo.
Press the
 button and the following screen will appear.
_of_kodak_digital_camera_pixpro_az401.png)
- Select [Yes] and press the button to confirm; select [Cancel] to cancel printing.
Print (without Date)
Use this setting to print the photos without dates on them.
In the PICTBRIDGE Menu, select [Print (without Date)] and the screen as shown below appears.
_kodak_digital_camera_pixpro_az401.png)
- Press the left/right arrow buttons to select a photo to be printed.
- Press the up/down arrow buttons to select the number of copies for the currently displayed photo.
Press the
 button and the following screen will appear.
_of_kodak_digital_camera_pixpro_az401.png)
- Select [Yes] and press the button to confirm; select [Cancel] to cancel printing.
Print Index
You can print all photos in the camera via this function.
In the PICTBRIDGE Menu, select [Print Index] and the screen as shown below appears.
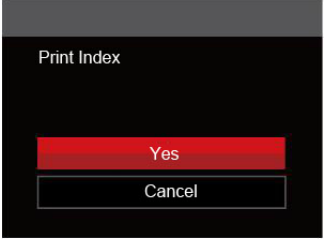
- Select [Yes] and press the button to confirm; select [Cancel] to cancel printing.
Print DPOF Images
To use DPOF printing, you must select your photos for printing using the DPOF settings first.
In the PICTBRIDGE Menu, select [Print DPOF Images] and the screen as shown below will appear.
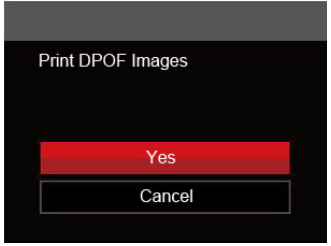
- Select [Yes] and press the button to confirm; select [Cancel] to cancel printing.
Exit
Select [Exit] to exit the PICTBRIDGE Menu. At this time, the message [Remove USB Cable!] will appear on the screen.
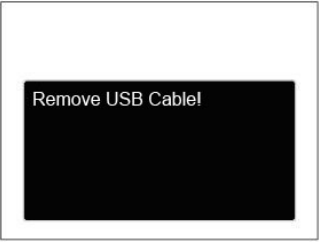
Disconnect the micro USB cable from the camera and printer.
Prompts and Warning Messages
Message | Description | Solution |
Warning! Battery exhausted. | The camera batteries are depleted. It is a warning indicating that the camera is going to shut off. | Replace with new batteries. The camera will shut down in 2 seconds. |
Lens obstruction, Re-start Camera. | The lens is jammed or some foreign object is preventing the lens from functioning properly. | Turn the cameraoff and restartit to reset the lens. |
Suggest using tripod. | When continuous exposure mode (Sunset, Fireworks, Night Portrait, Night Landscape) is enabled, this prompt message is displayed when the photo shooting screen is displayed for the first time. |
This message will disappear after 2 seconds |
Built-in memory error! |
An error has occurred in the built-in memory. | Try shutting down the camera and turning it on again. This message will disappear after 2 seconds. |
Improper alignment. Please try again. | The offset is too big for panorama shooting. | Retry taking thepanoramic picture. This message will disappear after 2 seconds. |
Warning! Do not turn off your camera during update! | This message appears during the firmware update process. | This message disappears after the camera update and restart. |
Remove USB Cable! | Indicates that you can disconnect the USB cable. | This message disappears after you disconnect the USB cable. | - |
Connection Failed! | Failure to connect toyour PC, printer, TV (with HDMI). | Remove USB cable and retry connection. | - |
Write Protect! |
The SD card is locked. | Remove SD card and switch the lever on the side of card to UNLOCK. This message will disappear after 2 seconds. | - |
Card Full! |
Indicates that the SD card isfull. | Replace SD card with another that has available memory. This message will disappear after 2 seconds. | - |
Memory Full! | Indicates that thecamera memory is full. | Erase Files or replace memorycard in order to take more photos or videos. | - |
Card Error! |
During power-on, the SD card cannotbe recognized or a read/write error occurs has occurred. | Format the SD card. WARNING: Formatting theSD card willerase all data on the card. Copy the data from the SD card to another storage, such as a computer. Otherwise, all data will be erased after the format. This message will disappear after 2 seconds. | - |
| - |
Card is not formatted. |
When an erroroccurs with the memory card, the message “Not Formatted” will appear. | Format the memory card. WARNING: Formatting the SD card willerase all data on the card. Copy the data from the memory card to another storage device, such as a computer. Otherwise, all data will be erased after the format. This message will disappear after 2 seconds. | - |
Slow access | When a memory card lower than Class 4 is used to record a HD movie, the writing speed will be slower and recording will not continue. |
Replace the memory card with a Class 4 or higherSD card. This message will disappear after 2 seconds. | - |
Cannot write to SDcard. | The photo shooting or video recording hasbeen interrupted, so recording cannot continue. | Turn the cameraoff. Then unloadand reload the SD card and turn on the camera to restart. Also check if SD card is full or in the locked position. | - |
No Red-Eye Detected! | Red eyes have not been detected in the image. | This message willdisappear after 2 seconds. | - |
This image cannot be edited. | The file format does not support editing or the edited file cannot be edited again. |
This message will disappear after 2 seconds. | - |
| - |
Exceeded maximum folder number. | This indicates that the SD card exceeded the maximum number of folders (999). This could cause a long read time during the camera's power up. |
Copy the data to your PC, and format the memory card using the camera. | - |
Too many pictures for fast processing. | During the playback by date, the images exceed specifications so that it is not possible to play by date. | This message disappears after 2 seconds and the camera returns to normal playback mode. | - |
Unable to recognize files. | The format of the file to be viewed is not supported or the file is corrupted so it cannotbe properly read. |
This message disappears only after the file is deleted. | - |
No Picture! | When you press the play button, no image filesexist in the camera or memory card. | This message disappears after 2 seconds and returns to the photo shooting screen. | - |
Protected! Undeletable! |
The file is protected. The message appears whenyou go into delete mode. | Remove SD card and switch the lever on the side of card to UNLOCK. Place card back into the camera and try again. Thismessage will disappear after 2 seconds. | - |
| - |
Kodak Digital Camera Pixpro AZ401 Troubleshooting
Problem | Possible causes | Solution | - |
Camera does not turn on | The batteries have been depleted. The batteries are not inserted correctly. | Replace the batteries. Correctly reinstall the batteries. | - |
Camera turns off suddenly during operation | The batteries have been depleted. |
Replace thebatteries. | - |
The picture is blurry |
Camera shakes while taking a picture. | Turn on OIS Feature. Please use tripod for high magnification (above 15X) Optical Zoom. | - |
Images and video files cannot be saved | The memorycard is full. The memory card is locked. | Use another memory card or delete unnecessary files. Unlock thememory card. | - |
Images will not print from the connected printer | The camera is not connected to the printer correctly. The printer is not PICTBRIDGE™ compatible. The printer is out of paper or ink. The printer paper is jammed. | Check the connection between the camera and printer. Usea PICTBRIDGE™ compatible printer. Load paperinto the printeror replace the ink cartridge in theprinter. Remove the jammed paper. | - |
| - | |||
| - | |||
| - |
Saving data to memory card is slow | Using a memory card below Class 4 may result in slower recording times. | Use a memorycard with writeClass 4 or higher to improve performance. |
Cannot write to the memory card | The memory cardhas been locked. | Release the write lock of the memory card or replace with another card. |
Too many moviesto process | The number of pictures or folders in thememory card exceed the specifications, so the playback of data folder can not be displayed. |
Delete unwanted files. |
The flash flashes on the LCD. | Current shooting environment requires flash. |
Turn on flash. |
Pros & Cons
Pros:
- High-quality 16-megapixel images
- 40x optical zoom for distant shots
- Intuitive and user-friendly interface
- Affordable price point
- Built-in image stabilization
- Support for 720p video recording
Cons:
- No 4K video recording capability
- Lower battery life compared to some competitors
- No touchscreen LCD
- Some users report slow autofocus
Customer Reviews
Customers generally praise the Kodak Pixpro AZ401 for its excellent zoom capabilities and good image quality. Many users appreciate its ease of use and the value for money it offers. However, some reviewers have noted that the autofocus can be slow and the battery life could be better.
Common complaints include the lack of 4K video recording and the absence of a touchscreen LCD. Despite these minor drawbacks, the AZ401 remains a popular choice among photographers looking for a reliable and feature-packed camera.
Faqs
What is the resolution of the images captured by the Kodak?
How much optical zoom does the Kodak Kodak Digital Camera Pixpro AZ401 offer?
Does the Kodak Pixpro have built-in image stabilization?
What type of memory cards does the Kodak Pixpro AZ401 support?
How long does the battery of the Kodak Pixpro last?
Can I connect the Kodak Digital Camera Pixpro AZ401 to my computer wirelessly?
What are some common issues with the Kodak?
Is the Kodak Pixpro suitable for professional photography?
Leave a Comment
