Lenovo Tablet MIIX 320-10ICR User Guide | Setup
Content
Introduction
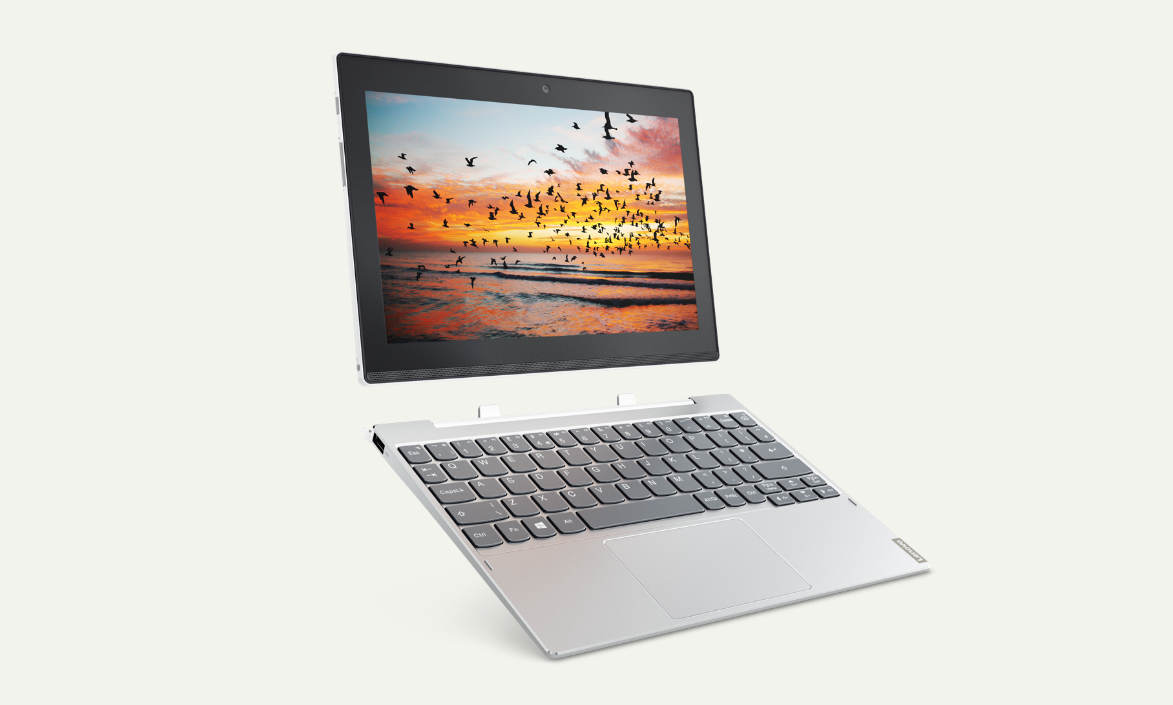
The Lenovo Tablet MIIX 320-10ICR is a versatile 2-in-1 device that combines the functionality of a tablet with the productivity of a laptop. Featuring a 10.1-inch touchscreen display, it offers a vibrant viewing experience for both work and entertainment. Powered by an Intel processor and equipped with Windows 10, it supports various applications and multitasking capabilities. With a detachable keyboard for easy typing and portability, this tablet is priced at approximately $249.99, making it an attractive option for users seeking flexibility and performance.
Notes
Before using the product, be sure to read the Lenovo Safety and General Information Guide first. The latest electronic compliance and environmental information are available from the Lenovo compliance information websites.
- To view compliance information, go to: http://www.lenovo.com/compliance
- To download environmental information, go to: http://www.lenovo.com/ecodeclaration
- Some instructions in this guide may assume that you are using Windows® 10. If you are using another Windows operating system, some operations may be slightly different.
If you are using other operating systems, some operations may not apply to you. - The features described in this guide are common to most models. Some features may not be available on your computer or your computer may include features that are not described in this user guide.
- The illustrations in this manual may differ from the actual product. The screenshots of the operating system are for reference only. Please refer to the actual product.
- Some instructions in this guide may assume that you are using Windows® 10. If you are using another Windows operating system, some operations may be slightly different.
Getting to know your computer
Note: The dashed areas indicate parts that are not visible externally.
Top view
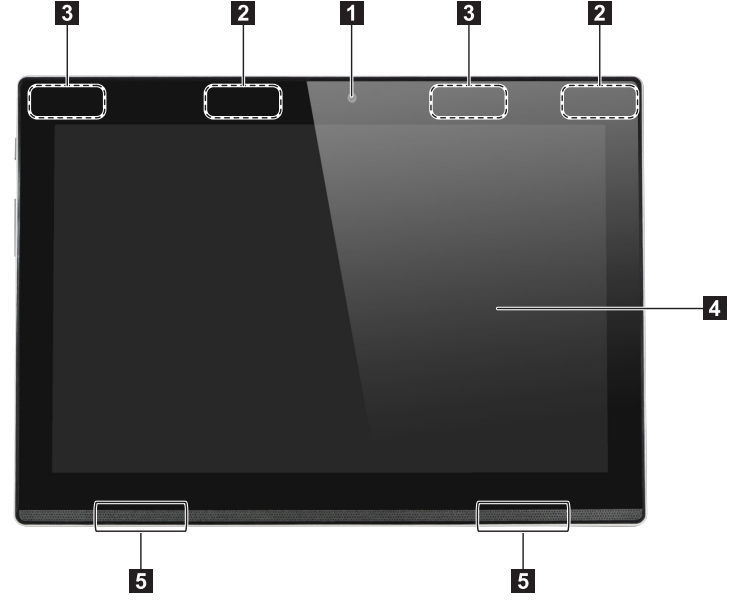
- Front camera: Use the camera for video communication or taking photos.
- Wireless LAN antennas: Connect to a wireless LAN adapter to send and receive wireless radio signals.
- Wireless WAN antennas (on select models): Connect to a wireless WAN adapter to send and receive wireless radio signals.
- Multi-touch screen: Functions as the visual display as well as touchpad input.
Note: For details, see “Touch screen operation” on page 22. - Speaker: Provides audio output.
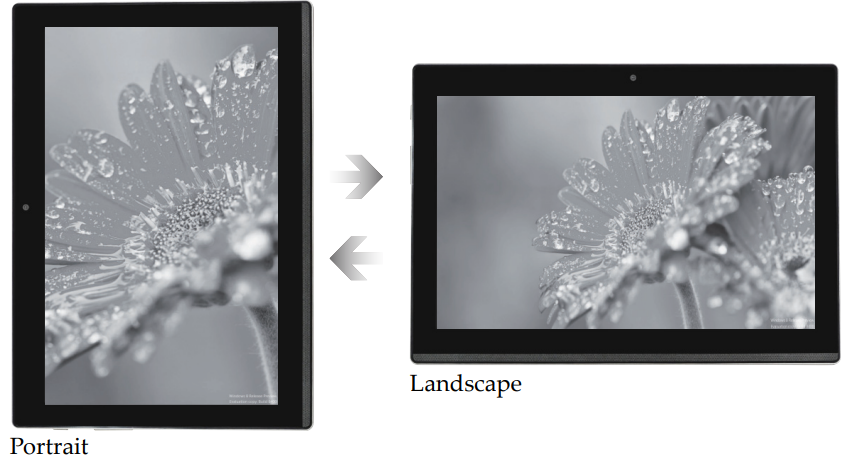
Screen orientation
You can rotate the display panel to your preferred orientation. The orientation of the display automatically changes (alternating between portrait and landscape modes) depending on how you hold it.
Left-side view

- Combo audio jack: Connects to headsets.
Notes: The combo audio jack does not support conventional microphones. The recording function might not be supported if third-party headphones or headsets are connected, due to different industry standards. - Volume down button: Decreases the volume level.
- Volume up button: Increases the volume level.
Power indicator:
Indicator
Indicator status
Meaning
Power
On (solid white)
The tablet is powered on.
On (solid amber)
The tablet is in sleepmode.
Off
The tablet is powered off.
- Power button: When the computer is off, press and hold this button to turn on the computer.
Right-side view

- Built-in microphone
Captures sound which can be used for video conferencing, voice narration, or audio recording. - Micro HDMI port
Connects to devices with micro HDMI input such as a TV or an external display. - Type-C port
Connects to Type-C devices. - AC power adapter jack
Connects to the AC power adapter.
Bottom view

- Card reader
Accepts micro SD card (not supplied) and Nano SIM card (not supplied).
Notes:- Select models may not have the Nano SIM card slot, please refer to the actual product.
- For details, see “Using the card reader” on page 6.
- Tablet-keyboard dock latch
Attaches the tablet to the dock, keeping the tablet secured in place.
Note: For details, see “Combination of tablet and keyboard dock” on page 13. - Keyboard dock connector
Connects the tablet to the keyboard dock.
Detailed Specifications
The Lenovo Tablet MIIX 320-10ICR features:
- Display: 10.1-inch Full HD (1920 x 1200) IPS
- Processor: Intel Pentium N4200 - RAM: 4GB DDR3L
- Storage: 64GB eMMC + microSD slot
- Operating System: Windows 10 Home
- Connectivity: Wi-Fi 5, Bluetooth 4.2
- Battery Life: Up to 8 hours
- Weight: Approximately 1.02 kg (2.25 lbs)
Using the card reader
Your computer supports the following types of cards:
- Micro Secure Digital (SD) card
- Nano Subscriber Identity Module (SIM) card (on select models)
Notes:
- The card tray may have two slots for different types of cards. Insert only one card in one slot at a time.
- Select models may not have the Nano SIM card slot, please refer to the actual product.
- This card reader does not support SDIO devices (e.g., SDIO Bluetooth and so on).
- The illustrations are for reference only, please refer to the actual product.
Inserting card(s)
- Turn off the tablet, and disconnect the AC adapter and any cable(s) from the tablet.
Insert a prying pin (not supplied) into the tiny hole on the card tray. Press firmly and push it straight in until the card tray pops out.
_lenovo_tablet_miix_320-10icr.png)
- Gently pull the card tray out of the card reader.
Put the card(s) in the corresponding slot on the card tray.
_of_lenovo_tablet_miix_320-10icr.png)
Reinsert the card tray.
_of_the_lenovo_tablet_miix_320-10icr.png)
Removing card(s)
- Turn off the tablet, and disconnect the AC adapter and any cable(s) from the tablet.
- Insert a prying pin into the tiny hole on the card tray. Press firmly and push it straight in until the card tray pops out.
- Gently pull the card tray out of the card reader.
- Remove the card(s) from the card tray, then reinsert the card tray.
Notes
- Do not insert or remove cards while the computer is turned on. Doing so may damage the card reader.
- Before removing the memory card, disable it by using the Windows "Safely Remove Hardware and Eject Media" utility to avoid data corruption.
Rearview
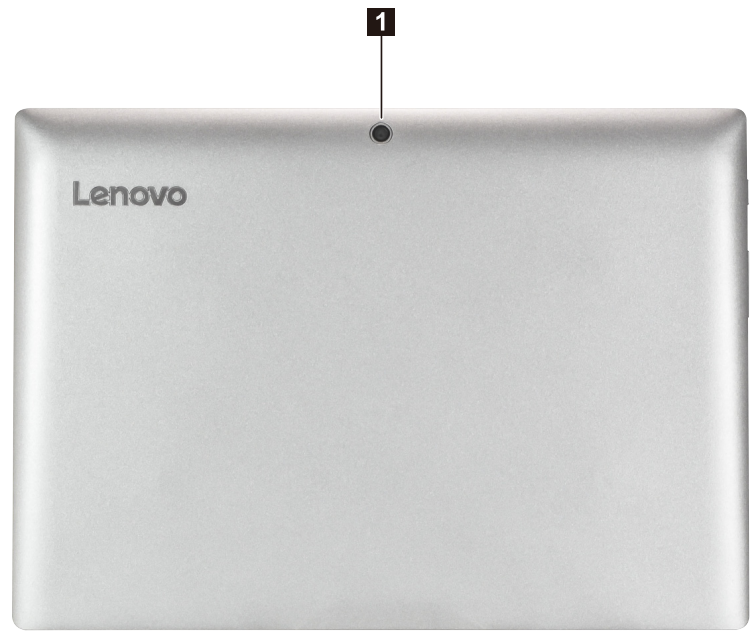
- Rear camera
Use the camera for video communication or taking photos.
Keyboard dock top view (Optional)
_lenovo_tablet_miix_320-10icr.png)
- Tablet-keyboard dock latch
Attaches the tablet to the dock, keeping the tablet secured in place.
Note: For details, see “Combination of tablet and keyboard dock” on page 13. - Keyboard dock connector
Connects the tablet to the keyboard dock. - Keyboard
- Touchpad
Function key combinations
Through the use of the function keys, you can change operational features instantly. To use this function, press and hold Fn ; then press one of the function keys .
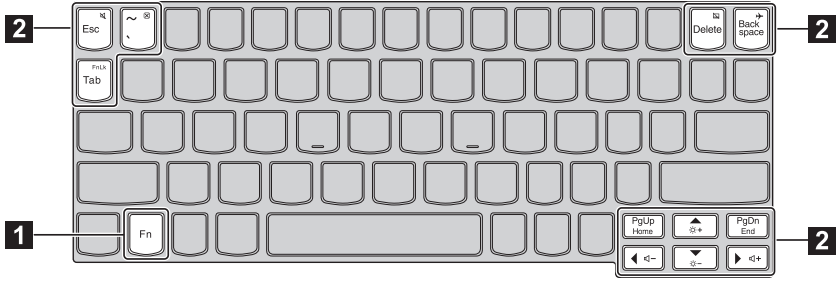
The following describes the features of each function key.Fn + Esc:
Mutes/unmutes the sound.
- Fn + :
Closes the currently active window. - Fn + Delete:
Enables/disables the touchpad. - Fn + Backspace:
Enables/disables Airplane mode. - Fn + PgUp:
Activates the home key function. - Fn + PgDn:
Activates the end key function. - Fn + :
Increases the display brightness. - Fn + :
Decreases the display brightness. - Fn + :
Decreases the volume level. - Fn + :
Increases the volume level. - Fn + Tab:
Locks/unlocks the function keys.
Keyboard dock left-side view (Optional)
_lenovo_tablet_miix_320-10icr.png)
- USB 2.0 port
Connects to USB devices.
Keyboard dock right-side view (Optional)
_lenovo_tablet_miix_320-10icr.png)
- USB 2.0 port
Connects to USB devices..
Description
The Lenovo Tablet MIIX 320-10ICR boasts a sleek and lightweight design, making it easy to carry around. The Full HD display provides vibrant colors and sharp visuals, enhancing your viewing experience. Powered by an Intel Pentium N4200 processor and 4GB of RAM, this tablet handles everyday tasks such as web browsing, email checking, and document editing with ease. It also includes a microSD card slot for expandable storage, ensuring you have enough space for your files and apps. With Windows 10 Home, you have access to a wide range of Microsoft services and applications.
Combination of tablet and keyboard dock
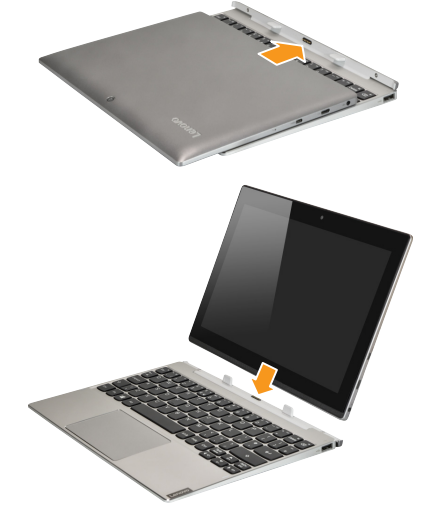
The Lenovo MIIX 320‐10ICR is not only a tablet. It can be combined with a keyboard dock and used as a notebook computer.
Attaching the tablet
Align the connector of the keyboard dock with the tablet and then attach the tablet in the direction shown by the arrow.
Detaching the tablet
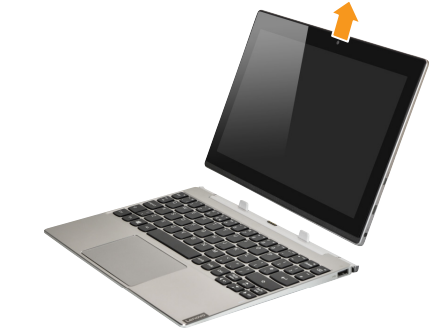
Carefully detach the tablet in the direction shown by the arrow.
Notes:
- Be careful not to damage the connector when attaching or detaching the tablet.
- The illustrations above are for reference only, please refer to the actual product.
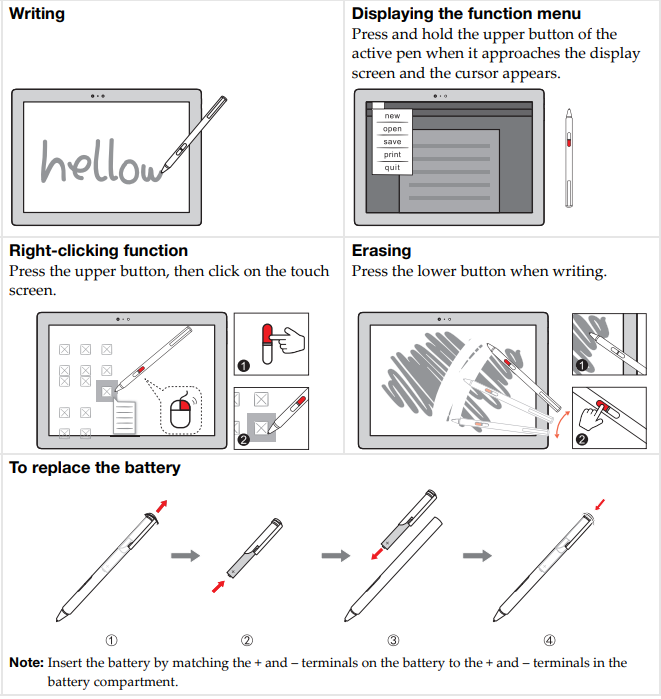
To use the Lenovo Active Pen (on select models)
Select models are equipped with the Lenovo Active Pen. To use it, refer to the following illustrations.
Starting to use Windows 10
Note: Windows 10 has an updated version. If you are using the updated version, some operations may be different. Please refer to the actual product.
Configuring the operating system for the first time
You may need to configure the operating system when it is first used. The configuration process may include the following procedures:
- Accepting the end user license agreement
- Configuring the Internet connection
- Registering the operating system
- Creating a user account
Operating system interface
Windows 10 comes with a powerful and useful start menu.
To open the start menu, do one of the following:
- Press the Windows key
 on the keyboard.
 - Select Start
 on the lower‐left corner of the desktop.
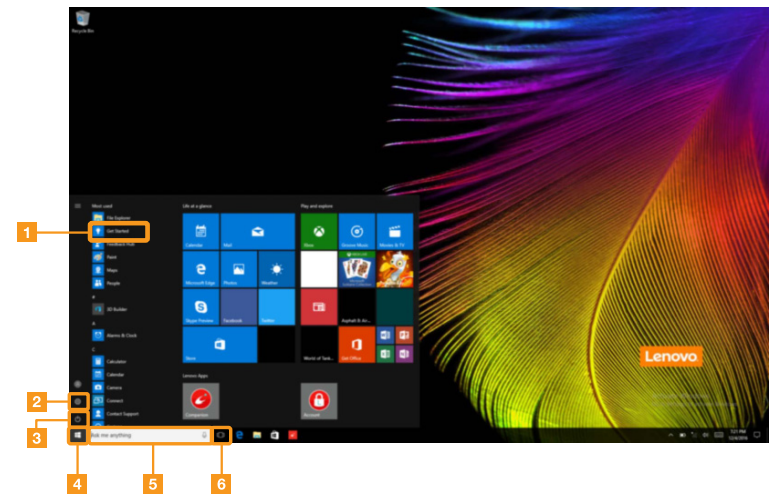
Get Started app
- Settings button
- Power button
- Start button
- Search box
- Task view button
Settings
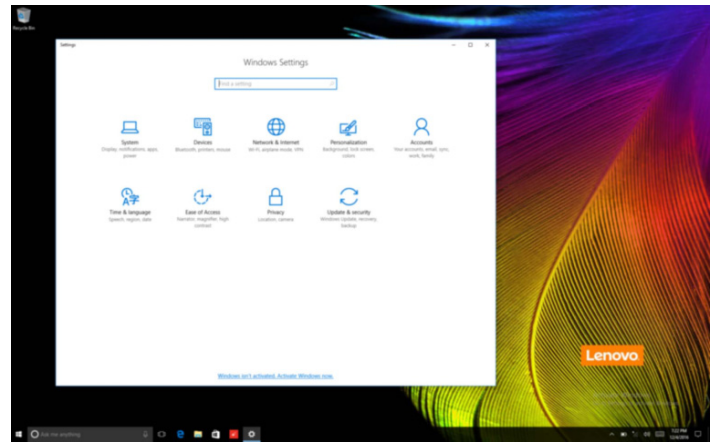
Settings lets you perform basic tasks. You can also search for more settings using the settings search box in the upper‐right corner.
To open the settings, do the following:
Open the start menu, and then select Settings
 .
.
Personalize the start menu
You can personalize the start menu with your favorite apps.
To personalize the start menu, do the following:
- Open the start menu and find the apps list on the left.
Right-click the app you want to add to the start menu, and then select Pin to Start.
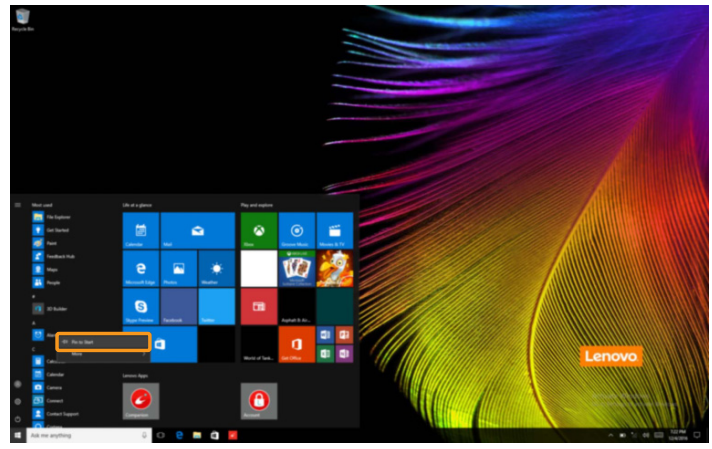
Note: You can also drag apps from the apps list to add them to the start menu.
Putting the computer to sleep or shutting it down
When you have finished working with your computer, you can put it to sleep or shut it down.
Putting your computer to sleep
If you will be away from your computer for only a short time, put the computer to sleep. When the computer is in sleep mode, you can quickly wake it to resume use, bypassing the startup process.
To put the computer to sleep, do one of the following:
- Close the display lid.
- Press the Power button.
- Open the start menu, and then select Power > Sleep.
Note: Wait until the power indicator light starts blinking (indicating that the computer is in sleep mode) before you move your computer. Moving your computer while the hard disk is spinning can damage the hard disk, causing loss of data.
To wake the computer, do one of the following:
- Press any key on the keyboard. (Notebook mode only)
- Press the Power button.
Shutting down the computer
If you are not going to use your computer for a long time, shut it down.
To shut down the computer, do one of the following:
Open the start menu, and then select Power > Shut down.
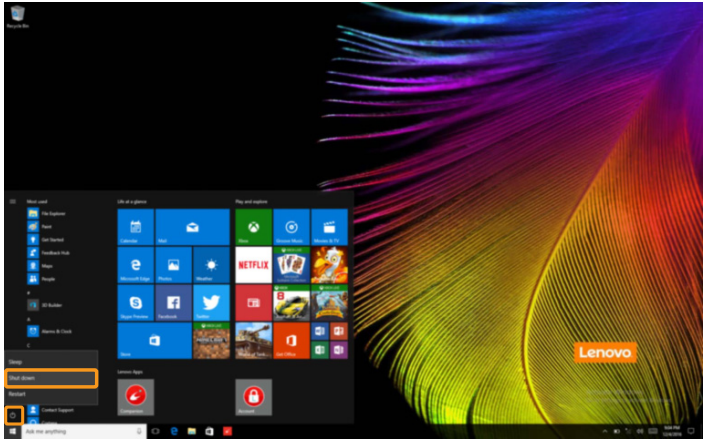
Press and hold or right-click the Start button in the lower-left corner and select Shut down or sign out > Shut down.

Task and desktop management
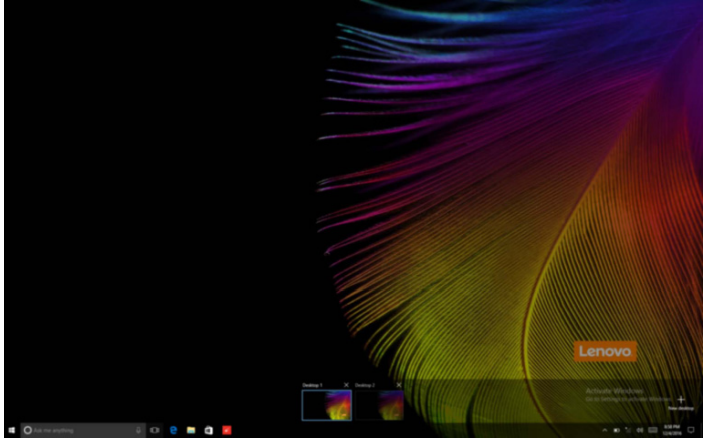
Task view
To open the task view, do one of the following:
- Select the Task view button
 on the taskbar.
 - Press the Windows key
 + Tab.
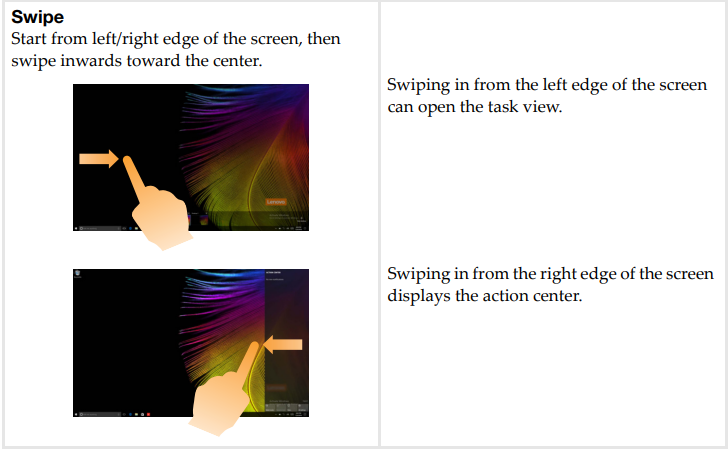
 - Swipe in from the left edge of the screen.
Virtual desktop management
Windows 10 supports the ability to create, manage, and switch between virtual desktops.
To create a new virtual desktop, do one of the following:
- Open the task view, and then select New desktop.
- Press the Windows key
 + Ctrl + D.
To switch between different desktops, do one of the following:
- Open the task view and select the desktop you want active.
- Press the Windows key
 + Ctrl + ⇐/⇒ to scroll through the desktops you’ve created.
Connecting to a wireless network
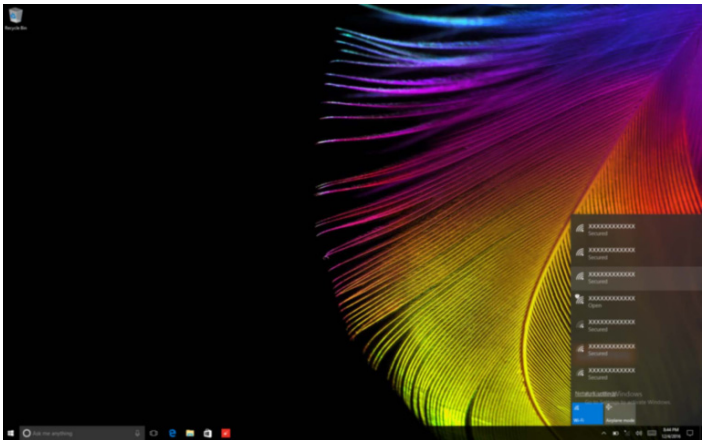
Enabling wireless connection
To enable wireless functions, do the following:
- Press Fn + Backspace to disable airplane mode.
- Click
 on the lower‐right corner of the taskbar to open the network configuration page.
Connecting to a wireless network
After wireless has been enabled, the computer will automatically scan for available wireless networks and display them in the wireless network list. To connect to a wireless network, click the network name in the list, and then click Connect.
Note: Some networks require a network security key or passphrase for connection. To connect to one of those networks, ask the network administrator or the Internet service provider (ISP) for the security key or passphrase.
Get Started app
Windows 10 also provides the Get Started app to explain the new features of Windows 10. You can find it on the start menu.
To open the Get Started app, do one of the following:
- Open the start menu and select Get Started
 .
. - Press the Windows key
 + Fn + F1 (depending on your keyboard layout).
Touch screen operation
The display panel can accept inputs like a tablet, using the multi‐touch screen, or like a traditional notebook computer, using the keyboard and touchpad.
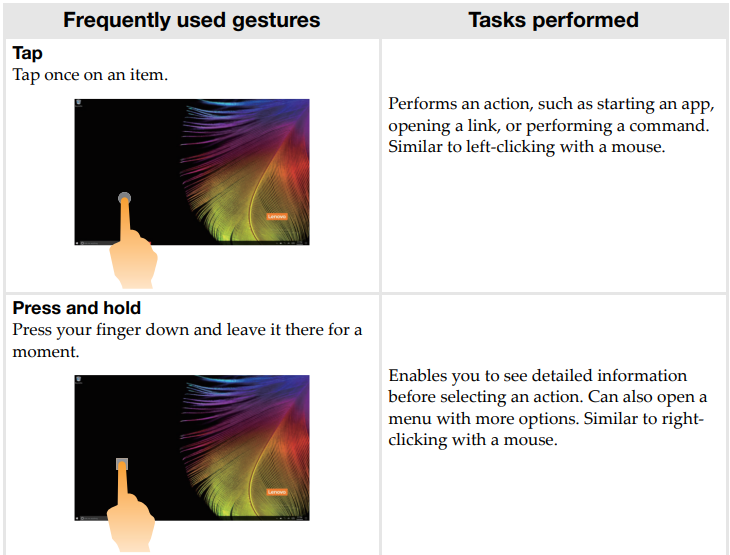
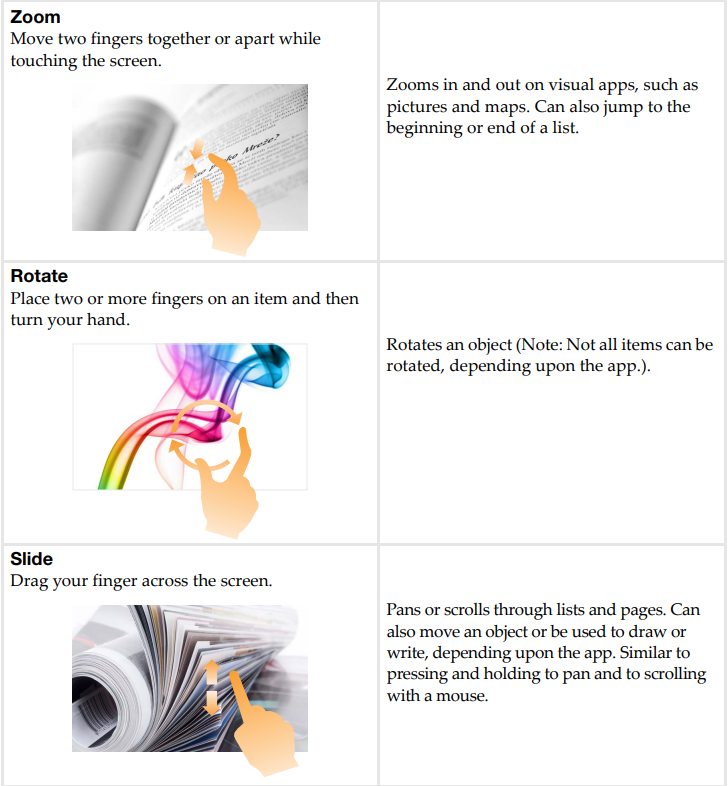
Multi-touch gestures
You can touch the screen with one or more fingertips to perform a variety of tasks.
Recovery system
Reset this PC is a built‐in recovery tool that enables users to restore their operating system to its original state. This preserves their data and important customizations, without the need to back up their data in advance.
The following Reset this PC features are available to users from multiple locations within Windows:
- Keep my files
Fixes software problems by reinstalling the factory default configuration. This preserves personal files and deletes apps and settings. - Remove everything
Prepares the computer for recycling or transfer of ownership. This reinstalls the factory default configuration and returns all user data and applications to the state of their original Out‐of‐Box Experience (OOBE).
Using Reset this PC
Reset this PC can be launched using one of the following methods:
- Power button + Volume up button:
- Shut down the computer and wait for at least five seconds.
- Press and hold the volume up button, then press the Power button until the Novo Menu appears on the screen.
- Novo Menu > System Recovery > Troubleshoot > Reset this PC.
- Windows PC settings:
- Windows PC settings > Update & security > Recovery > Reset this PC > Select Start.
For more instructions, see the Windows Help and Support file on your computer.
When I purchased my computer, it included a copy of Windows. How can I determine whether the copy of Windows is preinstalled by Lenovo?
On the outside of the sales package of your computer, you should find a label containing configuration information for your computer. Check the printed string next to OS. If it contains Windows or WIN, the copy of Windows was preinstalled by Lenovo.
What is the Recovery Partition?
If your computer is preinstalled with any version of Windows 10, the storage device of your computer contains a Recovery Partition. This partition contains the image file of the preinstalled Windows operating system. In cases of system failure, you can use the Lenovo OneKey Recovery system or the Windows Reset feature to restore the operating system to its factory status.
Note: The Recovery Partition is not assigned a drive letter and cannot be accessed through Windows File Explorer.
I uninstalled a preinstalled software, but there is no significant increase in the free drive space.
The copy of Windows running on your computer may be Compact technology enabled. For computers with Compact technology enabled Windows, the majority of files needed for preinstalled software are installed on the Recovery Partition and won’t be deleted through normal uninstallation.
What happens if I attempt to delete or modify the Recovery Partition?
Attention
- Do not delete or modify the Recovery Partition on a Compact technology enabled computer.
If the Recovery Partition is deleted or modified, you may not be able to restore Windows to the factory status. For computer models on which Compact technology is enabled, deleting the Recovery Partition may cause Windows to fail to start.
How can I determine whether the Windows running on my computer is Compact technology enabled?
Compact technology is normally enabled on copies of Windows 10 Update running on SSD (or eMMC)‐only computer models.
To check your computer:
- Right‐click the Start button in the lower‐left corner and select Disk Management.
- The Disk Management program starts.
If Wim Boot is labeled on the Windows partition (as illustrated), Compact technology is enabled on your copy of Windows.

Setup Guide
To set up your Lenovo Tablet MIIX 320-10ICR:
- Unboxing:** Carefully remove the tablet from its packaging and ensure all accessories are included.
- Charging:** Plug in the charger and let it charge for at least an hour before first use.
- Power On:** Press the power button located on the top right side of the device until it boots up.
- Initial Setup:** Follow on-screen instructions to set up your language, time zone, and network settings.
- Windows Setup:** Complete the Windows 10 setup process by following the prompts to configure your user account and other preferences.
- Software Updates:** Check for any available software updates to ensure you have the latest security patches and features.
Troubleshooting
Finding information
What safety precautions should I follow when using my computer?
Read and follow all safety precautions included in the Lenovo Safety and General Information Guide.
Note: To view the Lenovo Safety and General Information Guide, select the Companion (or Lenovo PC Manager) icon on the taskbar. You can also download it from the Lenovo Support website.
Where can I find the hardware specifications for my computer?
You can find hardware specifications for your computer on the printed flyers which came with your computer.
Where can I find warranty information?
For detailed warranty information on this machine, please visit the following website to check: support.lenovo.com/warrantystatus.
Drivers
Where can I find drivers for the various hardware devices of my computer?
You can download the latest device drivers from the Lenovo consumer support website.
Getting help
How can I contact the customer support center?
See “Chapter 3. Getting help and service” in the Lenovo Safety and General Information Guide.
Display problems | |
When I turn on the computer, nothing appears on the screen. |
‐ The AC power adapter is connected to the computer and the powercord is plugged into a working electrical outlet. ‐ The computer power is on.Press and holdthe Power button for about three seconds for confirmation. ‐ Press and hold the Power button for about ten seconds to forceshut down the computer. Then press the Power buttonfor about three seconds to restart.
|
The screen goes blank while the computer is on. |
‐ Press any key on the keyboard. ‐ Press thePower button. |
Sleep problems | |
The critical low-battery error message appears, and the computer immediately turns off. |
|
The computer enterssleep mode immediately after Power-on. |
‐ The batteryis charged. ‐ The operating temperature is within theacceptable range. See “Chapter 2. Use and care Information” in the Lenovo Safety and General Information Guide. |
Note: If thebattery is chargedand the temperature is within range,do the following: Press the Power button for about three seconds to turn on the computer. Press and hold the Power buttonfor about ten seconds to force shutdown. Press the Power buttonfor about threeseconds again to restart. Thenreset the computer with the Reset this PC recovery system. If the problem persists, have the computer serviced. | |
The computer does not return from sleep mode and the computer does not work. |
|
Note: If the system still does not return from sleep mode, your system has stopped responding, and you cannot turn off the computer; force shut down the computer (Unsaved data may be lost).To force shut down thecomputer, press and hold the Power button for aboutten seconds or more. If the computer still does not turn off, remove the AC power adapter. | |
Display panelproblems | |
The screenis blank. |
‐ If you are using the AC poweradapter or the battery, press Fn + (located on the keyboard) to make the screen brighter. ‐ Press the Power buttonto confirm if the computer is in sleepmode. ‐ If the problem persists, follow the solution in the next problem “The screen is unreadable or distorted.” |
The screen is unreadable or distorted. |
|
Incorrect characters appear on the screen. |
If theyare installed and configured correctly, do the following:
If the problempersists, have the computer serviced. |
Sound problems | |
No sound canbe heard from the speakers even when the volume is turned up. |
‐ The Mutefunction is off. ‐ The comboaudio jack is not beingused. ‐ Speakers areselected as theplayback device. |
Battery problems | |
Your computer shuts down before the battery status icon shows it is empty. -or- Your computer operates after thebattery status icon shows it is empty. |
|
A startupproblem | |
The Microsoft® Windows operating system does not start. |
Recovery Systemproblems | |
Failure to restore system partition to factory default. |
|
Other problems | |
Your computer doesnot respond. |
for about ten seconds or more. If the computer still does not respond, remove the AC power adapter. |
Lenovo Tablet MIIX 320-10ICR Pros & Cons
Pros
- Affordable Price: Budget-friendly option with good value for money.
- Lightweight and easy to carry around.
- Up to 8 hours of battery life on a single charge.
- High-quality display for enhanced viewing experience.
Cons
- May struggle with demanding applications due to processor constraints.
- Base model comes with limited storage; expandable via microSD but may require frequent cleaning of files.
- Only Wi-Fi connectivity available; no cellular option for data on the go.
- Processor technology is older compared to newer models available in the market today.
Customer Reviews
Customers generally praise the Lenovo Tablet MIIX 320-10ICR for its affordability, portability, and decent performance for everyday tasks. However, some users have noted limitations in processing power and storage capacity. Here are some common complaints:
- "The processor can be slow when running multiple heavy applications."
- "The storage is limited; I have to frequently clean up files." Despite these limitations, many users find it a great value-for-money option given its price range.
Faqs
What is the screen size of the Lenovo Tablet?
What operating system does the Lenovo Tablet MIIX 320-10ICR come with?
How much RAM does the Lenovo Tablet have?
Can I expand the storage on my Lenovo Tablet MIIX 320-10ICR?
What kind of processor powers the Lenovo Tablet?
How long does the battery last on a single charge?
Is there a cellular connectivity option available for this tablet?
Can I use this tablet for gaming?
How do I update my Lenovo Tablet MIIX 320-10ICR?
Is this tablet suitable for professional use?
Leave a Comment
