Specifications: Linksys AC1200 Max Wi-Fi Range Extender RE6500 User Guide
Content
Introduction
The Linksys AC1200 Max Wi-Fi Range Extender RE6500 is designed to enhance your home network by eliminating dead zones and extending Wi-Fi coverage. Supporting dual-band connectivity, it offers speeds of up to 300 Mbps on the 2.4 GHz band and 867 Mbps on the 5 GHz band, ensuring smooth streaming and browsing. With a user-friendly setup process and a built-in four-port Gigabit switch, this extender is perfect for connecting multiple devices. The Linksys RE6500 is priced at approximately $51.
Specifications
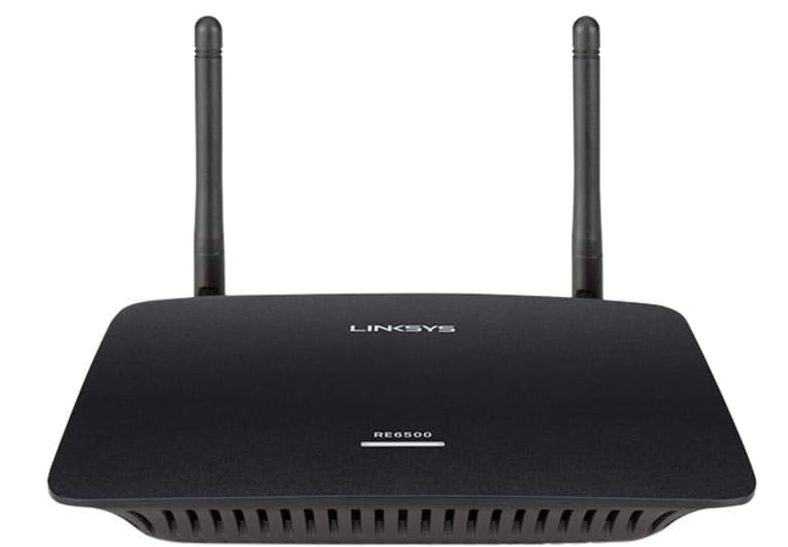
RE6500
- Model Name Linksys RE6500
- Description Dual-band Wireless-AC Range Extender
- Model Number RE6500
- Standards IEEE 802.11ac, 802.11a, 802.11n, 802.11g, 802.11b, 802.3u
- Ports Gigabit Ethernet, Audio, Power
- Buttons Reset, Wi-Fi Protected Setup™, Power (European model only)
- LEDs Power/Wi-Fi Protected Setup, Ethernet (link, activity)
- Cabling Cat5e
- Antennas 2 external
- Wireless Security Wi-Fi Protected Access™ 2 (WPA2), Wi-Fi
- Protected Access™ (WPA), WEP
- Security Key Bits Up to 128-bit encryption
- Environmental
- Dimensions 6.06”x4.29”x1.18” (154x109x30 mm)
- Weight 5.57 oz (158 g)
- Power 12VDC/1.0A
- Certification FCC, ICES-003, RSS210, CE, Wi-Fi (IEEE 802.11a/b/g/n/ac), WPA2™, WMM®, Wi-Fi Protected Setup
- Operating Temp. 32°F to 104°F (0°C to 40°C)
- Storage Temp. -4°F to 140°F (-20°C to 60°C)
- Operating Humidity 10% to 80% non-condensing
- Storage Humidity 5% to 90% non-condensing
Please contact http://support.linksys.com/enus/gplcodecenter for questions or GPL source code requests.
Description
The Linksys AC1200 Max Wi-Fi Range Extender RE6500 is a compact device that can be easily placed in any convenient location. It features a sleek design and is equipped with four Gigabit Ethernet ports, allowing you to connect devices that require a wired connection for maximum performance. The device also includes SpotFinder technology, which helps you find the optimal location for the extender to ensure the best possible coverage.
The range extender supports beamforming technology, which focuses the Wi-Fi signal on connected devices, enhancing overall network performance and reliability. It is compatible with any router or gateway, making it a versatile solution for various network configurations.
Linksys AC1200 Max Wi-Fi Range Extender RE6500 Product Overview
RE6500
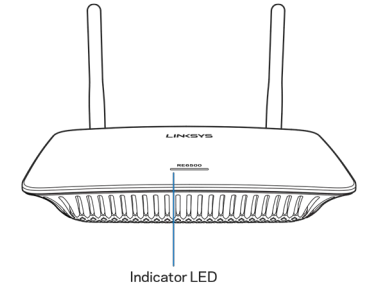
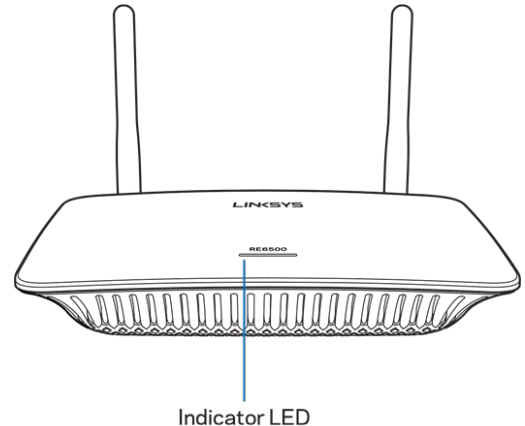
Front view
Indicator LED
The light on the top of the range extender gives you information about power, updating, Wi-Fi Protected Setup and signal strength.
Note: Your antennas might look different from those pictured here.
| Power Light Status | Description |
|---|---|
| Blinking white | • Booting up. |
| • Resetting to factory defaults. | |
| • Upgrading firmware. | |
| Solid white | • Ready to use. |
| Blinking orange | • Ready for setup. |
| • Disconnected from router. | |
| Solid orange | • Weak connection to router. |
Back view
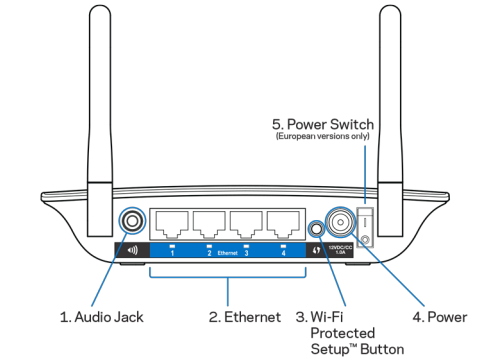
- Audio Jack (1)
Connect the extender to your speakers. - Ethernet (2)
Connect wired devices to your wireless network with Ethernet (network) cables. The green lights turn on when an Ethernet device is connected and active on these ports. The lights blink when the extender is sending or receiving data over the Ethernet ports. - Wi-Fi Protected Setup Button (3)
Use Wi-Fi Protected Setup to automatically and securely add compatible wireless devices to your network. - Power Port (4)
Plug in the provided power cable. - Power Switch (5)
Only on European versions.
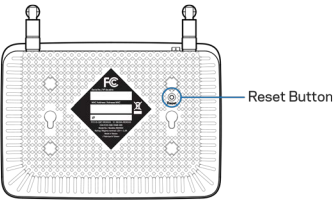
Bottom view
Reset Button
Press and hold until the power light on the top of the range extender blinks to reset to factory defaults. You can also restore the defaults from the Administration > Factory Defaults screen in the extender’s settings interface (page 16).
How to Install the Range Extender
Before starting setup, make sure your router has a working Internet connection.
Does your router have a WPS button?
Wi-Fi Protected Setup (WPS) is a simple way to connect Wi-Fi devices with Push Button Connect. Routers that support WPS have a button that might be labeled with this symbol:
If yes, continue with Wi-Fi Protected Setup below
If no (or not sure), continue with browser-based setup, also in this user guide.
Note
The WPS button will not work if you have disabled WPS on your router.
Wi-Fi Protected Setup (WPS)
- Connect antennas and power cable
Antennas should be upright for best results.
Note: Your antennas might look different from those shown. - Plug the range extender into an electrical outlet close to your router.
You can move the range extender to an ideal location later in step 5. After the range extender is plugged in the indicator LED on the top will blink white for up to a minute. - Wait for the indicator LED to blink orange
 before going to step 4.
This can take up to a minute. - Extend your 2.4 GHz network.
- Press the WPS button on your router. Within the next two minutes complete step 4b.
- Press the WPS button on the back of your range extender.
The indicator LED on the top of your range extender will blink white.
Watch the indicator LED on the front of your range extender to verify whether the connection was successful.
If it turns solid white, the connection was successful. Move to step 5.
If it starts to blink orange , the connection failed. You may try again by repeating step 4 or try browser-based setup, also in this document.
- Extend your 5 GHz network.
You may skip this step if your router does not have a 5 GHz network or if you don't want to extend that network.- Press the WPS button on your router again. Within the next two minutes complete step 5b.
- Press the WPS button on your range extender again.
The indicator LED on the top of your range extender will start to blink white.
Watch the indicator LED on the front of your range extender to verify whether the connection was successful.
If it turns solid white, the connection was successful.
If it starts to blink orange before it turns solid white, the connection failed. You may try again by repeating step 5.
- Move your range extender to an ideal spot.
Unplug your range extender and plug it back in midway between your router and the area without Wi-Fi. Using your mobile device or laptop, be sure you have at least two bars (around 50%) of your router’s Wi-Fi signal at that location. If you don’t have two bars, move the range extender closer to the router. - Check indicator LED for connection quality.
It can take up to a minute for the ranger extender to boot up after moving it. During this period you will see the blinking white LED once again.
Solid white Ready to use.
Solid orange Weak connection to the router. Find an outlet closer to your router.
Blinking orange Not connected to the router. Find an outlet closer to your router.
 - Connect your Wi-Fi devices to the extended network you just created. Select the extended network on your device's Wi-Fi manager. Extended networks are identified by "_Ext" added to the end of your main network name(s).
Your range extender is now set up. Enjoy your extended Wi-Fi coverage.
Accessing your range extender settings after WPS
- Your range extender's default admin password is "admin". It is highly recommended that you change this after WPS setup.
- To change or view range extender settings, first connect to an extended network. In a browser, go to http://extender.linksys.com and enter your admin password.
Browser-Based Setup
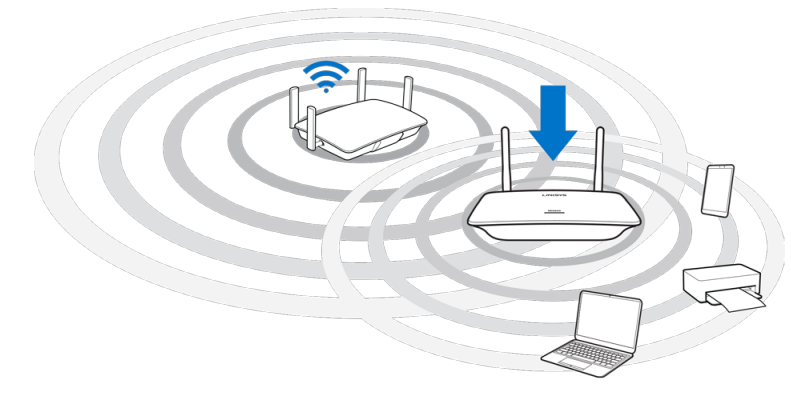
- Plug in the range extender
Connect the antennas and plug in the range extender midway between your router and the area without Wi-Fi. Using your mobile device or laptop, be sure you have at least two bars (around 50%) of your router’s Wi-Fi signal at that location. The setup software will help you find the right place if you have trouble. - Wait for a blinking orange light
It could take up to a minute for the light on the top of the range extender to change from blinking white to blinking orange.
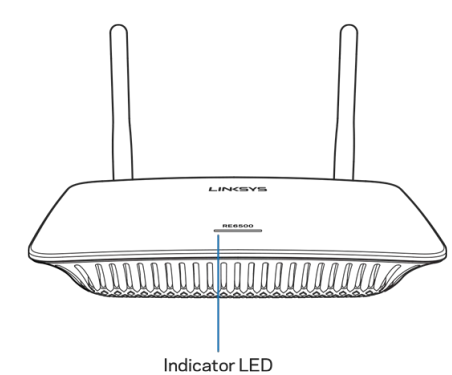
- If the light doesn’t change color, or if it is solid orange, reset to factory defaults.
Connect to the range extender
On a computer, phone or tablet, connect to the Wi-Fi network Linksys Extender Setup - XXX. (XXX are the last three digits of your range extender’s MAC address, which can be found on the bottom of the range extender.)
Launch setup
Enter http://extender.linksys.com in a browser to complete setup. Follow the on-screen instructions to select your network to extend, customize your extended network name and password, and find the best spot using Spot Finder Technology.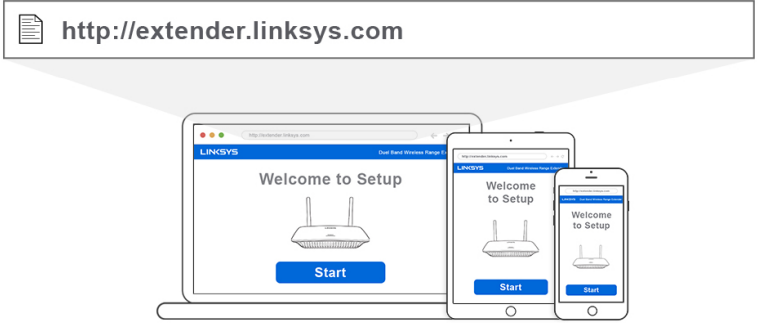
Tips
- The range extender is set to Auto Update by default. Auto Update allows the range extender to download and install updates overnight. On the License Agreement page in setup you can deselect Auto Update if you want to manually update your range extender.
- After setup use the extender’s settings interface to change any settings. If connected to your range extender go to extender.linksys.com.
Special Feature Music Streaming
Stream music through your AC1200 range extender to connected speakers
iOS

- Connect iOS device to the same Wi-Fi network as your range extender.
- Swipe up from the bottom of your screen.
- Tap on Linksys Range Extender.
Android

- Connect Galaxy device to the same Wi-Fi network as your range extender.
- Select Music app
- Choose music file and tap Screen Mirroring icon
- Choose Linksys Range Extender.
For other Android devices, stream music with MediaHouse, UPnPlay, ArkMC, BubbleUPnP, Pixel Media, and 2Player 2.0.
Windows

- Open Windows Media Player
- Right-click on a music file and choose Linksys Range Extender
Mac OS X
- Open iTunes
- Choose speakers
- Select Multiple to stream audio simultaneously to more than one range extender.
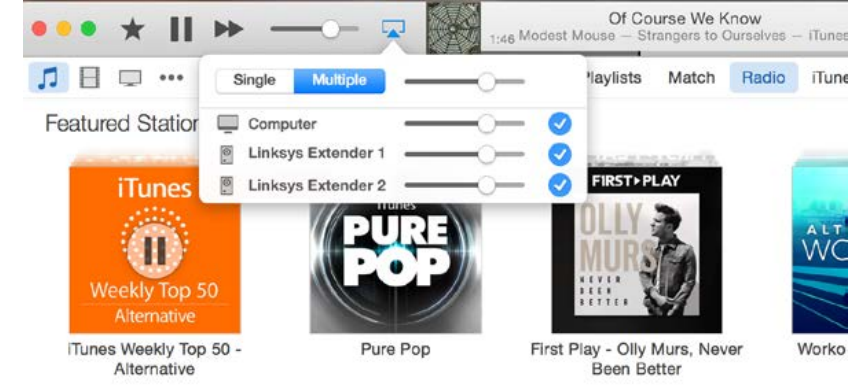
This list of supported media players is subject to change with the release of new software or mobile apps.
- Windows users can stream music with Windows Media Player12.
- Mac users can stream music with proprietary software or the SofaPlay app..
- Android users can stream music with MediaHouse, UPnPlay, ArkMC, BubbleUPnP, Pixel Media, and 2Player 2.0.
- IOS devices including iPhone, iPad or iPod can stream music with proprietary software or other apps such as ArkMC, Smartstor Fusion, Mconnect, and DK UPnP/DLNA.
- The extender supports MP3, FLAC, WAV, WMA and AAC file formats, as long as those formats are supported by the device and app doing the streaming.
- The 3.5mm stereo port supports earphones and powered speakers.
How to Access the Settings Interface
- After setup use the extender’s settings interface to change any settings.
- If you named your range extender during setup, you can access the settings interface by entering the name in a browser.
Example
If you named your extender MyExtender (Windows) or http://MyExtender.local (Mac). Your range extender’s default name or http://RE6500-XXX.local (Mac OS X or iOS).
Note: XXX are the last 3 digits of your range extender’s MAC address. You can find the MAC address on the bottom of your RE6500. - You can also enter your range extender’s IP address in a browser. Find the IP address on your router’s administrative interface.
Using Range Extender Settings
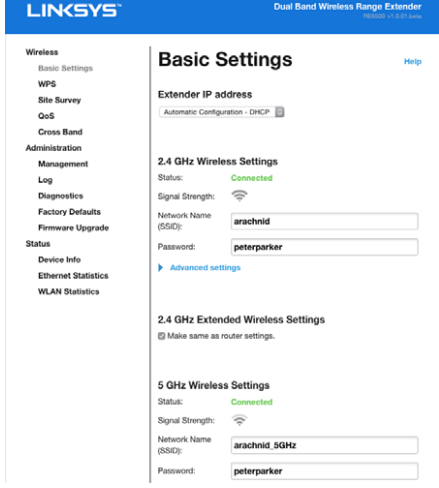
Click Help on the right side of the screen for additional information on the screen’s options. Changes to settings will not be effective until you click Save at the bottom of the screen. You also can click Cancel to clear any changes.
Using Wi-Fi Protected Setup
Wi-Fi Protected Setup makes it easy to connect your extender to your network, and connect other devices to your network through the range extender.
Wi-Fi Protected Setup light activity
| WPS Light Status | Description |
|---|---|
| Blinking slowly | WPS connection in progress. |
| (up to two minutes) | |
| Solid | WPS connection was successful. |
| (10 seconds) |
Connecting devices to your network through the range extender
Repeat the instructions for each client device that supports Wi-Fi Protected Setup.
- Connecting with the Wi-Fi Protected Setup Button
- Press the Wi-Fi Protected Setup button on the client device.
- Click the Wi-Fi Protected Setup button on the extender’s Wi-Fi Protected Setup screen, OR press and hold the Wi-Fi Protected Setup button on the back of the extender for one second. When the connection is complete, the Wi-Fi Protected Setup light on the extender will be solid for 10 seconds.
- If using the extender’s Wi-Fi Protected Setup screen, be sure to click OK within two minutes or you will have to start over.
Connecting with the client device’s PIN

- Enter the PIN from the client device in the field on the extender’s Wi-Fi Protected Setup screen.
- Click Register on the extender’s Wi-Fi Protected Setup screen. When the connection is complete, the Wi-Fi Protected Setup light on the extender will be solid for 10 seconds.
- Click OK on the extender’s Wi-Fi Protected Setup screen within two minutes or you will have to start over.
Connecting with the extender’s PIN

- On the client device, enter the PIN listed on the extender’s Wi-Fi Protected Setup screen. (It is also listed on the product label on the back of the extender.) When the connection is complete, the Wi-Fi Protected Setup light on the extender will be solid for 10 seconds.
- Click OK on the extender’s Wi-Fi Protected Setup screen within two minutes.
How to Use Site Survey
Site Survey gives a snapshot of all access points and wireless routers within range of the extender.
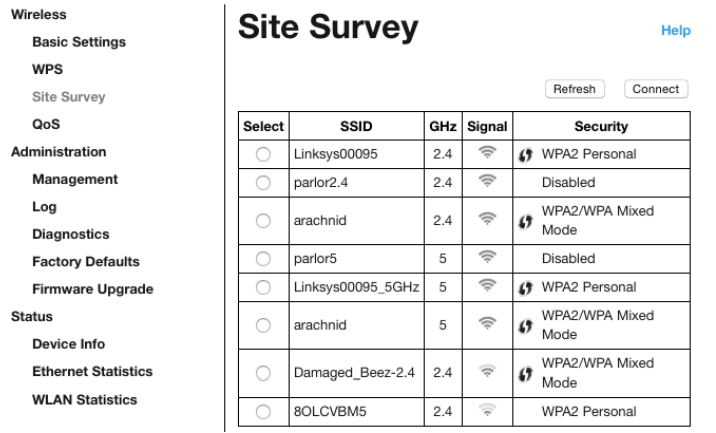
Log in to the settings interface (see “How to Access the Settings Interface” on page 15). Click the Wireless tab. Click the Site Survey page.
- Select—Click the button next to the wireless network name (SSID) in the Select column, and click Connect. For dual-band networks, be sure to connect to both bands, 2.4 GHz and 5 GHz.
- SSID—The names of neighboring wireless networks.
- GHz—The radio band (in GHz) of the neighboring wireless networks
- Signal Strength—The power of the wireless signal received: dot only = 25%, dot + one wave = 50%, dot + two waves = 75%, dot + three waves = 100%. If no waves are displayed, your extender is too far from the upstream access point or the signal is blocked. Try to keep the signal strength between 50% and 100% for optimum performance.
- Security—The mode of security in use by the neighboring wireless networks If a network supports Wi-Fi Protected Setup, the Wi-Fi Protected Setup icon is also displayed.
Cross-Band
Cross-Band is the simultaneous use of both bands for high-speed data transfer and uninterrupted streaming and gaming. When in Auto Cross-Band (default), the range extender selects the appropriate band (2.4 GHz or 5 GHz) when sending data from wireless clients to the Wi-Fi router.
Setup Guide
To set up the Linksys AC1200 Max Wi-Fi Range Extender RE6500,
- Start by placing the device in an area where it can receive a strong signal from your router.
- Use the SpotFinder technology to find the optimal location. Once placed, plug in the extender and turn it on.
- Next, connect to the extender's default network using your computer or mobile device.
- Open a web browser and navigate to the extender's setup page, usually at http://extender.linksys.com
- Follow the on-screen instructions to configure the extender, including selecting your router's network and entering the password.
- After configuration, the extender will create a new network with "_EXT" appended to your original network name. You can then connect your devices to this new network for extended coverage.
Linksys AC1200 Max Wi-Fi Range Extender RE6500 Troubleshooting
Your RE6500 works on 2.4GHz and 5 GHz networks.
You cannot get your range extender connected
Check the position of your router and extender.
- For first-time setup, you may need to place the extender closer to the router. After you’ve set up your extender, you can unplug it and move it to the final location.
- To reduce signal obstructions, try alternate locations for the router and extender.
- Try repositioning the antennas on the range extender.
- Avoid placing the router and extender near metal objects, masonry walls, and reflective surfaces such as glass or mirrors.
- Avoid placing the router and extender near other electronics that may cause signal interference.
If you’re using Wi-Fi Protected Setup to connect, wait until the Wi-Fi Protected Setup indicator stops blinking before trying to make the connection again.
Your Wi-Fi coverage isn’t meeting expectations
Reposition the antennas on your range extender. The left antenna extends your network on a horizontal plane, so the ideal position is pointing straight down (parallel to the range extender). The right antenna extends your network on a vertical plane, so the ideal position is straight out (perpendicular to the range extender).
You cannot access your range extender
To access your range extender, you must be connected to your own network. If you currently have wireless Internet access, the problem may be that you have accidentally connected to a different wireless network.
To fix the problem on Windows computers, do the following*:
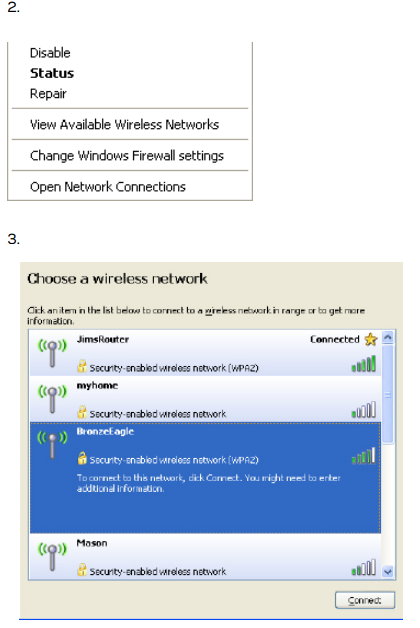
On your Windows desktop right-click the wireless icon in the system tray.

- Click View Available Wireless Networks. A list of available networks will appear.
Click your own network name. Click Connect. In the example below, the computer was connected to another wireless network named JimsRouter. Your wireless network name, BronzeEagle in this example, is shown selected.
- If you are prompted to enter a network key, type your password (Security Key) into the Network key and Confirm network key fields. Click Connect.
You should now be able to access the range extender’s settings interface.
Note—Depending on your version of Windows, there could be some differences in wording or icons in these steps.
To fix the problem on Mac computers, do the following:
- In the menu bar across the top of the screen, click the Wi-Fi icon. A list of wireless networks will appear. Linksys Smart Wi-Fi has automatically assigned your network a name.
- In the example below, the computer was connected to another wireless network named JimsRouter. The wireless network name of the router, BronzeEagle in this example, is shown selected.
- Select the wireless network name of the router you want to connect to.
- Type your wireless network password (Security Key) into the Password field. Click OK.
You should now be able to access the range extender’s settings interface.
You have intermittent connection problems
Plug in the range extender midway between your router and the area without Wi-Fi. Be sure you have at least 50% of your router’s Wi-Fi signal at that point on the device you used for setup.
Pros & Cons
Pros
- Easy setup process with SpotFinder technology
- Strong and reliable Wi-Fi signal extension
- Dual-band support for better performance
- Four Gigabit Ethernet ports for wired connections
- Beamforming technology for focused signal strength
Cons
- Larger than some other range extenders
- No passthrough outlet, which might be inconvenient for some users
- May require occasional restarts to maintain optimal performance
Customer Reviews
Customers generally praise the Linksys AC1200 Max Wi-Fi Range Extender RE6500 for its ease of setup and effective performance in extending Wi-Fi coverage. Many users appreciate the strong signal strength and the ability to connect multiple devices without significant drops in speed.
Some common complaints include the size of the device and the lack of a passthrough outlet. However, overall, the product is well-regarded for its reliability and efficiency in improving Wi-Fi coverage.
Faqs
How do I set up the Linksys AC1200 Max Wi-Fi Range Extender?
What is the maximum speed of the Linksys AC1200?
Does the Linksys AC1200 support wired connections?
Is the Linksys Wi-Fi compatible with any router or gateway?
What is SpotFinder technology and how does it help?
How do I troubleshoot if I have no light on the extender?
Can I use the Linksys AC1200 Max Wi-Fi Range Extender RE6500 to connect devices that require a wired connection?
Does the Linksys AC1200 support beamforming technology?
How often should I restart the AC1200 Max Wi-Fi Range Extender RE6500?
What security protocols does the AC1200 support?
Leave a Comment
