Lioncast Gaming Mouse LM20 User Guide | Buttons & Installation
Content
Introduction
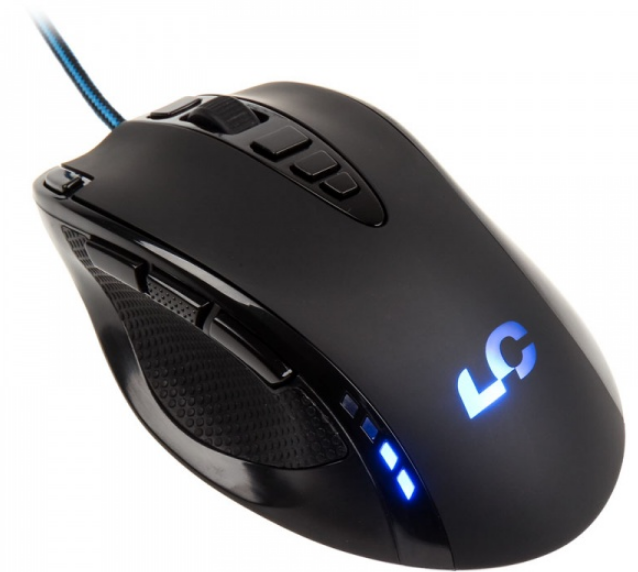
The Lioncast LM20 is the next evolutionary step in the history of Lioncast gaming mice. Optimi-zed for the use in FPS-, RTS-, and MOBA-Games, every detail was especially adjusted for these fields of application.
The modified Avago 9800 laser sensor with its scanning speed of 150IPS, acceleration of up to 30G and scanning speed of 12.000FPS is rea-dy to convey all of your movements into your game. Omron gaming grade switches have su-perior longevity with a guaranteed lifetime of over 5 million clicks and perfect activation every single time. The polling rate of 1000Hz enables reaction times up to 1ms to give you the that critical edge over your opponents.
The internal LEDs are configurable through the included software and can be stored in the five internal profiles, together with the DPI and button settings. Those profiles are stored in the internal hardware memory of the mouse and therefore available on every PC even without installing the software. The perfect solution for your tourneys or your next Lan-party!
Ergonomics were of the highest importance to us when developing the LM20 mouse. Optimi-zed for different grips and hand shapes, materials which provide the best grip in every situation, buttons which are easily accessible even in the heat of battle, millisecond reaction times and the adjustable weight – every detail was considered to give you the biggest possible advantage over your competition!
Package content
 LM20 Gaming Mouse
 Manual
 Installation CD
System requirements
- PC with Windows 8 / 7 / Vista / XP and a free USB port
- 13MB of free disk space
- CD-Rom drive or internet connection for software installation
Technical Specifications
- 16.400DPI Laser Sensor
- Up to 1.000Hz polling rate / 1ms reaction time
- High-performance teflon mouse glides
- 12 Buttons (including one profile switch)
- Software for programming individual button configurations and LEDs
- Weight tuning system
- Gold-plated USB connector
- Measurements: ca. 12,5 x 7,9 x 4,1cm
- Weight: 122g (including 8x 2,4g changeable weights)
Buttons and Installation
Front
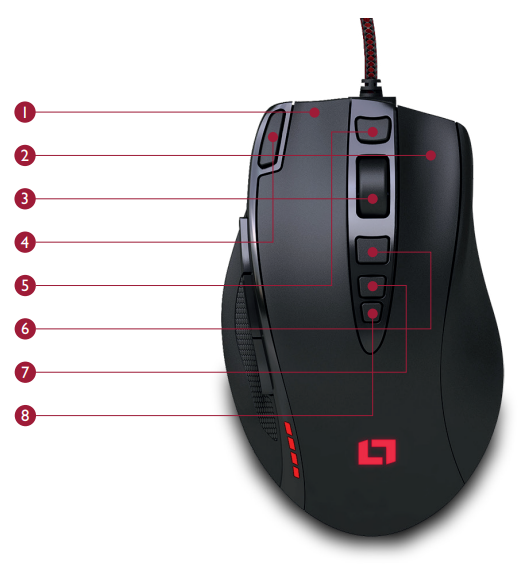
- Left Mouse Button
- Right Mouse Button
- Mousewheel
- Fire Button
- Forward
- Back
- DPI + Button
- DPI – Button
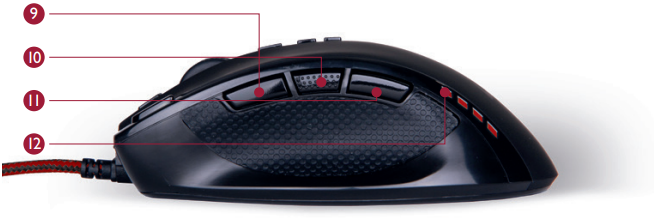
Side - Alt
- Ctrl
- Shift
DPI Status LEDs
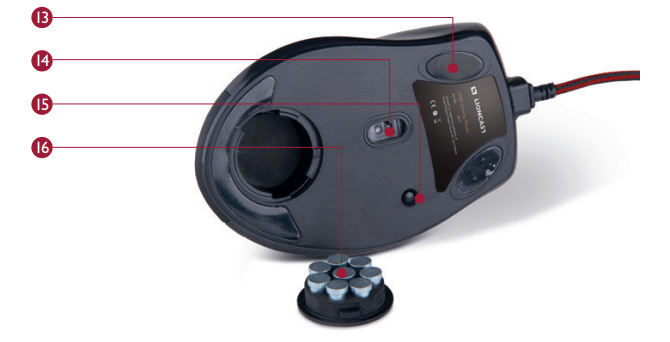
Back- Teflon Mouse Glides
- High-Performance Laser Sensor
- Profile switch
Weight System
Description
The Lioncast Gaming Mouse LM20 combines aesthetics and functionality seamlessly. Its sleek and ergonomic design fits comfortably in the hand, reducing fatigue during long gaming sessions. The mouse features RGB lighting that can be customized through the Lioncast software suite, allowing users to personalize their gaming setup. The LM20's durable build ensures it withstands heavy use, while its advanced sensor technology provides smooth and accurate cursor movement.
Additionally, the mouse includes a dedicated DPI switch, allowing quick adjustments between different sensitivity levels. The 11 programmable buttons can be customized using the Lioncast software, enabling users to assign complex macros and shortcuts to enhance their gaming performance.
Profile & Mouse Configuration
Configuring your mouse (without the software):
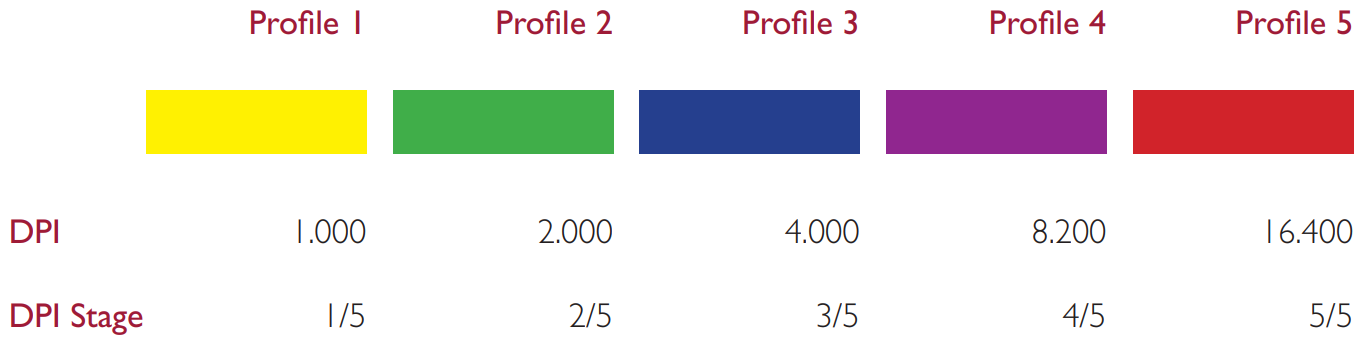
When using the mouse without the software you can choose between five profiles and the corresponding colors by using the profile switch on the bottom of the mouse. Please check the table above for reference. The chosen profile can always be checked by the color of the LED.
Each profile also has a standard DPI setting that can be changed by using the DPI + / - switches on the top of the mouse. In each profile you can freely choose any of the five standard DPI set-tings (1000 / 2000 / 4000 / 8200 / 16400 DPI).
Installing the Lioncast LM20 Software:
- Plug the Lioncast LM20 Mouse intothe USB port on your computer.
- Install the software either from the included CD or by downloading the installer from https://www.lioncast.de/downloads
- Run the installer and follow the instructions on the screen.
Note: On some Windows versions there is a warning prompt. Please ignore it and continue with the installation.
Lioncast Tip:
When configuring your mouse with the soft-ware, you can save all the settings into the mouse itself and use them on every computer just by plugging it in. No installation of the soft-ware is needed for this, only the plug and play drivers from Windows will be installed.
Software in Lioncast Gaming Mouse LM20
Main Functions I
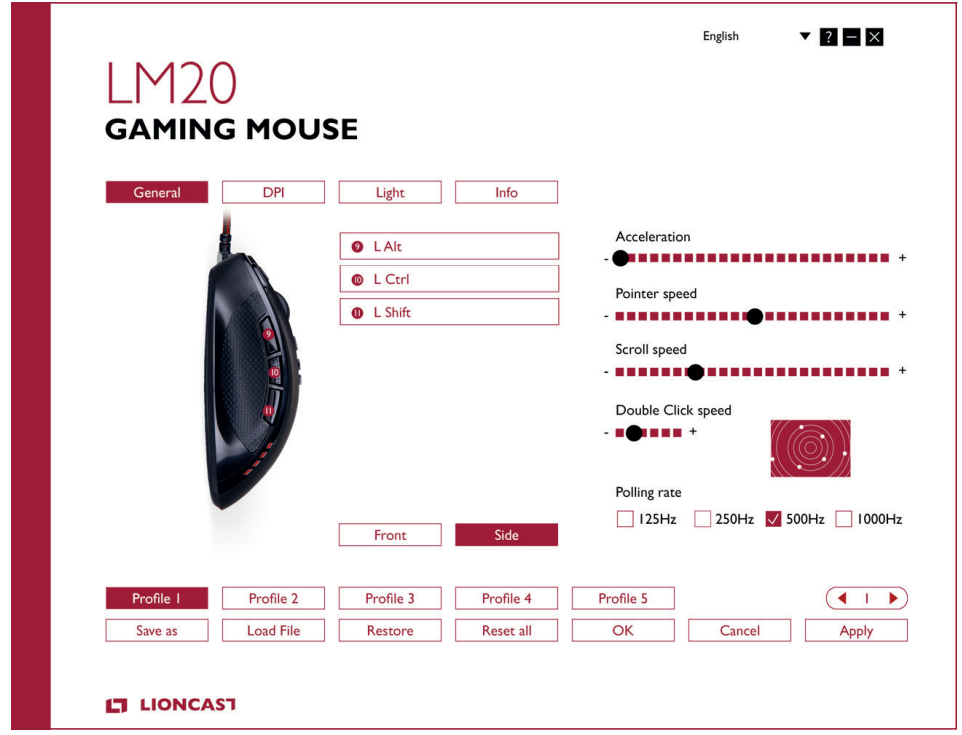
- General Tab
Here you can customize all the basic functions of your LM20 Mouse. - Acceleration
Changes the acceleration of the mouse depen-ding on the speed of the movement, recommen-ded setting is zero to improve accuracy. Pointer Speed Changes the speed of the mouse cursor. Re-commended setting is the default; use the DPI Tab to select desired sensitivity in the most ac-curate way. - Scroll Speed
Changes the speed of the scroll wheel. Double Click Speed Changes the delay in which two clicks are recog-nized as a double click, you can use the adjacent field for testing. - Polling Rate
This changes the rate at which the computer checks the information from your mouse, re-commended settings are 500 – 1000 Hz. - Save As
Save all the settings of your mouse in a file. Load File Load a settings file into the software.
Main Functions II
- Restore
Restore the current profile to the factory de-fault settings. - Reset All
Restore all the profiles to the factory default settings. - OK
Apply the changes and minimize the software window. - Cancel
Discard the changes and minimize the software window. - Apply
Apply the changes to the profile and load it into the mouse. - Profile 1-5
With the five profile buttons you can change the selected profile. This is identical to the profile switch on the bottom of the mouse. - Profile selector
With the profile selector you can choose the number of active internal profiles of the mouse. When only two profiles are needed this is ad-vantageous, as they can be switched faster.
Button Assignment
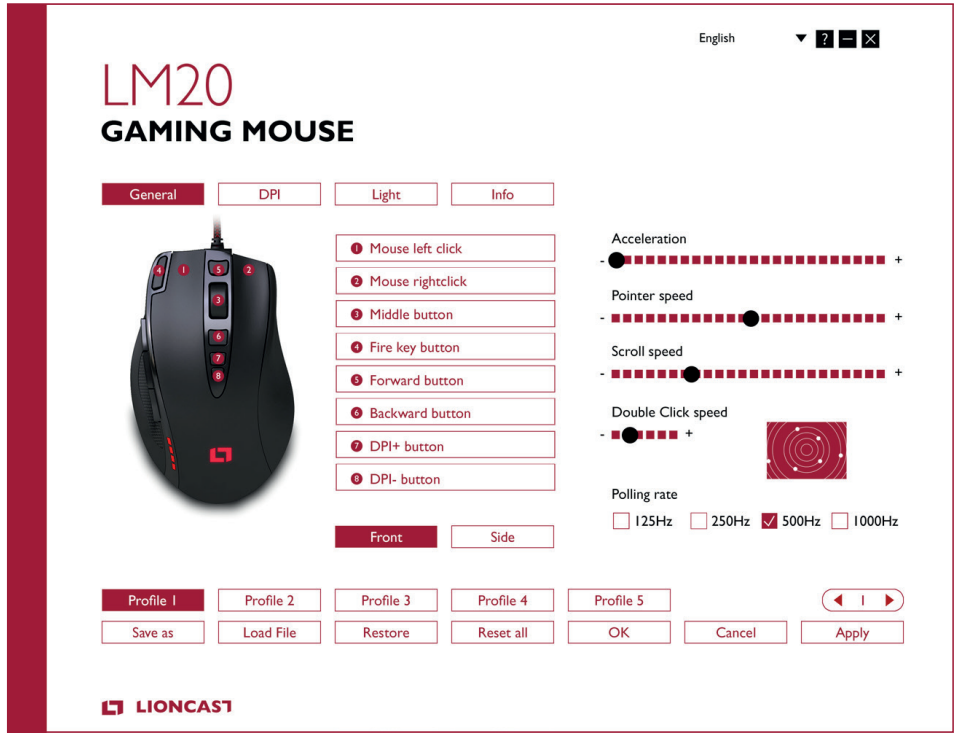
- Front
Display the front mouse buttons - Side
Display the thumb keyboard buttons
Each of the buttons of the LM20 Mouse can be assigned to any mouse button or keyboard fun-ction. It is also possible to use the special fire key, key combinations and macros. Below we will explain how to set up all these options. You can switch the function of any button by clicking the panel with the corresponding num-ber on it.
The following options are available:
- Click
Performs a left click - Right click
Performs a right click - Middle Button
Performs a mouse wheel click - Forward
Forward button in most browsers - Backward
Backward button in most browsers - Single Key
Here you can assign any key from your keyboard to a mouse button. - Combo Key
Here you can assign a combination of keys to a mouse button (e.g. Shift + A or CTRL + SHIFT + A). - Basic
Basic editing functions for office work (e.g. cut, copy, paste etc.) - Advance
Some more advanced Windows functions (e.g. open explorer, lock pc etc.) - Media
Performs remote functions for media players and audio settings - Macro
Assigns a recorded sequence of button presses with exact timing to a button, this is explained in detail below. - Fire Key …
Here you can define an automatic firing function and also specify a delay between the clicks. DPI Switch This cycles through the activated DPI modes, when you reach the highest activated DPI stage it will cycle to stage 1. - DPI (+)
This cycles up one DPI stage - DPI (-)
This cycles down one DPI stage - Profile Switch
This cycles through the five available profiles according to the button on the bottom of the mouse. - Disable
Disable one button.
DPI
DPI tab
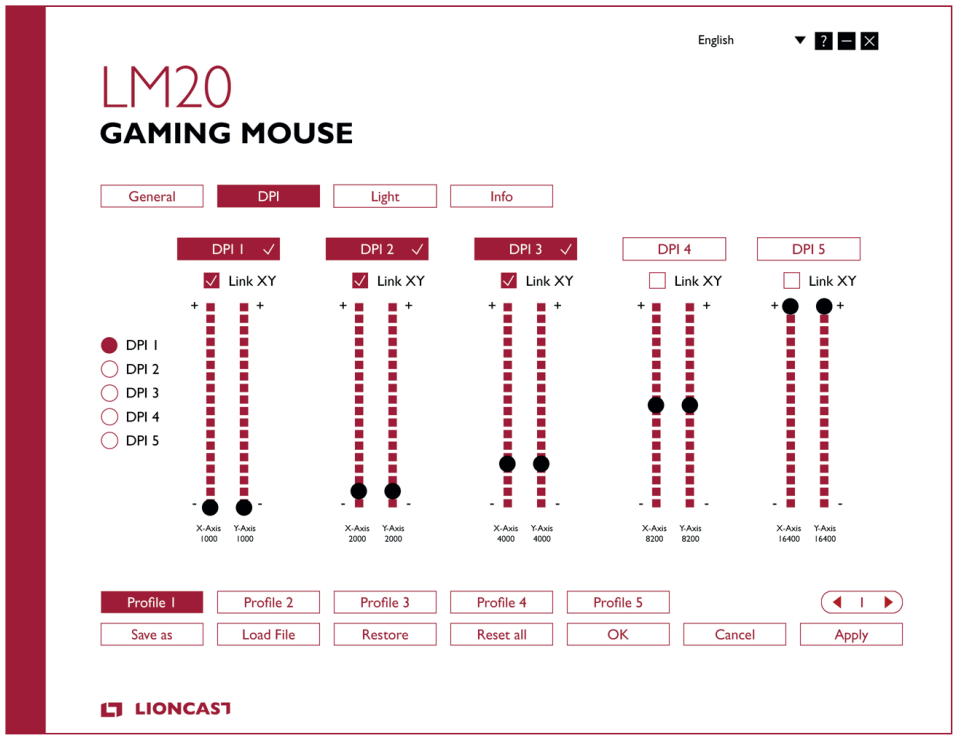
- Step 1
Decide how many DPI stages you need for your profile, in the example above we chose three. Deactivate the unneeded profiles by clicking on the DPI(x) button on the top. They will darken to let you know they are inactive. - Step 2
Decide if you want the same DPI setting for the x and y axis. Recommended is keeping it lin-ked. If you want to turn faster than look up and down, you can unlink them and choose different speeds. - Step 3
Choose your desired sensitivity by using the corresponding slider for each DPI stage. You can also fine tune them with the up and down ar-rows on your keyboard after clicking on them once. - Step 4
Hit Apply to transfer your settings to the mouse.
Macro Manager I
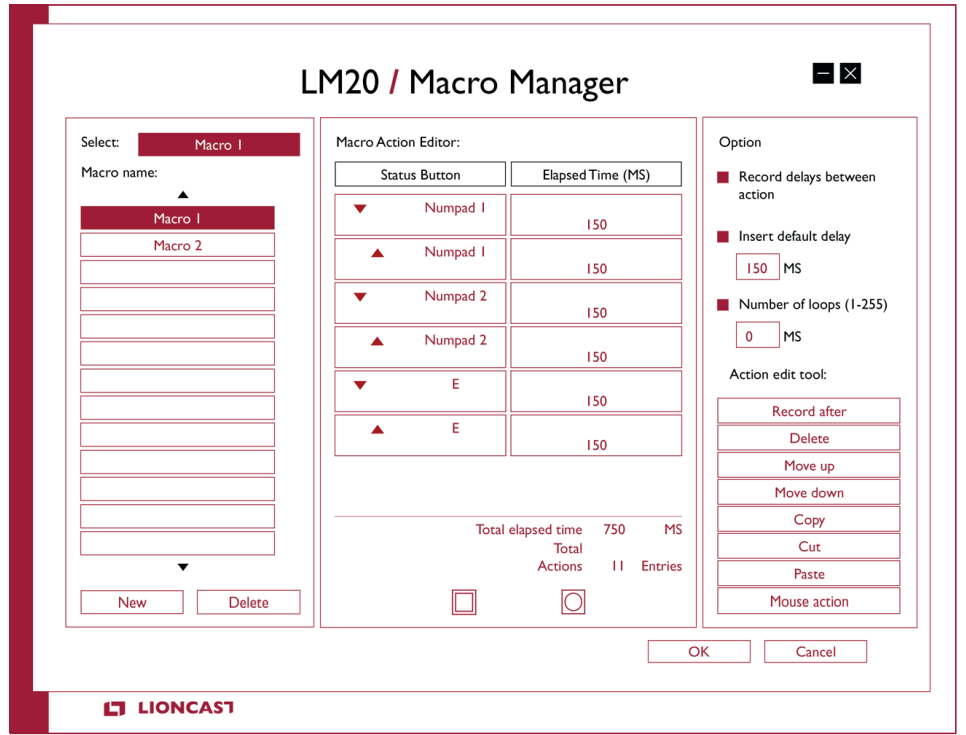
Macro Assignment
With the macro manager you can create a series of commands that are executed with perfect precision just by hitting one button. This is useful for all kinds of applications and your imagination is the limit. As this is a very complex topic you should take your time with this and expect some learning curve. We are interested in which cool solutions you will come up with!
Getting Started
- Step 1
Start the macro manager by selecting a mouse button on the general tab and clicking on macro and then macro manager. - Step 2
Click on New and choose a name for your macro. - Step 3
Click on the record button and record some key presses on your keyboard, like writing your name, then click the stop button. - Step 4
Click OK to confirm your work. - Step 5
Click Apply on the General tab to transfer the macro to your mouse. The macro with its num-ber should be displayed in the corresponding panel.
Step 6
Open Notepad to test your creation. Click into the notepad window and press your macro key on the mouse. Your macro should now be running and you should see the result on the notepad screen.
You can now tweak your macro with the action edit tools on the right hand side of the macro editor or record a new macro in another slot. With the options at the top right position you can automatically insert delays between your actions. The first option records the delay in real time and the second option inserts a fixed delay between the actions. The delay can be in-serted in the proper field in milliseconds. With the “Number of Loops” option you can let your macro cycle the desired amount of times. Mouse action can be recorded with the “Mouse Action” button on the bottom of the page only, but not in real time.
Have fun experimenting with this feature and get your advantage over the competition!
Action edit tools
- Record after
This will arm the recording after the selected line in your macro. - Delete
Delete the selected line - Move up
Move the selected line up one step - Move down
Move the selected line down one step - Copy
Copy the selected line - Cut
Cut the selected line - Paste
Paste the line from the memory - Mouse action…
Insert mouse actions, they cannot be recorded in real time.
Setup Guide
To set up the Lioncast Gaming Mouse LM20, follow these steps:
- Connect the USB receiver to your computer or plug in the mouse via the provided cable.
- Download and install the Lioncast software suite from the official website.
- Launch the software and follow the on-screen instructions to configure your mouse settings, including DPI, button assignments, and RGB lighting.
- Pair the wireless mouse by placing it close to the USB receiver and waiting for the connection to establish.
LED I
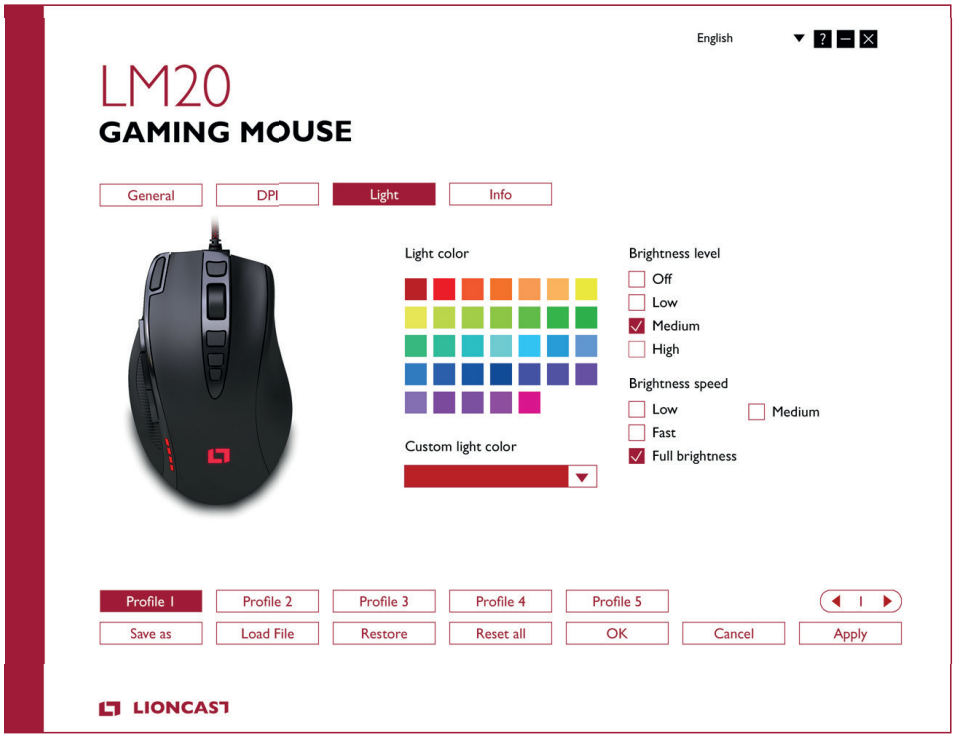
Light Tab
Here you can change the LED lights of the LM20 Gaming Mouse. Just choose your favorite color for your main profile and tweak from there. The color for the logo and the thumb keyboard can be chosen freely and are saved in the profile. You can also adjust the breathing speed and bright-ness level of the LED or even turn it off.

- Step 1
Choose your profile for tweaking. - Step 2
Choose your preferred color from the list and tweak it with the dropdown „Custom Light Co-lor“. - Step 3
Choose the brightness level of your LED. - Step 4
Choose the breathing pattern of your LED. - Step 5
Hit Apply, to transfer the settings to the mouse.
Troubleshooting
If you encounter any issues with your Lioncast Gaming Mouse LM20, here are some common problems and solutions:
- Mouse Not Connecting: Ensure the USB receiver is properly plugged in and that the mouse battery is charged. Restart both devices if necessary.
- Cursor Jumps or Skips: Clean the mouse sensor area and ensure the surface you're using is smooth and even.
- Check for software updates and ensure that the button assignments are correctly configured in the Lioncast software.
Warning: Avoid exposing the mouse to water or extreme temperatures, as this could damage the internal components.
Lioncast Gaming Mouse LM20 Pros & Cons
Pros
- High-precision sensor technology for accurate tracking.
- Ergonomic design for long-lasting comfort.
- Customizable RGB lighting and button assignments.
- Lightweight and durable construction.
- Long battery life with up to 40 hours of continuous use.
Cons
- Some users may find the mouse too lightweight.
- The software suite can be complex for beginners.
- No built-in storage for profiles or settings.
- May not fit comfortably for users with very large hands.
Customer Reviews
Customer reviews for the Lioncast Gaming Mouse LM20 have been overwhelmingly positive, with many praising its precision, comfort, and durability. Some users have noted that the software suite can be a bit complex to navigate but overall appreciate the customization options it provides. Common complaints include some users finding the mouse too lightweight and wishing for built-in profile storage.
Faqs
What is the DPI range of the Lioncast Gaming Mouse?
Is the Lioncast Gaming Mouse wireless?
How long does the battery last on the Gaming Mouse?
Can I customize the RGB lighting on the Lioncast Gaming Mouse LM20?
How many programmable buttons does the Lioncast Gaming Mouse have?
What is the weight of the Gaming Mouse?
Is the Lioncast Gaming Mouse LM20 compatible with Mac and PC?
How do I update the software for my Gaming Mouse?
Can I use the Lioncast Gaming Mouse LM20 for non-gaming applications?
What kind of warranty does the Lioncast come with?
Leave a Comment