How to Assemble: Little-Tikes 649615C Balance-to-Pedal bike User Guide
Content
Introduction
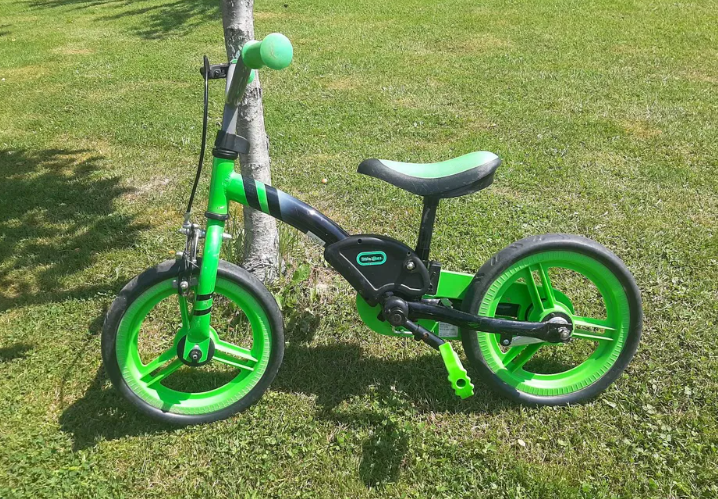
The Little Tikes 649615C Balance-to-Pedal bike is a fantastic training tool for children looking to transition from balance bikes to pedal bikes. This innovative bike features a unique design that allows children to first learn to balance and steer on two wheels before introducing pedals. With an estimated price of $120 and a launch date of January 2021, this bike is an excellent investment for parents looking to encourage their children's physical activity and independence.
Product Overview
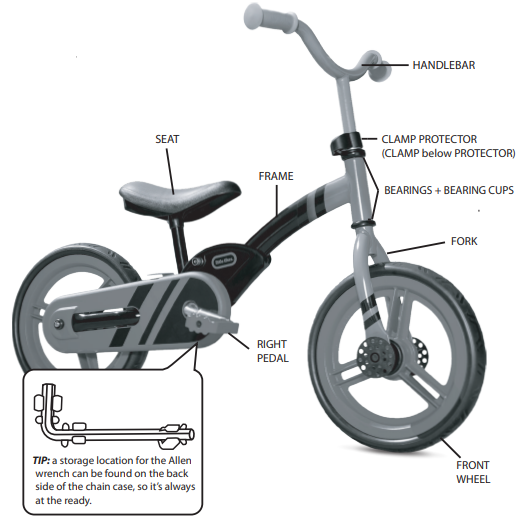
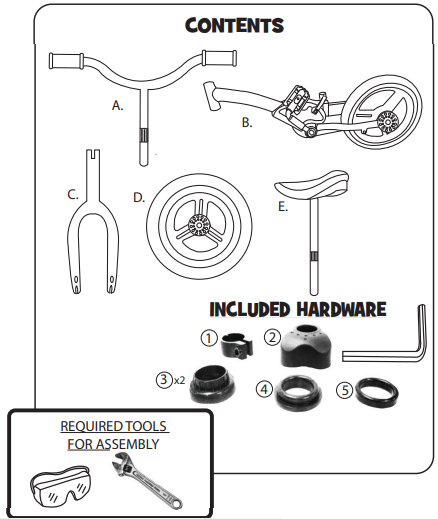
Before assembling, be sure you have all parts and hardware.
Positions
Detailed Specifications of Little Tikes 649615C
The Little Tikes 649615C Balance-to-Pedal bike boasts several key features that make it an exceptional choice for young riders. These features include:
- Adjustable seat height: The bike's seat can be adjusted to fit children between 3 and 5 years old, with a maximum weight limit of 50 pounds.
- Footrest: The bike features a footrest for children to rest their feet while coasting, promoting proper balancing techniques.
- Removable pedals: The pedals can be easily removed, allowing children to first learn to balance on two wheels before introducing pedaling.
- Durable tires: The bike's tires are designed to withstand rugged terrain, ensuring a smooth and comfortable ride.
- Lightweight frame: The bike's frame is made of lightweight materials, making it easy for children to maneuver and control.
ASSEMBLY
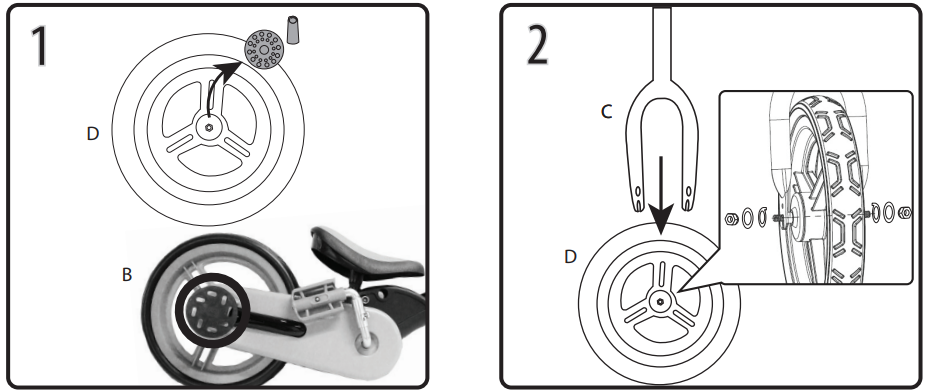
- Remove and discard the wheel nut protectors on the front (D) and rear (B) wheels.
Remove the nut, washer and metal pin from each side of the wheel (D), then insert the fork (C) over the wheel. Replace a metal pin, a washer and a nut, in that order, to each side of the wheel.
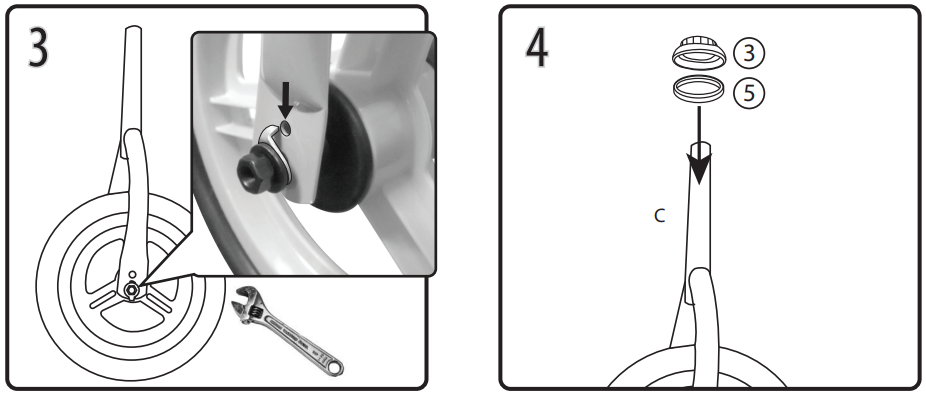
- Insert the metal pin into the hole above the axle on the fork. Do the same for the other side. Then, tighten the nuts with a wrench (not included) to secure the fork in place.
Slide bearing (5) and bearing cup (3) over the top of the fork (C).
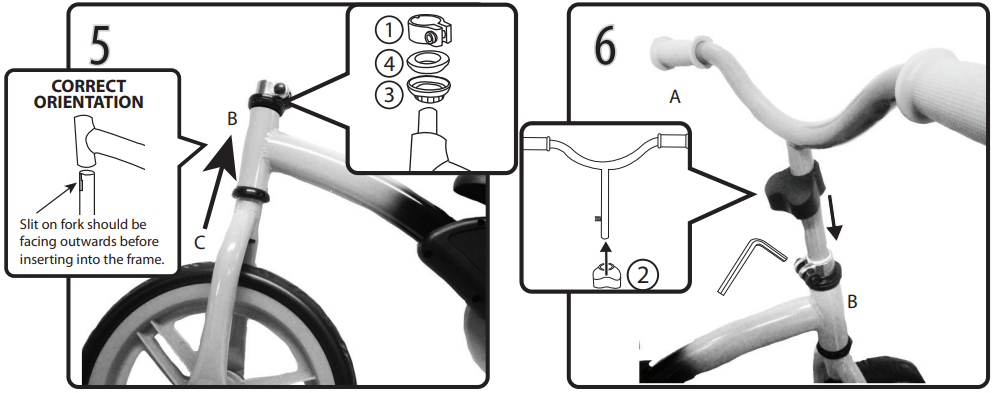
- Slide the fork (C) into the bottom of the frame (B). Then, slide the bearing cup (3), bearing (4) and clamp (1) over the top and onto the frame.
Insert the clamp protector (2) into the handlebar (A). Insert the handlebar into the frame (B). Adjust the height of the handlebar and tighten the clamp with the Allen wrench. Then, lower the clamp protector over the clamp.
Open the seat clamp on the frame (B) and insert the seat (E). Adjust the height of the seat and then close the clamp to lock in place.
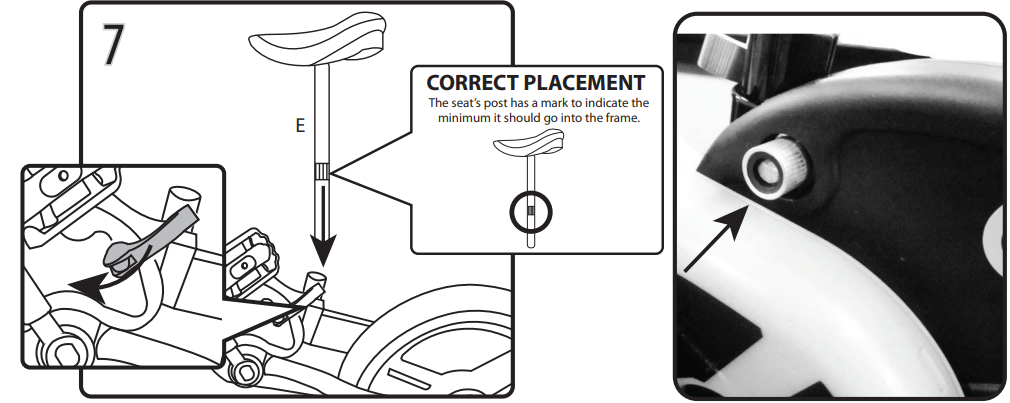
If the seat moves while the seat clamp lever is in the locked position, unlock the lever, tighten the thumb nut (as indicated by arrow), then relock the lever.
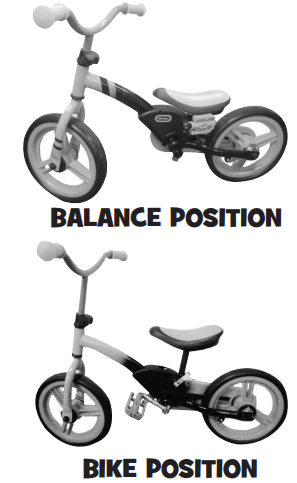
BIKE POSITION
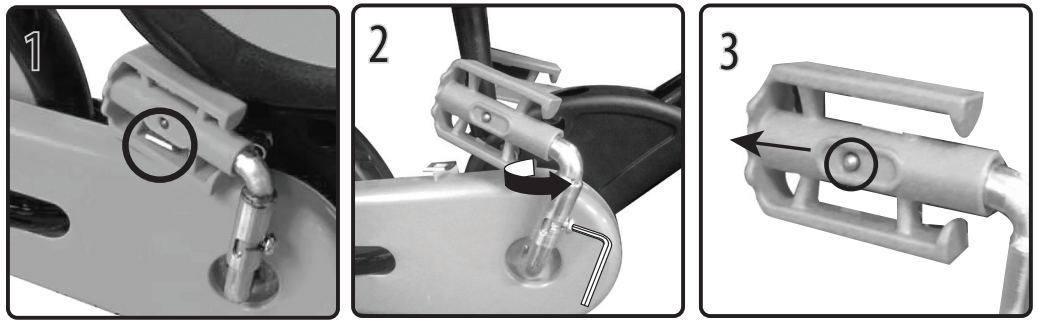
- Unhook the right pedal from the clip.
- Rotate the pedal arm out until it locks in place.
TIP: If the pedal arm is tight and won’t rotate, loosen the screw 1/4 turn with the Allen wrench. Tighten after rotating pedal arm. - Push in the button on the center of the pedal to slide it out so that the pedal can rotate.
LEFT PEDAL
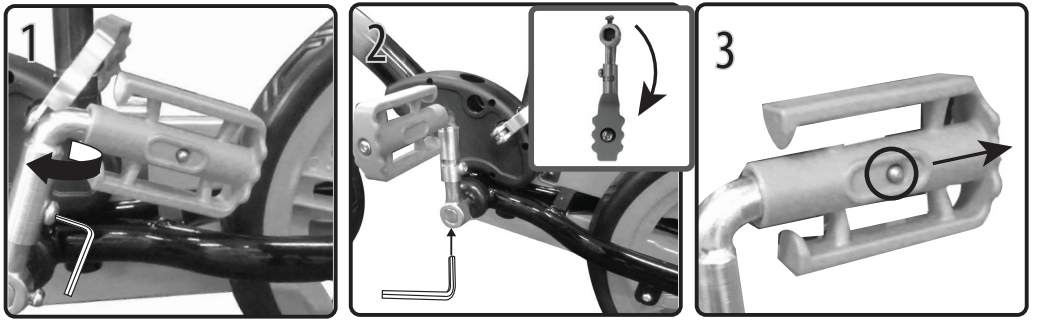
- Rotate the pedal arm out until it locks in place.
TIP: If the pedal arm is tight and won’t rotate, loosen the screw 1/4 turn with the Allen wrench. Tighten after rotating pedal arm. - Use the Allen wrench to loosen the bolt 3 full turns. Remove the pedal arm and rotate 180 degrees. Then, reattach the arm and tighten the bolt.
- Push in the button on the center of the pedal to slide it out so the pedal can rotate.
BALANCE POSITION
RIGHT PEDAL
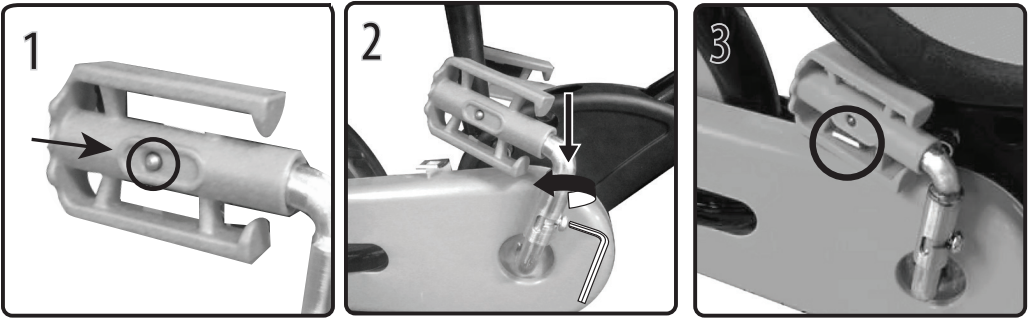
- Slide in the pedal until the buttons snaps back in place.
- Loosen the screw 1/4 turn with the Allen wrench. Push down the pedal arm and rotate into the frame. Then, tighten the screw.
- Lock the pedal into the clip.
If the rear wheel gets stuck when going in reverse after locking the pedal into the clip, follow the below steps:
- Unhook the pedal from the clip.
- Rotate the pedal arm out until it locks into place.
- Rotate the pedal forward about 45 degrees.
- Rotate back and lock pedal into the clip.
LEFT PEDAL

- Slide in the pedal until the buttons snaps back in place.
- Use the Allen wrench to loosen the bolt 3 full turns. Remove the pedal arm and rotate 180 degrees. Then, reattach the arm and tighten the bolt.
- Loosen the screw 1/4 turn with the Allen wrench. Push down the pedal arm and rotate into the frame. Then, tighten the screw.
Description
The Little Tikes 649615C Balance-to-Pedal bike is a high-quality training bike that helps children develop essential balancing and steering skills before transitioning to a pedal bike. The bike features a unique design that allows children to first learn to balance on two wheels, using the footrest to coast and steer. Once they have mastered balancing, parents can attach the removable pedals, allowing children to learn to pedal and steer simultaneously. With its durable tires and lightweight frame, this bike is perfect for outdoor adventures and can withstand rugged terrain, ensuring a safe and comfortable ride.
Little Tikes 649615C Balance-to-Pedal bike Setup Guide
Setting up the Little Tikes 649615C Balance-to-Pedal bike is easy and straightforward. Here are the steps to follow:
- Unbox the bike and remove all packaging materials.
- Adjust the seat height to fit your child's height, ensuring they can touch the ground with both feet.
- Insert the pedals into the crank arms, making sure they are securely attached.
- Check the tire pressure and adjust if necessary, ensuring they are inflated to the recommended PSI.
- Test the bike to ensure it is functioning properly and make any necessary adjustments before allowing your child to ride.
BEFORE EVERY RIDE: Just a minute spent before each ride can significantly improve your safety and the enjoyment of your ride. So, each time before you ride, make a habit of performing the following safety checks.
- Stand in front of the bicycle facing rearward and hold the front wheel securely between your legs. Try to twist the handlebars and verify that they do not move. Then pull the handlebars up, trying to lift the bike. There should be no movement of these components.
- Try to push the front wheel from side to side in the fork and confirm that it feels right and will not wobble. Lift the front wheel up by the handlebars and strike the wheel downward with the heel of your hand and confirm that it is tight. Spin the front wheel and confirm that it does not wobble or contact the fork or brake pads.
- Try to lift, push down on and twist the seat to confirm that it is tight.
- Look at the connections of the pedal to the crank arm. The pedal should feel firm.
- Apply your brake(s) and make sure that they feel firm to the touch, and then spin the wheel(s). Apply the brakes. They should stop the wheel(s).
- Now, put on your bicycle safety helmet and enjoy your ride. Your safety is well worth just a minute.
MAINTENANCE
Regularly examine all parts for wear or damage before use.
- Before each ride, check for cracks or other damage to the bike.
- Check all hardware such as bolts, nuts, cables, fasteners and other parts to ensure they are secure and properly assembled.
- If you hear any rattling from loose parts, the unit is damaged and should not be used. Immediately replace any damaged, missing, or badly worn parts with original equipment.
- Only use parts and accessories approved by the manufacturer and included with the product at the point of sale.
- Other accessories are not approved for use with the bike and could damage the unit or cause injury to the rider.
CHECKLIST
Before every ride
- Check wheel and pedal tightness
- Check brake operation
- Make sure all fasteners are tightened After every ride:
- Quick wipe down with damp cloth Monthly:
- Check brake adjustment (if applicable)
- Check tire wear
- Check that wheels are true
- Check hub, head set and crank bearings for looseness
- Check pedals and handlebars are tight
- Check seat and seat post are tight and comfortably adjusted
- Check frame and fork are true
- Check all nuts and bolts are tight
COASTER BRAKE
It is not necessary to assemble any part of your coaster brake, but it is important to understand how your coaster brake works.
OPERATION
Push the pedals backward to move the chain backward. The chain activates the coaster mechanism that is inside the rear hub. As you push the pedals backward with increasing force, the braking action of the coaster increases. If your bicycle has a caliper brake(s) in addition to the coaster brake, always use the coaster brake as the main brake to stop the bike.
FITTING THE RIDER TO THE BICYCLE
To determine the correct size of bicycle for the rider:
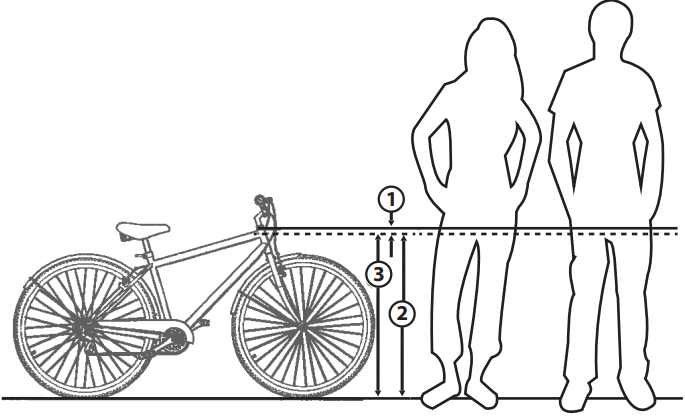
- Straddle the assembled bike with feet shoulder width apart and flat on the ground.
- There must be at least 1 inch (2.5 cm) of clearance (1) between the highest part of the top tube (2) and the crotch of the rider with tires properly inflated.
- The minimum leg-length for the rider is the highest part of the top tube plus one inch (3).
Troubleshooting of Little Tikes 649615C Balance-to-Pedal bike
While the Little Tikes 649615C Balance-to-Pedal bike is a high-quality and reliable product, there are a few common issues that may arise. Here are some troubleshooting tips:
- If the bike is difficult to steer, check the tire pressure and adjust if necessary. Improper tire pressure can affect the bike's steering and stability.
- If the pedals are difficult to turn, check for any debris or obstructions in the chain or gears. Clean and lubricate the chain if necessary to ensure smooth operation.
- If the bike is wobbling or unstable, check the seat height and ensure it is properly adjusted to fit your child's height.
- Always follow safety guidelines and warnings when assembling and operating the bike, ensuring your child's safety at all times.
WARRANTY
Little Tikes 649615C Balance-to-Pedal bike Company makes fun, high quality toys. We warrant to the original purchaser that this product is free of defects in materials or workmanship for one year * from the date of purchase (dated sales receipt is required for proof of purchase). At the sole election of The Little Tikes Company, the only remedies available under this warranty will be the replacement of the defective part or replacement of the product.
Little Pros & Cons
- Pros:
- Unique design promotes balancing and steering skills before introducing pedals.
- Adjustable seat height fits a wide range of children's heights.
- Durable tires and lightweight frame ensure a smooth and comfortable ride.
- Footrest promotes proper balancing techniques.
- Cons:
- Removable pedals may be difficult to attach properly.
- May be too small for some children over 5 years old.
Customer Reviews about Little Tikes 649615C
Customers have praised the Little Tikes 649615C Balance-to-Pedal bike for its unique design and high-quality construction. Many parents have noted that their children were able to quickly learn to balance and steer on two wheels before transitioning to pedals. However, some customers have noted that the removable pedals can be difficult to attach properly, and the bike may be too small for some children over 5 years old. Despite these minor issues, the Little Tikes 649615C Balance-to-Pedal bike remains a popular choice for parents looking to encourage their children's physical activity and independence.
Faqs
How to transition the Little Tikes 649615C Balance-to-Pedal bike from balance mode to pedal mode?
What is the recommended age range for the Little Tikes 649615C Balance-to-Pedal bike?
Can the Little Tikes 649615C Balance-to-Pedal bike be removed and reattached easily?
What is the Little Tikes 649615C Balance-to-Pedal bike frame made of?
What is the recommended tire pressure for the Little Tikes 649615C Balance-to-Pedal bike tires?
Can the seat height be adjusted on the Little Tikes 649615C Balance-to-Pedal bike?
Is the Little Tikes 649615C Balance-to-Pedal bike easy to assemble?
How does the Little Tikes 649615C Balance-to-Pedal bike promote physical activity in children?
Can the Little Tikes 649615C Balance-to-Pedal bike be used on rough terrain?
What is the warranty on the Little Tikes 649615C Balance-to-Pedal bike?
Leave a Comment