Lorex Smart Home Security Center L871T8 User Guide | Setup & Operations
Content
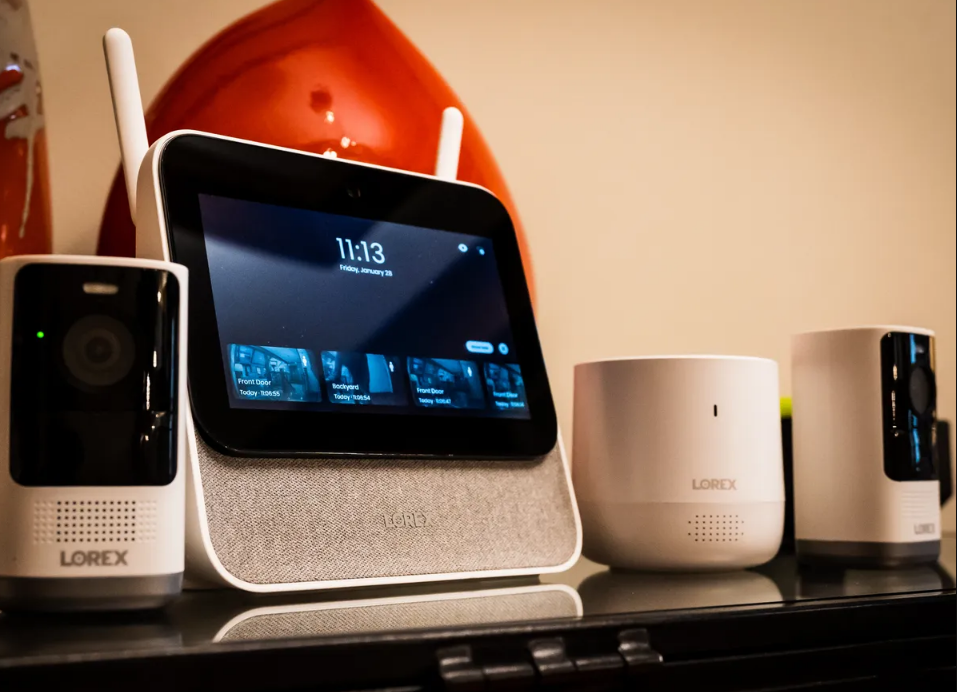
Lorex Smart Home Security Center L871T8
The Lorex Smart Home Security Center is a state-of-the-art home security system that offers advanced features, a sleek design, and reliable performance. With a suggested retail price of $499.99 and an expected launch date in mid-2023, this security center is an investment in your family's safety and peace of mind. Its key features include 4K resolution, color night vision, smart motion detection, and compatibility with popular smart home platforms.
Detailed Specification
- 4K resolution and 1/2.5" CMOS sensor for clear and detailed video
- Color night vision up to 150 feet
- Smart motion detection with person and vehicle detection
- Two-way audio with built-in microphone and speaker
- IP67 weatherproof rating for indoor or outdoor use
- H.265 video compression for efficient storage and faster transfer
- Up to 128GB microSD card slot for local storage
- Compatible with Amazon Alexa, Google Assistant, and IFTTT
- Works with the Lorex Cirrus app for remote monitoring and control
Description of Smart Home Security Center L871T8
The Smart Home Security Center is a versatile and powerful security solution that can adapt to various environments and scenarios. Its 4K resolution and color night vision ensure that you get sharp and vibrant images, day and night. The smart motion detection feature allows you to customize your alerts and reduce false alarms by distinguishing between people, vehicles, and other objects. The two-way audio adds an extra layer of convenience and security, as you can communicate with visitors or deter intruders remotely. The IP67 weatherproof rating means that you can install the Lorex Smart Home Security Center indoors or outdoors without worrying about its durability. Moreover, the compatibility with popular smart home platforms and the Lorex Cirrus app makes it easy to integrate the Lorex Smart Home Security Center L871T8 with your existing devices and routines.
Package contents
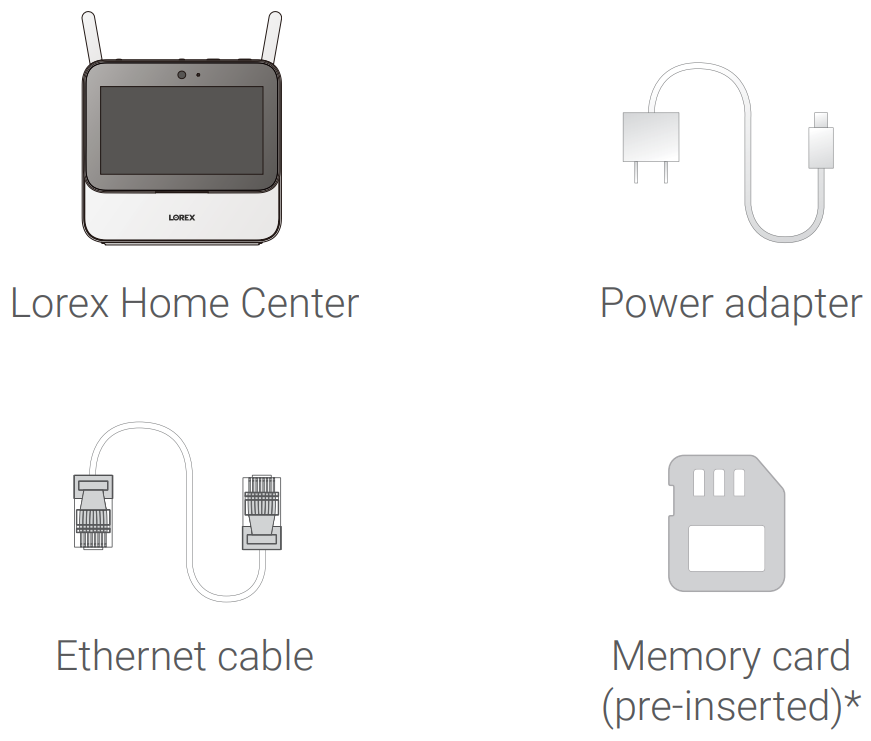
Attention: A REGULATED UL / CSA APPROVED power supply is REQUIRED for use with this camera (included). Use of a non-regulated, non-conforming power supply can damage this product and voids the warranty.
See product packaging for memory size details.
Overview
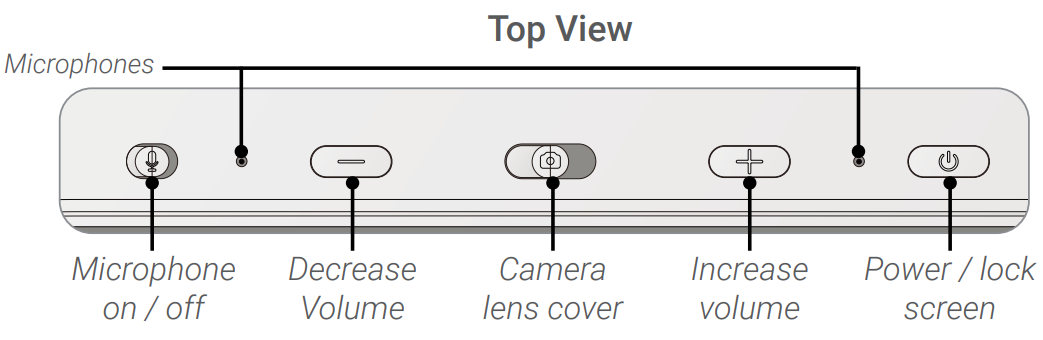
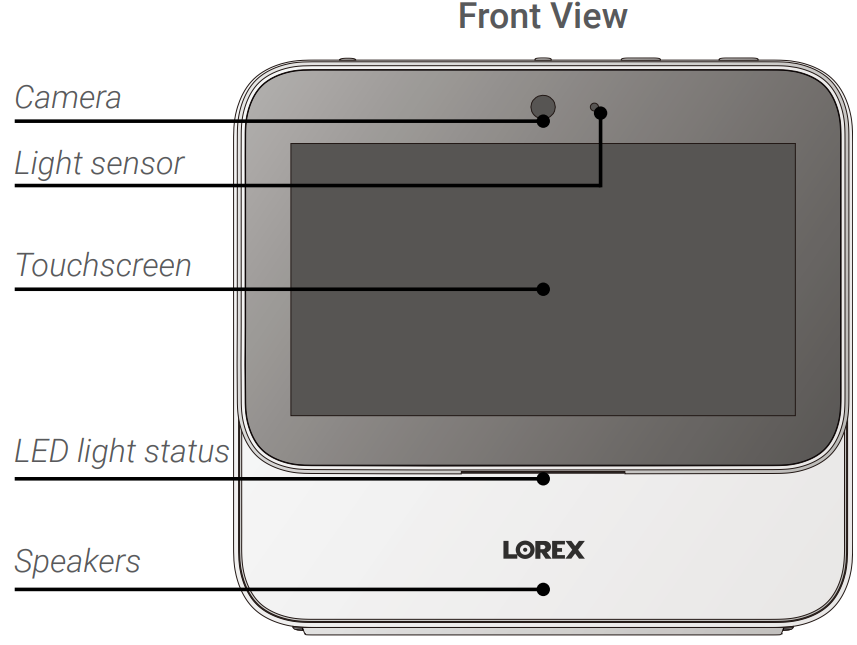
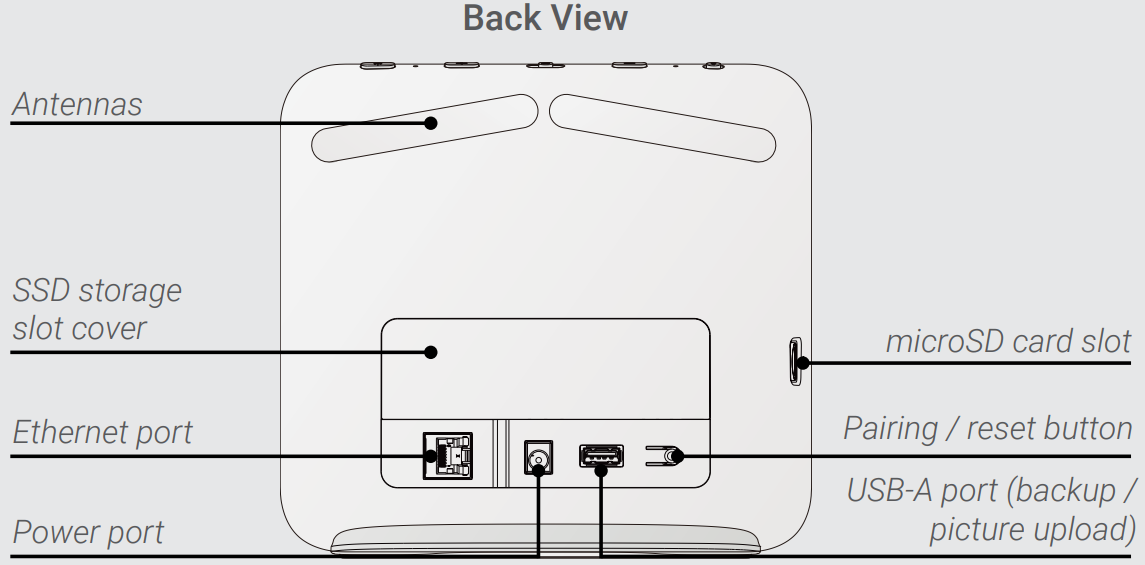
Basic operations
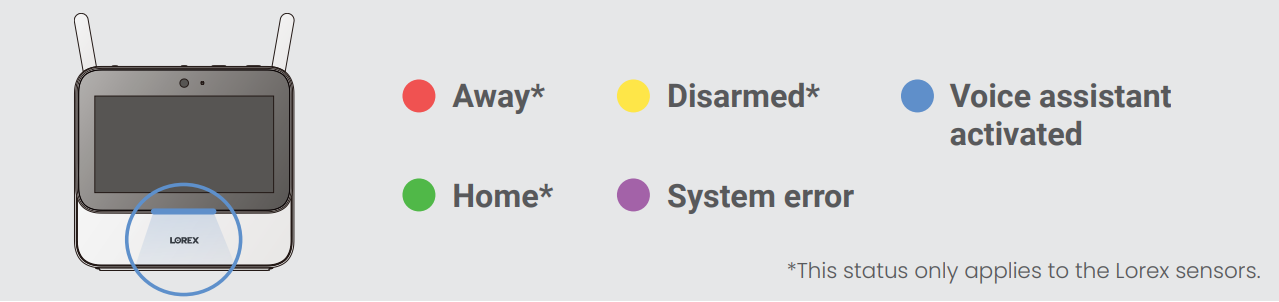
Status Indicator
Touchscreen Gestures
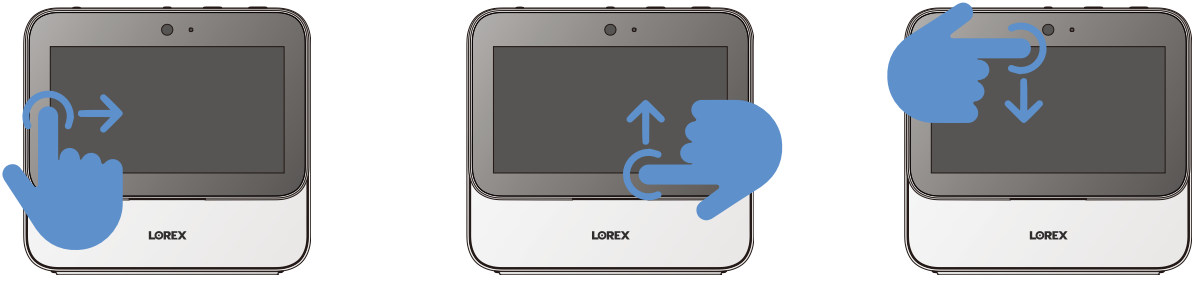
- Swipe right from the left edge of the screen to return to the previous screen
- Swipe up from the bottom edge of the screen to return to the home screen
- Swipe down from the top edge of the screen for the drop-down menu
Placing the Lorex Home Center
Recommendations for improving the range
- Choose a central location with good connectivity to your router and devices
- Limit the amount of walls, ceilings, and other major obstructions between the Lorex Home Center and your devices.
- Ensure the antennas are in the upright position
- If you need to extend the Lorex Home Center’s Wi-Fi signal, we recommend adding an extender. Place the extender between the Lorex Home Center and your other devices. See product page for device compatibility.

Setup
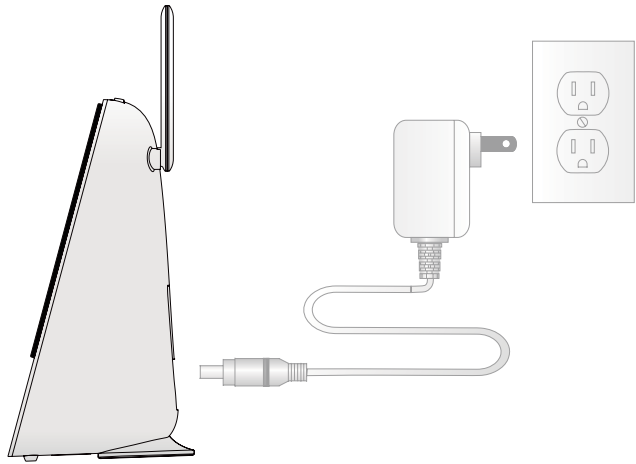
Plug the power cable into the Lorex Home Center. Then plug the power adapter into a wall outlet .
Follow the on-screen prompts to complete the first-time setup.- Create your passcode.
Passcode: This is a 6-digit passcode used to unlock your device or disarm your sensors (in case you use sensors with the system). You do not have to enter the passcode manually if the Face Unlock feature has been activated. You also have the option to skip this step. - Create your device password.
Device Password: This password is used to add the Lorex Home Center to the Lorex Home app. It must consist of at least 8 characters and contain a combination of numbers, letters, and special characters.
Note: If you forget both your passcode and device password, you must do a hardware reset. Press down on the reset button until a warning pop up appears. Select Yes. - Set up Face Unlock (optional).
Face Unlock: This feature allows you to unlock the Lorex Home Center with the built-in camera. Make sure that the camera lens is not covered, that nothing is covering your face, and that you position your face directly in front of the camera. A reasonable amount of light is required to have this function work properly. You also have the option to skip this step and cover the camera with the built-in lens cover for privacy.
Important: Only one device owner’s face can be stored.
Network setup
Choose your preferred connection setup method from the following three options
Wired
Tap the wired icon and connect the Lorex Home Center to your home router using the provided Ethernet cable. The Lorex Home Center must be placed near your home router and positioned centrally relative to the different Lorex devices.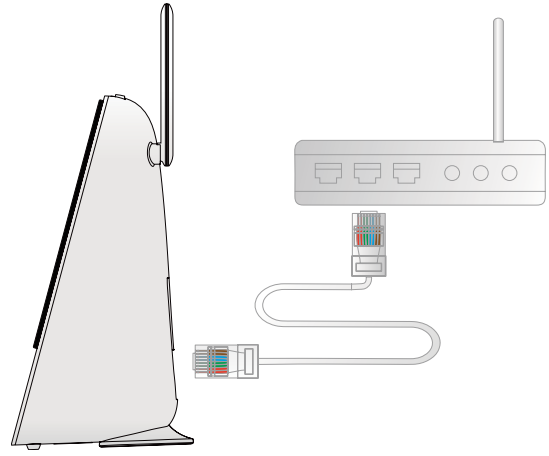
- Wireless
Tap the wireless icon, select your Wi-Fi network from the list, then enter the Wi-Fi password to connect. The Lorex Home Center can be placed wherever there is a good connection to your home router and positioned centrally relative to the different Lorex devices.
Note: Requires a dual-band router (2.4GHz / 5GHz) with 5GHz Wi-Fi network enabled. - Offline
Tap the offline icon to set up through a direct connection. The Lorex Home Center can work offline and no internet connection is required to operate it or connect it to different Lorex devices. Central placement is important for the Lorex devices to communicate directly with the Lorex Home Center. You will not be able to use the Lorex Home App to access the Lorex Home Center remotely and will not receive automatic update notifications.
Device setup
In the Device Setup screen, select the device you want to add and tap Next. Make sure your device is powered on and near the Lorex Home Center for initial setup. Once set up, you can move the device to its final location as long as it is within range of the Lorex Home Center.
List of compatible Lorex devices
Note: If you plan to set up other types of Wi-Fi cameras and/or a doorbell on the Lorex Home Center, visit lorex.com/compatibility to determine the right setup method for that device (either direct setup method or app setup method). Sensors can be set up directly from the Lorex Home Center.
Follow the Lorex Home Center's on-screen prompts to complete the device setup.
Pairing to the Lorex Home app
Pair the Lorex Home Center to the Lorex Home app for remote access and viewing.
- If you already have the app, skip this step. Scan the QR code on the right using your mobile device’s camera. Install the free Lorex Home app from the App Store™ or Google Play Store™.
- Tap the Lorex Home icon to launch the app.
- If you already have an account, skip this step. Tap Sign up, then follow the on-screen prompts to create an account. Record your account details below:
- Email:
- Account Password
- Tap on the + icon on the top right of the screen to add the Lorex Home Center.
- Scan the Lorex Home Center's QR code shown during the setup process. If you've skipped this step during the Lorex Home Center's setup, you can get the QR code by going to the home screen, tapping on the settings icon > Device Info > Lorex Home Center > Device ID.
Note: If your mobile device cannot scan the QR code, tap Manually enter Device ID. - Follow the in-app instructions to complete the setup.
Lorex Home Center user interface
Home Screen

Live View
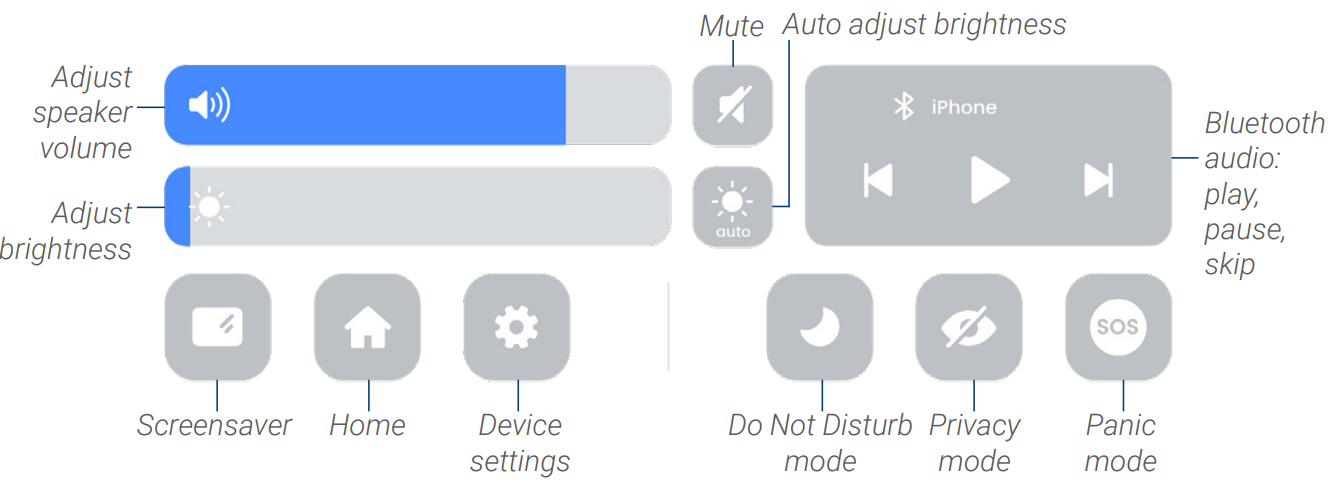
Swipe-down Menu
Definitions
- Do Not Disturb mode: Tap to silence alerts, notifications, and light statuses that you get while your device is locked. Tap again to disable DND mode.
- Privacy mode: Tap to turn off live feed from all cameras. Tap again to disable privacy mode.
- Panic mode: Press and hold panic mode for 5 seconds to turn on all lights and sirens from compatible active or smart deterrence cameras/doorbells. Tap again to turn off.
- Bluetooth audio: Any Bluetooth-capable device can play audio through the Lorex Home Center’s speakers. Go to your Bluetooth-capable device’s Settings > Bluetooth, turn on Bluetooth, then select “Lorex Home Center”. Complete the pairing process to begin streaming music/audio.
Lorex Voice Assistant
The Lorex Voice Assistant is a specially designed voice assistant for the Lorex Home Center. It was developed with your privacy in mind. All voice processing is done inside the Lorex Home Center. This means that no voice information leaves the device and makes response time quick. To enable this feature make sure that the microphone is turned on and say the wake-up word “Lorex”.
A sample voice command: “Lorex, show me all the cameras!”
For a sampling of the different voice commands, tap on the Voice Prompts icon ?. on the home screen.
Note: Voice control also works in offline mode.
Lorex Home app overview

Live View
For a complete overview of controls available on the Lorex Home app, scan the QR code using your mobile device’s camera.
Safety precautions
- Read this guide carefully and keep it for future reference.
- Follow all instructions for safe use and handling of the product.
- Use the camera within given temperature, humidity and voltage levels noted in the camera’s specifications.
- Do not disassemble the camera.
- Do not point the camera directly at the sun or a source of intense light.
- Periodic cleaning may be required. Use a damp cloth only. Do not use any harsh, chemical-based cleaners.
Troubleshooting of Lorex Smart Home Security Center
Here are some common issues and solutions for the Lorex Smart Home Security Center
- Which devices are compatible with the Lorex Home Center?
To find out which devices are compatible with the Lorex Home Center, visit lorex.com/compatibility. - Which devices require a direct setup method or an app setup method?
The direct setup method means you can connect a camera directly to the Lorex Home Center’s local network. The app setup method means that the camera must first be set up on the Lorex home app and then afterward the camera can be added to the Lorex Home Center. For more information on direct setup vs. app setup method, visit help.lorextechnology.com and go to the Lorex Home Center's product page. - Failed to pair to the Lorex Home Center using the direct setup method.
- The device must be powered on and ready to pair.
- The distance between the device and the Lorex Home Center is too far. Make sure the device is no more than 3ft from the Lorex Home Center during the setup process.
- Make sure you are only pairing one device to the Lorex Home Center at a time.
- Press the camera’s pairing button and wait for the camera's status indicator to flash green, then follow the Lorex Home Center's on-screen prompts to complete setup.
- Another possible solution would be to reset the device. For cameras, press and hold down the reset button for 10 seconds to perform a hard reset. For sensors and doorbells, use the included pin to insert into the reset hole and hold for 10 seconds to perform a hard reset. An audible chime from the device will indicate a successful reset. Once the reset is complete you can connect the device to the Lorex Home Center.
- Failed to pair to the Lorex Home Center using the app setup method.
- Make sure the device has been setup on the Lorex Home app first.
- Make sure the device is within range of your Wi-Fi router.
- The Lorex Home Center and the device should be on the same Wi-Fi network.
- How to add a device to the Lorex Home Center after the app setup.
- Press the pairing/reset button located on the back of the Lorex Home Center to navigate to the Device Setup screen.
- Step two. In the Device Setup screen, tap the search icon (highlighted in the image below).
- Step three. Once you have found the device, enter the device password. Note: The device password is the same password you used to setup the Lorex Home Center. It contains at least 8 characters and a combination of numbers, letters, and special characters.
- The camera/doorbell on the Lorex Home Center is offline, but the LED indicator on the camera/doorbell is solid green or blue.
- To resolve this, you will need to remove the camera/doorbell from the Lorex Home Center followed by a hard reset. In the Lorex Home Center’s home screen, tap Device Management and identify the device that is offline. Tap the settings ••• icon for the device that is offline and tap Remove Device. For cameras, press and hold down the reset button for 10 seconds to perform a hard reset. For doorbells, use the included pin to insert into the reset hole and hold for 10 seconds to perform a hard reset. An audible chime from the camera/doorbell will indicate a successful reset. Once the reset is complete you can connect the device to the Lorex Home Center. Note: While performing a reset to the device will clean video recordings from the events folder in the Lorex Home Center, the recordings are saved on the microSD card.
- How to turn off notification sound or chime.
- Unlock the Lorex Home Center and swipe down from the top edge of the screen to reveal the drop-down menu. Tap on the mute icon to mute sound or tap on the Do Not Disturb icon to mute all notifications. Option B: In the Lorex Home Center’s home screen, tap Device Settings > Sounds > Camera Notification Chime or Doorbell Chime. Select None from the chime options.
- How to turn on/off camera or sensor notifications.
To turn on/off individual notifications: In the Lorex Home Center’s home screen, tap on the notifications icon on the top right of the screen. Enable or disable the specific device’s notification and tap Save. To turn on/off all notifications: Unlock the Lorex Home Center and swipe down from the top edge of the screen to reveal the drop-down menu. Tap on the Do Not Disturb icon to mute all notifications. - How to set the Lorex Home Center to Offline Mode.
Note: In Offline Mode, you can still view your camera, and your sensors remain functional, but you cannot see your devices remotely from the Lorex Home app and you will not get device updates (notices). In the Lorex Home Center’s home screen, tap Device Settings > Network Settings > Wi-Fi Network and disable the Wi-Fi network. Then go back one screen, tap on Wired Network and disable the wired network. When both the Wi-Fi network and wired network have been turned off, the Lorex Home Center will operate in Offline Mode. - How to enable or disable Face Unlock or Passcode.
In the Lorex Home Center’s home screen, tap Device Settings > Security Settings. You can choose to enable Require passcode to unlock and enable Face Unlock to begin using these features. Note: Using the camera cover to hide the lens will not turn off Face Unlock, it will simply prevent video capturing for the Face Unlock feature. - How to reset the Lorex Home Center to factory settings.
Press and hold down the reset button until the warning message pops up. Tap Restore to factory settings.
Pros & Cons of Lorex L871T8
Pros
- 4K resolution and color night vision
- Smart motion detection and two-way audio
- Weatherproof and customizable
- Compatible with popular smart home platforms
- Local storage and remote monitoring
Cons
- Price may be too high for some budgets
- Setup and configuration may be complex for some users
Customer Reviews of Lorex Smart Home Security Center
Customers who have purchased and used the Lorex Smart Home Security Center L871T8 have praised its stunning video quality, smart motion detection, and easy installation. However, some have criticized its high price and complicated setup. Overall, the L871T8 has received positive reviews and is recommended for those who want a reliable and advanced home security system.
Faqs
What Are the Lorex L871T8 Security System's Main Features?
Is it Possible to Combine Smart Home Devices with Lorex L871T8?
How to Troubleshoot Lorex L871T8 Connectivity Issues?
Why Doesn't the Night Vision on My Lorex L871T8 Camera Work?
Is It Possible to Increase My Lorex L871T8 System's Storage Capacity?
Is it safe to use the Lorex L871T8 outside in the weather?
How Can I View the Lorex L871T8's Recorded Footage?
How Can I Update My Lorex L871T8's Firmware?
What Should I Do If I Forget My Password for My Lorex L871T8?
What kind of warranty is provided by Lorex for the L871T8 system?
Leave a Comment