Makita Backpack Vacuum Cleaner XCV17 Instruction Manual

Content
Introduction to the Makita Backpack Vacuum Cleaner XCV17
The Makita Backpack Vacuum Cleaner XCV17 is a powerful and efficient cleaning solution designed for professional use. This cordless vacuum operates on a 36V system powered by two 18V Lithium-Ion batteries, delivering up to 78 CFM of suction for effective debris removal. With a lightweight design of just 15 lbs and an ergonomic harness, it ensures comfort during extended use. The HEPA filter captures 99.97% of particles, making it ideal for dust-sensitive environments. The cost of the Makita XCV17 is approximately $400.
Specifications
| Model: | XCV17 | |
| Capacity | Filter bag | 6.0 L (1.6 gal.) |
| Dust bag | 5.5 L (1.5 gal.) | |
| Maximum air volume | With hoseø28 mm (1-1/8″) x 1.0 m (39-3/8″) | 2.0 m3/min (70.6 cu.ft/min) |
| With hoseø32 mm (1-1/4″) x 1.0 m (39-3/8″) | 2.2 m3/min (77.7 cu.ft/min) | |
| Vacuum | 110 hPa | |
| Dimensions (L x W x H) (excluding the harness) | 297 mm x 174 mm x 523 mm (11-3/4″ x 6-7/8″ x 20-5/8″) | |
| Rated voltage | D.C. 36 V | |
| Net weight | 6.1 - 6.7 kg (13.4 - 14.8 lbs) | |
- Due to our continuing program of research and development, the specifications herein are subject to change without notice.
- Specifications may differ from country to country.
- The weight does not include accessories but battery cartridge(s). The lightest and heaviest combination weight of the appliance and battery cartridge(s) are shown in the table.
- The length of supplied hose varies depending on the countries.
Applicable battery cartridge and charger
| Battery cartridge | BL1815N / BL1820B / BL1830 / BL1830B / BL1840B / BL1850B / BL1860B |
| Charger | DC18RC / DC18RD / DC18RE / DC18SD / DC18SE / DC18SF |
Some of the battery cartridges and chargers listed above may not be available depending on your region of residence.
WARNING: Only use the battery cartridges and chargers listed above. Use of any other battery cartridges and chargers may cause injury and/or fire.
FUNCTIONAL DESCRIPTION
CAUTION: Always be sure that the appli-ance is switched off and the battery cartridge is removed before adjusting or checking function on the appliance.
Installing or removing the battery cartridge
CAUTION: Always switch off the appliance before installing or removing of the battery cartridge.
CAUTION: Hold the appliance and the bat-tery cartridge firmly when installing or removing battery cartridge. Failure to hold the appliance and the battery cartridge firmly may cause them to slip off your hands and result in damage to the appliance and battery cartridge and a personal injury.
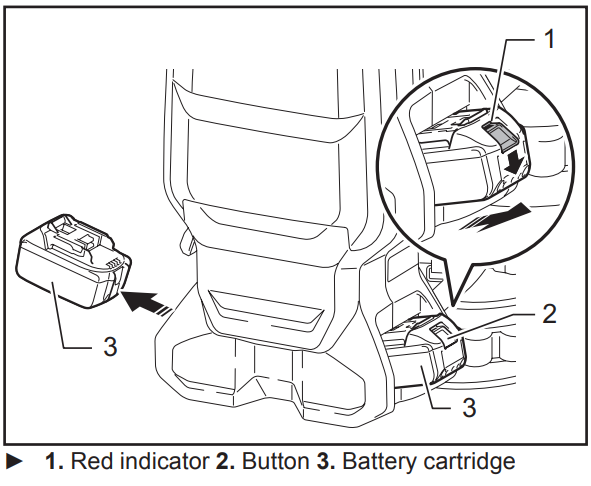
To remove the battery cartridge, slide it from the appliance while sliding the button on the front of the cartridge.
To install the battery cartridge, align the tongue on the battery cartridge with the groove in the housing and slip it into place. Insert it all the way until it locks in place with a little click. If you can see the red indicator on the upper side of the button, it is not locked completely.
CAUTION: Always install the battery cartridge fully until the red indicator cannot be seen. If not, it may accidentally fall out of the appliance, causing injury to you or someone around you.
CAUTION: Do not install the battery cartridge forcibly. If the cartridge does not slide in easily, it is not being inserted correctly.
Appliance/battery protection system
The appliance is equipped with a appliance / battery protec-tion system. This system automatically cuts off power to the motor to extend appliance and battery life. The appliance will automatically stop during operation if the appliance or battery is placed under one of the following conditions:
Overload protection
When the appliance is operated in a manner that causes it to draw an abnormally high current, the appliance automatically stops without any indication. In this situation, turn the appli-ance off and stop the application that caused the appliance to become overloaded. Then turn the appliance on to restart.
Overheat protection
When the appliance is overheated, the appliance stops automatically, and the LED light blinks about 60 seconds. In this situation, let the appliance cool down before turning the appliance on again.
While the LED light is blinking, you can turn off the LED light by pressing  button.
Over-discharge protection
When the battery capacity becomes low, the appliance stops automatically. If the product does not operate even when the switches are operated, remove the bat-teries from the appliance and charge the batteries.
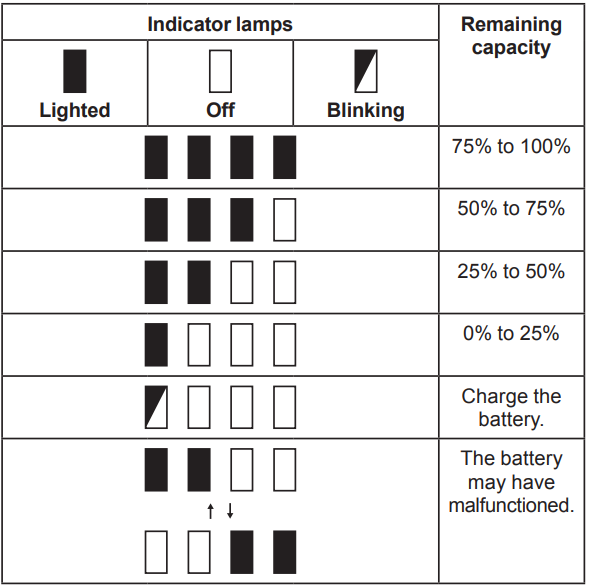
Indicating the remaining battery capacity
Only for battery cartridges with the indicator
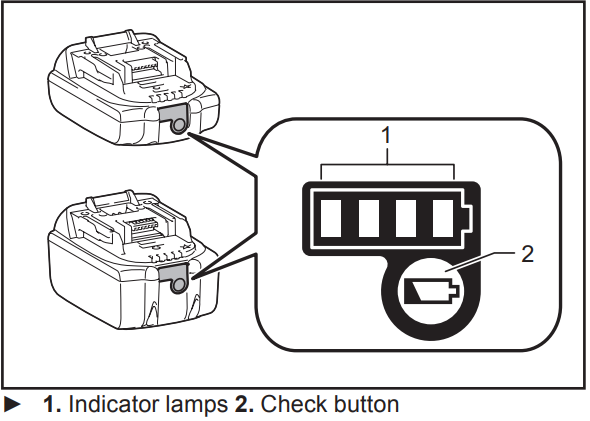
Press the check button on the battery cartridge to indi-cate the remaining battery capacity. The indicator lamps light up for a few seconds.
NOTE: Depending on the conditions of use and the ambient temperature, the indication may differ slightly from the actual capacity.
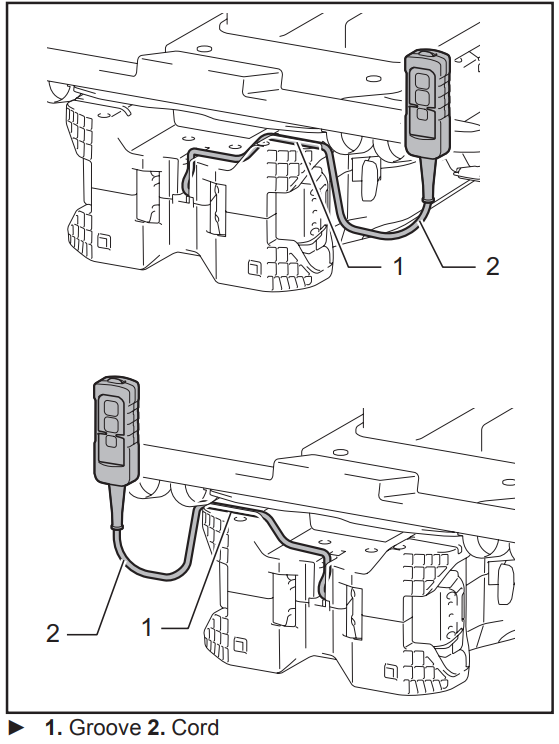
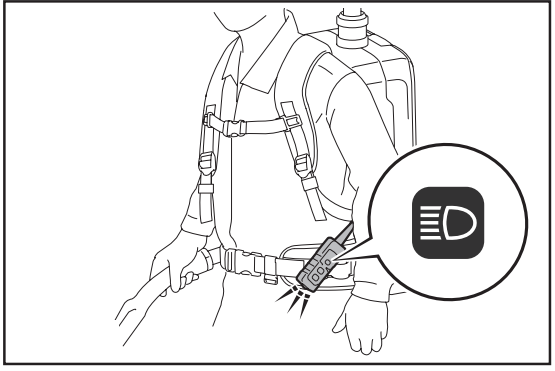
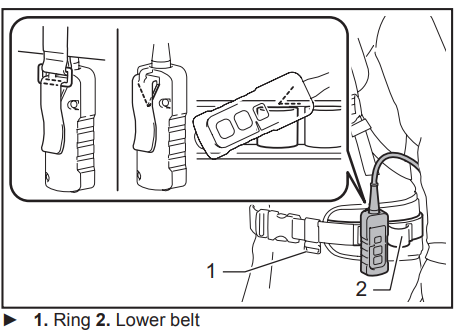
Switch box position
The switch box can be hooked on either side of the lower belt. Arrange the cord so that the switch box comes to your desired side. To prevent the cord from being damaged, pass the cord through the groove as illustrated.
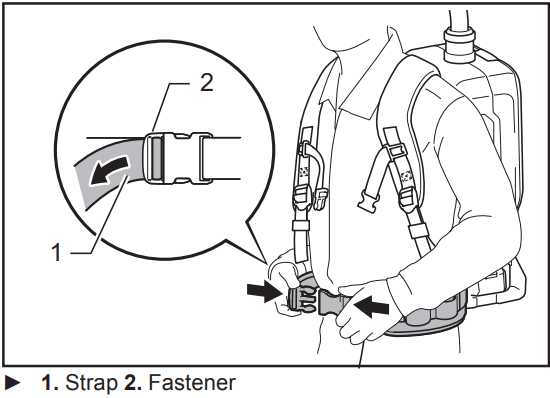
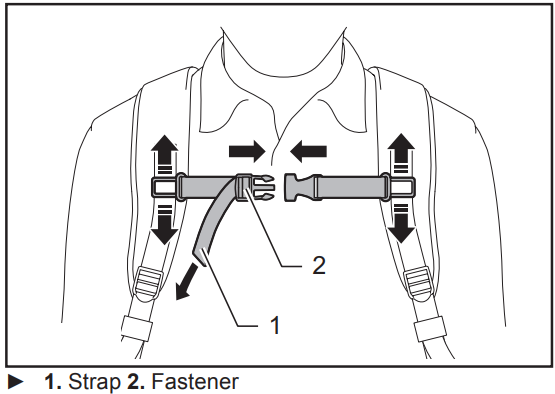
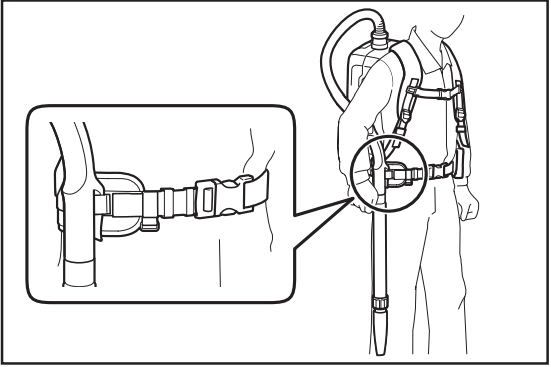
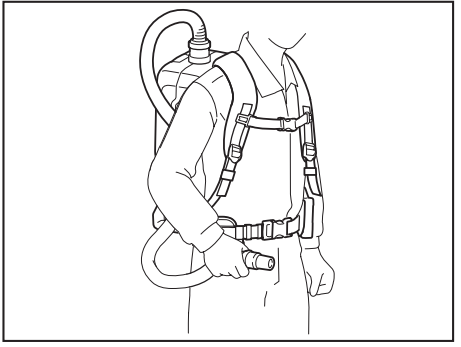
Adjusting belts
The tightness of the shoulder belts, upper and lower belts can be adjusted. Put your arms through the shoul-der belts first then fasten the lower and upper belts. To tighten, pull the end of the strap as illustrated. To loosen, pull up the end of the fastener.
Lower belt
Shoulder belts

Upper belt
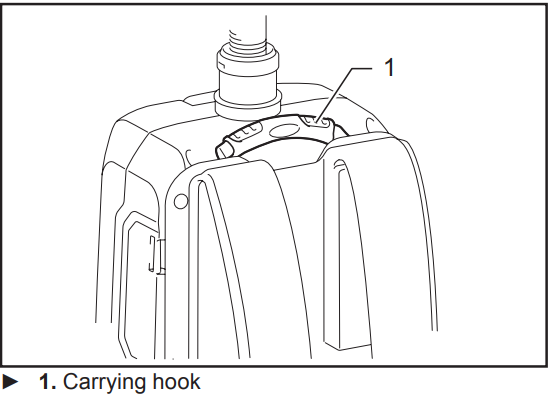
Carrying hook
Always grab the carrying hook when handling the vac-uum cleaner body.
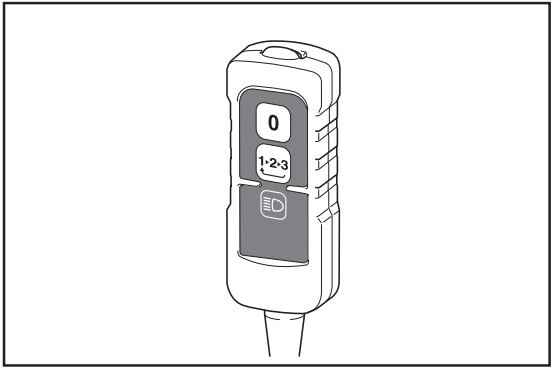
Switch action
- You can change the suction power in three steps: nor-mal (1), high (2), and max (3).
- To start vacuuming, press button once. When you change the suction power, press the button while the vacuum cleaner is running. The suction power switches in order normal (1) , high (2) , and max (3).
- To turn off the vacuum cleaner, press button.
NOTE: When you start the vacuum cleaner again, it will start in the same suction power as the previous setting.
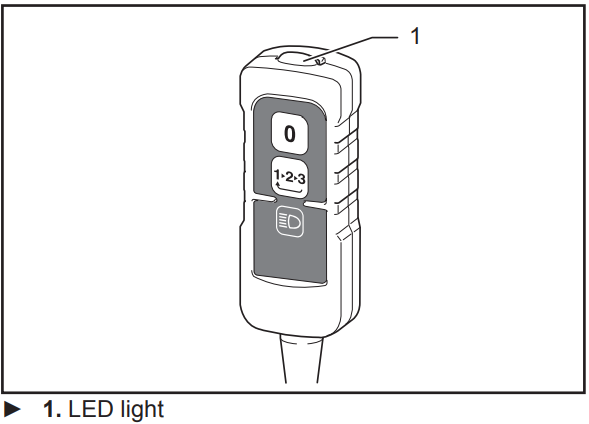
LED light
LED light is installed in the head of the switch box to ease the operations in dark places. Press button to turn the light on. To turn off, press button again.
CAUTION: Do not look in the light or see the source of light directly. Never aim the light to other people's eyes.
NOTE: The LED light is automatically turned off when the vacuum cleaner is not operated for more than 10 minutes.
NOTE: The vacuum cleaner will automatically switches off and the LED light flashes when the vac-uum cleaner is overheated due to the reduced air-flow into the machine caused by clogged hose, pipe, filter or other reasons. In this case, remove the cause of the problem and cool the vacuum cleaner before restarting.
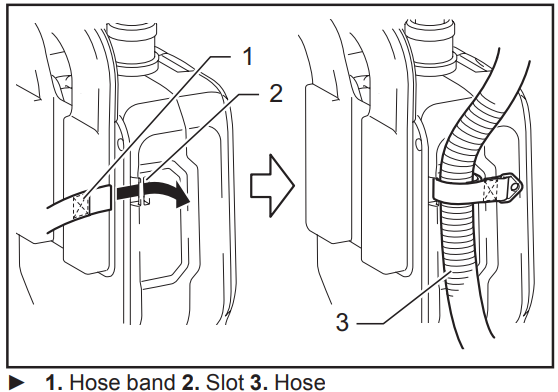
Hose band
Hose band can be used for holding the hose or free nozzle.
To secure the hose to the vacuum cleaner body, pass the hose band through the slot on the body. You can attach the hose band on either side.
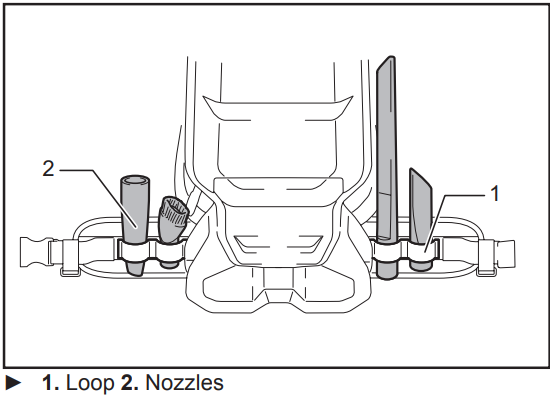
The loop on the lower belt can be used for carrying nozzles as illustrated.
Hose hook
When you suspend the operation, the hook on the bent pipe assembly can be used for hanging the wand on the lower belt.
Dust beating system
Dust goes down when you pull the lever or walk with wearing the cleaner. This system helps the cleaner maintaining the suction power.
NOTE: This function works when the cleaner is switched off and the filter bag/dust bag contains a certain amount of dust to touch the board.
Makita Backpack Vacuum Cleaner XCV17 ASSEMBLY
CAUTION: Always be sure that the appliance is switched off and the battery cartridge is removed before carrying out any work on the appliance.
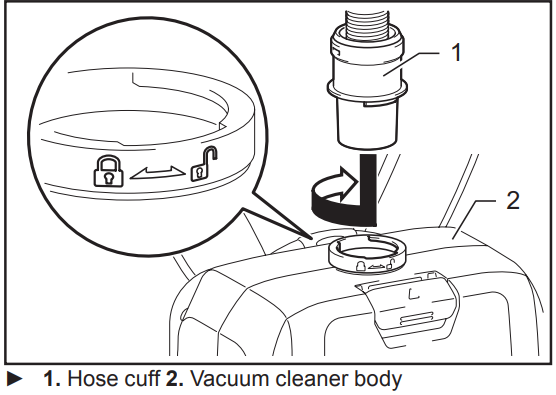
Assembling hose
Insert the hose cuff into the vacuum cleaner body and turn it clockwise.
Assembling nozzle and wand
Optional accessory
NOTE: The type of the nozzle and wand included in the product varies depending on countries. In some countries, the nozzle and wand are not included.
Twist and insert the nozzle to the extension wand.
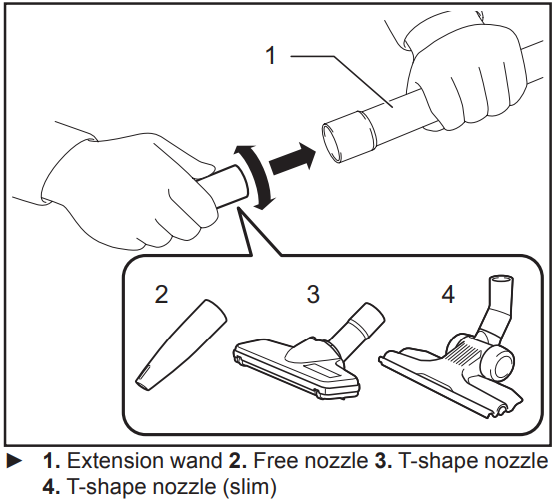
NOTE: By twisting the nozzle while inserting, the noz-zle can be attached to the extension wand securely.
NOTE: For the model with ø38 mm hose and front cuff 38, attach the supplied nozzle to the aluminum bending pipe / aluminum straight pipe.
Follow the procedures below, depending on the type of the extension wand :
NOTE: The slide-type extension wand and the ring-type extension wand are not compatible with each other. If you want to change the slide-type extension wand to the ring-type extension wand or vice versa, change the bent pipe assembly also.
NOTE: The free nozzle can be attached to the bent pipe assembly directly.
For the slide-type extension wand
Shoulder the vacuum cleaner body then insert the extension wand into the bent pipe assembly until it clicks. To disconnect, extract the extension wand with pressing the button.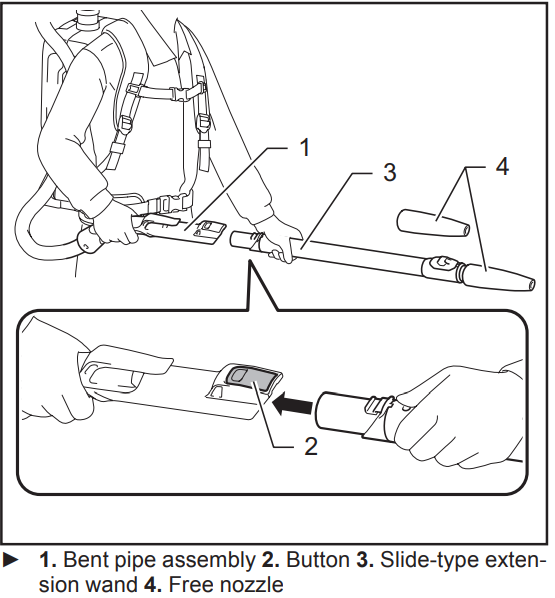
The length of the wand can be adjusted.
With pressing the slide button, adjust the wand length. The length is locked when releasing the slide button.
For the ring-type extension wand
Shoulder the vacuum cleaner body then twist and insert the extension wand into the bent pipe assembly. To disconnect, twist and extract it.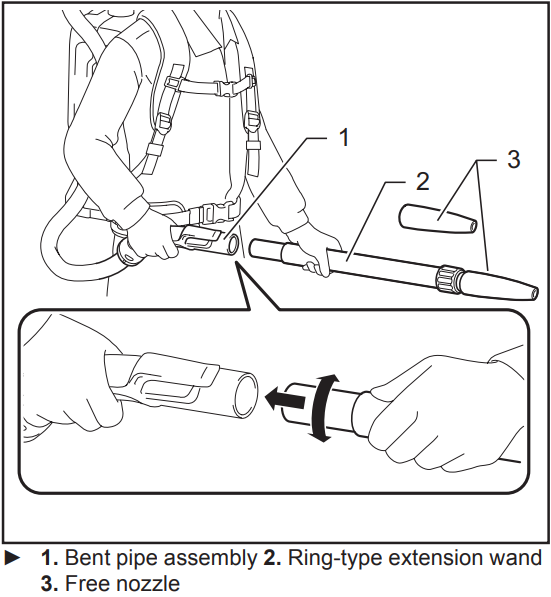
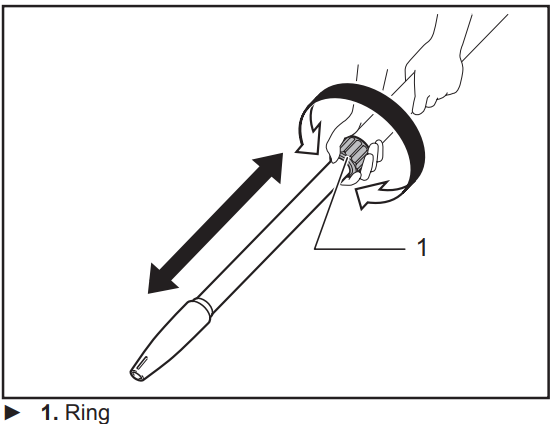
The length of the wand can be adjusted. Loosen the ring on the wand and adjust the wand length. Tighten the ring at your desired length.
For the aluminum bending pipe / aluminum straight pipe
(Only for the model with ø38 mm hose and front cuff 38) Shoulder the vacuum cleaner body then twist and insert the pipe into the front cuff. To disconnect, twist and extract it.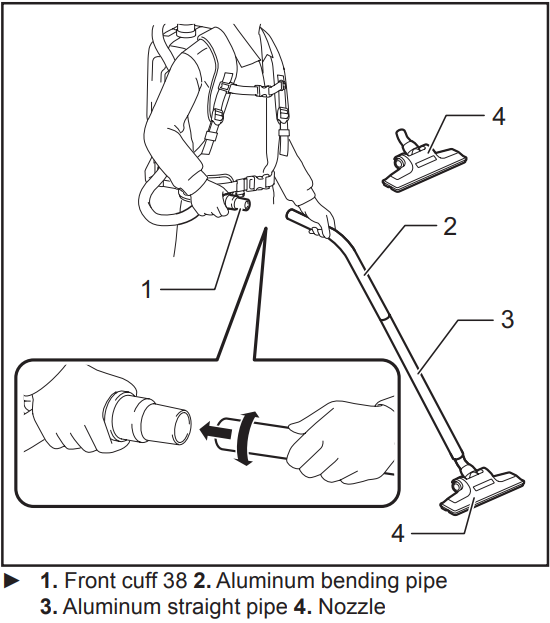
For the two aluminum straight pipes
Shoulder the vacuum cleaner body then twist and insert the pipes. To disconnect, twist and extract it.
Connecting the tool
NOTE: If the bent pipe assembly is attached to the hose, remove it beforehand.
To connect a tool to the cleaner, the dedicated hose and/or additional parts are required. Depending on your cleaner model, you need to replace the hose and/or prepare additional parts.
Refer to the following table for details.
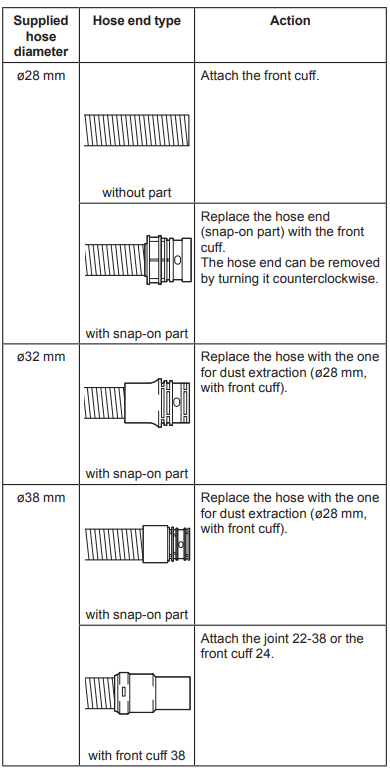
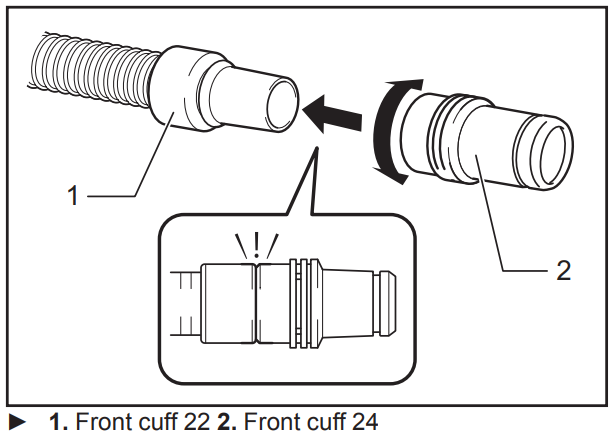
NOTE: Always use a suitable front cuff. When using the front cuff 24, attach it to the front cuff 22 that is connected to the hose.
When using ø28 mm dust extraction hose
- Attach the front cuff to the hose for dust extraction. When connecting the front cuff, make sure that it is securely screwed on the hose.
- Connect the front cuff to the tool's extraction outlet.
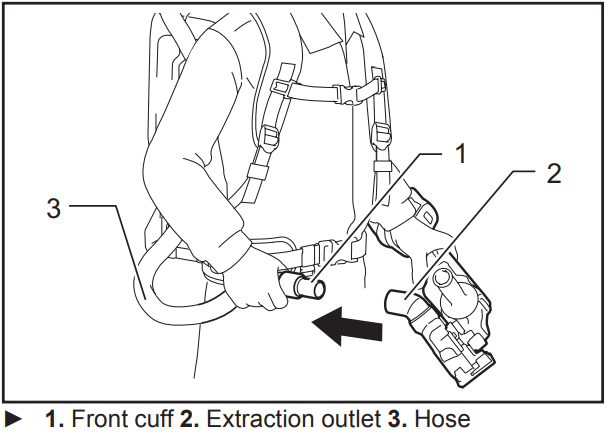
The front cuff can be detached by turning it counter-clockwise while holding the hose.
When using ø38 mm hose with front cuff 38
- Twist and insert the joint or the front cuff to the inlet part on the hose, depending on the tool that you are going to connect.
- Connect the front cuff to the tool's extraction outlet.

To remove the joint and the front cuff, follow the installa-tion procedures in reverse.
Attaching bent pipe assembly
Optional accessory
NOTE: You don't need to perform this procedure
if your model comes with the bent pipe assembly attached to the hose.
NOTE: There are two types of bent pipe assembly; the one for slide-type extension wand and the one for ring-type extension wand. If you prepare the bent pipe assembly, choose the one for your desired extension wand type.
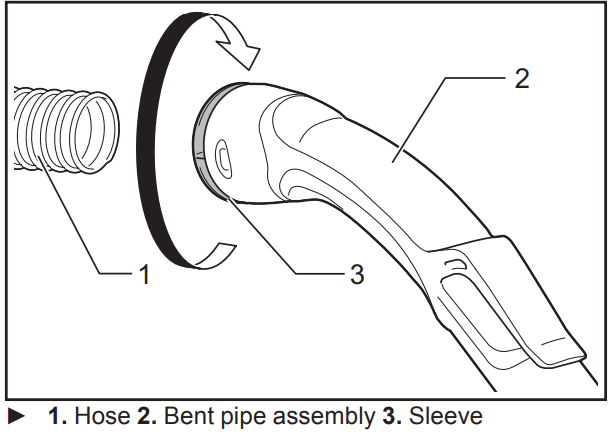
- The bent pipe assembly is used for connecting the extension wand or nozzle for vacuum cleaning to this product.
- If you want to use this product as the vacuum cleaner, attach the bent pipe assembly to the hose.
- To attach, unscrew the front cuff from the hose and fasten the sleeve of bent pipe assembly onto the hose. To remove, loosen the sleeve of bent pipe assembly from the hose.
Installing filter bag / dust bag
Optional accessory
CAUTION: Do not use a damaged filter bag. Always use the vacuum cleaner with the filter bag properly installed. Otherwise the vacuumed dust or particles may be exhausted from the cleaner and they may cause respiratory disease to the operator.
- Install either dust bag or filter bag before using cleaner.— Dust bag are usable many times repeatedly by cleaning it out.
- Filter bag is a throw-away type. Throw away the entire filter bag without emptying when it has become full.
NOTICE: When the filter bag is already full, replace with new one. When the dust bag is already full, empty it. Continuous use with the filter bag/dust bag full results in reduced suction power.
NOTICE: To prevent dust from getting into the motor:
- Make sure that the filter bag/dust bag is installed before use.
- Do not use a broken or ripped bag.
Otherwise, the motor may be broken.
NOTICE: Do not fold the cardboard at its open-ing when installing the filter bag/dust bag.
NOTICE: The filter bag/dust bag for the cleaner is an important component for maintaining the appliance performance. Using non-genuine filter bag/dust bag may cause smoke or ignition.
NOTE: When the filter bag/dust bag is not installed in the cleaner, the front cover does not close completely.

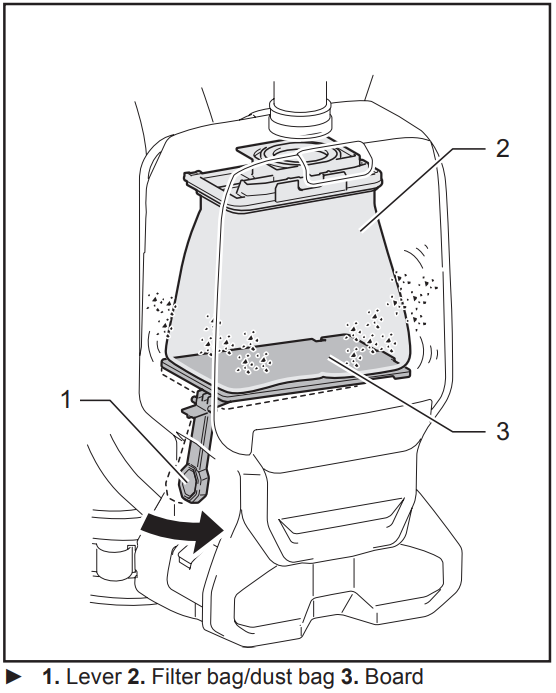
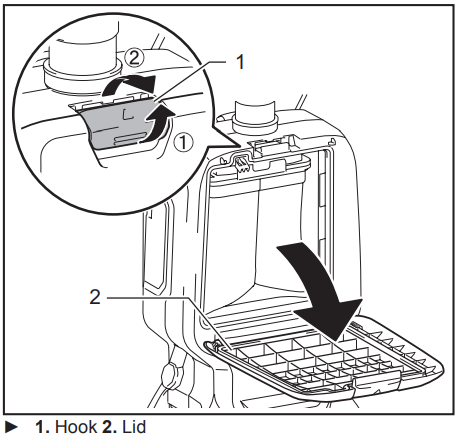
Unlock the latch by lifting the bottom side. Push the grooved area to lift the front latching side. Pull the latch to open the lid.
Insert the filter bag into the slit on the upper side of the room as illustrated.
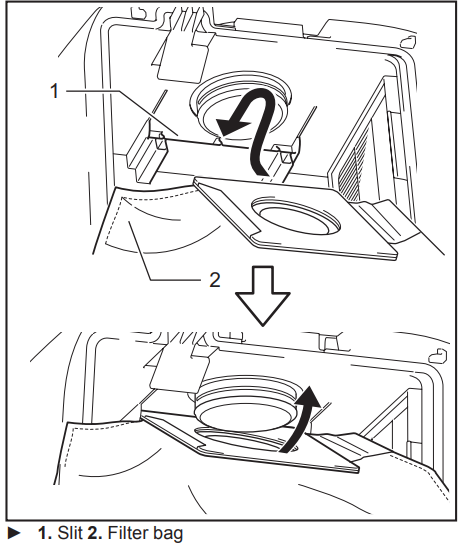
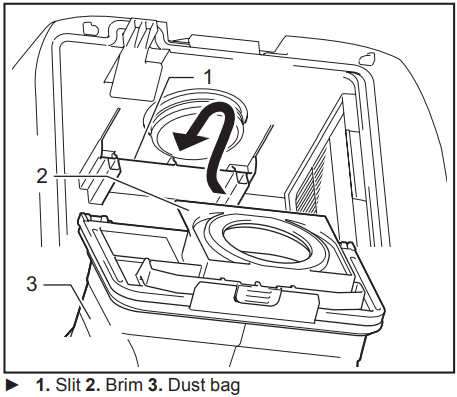
When using the dust bag, insert the brim of the dust bag into the slit.
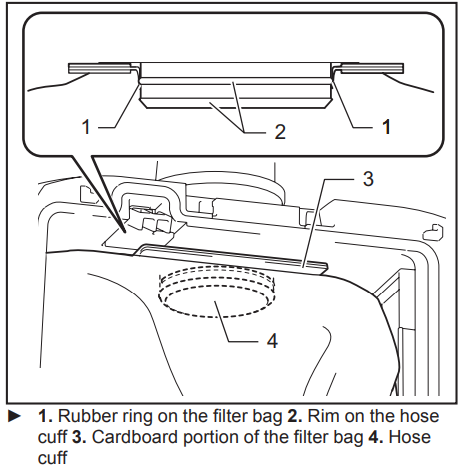
Align the hole of the filter bag with the hose cuff and push the cardboard portion to the end. Make sure that the rubber ring on the filter bag goes over the rim on the hose cuff.
OPERATION
WARNING: Operators shall be adequately instructed on the use of the vacuum cleaner.
WARNING: This vacuum cleaner is not suit-able for picking up hazardous dust.
CAUTION: This cleaner is for dry use only.
CAUTION: This cleaner is for indoor use only.
CAUTION: Always insert the battery cartridge all the way until it locks in place. If you can see the red indicator on the upper side of the button, it is not locked completely. Insert it fully until the red indicator cannot be seen. If not, it may accidentally fall out of the appliance, causing injury to you or someone around you.
CAUTION: During operation, be conscious of the vacuum cleaner on your back. You may lose your balance if the vacuum cleaner body bumps against a wall or the hose is hooked by an obstacles.
Shoulder the vacuum cleaner body and fas-ten upper and lower belts. Adjust the tightness as necessary.
Press
 button to start vacuuming. If you want to change the suction power, press button until the desired suction power is selected. Press
  button to stop.
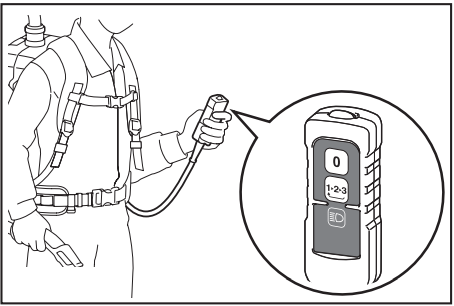
During the operation, hook the switch box on the ring or the lower belt. The hook can be slanted for lighting forward when hooked on the lower belt.
Replace the filter bag when it becomes full. Open the lid and take out the filter bag. Pull the strip on the side of the opening to shut the filter bag and dispose of the filter bag in whole.
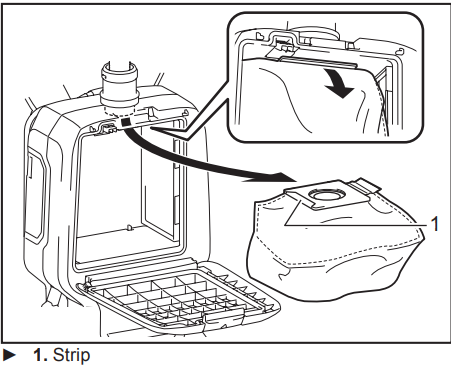
When using a dust bag, take out the dust bag and dis-pose of the dust by releasing the latch.
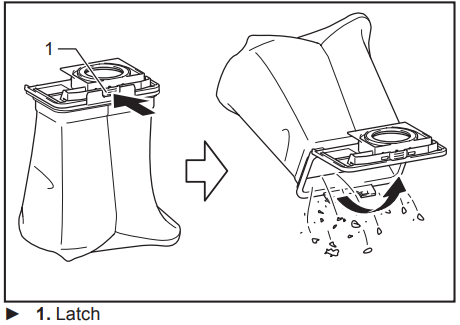
NOTICE: Do not put filter bag/dust bag or other heavy objects on the lid. The appliance may fall down.
NOTICE: Periodically check the filter bag if it is full. Continuous use with the filter bag full results in reduced suction power.
NOTICE: Do not use an used filter bag. The filter bag is designed for single use. Using filter bag repeat-edly may cause clogging of the filter and results in damage to the cleaner. If you want to use the bag repeatedly, use a dust bag.
Setup Guide
To operate the Makita Backpack Vacuum Cleaner XCV17:
- Assembly: Attach the extension wand to the vacuum body and secure it with the provided clips.
- Battery Installation: Insert the 18V LXT battery into the battery slot on the vacuum.
- Dust Bag Installation: Ensure the dust bag is properly attached to the vacuum body.
- Filter Check: Verify that the HEPA filter is securely in place.
- Usage: Put on the backpack, adjust the shoulder straps and waist belt for comfort, and turn on the vacuum using the power button located on the hip belt.
MAINTENANCE
CAUTION: Always be sure that the appliance is switched off and the battery cartridge is removed before attempting to perform inspection or maintenance.
NOTICE: Never use gasoline, benzine, thinner, alcohol or the like. Discoloration, deformation or cracks may result.
To maintain product SAFETY and RELIABILITY, repairs, any other maintenance or adjustment should be performed by Makita Authorized or Factory Service Centers, always using Makita replacement parts.
Cleaning the HEPA filter
CAUTION: Do not use the vacuum cleaner without a filter or continue to use dirty or dam-aged filter. Vacuumed dust or particles may be exhausted from the cleaner and they may cause respiratory disease to the operator.
NOTICE: To keep optimum suction power and clean exhaust, clean the filter periodically. If enough suction power is not obtained even after the cleaning, replace the filter with new one.
NOTICE: To prevent the filter from being damaged, do not use following tools and similar items for cleaning :
- Air duster
- High pressure washer
- Tools made of hard materials such as a metallic brush
Open the lid and take out the filter bag/dust bag. Release the hook on the filter and remove it from the vacuum cleaner body.
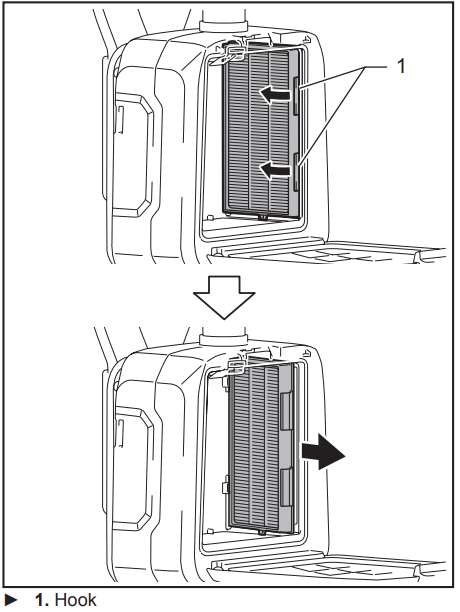
- Beat the dust off from the filter. The filter can be washed with water. Rinse away the dust and particles on the filter every 1 or 2 months. After that, dry the filter completely in a shaded and well-ventilated place to prevent unpleasant odor or malfunctions.
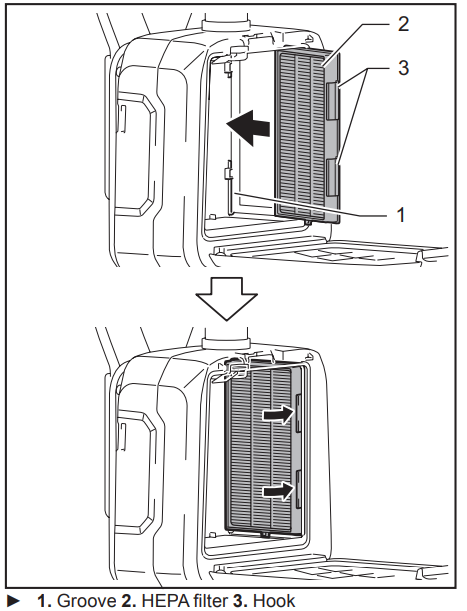
To install the filter, insert the side without the hooks into the groove then push in the filter until the hooks are secured with a click.
Cleaning the dust bag
Regularly clean the dust bag with soap and water. Turn the dust bag inside out and remove the sticky dust. Wash lightly by hand and rinse well with water. Dry completely before installing to the vacuum cleaner.
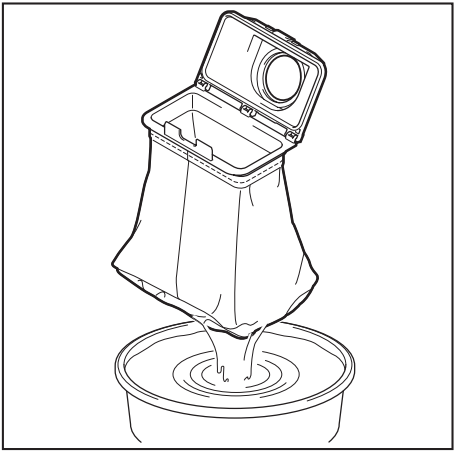
NOTICE: Wet dust bag lowers the vacuuming per-formance as well as the life of the motor.
Cleaning the clog
When cleaning the clog, remove the hose or the exten-sion wand, or the bent pipe assembly to check inside.
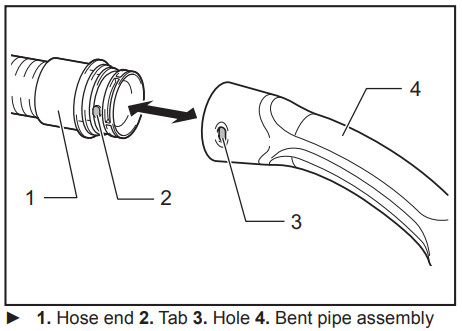
Removing/attaching the snap-on type bent pipe assembly
To remove, pull the bent pipe assembly while pressing both of the tab on the hose end.
To attach, insert the hose end into the bent pipe assem-bly. Make sure that the tabs on the hose end snap into the holes on the bent pipe assembly.
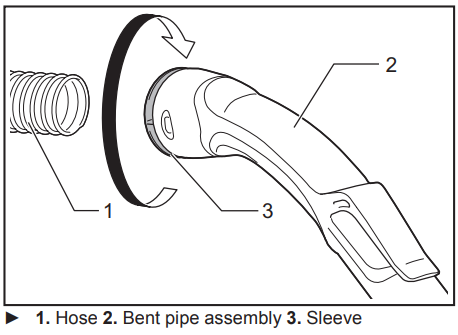
Removing/attaching the screw-in type bent pipe assembly
To remove, loosen the sleeve of bent pipe assembly from the hose.
To attach, fasten the sleeve of bent pipe assembly onto the hose.
Cleaning the room for filter bag/dust bag
When cleaning the room for filter bag/dust bag, remove and wipe the board inside.

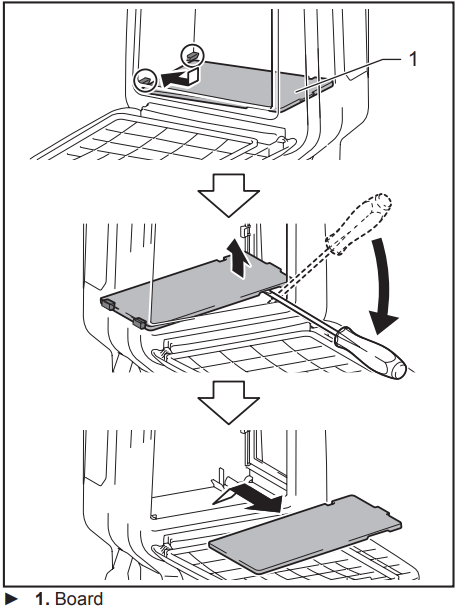
Removing the board
- Remove the HEPA filter. Refer to the section for cleaning the HEPA filter for how to remove.
- Push down the board, and slide it to left until the board touches the wall.
- Lift the right side of the board up and take it out.
The board is supported by three springs. If the springs came off from the board or the lever, reattach them as illustrated.
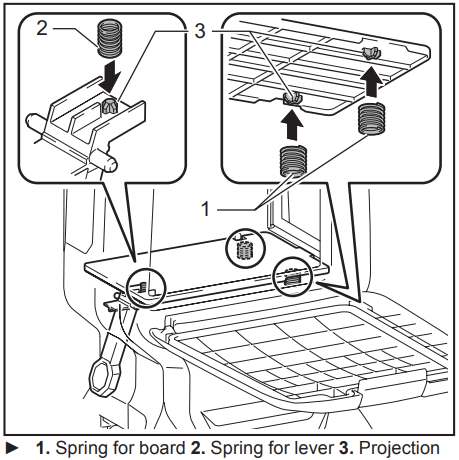
NOTE: Attach the springs securely so that the springs touch the root of the projections.
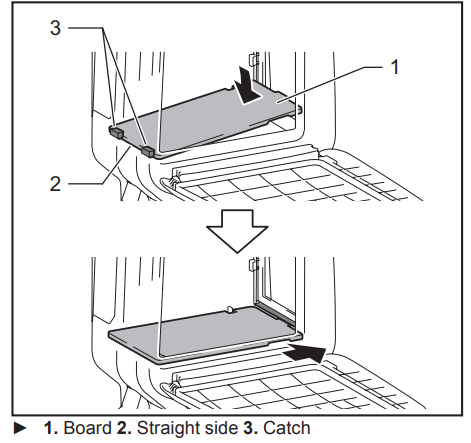
Attaching the board
- Insert the straight side of the board into the catches in the lower left side of the room.
- Put the right side of the board in place.
Makita XCV17 OPTIONAL ACCESSORIES
CAUTION: These accessories or attachments are recommended for use with your Makita prod-uct specified in this manual. The use of any other accessories or attachments might present a risk of injury to persons. Only use accessory or attachment for its stated purpose.
If you need any assistance for more details regard-ing these accessories, ask your local Makita Service Center.
- Hose (for vacuum cleaner type)
- Hose (for dust extraction type)
- Extension wand
- Free nozzle
- T-shape nozzle
- Seat nozzle
- Corner nozzle
- Shelf brush
- Round brush
- Bent pipe assembly
- Filter bag
- Dust bag
- Front cuff
- HEPA filter
- Pipe
- Makita genuine battery and charger
NOTE: Some items in the list may be included in the tool package as standard accessories. They may differ from country to country.
SAFETY WARNINGS
IMPORTANT SAFETY INSTRUCTIONS
When using an electrical appliance, basic precautions should always be followed, including the following:
READ ALL INSTRUCTIONS BEFORE USING THIS APPLIANCE.
WARNING
To reduce the risk of fire, electric shock or injury:
- Do not leave appliance when battery fitted. Remove battery from appliance when not in use and before servicing.
- Do not use on wet surfaces. Do not expose to rain. Store indoors.
- Do not allow to be used as a toy. Close attention is necessary when used by or near children.
- Use only as described in this man-ual. Use only manufacturer's recom-mended attachments.
- Do not use with damaged battery. If appliance is not working as it should, has been dropped, dam-aged, left outdoors, or dropped into water, return it to a service center.
- Do not handle appliance with wet hands.
- Do not put any object into open-ings. Do not use with any opening blocked; keep free of dust, lint, hair, and anything that may reduce air flow.
- Keep hair, loose clothing, fingers, and all parts of body away from openings and moving parts.
- Turn off all controls before removing the battery cartridge.
- Use extra care when cleaning on stairs.
- Do not use to pick up flammable or combustible liquids, such as gaso-line, or use in areas where they may be present.
- Do not pick up anything that is burn-ing or smoking, such as cigarettes, matches, or hot ashes.
- Do not use without dust collecting bag in place.
- Do not charge the battery outdoors.
- Prevent unintentional starting. Ensure the switch is in the off-po-sition before connecting to battery pack, picking up or carrying the appliance. Carrying the appliance with your finger on the switch or energiz-ing appliance that have the switch on invites accidents.
- Disconnect the battery pack from the appliance before making any adjustments, changing accessories, or storing appliance. Such preventive safety measures reduce the risk of starting the appliance accidentally.
- Recharge only with the charger specified by the manufacturer. A charger that is suitable for one type of battery pack may create a risk of fire when used with another battery pack.
- Use appliances only with specifi-cally designated battery packs. Use of any other battery packs may create a risk of injury and fire.
- When battery pack is not in use, keep it away from other metal objects, like paper clips, coins, keys, nails, screws or other small metal objects, that can make a connection from one terminal to another. Shorting the battery terminals together may cause burns or a fire.
- Under abusive conditions, liquid may be ejected from the battery; avoid contact. If contact acciden-tally occurs, flush with water. If liq-uid contacts eyes, additionally seek medical help. Liquid ejected from the battery may cause irritation or burns.
- Do not use a battery pack or appli-ance that is damaged or modified. Damaged or modified batteries may exhibit unpredictable behaviour resulting in fire, explosion or risk of injury.
- Do not expose a battery pack or appliance to fire or excessive tem-perature. Exposure to fire or tem-perature above 130 °C may cause explosion.
- Follow all charging instructions and do not charge the battery pack or appliance outside of the temperature range specified in the instructions. Charging improperly or at temperatures outside of the speci-fied range may damage the battery and increase the risk of fire.
- Have servicing performed by a qualified repair person using only identical replacement parts. This will ensure that the safety of the product is maintained.
- Do not modify or attempt to repair the appliance or the battery pack except as indicated in the instruc-tions for use and care.
SAVE THESE INSTRUCTIONS.
This appliance is intended for commer-cial use.
ADDITIONAL SAFETY RULES
- Read this instruction manual and the charger instruction manual care-fully before use.
- Do not vacuum the following:
- Flammable liquid (kerosene, gasoline, solvents such as ben-zine, thinner, etc.)
- Hot substances that are burning or smoking (cigarettes, matches, incense sticks, candles, hot ashes), sparks and metal dust generated by cutting or grinding metal, etc.
- Flammable material (toner, paint, spray, etc.)
- Foam like carpet cleaning agent, etc.(they may cause explosion or fire)
- Explosive or pyrophoric sub-stances (nitroglycerin, alumi-num, magnesium, titanium, zinc, red phosphorus, yellow phos-phorus, celluloid, etc. and their dust, gas or steam)
- Sharp objects (glass, cutlery, wood splinter, metal, stone, nail, razor, push pin, etc.)
- Solidifying and conductive fine powder (metal or carbon powder)
- Dehumidifier
- Large amount of powder (flour, fire extinguisher powder, etc.)
- Substances that cause toxic symptoms
- Aggressive chemicals (acid, leach, etc.)
- Liquid or damp garbage, includ-ing vomit and excreta
- Asbestos
- Pesticides
Such action may cause fire, injury and/or property damage.
To reduce your exposure to these chemicals, always wear approved respiratory protection such as dust masks that are specially designed to filter out microscopic particles. Direct the exhaust air away from your face and body.
NOTE: Read the OSHA regulation on silica dust to understand the requirements needed to reduce exposure to silica dust at the job-site. Specific rules apply to the drill-ing, demolition cutting and grinding materials that contain silica. All OSHA requirements regarding reducing silica dust can be found at the OSHA website: https://www.osha.gov
- Stop operation immediately if you notice anything abnormal.
- If you drop or strike the cleaner, check it carefully for cracks or dam-age before operation.
- Do not bring close to stoves or other heat sources.
- Do not block the intake hole or vent holes.
Battery tool use and care
- Prevent unintentional starting. Ensure the switch is in the off-po-sition before connecting to battery pack, picking up or carrying the appliance. Carrying the appliance with your finger on the switch or energiz-ing appliance that have the switch on invites accidents.
- Disconnect the battery pack from the appliance before making any adjustments, changing accessories, or storing appliance. Such preventive safety measures reduce the risk of starting the appliance accidentally.
- Recharge only with the charger specified by the manufacturer. A charger that is suitable for one type of battery pack may create a risk of fire when used with another battery pack.
- Use appliances only with specifi-cally designated battery packs. Use of any other battery packs may create a risk of injury and fire.
- When battery pack is not in use, keep it away from other metal objects, like paper clips, coins, keys, nails, screws or other small metal objects, that can make a connection from one terminal to another. Shorting the battery terminals together may cause burns or a fire.
- Under abusive conditions, liquid may be ejected from the battery; avoid contact. If contact acciden-tally occurs, flush with water. If liq-uid contacts eyes, additionally seek medical help. Liquid ejected from the battery may cause irritation or burns.
- Do not use a battery pack or appli-ance that is damaged or modified. Damaged or modified batteries may exhibit unpredictable behavior resulting in fire, explosion or risk of injury.
- Do not expose a battery pack or appliance to fire or excessive tem-perature. Exposure to fire or tem-perature above 130 °C may cause explosion.
- Follow all charging instructions and do not charge the battery pack or appliance outside of the temperature range specified in the instructions. Charging improperly or at temperatures outside of the speci-fied range may damage the battery and increase the risk of fire.
- Have servicing performed by a qualified repair person using only identical replacement parts. This will ensure that the safety of the product is maintained.
- Do not modify or attempt to repair the appliance or the battery pack except as indicated in the instruc-tions for use and care.
Symbols
The followings show the symbols used for tool.
 volts
volts direct current
Important safety instructions for battery cartridge
- Before using battery cartridge, read all instructions and cautionary mark-ings on (1) battery charger, (2) bat-tery, and (3) product using battery.
- Do not disassemble battery cartridge.
- If operating time has become excessively shorter, stop operating immediately. It may result in a risk of overheating, possible burns and even an explosion.
- If electrolyte gets into your eyes, rinse them out with clear water and seek medical attention right away. It may result in loss of your eyesight.
Do not short the battery cartridge:
- Do not touch the terminals with any conductive material.
- Avoid storing battery cartridge in a container with other metal objects such as nails, coins, etc.
- Do not expose battery cartridge to water or rain.
A battery short can cause a large current flow, overheating, possible burns and even a breakdown.
- Do not store the tool and battery cartridge in locations where the temperature may reach or exceed 50 °C (122 °F).
- Do not incinerate the battery car-tridge even if it is severely damaged or is completely worn out. The bat-tery cartridge can explode in a fire.
- Be careful not to drop or strike battery.
- Do not use a damaged battery.
- The contained lithium-ion batteries are subject to the Dangerous Goods Legislation requirements. For commercial transports e.g. by third parties, forwarding agents, special requirement on packaging and labeling must be observed.
For preparation of the item being shipped, consulting an expert for hazardous material is required. Please also observe possibly more detailed national regulations. Tape or mask off open contacts and pack up the battery in such a man-ner that it cannot move around in the packaging. - Follow your local regulations relat-ing to disposal of battery.
- When disposing the battery car-tridge, remove it from the tool and dispose of it in a safe place.
- Use the batteries only with the prod-ucts specified by Makita. Installing the batteries to non-compliant products may result in a fire, excessive heat, explosion, or leak of electrolyte.
- If the tool is not used for a long period of time, the battery must be removed from the tool.
SAVE THESE INSTRUCTIONS.
CAUTION: Only use genuine Makita batteries. Use of non-genuine Makita batteries, or batteries that have been altered, may result in the battery bursting causing fires, personal injury and damage. It will also void the Makita warranty for the Makita tool and charger.
Tips for maintaining maximum battery life
- Charge the battery cartridge before completely discharged. Always stop tool operation and charge the battery cartridge when you notice less tool power.
- Never recharge a fully charged battery car-tridge. Overcharging shortens the battery service life.
- Charge the battery cartridge with room tem-perature at 10 °C - 40 °C (50 °F - 104 °F). Let a hot battery cartridge cool down before charging it.
- Charge the battery cartridge if you do not use it for a long period (more than six months).
Troubleshooting
No Power: Check if the battery is fully charged or if it is properly installed.
- Reduced Suction: Clean or replace the filter if clogged. Ensure the dust bag is not full.
- Noisy Operation: Inspect for blockages in the hose or wand. Clean or replace worn-out parts.
- Warning: Always wear protective gear including gloves and safety glasses when operating power tools.
MAKITA WARRANTY
Please refer to the annexed warranty sheet for the most current warranty terms applicable to this product. If annexed warranty sheet is not available, refer to the warranty details set forth at below website for your respective country https://www.makitatools.com
WARNING
Some dust created by power sanding, sawing, grinding, drilling, and other construction activities contains chemicals known to the State of California to cause cancer, birth defects or other reproductive harm. Some examples of these chemicals are:
- lead from lead-based paints,
- crystalline silica from bricks and cement and other masonry products, and
- arsenic and chromium from chemically-treated lumber.
Your risk from these exposures varies, depending on how often you do this type of work. To reduce your exposure to these chemicals: work in a well ventilated area, and work with approved safety equipment, such as those dust masks that are specially designed to filter out microscopic particles.
Pros & Cons
Pros
- Powerful Suction: Effective at cleaning large areas quickly.
- Comfortable Design: Ergonomic backpack design reduces fatigue.
- Versatile Attachments: Includes various tools for different cleaning tasks.
- HEPA Filter: Captures allergens and dust particles efficiently.
Cons
- High Price Point: More expensive than some other vacuum cleaners on the market.
- Battery Life: May require frequent recharging for extended use.
- Noisy Operation: Can be loud during use, though within acceptable limits.
Customer Reviews
Customers have praised the Makita XCV17 for its robust performance and comfort. Many have noted its effectiveness in commercial settings and large residential cleaning tasks. However, some users have mentioned that the battery life could be improved and that it can be noisy during operation.
The most common complaints include the need for more frequent battery recharges and the initial cost of the product. Despite these, users generally appreciate its reliability and versatility.
Faqs
What is the battery life of the Makita Backpack?
Is the Makita Backpack Vacuum Cleaner XCV17 suitable for hard floors?
How often should I clean the filter of my Makita Backpack Vacuum Cleaner?
What are the dimensions and weight of the Makita?
Does the Makita Backpack Vacuum Cleaner XCV17come with a warranty?
Can I use this vacuum cleaner for small spaces?
How do I store my Backpack Vacuum Cleaner when not in use?
Is the Makita noisy during operation?
Can I purchase additional batteries for my Makita Backpack Vacuum Cleaner XCV17?
Leave a Comment