Makita Brushless Earth Auger XGD01 Instruction Manual
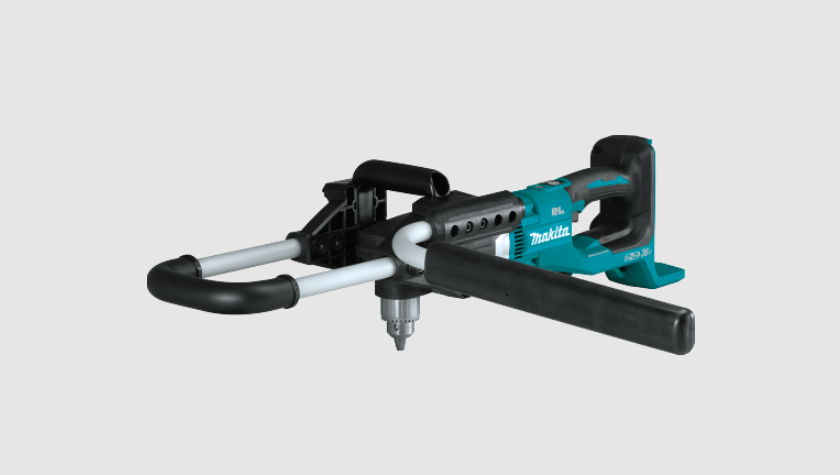
Content
Introduction
The Makita Brushless Earth Auger XGD01 is a powerful, cordless tool designed for efficient digging in various soil conditions. Featuring a robust 36V (18V X2) brushless motor, it can drill holes up to 8 inches wide and 41 inches deep, making it ideal for tasks like fence installation and large planting jobs. With two speed settings (0-350 RPM and 0-1,400 RPM) and Automatic Speed Change™ technology, it adapts to different drilling needs. The price for the XGD01 is approximately $499, reflecting its advanced features and performance.
SPECIFICATIONS
Model: | XGD01 | |
No load speed | High | 0 - 1,400 /min |
Low | 0 - 350 /min | |
Drilling capacities | For sandy soil: 200 mm (7-7/8") For clay soil: 150 mm (5-7/8") | |
Overall length | 840 mm (33") | |
Rated voltage | D.C. 36 V | |
Net weight | 7.3 - 8.2 kg (16.1 - 18.1 lbs) | |
- Due to our continuing program of research and development, the specifications herein are subject to change without notice.
- Specifications may differ from country to country.
- The weight may differ depending on the attachment(s), including the battery cartridge. The lightest and heavi-est combination, according to EPTA-Procedure 01/2014, are shown in the table.
Applicable battery cartridge and charger
Battery cartridge | BL1815N / BL1820B / BL1830 /BL1830B / BL1840B / BL1850B / BL1860B |
Charger | DC18RC / DC18RD / DC18RE / DC18SD / DC18SE / DC18SF / DC18SH |
- Some of the battery cartridges and chargers listed above may not be available depending on your region of residence.
WARNING: Only use the battery cartridges and chargers listed above. Use of any other battery cartridges and chargers may cause injury and/or fire.
INITIAL SETTING
CAUTION: Always be sure that the tool is switched off and the battery cartridge is removed before carrying out any work on the tool.
PARTS DESCRIPTION
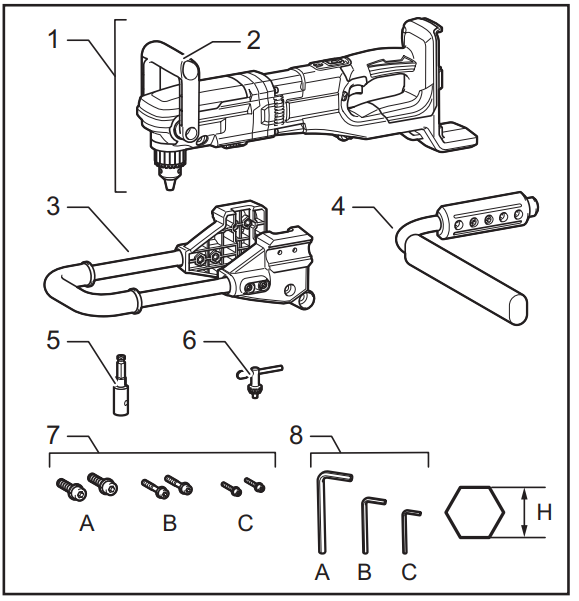
1 | Main tool | 2 | Front handle |
3 | Side handle | 4 | Reaction receiver |
5 | Bit adapter | 6 | Chuck key |
7 | Bolt | 8 | Wrench |
Specifications of the bolt / wrench
- | Nominal diameter of the bolt | Wrench size (H) |
A | M 12 | 10 mm (3/8") |
B | M 8 | 6 mm (1/4") |
C | M 6 | 5 mm (3/16") |
NOTE: The type of the bit adapter varies depending on the country.
Makita Brushless Earth Auger XGD01 Setting up the tool
CAUTION: Always be sure that the side handle and the reaction receiver are installed securely before operation.
NOTICE: Do not over tighten the bolts. It may damage the tool.
Installing the side handle
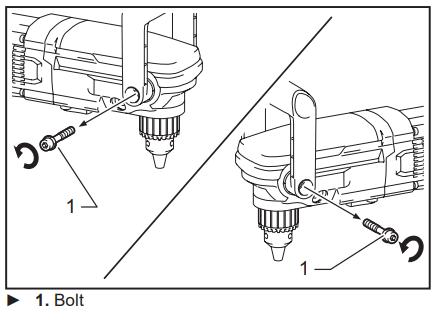
Remove the bolts shown in the figure from the tool. The removed bolt is not needed for this tool if you want to use this tool as a cordless earth auger.
Keep the bolts so that they are not lost.
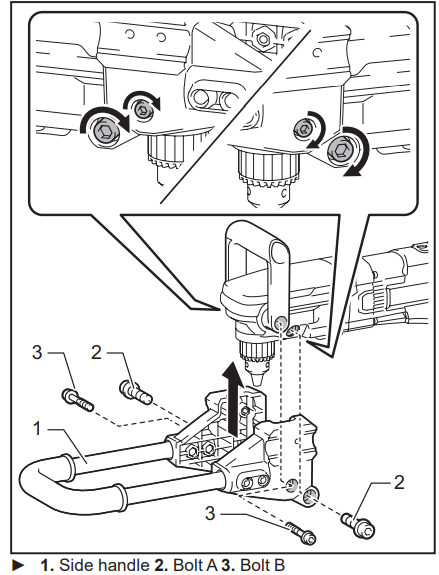
Place the side handle on the tool.
Tighten the all four bolts temporarily, and then securely tighten the bolts using the wrench.
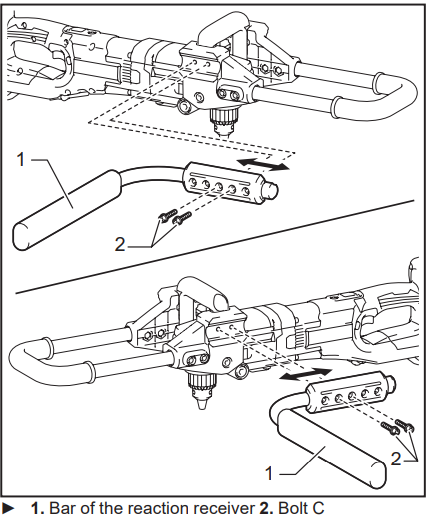
Installing the reaction receiver
Place the reaction receiver so that the bar of the reac-tion receiver comes to the left side of the operator. Adjust the position of the reaction receiver so that the axis of the drill chuck is in the center of the operator's body. Fasten the bolts firmly.
FUNCTIONAL DESCRIPTION
CAUTION: Always be sure that the tool is switched off and the battery cartridge is removed before adjusting or checking function on the tool.
Indicating the remaining battery capacity
Only for battery cartridges with the indicator
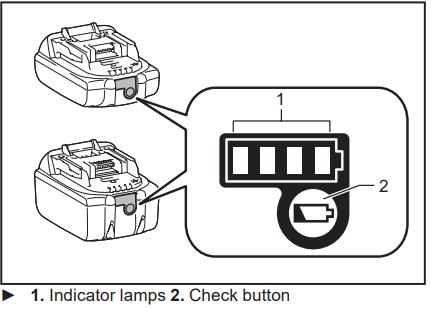
Press the check button on the battery cartridge to indi-cate the remaining battery capacity. The indicator lamps light up for a few seconds.
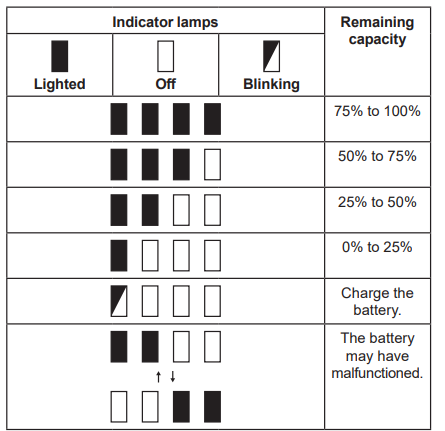
NOTE: Depending on the conditions of use and the ambient temperature, the indication may differ slightly from the actual capacity.
NOTE: The first (far left) indicator lamp will blink when the battery protection system works.
Tool / battery protection system
The tool is equipped with a tool/battery protection sys-tem. This system automatically cuts off power to the motor to extend tool and battery life. The tool will auto-matically stop during operation if the tool or battery is placed under one of the following conditions:
Overload protection
When the tool/battery is operated in a manner that causes it to draw an abnormally high current, the tool stops automatically. In this situation, turn the tool off and stop the application that caused the tool to become overloaded. Then turn the tool on to restart.
Overheat protection
When the tool/battery is overheated, the tool stops automatically. In this situation, let the tool/battery cool before turning the tool on again.
Overdischarge protection
When the battery capacity is not enough, the tool stops automatically. In this case, remove the battery from the tool and charge the battery.
Main power switch
WARNING: Always turn off the main power switch when not in use.
To stand by the tool, press the main power button until the main power lamp lights up. To turn off, press the main power button again.
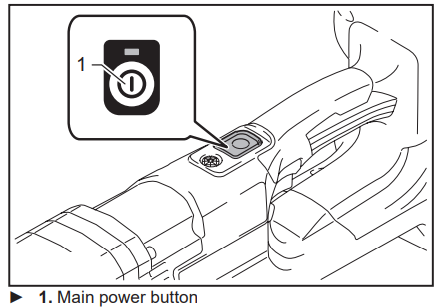
NOTE: This tool employs the auto power-off function. To avoid unintentional start up, the main power switch will automatically shut down when the switch trigger is not pulled for a certain period after the main power switch is turned on.
Switch action
CAUTION: Before installing the battery car-tridge into the tool, always check to see that the switch trigger actuates properly and returns to the "OFF" position when released.
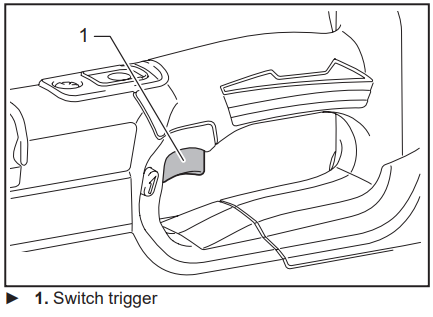
To start the tool, pull the switch trigger with the main power switch on. Tool speed is increased by increasing pressure on the switch trigger. Release the switch trigger to stop.
NOTE: The tool automatically stops if you keep pull-ing the switch trigger for about 6 minutes.
Electric brake
This tool is equipped with an electric brake. If the tool consistently fails to quickly stop after the switch trigger is released, have the tool serviced at a Makita service center.
Lighting up the front lamp
CAUTION: Do not look in the light or see the source of light directly.
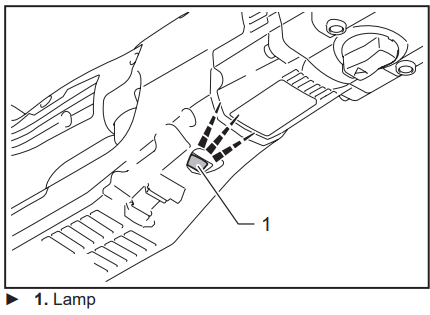
Pull the switch trigger to light up the lamp. The lamp keeps on lighting while the switch trigger is being pulled. The lamp goes out approximately 10 seconds after releasing the switch trigger.
NOTE: When the tool is overheated, the tool stops automatically and the lamp starts flashing. In this case, release the switch trigger. The lamp turns off in 5 minute.
NOTE: Use a dry cloth to wipe the dirt off the lens of the lamp. Be careful not to scratch the lens of lamp, or it may lower the illumination.
Reversing switch action
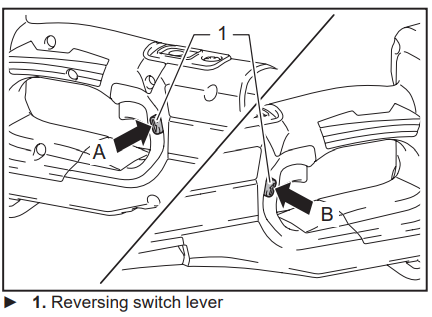
CAUTION: Always check the direction of rotation before operation.
CAUTION: Use the reversing switch only after the tool comes to a complete stop. Changing the direc-tion of rotation before the tool stops may damage the tool.
CAUTION: When not operating the tool, always set the reversing switch lever to the neutral position.
This tool has a reversing switch to change the direction of rotation. Depress the reversing switch lever from the A side for clockwise rotation or from the B side for coun-terclockwise rotation.
When the reversing switch lever is in the neutral posi-tion, the switch lever cannot be pulled.
Automatic speed change function
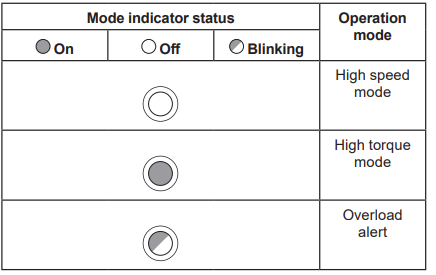
This tool has "high speed mode" and "high torque mode".
The tool automatically changes the operation mode depending on the work load. When the work load is low, the tool will run in the "high speed mode" for quicker operation. When the work load is high, the tool will run in the "high torque mode" for powerful operation.
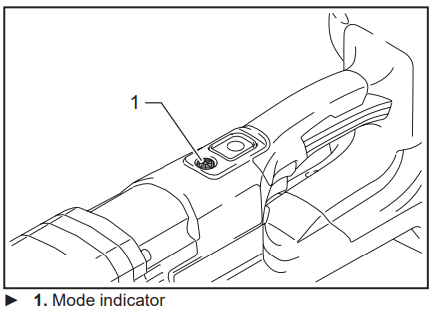
The mode indicator lights up in green when the tool is running in "high torque mode".
If the tool is operated with excessive load, the mode indicator will blink in green. The mode indicator stops blinking and then lights up or turns off if you reduce the load on the tool.
Speed change
NOTICE: Use the tool at low speed (position 1). Otherwise the digging operation may not be able to complete due to insufficient torque.
NOTICE: Use the speed change knob only after the tool comes to a complete stop. Changing the tool speed before the tool stops may damage the tool.
NOTICE: Always set the speed change knob carefully into the correct position. If you operate the tool with the speed change knob positioned half-way between the position 1 and the position 2, the tool may be damaged.
Two speed ranges can be preselected with the speed change knob.
To change the speed, depress the lock button and turn the speed change knob so that the pointer points to the position 1 for low speed or the position 2 for high speed.
Torque limiter
The torque limiter will actuate when a certain torque level is reached at the low speed setting (position 1). The motor will disengage from the output shaft. When this happens, the drill bit will stop turning.
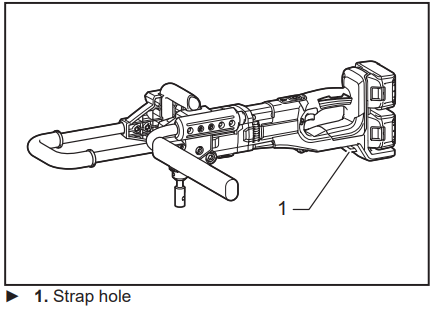
Strap hole
WARNING: Do not use the strap hole for any other purpose than hanging the tool or than anti-theft of the tool. Otherwise personal injury may occur.
ASSEMBLY
Installing or removing battery cartridge
CAUTION: Always switch off the tool before installing or removing of the battery cartridge.
CAUTION: Hold the tool and the battery car-tridge firmly when installing or removing battery cartridge. Failure to hold the tool and the battery cartridge firmly may cause them to slip off your hands and result in damage to the tool and battery cartridge and a personal injury.
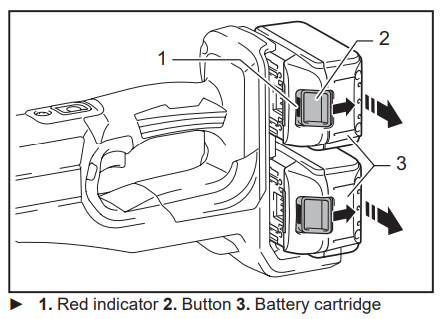
To remove the battery cartridge, slide it from the tool while sliding the button on the front of the cartridge.
To install the battery cartridge, align the tongue on the battery cartridge with the groove in the housing and slip it into place. Insert it all the way until it locks in place with a little click. If you can see the red indicator on the upper side of the button, it is not locked completely.
CAUTION: Always install the battery cartridge fully until the red indicator cannot be seen. If not, it may accidentally fall out of the tool, causing injury to you or someone around you.
CAUTION: Do not install the battery cartridge forcibly. If the cartridge does not slide in easily, it is not being inserted correctly.
Mounting the auger bit
CAUTION: Always be sure that the tool is switched off and the battery cartridge is removed before carrying out any work on the tool.
CAUTION: When installing the bit adapter to the chuck, make sure that the bit adapter is fully inserted.
CAUTION: When attaching the auger bit to the bit adapter, make sure that the auger pin is locked and inspect the auger pin for any damages.
CAUTION: When carrying the tool, remove the auger bit from the tool.
Installing or removing the bit adapter
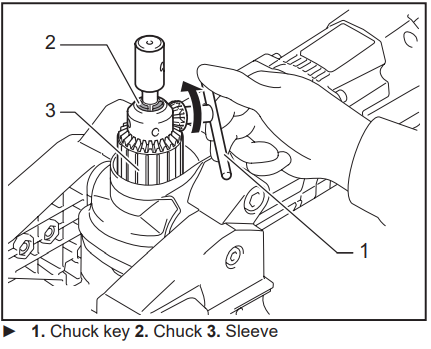
- To mount the auger bit, install the bit adapter in advance.
- To install the bit adapter, place the bit adapter in the chuck as far as it will go. Tighten the chuck by rotating the sleeve by hand.
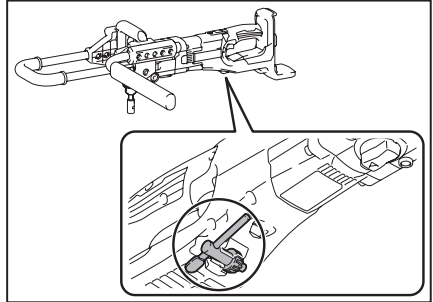
- Place the chuck key in the chuck hole and tighten clock-wise. Be sure to tighten all three chuck holes evenly. To remove the bit adapter, turn the chuck key counter-clockwise in just one hole, then loosen the chuck by hand.
After use, return the chuck key to the storage cavity on the tool as illustrated.
Mounting the auger bit on the bit adapter
NOTE: The shape and mechanism of the auger bit and the auger pin may vary depending on your auger bit.
Align the hole on the bit adapter with the hole on the auger bit.
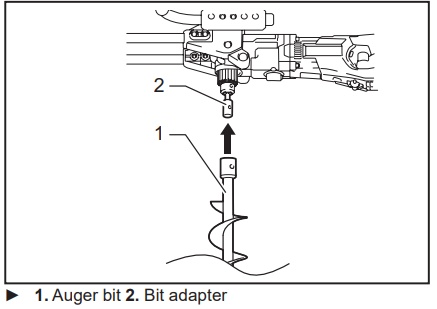
- Put the auger bit onto the bit adapter.
Fix the auger bit with the auger pin and the safety lock.
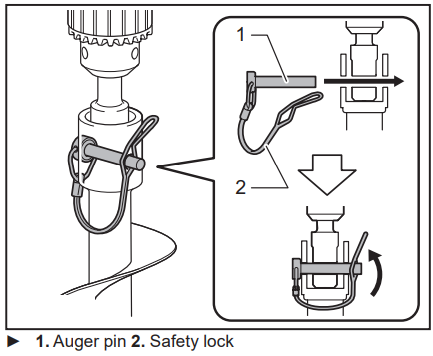
OPERATION
CAUTION: This is a powerful tool whitch generates high torque. It is important that the tool is securely held and properly braced.
CAUTION: Before operating, check that there is no foreign matter (sand, dirt, etc.) stuck in the openings or moving parts.
Work posture
Maintaining proper operating position is one of the most important and effective procedures for controlling kickback. Keep proper positioning by practicing the following points.
- Position the tool so that the bar of the reaction receiver always contacts on the left side of your waist.
- Grasp the handle and the side handle with both hands. Wrap your fingers around the gripping areas, keeping the gripping areas cradled between your thumbs and forefingers.
- Keep your back as vertical as possible by bending the legs as required during the digging process.
- Stay alert to the torque reaction force of the tool. Always keep the operating position that you can withstand the torque reaction force.
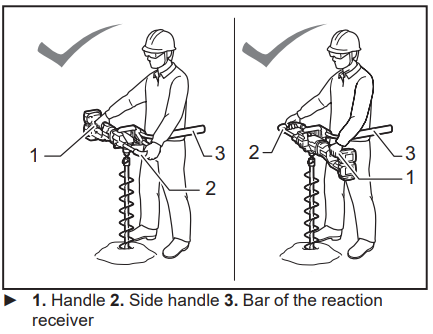
WARNING: Avoid improper positioning. Do not stand too far from the tool. Proper reaction and control may not be achieved in the event of kickback.
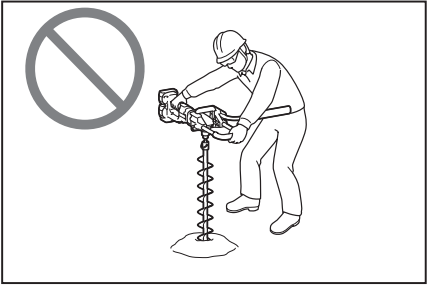
Digging operation
CAUTION: Hold the tool firmly when operat-ing the tool.
CAUTION: When leaving the tool, such as during a break, do not leave the tool stabbed in the ground or lean it against a wall. Store the tool in a stable condition.
NOTICE: When the rotation speed comes down extremely, reduce the load or stop the tool to avoid the tool damage.
NOTICE: Pressing excessively on the tool will not speed up the digging. In fact, this excessive pressure will only serve to damage the tip of the auger bit, decrease the tool performance and shorten the service life of the tool.
NOTICE: Avoid digging in material that you suspect contains hidden nails or other things that may cause the auger bit to bind or break.
NOTICE: If the tool is operated continuously until the battery cartridge has depleted, allow the tool to rest for 15 minutes before proceeding with a fresh battery.
- When digging a deep hole or digging in clay soil, do not try to dig at once. Dig the hole by lifting up and down the tool so that the soil in the hole can be discharged.
- If the rotation speed of the tool slows down due to high load operation, lift the tool up little, and move the tool up and down to dig in small steps.
When rotating the auger bit in reverse
A stuck auger bit can be removed simply by setting the reversing switch to reverse rotation in order to back out. When reversing, brace the tool by your body to prevent a clockwise reaction.
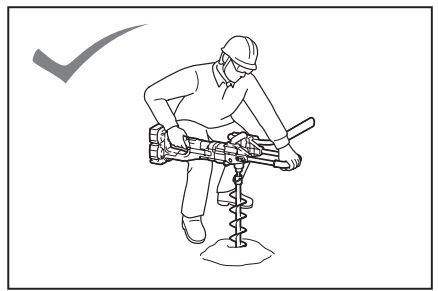
CAUTION: Hold the tool firmly. The tool may back out abruptly and cause an injury.
Setup Guide
To operate the Makita Brushless Earth Auger XGD01:
- Assembly: Attach the auger bit securely to the tool's shaft. Ensure all connections are tight before use.
- Battery Installation: Insert the 18V LXT Lithium-Ion battery into the tool's battery slot until it clicks into place.
- Speed Control: Use the variable speed control to adjust the auger's speed based on your task requirements.
- Safety Precautions: Always wear protective gear including gloves, safety glasses, and a dust mask when operating the auger.
MAINTENANCE
CAUTION: Always be sure that the tool is switched off and the battery cartridge is removed before attempting to perform inspection or maintenance.
NOTICE: Never use gasoline, benzine, thinner, alcohol or the like. Discoloration, deformation or cracks may result.
To maintain product SAFETY and RELIABILITY, repairs, any other maintenance or adjustment should be performed by Makita Authorized or Factory Service Centers, always using Makita replacement parts.
OPTIONAL ACCESSORIES
CAUTION: These accessories or attachments are recommended for use with your Makita tool specified in this manual. The use of any other accessories or attachments might present a risk of injury to persons. Only use accessory or attachment for its stated purpose.
If you need any assistance for more details regard-ing these accessories, ask your local Makita Service Center.
- Auger bits
- Bit adapter
- Makita genuine battery and charger
NOTE: Some items in the list may be included in the tool package as standard accessories. They may differ from country to country.
Makita Brushless Earth Auger XGD01 Troubleshooting
- Common Problems:
- Dead Battery: Ensure the battery is fully charged before use.
- Jammed Auger Bit: Clear any debris from the auger bit and ensure it is properly seated.
- Motor Overheating: Allow the tool to cool down periodically during extended use.
- Solutions:
- Recharge Battery: Use a Makita charger to recharge the battery.
- Clear Auger Bit: Use gloves and a wrench to clear debris from the auger bit.
- Cool Down: Stop using the tool for a few minutes to allow it to cool down.
- Instructions Warnings:
- Always follow safety guidelines provided in the user manual.
- Avoid using the tool in wet or icy conditions.
- Keep children and pets away from the working area.
MAKITA WARRANTY
Please refer to the annexed warranty sheet for the most current warranty terms applicable to this product. If annexed warranty sheet is not available, refer to the warranty details set forth at below website for your respective country.
Pros & Cons
Pros
- Efficient Brushless Motor: Provides longer battery life and reduced maintenance.
- Variable Speed Control: Allows for optimal performance in different soil conditions.
- Ergonomic Design: Comfortable grip and balanced weight distribution reduce user fatigue.
- Long Battery Life: Completes multiple tasks on a single charge.
Cons
- Weight: May be heavy for some users, especially during extended use.
- Cost: Higher price point compared to some other augers on the market.
- Battery Compatibility: Requires Makita 18V LXT Lithium-Ion batteries, which may be an additional expense if not already owned.
Customer Reviews
Customers have praised the Makita Brushless Earth Auger XGD01 for its powerful performance and ease of use. Many appreciate the variable speed control and long battery life, which make it suitable for various landscaping tasks. However, some users have noted that it can be heavy and expensive.
Most Common Complaints
- Weight: Some users find it too heavy for prolonged use.
- Cost: Higher than other similar products on the market.
Faqs
What is the power source of the Makita Brushless Earth Auger XGD01?
How long does the battery last on a single charge?
What are the dimensions of the Makita XGD01?
Is this auger suitable for drilling in hard soil?
What safety precautions should I take when using this auger?
How do I assemble and set up the Makita Brushless Earth Auger XGD01?
What if my auger bit gets jammed?
Why is my Makita Brushless Earth Auger XGD01 overheating?
What warranty does this product come with?
Leave a Comment
