Maxxima Slide Dimmer Rocker Switch 0-10V User Guide
Content

Maxxima Slide Dimmer Rocker Switch 0-10V Introduction
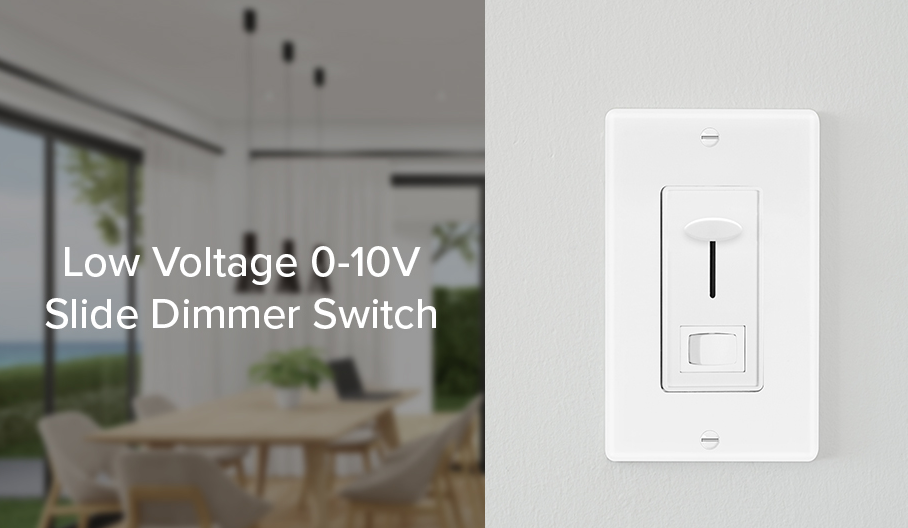
The Maxxima Slide Dimmer Rocker Switch 0-10V is an advanced lighting control solution designed for modern homes and commercial spaces. This dimmer switch allows users to adjust the brightness of compatible LED, fluorescent, and incandescent lights smoothly, enhancing ambiance and energy efficiency. Its sleek rocker design fits seamlessly into standard wall plates, making installation straightforward. Priced at approximately $30, it offers an affordable way to upgrade your lighting control system with precision and ease.
Detailed Specifications
- Dimming Range: 0-10V
- Compatibility: Works with LED, incandescent, halogen, and fluorescent lights
- Power Rating: Up to 500W
- Wiring: Simple 2-wire installation
- Material: Durable plastic with a smooth sliding mechanism
- Dimensions: 4.5 inches x 2.75 inches x 1 inch
Installing the Dimmer by itself or with other devices
If installing Dimmer in a single device application, proceed with Step 1. If installing Dimmer in a multi-device application, proceed as follows:
MULTI-DEVICE APPLICATION
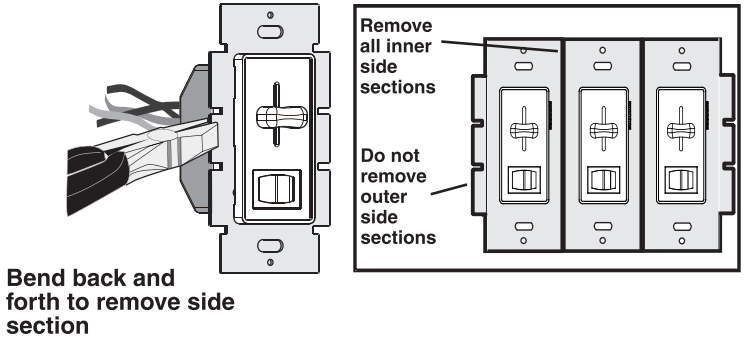
NOTE: You only need to remove side sections if installing with other dimmers or if it does not fit in wall box - not when installing with mechanical switches. When installing more than one dimmer in the same location, the side sections of the mounting strap must be removed. Use pliers to carefully bend side sections back and forth until they break off.
Installation
Step 1
WARNING: TO AVOID FIRE, SHOCK, OR DEATH; TURN OFF POWER at circuit breaker or fuse and test that power is off before wiring!
Step 2
Identifying your wiring application (most common):
NOTE: If the wiring in the wall box does not resemble any of these configurations, consult an electrician.
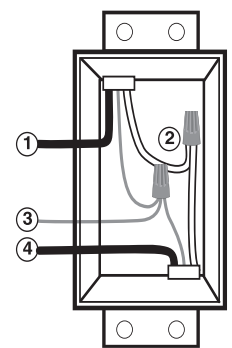
Single-Pole- Line (Hot)
- Neutral
- Ground
Load
3-Way
- Line or Load Common
(See important instruction below) - Neutral
- Ground
- First Traveler
Second Traveler
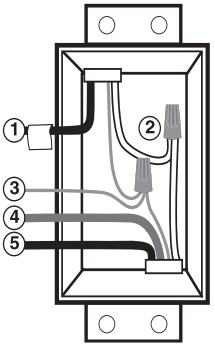
IMPORTANT: For 3-way applications, note that one of the screw terminals from the old switch being removed will usually be a different color (Black) or labeled Common. Tag that wire with electrical tape and identify as the common (Line or Load) in both the dimmer wall box and the standard 3-way switch wall box. The remaining two wires on the brass or lighter screws screw terminals of the old switch are the travelers.
- Step 3
Preparing wires:
NOTE: Ensure that low-voltage wiring (for the Gray and Violet connection of the dimmer) is installed at wall box that will house the Dimmer.- Pull off pre-cut insulation from Dimmer Leads
- Make sure that the ends of the wires from the wall box are straight (cut if necessary).
- For Single-Pole Application, go to Step 4A.
- For the 3-Way Application, go to Step 4B.
Step 4A
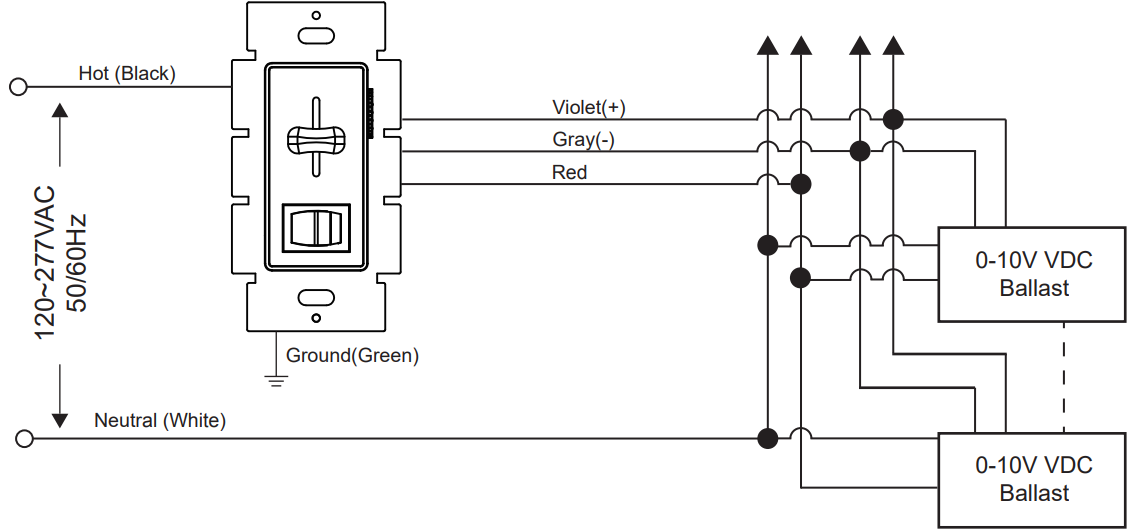
Single-Pole Wiring Application: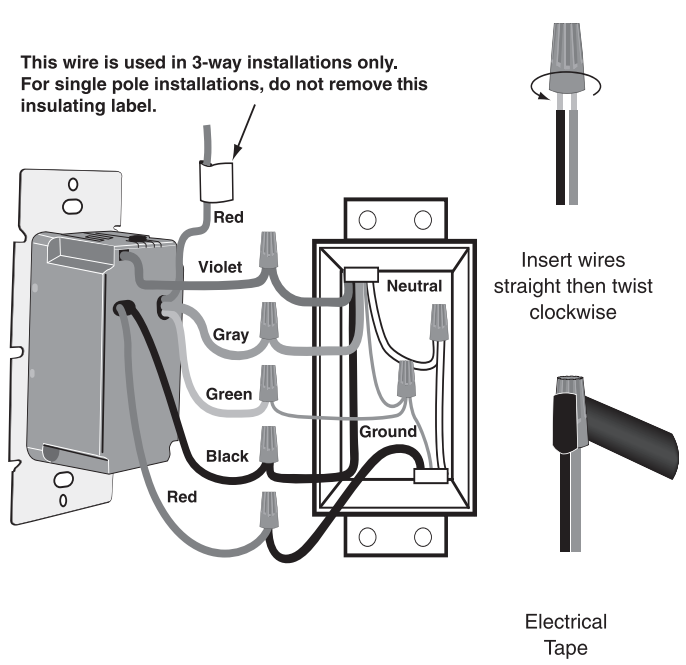
Connect wires per WIRING DIAGRAM A as follows:
Screw wire nuts on clockwise making sure no bare conductors show below the wire connectors. Secure each connector with electrical tape.- Green dimmer Ground leads, to the Green or bare copper wire in the wall box.
- Black dimmer leads to Line Hot wall box wire.
- Red dimmer leads without insulating label to Load wall box wire.
- The remaining Red dimmer lead should have a Red insulation label affixed.
NOTE: If the insulating label is not affixed to the Red lead, use a small wire nut or electrical tape to cap it off. - Violet dimmer leads to (+) Violet connection on the ballast.
- Gray dimmer leads to (-) Gray connection on ballast.
Step 4B
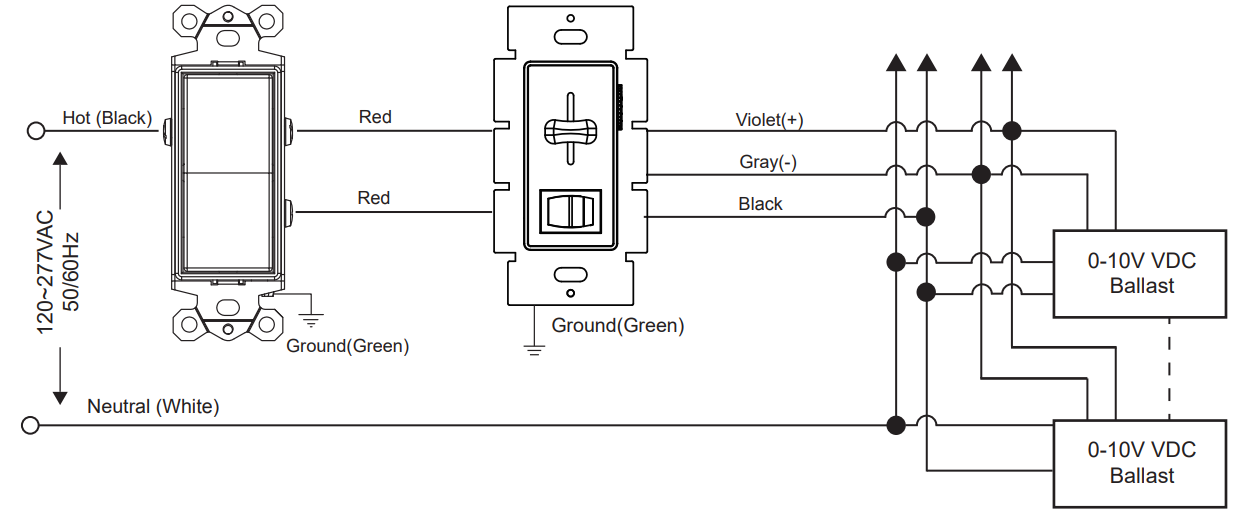
3-Way Wiring Application: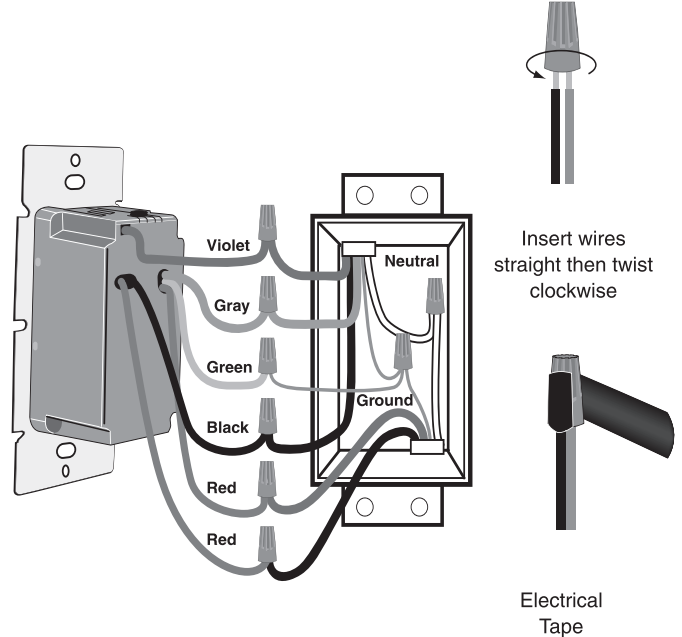
Connect wires per WIRING DIAGRAM B as follows:
Screw wire nuts on clockwise making sure no bare conductors show below the wire connectors. Secure each connector with electrical tape.
NOTE: Dimmer can be installed on either the Load or Line side.
NOTE: Ensure that low-voltage wiring (for Gray and Violet connection of dimmer) is installed at wallbox that will house the Dimmer.- Green dimmer Ground lead to Green or bare copper wire in wall box.
- Black dimmer lead to tagged (common) wall box wire identified in step 2.
- Remove Red insulating label from Red lead.
- First Traveler wall box wire identified in step 2 to any red dimmer lead.
- Second Traveler wall box wire identified in step 2 to the remaining red dimmer lead.
- Violet dimmer lead to (+) Violet connection on ballast.
- Gray dimmer lead to (-) Gray connection on ballst
Step 5
Dimmer Mounting: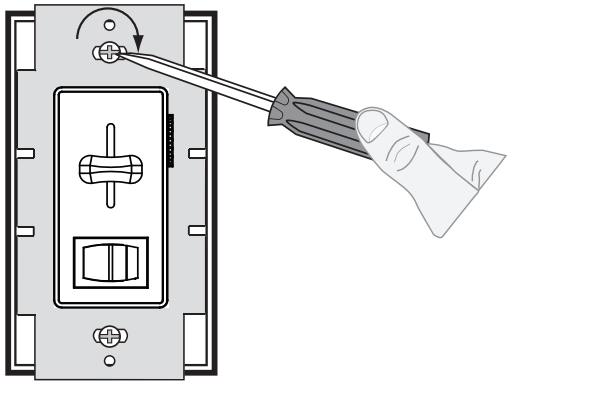
Installation may now be completed by carefully positioning all wires to provide room in wall box for dimmer. Mount dimmer into box with mounting screws supplied. Attach wallplate.
- Step 6
Restore Power:
Restore power at circuit breaker or fuse. Installation is complete.
Description
The Maxxima Slide Dimmer Rocker Switch 0-10V features a robust design that ensures long-lasting performance and reliability. The smooth slide mechanism allows for precise control over lighting levels, making it easy to set the desired brightness with minimal effort. This switch is also designed with safety in mind, featuring overload protection and heat dissipation to prevent overheating.
The user-friendly interface includes clear markings for different brightness levels, making it intuitive to use even in low-light conditions. Additionally, its compact size fits standard electrical boxes, ensuring a seamless integration into any wall space.
Maxxima Slide Dimmer Rocker Switch 0-10V OPERATION
NOTE: If using the dimmer in a 3-way application, the lights will turn ON at brightness set on dimmer's slide control lever. The lights can be controlled from either the dimmer or the switch location.
ON/OFF
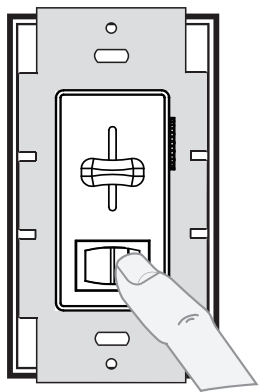
- Depress button switch to ON position - Lights will turn ON.
- Depress button switch to OFF position - Lights will turn OFF.
- BRIGHTEN & DIM: Move slider control lever - Lights will BRIGHTEN or DIM.
Setting the MaximumLight Level:
This dimmer features a Max trim adjustment to adjust the maximum light level of the dimmer.
- Locate the "Trim Adjustment" dial on the front of the dimmer
- Rotate the dial clockwise to increase the maximum light level, rotate counter clockwise to reduce the maximum light level.
Setup Guide
To set up the Maxxima Slide Dimmer Rocker Switch 0-10V, follow these steps:
- Turn off the power supply to the circuit at the electrical panel.
- Remove the existing switch plate and disconnect the wires from the old switch.
- Connect the wires to the corresponding terminals on the new dimmer switch (ensure to match black to black and white to white).
- Mount the new switch into the electrical box securely.
- Turn on the power supply and test the dimmer function.
For pairing with smart home systems or other devices, refer to the manufacturer's instructions for specific configuration steps.
Important Notes
Please read before installing (COMPLETE INSTALLATION INSTRUCTIONS CONTINUED ON THE OTHER SIDE)
- CAUTION: Use only permanently installed 120V AC fixtures using a 0-10V dimming circuit. To avoid overheating and possible damage to this device and other equipment, use only with the appropriate LED 0-10V dimmable power supplies/drivers.
- Always use appropriate electrical power verification instruments to verify that the power is OFF before installing the dimmer
- Install in accordance with all national and local electric codes.
- Only use one dimmer in a 3-way circuit.
- When no "grounding means" exists within the wall box then NEC 2008, Article 404-9 allows a dimmer without a grounding connection to be installed as a replacement, as long as a plastic, non-combustable wallplate is used. For this type of installation, cap the green ground wire on the dimmer.
- For new installations, install a test switch before installing the dimmer.
- Protect the dimmer from dust and dirt when painting or spackling.
- Clean the dimmer with a soft, damp cloth only. Do not use any chemical cleaners.
- For indoor use only.
- Mount the dimmer to the wall box using the provided screws. The dimmer must be mounted vertically.
Dimmer Capacity:
Dimmer power output depends on the LED driver power output, the maximum power is the total sum of the loop of LED drivers. The maximum load per driver for multi-devices is noted in the following table:
| Working Voltage | Rated Power | Single Driver | Double Driver | Two Driver Above |
|---|---|---|---|---|
| 120V | 1200VA | 960W | 960W | 960W |
| 277V | 1500VA | 1200W | 1200W | 1200W |
Switch Layout
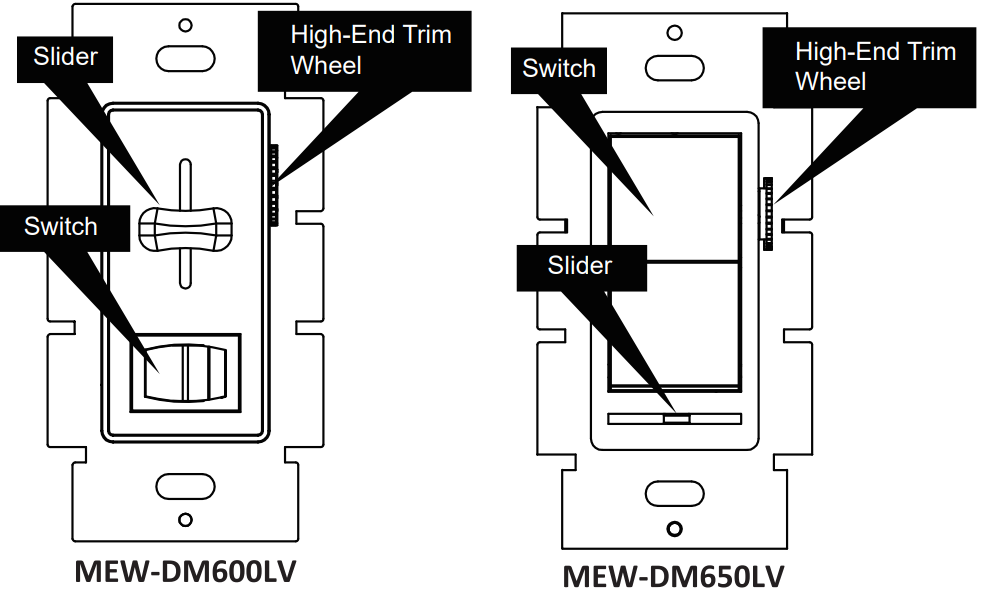
- Switch: Control power on/off
- Slider: Lighting intensity adjustment
- Trim Wheel: Maximum light level adjustment
General Installation Steps, see other side for complete details.
Step 1: Turn off power at circuit breaker or fuse and test that power is off before wiring.
Step 2: Identify wire application: Single Pole or 3-Way Wiring Application.
A: Single-Pole Wiring Application
B: 3-Way wiring Application
Setup different wire pipeline between power line and the 0-10V control line.
Dimmer can be damaged if the power line is connected to 0-10V control line.
Troubleshooting
If you encounter issues with your Maxxima Slide Dimmer Rocker Switch 0-10V, here are some common problems and solutions:
- No Power: Check if power is turned off at the electrical panel or if there is a blown fuse/circuit breaker.
- Dimming Issues: Ensure proper wiring connections and that no loose wires are present.
- Overheating: Reduce load on the switch by lowering total wattage of connected lights.
Always follow safety precautions when working with electrical systems and consult a professional if unsure about any steps.
Pros & Cons about Maxxima Slide Dimmer Rocker Switch 0-10V
Pros
- Smooth dimming control from 0-10V.
- Compatible with various light types.
- Easy installation process.
- Compact design fits standard electrical boxes.
- Affordable pricing.
Cons
- Limited load capacity (up to 500W).
- No built-in timer or scheduling features.
- No wireless connectivity options available.
Customer Reviews
Customers have praised the Maxxima Slide Dimmer Rocker Switch 0-10V for its ease of use and reliable performance. Many reviewers appreciated its smooth sliding mechanism and clear markings for different brightness levels. However, some users noted that it does not come with advanced smart features like scheduling or wireless connectivity.
The most common complaint was regarding the limited load capacity, which might not be sufficient for larger lighting setups. Overall, it has been well-received as an affordable and effective dimmer switch solution.
Faqs
What is the dimming range of the Maxxima Slide?
Is the Maxxima Slide compatible with all types of lights?
How do I install the Slide Dimmer Rocker Switch?
Why might my Dimmer Rocker Switch overheat?
Can I use this switch for smart home systems?
What are some common issues with this switch?
How do I troubleshoot common problems with this switch?
What are some pros of using this dimmer switch?
What are some cons of using this Maxxima Slide Dimmer Rocker Switch 0-10V?
Leave a Comment
