Mueller Brew 12-Cups Coffee Maker MLR010016N Instructions
Content

Introduction of Mueller Brew 12-Cups Coffee Maker MLR010016N
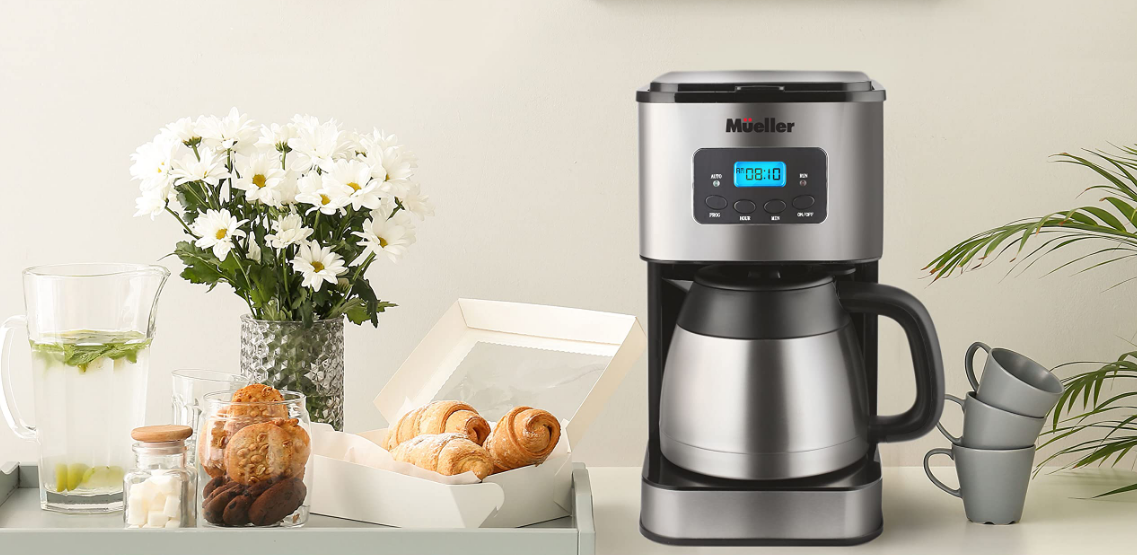
The Brew 12-Cups Coffee Maker MLR010016N is a versatile and efficient coffee maker designed to cater to the needs of coffee lovers who enjoy a good cup of coffee. This Mueller Brew 12-Cups Coffee Maker is perfect for both personal and office use, and it is available for an estimated price of $89.99. With its sleek and modern design, this coffee maker is sure to add a touch of elegance to any kitchen or office space.
SPECIFICATIONS
| Model Number | Voltage | Power | Capacity | Dimension | Weight |
|---|---|---|---|---|---|
| DC 750 | 120 V~ 60 Hz | 900 W | 12 Cup (60.86 oz / 1.8 L) | 10.78 x 7.2 x 13.77 in (27.4 x 18.3 x 35 cm) | 3.92 lb (1.78 kg) |
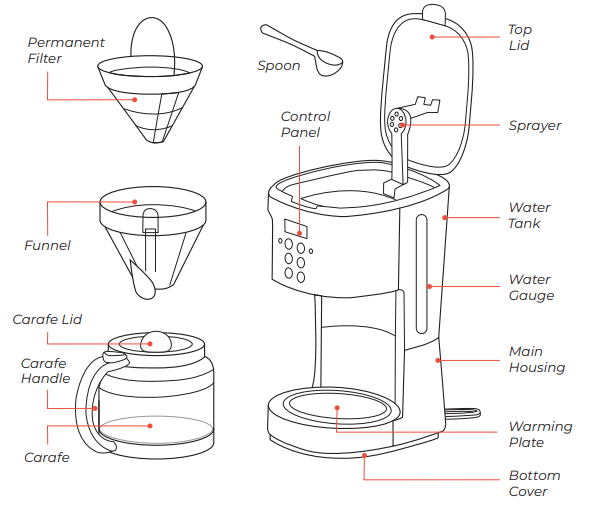
OVERVIEW OF PARTS
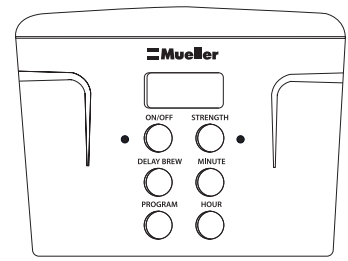
CONTROL PANEL
Setup of Mueller Brew 12-Cups Coffee Maker
Setting up the Mueller Brew MLR010016N is easy and straightforward. Start by unboxing the coffee maker and placing it on a flat and dry surface. Make sure to plug it into a power outlet. Next, fill the water reservoir with the desired amount of water. Then, add your favorite coffee grounds to the filter basket. You can use either paper filters or a permanent gold-tone filter. Once you have added the coffee grounds, close the lid and select your desired brewing settings. Finally, press the start button to begin the brewing process.
HOW TO MAKE COFFEE
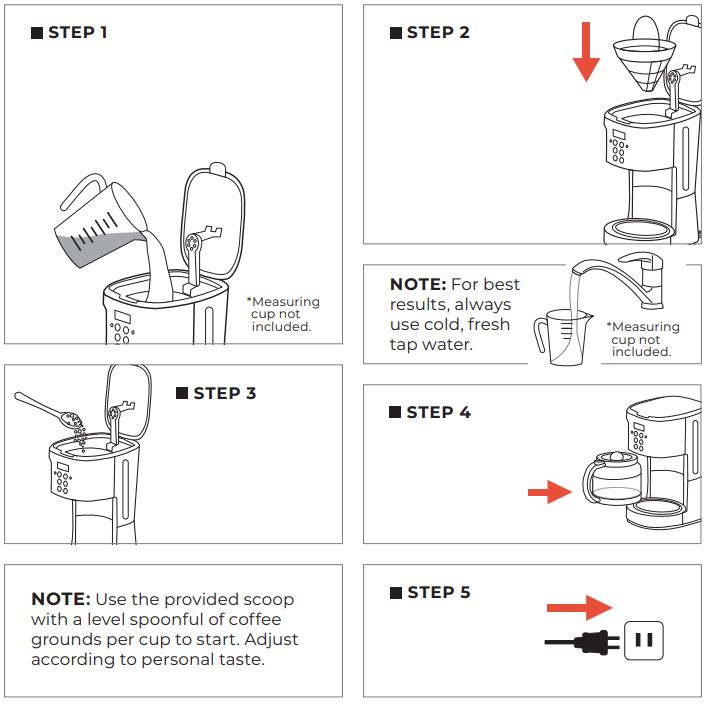
- Open the Top Lid and fill the Water Tank with drinking water. The water level should not exceed the MAX level, as indicated on the Water Gauge.
- Install the Funnel properly and then place the Permanent Filter into the Funnel. Make sure it is assembled correctly; otherwise, the Top Lid cannot be closed.
NOTE: For best results, always use cold, fresh tap water. - Add coffee grounds into the Permanent Filter. Close the Top Lidcompletely.
- Insert the Carafe with closed Lid onto the Warming Plate, horizontally.
NOTE: Use the provided scoop with a level spoonful of coffee grounds per cup to start. Adjust according to personal taste Plug the power cord into the outlet. To increase the coffee strength, press the “Strength” button once. The indicator will illuminate in red, and the appliance will brew strong coffee. If you do not wish to increase the coffee strength, continue with Step 7 to brew regular coffee.
- To increase the coffee strength, press the “Strength” button once. The indicator will illuminate inred, and the appliance will brew strong coffee. If you do not wish to increase the coffee strength, continue with Step 7 to brewregular coffee.
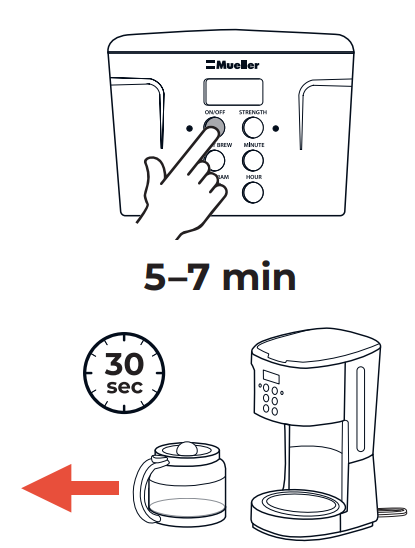
Press the “On/Off” button once. The indicator will illuminate in red, and the LCD will display “AM 12:00” (or the time you previously set). The appliance will begin to work.

- The brewing process can be interrupted by pressing the “On/Off” button at any time. The indicator of the “On/Off” button will turn off. The appliance will continue brewing once the “On/Off” button is pressed again.
- The Coffee Maker will take 5 to 7 minutes to brew your coffee depending on the amount ofcoffee and water you are using.
- You can take out the Carafe, pour, and serve your coffee at any time. The appliance will stop dripping automatically for 30 seconds.
- Need more time? Pause the brewing by pressing the “On/Off” button, pour your coffee, then replace the Carafe and press the “On/Off” button to continue brewing.
During the brewing process, the buttons “Program” “Delay Brew” “Hour” and “Minute” are not adjustable.
- Once the brewing is completed, if you do not want to serve immediately, coffee can be kept warm in the Carafe on the Warming Plate. The appliance will shut off automatically after two hours unless you manually turn it off by pressing the “On/Off” button.
- Always turn the Coffee Maker off and disconnect the power supply when not in use.
NOTE: Coffee grounds will absorb some water during brewing. For the best-tasting coffee, serve immediately after brewing. Take care when pouring hot coffee to avoid burns or serious injury.
DELAY FUNCTION
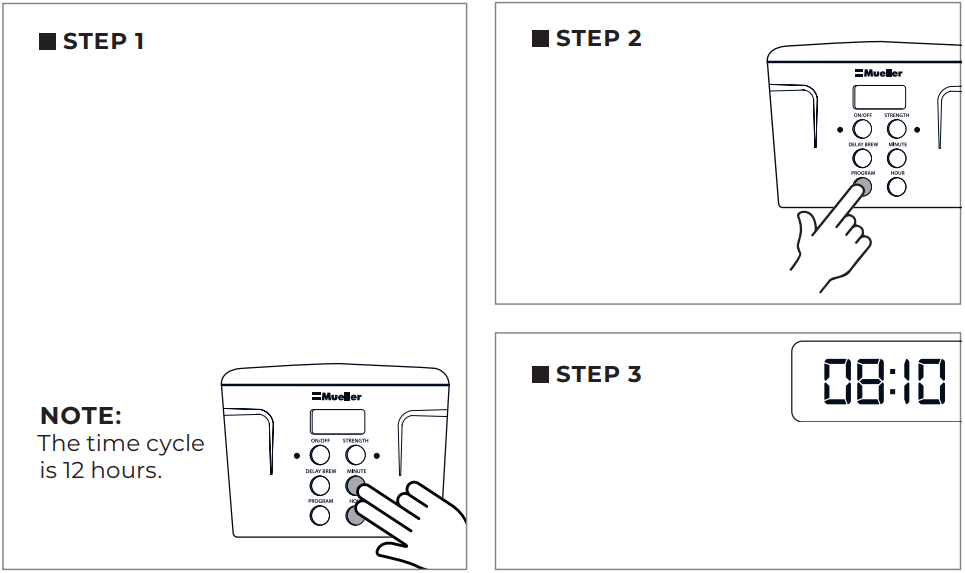
- Set the clock on the Coffee Maker to the current time by separately holding the “Hour” button and “Minute” buttons until the numbers change to the correct hour and minute. AM indicates the time before noon and PM indicates after noon (12:00 PM) and before midnight.
- Press the “Program” button once. The “On/Off” button indicator will display flashing green.
Press the “Hour” and “Minute” buttons to set the time to which you would like to delay the brew (in this case, 8:10 AM).
- Press the “Delay Brew” button. The “On/Off” button indicator will illuminate in green.
- Add water and coffee grounds to the Coffee Maker as you normally would with the Permanent Filter in place.
After a while, the LCD will display the current time. You may see the delayed brew start time by pressing the “Program” button.
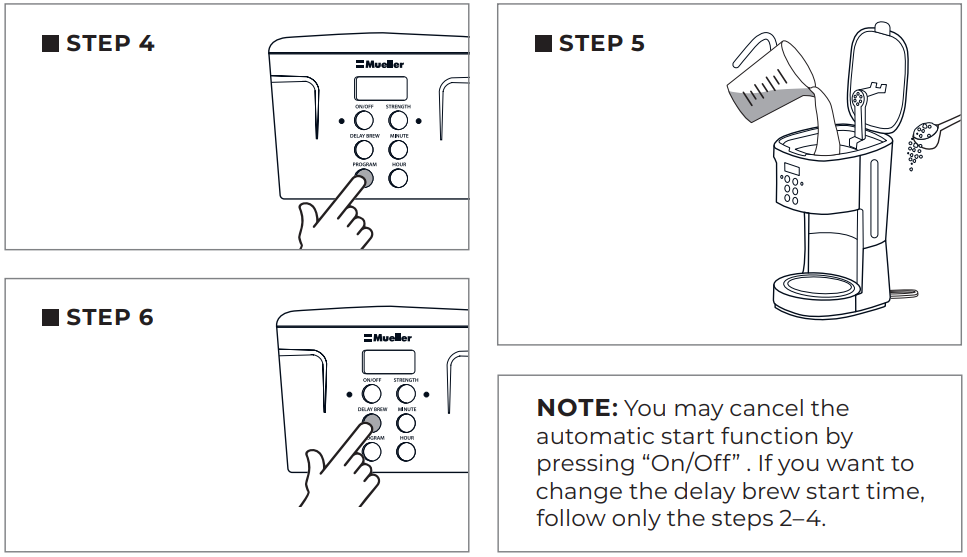
NOTE: You may cancel the automatic start function by pressing “On/Off” . If you want to change the delay brew start time, follow only the steps 2–4.
CLEANING AND MAINTENANCE
- Lift up the Top Lid, remove all removable parts such as Permanent Filter, Funnel and Carafe, and wash them with warm soapy water.
NOTE: Do not put any water in the unit once the Filter and Funnel have been removed. Wipe that area with a damp cloth. - Never immerse the unit in water or other liquid. To clean the exterior surface, simply wipe with a clean, damp cloth, and dry before storing.
- Water droplets may buildup in the area above the Funnel and drip onto the product base during brewing. To prevent the buildup, wipe off the area with a clean, dry cloth after each use.
- Use a clean, damp cloth to clean the Warming Plate. Never use rough, abrasive materials or cleansers to clean the Warming Plate.
- Do not dry the inside of the Water Tank with a cloth, as lint may remain.
- Keep your Coffee Maker in a dry and cool place.
REMOVING MINERAL DEPOSITS
Depending on the mineral content of your water, calcium deposits or scale may build up in your coffee machine. We recommend regular descaling of your Coffee Maker every 3–6 months to help maintain the heating element and other internal parts that come in contact with water. Calcium deposits may build up faster, making it necessary to descale more often.
- Fill the Water Tank with a water-vinegar (1:1 ratio) solution of 3.4 oz (100 ml) white vinegar and 3.4 oz (100 ml) clean water. You may also use citric acid to create the descaler solution by mixing 3.4 oz (100 ml) of water with 0.1 oz (3 ml) of citric acid.
- Make sure the Funnel and the Filter are in place.
- Place a coffee cup onto the Warming Plate.
- Start a brew cycle by pressing the “On/Off” button, until it start to brew hot water to Carafe for around 10–30 seconds, press the “On/Off” button to pause and let the solution set for 30–60 minute, depending on how much build-up you need to remove.
- After 30–60 minutes, press the “On/Off” button again and let the brew cycle finish.
- Perform the brew cycles until there is no more water-vinegar solution inside the Water Tank, allowing your Coffee Maker to cool between brews.
- If scale is still present in the Coffee Maker, repeat steps 1–6.
- Rinse the Funnel, Filter, and Water Tank with water a couple of times.
- Finally, the appliance needs to be cleaned with water to remove the descaling solution. Fill the Water Tank with fresh water to the MAX fill line and perform the brew cycle until the Water Tank is empty, allowing your Coffee Maker to cool between brews.
TIPS & COFFEE BEST PRACTICES
- Always use fresh, cold water in the Coffee Maker.
- For an optimum coffee taste, buy whole coffee beans and finely grind them just before brewing.
- A clean Coffee Maker is essential for making great-tasting coffee. Regularly clean the Coffee Maker as specified in the “Cleaning and Maintenance” section.
- Store the coffee grounds in a cool, dry place. After opening a package of coffee powder, reseal it tightly and store it.
- Do not reuse coffee grounds since this will significantly reduce the flavor. Reheating coffee is not recommended because coffee is at its ultimate flavor right after brewing.
Description
The Mueller Brew 12-Cups Coffee Maker is made with high-quality materials that ensure durability and longevity. It features a 12-cup carafe that is designed to keep your coffee hot for hours. The coffee maker also has a programmable timer that allows you to set the time you want your coffee to be ready. Additionally, it has an auto-start feature that starts the brewing process automatically at the set time. The Mueller Brew coffee maker also has a pause-and-serve feature that allows you to pour a cup of coffee before the brewing process is complete.
IMPORTANT SAFETY INSTRUCTIONS
When using electrical appliances, basic safety precautions should always be followed to reduce the risk of fire, electric shock, and/or injury to persons.
READ ALL INSTRUCTIONS thoroughly before use and save it for future reference.
- Make sure that your outlet voltage corresponds to the voltage stated on the rating label of the Ultra Brew Coffee Maker.
- To protect against fire, electric shock and injury, do not submerge the cord or the plug in water or other liquids.
- This appliance is not intended for use by persons (including children) with reduced physical, sensory or mental capabilities, or lack of experience and knowledge unless they are supervised during their use of the appliance by a person responsible for their safety and care.
- Do not operate the appliance with a damaged cord or plug or after the appliance malfunctions, or has been damaged in any manner. Return the appliance to an authorized service facility for examination, repair, or adjustment.
- Do not touch hot surfaces. Use handles and knobs.
- Always unplug from the outlet when not in use and before cleaning.
- Allow it to cool before putting on or taking off parts and before cleaning the appliance.
- The use of accessories not recommended by the appliance manufacturer may result in fire, electric shock, or injury.
- Do not use outdoors.
- Do not let the cord hang over the edge of a table or counter or touch hot surfaces.
- Always grasp the power plug to remove it from the wall outlet
- Do not pull on the power cord itself.
- Do not place on or near a hot gas or electric burner, or in a heated oven.
- Do not use the appliance for other than its intended use.
- Always fill the water reservoir first, then plug the cord into the wall outlet. To disconnect, push the “On/Off” button, then remove the plug from the wall outlet.
- Do not clean the Carafe with cleansers, steel wool pads, or other abrasive material.
- Scalding may occur if the Top Lid is removed during the brewing cycles.
- Make sure the Carafe Lid is secure before serving any beverages.
- The Carafe is designed for use with this Ultra Brew Coffee Maker only. It must never be used on a range top.
- Never leave the empty Carafe on the Warming Plate; otherwise, the Carafe might crack.
- Do not place a hot Carafe on a wet, hot, or cold surface.
- Do not use a cracked Carafe or a Carafe having a loose or weakened handle.
- Do not operate the Coffee Maker without water.
- Do not place cloth beneath the Coffee Maker or otherwise restrict airflow.
- Do not operate your appliance in an appliance garage or under a wall cabinet.
- When storing in an appliance garage, always unplug the unit from the electrical outlet. Not doing so could create a risk of fire especially if the appliance touches the walls of the garage or the door touches the unit as it closes.
- Avoid contact with moving parts.
- Do not use outdoors.
WARNING
To reduce the risk of fire or electric shock, do not remove the Bottom Cover. No user-serviceable parts are inside. Repairs should be done only by authorized personnel. Do not touch or clean the Warming Plate while the appliance is in use.
TROUBLESHOOTING
| Problem | Possible Cause | Solution |
|---|---|---|
| Coffee Maker indicator lights and clock are not lit. | The Coffee Maker is not plugged in securely or is not turned on. | Connect the power plug and press the "On/Off" power button. |
| Coffee Maker does not have power. | The Coffee Maker is not plugged in securely. | Plug into a different outlet. |
| The Top Lid cannot close. | The Funnel and Permanent Filter are assembled incorrectly. | Make sure the Funnel and Permanent Filter are assembled correctly (See Page 5). |
| Coffee Maker will not brew. | The Brew Head is not closed properly or not closed at all. | Close the Brew Head by pressing firmly down on the Handle. |
| Brewing a partial mug. | Calcium or scale is built up in the Coffee Maker. | De-scale the Coffee Maker. |
| Clock is showing the wrong time. | Clock needs to be programmed. | Set the clock to the correct time (See Step 1, Page 7). |
WARRANTY
This product is warranted to be free from defects in material and workmanship under normal use and service for one year from the date of the original purchase with the receipt. The manufacturer’s obligation shall be limited to repairing or replacing any part of the product that is defective. Such warranty shall not apply to damages resulting from accidents, abuse, or misuse.
Pros & Cons
Pros
- 12-cup carafe that keeps coffee hot for hours
- Programmable timer and auto-start feature
- Pause and serve feature
- High-quality materials ensure durability
- Sleek and modern design
Cons
- May be too large for small kitchens or offices
- Some users may find the coffee maker complicated to use
- The carafe may be difficult to clean
- Water reservoir may be difficult to fill
- Expensive compared to other coffee makers in its class
Customer Reviews of Mueller Brew 12-Cups Coffee Maker MLR010016N
Customers who have purchased the Mueller Brew 12-Cups Coffee Maker have given it mixed reviews. Some customers have praised the coffee maker for its sleek and modern design, as well as its programmable timer and auto-start feature. However, other customers have complained about the carafe being difficult to clean, as well as the water reservoir being difficult to fill. Some customers have also noted that the coffee maker is expensive compared to other coffee makers in its class.
Faqs
Does the Mueller Brew 12-Cup Coffee Maker work with any kind of coffee filter?
How frequently should my Mueller Brew Coffee Maker be cleaned?
Is there a programmable timer on the Mueller Brew coffee maker?
With the Mueller Brew coffee maker, is it possible to use paper filters?
What is the best way to sanitise the Mueller Brew coffee maker?
I have a Mueller Brew coffee maker; is it possible to use flavoured or oily coffee grinds with it?
When it comes to the Mueller Brew coffee maker, how long does it take for a pot of coffee to be brewed completely?
The Mueller Brew Coffee Maker works best with what kind of coffee grounds?
Is it possible to set up my Mueller Coffee Maker to make coffee on its own?
What is the Mueller Brew coffee maker's warranty?
Leave a Comment