Netgear AC750 WiF Extender EX3800 User Guide
Content
Netgear AC750 WiFi Extender EX3800 Introduction
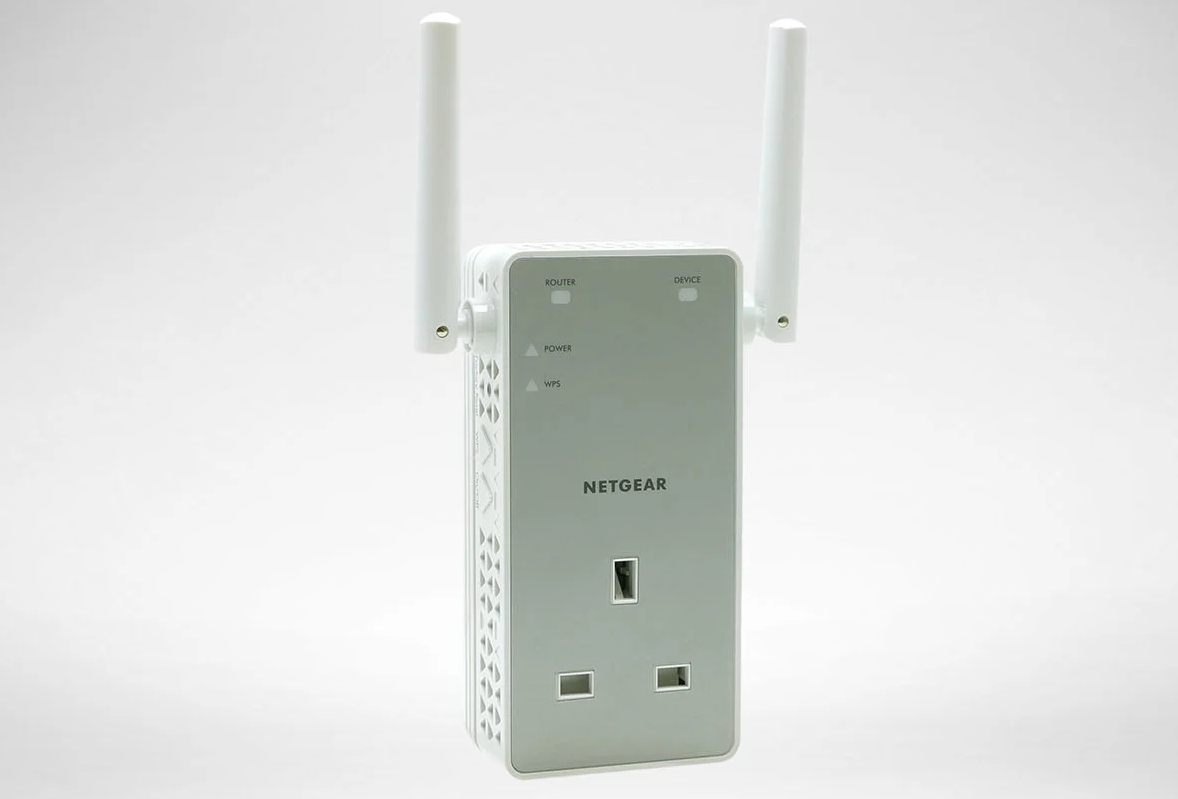
The Netgear AC750 WiFi Extender EX3800 is a compact and reliable solution designed to enhance your home or office WiFi coverage. By boosting your existing wireless signal, this extender eliminates dead zones and provides seamless connectivity in hard-to-reach areas. With dual-band support and speeds up to 750Mbps, the EX3800 ensures smooth streaming, gaming, and browsing experiences. It also features a convenient pass-through outlet and an Ethernet port for connecting wired devices, making it a versatile addition to any network setup.
Overview
The WiFi Range Extender boosts your existing network range and speed, delivering dual-band WiFi. You can also use the extender in access point mode as a WiFi access point and create a new WiFi hotspot by using a wired Ethernet connection.
Note: For more information about the topics covered in this manual, visit the support website at https://support.netgear.com
Meet Your Extender
Before you install your extender, familiarize yourself with its LEDs, buttons, and port.
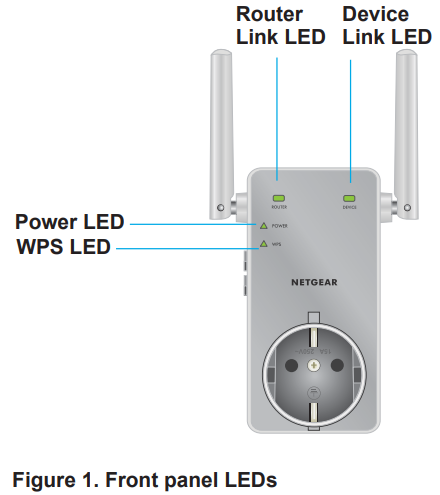
Front Panel
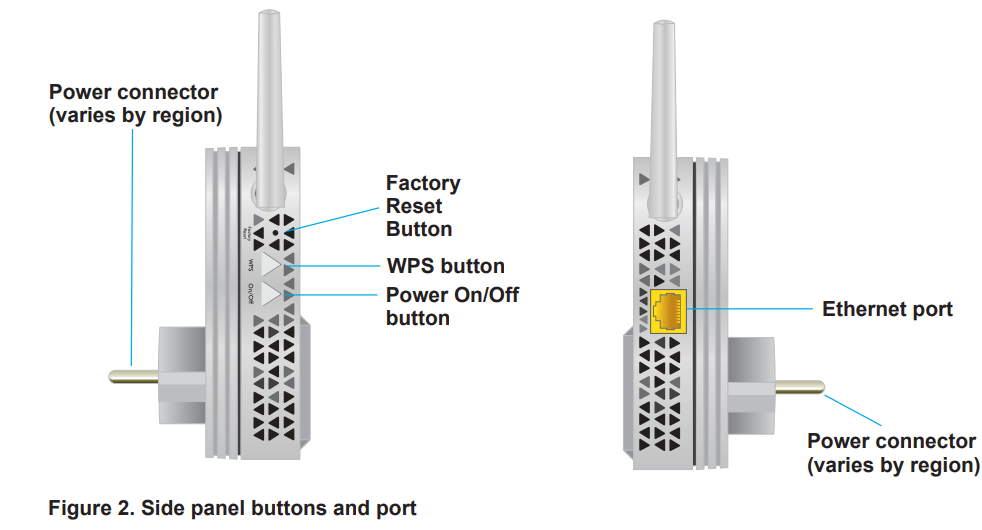
Side Panels
The following table describes the LEDs.
Table 1. Front panel LEDs
| LED | Description |
Router Link  | This LED indicates the connection betweenthe extender andthe router or access point:
|
Device Device Link  | This LED indicates the connection betweenthe extender and a computer or WiFi device:
|
Power  |
|
| WPS |
|
When to Use Your Extender
NETGEAR recommends that you connect through the extender network only when the WiFi device is in a “dead zone” where connection from the existing network is poor or nonexistent. Data traffic routed through the extender is inherently slower than traffic routed directly from the network.
How the Extender Works
The extender works like a bridge between a WiFi router (or a WiFi access point) and a WiFi device outside the range of the WiFi router. The extender performs two main jobs:
- The extender connects to a working WiFi network.
When the extender connects over WiFi to an existing network, it functions as a network client, similar to how a WiFi device connects to a network. The extender acts as an access point for WiFi devices.
The extender broadcasts its own WiFi network that WiFi devices can join. In its role as an access point, the extender performs tasks that WiFi routers do, such as broadcasting its network name (SSID).
The extender must do each of these jobs so that both ends of the bridge are in place.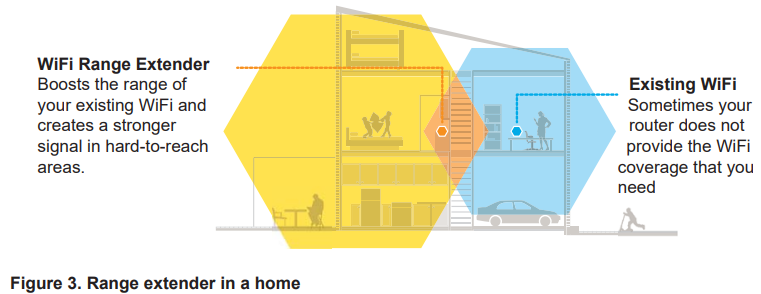
Detailed Specifications
Key features of the Netgear AC750 WiFi Extender EX3800 include support for dual-band WiFi (2.4GHz and 5GHz), a speed of up to 750Mbps, external antennas for enhanced coverage, and a FastLane technology for seamless streaming and gaming. This device also supports WEP and WPA/WPA2 wireless security protocols, ensuring your network is always protected. Additionally, it comes with a convenient Ethernet port for connecting wired devices.
Get Started
Install the WiFi Extender
Place the extender, apply power, and connect the extender to your WiFi network.
Note: You can also use the extender as a WiFi access point and create a new WiFi hotspot by using a wired Ethernet connection. .
Place the Extender and Apply Power
To place the extender and apply power:
- Place your extender in the same room as your WiFi router.
Proximity to the WiFi router is required only during the initial setup process. - Plug the extender into an electrical outlet.
- Wait for the Power LED to light amber and then turn green.
If the Power LED does not light, press the Power On/Off button on the side of the extender.
Connect to an Existing WiFi Network
To extend the range of your WiFi network, you must connect the extender to your existing WiFi network.
You can do this in one of two ways:
- Connect with WPS.
- Connect with web browser setup.
Connect with WPS
Wi-Fi Protected Setup (WPS) lets you join a secure WiFi network without typing the network name and password.
Note: WPS does not support WEP network security. If you are using WEP security.
To use WPS to connect the extender to your WiFi router:
- Press the WPS button on the side panel of the extender. The WPS LED blinks.
- Within two minutes, press the WPS button on your router or access point.
The WPS LED on the extender lights solid green, the Router Link LED lights, and the extender connects to your existing WiFi network.
If the Router Link LED does not light, try again. If it still does not light. - If your WiFi router supports the 5 GHz band, repeat Steps 1 and 2 to connect the extender to the 5 GHz band.
- Find the new extender network name on your computer or WiFi device.
The extender creates two new extended WiFi networks. The extender’s new WiFi network names are based on your existing WiFi network name, with _EXT at the end of the name.
For example:- Existing WiFi network name. MyNetworkName
- New extended network names. MyNetworkName_2GEXT and MyNetworkName_5GEXT\
- Connect your computer or WiFi devices to the new extended WiFi network.
Use the same WiFi password that you use for your WiFi router. - Unplug the extender and move it to a new location closer to the area with a poor WiFi signal. The location that you choose must be within the range of your existing WiFi router network.
- Plug the extender into an electrical outlet.
- Wait for the Power LED to light amber and then turn green.
If the Power LED does not light, press the Power On/Off button on the side of the extender. - Use the Router Link LED on the front panel to help you choose a spot where the extender-to-router connection is optimal.
Connect with Web Browser Setup
You can use a web browser to log in to the extender and set up its WiFi connection to your existing WiFi router.
To use a web browser to connect the extender to your WiFi router:
- Use a WiFi network manager on a computer or WiFi device to find and connect to the extender WiFi network NETGEAR_EXT.
After the connection with the computer or WiFi device is established, the Device Link LED lights. - Launch web browser.
- Enter https://www.mywifiext.net in the address field of the browser.
The New Extender Setup page displays. Click the NEW EXTENDER SETUP button.
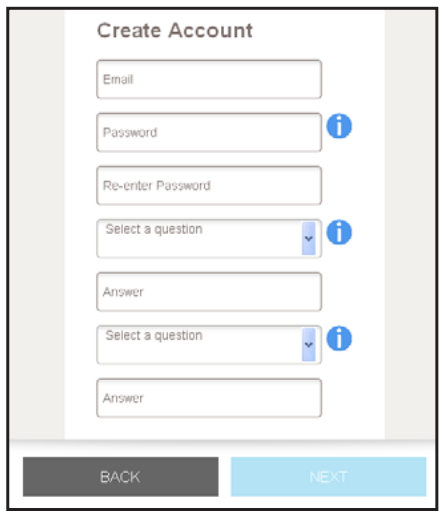
The first time that you log in to the extender, the Create Account page displays. If the Create Account page does not display, visit https://www.mywifiext.net
- Complete the fields on the Create Account page and click the NEXT button.
When prompted, select your country or region from the Regional Settings menu and click the NEXT button.
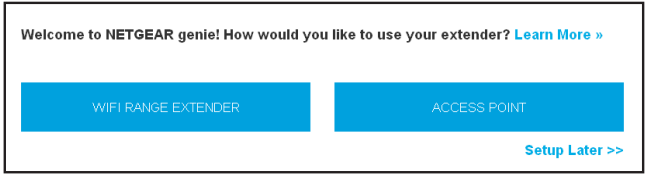
- Click the WIFI RANGE EXTENDER button.
The extender scans for WiFi networks in your area and displays a list. - Select a WiFi network to extend and click the NEXT button.
If you do not want to extend both WiFi bands, clear the 2.4 GHz WiFi Networks or the 5 GHz WiFi Networks check box. - In the Password (Network Key) field, type the existing WiFi network password (also called passphrase or security key) and click the NEXT button.
- Set the network name (SSID) and password for your new extender WiFi network and click the NEXT button.
- Use a WiFi network manager on the computer or WiFi device to connect to the new extended WiFi network.
Repeat this step for all of your computers and WiFi devices. - Click the CONTINUE button.
A message displays confirming that the extender is connected to the new extended WiFi network. - Click the NEXT button.
The registration page displays. - Complete the registration fields and click the FINISH button to complete the setup.
If you do not want to register your extender, click the Skip Registration link. Note that you must register your extender before you can use NETGEAR telephone support. The Status page displays. - Unplug the extender and move it to a new location closer to the area with a poor WiFi signal. The location that you choose must be within the range of your existing WiFi router network.
- Plug the extender into an electrical outlet.
Wait for the Power LED to light amber and then turn green.
If the Power LED does not light, press the Power On/Off button. - Use the Router Link LED to help you choose a spot where the extender-to-router connection is optimal.
The extender connects to your existing router’s WiFi network.
Description
The Netgear AC750 WiFi Extender EX3800 is designed to extend your wireless network coverage and improve your online experience. With its dual-band technology, this extender supports both 2.4GHz and 5GHz bands, providing a fast and reliable connection for all your devices. The external antennas offer enhanced coverage, ensuring that even the farthest corners of your home or office receive a strong signal. The FastLane technology also allows you to prioritize traffic for smooth streaming and gaming, making it the perfect choice for heavy internet users.
Find the Best Location
If the WiFi signal is weak, the first time you join the extender network, the Router Link LED or Device Link LED is amber or red. If this happens, adjust the position of the extender:
- If the Router Link LED is amber or red, move the extender closer to the router.
- If the Device Link LED is amber or red, move the computer or WiFi device closer to the extender.
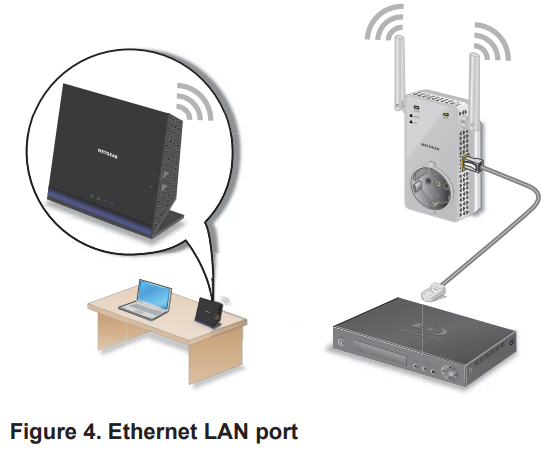
Connect an Ethernet-Enabled Device
After the extender is connected to your existing WiFi network, you can connect a wired device to the extender using an Ethernet cable. The device can then access your existing network through the extender’s WiFi connection.
Use the Extender in Access Point Mode
You can use the extender as a WiFi access point, which creates a new WiFi hotspot by using a wired Ethernet connection.

To use the extender in access point mode:
- Plug the extender into an electrical outlet.
- Wait for the Power LED to light amber and then turn green.
If the Power LED does not light, press the Power On/Off button on the side of the extender. - Use an Ethernet cable to connect the Ethernet port on the extender to a router Ethernet LAN port or a remote Ethernet LAN jack with LAN access.
The extender joins the LAN and creates a WiFi hotspot. - Use a WiFi network manager on a computer or WiFi device to find and connect to the NETGEAR_EXT WiFi network.
When you join the network, the extender Device Link LED lights to show that you are connected. Launch a web browser and enter https://www.mywifiext.net in the address field.
The New Extender Setup page displays.
- Click the NEW EXTENDER SETUP button.
The first time that you log in to the extender, the Create Account page displays. If the Create Account page does not display, visit https://www.mywifiext.net - Complete the fields on the Create Account page and click the NEXT button.
When prompted, select your country or region from the Regional Settings menu and click the NEXT button.
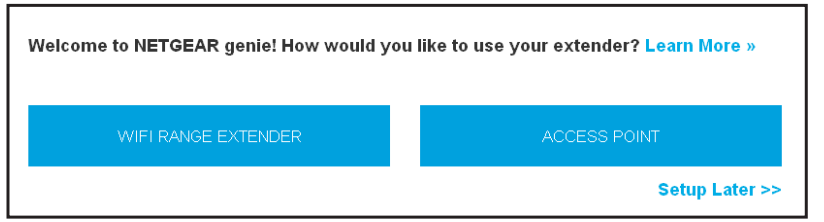
- Click the ACCESS POINT button.
The extender checks for an Internet connection. - When prompted, set the network name (SSID), security option, and password, and click the NEXT button.
Your settings are applied and the extender is ready to be used as an access point. - Use a WiFi network manager on the computer or WiFi device to connect to the new access point network.
Repeat this step for all of your computers and WiFi devices. - Click the CONTINUE button.
A page displays that says you successfully created an access point. - Click the NEXT button.
The registration page displays. - Complete the registration fields and click the FINISH button to complete the setup.
If you do not want to register your extender, click the Skip Registration link. Note that you must register your extender before you can use NETGEAR telephone support. The Status page displays.
Log In to the Extender After Installation
After installation, you can log in to the extender to view or change the extender’s settings.
To log in to the extender:
- Use a WiFi network manager on a computer or WiFi device to find and connect to the new extended WiFi network.
After the connection with the computer or WiFi device is established, the Device Link LED lights solid green. - Launch a web browser.
- Enter www.mywifiext.net in the address field of the browser.
A login window opens. - Enter your email address and password and click the LOG IN button.
The Status page displays.
Run Smart Setup Installation
You can use Smart Setup to change the extender settings. This is an easy way to connect the extender to a different router or to change the extender WiFi network name (SSID) or WiFi password.
To run Smart Setup:
- Use a WiFi network manager on a computer or WiFi device to find and connect to the new extended WiFi network.
After the connection with the computer or WiFi device is established, the Device Link LED lights solid green. - Launch a web browser.
- Enter www.mywifiext.net in the address field of the browser.
A login window opens. - Enter your email address and password and click the LOG IN button.
The Status page displays. - Click the SMART SETUP button.
The Welcome page displays. - Click the WIFI RANGE EXTENDER button.
The extender scans for WiFi signals and finds the WiFi networks in your area and displays a list. - Select your WiFi network and click the NEXT button.
- When prompted, enter the password to connect to your WiFi network and click the NEXT button.
A message displays when the extender connects to your existing router’s WiFi network. - Click the NEXT button.
The extender applies your settings to its WiFi network names and WiFi passwords. During this change, the extender disconnects you from its WiFi network. - When prompted, connect your WiFi devices to the extender WiFi network and click the CONTINUE button.
The registration page displays. - Complete the registration fields and click the FINISH button to complete the setup.
If you do not want to register your extender, click the Skip Registration link. Note that you must register your extender before you can use NETGEAR telephone support. The Status page displays.
Setup Guide
Setting up the Netgear AC750 WiFi Extender EX3800 is simple and straightforward.
- First, plug the extender into a power outlet near your router.
- Next, connect your computer to the extender's wireless network and visit www.mywifiext.net to access the web-based setup page.
- From there, follow the on-screen instructions to configure your extender and connect it to your router.
- Finally, move the extender to a location that offers the best WiFi coverage for your devices.
Factory Default Settings
To reset the extender to factory default settings, you can use the Factory Reset button on the side panel or you can log in and click the onscreen RESET button. For more information, see Return the Extender to Its Factory Default Settings on page 37.
The following table shows the factory default settings.
Table 2. Factory default settings
| Technical Specifications | |
| Network protocol and standards compatibility | Data and routing protocols: TCP/IP, DHCP server and client, DNS relay, |
| Physical specifications | • •Dimensions: 54.89 x 114.01 x 34 mm (2.6 x 4.5 x 1.34 in.) • •Weight: 192 g (0.42 lb) |
| Environmental |
|
| Interface |
|
- Maximum WiFi signal rate (IEEE Standard 802.11). Actual throughput can vary. Network conditions and environmental factors, including volume of network traffic, building materials and construction, and network overhead lower actual data throughput rate.
Technical specifications
The following table shows the technical and environmental specifications.
| Technical Specifications | |
| Network protocol and standards compatibility | Data and routing protocols: TCP/IP, DHCP server and client, DNS relay, |
| Physical specifications | • •Dimensions: 54.89 x 114.01 x 34 mm (2.6 x 4.5 x 1.34 in.) • •Weight: 192 g (0.42 lb) |
| Environmental |
|
| Interface |
|
Troubleshooting
If you experience any issues with your Netgear AC750 WiFi Extender EX3800, try the following solutions:
- Ensure that the extender is plugged into a power outlet and receiving power.
- Check that the extender is connected to your router's wireless network.
- Try resetting the extender to its factory settings by pressing the reset button on the back of the device.
- If the problem persists, contact Netgear support for further assistance.
Pros & Cons
Pros
- Dual-band technology for fast and reliable connectivity
- External antennas for enhanced coverage
- FastLane technology for smooth streaming and gaming
- Supports WEP and WPA/WPA2 wireless security protocols
- Convenient Ethernet port for connecting wired devices
Cons
- May not support all routers or devices
- Limited range compared to some other extenders
- May experience occasional connectivity issues
Customer Reviews
Customers have praised the Netgear AC750 WiFi Extender EX3800 for its easy setup, reliable connectivity, and enhanced coverage. However, some have reported issues with compatibility and limited range. Overall, this extender has received positive reviews and is a popular choice for improving wireless network coverage and performance.
Faqs
What is the range of the Netgear AC750 WiFi Extender EX3800?
Can the Netgear AC750 WiFi Extender EX3800 be used with any router?
How do I reset the Netgear AC750 WiFi Extender EX3800 to its factory settings?
What is the FastLane technology on the Netgear AC750 WiFi Extender EX3800?
How many devices can the Netgear AC750 WiFi Extender EX3800 support?
What security protocols does the Netgear AC750 WiFi Extender EX3800 support?
How do I update the firmware on the Netgear AC750 WiFi Extender EX3800?
What is the return policy for the Netgear AC750 WiFi Extender EX3800?
Leave a Comment