Netgear AirCard Cradle DC112A User Manual | Setup Instructions
Content
Introduction
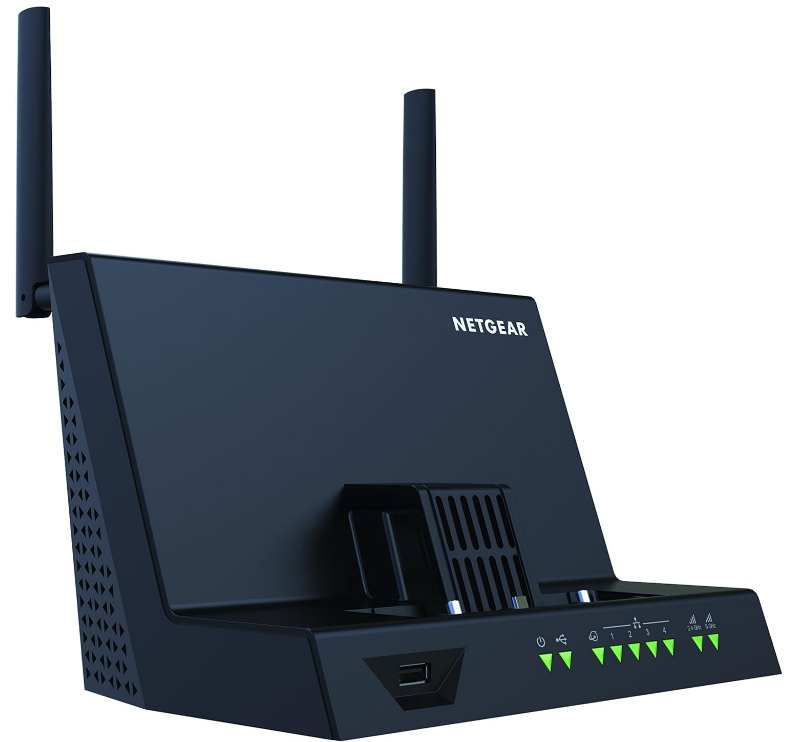
An adaptable add-on that improves the functionality and performance of your Netgear AirCard mobile hotspot is the Netgear AirCard Cradle DC112A. With the help of this cradle, you can securely and steadily dock your mobile hotspot and turn it into a potent internet gateway for your house or place of business. The DC112A boosts signal strength and expands coverage with its sophisticated features, which include high-gain WiFi antennae, Gigabit Ethernet connectors, and USB ports for media sharing. For individuals looking to get the most out of their mobile internet experience with more network performance, connectivity options, and reliability, this is the perfect solution.
Detailed Specifications
| Feature | Default Behavior |
|---|---|
| Smart Cradle login | |
| User login URL | netgear.cradle or http://192.168.100.1 |
| User name (case-sensitive) | admin |
| Login password (case-sensitive) | password |
| Internet connection | |
| WAN MAC address | Use default hardware address |
| WAN MTU size | 1500 |
| Port speed | AutoSensing |
| Local network (LAN) | |
| LAN IP | http://192.168.100.1 |
| Subnet mask | 255.255.255.0 |
| DHCP server | Enabled |
| DHCP range | 192.168.100.2 to 192.168.100.254 |
| DHCP starting IP address | 192.168.100.2 |
| DHCP ending IP address | 192.168.100.254 |
| DMZ | Disabled |
| Time zone | GMT for WW except NA and GR, GMT+1 for GR, GMT-8 for NA, GMT+10 for AU |
| Time zone adjusted for daylight saving time | Disabled |
| SNMP | Disabled |
| Firewall | |
| Inbound (communications coming in from the Internet) | Disabled (except traffic on port 80, the HTTP port) |
| Outbound (communications going out to the Internet) | Enabled (all) |
| Source MAC filtering | Disabled |
| WiFi | |
| Wireless communication | Enabled |
| SSID name | See the product label |
| WiFi password or security key | See the product label |
| Security | WPA2-PSK (AES) |
| Broadcast SSID | Enabled |
| Transmission speed | Auto1 |
| Country/region | United States in the US; otherwise, varies by region |
| RF channel | 2.4GHz, CH 153 for 5 GHz (depending on the region) |
| Operating mode | Up to 300 Mbps at 2.4 GHz, 867 Mbps at 5 GHz |
Cradle specifications
| Feature | Description |
|---|---|
| Data and routing protocols | TCP/IP, RIP-1, RIP-2, DHCP, PPPoE, PPTP, Dynamic DNS, UPnP, and SMB |
| Power adapter | 240V, 50 Hz, input; 12V/2.5A DC output |
| Dimensions | 157 x 230.4 x 148.75 mm (6.18 x 9.07 x 5.86 in.) |
| Weight | 800 g (1.76 lbs) |
| Operating temperature | 0° to 40° C (32° to 104º F) |
| Operating humidity | 90% maximum relative humidity, noncondensing |
| LAN | 10BASE-T or 100BASE-TX or 1000BASE-T, RJ-45 |
| WAN | 10BASE-T or 100BASE-TX or 1000BASE-T, RJ-45 |
| Wireless | Maximum wireless signal rate complies with the IEEE 802.11 standard. Auto Rate Sensing |
| Radio data rates | IEEE® 802.11 b/g/n 2.4 GHz; IEEE® 802.11 a/n/ac 5.0 GHz |
| Data encoding standards | Limited by the amount of wireless network traffic generated by each node (typically 15 nodes). |
| Maximum computers per wireless network | Limited by the amount of wireless network traffic generated by each node (typically 15 nodes). |
| Frequency bands supported | 2.4 GHz and 5 GHz |
| External Wifi frequency range | 700/850/900/1800/2100/2600 MHz with 2 x 2 MIMO |
| LTE bands | 700 MHz (B28) / 850 MHz (B5) / 900 MHz (B8) / 1800 MHz (B3) / 1900 MHz (B2) / 2100 MHz (B1) / 2600 MHz (B7) |
| HSPA + DC | 850/900/1900/2100 MHz |
| 802.11 security | • WPA2-PSK (AES) <br> • WPA-PSK (TKIP) + WPA2-PSK (AES) <br> • WPA/WPA2 Enterprise |
Hardware Setup
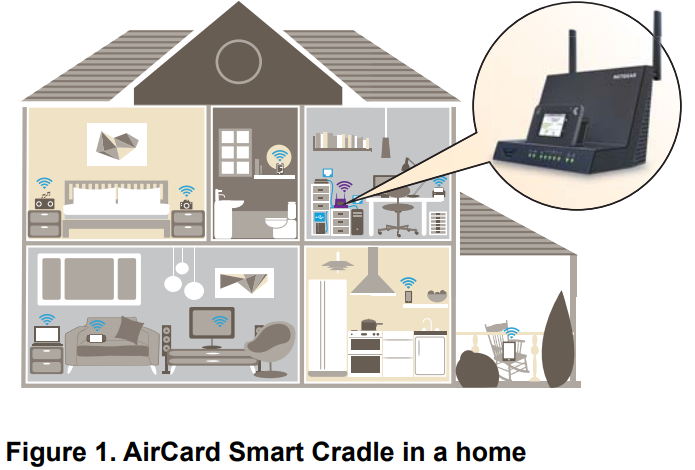
The AirCard Smart Cradle allows you to transform your AirCard mobile hotspot into a powerful LTE router by combining the benefits of a home router and a WiFi signal booster. It charges your mobile hotspot battery, boosts the mobile hotspot’s 4G/3G signal, extends WiFi coverage, and expands your mobile hotspot connection to both wired and wireless devices. This AirCard Smart Cradle can also be used as a standalone 802.11ac dual-band WiFi router.
Unpack Your AirCard Smart Cradle
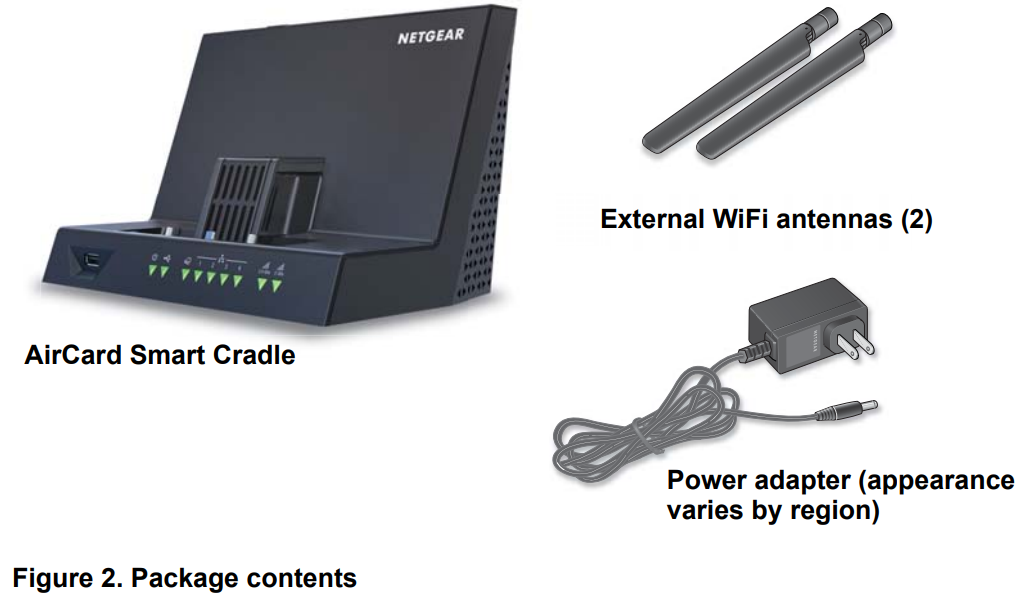
Your package contains the following items.
Front Panel
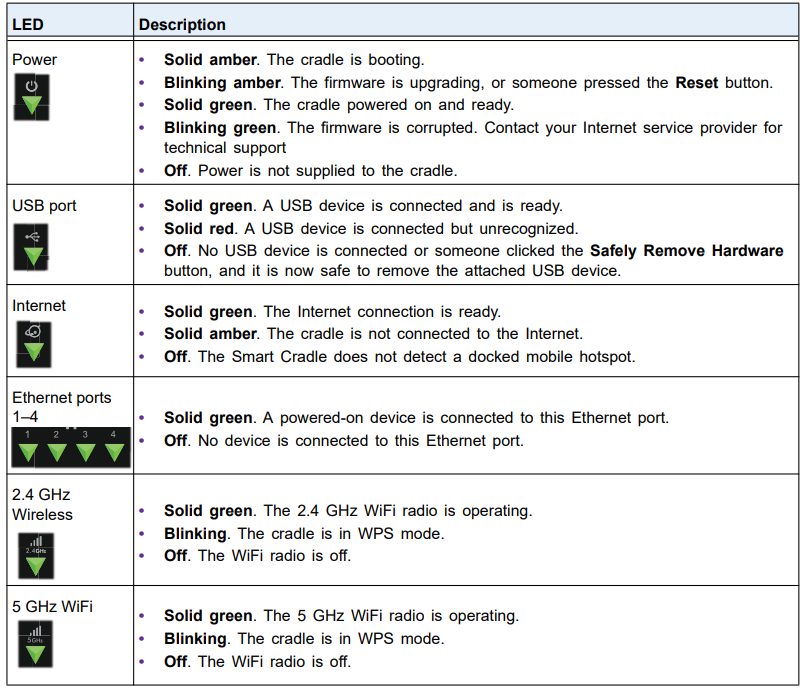
A USB port, an adjustable holder for the mobile hotspot, and the status LEDs and are located on the front of the cradle.
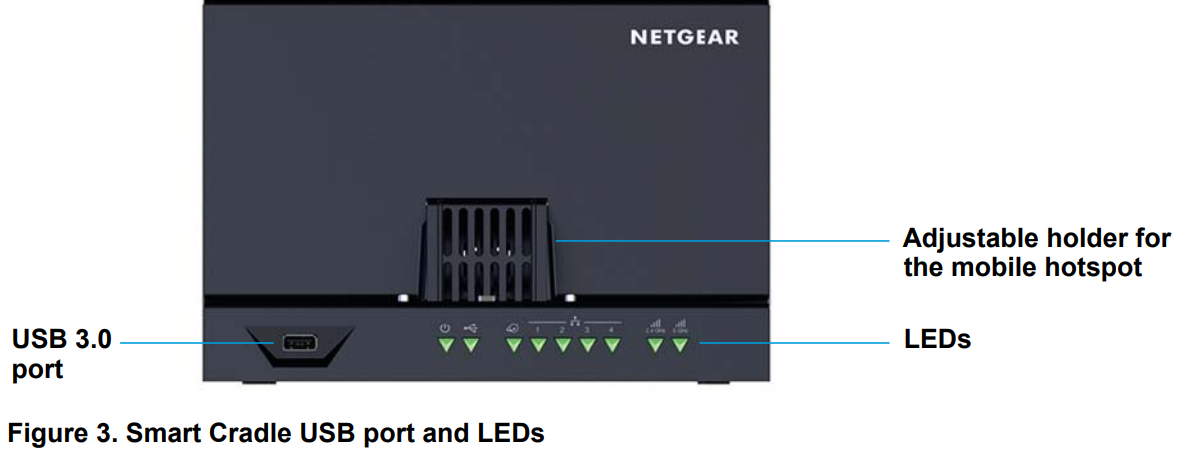
You can slide the adjustable holder forward to secure your mobile hotspot when it is docked.
Table 1. LED descriptions
Rear Panel
The rear panel connections and buttons are shown in the following figure.
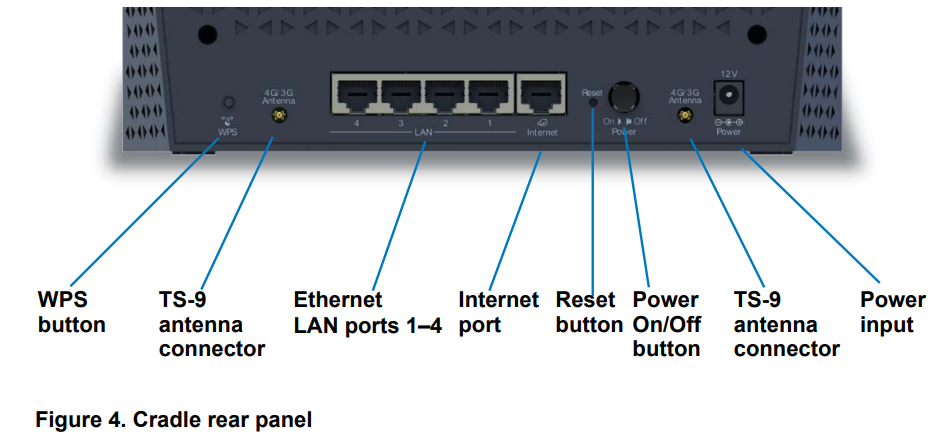
- Pressing the WPS button lets you add a computer or WiFi device to the WiFi network without typing the WiFi network password (security key). For more information about WPS, see Connect to the AirCard Smart Cradle on page 18.
- Pressing the Reset button restores the factory settings.
Attach the External WiFi Antennas
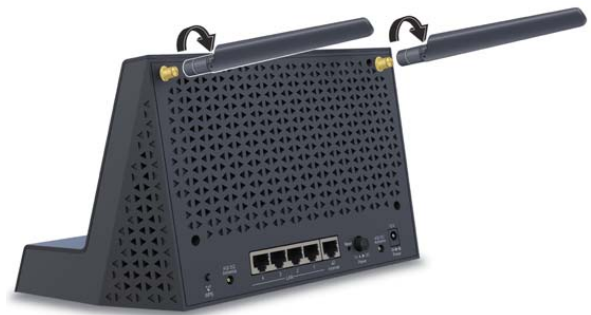
For the best WiFi performance, attach both antennas.
To attach the external WiFi antennas:
- Align the antennas with the antenna posts on the Smart Cradle.
- Attach the antennas on the threaded antenna posts, ensuring that the connection is secure.
Adjust the antenna positions so that they point straight up.
Dock the Mobile Hotspot in the Smart Cradle
To dock the mobile hotspot in the Smart Cradle:
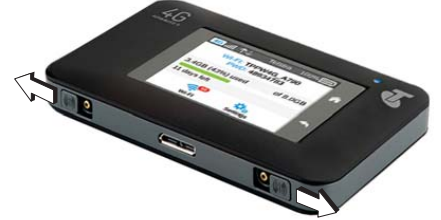
Slide the antenna covers on the bottom of the mobile hotspot to the open position.
Slide the Smart Cradle’s plastic holder back to allow enough room for the mobile hotspot.
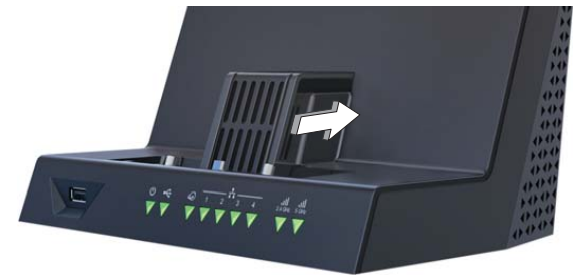
Dock the mobile hotspot in the Smart Cradle.
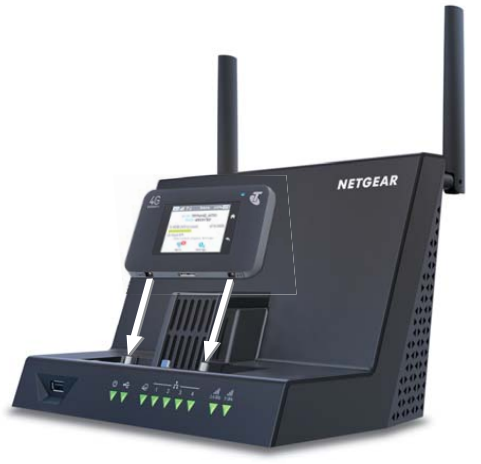
Docking the mobile hotspot for the first time aligns the connectors, so the unit might be stiff going in and out.
Slide the plastic holder forward to secure the mobile hotspot.
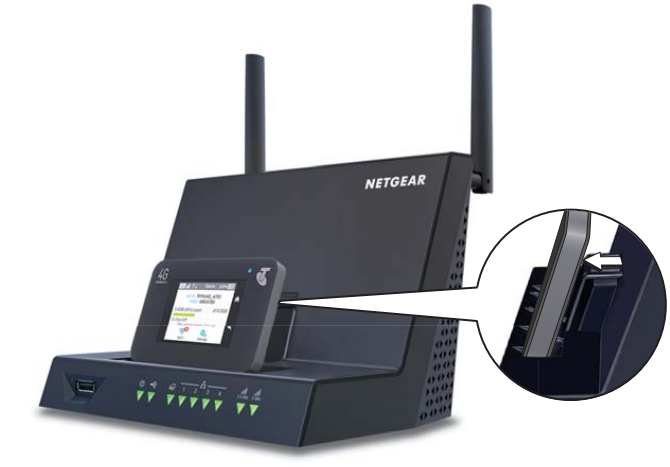
Note: A gap of up to 1.5 mm between the plastic holder and the mobile hotspot is normal. Do not try to push the holder forward to fill the gap.
- When the Smart Cradle detects your mobile hotspot’s Internet connection, the Internet LED lights green and the Smart Cradle uses the mobile hotspot’s Internet connection. The mobile hotspot must have an active Internet service account.
- When your mobile hotspot detects that it is docked, the mobile hotspot LCD and home page indicate that it is docked in the Smart Cradle. The mobile hotspot uses the Smart Cradle’s more powerful internal 3G/4G antennas for better network coverage and charges itself through the Smart Cradle.
- The mobile hotspot disables its WiFi signal so that you can connect to the Smart Cradle’s stronger WiFi signal.
Note: Some hotspots require a firmware update before they automatically disable WiFi when docked. If your mobile hotspot broadcasts its WiFi signal when docked, manually set up your mobile hotspot to disable WiFi.
Undock the Mobile Hotspot from the Smart Cradle
To undock the mobile hotspot from the Smart Cradle:
- Lift the mobile hotspot out of the AirCard Smart Cradle.
Docking the mobile hotspot for the first time aligns the connectors, so the unit might be stiff going in and out. If the mobile hotspot is difficult to lift, gently wiggle it side to side to disconnect it from the AirCard Smart Cradle.
When you remove the mobile hotspot from the Smart Cradle, the Smart Cradle loses its Internet connection, but it can be used as a WiFi router. The mobile hotspot enables its own WiFi again after being undocked so that you can connect to the mobile hotspot WiFi.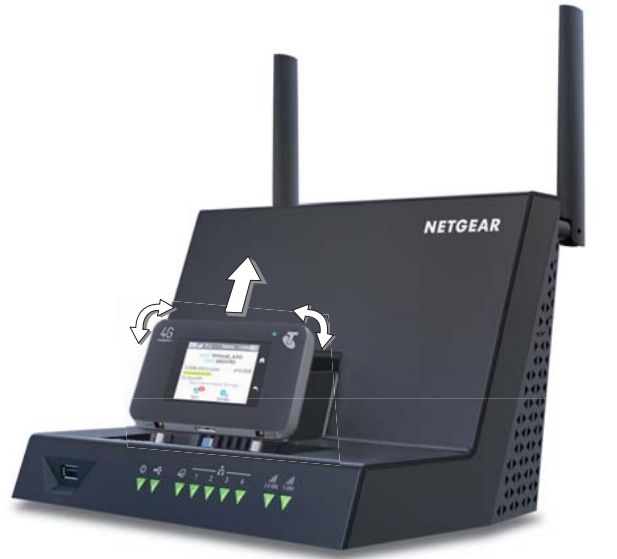
Position the Smart Cradle
The cradle lets you access your network anywhere within the operating range of your wireless network. However, the operating distance or range of your wireless connection can vary significantly depending on the physical placement of your cradle. For example, the thickness and number of walls the wireless signal passes through can limit the range.
Additionally, other wireless access points in and around your home might affect your cradle’s signal. Wireless access points are routers, repeaters, WiFi range extenders, and any other devices that emit a wireless signal for network access.
Position your cradle according to the following guidelines:
Position your cradle according to the following guidelines:
- Place your cradle near the center of the area where your computers and other devices operate, and within line of sight to your wireless devices.
- Make sure that the cradle is within reach of an AC power outlet and near Ethernet cables for wired computers.
- Place the cradle in an elevated location, minimizing the number walls and ceilings between the cradle and your other devices.
- Place the cradle away from electrical devices such as these:
- Ceiling fans
- Home security systems
- Microwaves
- Computers
- Base of a cordless phone
- 2.4 GHz cordless phone
- Place the cradle away from large metal surfaces, large glass surfaces, and insulated walls such as these:
- Solid metal doors
- Aluminum studs
- Fish tanks
- Mirrors
- Brick
- Concrete
Install Your Smart Cradle
To install your cradle:
- Place the cradle in your preferred location.
- Connect the Smart Cradle’s power adapter and plug it into an electrical outlet.
The Power LED lights green within one minute. If the Power LED does not light, press the Power On/Off button on the rear panel of the cradle.
The cradle’s internal fan turns on momentarily when the cradle is powering up and then turns off.
Note: After power up, the cradle’s internal fan turns on only when the cradle senses high temperatures of 40C (104° F) or higher. This might happen during continuous high-data rate transmissions or if the cradle is in a warm location. The fan protects the mobile hotspot and the cradle from high temperatures. Once the mobile hotspot and cradle temperatures return to lower levels, the fan switches off. - Dock the mobile hotspot in the cradle.
- Check the cradle’s Internet LED.
When the cradle detects your mobile hotspot’s Internet connection, the Internet LED lights green and the Smart Cradle uses the mobile hotspot’s Internet connection. The mobile hotspot Internet service account must be active.
When your mobile hotspot detects that it is docked, the mobile hotspot LCD and home page indicate that it is docked in the Smart Cradle. The mobile hotspot uses the Smart Cradle’s more powerful internal 3G/4G antennas for better network coverage and charges itself through the Smart Cradle.
The mobile hotspot disables its WiFi signal so that you can connect to the cradle’s stronger WiFi signal.
Note: Some hotspots require a firmware update before they automatically disable WiFi when docked. If your mobile hotspot broadcasts its WiFi signal when docked, manually set up your mobile hotspot to disable WiFi when USB is connected. - Connect to the Smart Cradle’s WiFi network.
On your computer or WiFi device, find and connect to the WiFi network name on the Smart Cradle label
Netgear AirCard Cradle DC112A Description
For individuals who require a dependable internet connection while on the go, the Netgear AirCard Cradle DC112A is an ideal portable hotspot due to its small size and low weight. It's compatible with most major US carriers and offers 4G LTE connectivity, making it a practical and adaptable option for anyone in need of a mobile hotspot. The DC112A features a microSD card slot that lets you exchange files and media with other linked devices, as well as an integrated rechargeable battery that can run the device for up to 10 hours. In addition, the gadget features a 1.7-inch color LCD display that indicates battery and network status, as well as a USB connector for charging. The DC112A is a fantastic option for people who need to stay connected while on the go because it can connect up to 10 devices at once.
Connect to the AirCard Smart Cradle
Connect to the AirCard Smart Cradle
You can connect to the cradle’s network through a wired or WiFi connection. If you set up your computer to use a static IP address, change the settings so that it uses Dynamic Host Configuration Protocol (DHCP).
Wired Connection
You can connect your computer to the cradle using the supplied Ethernet cable and join the cradle’s local area network (LAN).
To connect your computer to the cradle with an Ethernet cable:
- Make sure that power is supplied to the cradle (its Power LED is lit).
- Connect an Ethernet cable to an Ethernet port on your computer.
- Connect the other end of the Ethernet cable to one of the numbered Ethernet ports. Your computer connects to the local area network (LAN). A message might display on your computer screen to notify you that an Ethernet cable is connected.
WiFi Connection
You can connect to the cradle’s WiFi network with Wi-Fi Protected Setup (WPS) or you can find and select the WiFi network.
To use WPS to connect to the WiFi network:
- Make sure that power is supplied to the cradle (its Power LED is lit).
- Check the WPS instructions for your computer or wireless device.
- Press the WPS button on the cradle.
- Within two minutes, on your computer or WiFi device, press its WPS button or follow its instructions for WPS connections.
Your computer or wireless device connects to the WiFi network.
To find and select the WiFi network:
- Make sure that power is supplied to the cradle (its Power LED is lit).
- On your computer or wireless device, find and select the WiFi network.
The WiFi network name is on the cradle’s label. - Join the WiFi network and enter the WiFi password.
The password is on the cradle’s label.
Your wireless device connects to the WiFi network.
Types of Logins
Separate types of logins serve different purposes. It is important that you understand the difference so that you know which login to use.
Types of logins:
- Mobile broadband account login
The login that your ISP gave you at the time of purchase logs you in to your Internet service. Your service provider gave you this login information in a letter or some other way. If you cannot find this login information, contact your service provider. - WiFi network key or password
Your cradle is preset with a unique wireless network name (SSID) and password for wireless access. This information is on the cradle label. - Cradle login
This logs you in to the cradle interface from a web browser as admin.
Change the Language
By default, the language is set as Auto.
To change the language:
- Launch a web browser from a computer or wireless device that is connected to the Smart Cradle.
- In the address field of the browser, enter http://netgear.cradle or http://192.168.100.1. A login prompt displays.
- Enter the cradle user name and password.
The user name is admin. The default password is password. The user name and password are case-sensitive.
The BASIC Home screen displays. - In the upper right corner, select a language from the list.
- When prompted, click the OK button to confirm this change.
The screen refreshes with the language that you selected.
Log In to the AirCard Smart Cradle
You can log in to the cradle to view or change its settings.
To log in to the AirCard Smart Cradle:
- Connect a computer to the Smart Cradle:
For a WiFi connection, on your computer or WiFi device, find and connect to the WiFi network name on the Smart Cradle label.
For a wired connection, use an Ethernet cable to connect a computer to an Ethernet LAN port on the rear panel of the Smart Cradle. - Launch a web browser.
- In the address field of the browser, enter http://netgear.cradle or http://192.168.100.1 A login prompt displays.
- Enter the cradle user name and password.
The user name is admin. The default password is password. The user name and password are case-sensitive.
The BASIC Home screen displays.
Access the AirCard Smart Cradle with NETGEAR genie Apps
The genie app is the easy dashboard for managing, monitoring, and repairing your home network. The genie app can help you with the following:
- Automatically repair common wireless network problems.
- Easily manage cradle features like Live Parental Controls, guest access, Internet traffic meter, speed test, and more.
To use the genie app to access the cradle
- Visit the NETGEAR genie web page at https://www.NETGEAR.com/genie
- Follow the onscreen instructions to install the app on your smartphone, tablet, or computer.
- Launch the genie app.
The genie app dashboard screen displays.
Access USB Devices Through the Internet
You can access USB devices through the Internet when you’re not home.
To access USB devices from a remote computer:
- Launch a web browser on a computer that is not on your home network.
- Connect to your Smart Cradle:
- To connect with Dynamic DNS, type the DNS name.
To use a Dynamic DNS account, you must enter the account information in the Dynamic DNS screen. See Dynamic DNS on page 131. - To connect without Dynamic DNS, type the cradle’s Internet port IP address. You can view the cradle’s Internet IP address on the BASIC Home screen.
- To connect with Dynamic DNS, type the DNS name.
You can use FTP to share files on a USB device connected to the cradle.
Set Up FTP Access Through the Internet
To set up FTP access:
- Launch a web browser from a computer or wireless device that is connected to the Smart Cradle.
- In the address field of the browser, enter http://netgear.cradle or http://192.168.100.1. A login prompt displays.
- Enter the cradle user name and password.
The user name is admin. The default password is password. The user name and password are case-sensitive.
The BASIC Home screen displays. Select ADVANCED > USB Storage > Advanced Settings.
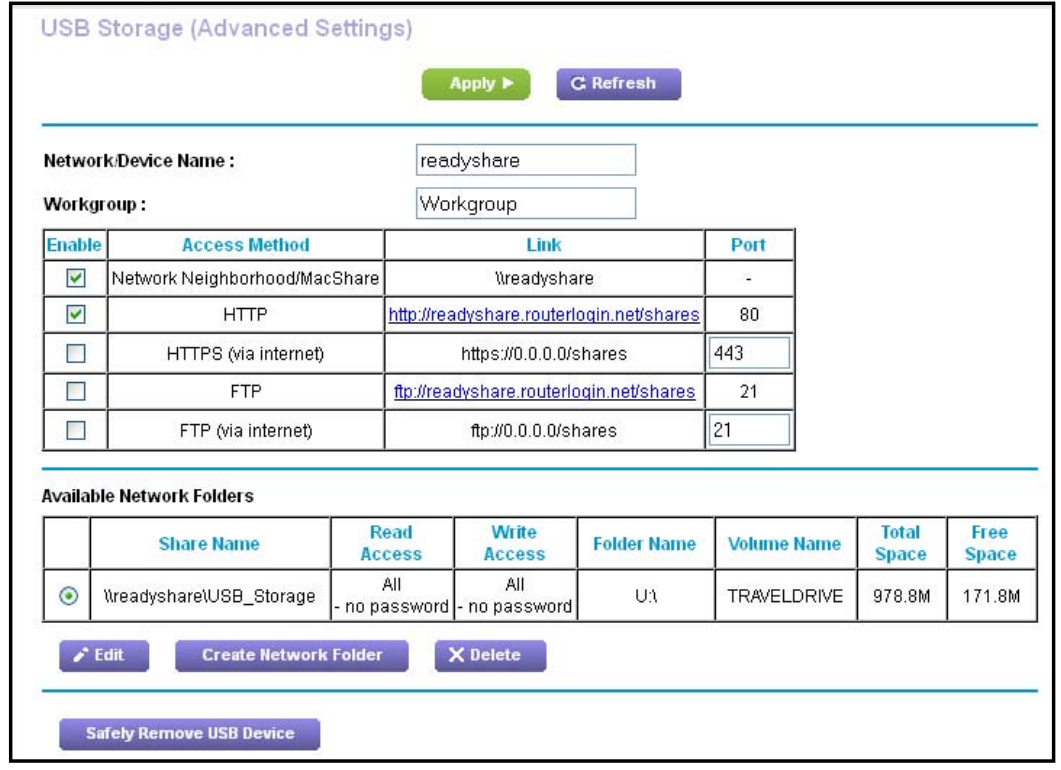
- Select the FTP (via Internet) check box.
- Click the Apply button.
Your changes are saved. To limit access to the admin user, click the Edit button.
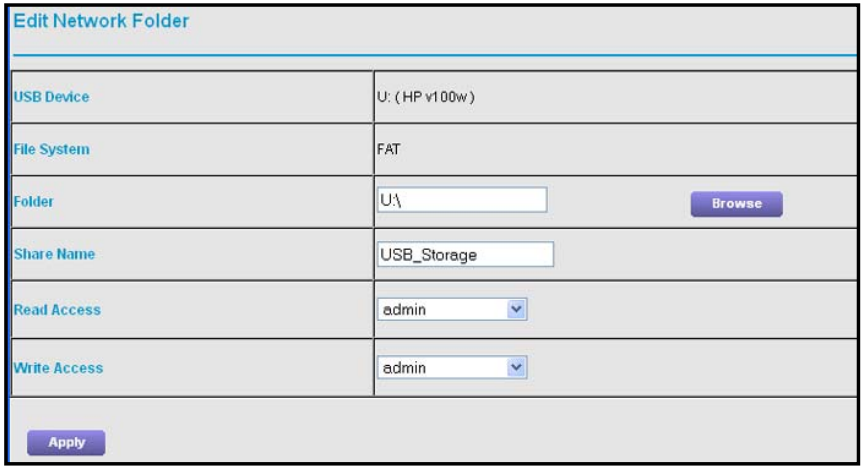
- In the Read Access list, select admin.
- In the Write Access list, select admin.
- Click the Apply button.
Your changes are saved.
Access USB Devices Through the Internet with FTP
To access a USB device with FTP from a remote computer:
- To download, launch a web browser.
- To upload, use an FTP client such as FileZilla.
- Type ftp:// and the Internet port IP address in the address field of the browser.
For example, type ftp://10.1.65.4. If you are using Dynamic DNS, type the DNS name.
For example, type ftp://MyName.mynetgear.com. - When prompted, log in:
- To log in as admin, in the user name field, enter admin and in the password field, enter the same password that you use to log in to the cradle.
- To log in as guest, in the user name field, enter guest.
The guest user name does not use a password. To restrict access to the USB device, you can specify that only the admin user can access it.
Your Personal FTP Server
With your customized free URL, you can use FTP to access your network when you aren’t home through Dynamic DNS. To set up your FTP server, you must register for a free
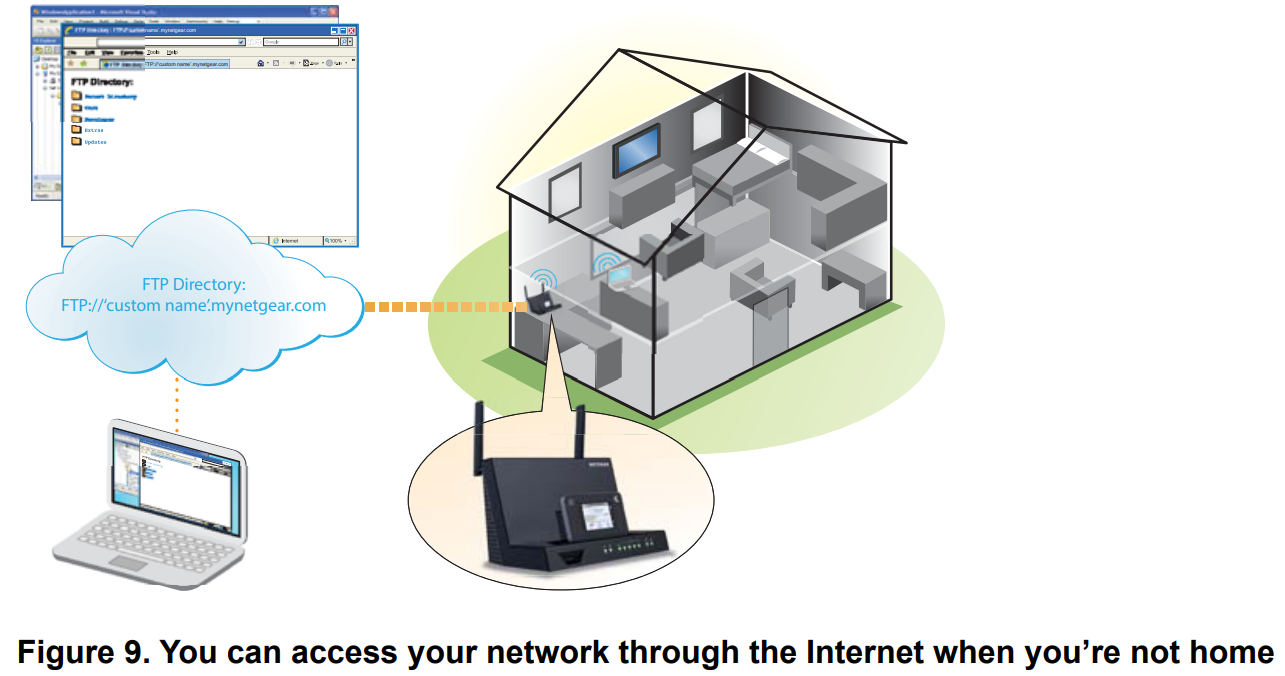
Note: The cradle supports only basic DDNS and the login and password might not be secure. You can use DDNS with a VPN tunnel for a secure connection.
Dynamic DNS
Internet service providers (ISPs) assign numbers called IP addresses to identify each Internet account. Most ISPs use dynamically assigned IP addresses. This means that the IP address can change at any time. You can use the IP address to access your network remotely, but most people don’t know what their IP addresses are or when this number changes.
To make it easier to connect, you can get a free account with a Dynamic DNS service that lets you use a domain name to access your home network. To use this account, you must set up the cradle to use Dynamic DNS. Then the cradle notifies the Dynamic DNS service provider whenever its IP address changes. When you access your Dynamic DNS account, the service finds the current IP address of your home network and automatically connects you.
If your ISP assigns a private WAN IP address (such as 192.168.x.x or 10.x.x.x), the Dynamic DNS service does not work because private addresses are not routed on the Internet.
Set Up a New Dynamic DNS Account
To set up Dynamic DNS and register for a free NETGEAR account:
- Launch a web browser from a computer or wireless device that is connected to the Smart Cradle.
- In the address field of the browser, enter http://netgear.cradle or http://192.168.100.1. A login prompt displays.
- Enter the cradle user name and password.
The user name is admin. The default password is password. The user name and password are case-sensitive.
The BASIC Home screen displays. Select ADVANCED > Advanced Settings > Dynamic DNS.
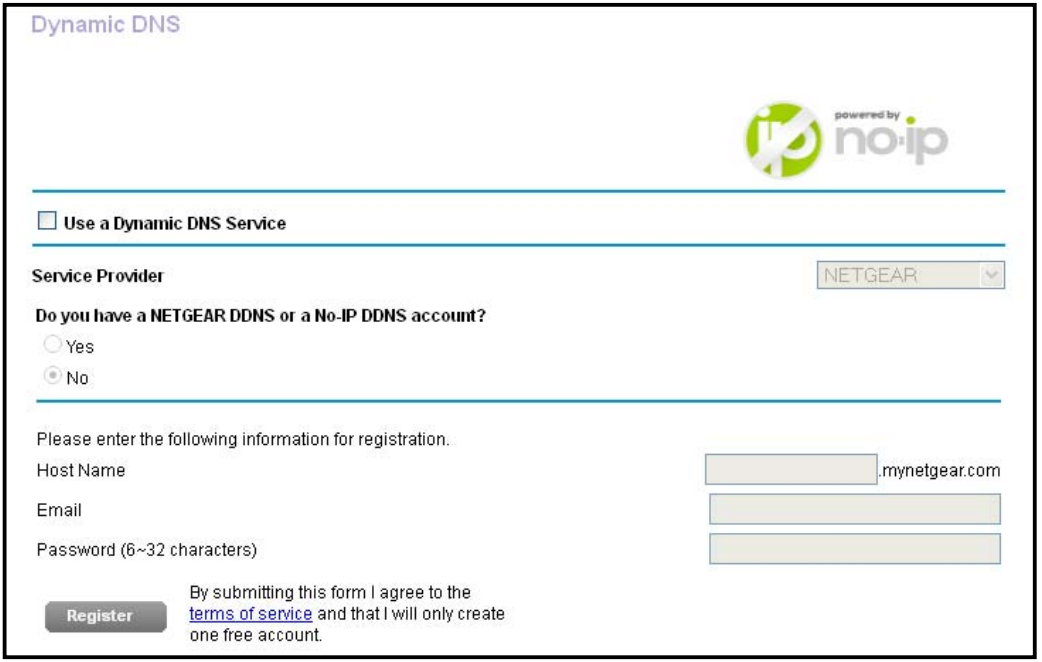
- Select the Use a Dynamic DNS Service check box.
- In the Service Provider list, select NETGEAR.
- Select the No radio button.
- In the Host Name field, type the name that you want to use for your URL.
The host name is sometimes called the domain name. Your free URL includes the host name that you specify and ends with mynetgear.com. For example, specify MyName.mynetgear.com. - In the Email field, type the email address for your account.
- In the Password (6-32 characters) field, type the password for your account.
- Click the Register button.
- Follow the onscreen instructions to register for your NETGEAR Dynamic DNS service.
Specify a DNS Account That You Already Use
If you already use a Dynamic DNS account with NETGEAR no-ip, www.no-ip.com, or Dyn.com, you can set up the cradle to use your account.
To set up Dynamic DNS if you already use an account:
- Launch a web browser from a computer or wireless device that is connected to the Smart Cradle.
- In the address field of the browser, enter http://netgear.cradle or http://192.168.100.1. A login prompt displays.
- Enter the cradle user name and password.
The user name is admin. The default password is password. The user name and password are case-sensitive.
The BASIC Home screen displays. - Select ADVANCED > Advanced Settings > Dynamic DNS.
- Select the Use a Dynamic DNS Service check box.
- Select a service provider from the list.
- Select the Yes radio button.
The screen adjusts and displays the Show Status, Cancel, and Apply buttons. - In the Host Name field, type the host name (sometimes called the domain name) for your account.
- For a https://www.no-ip or https://Dyn.com account, in the User Name field, type the user name for your account.
- For a NETGEAR account at www.no-ip, in the Email field, type the email address for your account.
- In the Password (6-32 characters) field, type the password for your DDNS account.
- Click the Apply button.
Your changes are saved. - To verify that your Dynamic DNS service is enabled in the cradle, click the Show Status button.
A message displays the Dynamic DNS status.
Change the Dynamic DNS Settings
To change your settings:
- Launch a web browser from a computer or wireless device that is connected to the Smart Cradle.
- In the address field of the browser, enter http://netgear.cradle or http://192.168.100.1. A login prompt displays.
- Enter the cradle user name and password.
The user name is admin. The default password is password. The user name and password are case-sensitive.
The BASIC Home screen displays. - Select ADVANCED > Advanced Settings > Dynamic DNS.
The Dynamic DNS screen displays. - Change your DDNS account settings as necessary.
- Click the Apply button.
Your changes are saved.
Set Up Your Personal FTP Server
To set up your personal account and use FTP:
- Get your free NETGEAR Dynamic DNS domain name.
- Make sure that your Internet connection is working.
Your cradle must use a direct Internet connection. It cannot connect to a different router to access the Internet. - Connect a USB hard disk drive to the USB port on the cradle.
- Set up FTP access in the cradle.
- On a remote computer with Internet access, you can use FTP to access your cradle using ftp://yourname.mynetgear.com
Battery Tips
- Charge batteries in a room-temperature environment, which is generally between 68° F and 79° F (20° C and 26° C). Charging may be temporarily disabled if the battery temperature exceeds 113° F (60° C).
- If a battery exhibits significantly shorter runtime or discharge capacity compared to new, it may have reached the end of its reasonable lifetime; consider replacing it.
- A battery that does not charge or exhibits excessive charging time may have reached the end of its life and may need to be replaced.
- All batteries degrade and lose charge capacity over time as a result of use or storage, and eventually need to be replaced.
- Batteries are best stored in a cool, dark, dry place. Avoid storage in direct sunlight and in vehicles parked outdoors.
- Batteries may get warm while charging and discharging; this is normal behavior for all batteries.
- Use the AC adapter and the USB cable that came with this device.
- Use the latest firmware; check for updates on a regular basis.
- Device performance and runtime are affected by workload or usage. Higher workloads or usage can lead to higher battery temperatures and faster battery power consumption.
- Streaming large amounts of data affects the power consumption and reduces the operating time of the battery.
General Battery Safety
- Stop using a battery if its case appears damaged, swollen, or compromised. Examples include, but are not limited to, leaking, odors, dents, corrosion, rust, cracks, swelling, melting, and scratches.
- Do not expose batteries to fire or other heat- generating environments
- Do not place the battery or the device in areas that may get hot. Examples include, but are not limited to, on or near a space heater, cooking surface, cooking applance, iron, radiator, or fireplace.
- Do not get the battery or the device wet. Even though they may dry and appear to operate normally, the circuitry can slowly corrode and defeat its safety circuitry.
- Do not crush, puncture, deform, or put a high degree of pressure on the battery, which can cause an internal short circuit, resulting in overheating.
- Avoid dropping the battery or the device. Dropping it, especially on a hard surface, may cause damage to the battery and the device. If you suspect damage to the battery or the device, replace it.
- When the battery is outside the device, do not allow the battery to come in contact with metal objects, such as coins, keys, jewelry, or tools.
- Do not disassemble or modify batteries. Do not use a battery for anything other than its intended purpose.
Troubleshooting
Troubleshoot with the LEDs
You can use the LEDs to help identify the cause of problems and troubleshoot.
Standard LED Behavior When the AirCard Smart Cradle is Powered On
After you turn on power to the cradle, verify that the following sequence of events occurs:
- When power is first applied, verify that the Power LED is lit.
- After approximately 30 seconds, verify the following:
- The Power LED is solid green.
- The Internet LED is lit.
- The WiFi LED is lit unless you turned off the wireless radio.
You can use the LEDs on the front panel of the cradle for troubleshooting.
Power LED Is Off or Blinking
Make sure that the power adapter is securely connected to your cradle and securely connected to a working power outlet.
Check that you are using the power adapter that NETGEAR supplied for this product.
If the Power LED blinks slowly and continuously, the cradle firmware is corrupted. This can happen if a firmware upgrade is interrupted, or if the cradle detects a problem with the firmware. If the error persists, a hardware problem occurred.
Power LED Stays Amber
When the cradle is turned on, the Power LED turns amber for about 20 seconds and then turns green. If the LED does not turn green, a problem occurred in cradle.
If the Power LED is still amber one minute after you turn on power to the cradle, do the following:
- Turn off the power and then turn it back on to see if the cradle recovers.
- Press and hold the Reset button to return the cradle to its factory settings.
If the error persists, it is possible that a hardware problem occurred.
LEDs Never Turn Off
When the cradle is turned on, the LEDs light for about 10 seconds and then turn off. If all the LEDs stay on, this indicates a fault within the cradle.
If all LEDs are still lit one minute after power-up, do the following:
- Cycle the power to see if the cradle recovers.
- Press and hold the Reset button to return the cradle to its factory settings.
If the error persists, it is possible that a hardware problem occurred.
Internet LED Is Off
If the Internet LED does not light, check the following:
- The mobile hotspot might not be securely docked. Undock the mobile hotspot and then dock it again.
- For an Ethernet WAN connection, make sure that the Ethernet cable connections are secure at the cradle and at the modem or computer.
- Make sure that power is turned on to the connected modem or computer.
- Be sure that you are using the correct cable.
WiFi LEDs Are Off
If the WiFi LED stays off, check to see if someone logged in an disabled the wireless radios. The WiFi LEDs are lit when the wireless radio is turned on.
Cannot Log In to the Cradle
If you are unable to log in to the cradle from a computer on your local network, check the following:
- If you are using an Ethernet-connected computer, check the Ethernet connection between the computer and the cradle.
- Make sure that the IP address of your computer is on the same subnet as the cradle. If you are using the recommended addressing scheme, your computer’s address is in the range of 192.168.100.2 to 192.168.100.254.
- If your computer’s IP address is shown as 169.254.x.x, recent versions of Windows and Mac OS generate and assign an IP address if the computer cannot reach a DHCP server. These autogenerated addresses are in the range of 169.254.x.x. If your IP address is in this range, check the connection from the computer to the cradle, and reboot your computer.
- If your cradle’s IP address was changed and you do not know the current IP address, clear the cradle’s configuration to factory defaults. This sets the cradle’s IP address to 192.168.100.1. For more information, see Factory Settings on page 154.
- Make sure that your Java, JavaScript, or ActiveX is enabled in your browser. If you are using Internet Explorer, click the Refresh button to be sure that the Java applet is loaded.
- Try quitting the browser and launching it again.
- Make sure that you are using the correct login information. The user name is admin, and the default password is password. Make sure that Caps Lock is off when you enter this information.
- If you are attempting to set up your NETGEAR cradle as a replacement for an ADSL gateway in your network, the cradle cannot perform many gateway services. For example, the cradle cannot convert ADSL or cable data into Ethernet networking information.
Pros & Cons
Pros
- 4G LTE connectivity
- Compatible with most major US carriers
- Connects up to 10 devices simultaneously
- Built-in rechargeable battery
- MicroSD card slot for sharing media and files
Cons
- May not be compatible with some carriers
- Can be expensive to use with a pay-as-you-go data plan
- No built-in ethernet port
Faqs
What carriers is the Cradle compatible with?
How does the cradle improve WiFi performance?
How do I access the Netgear settings?
Can I use the Netgear AirCard Cradle outside of the US?
How do I update the Netgear AirCard Cradle firmware?
What are the benefits of the USB ports on the DC112A?
Leave a Comment
