Netis SEK204 Wireless IP Camera & Security kit | Installation Guide
Content
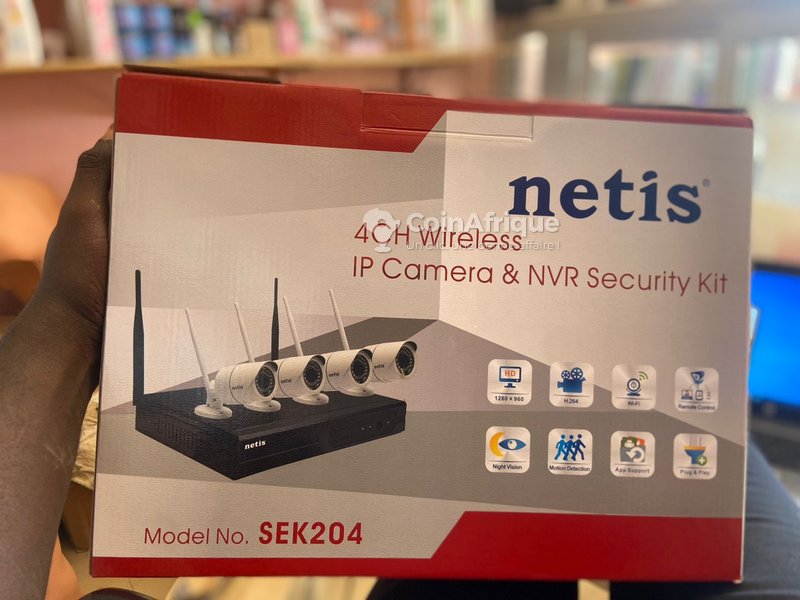
Introduction of Netis SEK204 Wireless IP Camera & Security Kit
The SEK204 Wireless IP Camera & Security Kit is a top-notch home security solution that offers crystal-clear 1080p video recording, night vision, and motion detection capabilities. With a user-friendly mobile app and easy setup process, this security kit is perfect for anyone looking to secure their home or office. The estimated price of the Netis SEK204 Wireless IP Camera & Security Kit is $199.99, and it is now available for purchase.
Detailed Specifications
Here are the detailed specifications of the Netis Wireless IP Camera & Security Kit
- 1080p Full HD resolution
- 1/2.9" Progressive Scan CMOS sensor
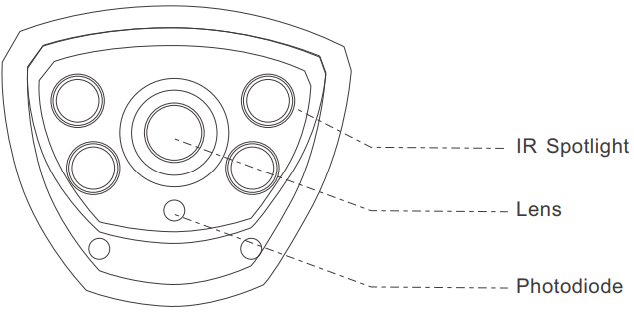
- 3.6mm fixed lens with 80.6° viewing angle
- Night vision range up to 30 feet
- Motion detection with adjustable sensitivity
- Two-way audio with built-in microphone and speaker
- IP66 weatherproof rating
- Wireless N connectivity (802.11b/g/n)
- H.264 video compression
- Supports up to 128GB microSD card (not included)
Description of SEK204 Wireless IP Camera & Security Kit
The SEK204 Wireless IP Camera & Security Kit is a high-quality home security solution that offers crystal-clear 1080p video recording, night vision, and motion detection capabilities. The camera features a 1/2.9" Progressive Scan CMOS sensor and a 3.6mm fixed lens with a 80.6° viewing angle, providing a clear and wide view of your home or office. The camera's night vision range is up to 30 feet, ensuring that you can see what's happening even in low-light conditions. The Netis Wireless IP Camera & Security Kit also features motion detection with adjustable sensitivity, allowing you to customize the sensitivity of the motion detection to suit your needs. The camera's two-way audio feature lets you hear what's happening in your home or office, and also lets you communicate with anyone who's there. The camera has an IP66 weatherproof rating, making it suitable for both indoor and outdoor use.
Package Contents
The following items should be found in your package
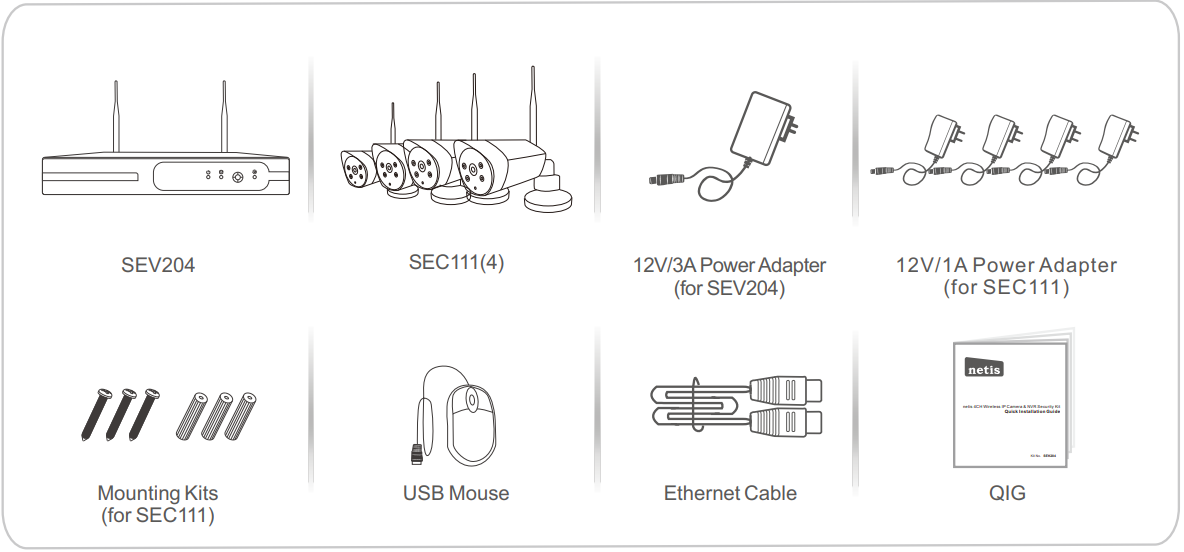
- SEV204: 4CH Wireless NVR
- SEC111: 720P HD Wireless IP Camera
- The Mounting Kits should including plastic wall anchors and self-tapping screws. They are used for SEC111 fixing, each of the SEC111 with a pack of them.
Hardware Information
SEV204
Front Panel

LED | Status | Indication |
PWR | On | Thedevice is poweredon. |
Off | Thedevice is poweredoff. | |
HDD | Flashing | TheHDD is workingproperly. |
Off | There is no HDD or the HDD doesn't formatted. | |
SYS | Flashing | Thedevice is workingproperly. |
Off | There's a software failure. |
Rear Panel
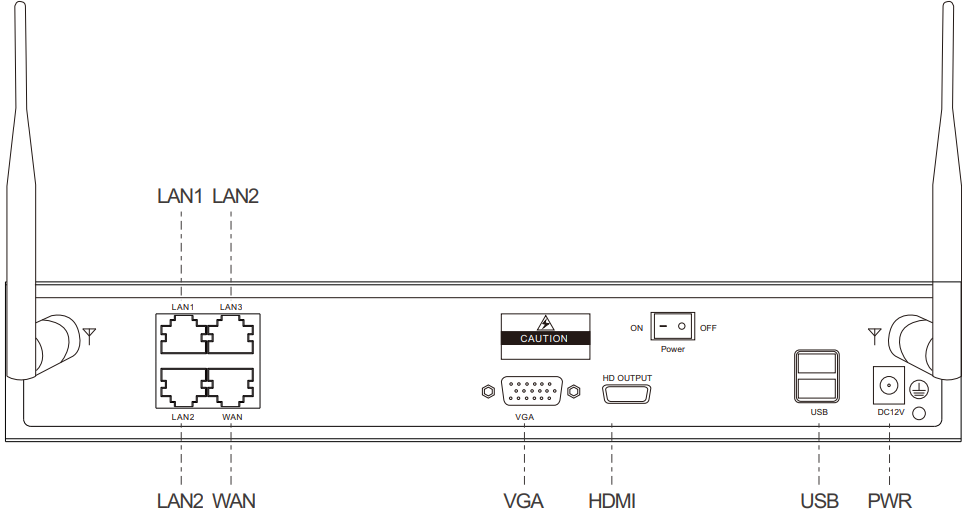
Interface | Description |
|
|
LAN1/LAN2/LAN3 | The LAN port is used to connect to IPC camera or dock with the IP camera through Ethernet cable. |
WAN | TheWAN port is used to connect to the Internet. |
VGA/HDMI Interface | The VGA/HDMI interface is used to connect to display device. |
USB Interface | The USB interface is used to connect to the providedUSB Mouse or backup via U disk, USB mobile HDD etc. |
Power Switch | Thepower switch is used to power on/offthe device. |
PWR | The PWR port is used to connect to the provided 12V/3A PowerAdapter. |
SEC111
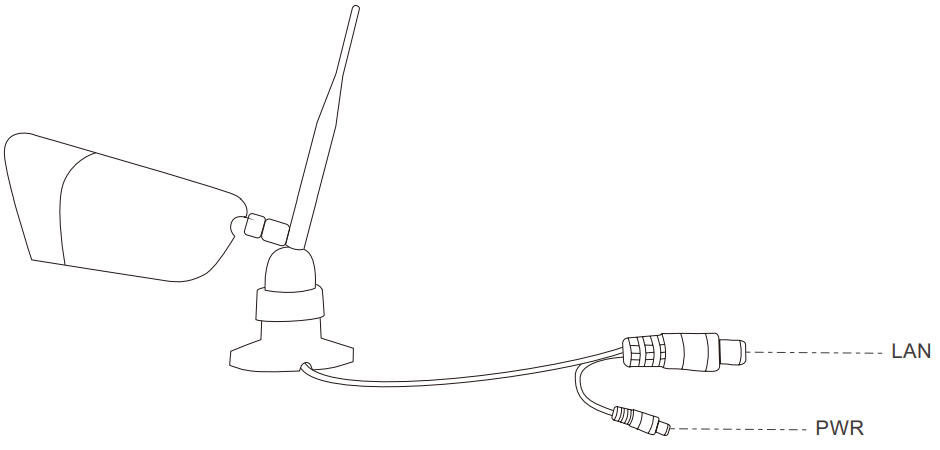
Interface | Description |
LAN | TheLAN port is used to connect to LAN1/LAN2/LAN3 port of the wirelessNVR through Ethernet cable. |
PWR | ThePWR port is used to connect to the provided 12V/1A PowerAdapter. |
Setup Guide of Netis SEK204
Setting up the Netis Wireless IP Camera & Security Kit is easy and straightforward. Here's how you can do it
- Install the microSD card (not included) into the camera.
- Connect the camera to a power source using the included power adapter.
- Download the Netis app from the App Store or Google Play Store.
- Launch the app and follow the on-screen instructions to connect the camera to your wireless network.
- Once the camera is connected, you can view its live video feed and adjust its settings using the app.
Typical Application
Please check the application according to your network environment, and follow the corresponding steps for the application.
Typical Application and hardware connection as follows


- Connect the provided USB Mouse to the USB Interface.
- Connect your display device to the VGA/HDMI Interface via VGA/HDMI cable.
- Connect the WAN port of Wireless NVR to an xDSL/Cable/Fiber modem or uplink Ethernet port with an Ethernet cable.
Note: There is no need to connect to the Internet for local use, if you want to access remotely you should connect it. - Plug the provided 12V/3A Power Adapter into the PWR port of wireless NVR and the other end to a stand electrical wall socket.
- Plug the provided 12V/1A Power Adapter into the PWR port of IP Camera and the other end to a stand electrical wall socket.
- Then go to “4. Setup Wizard”, to configure them.
Setup Wizard
It is quite easy to configure them, here we provide step-by step configuration process of the surveillance system.
- Power on the wireless NVR and wireless IP cameras, wait for 1 minute, the monitoring pictures will appear on the display screen. Now you can mount the wireless IP cameras to where you need, and please refer to “5. Hardware Installation” to select the best position to install them.
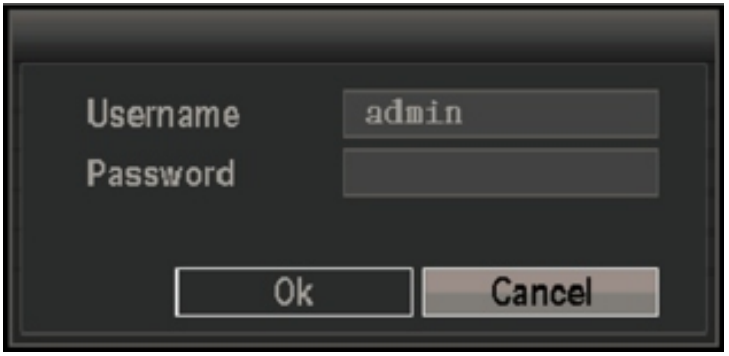
If you want to do more settings, please go on with the steps to finish the Setup Wizard. Right-click on the windows, select “Setup Wizard” from the shortcut menu list, then pops up the login window on the display screen. In default, username is “admin”and password is empty, left-click on “OK”.
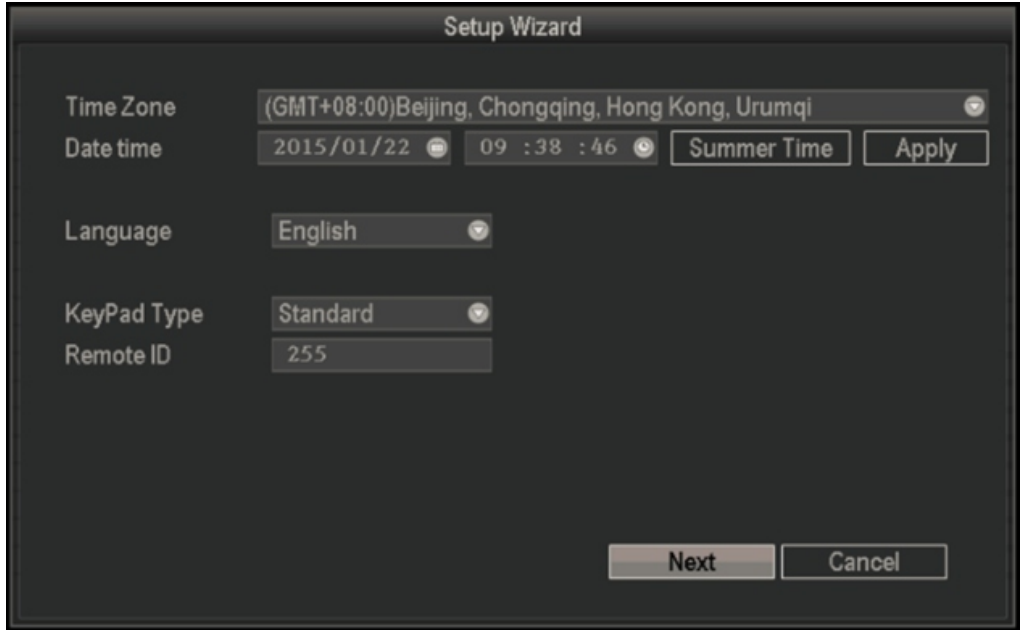
Open the Setup Wizard window, here you can set the time zone, date time, language, left-click on “Next”.
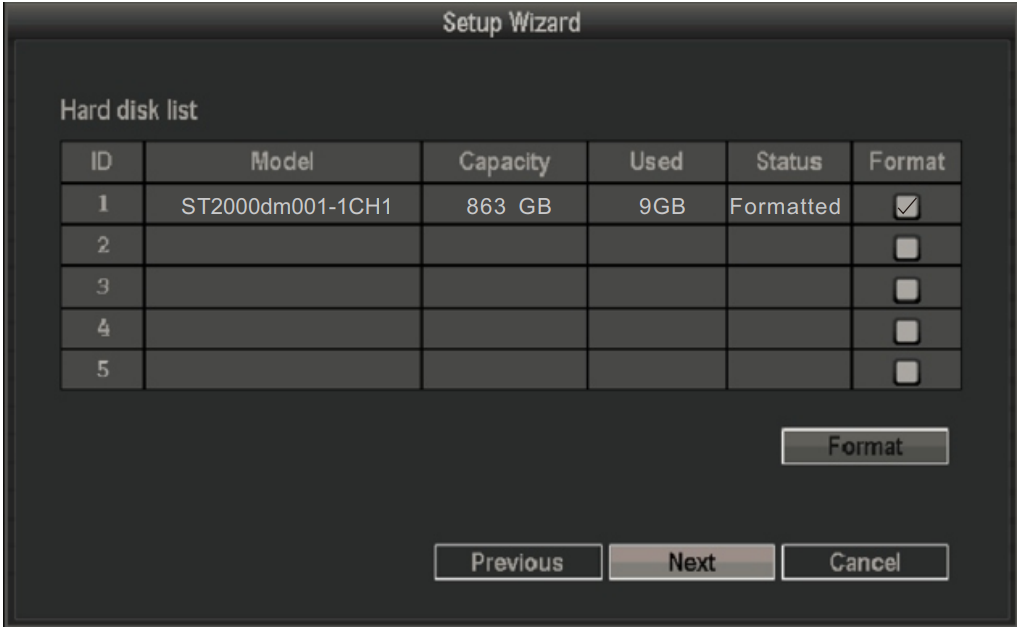
Hard disk list, the HDD has been formatted in the initial state, left-click on “Next”.
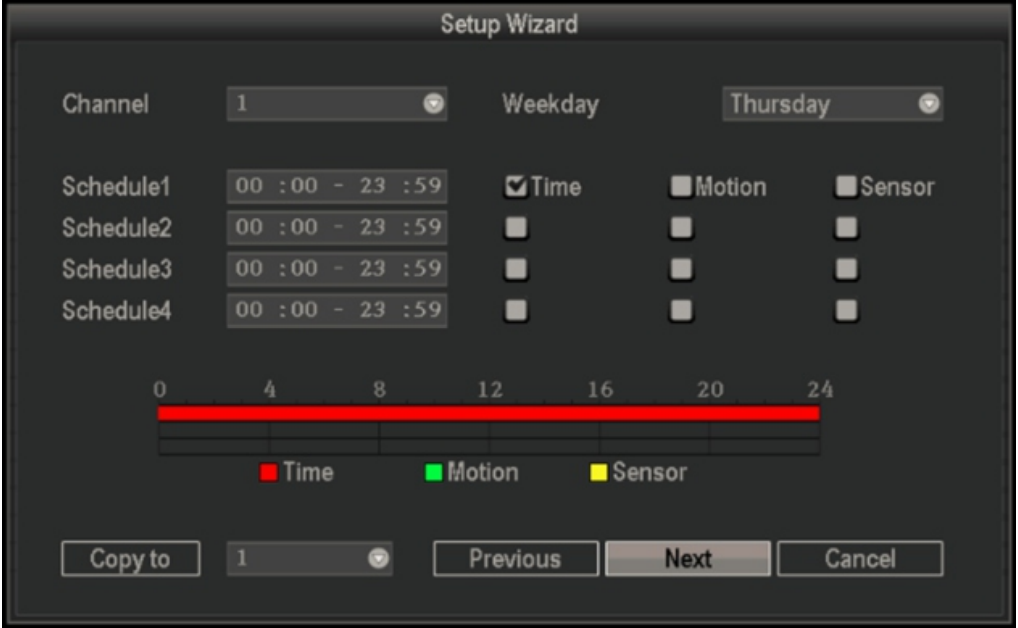
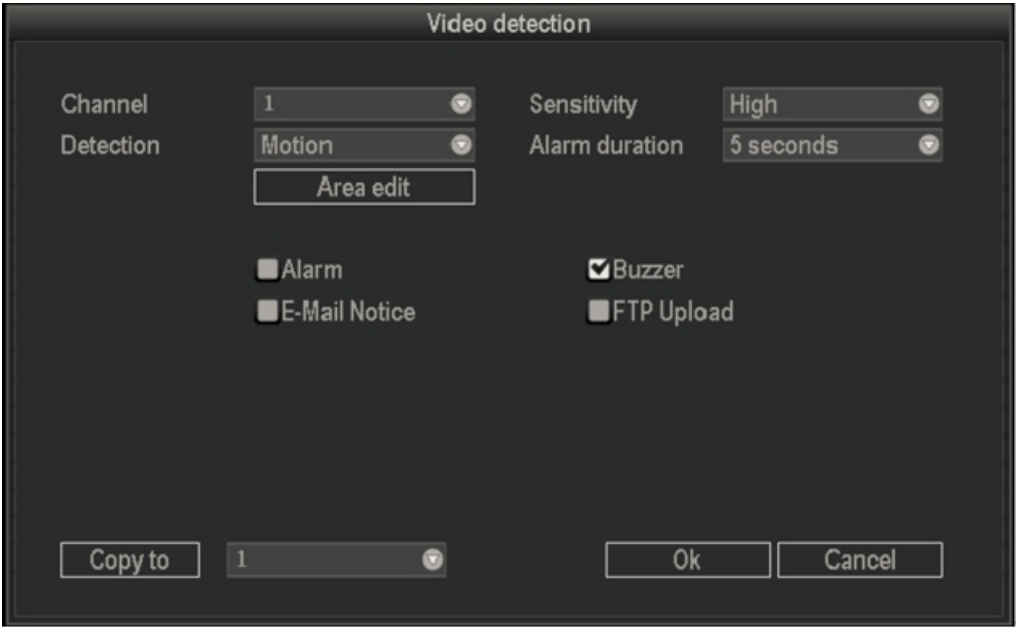
Recording settings for each channel. You can choose different time range for recording in the motion detection record mode or alarm trigger record mode, also you can copy the settings to other channels. Left-click on “Next”.
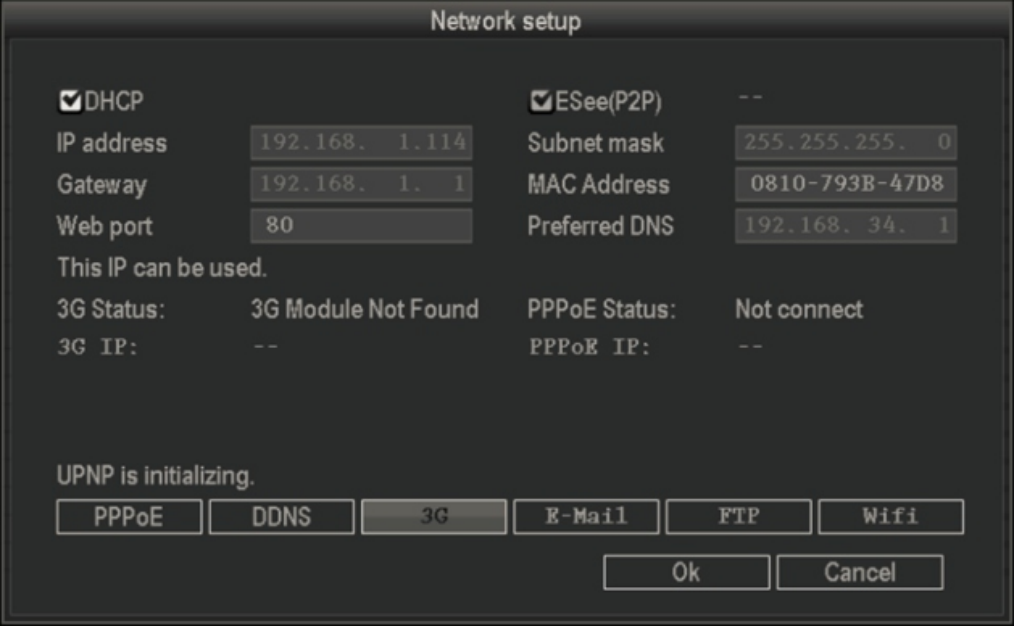
Internet connection. In default the connection type is DHCP, you can manually select the type and fill in the needed network parameters from your ISP. Left-click on “Next”, then the system will search IP camera automatically.
Note: The wireless NVR support three Internet connection types.
DHCP: The wireless NVR will automatically receive the IP parameters from your ISP. Static IP: Please enter the IP address, default gateway, subnet mask, preferred DNS Servers given by your ISP.
PPPoE: Please enter the username and password given by your ISP.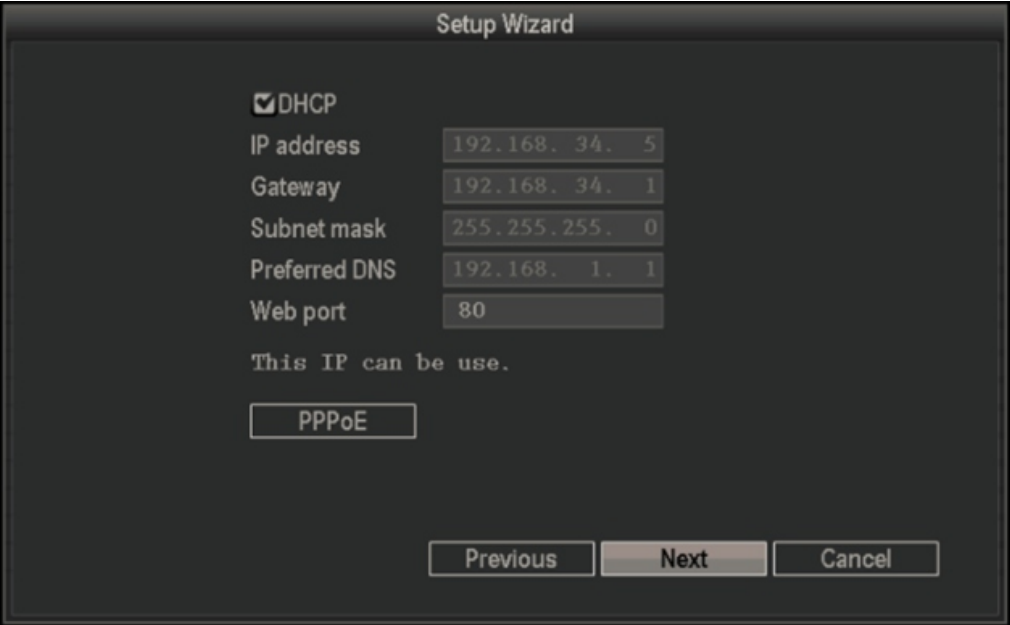
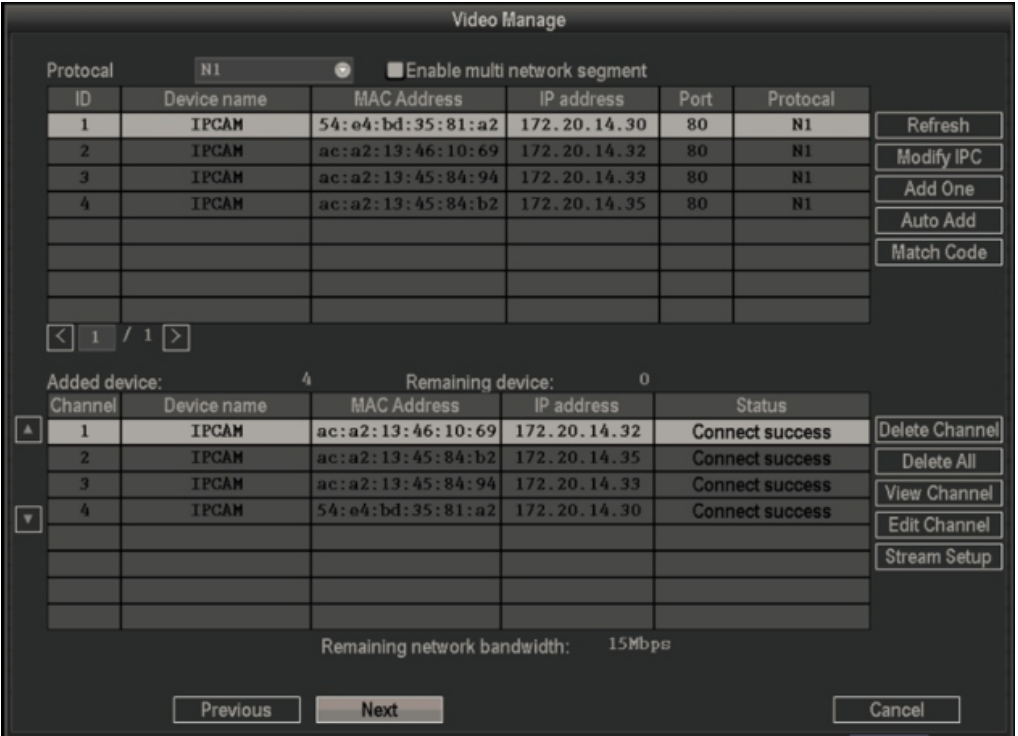
Video manage, here you can edit channel, set stream, match code and so on. Left-click on “Next”.
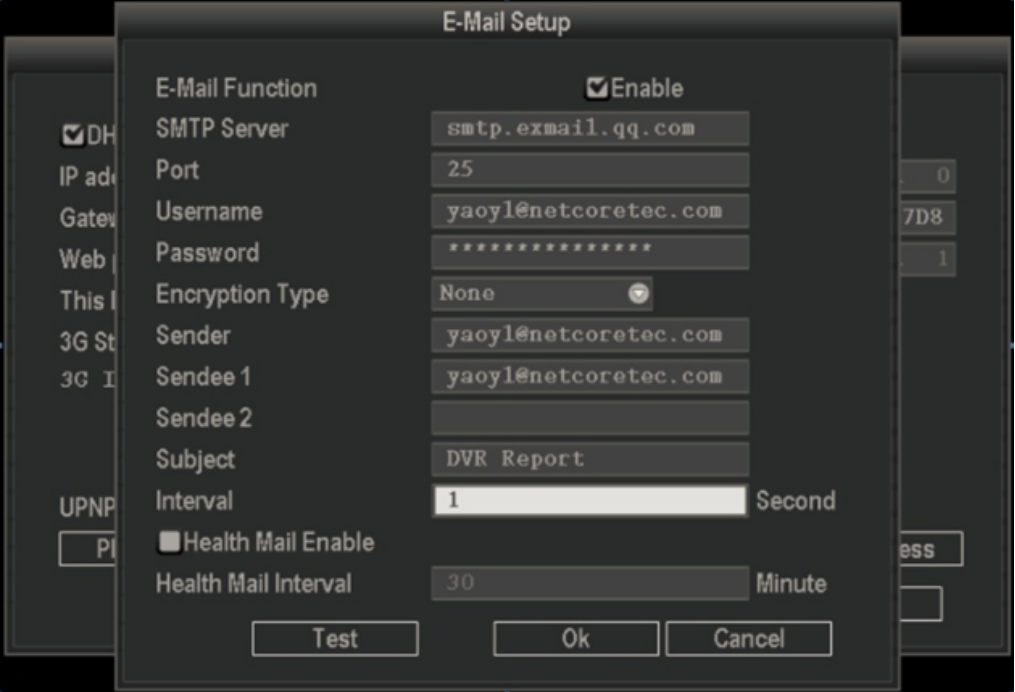
Note: If you want to enable the buzzer alarm function. Please click on “Edit Channel”, and select stream type “Video-Alarm”. Now the function is enabled. Then go to “Main Menu” -> “System Setup”->“Video Detection” to check “Buzzer”, also you can check “E-mail Notice”, and go back to “System Setup” -> “Network Setup” to set the E-Mail.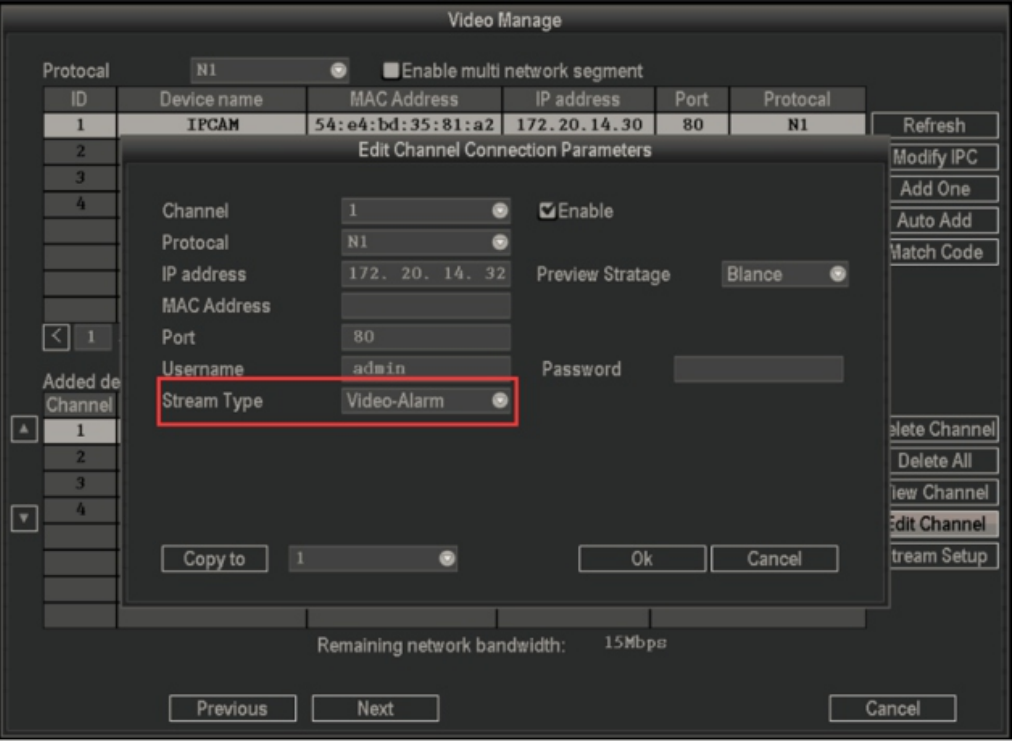
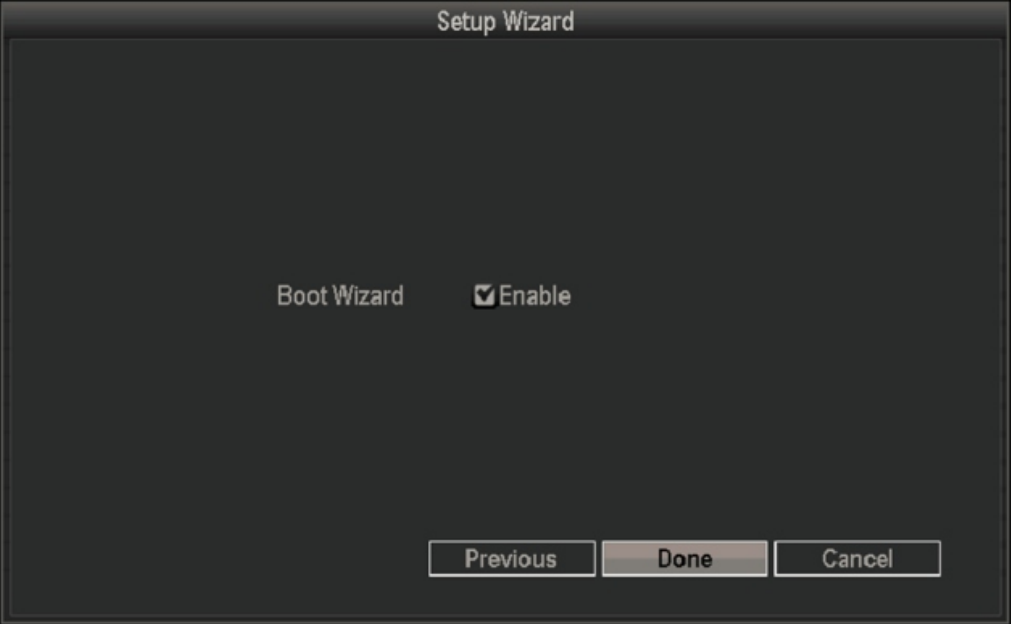
- Left-click on “Done”, the Setup Wizard is finished.
Hardware Installation
There are three steps to install the wireless IP camera & NVR security kit
- Well locate the wireless NVR Wireless NVR is suggested to be located in the center of monitoring regional. Barrier should be avoided between wireless IP camera and wireless NVR, as the signal coverage is easily affected by the physical properties of the barrier and surroundings.
Note: When IP cameras working synchronously, the distance should be kept within 60 meters without barrier, 30 meters with a wall, 15 meters with two walls.(for installation reference) Testing the effective coverage of wireless signal Please select “Main Menu” -> “System setup” -> “Network setup” -> “Wireless” -> “Wireless setup”, check the wireless SSID and Password, then connect the Wi-Fi with your mobile phone. More than two bars signal will be better under the effective coverage.
Note: While testing the signal strength, please wait for more than 1 minute to ensure the signal is stably.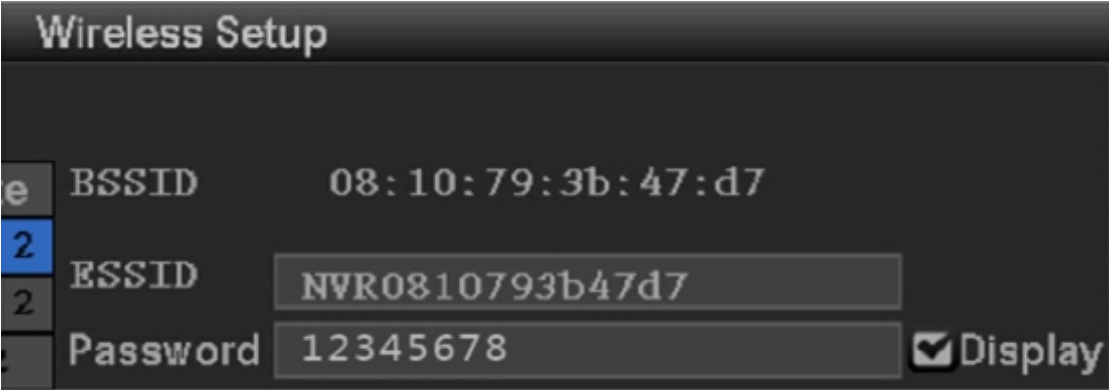
- Install and fasten wireless IP camera
Install the wireless IP camera in the location under the effective Wi-Fi coverage, and connect to the provided 12V/1A power adapter. The video of will be shown on the display device after 1 minute. - Set the angle of the wireless IP camera. The installation is finished.
Note: For security, please forbid the SSID broadcast after the installation

Smartphone Monitor
APP Download and Install
- iPhone & iPad
Search “ESEENET+” in APP Store, download and install it.

- Scan the QR code as following into the APP Store to download “ESEENET+” and install it.
- Android Smartphone
- Search “ESEENET+” in Google Play, download and install it
Wireless IP Camera Live View
Please type your Device ID (same as Esee ID, which shown in the bottom right of your display device), and input the username “admin”, the password is empty in default, choose 4 channels, touch on “Save”, then you can see a device list. Now you can touch and connect the channels to view video by your smart mobile device.

PC Monitor
Type your device ID, username, password, click on “Login”, then you can view video by your PC device.

Tip
- Default Username: admin
- Default Password: (The password is empty)
Troubleshooting
How do I restore my wireless NVR's configuration to its default settings?
With the wireless NVR powered on, please go to “Main Menu” -> “System tools” -> “Factory setting”, check the items what you need to restore to default, left-click on “OK” to reset wireless NVR to factory default.
Pros & Cons
Pros
- Crystal-clear 1080p video recording
- Night vision range up to 30 feet
- Motion detection with adjustable sensitivity
- Two-way audio with built-in microphone and speaker
- IP66 weatherproof rating
Cons
- MicroSD card not included
- No local storage option
- No audio output for external speakers
Customer Reviews of SEK204 Wireless IP Camera & Security Kit
Customers who have purchased the Netis Wireless IP Camera & Security Kit are generally very satisfied with their purchase. They appreciate the camera's high-quality video recording, night vision, and motion detection capabilities, as well as its easy setup process and user-friend
mobile app. However, some customers have expressed disappointment with the lack of local storage options and audio output for external speakers. Overall, the Netis SEK204 Wireless IP Camera & Security Kit is a reliable and affordable home security solution that offers a lot of value for its price.
Faqs
How Should the Lorex L871T8 Security Centre Be Installed in My House?
What Features Does the Lorex L871T8 Security System Come With?
Is It Possible to Remotely Access My Lorex L871T8 Cameras?
What Should I Do If the Lorex L871T8 Camera Isn't Working?
How Can I Adjust the Lorex L871T8's Motion Detection Settings?
Is the Lorex L871T8 Compatible With Smart Home Devices Made by Third Parties?
How Can I Update My Lorex L871T8 Security System's Firmware?
To what extent does the Lorex L871T8 offer a variety of storage opportunities?
On the Lorex L871T8 Security System, how can I get the recorded footage that has been stored?
How long is the Lorex L871T8 Security System warranty valid?
Leave a Comment