Nordictrack T6.5 S Treadmill NTL17915.1 User Manual
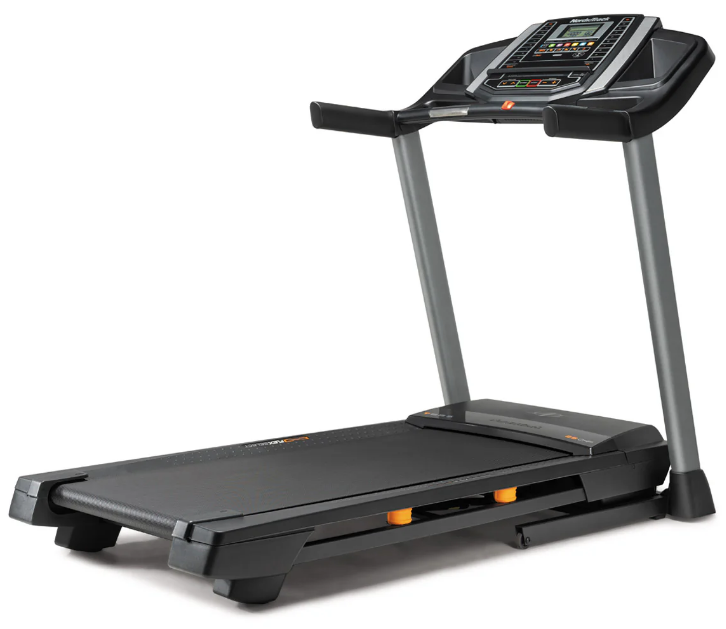
Content
Introduction
The NordicTrack T6.5 S Treadmill NTL17915.1 is an excellent choice for home fitness enthusiasts, offering a blend of performance and convenience. This treadmill features a 2.6 CHP SMART-Response motor and a spacious 20" x 55" running surface, providing ample room for comfortable workouts. With a maximum speed of 10 MPH and a 10% incline, it caters to various fitness levels. Priced at approximately $699, the T6.5 S is a cost-effective solution for achieving your fitness goals at home.
PART LIST
| Key No. | Qty. | Description |
|---|---|---|
| 1 | 16 | #8 x 1/2" Screw |
| 2 | 22 | #8 x 3/4" Screw |
| 3 | 2 | Base Pad |
| 4 | 4 | 1/4" x 1/2" Screw |
| 5 | 4 | #10 Star Washer |
| 6 | 1 | Base |
| 7 | 6 | 3/8" x 4" Screw |
| 8 | 2 | 5/16" x 3/4" Screw |
| 9 | 4 | #10 x 1 1/4" Screw |
| 10 | 9 | #8 x 1/2" Silver Screw |
| 11 | 6 | 5/16" Star Washer |
| 12 | 4 | #8 x 1" Tek Screw |
| 13 | 6 | 3/8" Star Washer |
| 14 | 1 | #8 x 3/4" Tek Screw |
| 15 | 3 | 1/4" x 2 1/2" Screw |
| 16 | 1 | 3/8" x 1 1/2" Bolt |
| 17 | 2 | 3/8" x 1 1/2" Wheel Bolt |
| 18 | 1 | Console Frame |
| 19 | 4 | #8 x 7/16" Screw |
| 20 | 2 | 1/4" Motor Screw |
| 21 | 2 | 3/8" Pin |
| 22 | 2 | 3/8" x 1" Bolt |
| 23 | 4 | 5/16" x 1 3/4" Shoulder Bolt |
| 24 | 2 | #8 Star Washer |
| 25 | 4 | #8 x 1" Screw |
| 26 | 1 | Storage Latch |
| 27 | 1 | Right Tray |
| 28 | 4 | 5/16" x 3" Screw |
| 29 | 1 | 3/8" x 1 3/4" Hex Head Bolt |
| 30 | 4 | 5/16" Flat Washer |
| 31 | 5 | #8 x 3/4" Truss Head Screw |
| 32 | 2 | Incline Motor Spacer |
| 33 | 6 | 3/8" Jam Nut |
| 34 | 6 | 5/16" Nut |
| 35 | 9 | 1/4" Jam Nut |
| 36 | 1 | Left Tray |
| 37 | 6 | #8 x 5/8" Screw |
| 38 | 2 | Wheel |
| 39 | 4 | Isolator |
| 40 | 2 | Rear Foot |
| 41 | 1 | Latch Crossbar |
| 42 | 1 | Left Foot Rail |
| 43 | 1 | Caution Decal |
| 44 | 1 | Walking Platform |
| 45 | 1 | Walking Belt |
| 46 | 2 | Belt Guide |
| 47 | 1 | Right Rear Foot |
| 48 | 4 | Cable Tie |
| Key No. | Qty. | Description |
|---|---|---|
| 49 | 1 | Drive Roller/Pulley |
| 50 | 1 | Magnet |
| 51 | 1 | Reed Switch Clip |
| 52 | 1 | Reed Switch |
| 53 | 2 | 1/4" x 1 1/2" Screw |
| 54 | 1 | Drive Belt |
| 55 | 1 | Motor Belt |
| 56 | 1 | Frame |
| 57 | 1 | Left Rear Foot |
| 58 | 1 | Console Ground Wire |
| 59 | 4 | Rubber Cushion |
| 60 | 1 | Right Foot Rail |
| 61 | 1 | Idler Roller |
| 62 | 1 | 5/16" x 3/4" Bolt |
| 63 | 1
| 5/16" x 2 3/4" Bolt |
| 64 | 1 | Console Base |
| 65 | 1 | Motor Hood |
| 66 | 1 | Hood Accent |
| 67 | 2 | Incline Frame Spacer |
| 68 | 5 | Hood Clip |
| 69 | 1 | Incline Motor |
| 70 | 1 | Incline Frame |
| 71 | 2 | Frame Spacer |
| 72 | 1 | Controller |
| 73 | 1 | Controller Bracket |
| 74 | 2 | Base Cap |
| 75 | 1 | Power Switch |
| 76 | 1 | Power Cord |
| 77 | 2 | Grommet |
| 78 | 1 | Belly Pan |
| 79 | 1 | Handrail Grip |
| 80 | 1 | Console |
| 81 | 1 | Upright Wire |
| 82 | 1 | Left Base Cover |
| 83 | 1 | Right Base Cover |
| 84 | 1 | Right Handrail |
| 85 | 1 | Left Handrail |
| 86 | 2 | Cable Tie |
| 87 | 2 | Handrail Cap |
| 88 | 1 | Key/Clip |
| 89 | 1 | Left Upright |
| 90 | 1 | Right Upright |
| 91 | 2 | Warning Decal |
| 92 | 2 | Console Clamp |
| 93 | 1 | Pulse Crossbar |
| 94 | 1 | Controller Clamp |
| User's Manual |
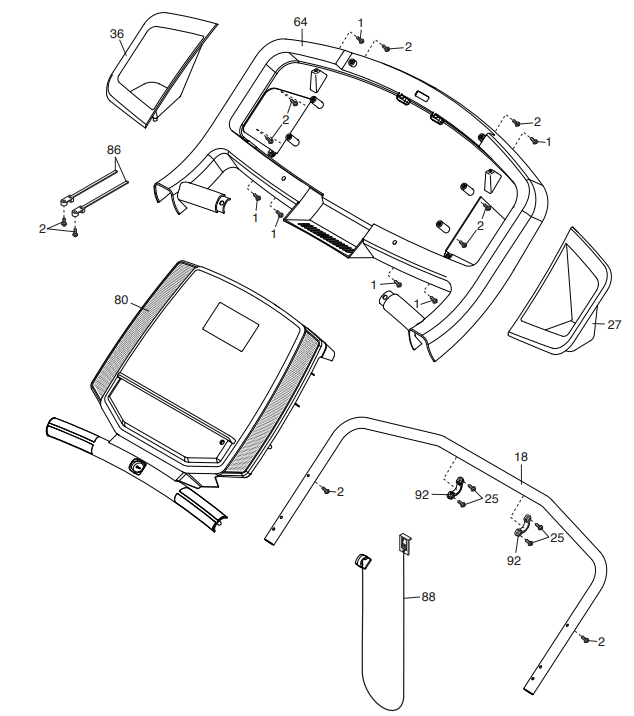
EXPLODED DRAWING A
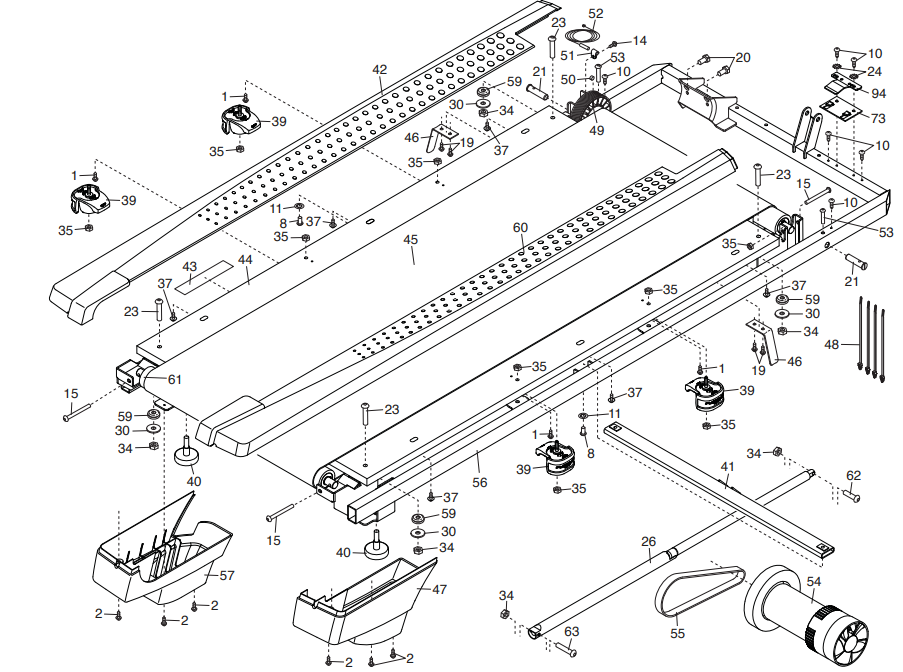
EXPLODED DRAWING B
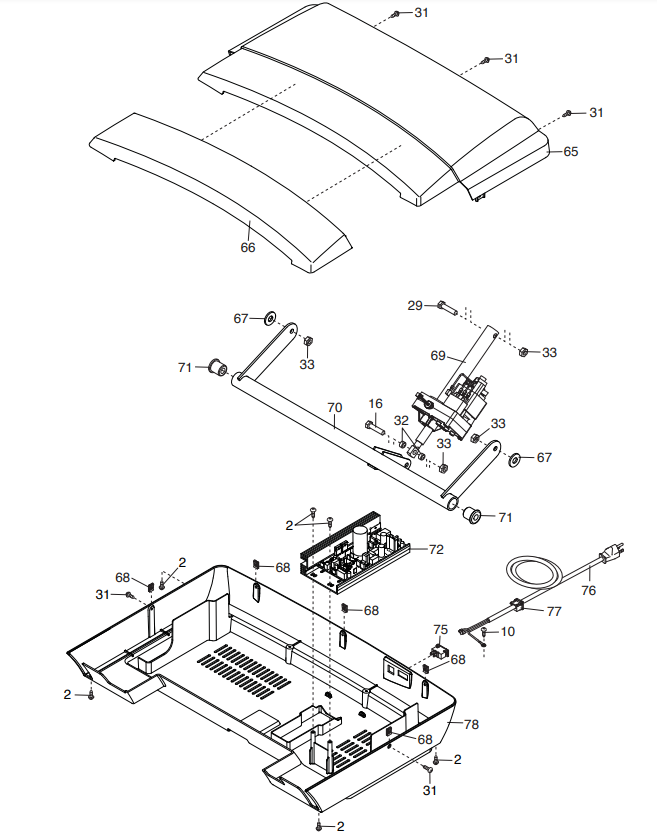
EXPLODED DRAWING C
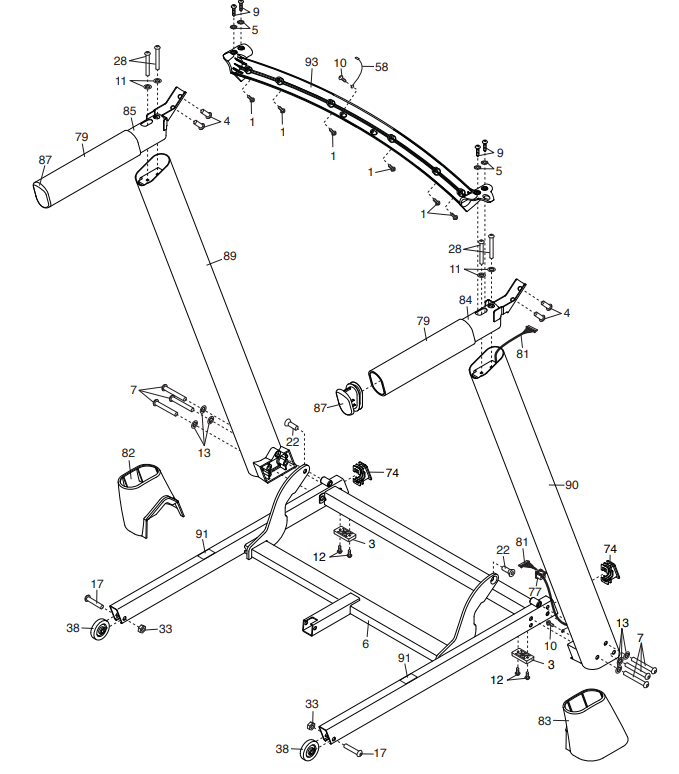
EXPLODED DRAWING D
NordicTrack T6.5 S Treadmill NTL17915.1 Specifications
- Motor: 2.5 Continuous Duty HP Motor
- Incline: 0-10% Automatic Incline
- Speed: 0-10 MPH
- Running Surface: 20" x 55" Tread Belt
- Programs: 20 Pre-Set Programs
- Heart Rate Monitoring: Dual-Grip EKG Heart Rate Monitor
- Console: Backlit LCD Display with Touchscreen Capabilities
- Connectivity: Bluetooth and Wi-Fi Compatible
- SpaceSaver Design: Foldable for Easy Storage
- Weight Capacity: 300 lbs
Description
The NordicTrack T6.5 S Treadmill boasts a sturdy frame and a spacious running surface, ensuring a comfortable and stable workout. The 2.5 HP motor provides smooth and quiet operation, while the 0-10% incline feature allows for varied intensity levels. The console is equipped with a backlit LCD display and touchscreen capabilities, making it easy to navigate through the 20 pre-set programs or customize your own workout routines. The treadmill also includes dual-grip EKG heart rate monitoring for accurate health tracking.
The SpaceSaver design allows for easy folding and storage, making it an ideal choice for homes with limited space. Additionally, the treadmill is Bluetooth and Wi-Fi compatible, enabling seamless integration with fitness apps and online training programs.
BEFORE YOU BEGIN
T 6.5 S treadmill. The T 6.5 S treadmill provides an impressive selection of features designed to make your workouts at home more effective and enjoyable.
For your benefit, read this manual carefully before you use the treadmill. If you have questions after reading this manual, please see the front cover of this manual. To help us assist you, note the product model number and serial number before contacting us. The model number and the location of the serial number decal are shown on the front cover of this manual. Before reading further, please familiarize yourself with the parts that are labeled in the drawing below.
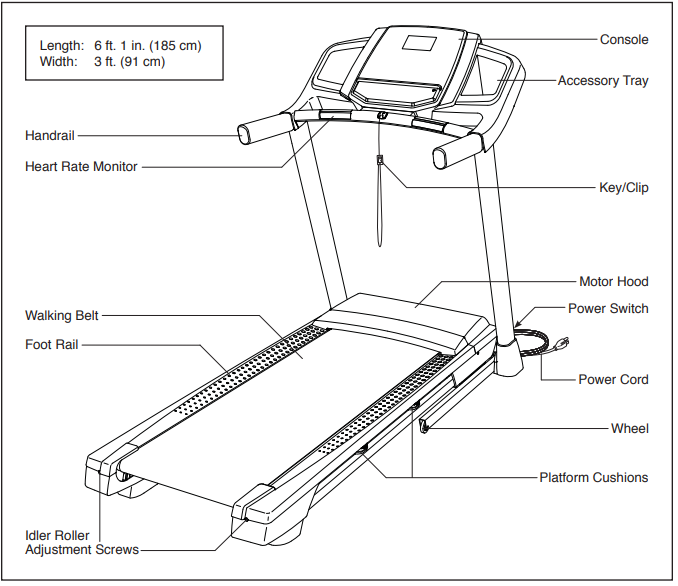
PART IDENTIFICATION CHART
Use the drawings below to identify small parts used for assembly. The number in parentheses below each draw-ing is the key number of the part, from the PART LIST near the end of this manual. The number following the key number is the quantity used for assembly.
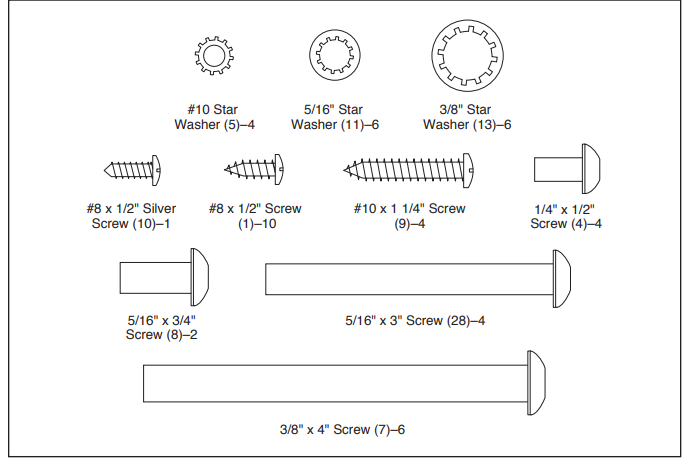
Note: If a part is not in the hardware kit, check to see whether it is preattached. Extra parts may be included.
ASSEMBLY
- Assembly requires two persons.
- Place all parts in a cleared area and remove the packing materials. Do not dispose of the packing materials until you fi nish all assembly steps.
- After shipping, there may be an oily substance on the exterior of the treadmill. This is normal. If there is an oily substance on the treadmill, wipe it off with a soft cloth and a mild, non-abrasive cleaner.
- Left parts are marked “L” or “Left” and right parts are marked “R” or “Right.”
- To identify small parts, see page 7.
- Assembly requires the following tools: the included hex keys one Phillips screwdriver
To avoid damaging parts, do not use power tools.
- Go to https://www.nordictrackservice.com/registration on your computer and register your product.
- activates your warranty
- saves you time if you ever need to contact Customer Care
allows us to notify you of upgrades and offers
Note: If you do not have Internet access, call Customer Care (see the front cover of this manual) and register your product.
- Make sure that the power cord is unplugged.
Press a Base Cap (74) into each side of the Base (6).
Identify the Right Upright (90). Have a second person hold the Right Upright near the Base (6).
See the inset drawing. Tie the wire tie in the Right Upright (90) securely around the end of the Upright Wire (81). Then, insert the Upright Wire into the lower end of the Right Upright as you pull the other end of the wire tie through the Right Upright. Lay the Right Upright (90) near the Base (6). Press the Grommet (77) into the square hole in the Right Upright (90). Make sure not to pinch the ground wire.
If there is a screw (A) preattached to the Right Upright (90), remove and discard it.
Then, attach the ground wire to the Right Upright (90) with a #8 x 1/2" Silver Screw (10).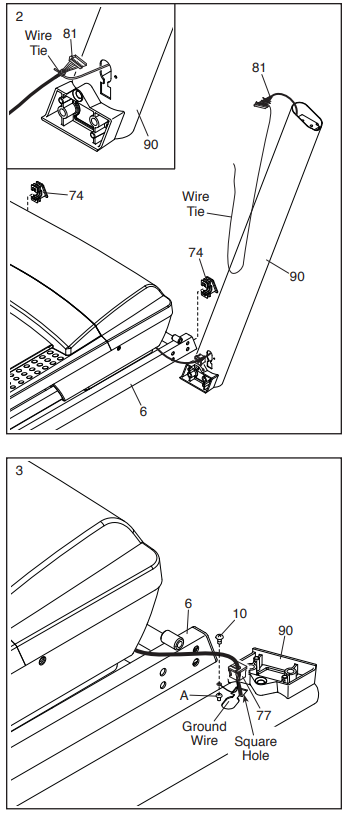
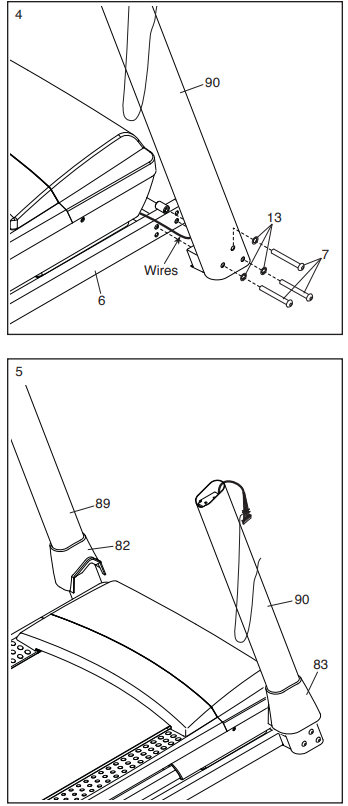
- Hold the Right Upright (90) against the Base (6). Be careful not to pinch the wires. Partially tighten three 3/8" x 4" Screws (7) with three 3/8" Star Washers (13) into the Right Upright and the Base; do not fully tighten the Screws yet.
Attach the Left Upright (not shown) in the same way.
Note: There are no wires on the left side. Identify the Left and Right Base Covers (82, 83). Slide the Left and Right Base Covers onto the Left and Right Uprights (89, 90) as shown. Do not press the Left and Right Base Covers into place yet.
- Identify the Right Handrail (84).
Attach the Right Handrail (84) to the Right Upright (90) with two 5/16" x 3" Screws (28) and two 5/16" Star Washers (11); start both Screws, and then tighten them. Make sure not to pinch the Upright Wire (81).
Attach the Left Handrail (not shown) to the Left Upright (not shown) in the same way.
Note: There are no wires on the left side. Set the Console Base (64) face down on a soft surface to avoid scratching the Console Base.
Remove and discard the two indicated screws (B). Then, remove the Pulse Crossbar (93).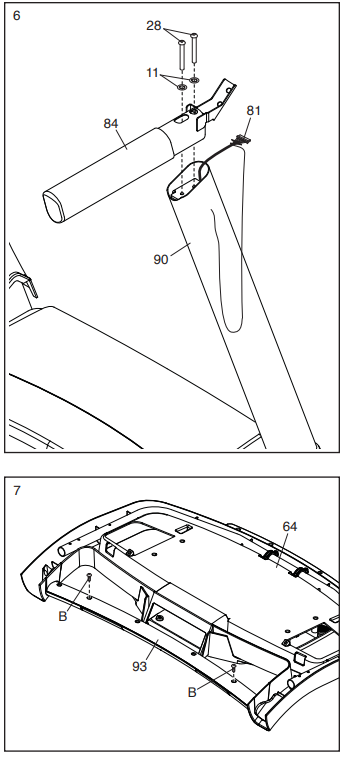
- If there are four screws (C) preattached inside the Handrails (84, 85), remove and discard the screws.
IMPORTANT: To avoid damaging the Pulse Crossbar (93), do not use power tools and do not overtighten the #10 x 1 1/4" Screws (9).
Orient the Pulse Crossbar (93) as shown. Attach the Pulse Crossbar to the Right and Left Handrails (84, 85) with four #10 x 1 1/4" Screws (9) and four #10 Star Washers (5); start all four Screws, and then tighten them. With the help of a second person, hold the console assembly near the Right Handrail (84) and the Left Handrail (not shown).
Connect the ground wire from the console assembly to the Console Ground Wire (58) on the Pulse Crossbar (93).
See the inset drawing. Connect the Upright Wire (81) to the console wire. The connectors should slide together easily and snap into place. If they do not, turn one connector and try again. IF YOU DO NOT CONNECT THE CON-NECTORS PROPERLY, THE CONSOLE MAY BECOME DAMAGED WHEN YOU TURN ON THE POWER. Then, remove the wire tie from the Upright Wire.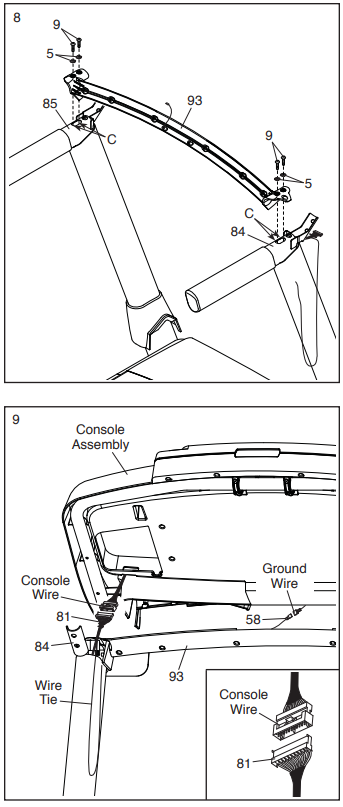
- Set the console assembly on the Right and Left Handrails (84, 85). Make sure that no wires are pinched. Insert the excess Upright Wire (81) into the Right Upright (90).
Attach the console assembly to the brackets on the Handrails (84, 85) with four 1/4" x 1/2" Screws (4); do not tighten the Screws yet. Attach the Pulse Crossbar (93) to the console assembly with six #8 x 1/2" Screws (1); start all six Screws, and then tighten them.
Firmly tighten the four 1/4" x 1/2" Screws (4).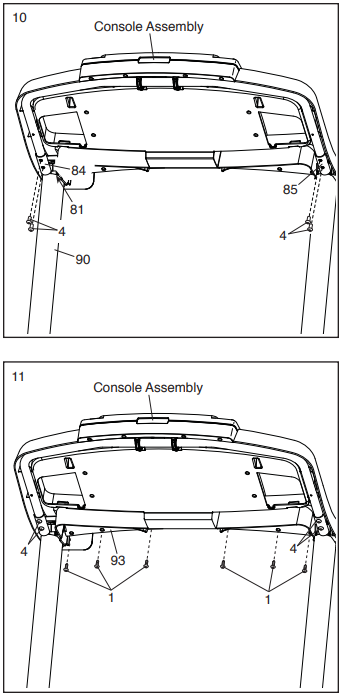
- Attach the Right and Left Trays (27, 36) with four #8 x 1/2" Screws (1).
Raise the Frame (56) to the upright position.
Have a second person hold the Frame until step 15 is completed.
Orient the Latch Crossbar (41) as shown. Make sure that the “This side toward belt” sticker (D) is facing the treadmill. Attach the Latch Crossbar to the brackets on the Frame (56) with two 5/16" x 3/4" Screws (8) and two 5/16" Star Washers (11).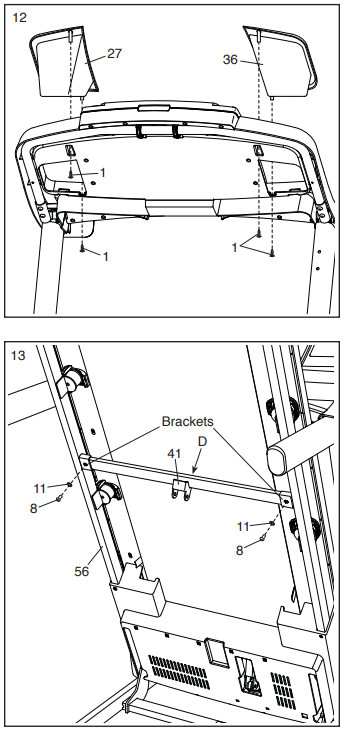
- Remove the 5/16" Nut (34) and the 5/16" x 1 3/4" Bolt (62) from the bracket on the Base (6).
Orient the Storage Latch (26) so that the decals are facing away from the treadmill as shown.
Next, orient the Storage Latch (26) as shown.
Attach the lower end of the Storage Latch (26) to the bracket on the Base (6) with the 5/16" x 1 3/4" Bolt (62) and the 5/16" Nut (34).
Then, raise the Storage Latch (26) to a vertical position, and remove the tie. Remove the 5/16" Nut (34) and the 5/16" x 2 1/4" Bolt (63) from the bracket on the Latch Crossbar (41).
Align the upper end of the Storage Latch (26) with the bracket on the Latch Crossbar (41), and insert the 5/16" x 2 1/4" Bolt (63) through the bracket and the Storage Latch. This will push a spacer (E) out of the Storage Latch; discard the spacer.
Next, tighten the 5/16" Nut (34) onto the 5/16" x 2 1/4" Bolt (63). Do not overtighten the Nut; the Storage Latch (26) must be able to pivot.
Then, lower the Frame (56) (see HOW TO LOWER THE TREADMILL FOR USE on page 26).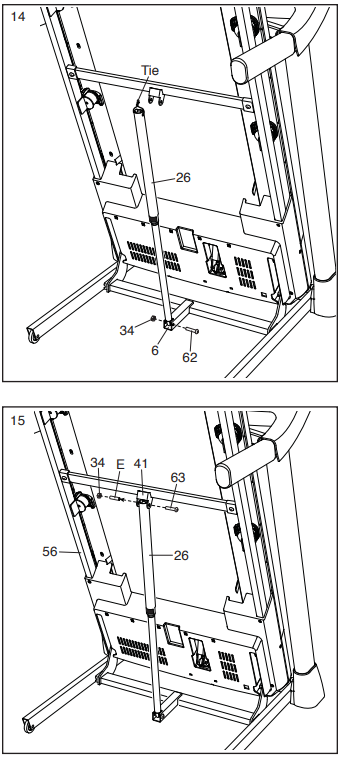
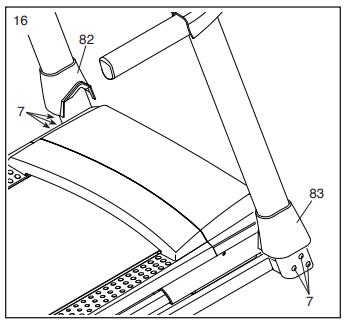
Firmly tighten all six 3/8" x 4" Screws (7). Then, slide the Left and Right Base Covers (82, 83) downward.
- Make sure that all parts are properly tightened before you use the treadmill. If there are sheets of plastic on the treadmill decals, remove the plastic. To protect the floor or carpet, place a mat under the treadmill. To avoid damage to the console, keep the treadmill out of direct sunlight. Keep the included hex key in a secure place; the hex key is used to adjust the walking belt (see pages 28 and 29).
Note: Extra hardware may be included.
HOW TO FOLD AND MOVE THE TREADMILL
HOW TO FOLD THE TREADMILL
To avoid damaging the treadmill, adjust the incline to zero before you fold the treadmill. Then, remove the key and unplug the power cord.
CAUTION: You must be able to safely lift 45 lbs. (20 kg) to raise, lower, or move the treadmill.
- Hold the metal frame fi rmly in the location shown by the arrow below.
CAUTION: Do not hold the frame by the plastic foot rails. Bend your legs and keep your back straight. Raise the frame until the storage latch locks in the storage position.
CAUTION: Make sure that the storage latch locks.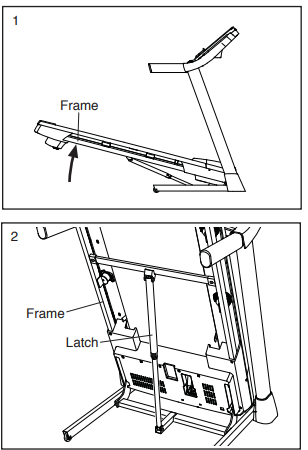
To protect the fl oor or carpet, place a mat under the treadmill. Keep the treadmill out of direct sunlight. Do not leave the treadmill in the storage position in temperatures above 85° F (30° C).
HOW TO MOVE THE TREADMILL
Before moving the treadmill, fold it as described at the left.
CAUTION: Make sure that the latch knob is locked in the storage position. Moving the treadmill may require two people.
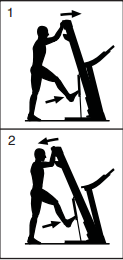
Hold the frame and one of the handrails, and place one foot against a wheel.
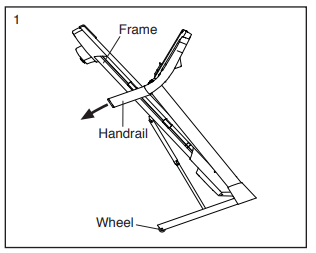
- Pull back on the handrail until the treadmill will roll on the wheels, and carefully move it to the desired location. CAUTION: Do not move the tread-mill without tipping it back, do not pull on the frame, and do not move the treadmill over an uneven surface.
HOW TO LOWER THE TREADMILL FOR USE
- Push the upper end of the frame forward, and gently press the upper part of the storage latch with your foot at the same time.
- While pressing the storage latch with your foot, pull the upper end of the frame toward yourself.
Step back and let the frame lower to the floor.
NordicTrack T6.5 S Treadmill NTL17915.1 MAINTENANCE
- Regular maintenance is important for optimal performance and to reduce wear. Inspect and properly tighten all parts each time the treadmill is used.
- Regularly clean the treadmill and keep the walking belt clean and dry. First, press the power switch into the off position and unplug the power cord. Wipe the exterior parts of the treadmill with a damp cloth and a small amount of mild soap.
IMPORTANT: Do not spray liquids directly onto the treadmill. To avoid damage to the console, keep liquids away from the console. Then, thoroughly dry the treadmill with a soft towel.
TROUBLESHOOTING
Most treadmill problems can be solved by following the simple steps below. Find the symptom that applies, and follow the steps listed. If further assistance is needed, see the front cover of this manual.
SYMPTOM: The power does not turn on
- Make sure that the power cord is plugged into a surge suppressor and that the surge suppressor is plugged into a properly grounded outlet (see page 17). Use only a surge suppressor that meets
all of the specifi cations described on page 17.
IMPORTANT: If the treadmill is connected to an AFCI-equipped outlet and your circuit breaker trips repeatedly when the treadmill is used, see the front cover of this manual to purchase an arc fi lter. - After the power cord has been plugged in, make sure that the key is inserted into the console.
Check the power switch located on the treadmill frame near the power cord. If the switch protrudes as shown, the switch has tripped. To reset the power switch, wait for five minutes and then press the switch back in.

SYMPTOM: The power turns off during use
- Check the power switch (see drawing c at the left). If the switch has tripped, wait for five minutes and then press the switch back in.
- Make sure that the power cord is plugged in. If the power cord is plugged in, unplug it, wait for five minutes, and then plug it back in.
- Remove the key from the console, and then reinsert it.
- If the treadmill still will not run, please see the front cover of this manual.
SYMPTOM: The console displays remain lit when you remove the key from the console
- The console features a display demo mode, designed to be used if the treadmill is displayed in a store. If the displays remain lit when you remove the key, the demo mode is turned on. To turn off the demo mode, hold down the Stop button for a few seconds. If the displays are still lit, see THE SETTINGS MODE on page 23 to turn off the demo mode.
SYMPTOM: The displays of the console do not function properly
Remove the key from the console and UNPLUG THE POWER CORD. Next, remove the fi ve #8 x 3/4" Truss Head Screws (31), and carefully pivot the Motor Hood (65) off.
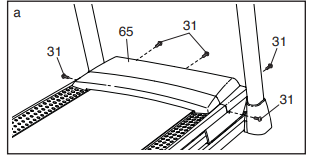
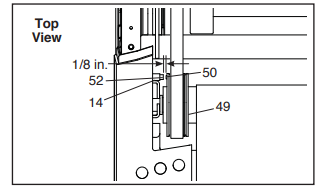
Next, locate the Reed Switch (52) and the Magnet (50) on the left side of the Pulley (49). Turn the Pulley until the Magnet is aligned with the Reed Switch. Make sure that the gap between the Magnet and the Reed Switch is about 1/8 in. (3 mm). If necessary, loosen the #8 x 3/4" Tek Screw (14), move the Reed Switch slightly, and then retighten the Tek Screw. Reattach the Motor Hood (not shown), and run the treadmill for a few minutes to check for a correct speed reading.
SYMPTOM: The incline of the treadmill does not change correctly
- Hold down the Stop button and the Speed increase button, insert the key into the console, and then release the Stop button and the Speed increase button. Next, press the Stop button and then press the Incline increase or decrease button. The treadmill will automatically rise to the maximum incline level and then return to the minimum level. This will recalibrate the incline system. If the incline system does not begin calibrating, press the Stop button again, and then press the Incline increase or decrease button again. When the incline system is calibrated, remove the key from the console.
SYMPTOM: The walking belt slows when walked on
- Use only a surge suppressor that meets all of the specifi cations described on page 17.
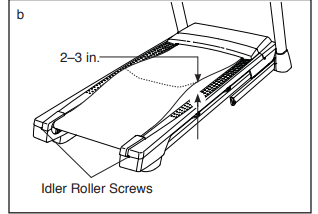
If the walking belt is overtightened, treadmill per-formance may decrease and the walking belt may become damaged. Remove the key and UNPLUG THE POWER CORD. Using the hex key, turn both idler roller screws counterclockwise, 1/4 of a turn. When the walking belt is properly tightened, you should be able to lift each edge of the walking belt 2 to 3 in. (5 to 7 cm) off the walking platform. Be careful to keep the walking belt centered. Then, plug in the power cord, insert the key, and run the treadmill for a few minutes. Repeat until the walk-ing belt is properly tightened.
- Your treadmill features a walking belt coated with high-performance lubricant.
IMPORTANT: Never apply silicone spray or other substances to the walking belt or the walking platform unless instructed to do so by an authorized service representative. Such substances may deterio-rate the walking belt and cause excessive wear. If you suspect that the walking belt needs more lubricant, see the front cover of this manual. - If the walking belt still slows when walked on, see the front cover of this manual.
SYMPTOM: The walking belt is off-center or slips when walked on
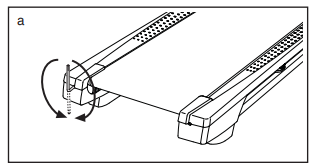
If the walking belt is off-center, fi rst remove the key and UNPLUG THE POWER CORD. If the walking belt has shifted to the left, use the hex key to turn the left idler roller screw clockwise 1/2 of a turn; if the walking belt has shifted to the right, turn the left idler roller screw counterclock-wise 1/2 of a turn. Be careful not to overtighten the walking belt. Then, plug in the power cord, insert the key, and run the treadmill for a few minutes. Repeat until the walking belt is centered.
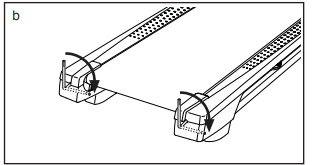
If the walking belt slips when walked on, first remove the key and UNPLUG THE POWER CORD. Using the hex key, turn both idler roller screws clockwise, 1/4 of a turn. When the walk-ing belt is correctly tightened, you should be able to lift each edge of the walking belt 2 to 3 in. (5 to 7 cm) off the walking platform. Be careful to keep the walking belt centered. Then, plug in the power cord, insert the key, and carefully walk on the treadmill for a few minutes. Repeat until the walk-ing belt is properly tightened.
EXERCISE GUIDELINES
WARNING: Before beginning this or any exercise program, consult your physi-cian. This is especially important for persons over age 35 or persons with pre-existing health problems.
The heart rate monitor is not a medical device. Various factors may affect the accuracy of heart rate readings. The heart rate monitor is intended only as an exercise aid in determin-ing heart rate trends in general.
These guidelines will help you to plan your exercise program. For detailed exercise information, obtain a reputable book or consult your physician. Remember, proper nutrition and adequate rest are essential for successful results.
EXERCISE INTENSITY
Whether your goal is to burn fat or to strengthen your cardiovascular system, exercising at the proper inten-sity is the key to achieving results. You can use your heart rate as a guide to find the proper intensity level. The chart below shows recommended heart rates for fat burning and aerobic exercise.
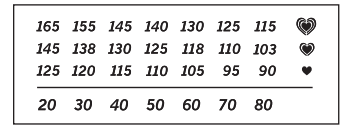
To find the proper intensity level, find your age at the bottom of the chart (ages are rounded off to the near-est ten years). The three numbers listed above your age define your “training zone.” The lowest number is the heart rate for fat burning, the middle number is the heart rate for maximum fat burning, and the highest number is the heart rate for aerobic exercise.
- Burning Fat—To burn fat effectively, you must exer-cise at a low intensity level for a sustained period of time. During the first few minutes of exercise, your body uses carbohydrate calories for energy. Only after the first few minutes of exercise does your body begin to use stored fat calories for energy. If your goal is to burn fat, adjust the intensity of your exercise until your heart rate is near the lowest number in your training zone. For maximum fat burning, exercise with your heart rate near the middle number in your training zone.
- Aerobic Exercise—If your goal is to strengthen your cardiovascular system, you must perform aerobic exercise, which is activity that requires large amounts of oxygen for prolonged periods of time. For aerobic exercise, adjust the intensity of your exercise until your heart rate is near the highest number in your training zone.
WORKOUT GUIDELINES
- Warming Up—Start with 5 to 10 minutes of stretch-ing and light exercise. A warm-up increases your body temperature, heart rate, and circulation in preparation for exercise.
- Training Zone Exercise—Exercise for 20 to 30 min-utes with your heart rate in your training zone. (During the first few weeks of your exercise program, do not keep your heart rate in your training zone for longer than 20 minutes.) Breathe regularly and deeply as you exercise; never hold your breath.
- Cooling Down—Finish with 5 to 10 minutes of stretch-ing. Stretching increases the flexibility of your muscles and helps to prevent post-exercise problems.
EXERCISE FREQUENCY
To maintain or improve your condition, complete three workouts each week, with at least one day of rest between workouts. After a few months of regular exer-cise, you may complete up to five workouts each week, if desired. Remember, the key to success is to make exercise a regular and enjoyable part of your everyday life.
Setup Guide
Assembling the NordicTrack T6.5 S Treadmill is relatively straightforward and can be completed with the help of the included manual. Here are some key steps:
- Unbox and lay out all the components.
- Attach the legs and frame together using the provided bolts.
- Install the console and ensure all wires are securely connected.
- Place the tread belt on the rollers and align it properly.
- Plug in the treadmill and follow the on-screen instructions for calibration and setup.
Once assembled, you can configure your workout settings through the touchscreen console. Pairing with Bluetooth or Wi-Fi allows you to sync your data with fitness apps like iFit.
Troubleshooting
If you encounter any issues with your NordicTrack T6.5 S Treadmill, here are some common problems and their solutions:
- Treadmill Not Turning On: Check the power cord and ensure it is properly plugged in. Also, verify that the circuit breaker has not tripped.
- Incline Not Working: Check if the incline button is functioning correctly and ensure that there are no blockages in the incline mechanism.
- Heart Rate Monitor Not Working: Ensure that your hands are properly placed on the grip handles and that the heart rate monitor is calibrated correctly.
Always refer to the user manual for detailed troubleshooting instructions and follow safety warnings to avoid any injuries or damage to the equipment.
NordicTrack T6.5 S Treadmill NTL17915.1 Pros & Cons
Pros
- Durable Construction: Built with high-quality materials for long-lasting performance.
- Versatile Workout Options: Includes 20 pre-set programs and customizable settings.
- Features like incline, heart rate monitoring, and Bluetooth/Wi-Fi connectivity enhance the workout experience.
- Foldable design makes it easy to store when not in use.
Cons
- Requires some effort and time to assemble.
- Can be somewhat noisy during operation.
- Regular maintenance is necessary to ensure optimal performance.
Customer Reviews
Customers generally praise the NordicTrack T6.5 S Treadmill for its robust build, user-friendly interface, and effective workout options. Many appreciate the variety of pre-set programs and the ability to customize their workouts. However, some users have noted that assembly can be challenging and that regular maintenance is required to keep the treadmill in good condition.
A common complaint is the noise level during operation, but overall, the treadmill is well-regarded for its value and performance.
Faqs
What is the weight capacity of the NordicTrack?
Does the NordicTrack Treadmill come with pre-set workout programs?
How do I assemble the T6.5 S Treadmill?
Can I fold and store the Treadmill when not in use?
Is the NordicTrack Treadmill compatible with fitness apps?
What kind of heart rate monitoring does the NordicTrack T6.5 S Treadmill NTL17915.1 offer?
What is the speed range of the Treadmill Machine?
Does the NordicTrack Treadmill have an automatic incline feature?
How large is the running surface of the NordicTrack Treadmill?
Leave a Comment
