Omron IntelliSense BP Monitor HEM-907XL User Guide
Content
Introduction
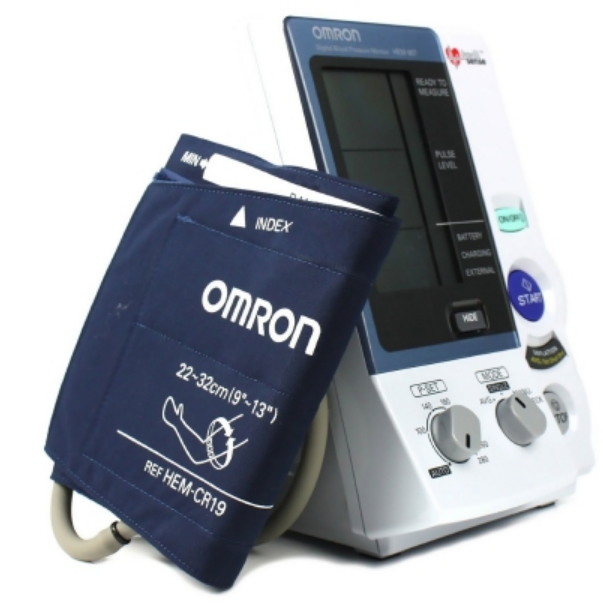
The Omron IntelliSense BP Monitor HEM-907XL is a top-tier blood pressure monitor designed for clinical use, offering automatic inflation and deflation for accurate readings. This device is equipped with advanced IntelliSense technology, ensuring comfort and precision during measurements. It features multiple measurement modes and accommodates various cuff sizes, making it versatile for different patients.The cost of the Omron HEM-907XL is approximately $932.79, highlighting its professional-grade quality and reliability.
COMPONENTS OF THE PRODUCT
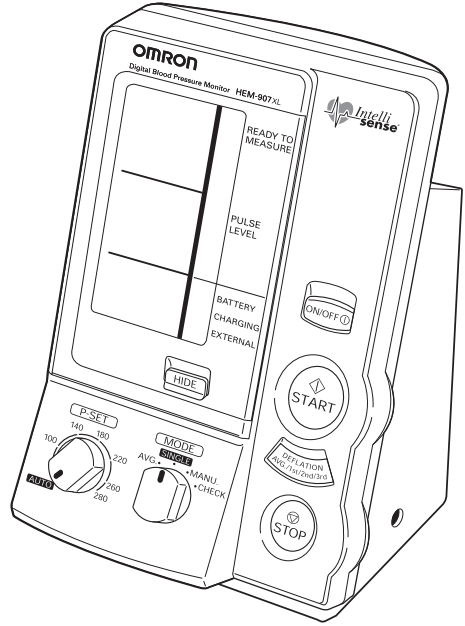
Main unit
IntelliSense Blood Pressure Monitor, Model HEM-907XL
Accessories
(Included and also available separately)
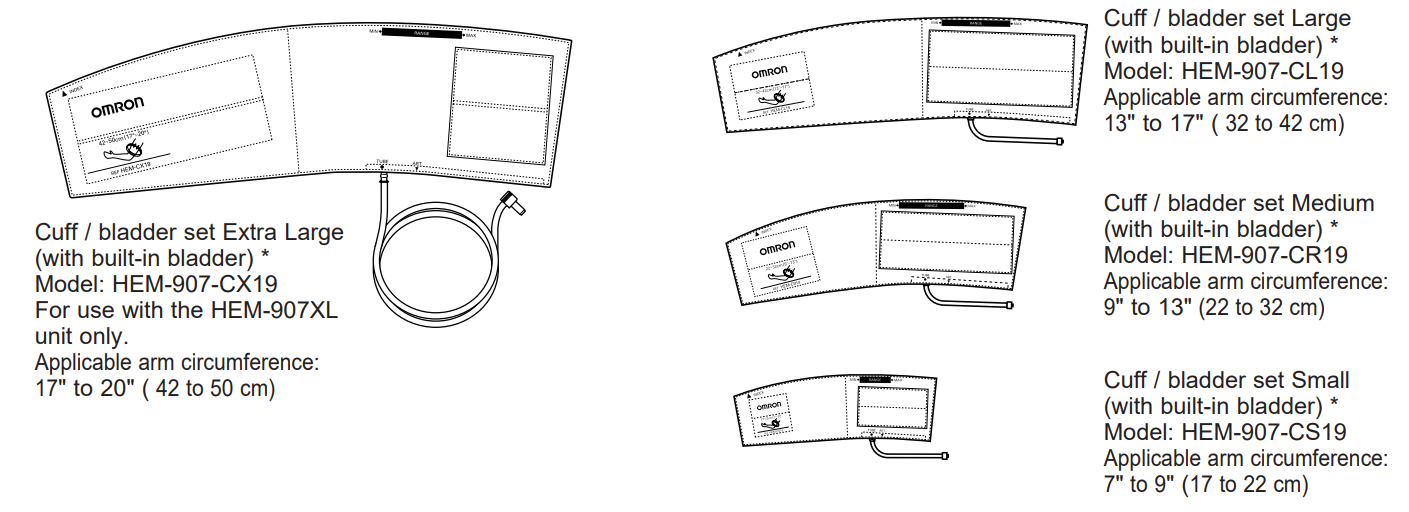

Items identified with an asterisk (*) are consumables and not covered by the guarantee.
Specifications
Name: OMRON Digital Automatic Blood Pressure Monitor
Model: HEM-907XL (HEM-907-Z2)
Display: Digital display
Measurement: Oscillometric method
Measurement Range:
- Pressure: 0 to 299 mmHg
- Pulse rate: 30 to 199 beats/min
Accuracy:
- Pressure: Within ±3 mmHg or 2% of reading
- Pulse rate: Within ±5% of reading
Inflation: Automatic inflation with pumping
Deflation: Automatic deflation by electromagnetic control valve
Air Release: Automatic rapid air release by electromagnetic control valve
Power supply:
- AC adapter (AC 120V, 50/60Hz, 0.2A)
- Battery pack (DC 4.8V, 6W)
Protection Class: Class II, Internally powered equipment
Degree of Protection: Type BF
Operating Temperature / Humidity:
- 50°F to 104°F (10 to 40°C)
- 30 to 85% RH (IPX 0 Rating)
Storage Temperature / Humidity / Air pressure:
- -4°F to 140°F (-20 to 60°C)
- 10 to 95% RH
- 700 - 1060 hPa
Weight of Main Unit: Approx. 32 oz (910 g)
External Dimensions:
- Approx. 5 1/2" (W) x 8"(H) x 5 1/6"(D)
- 139 (W) x 203 (H) x 131 (D) mm
Accessories:
- Cuff / bladder set Extra Large
- Cuff / bladder set Large
- Cuff / bladder set Medium
- Cuff / bladder set Small
- AC adapter
- Battery pack
- Air tube 1.3 m (51 3/16")
- Instruction Manual
Options:
- Air tube 1.3 m (51 3/16")
- Stand exclusive for this unit (Item: HEM-907-STAND)
- Wall-hanging kit (Item: HEM-907-WKIT)
- Pole-mounting kit (Item: HEM-907-PKIT)
Complies with:
- IEC 60601-1:1988+A1:1991+A2:1995 General requirements for safety
- IEC 60601-1-2:2007 Electromagnetic compatibility - Requirements and tests
- ANSI/AAMI SP10:1992 Manual, Electronic or Automated Sphygmomanometers
FEATURES OF THE PRODUCT
OMRON IntelliSense Blood Pressure unit, Model HEM-907XL is developed to measure blood pressure and pulse rate accurately and simply in a doctor’s office, examination room, or patient bedside.
One-button operation
Simply wrap the cuff and push the START Button. Blood pressure and pulse rate are automatically measured by the oscillometric method.
Automatic pressure setting
When the P-SET (Pressure Setting) Knob is set to “AUTO”, the unit will automatically inflate the cuff to the optimal pressure according to each patient’s blood pressure. Pre-setting inflation level is not necessary.
Noiseless operation
This unit operates so quietly that it can be used in the patient room at night.
Average Mode (AVG Mode)
In the AVG Mode, this unit will automatically measure for two or three times. The average of systolic and diastolic blood pressures and pulse rate are displayed. Each measurement can also be shown individually. The number of measurements, waiting time before first measurement, and the interval can be changed.
Auscultation Mode (MANU Mode)
You can measure auscultatory blood pressure by using a stethoscope, with automatic cuff inflation and deflation by this unit. Because the cuff pressures during deflation are displayed digitally and synchronized with the heart beat, they can be read with accuracy. After taking systolic reading you can accelerate cuff deflation to shorten measurement time.
Large and easy to read display
Large and easy to read figures are displayed on the LCD display.
Names of the Parts
Main unit
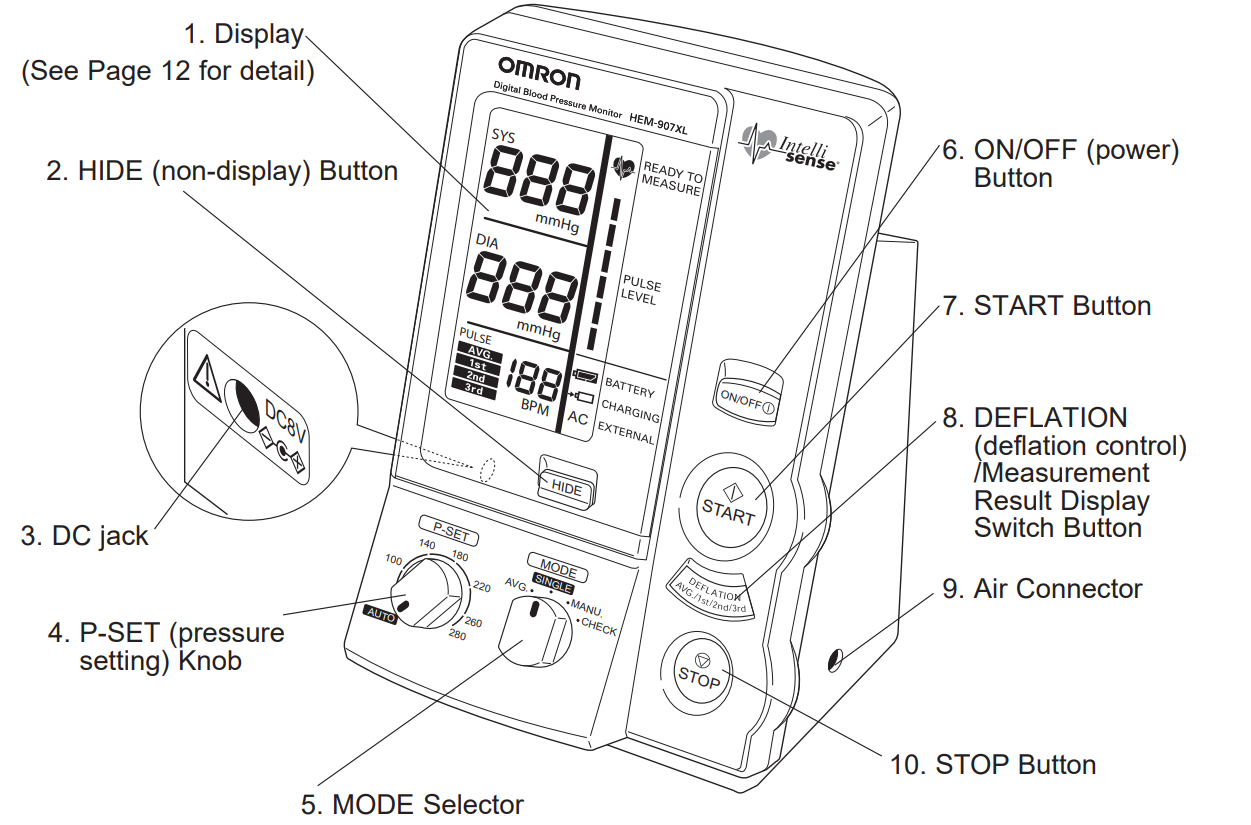
- Display: Displays blood pressure and, pulse rate readings, and oscillation pulse level.
- HIDE Button: Switches display and non-display of measured results.
- DC jack: Connects the AC adapter.
- P-SET (pressure setting) Knob: In the AUTO position, inflation level is automatically set. Otherwise, inflation level can optionally be set manually between 100 and 280 mmHg.
- MODE Selector: Selects the operation mode.
- One-time Measurement Mode (SINGLE Mode): Measurement with automatic inflation.
- Average Mode (AVG Mode): Automatically measures two (or three) times consecutively.
- Auscultation Mode (MANU Mode): Automatic inflation, automatic deflation, and pressure display for auscultation (does not measure blood pressure).
- Check Mode (CHECK Mode): Checks the accuracy of pressure display. Displays only pressure.
- ON/OFF (power) Button: Turns on or off the unit.
- START Button: Starts the measurement.
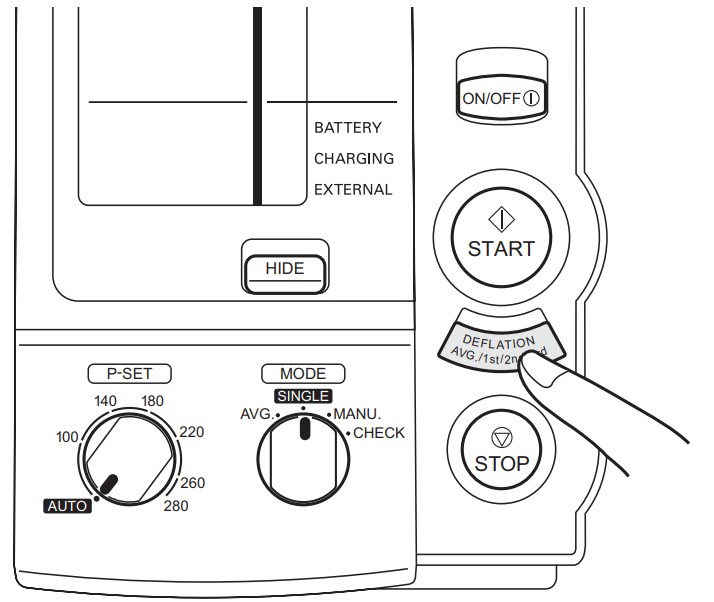
- DEFLATION (deflation control) /Measurement Result Display Switch Button:
- In the MANU Mode, deflates the cuff by approximately 5 to 10 mmHg with each push during deflation.
- In the AVG Mode, switches the display of average values and the measurement results with each push.
- Air Connector: Connects the air tube.
- STOP Button: Stops the measurement and deflates air rapidly.
Omron IntelliSense BP Monitor HEM-907XL Display
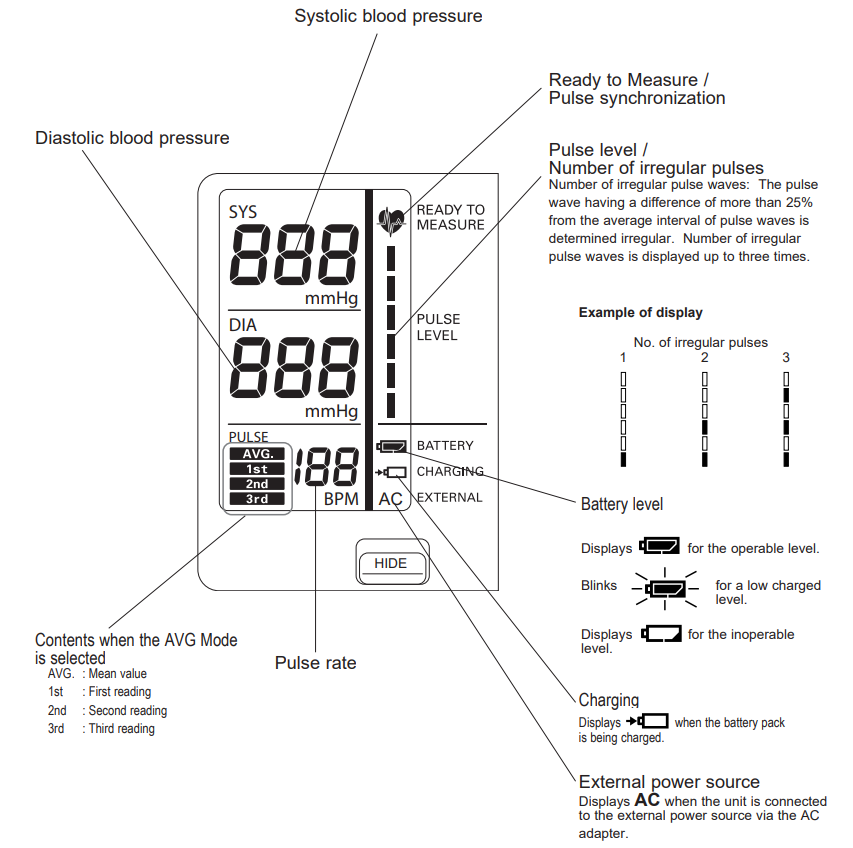
Functions setting
- Inflation level setting

AUTO (Automatic setting): Can be used when the SINGLE, AVG, or MANU Mode is selected. The unit estimates the systolic blood pressure during inflation and inflates to a proper cuff pressure (approximately 30-40 mmHg above the patient’s systolic pressure).
Manual level setting: Inflation level can be set manually between 100 and 280 mmHg. Set the level to 30 to 40 mmHg higher than the expected systolic pressure.
- To set the P-SET to “AUTO”, turn the P-SET Knob counterclockwise as far as it goes until you can hear a click.
- In the “AUTO” setting, inflation level may not be set automatically when the systolic blood pressure is more than 220 mmHg. Use the unit in the manual setting.
- If the cuff has not been inflated to the necessary level, it may be re-inflated automatically.
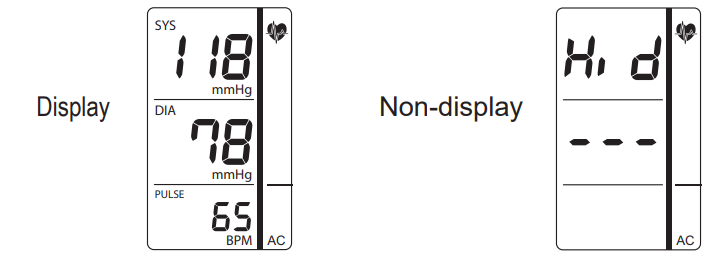
Non-display function

Use to prohibit the display of measurement results. However, the cuff pressure during measurement is displayed. This function can be used in the SINGLE and AVG Modes.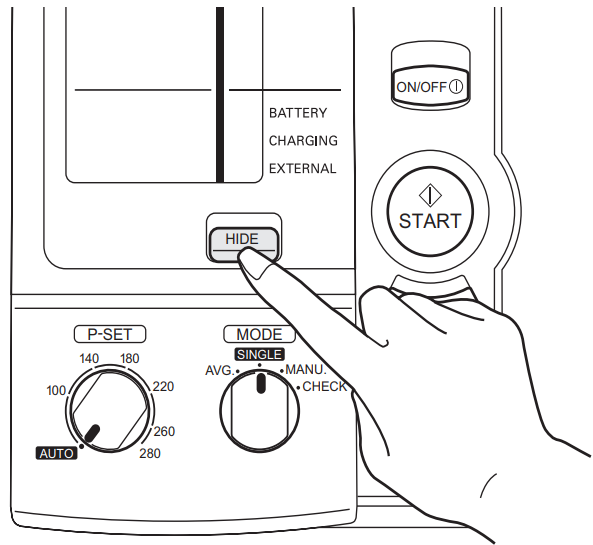
By pushing the , display or non-display of status is switched alternatingly.
Manual deflation control

Accelerate deflation by pushing the DEFLATION (deflation control) / Measurement Result Display Switch Button during deflation in the measurement by the MANU Mode.
With each push of the Button, cuff is deflated rapidly in increments of 5 to 10 mmHg.
List of Functions for each ModeMeasurement
Mode
Function
Single (SINGLE) Mode
Average (AVG) Mode
Auscultation (MANU) Mode
Check (CHECK) Mode
Inflation level set- ting
Non-display func- tion
Manual deflation control
AVG Function setting
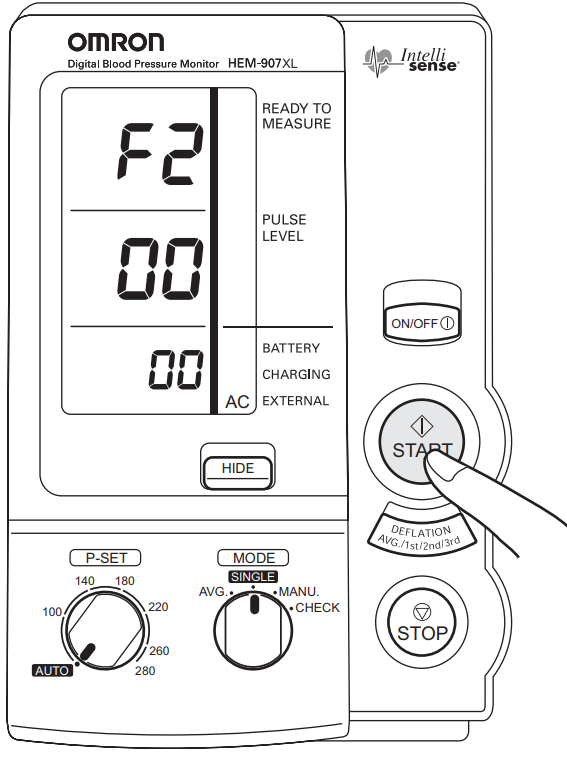
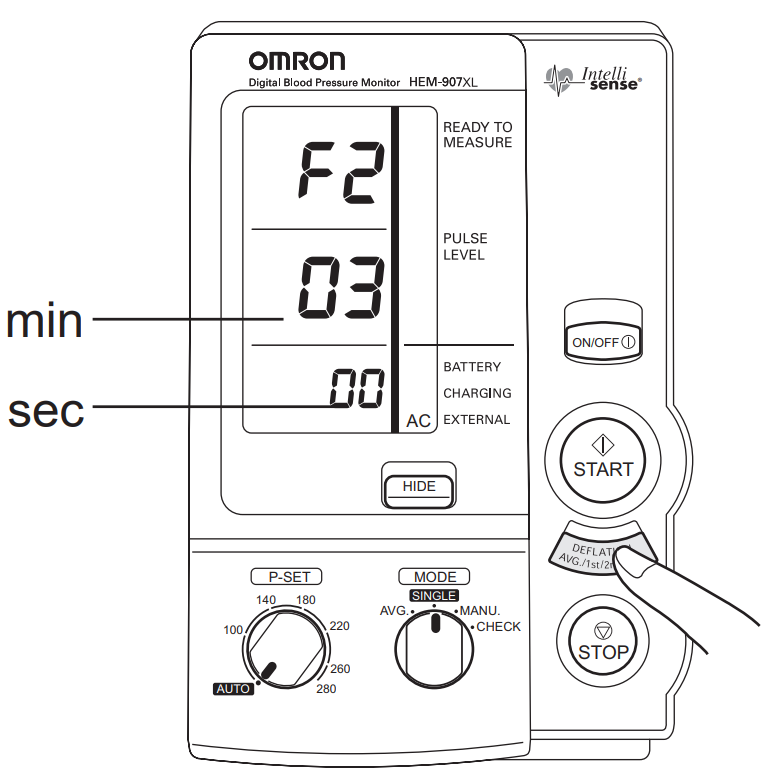
You can set the number of measurements, the waiting time until the 1st measurement, and the measurement interval for the AVG Mode.Function Items to Set Set Value F1 Number of measurements 2 times or 3 times F2 Waiting time until the start of 1st measurement 0 sec, 3 min, 5 min, or 10 min F3 Measurement interval 5 sec, 30 sec, 1 min, or 2 min
Note: The bold letters represent the factory-set values.
Procedure to change the set values
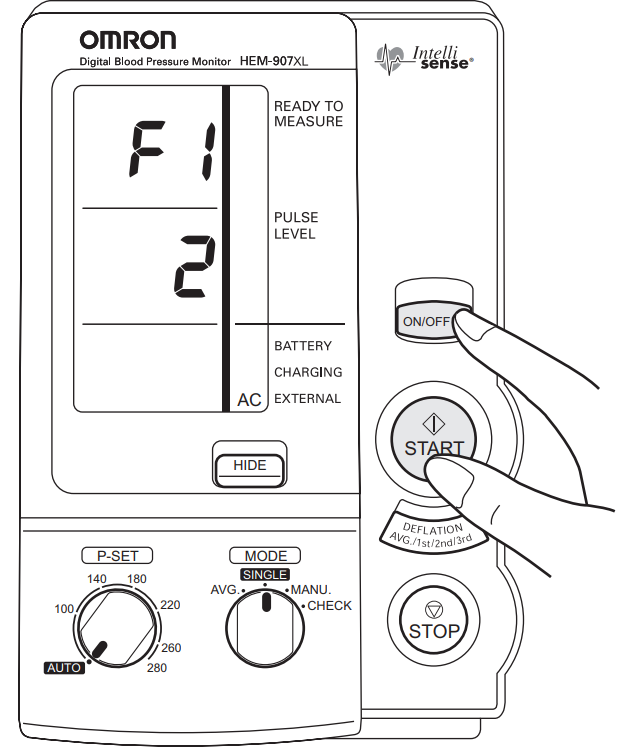
When the power is OFF, push the ON/OFF (power) Button for more than three seconds while holding the START Button; F1 is displayed.
Push the START Button and select the function to set from F1 to F3. Each time you push the START Button, the functions change in the order of
 .
.
- Push the DEFLATION (deflation control)/Measurement Result Display Switch Button and change the set values.
When the setting is finished, push the ON/OFF (power) Button to turn off the power. The setting is changed.
Description
The Omron IntelliSense BP Monitor HEM-907XL boasts a sleek and compact design that fits comfortably on any countertop. The large LCD display screen ensures that readings are clear and easy to read, even for those with impaired vision. The monitor comes with a standard adult cuff that fits arms ranging from 9 to 17 inches in circumference, making it versatile for most users. Additionally, the device includes a carrying case for convenient storage and transport.
HOW TO APPLY THE CUFF
The cuff of OMRON IntelliSense Blood Pressure Monitor HEM-907XL plays an important role of collecting the information on blood vessels. Please wrap the cuff according to the procedure, below.
- Do not wrap the cuff over an arm to which intravenous injection or transfusion is being conducted, or when otherwise contraindicated.
- Do not connect the air tube or the cuff to other equipment which is connected to intracorporeal organ. Air embolisms may result.
General advice
- Do not inflate the cuff without being wrapped over the arm.
- Do not use a damaged cuff.
Select the cuff according to the arm size
Arm Circumference Name of the Cuff (7" - 9") 17-22 cm HEM-907-CS19 (Small) (9" - 13") 22-32 cm HEM-907-CR19 (Medium) (13" - 17") 32-42 cm HEM-907-CL19 (Large) (17" - 20") 42-50 cm HEM-907-CX19 (Extra Large) 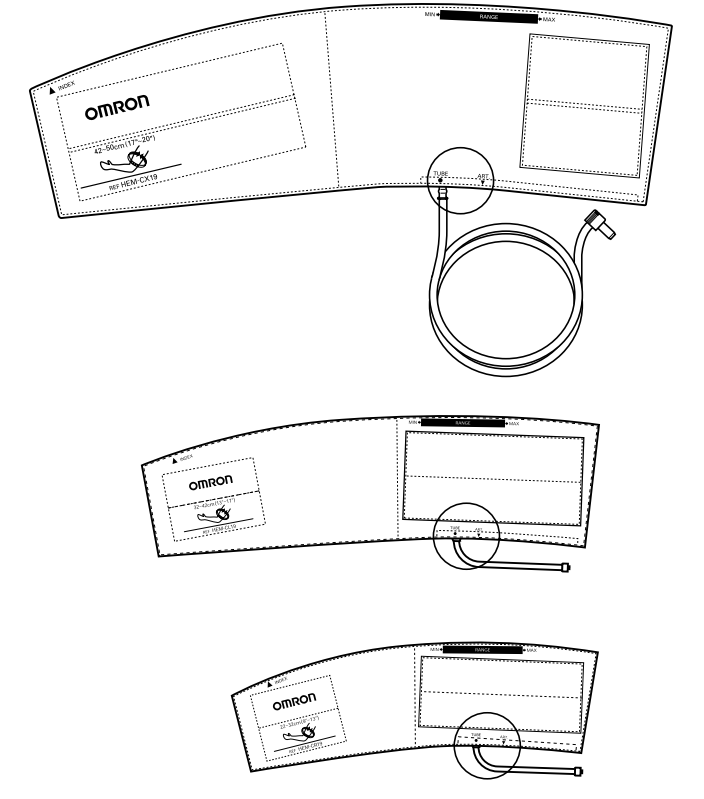
Check the following before applying the cuff:
- The bladder is correctly installed in the cuff.
- The bladder is not twisted inside the cuff.
The bladder tube is protruding from the cuff as shown in the Figure on the right.
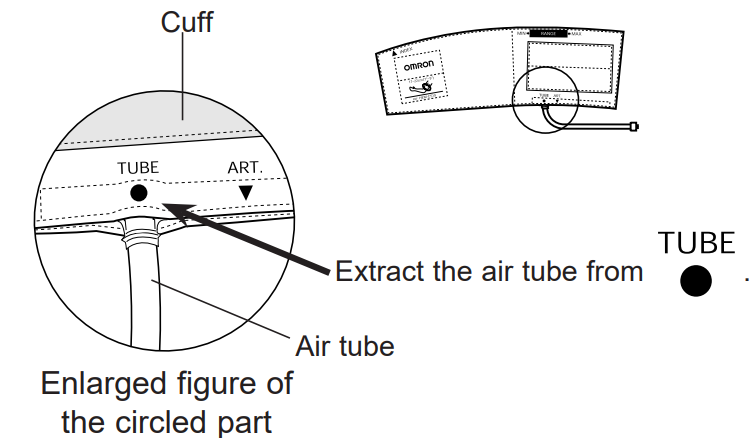
Connect the air tube securely.
To use the cuff in small, medium or large size
Connect the air tube to the main unit by securing the air plug to the base of the air connector.
Securely connect the air tube and the cuff/bladder set by rotating the luer connection as shown in the Figure on the right.
To use the cuff in extra-large size only
The extra-large cuff comes with an air tube with an integrated air plug. Connect the air plug of the cuff to the air connector securely when connecting to the main unit.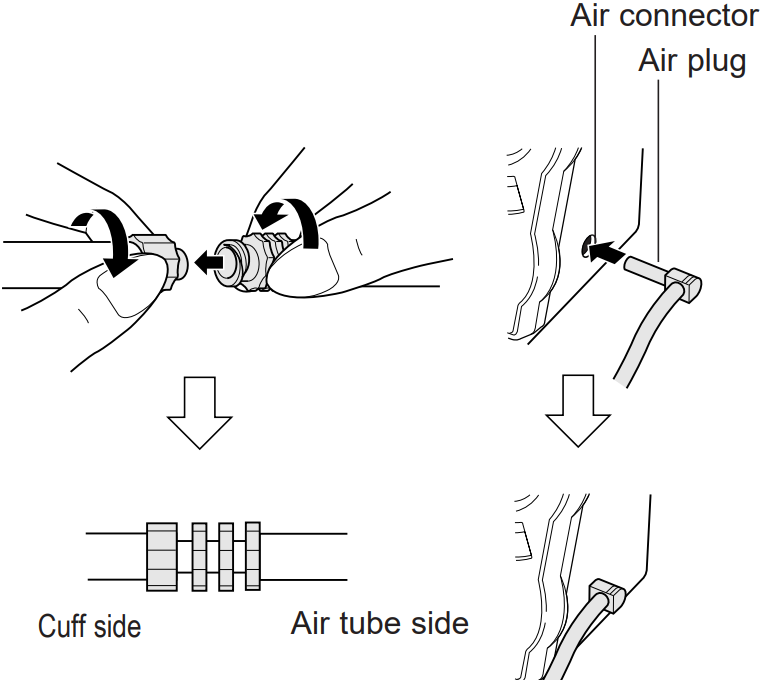
- Place the right or left hand of the patient with the palm of hand facing upward.
Align the Artery Position Mark with the brachial artery.
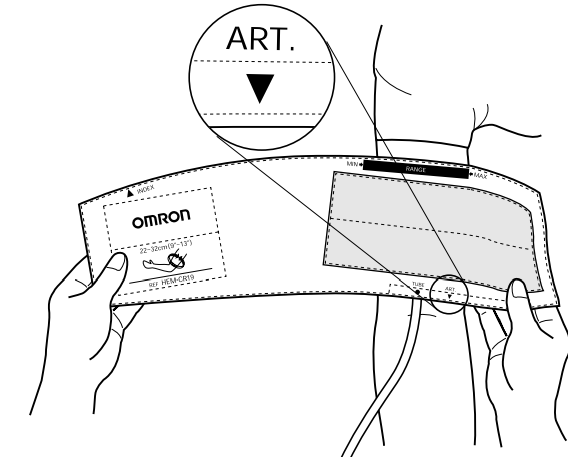
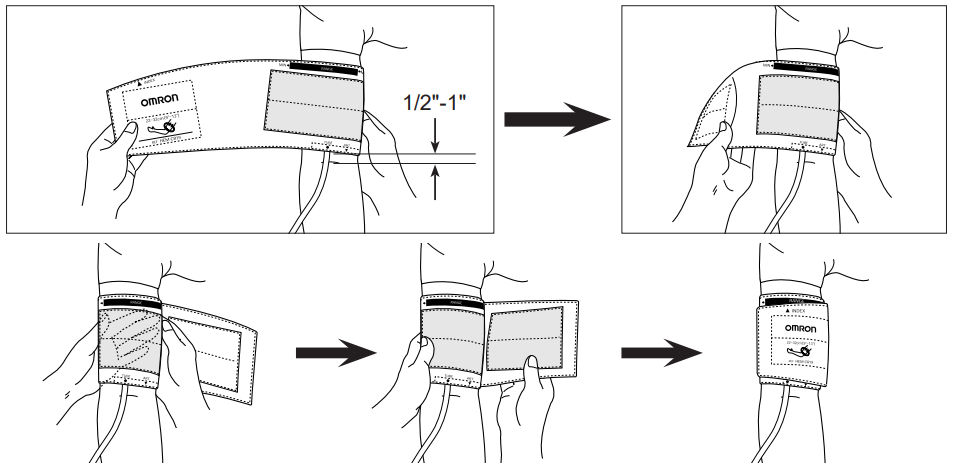
- Wrap the cuff snugly using both hands and securely fasten it with the Velcro™ tape. At this time, the lower edge of the cuff must be placed 1/2" to 1" above the inner side of elbow joint.
- If the INDEX is positioned outside the RANGE, select the cuff suitable for the patient’s arm circumference and wrap it again.
- Wrap the cuff so that you can insert only one finger between the cuff and arm.
Keep the level of the cuff at the same level as the heart during the measurement.
HOW TO USE THE POWER SOURCE
DANGER
TO REDUCE THE RISK OF FIRE OR ELECTRIC SHOCK, CAREFULLY FOLLOW THESE INSTRUCTIONS.
For connection to a power supply not in the U.S.A., use an attachment plug adapter of the proper configuration for the power outlet. The power unit (AC Adapter) is intended to be correctly oriented in a vertical or floor mount position.
NOTE: Use only the authorized AC Adapter that came with this monitor.
CAUTION
Use only authorized parts and accessories. Parts and accessories not approved for use with the device may damage the unit.
How to use the AC adapter
WARNING
Do not use this unit in the presence of flammable gas, or anesthetics, or in a high pressure oxygen room or oxygen tent.
DANGER
Do not touch the AC adapter with wet hands.
CAUTION
Be sure to use the AC adapter from the power supply of 110 VAC.
WARNING
Do not install or store this unit where it may come in contact with water or liquid medication. This is a Class II device with double isolation. Earth pin is not for protective purposes.
General advice
Read the instruction manual of the other devices to be used at the same time with this unit to understand and be aware of the interaction between the devices.
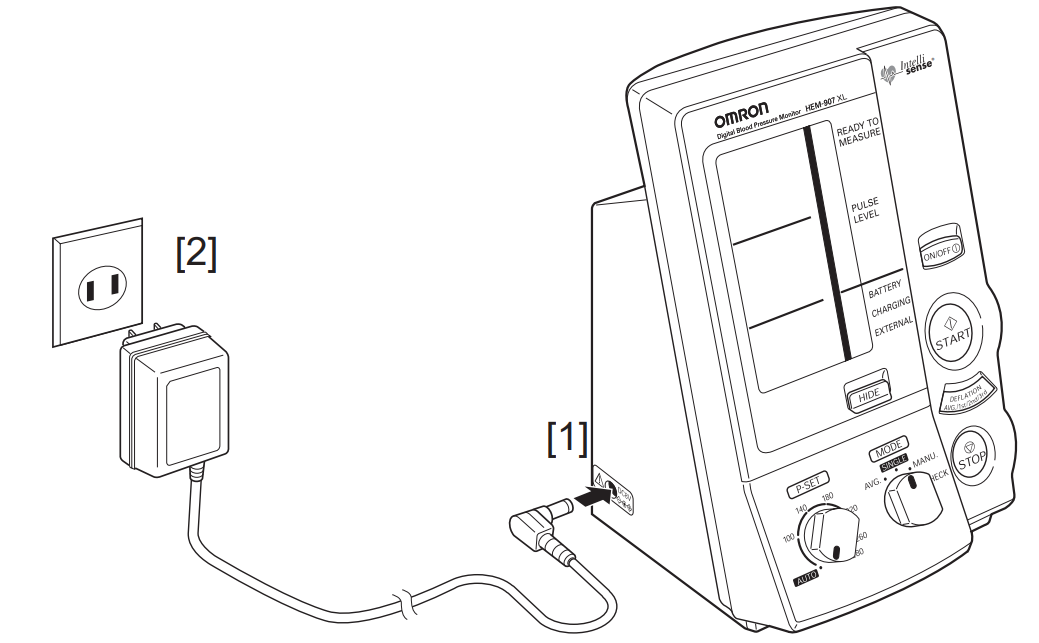
Connect the AC adapter to the DC jack of the main unit [1] and the electric outlet [2].
NOTE
When the AC adapter is connected and the unit is turned off, the AC adapter charges the installed rechargeable battery.
Installation and Replacement of Battery Pack
WARNING
If battery fluid gets into your eye or comes in contact with skin, wash the affected area with water repeatedly. Immediately consult a doctor for treatment.
CAUTION
Do not use the battery pack for devices other than for this unit. Do not disassemble the battery pack.
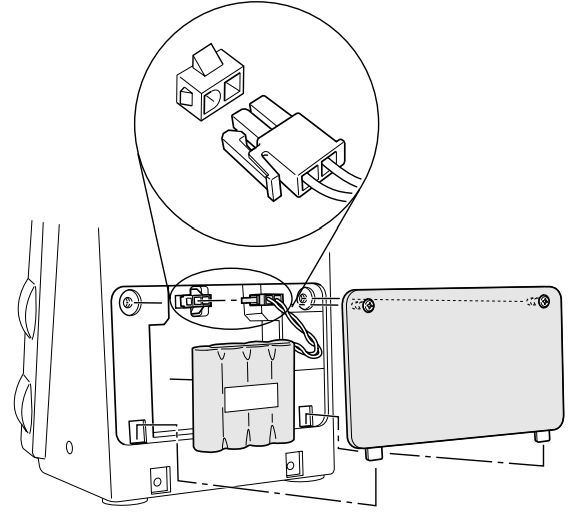
- Remove both screws on the upper portion of the battery cover of this unit, and remove the cover.
- Disconnect the old battery pack from the connector and replace with a new one.
- Install the battery cover and fasten it with both screws. Be careful not to pinch the lead wire.
- Connect the main unit to the AC adapter to charge the new battery. The battery is not charged when you purchase the monitor. When you use the battery for the first time, charge it for more than twelve hours before use.
Battery life
- You can use the unit for approximately three hundred measurements with one charge.
- The approximate life of the battery is two years. However, the battery life from each charging may be shortened depending on the state of using. If the interval between charging becomes short and the icon
 appears frequently, replace it.
Charging time
- At approximately five seconds after connecting the AC adapter, the unit will start battery charging automatically.
- While the battery is being charged, the
 icon turns on.
 - The battery can be completely charged in approximately twelve hours.
Battery low
- When the
 icon starts to blink, twenty to thirty measurements remain on the battery. However, if the Battery Low Mark starts to blink, charge it soon.
 - If the icon
 is displayed, the battery is low and the unit cannot operate. Please charge the battery.
Automatic Power Off
- When using the unit with the battery, the unit will turn off automatically after five minutes of inactivity.
- While the AC adapter is connected, the Auto Power Off function does not work.
Setup Guide
- Remove the monitor from its packaging and ensure all components are included (monitor unit, cuff, batteries, and carrying case).
- Insert four AA batteries into the battery compartment located on the back of the monitor.
- Wrap the cuff around your bare upper arm, ensuring it is snug but not too tight.
- Press the start button on the monitor; it will inflate the cuff automatically.
- Remain still during the measurement process; the monitor will deflate the cuff once complete.
- View your reading on the LCD screen; it will display systolic pressure, diastolic pressure, pulse rate, and any irregular heartbeat alerts if applicable.
HOW TO CLEAN THE UNIT AFTER USE
CAUTION
When cleaning this unit, unplug the AC adapter from the electric outlet.
NOTE
After cleaning this unit, dry it well, before plugging the AC adapter in the electric outlet.
General advice
- Do not clean this unit with gasoline, paint thinner, or high-concentration alcohol.
- Do not disinfect this unit by autoclave or gas sterilization (EtO, glutaraldehyde, or high concentration ozone.)
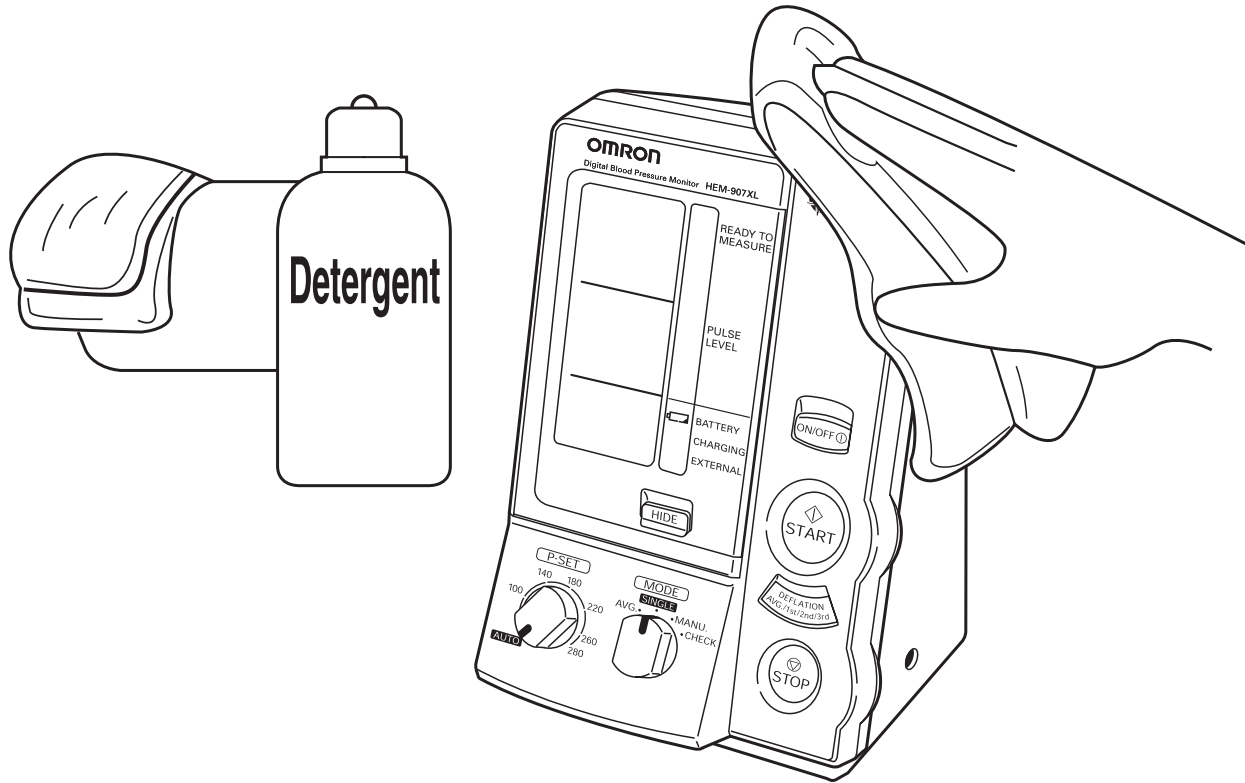
- Wipe the monitor with a soft, damp cloth diluted with disinfectant alcohol, or diluted detergent.
Complete cleaning by wiping the monitor with a soft, dry cloth.
LIST OF ERROR CODES
Error code | Explanation | How to correct |
| Er 1 | Inflation error
12 mmHg within the set time after the start of inflation
|
|
| Er 2 | Deflation error
| |
Er 3 | Overpressure error
|
|
| Er 4 | Insufficient inflation error
|
|
| Er 5 | Indeterminable blood pressure error
|
|
| Er 6 | Low pulse level error
|
|
| Er 7 | Blood pressure error
|
|
| Er 8 | Pulse rate error
| |
| Er 9 | Device error
|
|
TROUBLESHOOTING
If the unit malfunctions during use, please check the following:
Trouble | What to inspect | How to correct |
The unit inflates to abnormally high (low) pressure. |
Is the cuff wrapped correctly? | Wrap the cuff correctly, and measure again. |
Is the patient moving during inflation? |
Ask the patient not to move during measurement, and measure again. | |
Does this patient have arrhythmia? |
Set the P-SET to 30 to 40 mmHg higher than estimated systolic pressure of the patient, then measure. | |
Check the patient’s condition. | After checking the patient with the stethoscope refer to the “List of Error Codes”. (Refer to Page 29.) | |
Is the patient moving during the measurement? |
Ask the patient not to move during measurement, and measure again. | |
The monitor cannot measure blood pressure.
Measured values are abnormally high (low). |
Does the patient have an arrhythmia? | Set the P-SET to 30 to 40 mmHg higher than estimated systolic pressure of the patient, then measure. |
Is the size of the cuff correct and is it wrapped correctly? | Select the cuff according to the patient’s arm circumference, wrap it correctly, then measure again. | |
Is the level of the brachium to which the cuff is wrapped at the same level as the heart? |
Keep the level of the brachium to which the cuff is wrapped at the same level as the heart, then measure again. | |
Are the patient’s clothes restricting normal blood flow to the arm? |
Remove the clothing and measure again. |
Omron IntelliSense BP Monitor HEM-907XL Pros & Cons
Pros
- Accurate readings due to IntelliSense technology
- Easy-to-use interface with clear display screen
- Irregular heartbeat detection feature
- Memory storage for tracking previous readings
- Lightweight and portable design
Cons
- Battery life could be longer
- Some users find cuff sizing limitations restrictive
- No Bluetooth connectivity for data transfer
Customer Reviews
Customer reviews of the Omron IntelliSense BP Monitor HEM-907XL are generally positive. Users praise its ease of use, accuracy in readings, and compact design. However, some users note that battery life could be improved and that there are limitations in cuff sizes available.
Common Complaints
Some users have reported issues with inconsistent readings when using improper cuff sizing or incorrect positioning.
FIVE-YEAR LIMITED WARRANTY
Your HEM-907XL IntelliSense Automatic Blood Pressure Monitor is warranted to be free from manufacturing defects for a period of five years under normal use. The five year warranty excludes the monitor cuff. The cuff is warranted for a one year period. This warranty extends only to the original retail purchaser.
Faqs
What technology does Omron IntelliSense use?
How do I properly position the cuff on my arm?
Can I use this monitor if I have an irregular heartbeat?
How many readings can this monitor store?
What are some common issues that might affect accuracy?
How do I clean and maintain this device?
Can I use this Omron IntelliSense BP Monitor HEM-907XL if I have very large arms?
What is average reading function?
How long does it typically take to get a Omron IntelliSense BP Monitor HEM-907XL reading?
Is there any warranty provided with this product?
Leave a Comment
