Specs & Features : Sanyo 32 Inch LED TV XT-32A170H1
Content
Introduction of Sanyo 32 Inch LED TV XT-32A170H1
Warning: Handling the mains plug and lead
Insert the mains plug fully into the socket outlet. (If the mains plug is loose, it could generate heat and cause fire.)
Ensure that the mains plug is easily accessible.
Do not touch the mains plug with a wet hand. (This may cause electrical shock.)
Do not use any mains lead other than that provided with this TV. (This may cause fire or electrical shock.)
Do not damage the mains lead. (A damaged lead may cause fire or electrical shock.)
Do not move the TV with the lead plugged in the socket outlet.
Do not place a heavy object on the lead or place the lead near a high-temperature object.
Do not twist the lead, bend it excessively or stretch it.
Do not pull on the lead. Hold onto the mains plug body when disconnecting the lead.
Do not use a damaged mains plug or socket outlet.
Use the TV in moderate climates.
Power source
This TV is designed to operate on 100 – 240V ~ 50/60 Hz
Table-top use / Wall hanging
Do not use external voltage stabilizer with the TV set
Inferior quality stabilizer may cause damage to the TV.
Warranty is not valid if external stabilizer is used.
Do not remove covers and never modify the TV by yourself
Do not remove the rear cover as live parts are accessible when it is removed. There are no user serviceable parts inside. (High-voltage components may cause serious electrical shock.)
Have the TV checked, adjusted, or repaired at your local Sanyo dealer.
Please refer the information on exterior back enclosure for electrical and safety information before installing or operating the apparatus.
The mains plug is used as disconnect device, the disconnect device shall remain readily operable.
Do not expose to rain or excessive moisture
To prevent damage which might result in electrical shock or fire, do not expose this TV to rain or excessive moisture. This TV must not be exposed dripping or splashing water and objects filled with liquid, such as vases, must not be placed on top of or above the TV.
Do not insert external objects into the TV
Do not allow any objects to drop into the TV through the air vents. (Fire or electrical shock may result)
Do not place the TV on sloped or unstable surfaces, and ensure that the TV does not hang over the edge of the base
The TV may fall off or tip over.
Use only the dedicated pedestals/mounting equipments
Use an unapproved pedestal or other fixtures may make the TV unstable, risking injury. Be sure to ask your local Sanyo dealer to perform setup.
When mounting the TV on a wall or ceiling, be sure to install the product according to the methods recommended by the manufacturer. This is a safety feature.
Only use attachments/accessories specified or provided by the manufacturer (such as the exclusive supply adapter, battery, etc.).
Do not expose to direct sunlight and other sources of heat
Avoid exposing the TV to direct sunlight and other sources of heat.
To prevent the spread of fire, keep candles or other open flames away from this product at all times.
Use Environment
Warning: Never place a television set in an unstable location. A television set may fall, causing serious personal injury or death. Many injuries, particularly to children, can be avoided by taking simple precautions such as:
Using cabinets or stands recommended by the manufacturer of the television.
Only using furniture that can safely support the television.
Ensuring the television is not overhanging the edge of the supporting furniture.
Not placing the television on tall furniture (for example, cupboards or bookcases) without anchoring both the furniture and the television set to a suitable support.
Not placing the television set on cloth or other materials that may be located between the television set and supporting furniture.
Educating children about the dangers of climbing on furniture to reach the television or its controls.
If your existing television set is being retained and relocated, the same considerations as above should be applied. (Only for the TV with mass exceeds 7 kg)
Cleaning
Do not spray water or detergent directly on TV screen for cleaning purpose. Leaking liquid substance will cause damage to TV.
Be careful of cats, rats or other animals that may urinate on the TV (front and rear). It may lead to TV failure.
Do not use sharp or hard objects (finger nails, knife and etc.) on TV screen. This may cause damage to the screen surface.
Hanging the TV Set on the Wall
Check that the wall can support the weight of the TV set and wall mount assembly.
Follow the mounting instructions provided with the wall mount.
The TV set must be installed on a vertical wall.
Make sure to use only screws suitable for the material of the wall.
Make sure that the TV set cables are placed so that there is not danger of tripping over them. All other safety instructions about our TV sets are also applicable here.
Warning: This operation requires two people.
To ensure a safe installation, observe the following safety precautions:
CAUTION
Read these instructions—all the operating instructions must be read and understood before the product is operated.
Keep these instructions—These safety and operating instructions must be kept in a safe place for future reference.
Read all warnings—All warnings on the product and in the instructions must be observed closely.
Follow all instructions—All operating instructions must be followed.
Attachments—Only use attachments/accessories specified by the manufacturer. Do not use attachments not recommended by the manufacturer. Use of improper attachments can result in accidents.
Power source—This product is intended to be supplied by a listed power supply indicated on the marking label. If you are not sure of the type of power supply to your home, consult your product dealer or local power company. For added protection for this product during a lightning storm, or when it is left unattended and unused for long periods of time, unplug it from the wall outlet and disconnect the cable system.
Power cord protection—Protect the power cord from being walked on or pinched particularly at plugs, convenience receptacles, and the point where they exit from the apparatus.
Overloading—Do not overload wall outlets, extension cords, or convenience receptacles on other equipment as this can result in a risk of fire or electric shock.
Servicing—Refer all servicing to qualified service personnel. Servicing is required when the apparatus has been damaged in any way, such as power-supply cord or plug is damaged, liquid has been spilled or objects have fallen into the apparatus, the apparatus has been exposed to rain or moisture, does not operate normally, or has been dropped.
Damage requiring service—If any of the following conditions occurs, unplug the power cord from the AC outlet, and request a qualified service person to perform repairs. a. When the power cord or plug is damaged. b. When a liquid is spilled on the product or when objects have fallen into the product. c. When the product does not operate properly as described in the operating instructions. d. Do not touch the controls other than those described in the operating instructions. Improper adjustment of controls not described in the instructions can cause damage, which often requires extensive adjustment work by a qualified technician. e. If the product has been dropped or the cabinet has been damaged in any way. f. When the product displays an abnormal condition or exhibits a distinct change in performance. Any noticeable abnormality in the product indicates that the product needs servicing.
Replacement parts—In case the product needs replacement parts, make sure that the service person uses replacement parts specified by the manufacturer, or those with the same characteristics and performance as the original parts. Use of unauthorized parts can result in fire, electric shock and/or other danger.
Safety checks—Upon completion of service or repair work, request the service technician to perform safety checks to ensure that the product is in proper operating condition.
Stand—Use only with the cart, stand, tripod, bracket or table specified by the manufacturer, or sold with the apparatus. Do not place the product on an unstable trolley, stand, tripod or table. Placing the product on an unstable base can cause the product to fall, resulting in serious personal injuries as well as damage to the product. When mounting the product on a wall, be sure to follow the manufacturer's instructions. Use only the mounting hardware recommended by the manufacturer.
Careful move—When a cart is used, use caution when moving the cart/apparatus combination to avoid injury from tip-over. Sudden stops, excessive force and uneven floor surfaces can cause the product to fall from the trolley. Never attempt to move the TV unless the AC power cord has been disconnected.
Lightning—Unplug this apparatus during lightning storms or when unused for long periods of time. For added protection for this television equipment during a lightning storm, or when it is left unattended and unused for long periods of time, unplug it from the wall outlet and disconnect the antenna. This will prevent damage to the equipment due to lightning and power-line surges.
Panel protection—The display panel used in this product is made of glass. Therefore, it can break when the product is dropped or impacted upon by other objects. Be careful not to be injured by broken glass pieces in case the display panel breaks.
Pixel defect—The display panel is a very high technology product, giving you finely detailed pictures. Occasionally, a few non-active pixels may appear on the screen as a fixed point of blue, green or red. Please note that this does not affect the performance of your product.
Do not block the rear air vents
Adequate ventilation is essential to prevent failure of electronic components.
Ventilation should not be impeded by covering the ventilation openings with items such as newspapers, table cloths and curtains.
We recommended that a gap of at least 10 cm is left all around this TV even when placed inside a cabinet or between shelves.
When using the pedestal, keep the space between the bottom of the TV and the surface where the TV is set. If pedestal is not used, ensure the vents in the bottom of the TV are not blocked.
Do not install this equipment in a confined or building-in space such as a book case or similar unit, and remain in well ventilation conditions at open site.
Do not ingest the battery, Chemical Burn Hazard—Keep new and used batteries away from children. If the battery compartment does not close securely, stop using the product and keep it away from children. If you think batteries might have been swallowed or placed inside any part of the body, seek immediate medical attention.
Listening—Listening to music at high volume levels and for extended durations can damage one's hearing. In order to reduce the risk of damage to hearing, one should lower the volume to a safe, comfortable level, and reduce the amount of time listening at high levels.
Symbol
For the terminals marked with symbol of "⚡" may be of sufficient magnitude to constitute a risk of electric shock. The external wiring connected to the terminals requires installation by an instructed person or the used of ready-made leads or cords.
If the product has the symbol "
 " in its rating label and the power cord has two pins, it means that the equipment is a Class II or double insulated electrical appliance. It has been designed in such a way that it does not require a safety connection to electrical earth.
The following information are recommended to be included where applicable:
"∿" Refers to alternating current(AC).
"—" Refers to direct current(DC).
"
" Refers to Class II equipment."(
 )" Refers to stand-by.
"|" Refers to power ON.
"⚡" Refers to dangerous voltage.
This lightning flash with arrowhead symbol within an equilateral triangle is intended to alert the user to the presence of non-insulated “dangerous voltage” within the product's enclosure that may be of sufficient magnitude to constitute a risk of electric shock.
To reduce the risk of electric shock. Do not remove cover (or back). No user serviceable parts inside. Refer to qualified service personnel.
The exclamation point within an equilateral triangle is intended to alert the user to the presence of important operating and maintenance instructions in the literature accompanying the appliance.
Precautions for Using Remote Control
Use the remote control by pointing it towards the remote sensor. The items between the remote control and the remote sensor will interfere with the normal operation.
Do not make remote control vibrate violently. Also, do not splash liquid on the remote control, also do not put the remote control in high humidity place, which will cause deformation of the unit by sunlight.
When the remote sensor is under direct sunlight or strong lighting, the remote control will not work. If so please change the lighting or TV's position, or operate the remote control closer to the remote sensor.
Installing/Removing Remote’s Batteries
Place two AAA size batteries in the remote control's battery compartment, making sure to match the polarity markings inside the compartment.

Caution
Incorrect installation may cause battery leakage and corrosion, resulting in damage to the remote control.
Do not mix old and new batteries.
Replace only with same or equivalent type. Do not mix different battery types (such as alkaline and manganese batteries).
Do not use rechargeable (Ni-Cd) batteries.
Do not burn or break up batteries.
Do not expose batteries to excessive heat such as sunshine, fire or the like.
Ensure batteries are replaced correctly, there is danger of explosion and fire if battery is reversed.
Do not disassemble or modify the remote control.
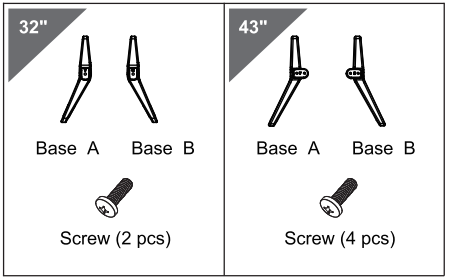
Standard Accessories
Remote Control
Pedestal (2)
Screws (2/4)
Batteries (2) {AAA size)
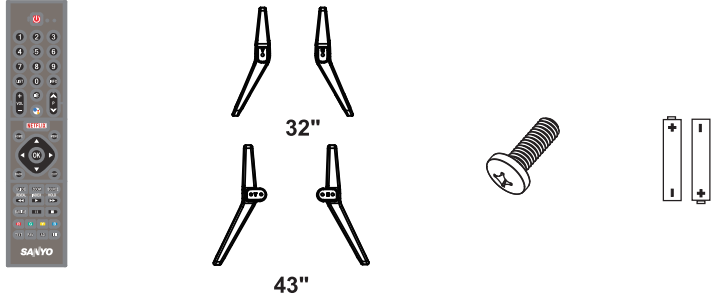
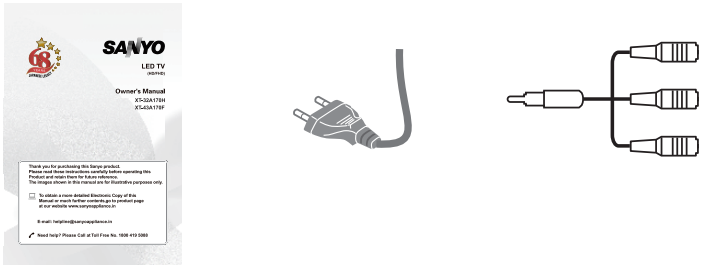
Operating Instructions
AC Power Cord
AV Converting Cable
Sanyo 32 Inch LED TV XT-32A170H1 Optional Accessories
Please contact your local Sanyo dealer to purchase the recommended optional accessories. For additional details, please read the manual of optional accessories.
Wall-hanging bracket
Please contact your local Panasonic dealer to purchase the recommended wall-hanging bracket.
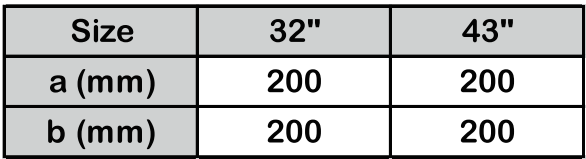
Screw Specifications

VESA
Warning
Failure to use a Sanyo bracket or choosing to mount the unit yourself will be done at the risk of the consumer. Always be sure to ask a qualified technician to carry out set up. Incorrect fitting may cause equipment to fall, resulting in injury and product damage. Any damage resulting from not having a professional installer mount your unit will void your warranty.
When any optional accessories or wall hanging brackets are used, always ensure that the instructions provided are followed fully.
Do not mount the unit directly below ceiling lights (such as spotlights or halogen lights) which typically give off high heat. Doing so may warp or damage plastic cabinet parts.
Take care when fixing wall brackets to the wall. Wall-mounted equipment shall not be grounded by metal within the wall. Always ensure that there are no electrical cables or pipes in the wall before hanging bracket.
To prevent fall and injury, remove the TV from its fixed wall position when it is no longer in use.
Specifications
Model No. | XT-32A170H | XT-43A170H | |||
Power Source | 110 - 240 V- | 50/60 Hz | 110 - 240 V- 50/60 Hz | ||
| POWER CONSUMPTION | PowerRating | 60W |
74W | ||
Standby Condition | < 0.5W | <0.5W | |||
| DISPLAY PANEL | Visible Screen Size | 80 cm | 108 cm | ||
Resolution | 1366 X 768 | 1920 X 1080 | |||
with Pedestal |
72.0 X 18.8 X 47.2 cm |
95.8 X 20.5 X 60.0 cm | |||
| DIMENSIONS | |||||
TV only | 72.0 X 8.9 X 42.1 cm | 95.8X 8. 9 X 55.6 cm | |||
Net Weight | 3.86 kg (with Pedestal) 3.81 kg (TV only) |
6.7 kg (with Pedestal) 6.5 kg (TVonly) | |||
Gross Weight | 5.3 kg | 9.4 kg | |||
Speaker | 60 | 60 | |||
Audio Output | 10W+10W | 10W+10W | |||
| SOUND | |||||
TV System | DTV: DVB-T/T2/C | ||||
ATV: PAL BG/I/DK | |||||
Connection Terminals
| COMPOSITE | Mini AV Connector x 1 (NeedAV converting cable) | |||
ANTENNA IN | Aerial Connector x 1 | ||||
HDMI | HDMI Connector x 2 | ||||
USB | USB2.0 Connector x 2 | DC 5 V, Max. 500mA | |||
DIGITAL AUDIOOUT | Optical x 1 | ||||
LANIN | Network Connector x 1 | ||||
Description
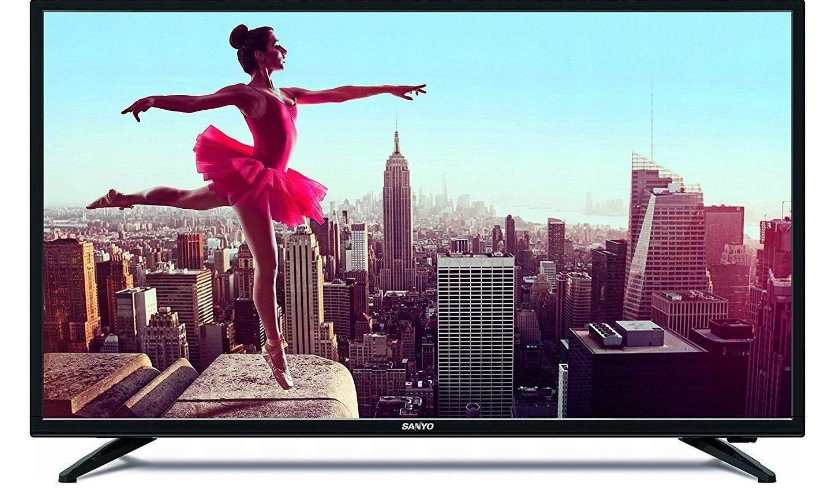
The Sanyo 32 Inch LED TV XT-32A170H1 is a high-quality and affordable television that delivers stunning visuals and impressive sound performance. This model boasts a 32-inch LED display with a resolution of 1366 x 768, providing clear and crisp images. The TV also features built-in speakers that deliver rich and immersive audio, making it perfect for watching movies, sports, and TV shows. With its sleek and modern design, this TV is sure to complement any home decor.
Pedestal Installation
Warning
Do not disassemble or modify the pedestal.
Otherwise the TV may fall over and become damaged, and personal injury may result.
Caution
Do not use any pedestal other than the one provided with this TV.
Otherwise the TV may fall over and become damaged, and personal injury may result.
Do not use the pedestal if it becomes warped or physically damaged.
If you use the pedestal while it is physically damaged, personal injury may result. Contact your local Sanyo dealer immediately.
During set-up, make sure that all screws are securely tightened.
If insufficient care is taken to ensure screws are properly tightened during assembly, the pedestal will not be strong enough to support the TV, and it might fall over and become damaged, and personal injury may result.
Ensure that the TV does not fall over.
If the TV is knocked or children climb onto the pedestal while the TV is installed, the TV may fall over and personal injury may result.
Two or more people are required to install and remove the TV.
If two or more people are not present, the TV may be dropped, and personal injury may result.
When removing the pedestal from the TV, do not remove the pedestal by the methods other than the specified procedure.
Otherwise the TV and / or pedestal may fall over and become damaged, and personal injury may result.
The appearance of the product in illustrations may differ from your actual product, and is for reference purposes only.
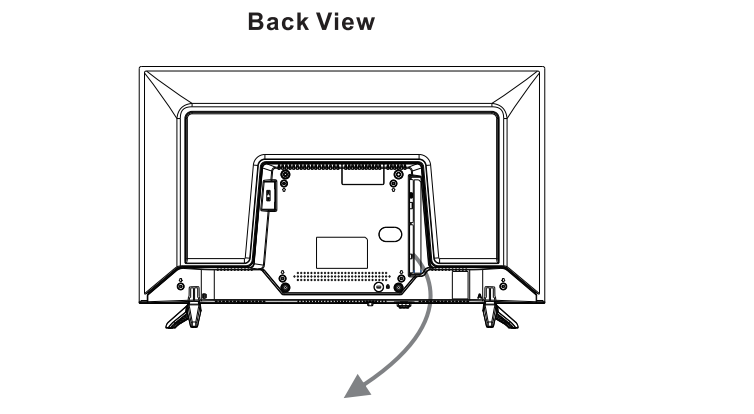
Removing the pedestal from the TV
Be sure to remove the pedestal in the following way when using the wall-hanging bracket or repacking the TV:
Remove the assembly screws from the TV.
Remove the pedestal from the TV.
Note: The pictures are only for reference.
Please take out the accessory bag from the package and check if all below parts exist without missing, if not, please contact your local dealer.
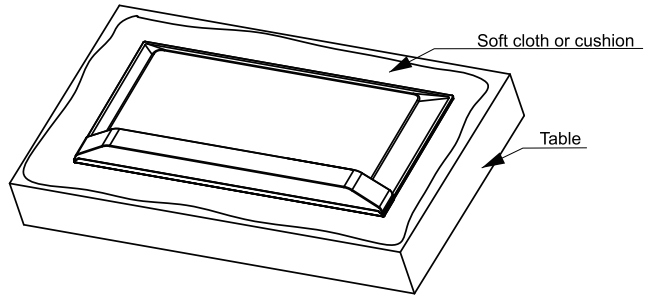
Take out the TV and carefully put it (screen downward) on a stable and flat table with a soft cloth or cushion on it.
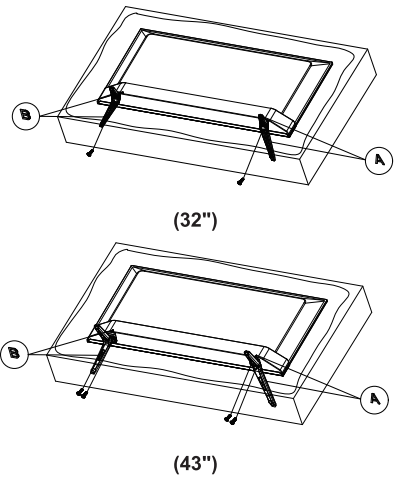
Connect the TV and base by putting and fastening matched screws into the holes.
Basic Features
TV Terminals
Note: The pictures are only for reference. The positions of terminals may vary by different models.
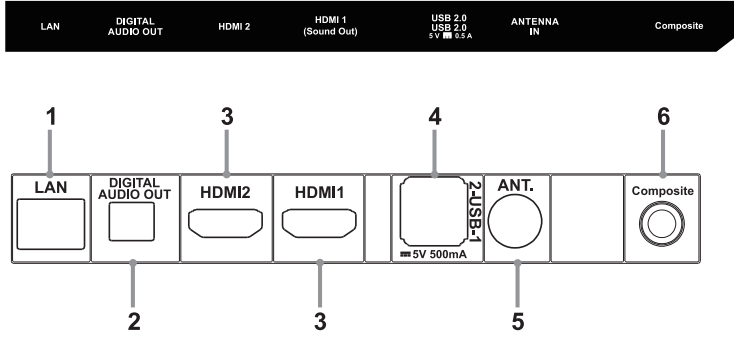
LAN Network port.

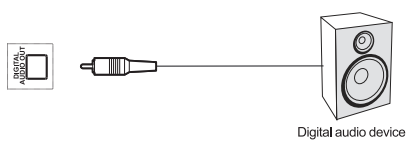
DIGITAL AUDIO OUT: Connect an optical cable to output the TV's digital audio signal to a compatible audio receiver.
HDMI IN: Receive HDMI input signal from the connected HDMI device.
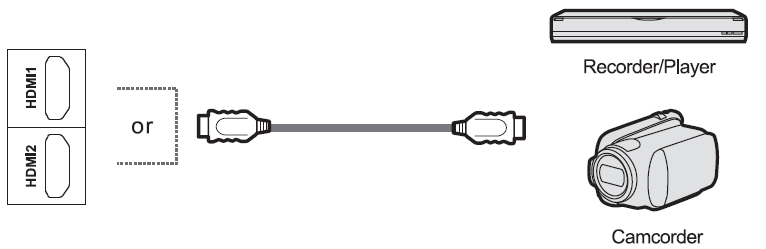
Note: If the external device has a DVI output only, use a DVI to HDMI adapter cable to connect to the HDMI terminal.
USB Connect USB devices to the TV.
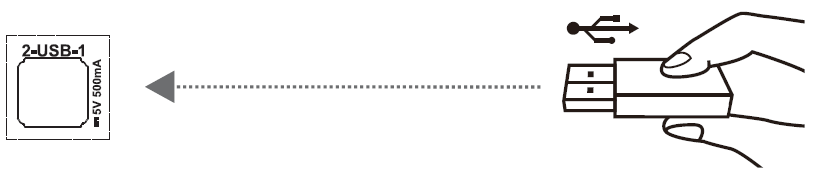
Note: Never remove the USB device or turn off the TV while using the USB device.
ANTENNA IN Connect a coaxial cable to receive signal from the antenna or cable.
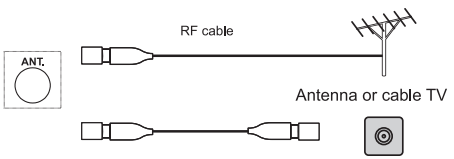
- Do not place the RF cable under the TV.
- To obtain the optimum quality of picture and sound, an aerial, the correct cable (750 coaxial} and the correct terminal are required.
- If a community antenna system is used, you may require the correct connection cable and plug between the wall aerial socket and the TV.
- Your local Television Service Center or dealer may be able to assist you in obtaining the correct aerial system for your particular area and the accessories required.
- Any matters regarding aerial installation, upgrading of existing systems or accessories required, and the costs incurred, are the responsibility of you, the customer.
Composite: Receive audio and video signal from signal source such as DVD.

TV Controls
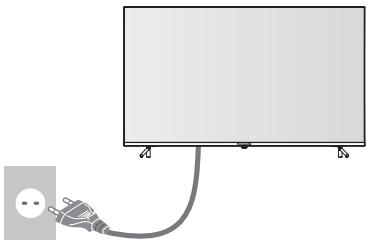
Power Connection
Connect the power cord to the TV and the power outlet (110-240V- 50/60Hz).
Turn on or turn off the TV
Connect the power cord to the power outlet and the TV.
In standby mode, press POWER button to turn on the TV.
In working status, press POWER button to turn the TV to standby mode.
Disconnect the power cord to power off the TV completely.
Power Indicator
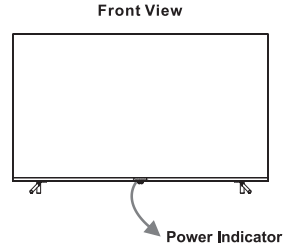
Lit in Red: Standby mode.
Lit in Green: Working status.
Unlit: Power off.
Rocker Button
Press Middle
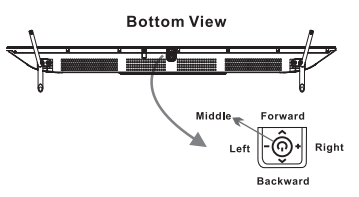
In standby mode, press it to turn on the TV.
In working status,
Without the source list, short press it to access the source list.
With the source list, short press it to enter the selected source.
Long press it to exit the source list or turn the TV to standby mode.
Push Left/Right: Adjust the TV sound volume.
Push Backward/Forward: Switch channels, or select the input source in source list.
Remote Control
Note
The picture is only for reference.
Some buttons may not be available for some regions, some models or some sources.
Some DTV-related buttons may not be applicable due to non-availability of DTV signal in some areas.
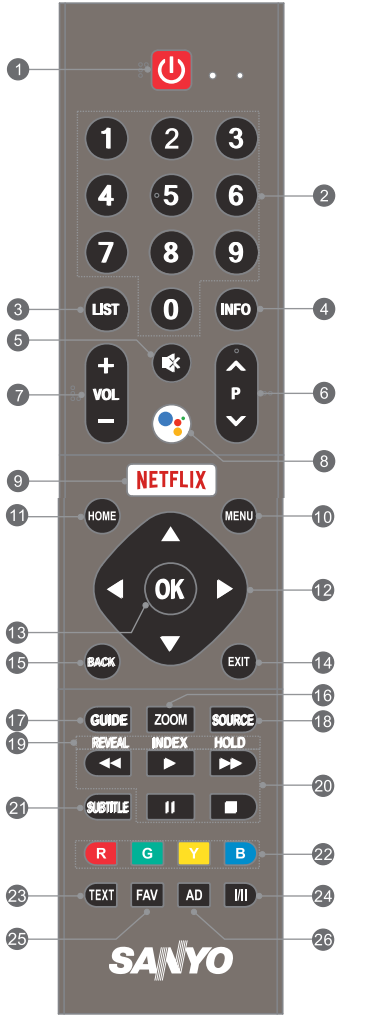
POWER (
): Turn the TV on or to standby mode.Number Buttons (0-9): Choose the channel directly.
LIST: Access the channel list.
INFO: Access the INFO interface.
MUTE (🔇): Mute or restore the sound.
Program Up/Down (P▲ /▼): Change to next or previous program.
Volume Up/Down (VOL +/-): Increase or decrease the sound volume.
MIC (🎤): Start talking to Google Assistant of the TV.
Netflix: Access the application of Netflix.
MENU: Access the quick menu settings.
HOME: Enter the home page.
UP/DOWN/LEFT/RIGHT (▲ / ▼ / ◄ / ►): Navigate the menu to select what you want.
OK: Confirm or enter the selected content, or access the channel list in TV mode.
EXIT: Exit the current operation.
BACK: Back to the upper-level menu.
ZOOM: Select the aspect ratio.
GUIDE: Access the EPG interface.
SOURCE: Select the input source.
19 & 23. Teletext Buttons
REXt: Enter or exit the teletext menu.
REVEAL: Display the concealed information.
INDEX: Display the index page.
HOLD: Hold the teletext page on screen without updates or changes.
USB Play Control Buttons
PLAY (▶): Start the playback.
PAUSE (❚❚): Pause the playback, or enable Time-shift function in DTV mode.
Stop (■): Stop the playback.
Fast Backward (◀◀): Fast backward the playback.
Fast Forward (▶▶): Fast forward the playback.
Subtitle: Open or close the subtitle.
Color Buttons (RED/GREEN/YELLOW/BLUE): Execute the prompt function in specific mode.
II.: Select Audio language depending on the broadcasting program.
FAV: Access the list of favorite programs.
AD: Access the accessibility settings.
How to Pair Remote Control with the TV
Note
The pictures are only for references.
This is a Bluetooth remote control. Before using it, please pair it with the TV.
If you wait for more than 2 minutes and it can't pair, please repeat the following steps for pairing again.
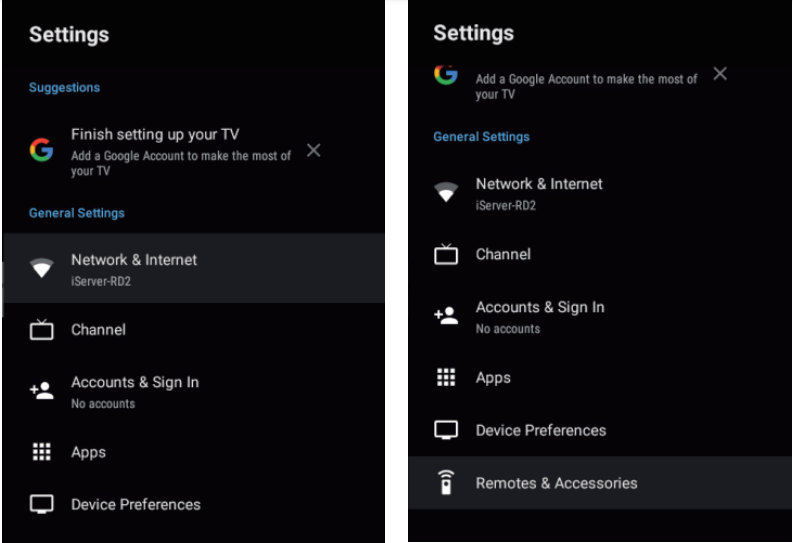
Press HOME ▲ button to enter the home page.
- Press .▲ . button to select "Settings" at the home page.
- Enter "General Settings" to select "Remotes & Accessories".
.png)
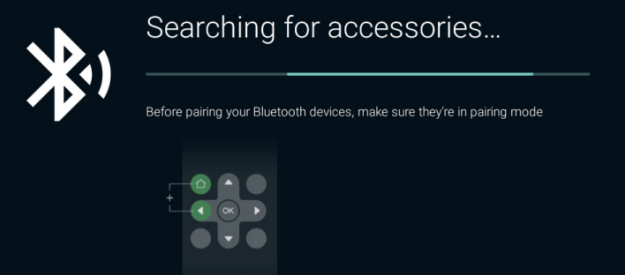
Select "Add accessory" to enter the interface of "Searching for accessories".
.png)
Press HOME and ◄ button together for a while until there shows the name of your Bluetooth remote control on the TV searching interface. The LED of remote control turns green and starts blinking continuously.
.png)
Check and select the name, and the default name is "TV BLE Remote".
.png)
Press OK button to start pairing the Bluetooth remote control. The screen will display “Pairing...”.
Then the screen will display “Connecting...”.
The screen will display “Paired” and green LED will stop blinking temporarily if the remote control is paired successfully. It will turn green and blinks once each time when you press any button of the remote control.
.png)
The LED status of remote control in Bluetooth and infrared modes.
Continuous blinking of green LED
In Bluetooth pairing mode, the LED of remote control turns green and keeps blinking continuously.
One blinking of green LED
In Bluetooth using status after paired successfully, the LED of remote control turns green and blinks once each time when you press any button.
One blinking of red LED
In infrared using status, the LED of remote control turns red and blinks once each time when you press any button.
Initial Setup
When you turn on the TV for the first time, there will show a wizard to guide you to finish the following initial settings:
Connect your Bluetooth remote control.
Select the menu language as you need.
.png)
Select whether or not to use an Android phone to setup the TV.
.png)
Note: If you don't want to use your Android phone to setup the TV, you can skip directly to Step 4. If you want to use your Android phone to setup the TV, please operate as the following instructions.
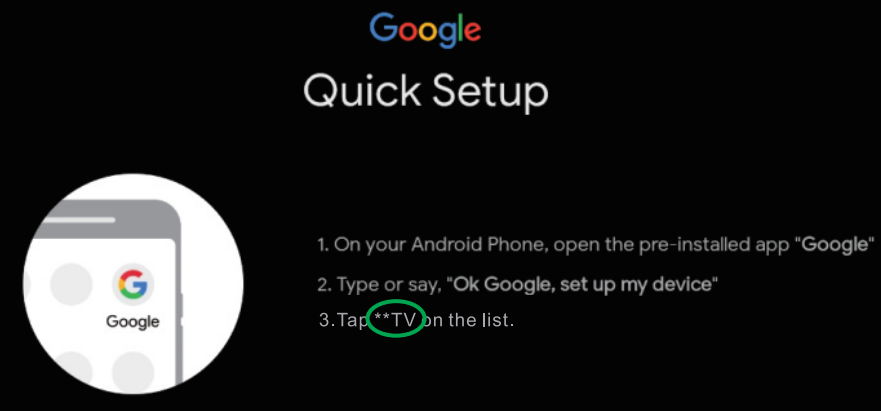
Instructions to Setup the TV with Your Android Phone
Turn on the Bluetooth functions of your Android phone, then find and open "Google" application on your phone.
.png)
Click the "🔍" icon, then say "Ok Google, setup my device."
.png)
When there shows "Getting started", please click "Next" to search for devices.
.png)
Select the name of your TV, which is the same as that shown on the TV screen.
.png)
Verify to make sure that the code shown on your phone is the same as that shown on the TV screen. Then click "Next" to connect the TV with your phone.
.png)
.png)
Connect your phone to the selected wireless network, then choose your Google account.
.png)
Copy your Google account and internet to the TV.
.png)
Input your password and finish connecting the internet and Google account onto the TV.
.png)
Select whether or not to connect your TV set to the wireless network.
.png)
Note: If you have connected the TV to the wireless network, it will check for updates like Google service updates and so on. Then please select whether or not to sign in to your Google account.
.png)
Read to accept the Google terms of service and privacy policy.
.png)
Select whether or not to let Google or third party to use your TV location.
.png)
Select whether or not to allow Google to help improve your Android TV.
.png)
Introduction on main functions of your Android TV.
.png)
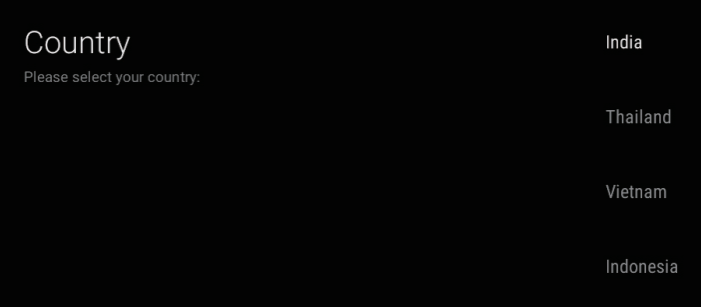
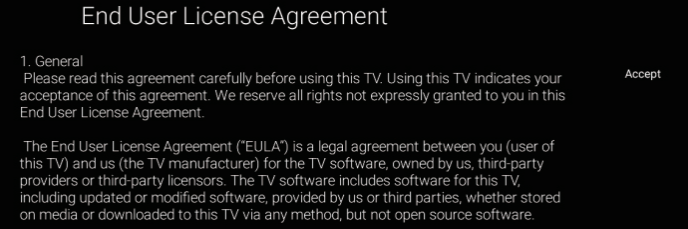
Select the country. Read the end user license agreement.
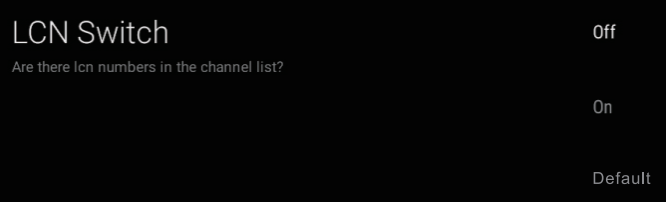
Turn on or turn off the switch of LCN (Logical Channel Number).
Setup the initial password for the parental control system.

Input the local postal code. It is only available for Indonesia

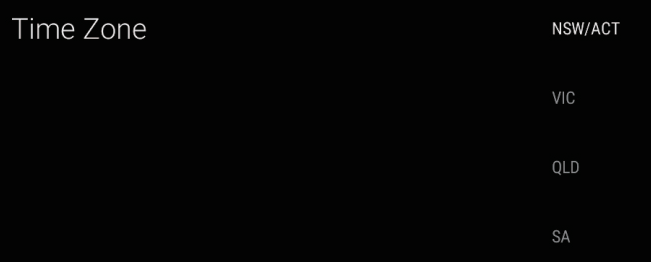
Select the time zone. It is only available for Australia.
Select the TV mode. "Home" mode is recommended for home viewing and "Shop" mode is used to demonstrate the TV in a shop, etc

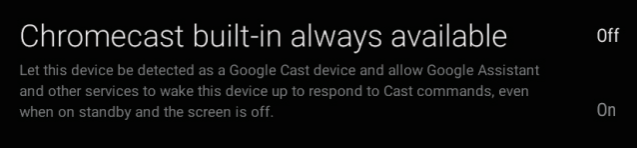
Note: It will consume more energy if you select "Shop" as your TV mode.Select whether or not to wake this device up to respond to Cast commands.
Select the tuner mode.

Select whether or not to start "Channel Scan".

Initial Setup is finished.

Read the End User License Agreement.
NOTE
- The pictures are only for references. and please refer to actual screen images on your Android TV or phone for clear images and correct contents.
- Initial settings may change without notice, which depends on Google requirements. You need to finish all initial settings according to what is indicated on the screen.
- If you want to restart the initial setup after the first time, please select <HOME--> Settings --> General Settings --> Device Preferences --+ Reset>.
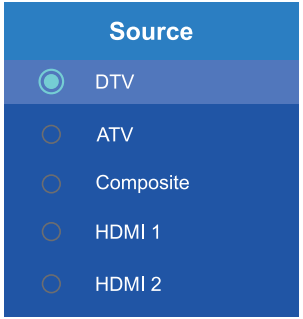
Selecting the Input Source
- Press SOURCE button to access the list of input sources.
- Press ▲/▼ button to select the desired input source.
Press OK button to access the selected input source.
Electronic Program Guide
Electronic Program Guide is supplied by the program providers and offers information about the programs to be broadcast. You can access it in DTV mode by pressing GUIDE button on the remote control.
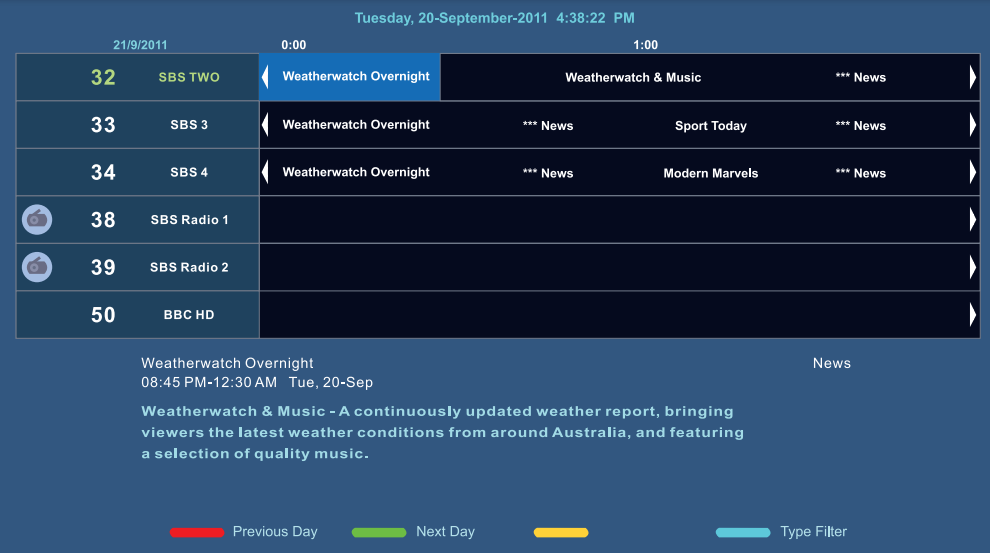
- Press RED button to edit the selected program.
- Press GREEN button to check program information of the next day.
- Press BLUE button to select the desired program type.
Time Shift Function
Time Shift is used to record a DTV program temporarily when your viewing is interrupted or delayed.
- Press MENU button to enter the quick menu settings.
- Press ▼and ► button to select “Time Shift Mode” in "Time Shift" list.
- Press OK button to enter and turn on the "Time Shift Mode".
- Change to watch the desired DTV program.
- Press ❚❚ button to pause playing the DTV program and start Time Shift
- Press ► button to continue playing the program from when you paused when you come back.
- Press ■ button to stop Time Shift.
Note
- Before time-shift, you'd better format your USB device to ensure there is enough space for time-shift recording.
- The recorded program of time-shift will be cleared automatically after playing the program or stopping time-shift function.
- If time-shift recording lasts too long, and there is no more space for recording new program, the TV will start to play the program automatically from the recording beginning to release the space of program which has been played for new program recording.
Time Shift Settings
The first time when you use Time Shift function, there will show a setup wizard to guide you on how to setup your USB device for the best usage of Time Shift function.
- Select the setup mode: Auto or Manual.
- If Auto is selected, the TV will finish related settings automatically. What you need to do is only to wait for the result.
- If Manual is selected, please go on with the following steps.
- Select whether or not to format the USB device.
- Select the file size for Time Shift function.
- Test the speed of the USB device.
- Show the result that the USB is ready for Time Shift function.
Note
- If you have setup for Time Shift function, you will be able to use Time Shift function directly without setup again.
- If you want to change the settings for Time Shift function, please select <MENU--→▼---> Time Shift --→ Device Info>.
Quick Menu Settings
- Press MENU button to enter quick menu settings.
- Press ▲/▼ button to select a submenu: Channels, TV Options or Time Shift.
- Press ◄/► button to select an item in the selected submenu.
- Press OK button to enter the selected item.
- Press ▲/▼ or ◄/► or OK button to adjust the item.
- Press EXIT button to exit quick menu settings.
Note
- The pictures are only for references.
- Please change to "Live TV" mode before entering quick menu settings.
- Some items may not be available for some regions, some models or some input sources.
Channels
Add to My Favorite: Add/Remove the currently-viewed program to/from the favorite list.
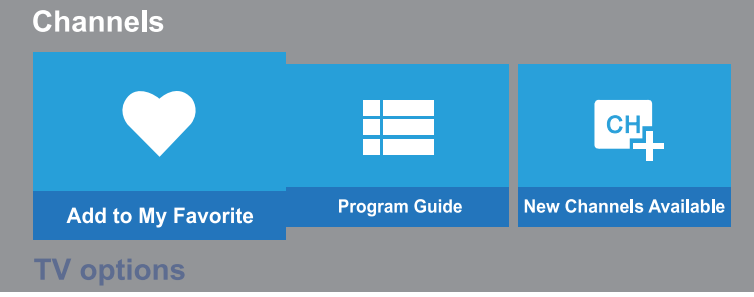
- Program Guide: Access the electronic program guide.
- New Channels Available: Setup the sources to update for the traditional live TV channels, or streaming channels from installed applications.
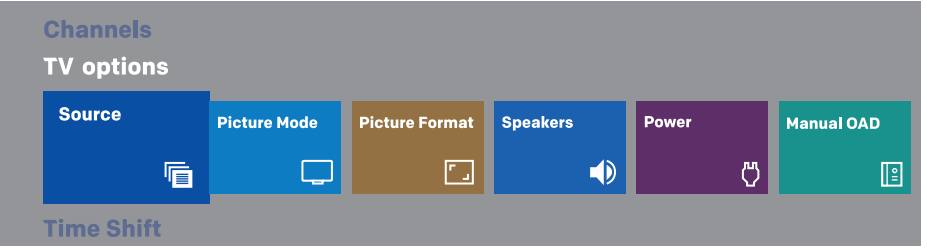
TV Options
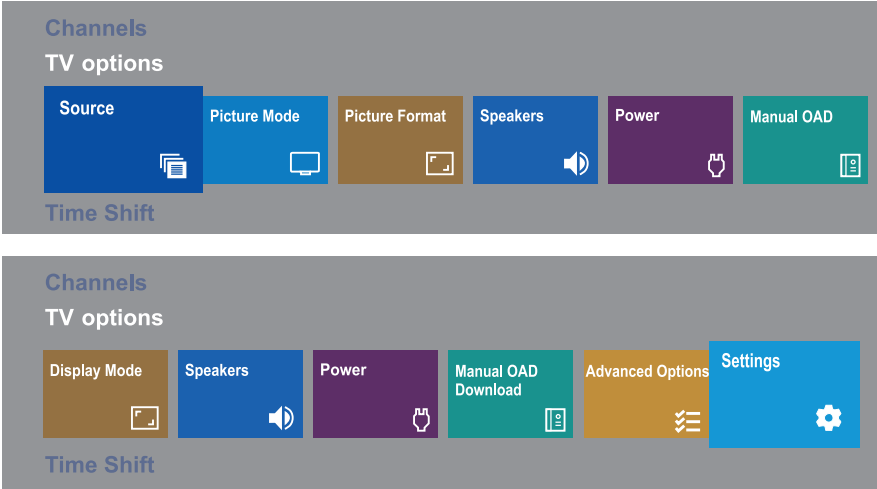
- Source: Select the input source.
- Picture Mode: Select the picture mode.
- Display Mode: Select the aspect ratio.
- Speakers: Switch the sound output device between "TV Speakers" and "External Audio System".
- Power: Setup different timers to turn off the TV automatically, or setup the function to turn off the picture only.
- Manual OAD: Scan for new software manually over the air.
- Advanced Options: Setup advanced quick settings like Blue Mute, Power on Channel, Subtitle, Teletext, etc.
- Settings: Access main menu settings.
Time Shift
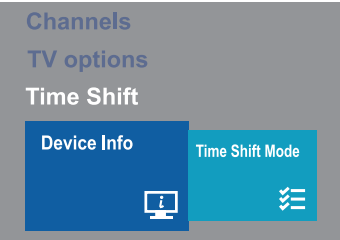
- Device Info: Setup for best usage of Time Shift function.
- Time Shift Mode: Enable or disable the Time Shift function.
Main Menu Settings
- To enter the main menu settings, please select <MENU _, TV options _, Settings> or <HOME _, Settings>
- Press ▲/▼ /◄/► and OK buttons to select and adjust an item.
- Press BACK button to back to the upper-level menu, or exit main menu settings.
NOTE
- The pictures are only for references.
Some items may not be available for some regions, some models or some input sources.
Suggestions
Show the recommended or unfinished settings for the best usage of your TV.
General Settings
Setup details for overall functions of your TV.
Network & Internet: Connect the TV to the wireless or wired network, and adjust settings related to the network.
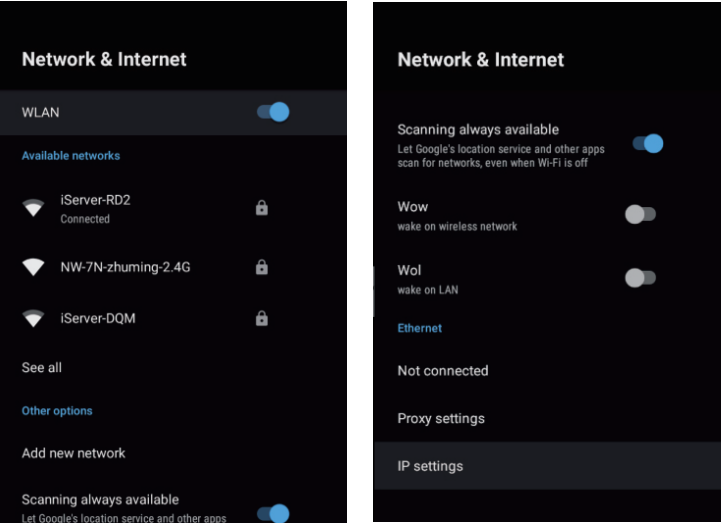
WLAN |
Turn on or turn off the switch of wireless network. |
Available networks |
Show the available wireless network for your selection. |
Other options |
* Setup WOWNVOL function to turn on the TV from standby modeby your mobile device through networkconnection. |
Ethernet |
* Adjust proxy or IP settings. |
Channel: Search for channels automatically or manually, and adjust settings related to channels.
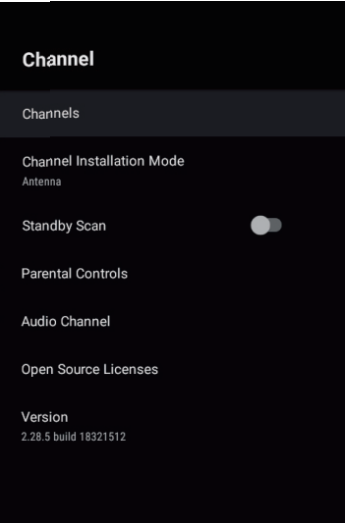
Channels |
* Edit channels.
|
Channel Installation Mode |
Select the tuner mode between Antenna and Cable. |
Standby Scan |
Turn on to search for channels automatically when the TV turns standby. It is only available for some countries. |
Parental Controls | * Setup access restrictions to specific channels, programs or input sources.
|
Audio Language (2nd) |
Select the audio languages. It is only available for DTV mode. |
Audio Channel |
Setup the audio channel. It is only available for ATV mode. |
Open Source Licenses |
Check the open source licenses related to channel. |
Version |
Show the version number of TV software. |
Accounts & Sign In: Sign in to your Google Account for new apps, recommendations, movies and more from Google.

Apps: Show the list of recently-opened or installed apps, and system apps, or setup specific app permissions.
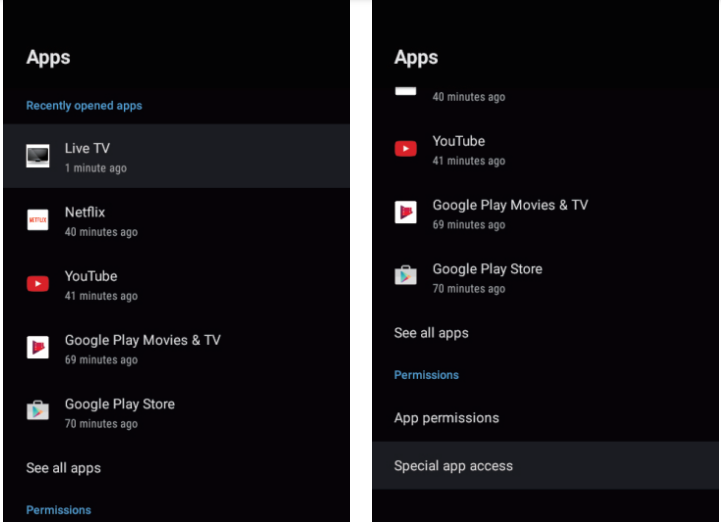
Recently opened apps |
Show the listof applications openedrecently. |
See all apps |
|
Permissions |
|
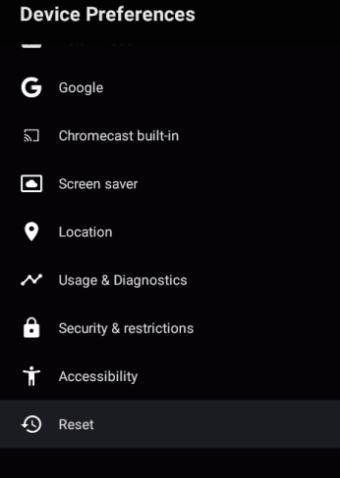
Device Preferences: Show basic information, and adjust settings related to the system and features of this TV device.

About |
|
Date & time |
|
Timer |
Setup the timer and repeat mode to turn on or turn off the TV automatically. |
Language |
Select the menu language. |
Keyboard |
Select, setup or manage the TV keyboard. |
Inputs |
|
Power |
Setup different timers to turnoff the TV automatically, or turn off the picture only. |
Picture | * Adjust basic or advanced picture settings to get the best quality of picture displayed on the TV.
|
Sound |
|
Storage |
|
Home screen |
|
Shop mode |
Setup the shop mode and messaging type. |
Google Assistant |
|
Chromecast built-in |
|
Screen saver |
|
Location | * Select whether or not to estimate the TV locattion by network.
|
Usage & Diagnostics |
Select whether or not to automatically send diagnostics information for Google to help improve the features of the Android TV. |
Security & restrictions |
Setup restrictions or warning on installation of applications downloaded from sources other than Google Play sotre, or that may cause harm. |
Accessibility |
Setup accessibility features to help the blind or visually-impaired, and the deaf or hearing-impaired, and other viewers who need special care or attention to understand and enjoy the TV. |
Reset |
|
Remotes & Accessories: Search and connect the Bluetooth remote control or other Bluetooth devices.
Note: Before Bluetooth searching, please make sure you have turned external Bluetooth devices in the pairing mode. For the remote control, you can press and HOME ◄ buttons together to open its pairing mode. For other Bluetooth devices, please read their own instruction manuals for opening the pairing mode.
Setup Guide
Setting up the Sanyo 32 Inch LED TV XT-32A170H1 is a breeze. First, attach the stand to the TV using the screws provided in the box. Next, connect the TV to a power source and turn it on. Use the remote control to navigate through the setup menu and configure the TV to your preferences. You can also connect external devices such as a Blu-ray player, gaming console, or soundbar using the HDMI or USB ports.
Smart Features
Home Page
Please press HOME button to enter the home page to enjoy the following functions.
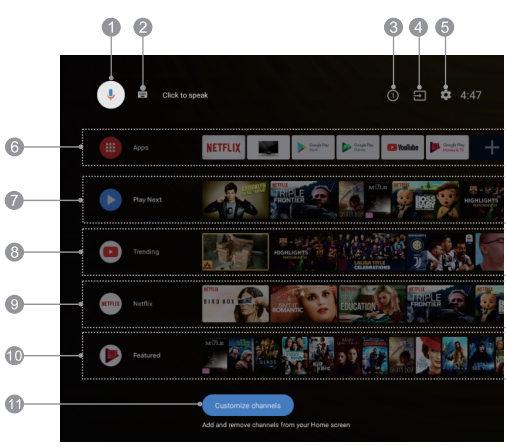
- Google Assistant: Click to interact with Google Assistant of the TV.
- Text Searching: Click to start the searching by typing the text.
- Notifications: Remind you of system-critical information, such as low disk space, Google sign in or account errors, network connectivity issues, etc.
- Input: Select the input source.
- Settings: Access the main menu settings.
- Apps: Show the list of favorite applications, or access the application center.
- Play Next: Show the program you are watching or about to watch. You can add the desired program by long pressing OK button, then selecting "Add to Play Next".
- Trending: Show the list of trending contents from YouTube.
- Netflix: Show the list of recommended contents from Netflix.
- Featured: Show the list of featured contents from Google Play Movies & TV.
- Customize Channels: Add or remove the selected channel as you like.
NOTE
- The functions and contents of "Home Page" may vary by different countries or models.
- Before using network functions in home page like network applications and so on, please connect the TV to the network firstly.
- Icon copyrights are owned by the application providers.
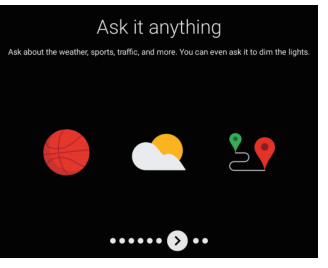
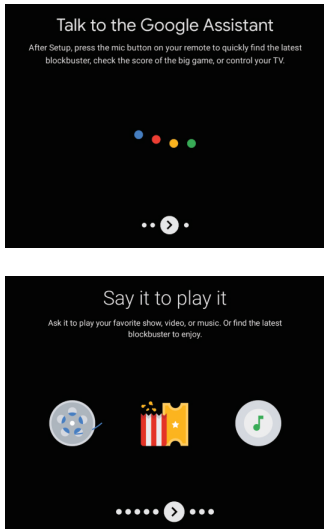
Google Assistant
Google Assistant is available on your Android TV as your virtual personal helper. Press MIC button on your remote control to start and enjoy it. It is so wonderful that you will love it instantly! With Google Assistant, you can get what you want easily and quickly by using the power of your voice.
There is no complicated or boring text typing, and what you need to do is just speaking to your TV.
.png)
If you want to know the detailed functions of Google Assistant, please ask Google Assistant "What can you do", then there will show the list with kinds of functions on the screen to tell you what Google Assistant can do for you.
.png)
- Before using Google Assistant, please make sure that you have connected your TV to the network, and that you have paired your Bluetooth remote control with the TV successfully, and also that you have signed in your Google Account.
Google Play
Google Play Store
"Google Play Store" is the official application market which is developed and operated by Google. You can search and download the free or paid application as you want. The followings are only for your reference to search and download a web browser:
.png)
- Select <HOME ---> Apps ---> Google Play Store> to enter the application market.
- Search for "Web Browser" & download the desired browser.
- Install it on your TV, then its icon will be displayed in the application center.
- Click "Apps" on home page to enter the application center.
- Select the installed browser and long press OK button to enter the menu of application management.
- Select "Add to Favorites" to add the browser to the list of favorite applications on home page.
Google Play Music
"Google Play Music" is an online music center, where you can search and listen to the free or paid music as you like.
Google Play Games
"Google Play Games" is a game application center, where you can search and download the free or paid game application as you like.
Google Play Movies & TV
"Google Play Movies & TV" is a service center offering movies and television shows available for your purchase or rental.
- The picture is only for reference.
- The functions and contents of "Google Play" may vary by different countries or models. Play store & applications are controlled by Google & are subjected to regional availability.
- To use the functions of "Google Play'; you must have connected the N to the network, and have signed in to your Google account.
- According to circumstances of the content provider, an application's updates or the application itself may be discontinued.
- Changes in application content may be made without prior notice by the service provider.
- Manufacturer does not warrants or held responsible for the any complaint, defect caused due to installation of third party applications.
Chromecast Built-In
.png)
Definiton of Chromecast Built-in
"Chromecast Built-In" is a castling technology developed by Google that enables your mobile device or personal computer to initiate and control playback of internet-streamed audio/video content on the TV.
How to Cast Content
"Chromecast Built-In" offers two methods to cast content: The first employs mobile device and web apps that support Chromecast Built-In technology. The second allows mirroring of content from the web browser "Google Chrome" (with cast extension) running on a personal computer. In both cases, playback is initiated through the cast icon "l;iJ" on the sender device.
Cast Screen/Audio {like Google Home)
Cast your mobile device's screen and audio to the TV.
- Connect your phone and the TV to the same wireless network successfully.
Select and access "Home" application from your phone, then click
 to enter the account page.
 .png)
Select and access "Mirror device", then select the name of the TV to connect the TV with your phone.
.png)
The contents on the screen of your phone has been completely cast onto the TV big screen. Click "DISCONNECT" to stop casting.
.png)
Cast Live streams and Videos {like YouTube)
Cast your mobile device's live streams and videos to the TV.
- Connect your phone and the TV to the same wireless network successfully.
Select and access "YouTube" application from your phone.
.png)
- Select the content you like, then click cast icon
 to cast the site link of the content to the TV for playing the content by the TV instead of your phone. Click cast icon "" again to stop casting.
 .png)
Bellow buttons you can use on remote control while playing videos:
Note: For above You Tube cast feature, both smart phone & the TV Should be connected to the same network.
- ▶ / ❚❚ Play/ Pause
- ◀◀ / ▶▶ Fast Backward/ Fast Forward
- ■ To stop the video
Disclaimer about Using Android
Network application contents and services are controlled by network application providers by means of networks and transmission facilities, which are subject to alteration, suspension, removal, termination or interruption, or invalid access at any time without further notice in that the manufacturer is unable to control or to be informed of the aforesaid change. The manufacturer makes a further declaration that ii disclaims any responsibility or liability arising from customer's failure to use the network application contents and services caused by, including but not limited to, failure of network connection or communication lines, technological updates, or the alteration, suspension, interruption, termination, disabling, or removal of any contents or services by the network application providers etc.
Note
- Some USB storage devices may not be compatible to operate smoothly with this TV.
- Back up all of the data in the USB storage device in case data was lost due to an unexpected accident.
- We do not assume any liability for the losses by misuse or malfunction. Data backup is consumer's responsibility.
- For large file sizes, the loading speed may be slightly longer.
- The recognition speed of a USB storage device may depend on each device.
- When connecting or disconnecting the USB storage device, ensure that the TV is not in USB mode otherwise the USB storage device or the files stored in it may be damaged.
- Please use only a USB storage device which is formatted in FAT16, FAT32, NTFS file system provided with the Windows operating system. In case of a storage device formatted as a different utility program which is not supported by Windows, it may not be recognized.
- When using a USB Hard Disk Drive which requires electric power source, ensure its rated power does not exceed the current marked at the USB terminal.If the power of the USB hard Disk exceeds the marked current, the TV system will be changed into standby mode, then you must pull away the USB Hard Disk and restart the TV system.
- An "Unsupported File" message will be displayed if the file format is unsupported or corrupted.
- FHD big picture needs longer time to process, which is not caused by the TV. Please be patient to wait.
- This TV may not support some multimedia files changed and upgraded as the change of encoding format or other technical advances.
- Use high-quality mobile device to record HD programs, otherwise the videos will be jammed during the playback. Back up all of the data in the USB storage device in case data was lost due to an unexpected accident.
- We do not assume any liability for the losses by misuse or malfunction. Data backup is consumer's responsibility.
- Do not power off the TV during the software upgrading process, otherwise the TV may not work, and the customer should be responsible.
- Manufacturer does not guarantee the operation of third-party web browsers. Third-party apps that have been downloaded and installed from the Google Play store are supported by the company or developer who produced them.
- The browser may not support some web pages or videos due to network, region, format or internet service provider, which has nothing to do with the TV.
- Each trade mark indicated on this TV are the property of each trademark right holder, and all rights are reserved by them.
- The browser may stop responding, if the size of website is too large.
- For better & smooth experience, please delete web browser history regularly.
Media Player
Preparation
- Insert your USB device on the TV to view compatible photo and movie on the TV screen or play compatible music through the TV.
- If the connected USB hard disk does not have an external power source, it may not be detected. Be sure to connect the external power source.
- To avoid losing the data on your USB device or damaging your USB device, it is recommended that you back up all data on your USB device.
- The control menu displays in media player may differ by different regions or models. And please take your actual TV as the standard.
- If you want to pull out your USB device, please exit USB mode firstly.
- For instructions on using your USB device, refer to the owner's manual of your USB device.
- Never remove the USB device or turn off the TV while using the USB device. Doing so may result in loss of data or damage to the USB device or the TV.
- Certain types of USB devices may not be compatible with the TV.
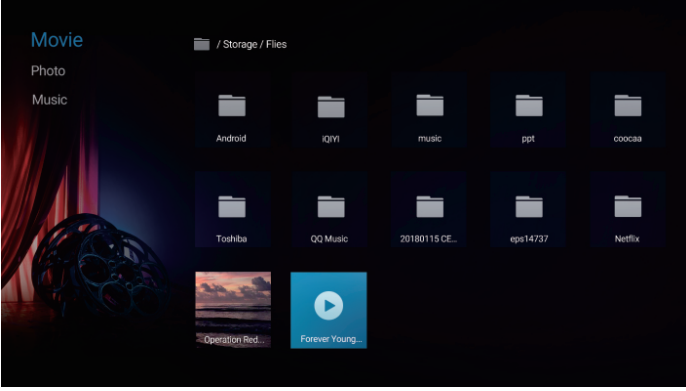
Media Operation
Please select <HOME --> Apps --> Media> to open the media player where you can play the selected media file on the TV screen.
- Connect your USB device to the TV.
- Press HOME button to enter the home page.
- Press ▲ / ▼ / ◄ / ► and OK button to select and enter "Apps".
- Press ▲ / ▼ / ◄ / ► and OK button to select and enter "Media".
- Press ▲ / ▼ / ◄ / ► button to select and enter a file type: Movie, Photo or Music.
- Press ▲ / ▼ / ◄ / ►and OK button to select and play the desired media file which is the same file type as which you have selected in Step 5.
- Press OK button to start the playback.
- Press BACK button to exit the playback.
Watch Movies
While watching a movie, press the following buttons to control the movie playback.
Button | Status | Function |
OK | Without control bar | Call outthe control bar. |
With control bar | Pause or play. | |
LEFT/RIGHT | Without controlbar | Change to previous or next movie. |
With control bar | Fast backward or fastforward. | |
DOWN/INFO | Both | Access INFO interface of the current movie. |
Browse Photos
While browsing a photo, press the following buttons to control the photo playback.
Button | Function |
LEFT/RIGHT | Change to previous or next photo. |
OK | Pauseor play. |
DOWN/INFO | Access INFO interface of the current photo. |
Play Music
While playing music, press the following buttons to control the music playback.
Button | Status | Function |
OK | Without controlbar | Call out the control bar. |
With control bar | Pauseor play. | |
LEFTfRIGHT | Without control bar | Change to previous or next music. |
With control bar | Fast backward or fast forward. | |
UP | Both | Display the lyrics. |
DOWN/INFO | Both | Access INFO interface of the current music. |
- Under the following conditions, this system cannot decode the file and the file cannot be played normally:
The parameters of file, such as the pixel of picture, code rate of audio and video file, sampling rate of audio file, exceed the limit of the system; The format of file is not matched or the file is harmed.
Note: The code rate this system supports does not exceed 20Mbps. - Hot plug: Do not disconnect when the system is reading or transmitting data, avoid damaging the system or the device.
- Pay attention to the power supply of the device when you are using a mobile hard disk or a digital camera. If the power supply is not sufficient or not stable, you may encounter problems during operating or can not operate at all. In this case, please restart the device, or unplug the device and plug it again, and ensure that its power supply is normal.
- The system supports standard USB1.1, USB2.0 and USB3.0 devices, such as standard U-disks, MP3 players, mobile hard disks, etc.
- For obtaining better audio and video quality, It is suggested to use the external device which accords with USB2.0 standard.
- When playing the video with high compression ratio, these phenomenons, such as picture standstill and menu long time response, are normal.
- For some USB device with power supply, such as large size hard disk, MP4, etc., Suggest using it with power to avoid electric power shortage. -The parameters of file, such as the pixel of picture, code rate of audio and video file, sampling rate of audio file, exceed the limit of the system.
- The file may not be played normally because its parameters, such as the pixel of picture, code rate of audio and video file, sampling rate of audio file, exceed the limit of the system.
Technical Information
Supported File Formats in Media Player
Video
Container | Video Codec (file type) | File Extension Name | Sampling rate SPEC | Bit Rate | Profile |
·MPG/MPEG | Mpegl | .dat .mpg.mpeg | 1080P @ 60fps | 40Mbps | MP@ HL |
Mpeg2 | 80Mbps | ||||
MP4 | Mpegl |
.mp4 |
1080P@ 60fps | 40Mbps | MP@ HL |
Mpeg2 | 80Mbps | ||||
Mpeg4 |
40Mbps | Simple Profile and Advanced Simple Profile @Level 5 | |||
H.263 | |||||
H.264 | 62.SMbps | Main Profile andHigh Profile@Level 4.2 | |||
HEVC/H.265 | .mp4 .mov | 2048'1088@60fps | S0Mbps | Main Profile, High Tier @Level 4.1 | |
Motion JPEG | .mp4 | 640x480@30fps | lOMbps | ||
MKV | Mpegl |
.mkv |
1080P @ 60fps | 40Mbps | MP@HL |
Mpeg2 | 80Mbps | ||||
Mpeg4 |
40Mbps | Simple Profile and Advanced Simple Profile @Level 5 | |||
H.263 | |||||
H.264 | 62.SMbps | Main Profile andHigh Profile@Level 4.2 | |||
VCl |
45Mbps | . Advanced Profile @Level 3 . Simple Profile . Main Profile | |||
VPB | S0Mbps | ||||
VP9 | 2048x1088@60fps | 30Mbps | Profile0/2 | ||
MotinJPEG | 640x480@30fps | lOMbps | |||
AV! | Mpegl,2 |
.avi |
1080P @ 60fps | 40Mbps 80Mbps | MP@ HL |
Mpeg4 |
40Mbps | . Simple Profile . Advanced Simple Profile@Level 5 | |||
H.263 | |||||
H.264 | 62.SMbps | Main Profile and High Profile@Level 4.2 | |||
VCl |
45Mbps | . Advanced Profile @Level 3 . Simple Profile . Main Profile | |||
MotinJPEG | 640x480@30fps | lOMbps | |||
ASF | Mpegl |
.asf |
1080P @ 60fps | 40Mbps | MP@ HL |
Mpeg2 | 80Mbps | ||||
Mpeg4 |
40Mbps | Simple Profile and Advanced Simple Profile @Level 5 | |||
H.264 | 62.SMbps | Main Profile and High Profile@Level4.2 | |||
VCl |
45Mbps | Advanced Profile @Level 3 . Simple Profile . Main Profile | |||
MotinJPEG | 640x480@30fps | lOMbps |
Audio
Container | Audio Codec(file type) | File Extension Name | Bit Rate |
MP3 | MPEG1/2Layerl | .MP3 | 32Kbps -448Kbps(8itrate) 16KHz - 48KHz(Sampling rate) |
MPEGl/2 Layer2 | .MP3 | 8Kbps - 384Kbps(6it rate) 16KHz - 48KHz(Sampling rate) | |
MPEG1/2/2.5Layer3 | .MP3 | 8Kbps-320Kbps(6itrate) SKHz - 48KHz(Sampling rate) | |
IMA-ADPCM/MS-ADPCM | N/A (work with video files only) |
6itrate:32Kbps-384Kbps SamplingRate:SKHz - 48Khz | |
LPCM | N/A (work withvideo files only) | Bitrate:64Kbps ~ l.SMbpsSampling Rate:SKHz ~ 48Khz | |
AAC/MP4 |
AAC, HEAAC |
.m4a.aac | AAC-LC:12Kbps ~ 576Kbps(Bit rate) Vl:6Kbps ~ 288Kbps(Bitrate) V2:3Kbps ~ 144Kbps(Bitrate) 8KHi-48KHi(Sampling rate) |
MP4/0GG | VORBIS | .m4a.ogg | samplerateupto48KHz |
AC3/MP4 |
AC3 |
ac3.m4a | Bitrate:32Kbps~ 640Kbps Sampling Rate:32Khz,44.1Khz, 48Khz |
EAC3/MP4 |
EAC3 |
ec3.m4a | Bitrate:32Kbps~6Mbps Sampling Rate:32Khz,44.1Khz, 48Khz |
Photo
Container |
File Extension Name |
Photo |
Resolution | Required DRAM size (Mbytes) |
bytes |
JPEG |
jpeg | Base-line | 15360x8640 (1920X8 1080X8) | 3.96 | 414720 |
Progressive | 1024x768 | 6.00 | 6291456 | ||
jpg | Base-line | 15360x8640 (1920X8 1080X8) | 3.96 | 414720 | |
Progressive | 1024x768 | 6.00 | 6291456 | ||
PNG | .png | non-interlace | 9600x6400 | 3.66 | 3840000 |
interlace | 1200x800 | 3.66 | 3840000 | ||
BMP | .bmp | 9600x6400 | 3.66 | 3840000 |
Do's & Don't: E waste (Management) Amendment Rules 2018
S.No. | Do | Don't |
All electrical and electronic products are required to be handed over only to the Authorized recycler | The product should not be opened by the User himself/herself, but only by authorized service personnel. | |
The product should be handed over only to authorized recycler for disposal. | The product is not meant for re-sale any unauthorized agencies/scrap dealer/ kabari walas. | |
Keep the product in isolated area, after it becomes non functional/un-repairable so as to prevent its accidental breakage. |
The product is not meant for mixing into household waste stream. | |
Provide information on the catalogue with product end-of-life. | Do not keep any replaced spare part(s) from the product in exposed | |
Always Dispose products that have reached end-of life al Sanyo | Do not donate old electronic items to any body. Do not dispose your product in garbage bins along with municipal waste that ultimately reaches land fill. | |
Wherever possible or as instructed, separate the packaging material according to responsible waste disposal options and sorting for recycling. |
Do not give e-waste to informal and unorganized sectors like Local Scrap Dealer/Rag Pickers. |
Some files may not be played back even if they fulfil these conditions. The device may become unusable with this TV if the file or folder names are changed.
Sanyo 32 Inch LED TV XT-32A170H1 Maintenance
First, remove the mains plug from the socket outlet.
Regular care: Gently wipe the surface of the display panel, cabinet, or pedestal by using a soft cloth to clean the dirt or fingerprints.
For stubborn dirt: First clean the dust on the surface. Dampen a soft cloth with clean water or diluted neutral detergent ( 1 part detergent to 100 parts water). Wring the cloth and wipe the surface. Finally, wipe away all the moisture.
Mains plug
Wipe the mains plug with a dry cloth at regular intervals. Moisture and dust may lead to fire or electrical shock.
- Do not use a hard cloth or rub the surface too hard, otherwise this may cause scratches on the surface.
- Take care not to subject the TV' surfaces to water or detergent Liquid inside the TV could lead to product failure.
- Take care not to subject the surface to insect repellent, solvent, thinner or other volatile substances. This may degrade surface quality or cause peeling pf the paint.
- The surface of the display panel is specially treated and may be easily damaged. Take care not to tap or scratch the surface with your fingernail or other hard objects.
- Do not allow the cabinet and pedestal to make contact with a rubber or PVC substance for a long time. This may degrade surface quality.
Troubleshooting
Most problems you encounter with your TV can be corrected by consulting the following troubleshooting list.
No picture, no sound
- Check if the fuse or circuit breaker is working.
- Plug another electrical device into the outlet to make sure it is working or turned on.
- Power plug is in a bad contact with the outlet.
- Check the signal source.
No colour
- Adjust the saturation.
Remote control does not work
- Change the batteries.
- Batteries are not installed correctly.
- Main power is not connected.
No picture, normal sound
- Adjust the brightness and contrast.
Normal picture, no sound
- Press the Vol+ button to increase volume.
- Volume is set to mute, press the mute button to restore sound.
Radio frequency interference
- This interference produces moving ripples or diagonal streaks, and in some case, loss of contrast in the picture. Find out and remove the radio interference source.
Bluetooth remote control can't be paired successfully
- Retry to pair remote control for more times.
- Change the batteries.
Can't sign in Google account
- Retry to sign in again.
- Use another device to check if there is something wrong with the network.
- Use another Android device to check if there is something wrong with the Google server. Can't use Google Assistant
- Check if the Bluetooth remote control has been paired successfully.
- Use another device to check if there is something wrong with the network.
- Use another Android device to check if there is something wrong with the Google server.
Pros & Cons
Pros
- Affordable price point
- Clear and crisp image quality
- Rich and immersive audio performance
- Sleek and modern design
- Easy to set up and use
Cons
- Limited smart TV features
- No built-in Wi-Fi or Ethernet port
- Resolution is lower than some competitors
Customer Reviews about Sanyo 32 Inch LED TV XT-32A170H1
Customers love the Sanyo 32 Inch LED TV XT-32A170H1 for its affordable price, clear image quality, and rich audio performance. Many reviewers appreciate the TV's sleek and modern design, which complements their home decor. However, some customers have noted that the TV's smart features are limited and that there is no built-in Wi-Fi or Ethernet port. Additionally, some reviewers have mentioned that the resolution is lower than some competitors, but they still find the image quality to be clear and crisp.
Faqs
What is the resolution of the Sanyo 32 Inch LED TV XT-32A170H1?
Does the TV have built-in Wi-Fi or Ethernet port?
What are the TV's smart features?
Can I connect external devices to the TV?
What is the TV's audio performance like?
How easy is it to set up the TV?
What is the TV's design like?
What is the TV's price point?
Can I mount the TV on the wall?
What is the TV's refresh rate?
Leave a Comment