How to Use: Oster Power Blender BLSTJJ-BNT User Manual

Content

Introduction
The Oster Power Blender BLSTJJ-BNT is a versatile kitchen appliance designed to tackle a variety of blending tasks with ease. Equipped with a powerful 800 peak-watt motor, it features a wide-base design and a 6-point stainless steel blade that ensures efficient blending and mixing. Priced at $79.99, this blender offers seven-speed settings, allowing you to create everything from smoothies to soups with precision. Its durable glass jar and user-friendly controls make it an essential tool for any home chef.
Specifications
- 1000-watt motor for powerful blending
- Stainless steel blade for durability and efficiency
- BPA-free Tritan jar for safety and clarity
- Pulse function and pre-programmed settings for various blends
- 64-ounce blending capacity
- Ergonomic design with comfortable grip
- Easy-to-clean parts and dishwasher-safe components
Description
We created the Oster Power Blender BLSTJJ-BNT for quality and function. The 1000-watt motor blends ice, seeds, and nuts. The BPA-free Tritan jar provides visibility and safety, while the stainless steel blade lasts. The blender's pulse button and pre-programmed settings make blending effortless. This blender makes smoothies and complicated recipes easy.
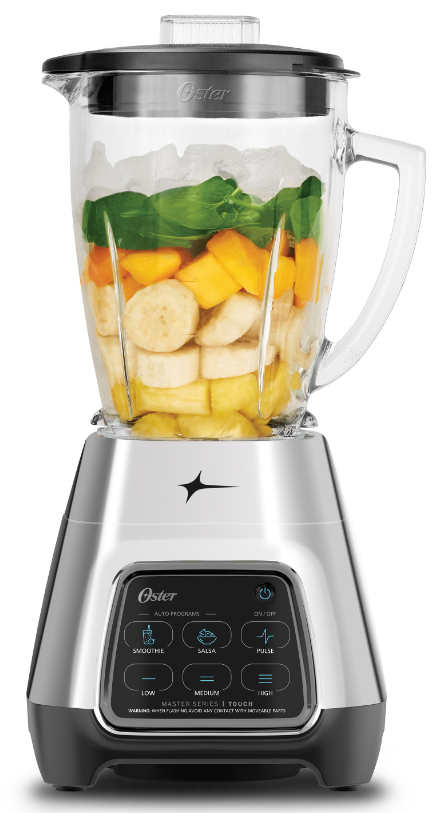
Learning About the Oster Power Blender with Touchscreen Technology

- Filler Cap / 2 Ounce Measuring Cup: – Allows you to add ingredients during use. Also allows you to open to allow steam to escape when blending hot foods.
- Jar lid – Seals the blender jar.
- Glass jar
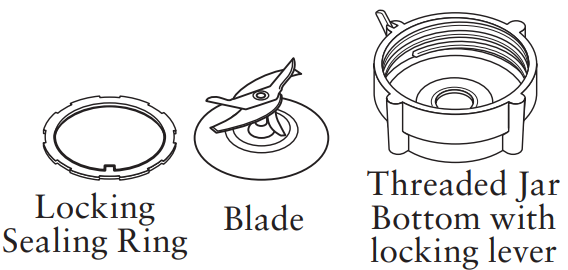
Glass Jar Blade Assembly – With locking feature to secure blade assembly to threaded jar bottom. Seals the jar to the blade for leak-proof operation. - Sealing Ring
- Blade
- Threaded Jar Bottom With Locking Lever –Advanced design for simple assembly to jar.
- Motor Base – Holds the jar securely. Contains a powerful, variable-speed motor.
- Touchscreen Controls
- Power Button – Turns the product On and Off.
- Pre-Programmed Settings: Use for flawless results at the touch of a button. Select the desired setting and your Oster Power Blender cycle through the program, delivering expert results at the touch of a button. Unit will Stop after running through the cycle. Select From: Smoothie, Salsa
- Manual Controls: Select from Low-Med-High
Pulse button – Press to pulse and release to stop.

6 Cup glass Jar Assembly

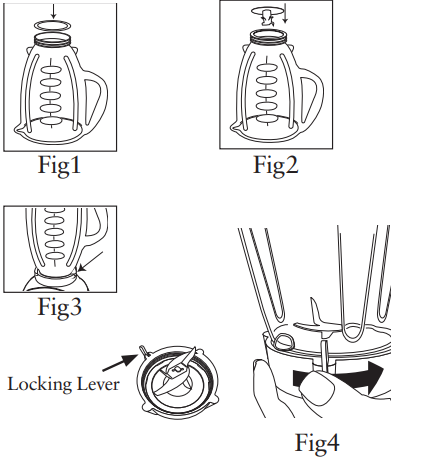
- Turn jar upside down so the small opening is at the top. Then place the sealing ring over jar opening. (Fig.1)
- Place blade into jar. (Fig2)
- Place threaded jar nut or threaded jar skirt over blade and jar
(NOTE: If there are slots on top of collar, line them up with notches on the jar.) Place the threaded jar nut or threaded jar skirt on the jar and turn it clockwise to tighten. - Place jar assembly onto base.
- Line up tabs of jar with tabs on blender base. Make sure the tab of the jar on the left side is in the back of the tab of the blender base and the tab of the jar on the right side is in front of the tab of the blender base. Make sure jar is seated into position. (Fig3)
CAUTION: If Locking Lever is damaged or missing, do not operate blender, and contact Customer Service for a replacement. - Put the ingredients into the jar.
- Secure the lid and filler cap.
- Place the jar onto the base.
Plug the power cord into a standard household 120/127-volt, 60 hz. AC outlet. You are now ready to start. ALWAYS PLACE YOUR HAND ON THE CONTAINER COVER WHILE OPERATING BLENDER.

Using the Touchscreen Controls
- Plug in the blender. Once plugged in, press on the “
 ” button for one second to turn the blender on.
 - Select setting and blend ingredients to desired consistency.
NOTE: Control panel lists function as well as desired outcome. - Press Power Button to stop and turn off blender.
- Press and hold PULSE
 for ice crushing and chopping. Repeat as needed.
Using the Pre-Programmed Settings
- Press the power button
 to turn the product on. The power light will flash, indicating the product is active and ready to use. The light will stay on whenthe motor is running.
 - Select and Press the desired Pre-Programmed Setting Button:
- SMOOTHIE

- SALSA

- SMOOTHIE
- To change your selection, press
 twice followed by another Pre- Pre-Programmed Setting button (“SMOOTHIE” or “SALSA”)
 - Once the program is complete the product automatically stops.
Please note: You may press the button to cancel the program at any time. The blinking bule light indicates that the blender is ready.
 - Press the power button
 to turn the product off. This product is preprogrammed to turn off automatically if not used for a period of several minutes. All lights will turn off when the unit automatically powers down.
Using the Manual Controls
The Manual Controls include:
- LOW
- MEDIUM
- HIGH
- PULSE

Use these controls for personal recipes or to continue blending after a Programmed Setting is finished.
- Press the power button
 to turn the product on. The power light will flash, indicating the product is active and ready to use. The light will stay on when the motor is running.
 - Put the ingredients into the jar.
- Secure the lid and the filler cap.
Pressing any speed setting will interrupt the active function. e.g. blender is running on “LOW”, pressing “HIGH” button will change the speed to “HIGH”. Or pressing “LOW” a second time will turn the blender to the active and ready to use screen (flashing power button![]() ).
).
Setup Guide
Operating the Oster Power Blender BLSTJJ-BNT,
- Check all parts' assembly first.
- Align the Tritan jar with the motor base's locking mechanism.
- To secure the jar, twist it clockwise until it clicks.
- Put your components in the container, not overflowing.
- Secure the lid to prevent spillage while operating.
- Adjust the setting or utilize the pulse function.
- Just dismantle and wash or put the components in the dishwasher.
Caring for Your Product
After Use
- Press the Power Button and unplug blender. Lift the jar straight up from the base, remove the lid and empty the jar.
- If necessary, use a rubber spatula to scrape foods away from the sides of the jar.
Cleaning
WARNING: Blades are sharp. Handle carefully.
CAREFULLY release the blade from the bottom of the jar by turning the threaded jar bottom counterclockwise. The jar lid, filler cap and blade are dishwasher safe. Use the top rack of the dishwasher for the jar lid, filler cap, and blade. Place sealing ring into bottom basket of dishwasher.
You can also wash the parts in warm, soapy water. Rinse well and dry. Wipe the base with a soft, damp cloth to clean. Never submerge the blender base in a liquid.
Check the parts as you put them back together.
TIP: Run blender with soapy water for 20-30 seconds at Low or Medium Speed for cleaning without disassembly. Follow with clean water rinse.
Storing
Reassemble the blender for storage. Leave the lid open a gap so no odors are retained.

NOTICE: Never put the jar, or any other parts, in a microwave oven. Never store foods or drinks in the jar.
Servicing
This appliance has no user serviceable parts. Any servicing beyond the cleaning described in the Cleaning section should be performed by an authorized service representative only. If repairs are needed, send your appliance only to an authorized OSTER Appliance Service Center.
Blending Tips Liquids
Put liquids into the jar first, unless the recipe says otherwise. Add more liquid if ingredients are not blending properly.
Using the Filler Cap
Do not remove the lid while in use. Instead, open the filler cap to add smaller ingredients.
Ice Crushing
Without Liquid: use pulse button until you achieve desired results. With Liquid: Add desired amount of ice cubes and water until ice floats. Blend on High until you achieve desired results then strain off water.
Working with Hot Foods or Liquids
WARNING: When you work with HOT FOODS, remove the filler cap to vent steam. Tilt the lid away from you partially covering the opening. Keep hands and other exposed skin away from the lid opening to prevent possible burns.
WARNING:When you work with HOT LIQUIDS, remove the filler cap and start at a low speed, and then gradually increase to a faster speed. Do not add liquid over the 4 cup (1L) level. Always keep hands away from steam.
Ingredient Quantities
Use only the amount of food suggested in the recipes. If you want greater amounts, prepare in batches. Using larger amounts may overload and strain the motor. You might also get different results from those described.
Troubleshooting
- Check the outlet and plug if your blender won't start. Align and secure the jar to the motor base.
- An imbalance of components may cause the blender to make a loud noise or vibrate excessively. Restart the blender after redistributing ingredients.
- For lid sealing concerns, check for obstructions or debris. Reassemble the lid and jar after cleaning.
Pros & Cons
Pros
- Powerful 1000-watt motor blends efficiently
- Strong stainless steel blade and BPA-free Tritan jar
- Pre-programmed parameters and pulse function simplify use.
- Big 64-ounce blender
- Easy-to-clean, ergonomic design
Cons
- Noiseful while operating
- Some find the foundation hefty and unwieldy.
- Possible vibration from unbalanced components
Customer Reviews
The Oster Power Blender BLSTJJ-BNT is popular for its power and ease of use. Many praise its capacity to handle ice and seeds. It can be loud and vibrate if not balanced, according to some users.
3 YEAR SATISFACTION GUARANTEE
Sunbeam Products, Inc. or if in Canada, Newell Brands Canada ULC (collectively “Sunbeam”) warrants that for a period of three (3) years from the date of purchase, this product will be free from defects in material and workmanship. Sunbeam, at the Consumer’s sole option, will repair, or replace this product or any component of the product found to be defective during the guarantee period.
All Metal Drive Ten (10) Year Limited Warranty
Sunbeam also warrants that for a period of ten (10) years from the date of purchase, the All Metal Drive base unit metal coupling will be free from defects in material and workmanship. Sunbeam, at its option, will repair or replace the metal drive stud component of the All Metal Drive coupling if found to be defective during the warranty period.
Faqs
How much power does the Power have?
Is the Tritan jar BPA-free?
What are the pre-programmed settings on this blender?
How can I prevent liquids from leaking out?
How do I clean the Oster Power Blender?
Why is my blender making a loud noise?
What if my blender doesn’t turn on?
Is this blender suitable for making frozen treats like margaritas?
Can I replace the blade if it gets damaged?
Does this blender come with a warranty?
Leave a Comment
