Owc ThunderBay 4 Storage TB3SRKIT0GB User Guide
Content
Introduction
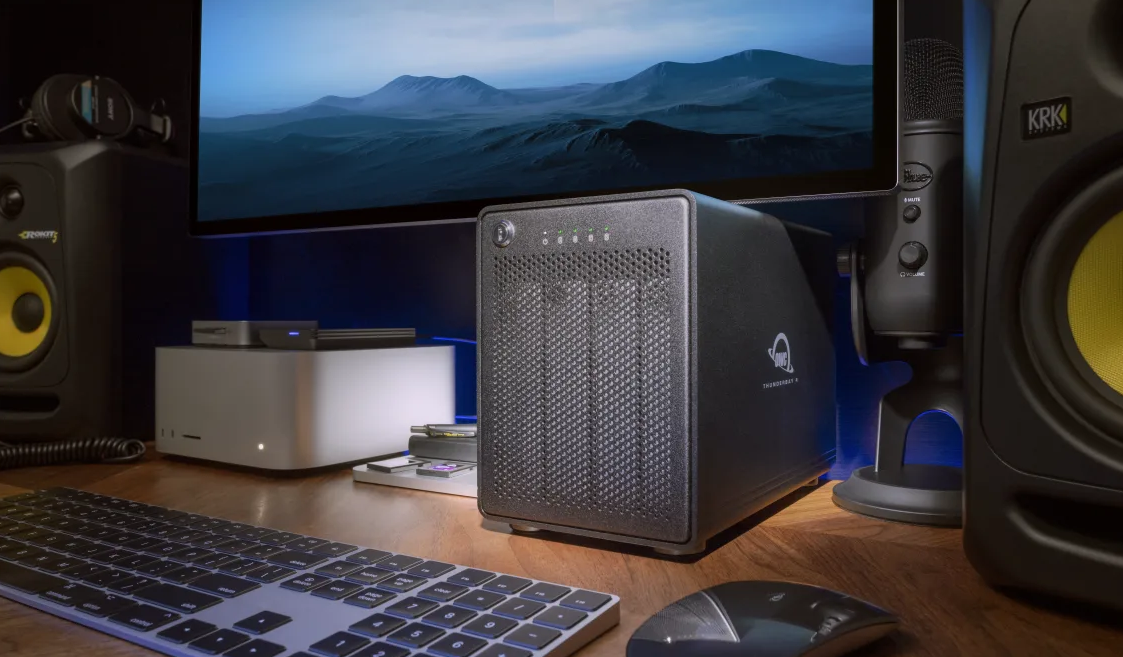
The OWC ThunderBay 4 Storage TB3SRKIT0GB is a powerful Thunderbolt 3 RAID storage solution designed for content creators and professionals needing high-capacity data management. With four drive bays, it supports up to 80TB of storage, enabling users to handle demanding tasks like video editing and audio production with ease. The device offers impressive speeds of up to 1527MB/s and comes bundled with OWC SoftRAID for flexible configuration options. Priced at approximately $599.00, it provides a robust and reliable storage solution for various creative workflows.
MINIMUM SYSTEM REQUIREMENTS
- Apple Mac Requirements
Thunderbolt port: OS X 10.6 or later - PC Requirements
Thunderbolt port: Windows 7 or later - Supported Drives
Up to four 3.5” SATA drives (1.5Gb/s, 3.0Gb/s, or 6.0Gb/s).
PACKAGE CONTENTS
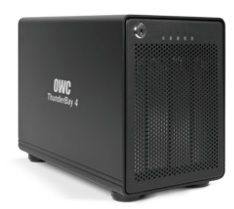
ThunderBay 4
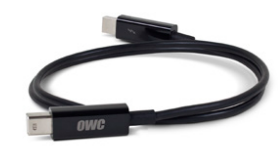
Thunderbolt cable
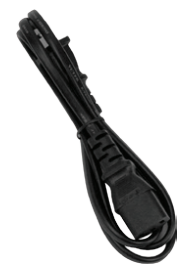
Power cable
Keys

NOT PICTURED: Hard drives have been installed into drive trays prior to shipping.
ABOUT THIS MANUAL
Firmware, images, and descriptions may vary slightly between this manual and the unit shipped. Functions and features may change depending on the firmware version. Please visit the product webpage for the most recent product specifications.
FRONT VIEW

| LED | COLOR | THUNDERBAY ON | THUNDERBAY SLEEPING | DRIVE ACTIVITY | DRIVE BAD/ BAY EMPTY |
| Power | Blue/ orange | Solid blue | Orange | N/A | N/A |
| Drive (A, B, C, D) | Green | N/A | Off (all four) | Flashing green | Off |
Front Features
- Locking faceplate — Use the included keys to lock the faceplate for security, or remove the faceplate to gain access to the drive bays.
- LED indicators — See the following chart for details on the ThunderBay 4’s LEDs.
REARVIEW
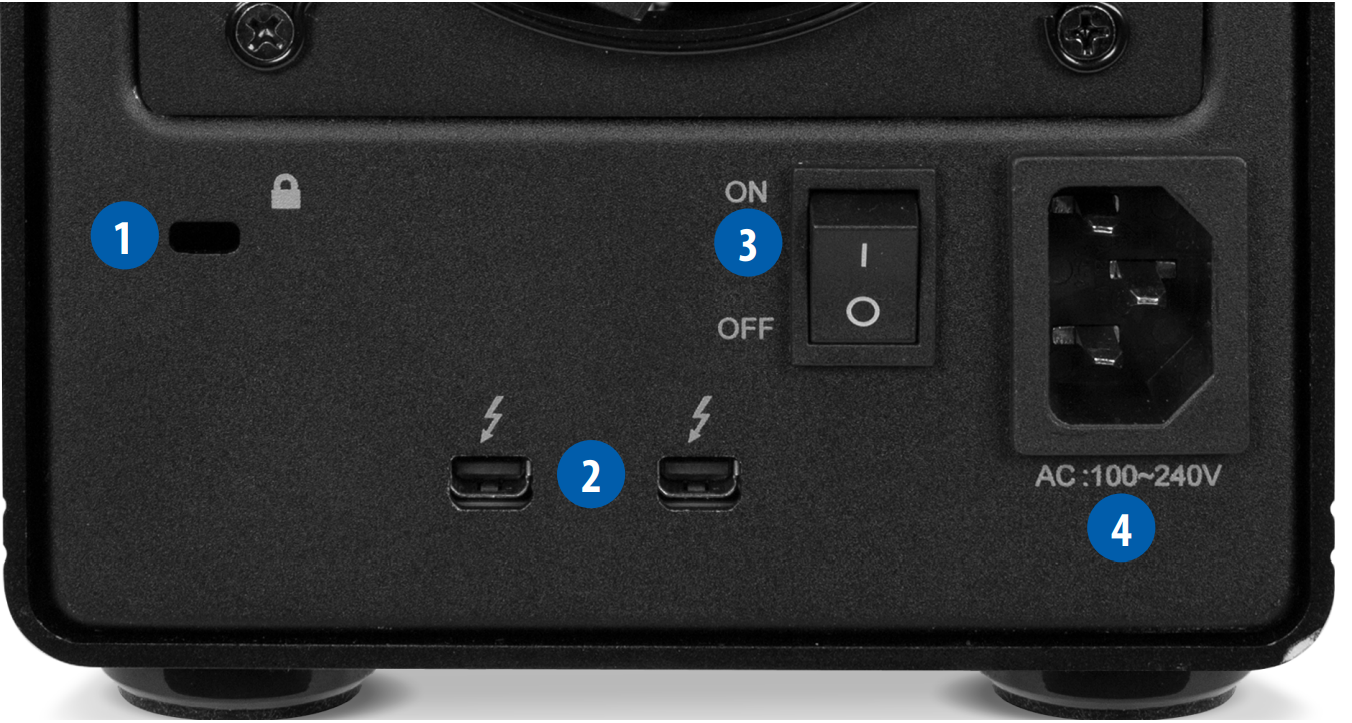
Rear Features
- Kensington Security Slot
Connect a security tether here. - Thunderbolt 2 ports
Attach the included Thunderbolt cable to one of these ports and to your computer, or to another Thunderbolt device. Use the other Thunderbolt 2 port to add more Thunderbolt devices to the chain. - On/off switch
Turn on and off power to the ThunderBay 4 here. - Power input
Connect the included power cable here.
NOTE:
- Although the on/off switch controls power to the device, the ThunderBay 4 requires a data signal in order to turn on. As long as the on/off switch is in the ‘on’ position, the ThunderBay 4 will turn on when it receives a data signal through the Thunderbolt cable. If there is no Thunderbolt cable connected, or if the computer is off or in a sleep or hibernation mode, the ThunderBay 4 will turn off and its power LED will turn orange to indicate that it is not receiving a data signal.
- In order to use any Thunderbolt devices chained through the ThunderBay 4, the on/off switch of the ThunderBay 4 must be in the ‘on’ position.
- Thunderbolt device chains can support up to six Thunderbolt devices.
- Thunderbolt 2 is backward compatible with Thunderbolt, but any devices connected in a Thunderbolt chain after a Thunderbolt device will operate at the original Thunderbolt speed (10Gb/s) rather than Thunderbolt 2 speed (20Gb/s). If mixing Thunderbolt 2 and original Thunderbolt devices, make sure all Thunderbolt 2 devices are in front of the Thunderbolt devices (i.e. computer>Thunderbolt 2 devices>Thunderbolt devices).
- For the safe removal of your drive and to ensure that no data is lost, always eject or unmount the drive from your operating system before powering off.
Specifications
- Interface: Thunderbolt 3 (Thunderbolt 2 compatible with adapter)
- Number of Bays: 4
- Drive Compatibility: 3.5-inch and 2.5-inch SSDs/HDDs
- Maximum Capacity: Up to 64TB (16TB per bay)
- Speed: Up to 1527 MB/s
- RAID Support: RAID 0, 1, 4, 5, and 10
- Power Supply: 110/220V AC
- Dimensions: 9.9 x 5.7 x 6.9 inches
- Weight: Approximately 7.5 pounds
Description
The sturdy aluminum casing of the OWC ThunderBay 4 Storage TB3SRKIT0GB guarantees longevity and heat dissipation. In addition to having LED indicators for each drive bay that provide real-time status updates, the gadget contains a silent fan for cooling. For extra protection, it also has a Kensington security slot.
Because of its extremely adaptable architecture, the ThunderBay 4 enables customers to set up several RAID configurations to suit their storage requirements. Professionals that want both high performance and data redundancy will find it to be a great option due to its versatility.
SYSTEM SETUP
As the ThunderBay 4 has been pre-configured, the four drives have been installed into their drive trays and have been packed separately from the ThunderBay 4 enclosure. Follow the instructions in Section 2.1 to install your own drives into the ThunderBay 4 or when replacing a failed drive. The drive trays are labeled A, B, C, and D, but the arrangement of the drive trays when they are installed in the ThunderBay 4 does not matter
HARD DRIVE INSTALLATION
Follow these steps to install hard drives into your ThunderBay 4, or to replace existing drives. Repeat steps 1 through 8 as necessary for the number of drives you are installing.
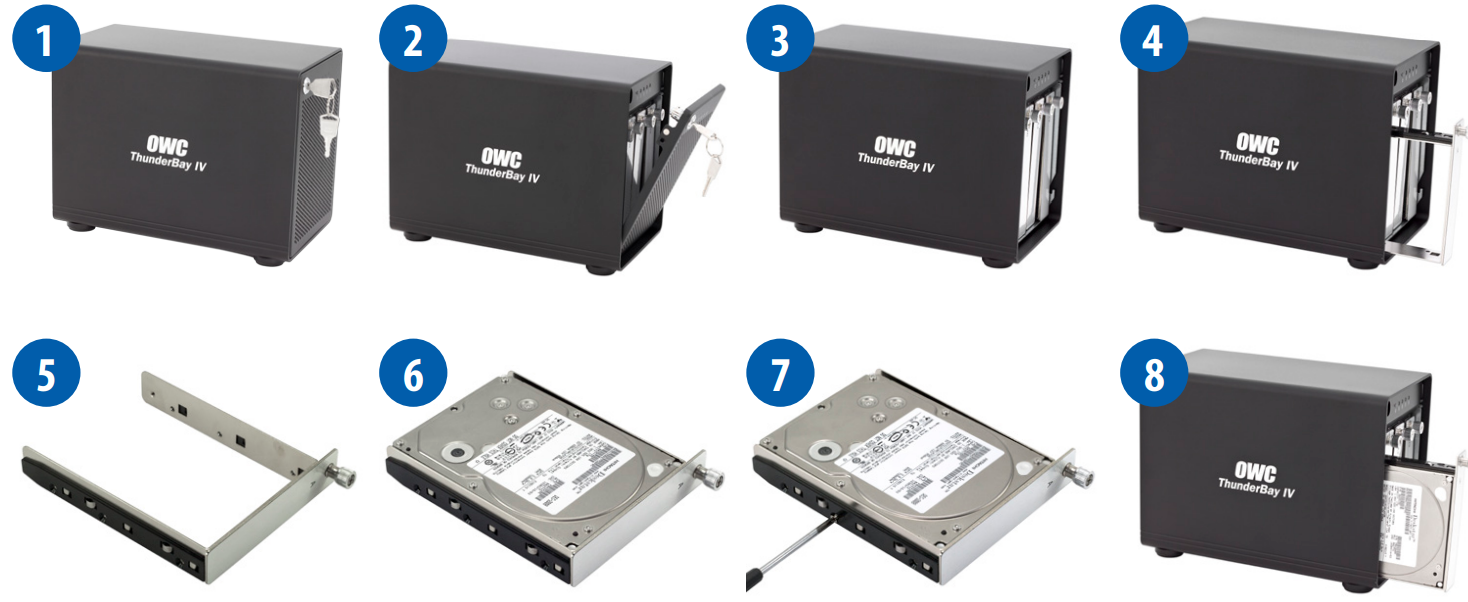
- Insert one of the included keys into the lock on the upper left of the faceplate.
- Turn the key clockwise, then pull the key towards you. The faceplate will swing open, as shown.
- Once the faceplate has swung open as far as it will go, pull up to remove it.
- On the drive tray you wish to remove, turn the thumbscrew counter-clockwise until you no longer feel resistance. Then hold onto the thumscrew and pull the drive tray out.
- Set the drive tray as shown on your work surface. If you are replacing an existing hard drive, unscrew it from the drive tray at this time. Place the new hard drive inside the drive tray as shown. The label should face up and the SATA connectors should be on the far rear corner of the drive.
- Fasten the drive into the drive tray using six of the included screws.
- Slide the drive tray back into the rails in the ThunderBay 4 and push until it is seated fully, then push in on the thumbscrew and turn it clockwise until it stops moving. If you encounter resistance, do not force the drive tray. Remove it, check to make sure that there are no obstructions and that the drive tray is lined up correctly, then slide it in again.
QUICK START OWC ThunderBay 4 Storage TB3SRKIT0GB
This ThunderBay 4 comes pre-configured with SoftRAID 5, a powerful software RAID application for Mac. In addition to setting up RAID volumes, you can use SoftRAID to certify that disks are healthy, monitor the status of your RAID volumes, predict drive failures, and send you an email when a problem occurs. This ThunderBay 4 has been set up as a RAID 5 volume in SoftRAID. Proceed to the next section for first-time setup instructions.
- Install hard drives into the ThunderBay 4 according to the instructions in Section 2.1.
- Connect the power cable between the ThunderBay 4 and a power outlet, then make sure the on/off switch is set to the ‘on’ position.
- Connect a Thunderbolt cable between the ThunderBay 4 and a computer. When you do this, the ThunderBay 4 will turn on.
- If the computer is using OS X 10.9 Mavericks or later, the RAID 5 volume will be available immediately on the computer and can be used. In earlier versions of OS X, the individual drives will be seen in Disk Utility, but the RAID volume will not be recognized. In both cases, you will need to install the SoftRAID 5 application in order to have full use of the RAID 5 volume, including advanced features such as email alerts.
- Download the SoftRAID installer from: https://www.macsales.com/SoftRAIDSupport
- Open the SoftRAID installer and drag the SoftRAID folder into your ‘Applications’ folder as prompted.
- Go to your ‘Applications’ folder, open the SoftRAID folder, then open the ThunderBay 4 Installer. You may be prompted to confirm that you wish to open the application and to enter an administrator password.
- The ThunderBay 4 Installer will install the SoftRAID driver on your computer. You may see a dialog box asking if you wish to upgrade the existing driver. Click ‘Update’ and enter the administrator password to install the updated driver. You may be prompted to restart your computer.
- SoftRAID is now completely installed on your computer. The next time you launch Soft-Raid, you will be prompted to enter the serial number. To obtain your serial number for SoftRAID, go to: https://www.macsales.com/registration Proceed to the next section for more specific information on SoftRAID 5, including how to set up email notifications and rebuild a RAID volume.
SOFTRAID 5
Configuring Email Notifications
SoftRAID has the ability to send out email notifications when one of a set of events occurs. To configure email notifications, follow these steps:
- Open SoftRAID, then go to the ‘SoftRAID’ menu on the menu bar next to the Apple logo and select ‘Email Notification...’
- In the ‘Sender Info’ tab, enter the full name and email address that you want to use when SoftRAID sends out email notifications. Note that this information does not need to match a real email address. It can be anything you like, and is simply there to identify the email as being sent by SoftRAID.
- In the ‘Outgoing Server’ tab, enter the information for the server, username, and password that will be used to send the email messages. The ‘Configure For’ dropdown menu will help fill in the server information for common email services like Gmail and Yahoo! Mail. There is an option to configure an alternate SMTP server as a backup, but it is not necessary.
- The next two tabs, ‘Notifying Events’ and ‘Alarms’, contain checkboxes that allow you to customize what will cause SoftRAID to send out an email notification. ‘Notifying Events’ contains mostly hardware problems such as disk I/O errors and rebuild failures. ‘Alarms’ lets you set optional thresholds for things like a disk becoming too full or abnormally high CPU load.
- The last tab, ‘Recipients’, lets you set one or more email addresses to receive the email notifications.
Disk Failure, Replacement, and RAID Rebuild
In the event of a disk failure or similar event, SoftRAID will indicate that the RAID volume of which the failed disk is a member is in a degraded state. If your ThunderBay 4 has a failed disk, it will look like this:

To replace the failed disk and rebuild the RAID volume, follow these steps:
Identify the disk in the ThunderBay 4. To do this, right-click on the disk in SoftRAID, then on the menu that appears, select ‘Blink Disk Light’.
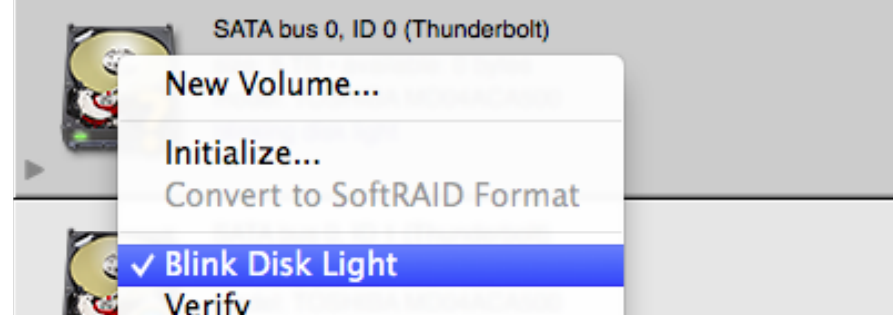
Look at the front of the ThunderBay 4 and remove the disk with the blinking light.
Remove the failed disk, then replace it with a new one, following the steps in Section 2.1, Hard Drive Installation. When the new disk is inserted, Disk Utility will ask you what to do with the new disk.

Click ‘Ignore’ on this pop-up notification and go back to SoftRAID.
The new disk will show up in SoftRA
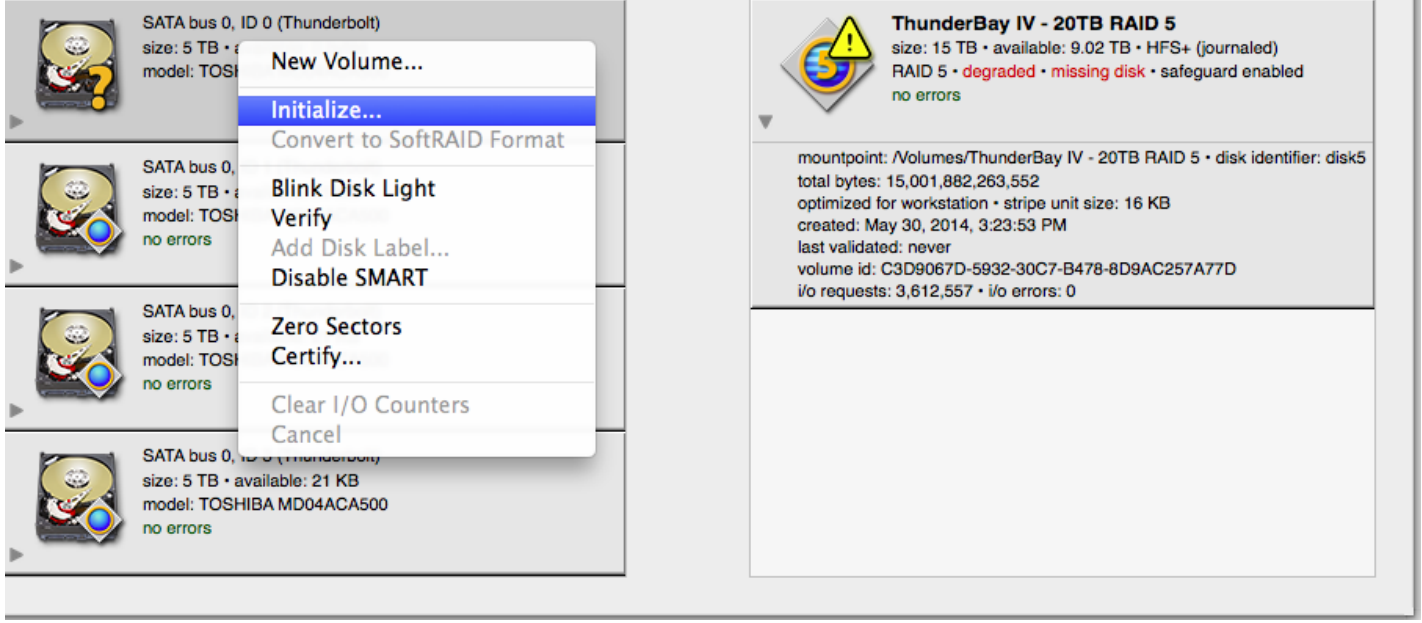
ID with a question mark icon, and the RAID volume will be displayed as ‘degraded’ with a missing disk. The new disk needs to be initialized in SoftRAID before it can be added to the RAID volume. To do this, right-click the disk and select ‘Initialize’.
You will be warned that data on the disk will be destroyed. Select ‘Initialize’ again.Once the new disk is initialized, right-click on the degraded RAID volume and select ‘Add Disk...’
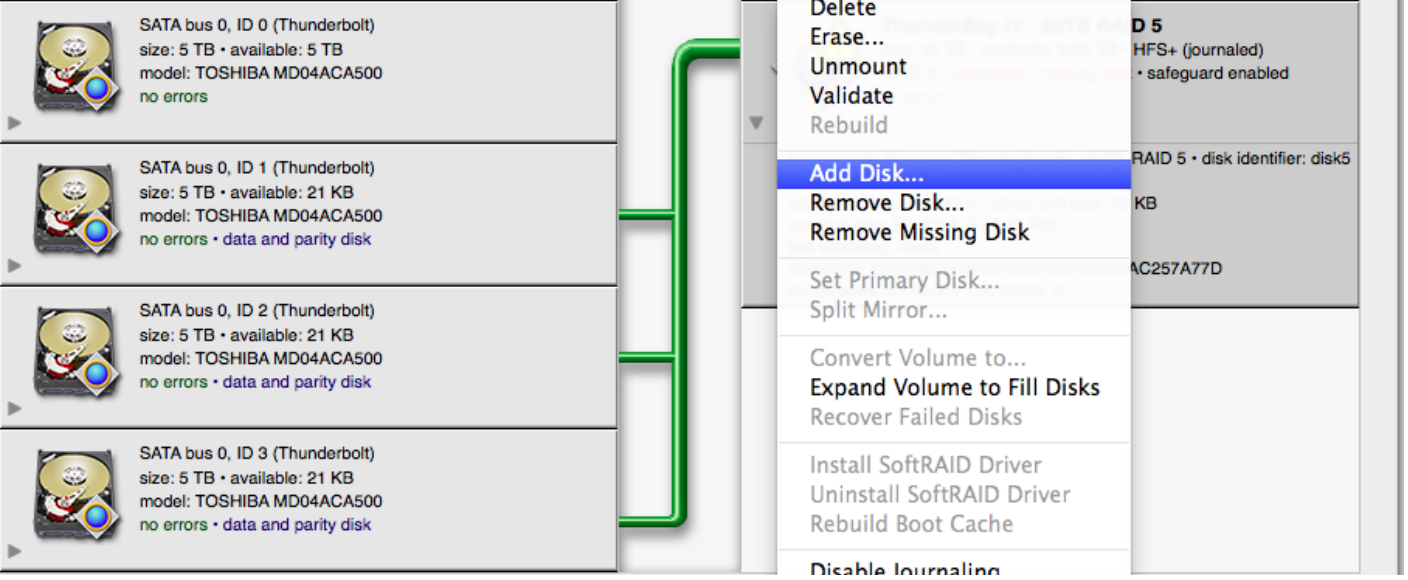
In the window that pops up next, click on the new disk to select it, then click ‘Add’. You will be prompted to confirm your selection. Click ‘Add’ again to add the new disk to the RAID volume and begin the rebuild process.
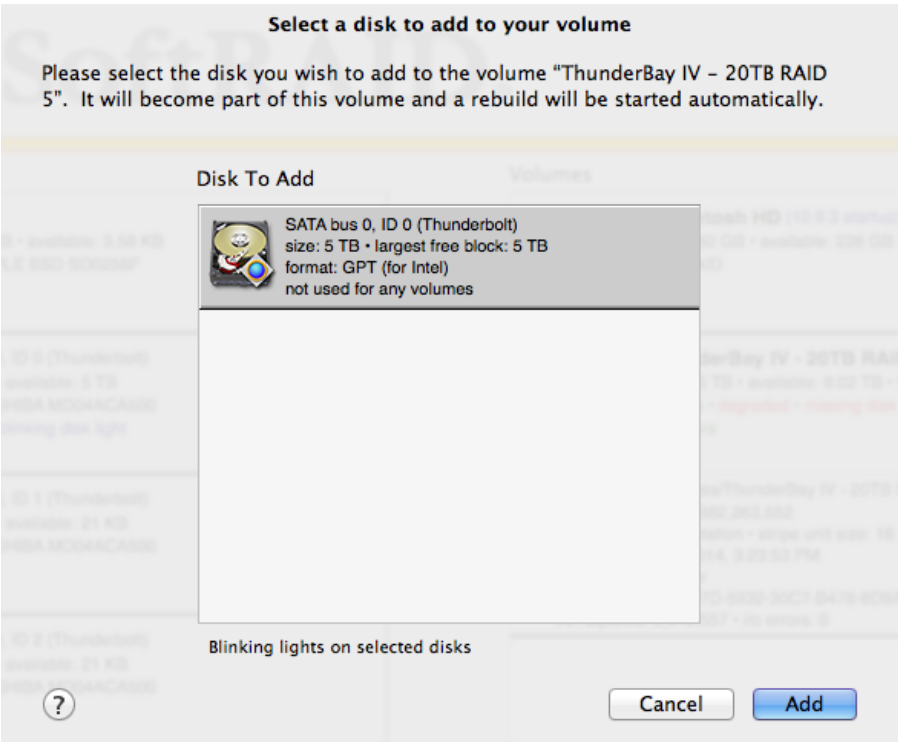
The rebuild process will begin automatically as soon as you confirm the addition of the new disk to the RAID volume. You can see the estimate of the rebuild time on the icon for the RAID volume in SoftRAID.
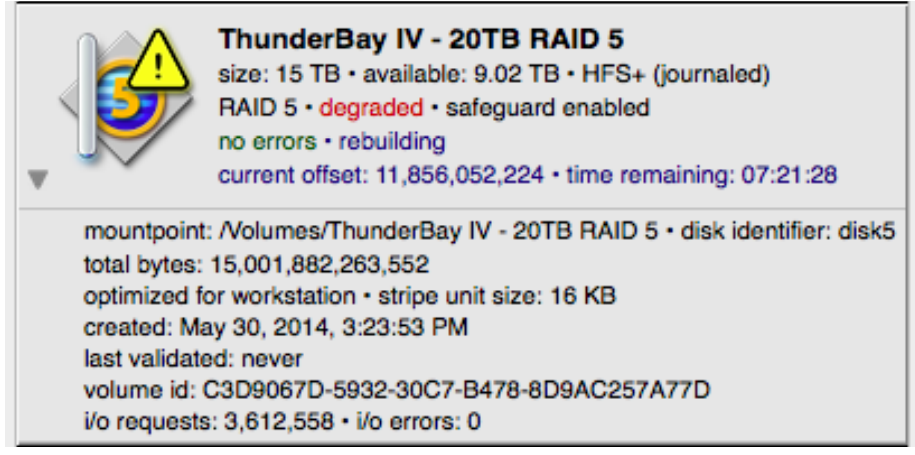
You will be able to use the RAID volume during the rebuild process. Make sure not to turn off or put the computer to sleep, and keep the ThunderBay 4 turned on and connected to the computer during this process, or the rebuild will be interrupted.
CHANGING DRIVES
If you reconfigure the ThunderBay 4 from the default RAID 5 volume in SoftRAID to an independent drive setup, you can add or remove any drive without needing to turn off the ThunderBay 4 or unmount any of the other drives. If two or more drives in the ThunderBay 4 are members of a Software RAID, make sure you understand the ramifications of removing a drive before doing so.
In a RAID 5 volume, the default configuration of the ThunderBay 4, you can remove and replace one drive and still be able to use the volume, however when the drive is replaced the RAID volume will need to be rebuilt, which can take several hours. if any drives are configured in a stripe (RAID 0), removing one drive will destroy the data on the entire volume.
Safety Precautions
Health And Safety Precautions
- Use proper anti-static precautions while performing the installation of your hard drives into this drive enclosure. Failure to do so can cause damage to your drive mechanisms and/or the hard drive enclosure.
- Read this user guide carefully and follow the correct procedures when setting up the device.
- Do not attempt to disassemble or modify the device. To avoid any risk of electrical shock, fire, short-circuiting or dangerous emissions, never insert any metallic object into the device. If it appears to be malfunctioning, contact Other World Computing technical support.
- Never expose your device to rain, or use it near water or in damp or wet conditions. Never place objects containing liquids on the drive, as they may spill into its openings. Doing so increases the risk of electrical shock, short-circuiting, fire or personal injury.
General Use Precautions
- To avoid damage, do not expose the device to temperatures outside the range of 5° C to 40° C (41° F to 104° F).
- Always unplug the device from the electrical outlet if there is a risk of lightning or if it will be unused for an extended period of time. Otherwise, there is an increased risk of electrical shock, short-circuiting or fire.
- Do not use the device near other electrical appliances such as televisions, radios or speakers. Doing so may cause interference which will adversely affect the operation of the other products.
- Do not place the device near sources of magnetic interference, such as computer displays, televisions or speakers. Magnetic interference can affect the operation and stability of hard drives.
- Do not place heavy objects on top of the device.
- Protect your device from excessive exposure to dust during use or storage. Dust can build up inside the device, increasing the risk of damage or malfunction.
- Do not block any ventilation openings on the device. These help to keep the device cool during operation. Blocking the ventilation openings may cause damage to the device and cause an increased risk of short-circuiting or fire.
- For up-to-date product and warranty information, please visit the product webpage.
Troubleshooting
- Begin your troubleshooting by verifying that the power cable is connected to the ThunderBay 4 and to a power source.
- If the power cable is connected to a power strip, make sure that the power switch on the strip is turned on.
- Then, simply verify that both ends of your cables are properly plugged into the computer and the ThunderBay 4.
- If the ThunderBay 4 is still not working properly, try connecting to another computer or using another Thunderbolt cable. Remember that the ThunderBay 4needs an active data signal to remain on. If it is disconnected from the computer, or if the computer goes to sleep or turns off, the ThunderBay 4 will go to sleep.
If you are still experiencing problems, consult our online list of frequently asked questions at https://www.macsales.com/FAQ or see Section 3.4 for information on contacting OWC technical support.
ABOUT DATA BACKUP
To ensure that your files are protected and to prevent data loss, we strongly suggest that you keep two copies of your data: one copy on your ThunderBay 4 and a second copy on either your internal drive or another storage medium, such as an optical backup, or on another external storage unit. Any data loss or corruption while using the ThunderBay 4 is the sole responsibility of the user, and under no circumstances will Other World Computing be held liable for compensation or the recovery of any lost data.
OWC ThunderBay 4 Storage TB3SRKIT0GB Pros & Cons
Pros
- High-speed storage with Thunderbolt 3 interface
- Flexible RAID configurations for performance and redundancy
- Durable aluminum enclosure with effective cooling system
- Support for up to 64TB of storage
- Backward compatibility with Thunderbolt 2 devices
Cons
- Pricier compared to other storage solutions
- Requires Thunderbolt 3 port for optimal performance
- No built-in USB or Ethernet ports
- Can be noisy during intense operations due to the fan
Customer Reviews
Customers have generally praised the OWC ThunderBay 4 for its reliability, speed, and ease of setup. Many have noted its robust construction and quiet operation despite the fan. However, some users have mentioned that the device can be quite expensive, especially when fully populated with high-capacity drives.
A common complaint is the lack of additional connectivity options such as USB or Ethernet ports. Despite this, the ThunderBay 4 remains a top choice among professionals who require high-performance storage solutions.
Faqs
What is the maximum storage capacity of the OWC?
Is the OWC compatible with Thunderbolt 2 devices?
What RAID configurations are supported by the OWC ThunderBay 4?
How do I configure RAID settings on the Storage TB3SRKIT0GB?
Can I use both SSDs and HDDs in the OWC?
What are the dimensions and weight of the Storage?
Does the ThunderBay have any built-in security features?
How do I troubleshoot drive detection issues with the OWC ThunderBay 4?
Is the OWC ThunderBay 4 quiet during operation?
Can I use the Storage TB3SRKIT0GB with non-Apple devices?
Leave a Comment
