Panasonic High Definition Video Camera HC-V785 User Guide

Content
Introduction
Camera HC-V785 is a versatile camcorder designed for capturing stunning video in various conditions. Featuring a 20x optical zoom lens and advanced HYBRID OIS+ stabilization, it ensures smooth footage even during handheld shooting. The camera supports Full HD recording at up to 240 fps, allowing for dramatic slow-motion playback. With built-in Wi-Fi for easy sharing and remote control, the HC-V785 is perfect for both casual users and serious videographers. Priced at approximately $499.99, it combines high performance with user-friendly features.
Specifications
The Panasonic HC-V785 comes with several key features that make it a standout in its class. Here are some of the detailed specifications:
- 1/2.3-inch BSI MOS Sensor
- 50x Optical Zoom and 90x Intelligent Zoom
- 1080p Full HD Video Recording at 50fps
- 3-inch LCD Touchscreen
- Wi-Fi and NFC Connectivity
- Manual Focus and Zoom Ring
- Optical Image Stabilizer
- MicroSD Card Slot for Expandable Storage
Names and Functions of Main Parts

- Speaker
- Shoe adaptor release lever [SHOE ADAPTOR RELEASE]
- Recording/playback button [
 ]
] - Level Shot Function button [
 ]
] - Power button [
 ]
] - Battery release lever [BATT]
- USB terminal [
 ]
] - Micro HDMI connector [HDMI]
- A/V connector [A/V]
- Microphone terminal [MIC]
A compatible plug-in powered microphone can be used as an external microphone.
If you connect an external microphone when a setting other than [AUTO] is selected for [MIC LEVEL] (Microphone input level meter) will be displayed.
When the unit is connected with the AC adaptor, sometimes noise may be heard depending on the microphone type. In this case, please switch to the battery for the power supply and the noise will stop. - Internal microphones
- Lens cover
The lens cover opens in Motion Picture Recording Mode or Still Picture Recording Mode. - Multi Manual Dial [CAMERA FUNCTION]
- Video light
Lens
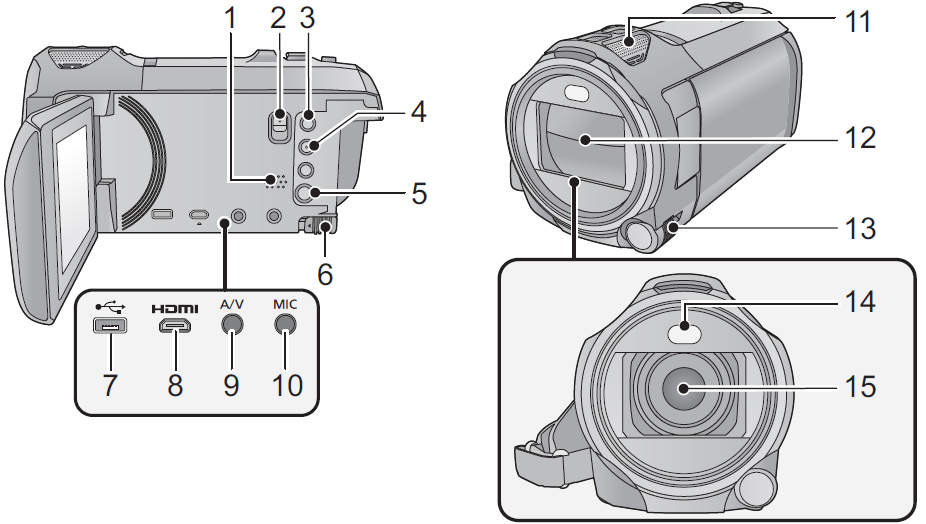
- Shoe adaptor mounting part [SHOE ADAPTOR]
- Status indicator
- Recording start/stop button
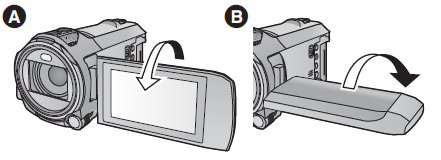
LCD monitor (Touch screen)
It can open up to 90%.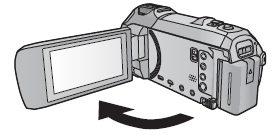
It can rotate up to 180º A towards the lens or 90o B towards the opposite direction.
- Battery holder
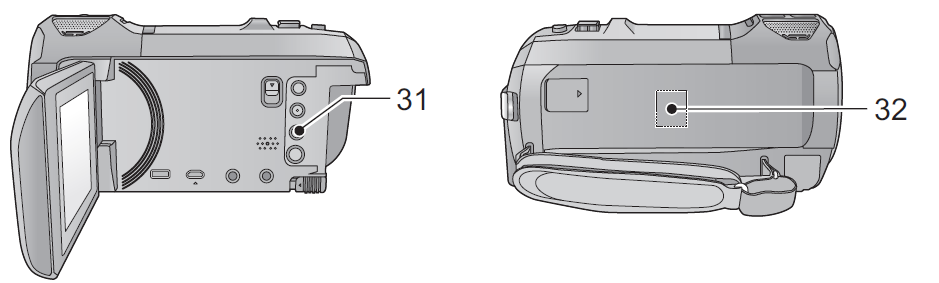
- Shoulder strap fixture
- Tripod receptacle
Attaching a tripod with a screw length of 5.5 mm (0.22 q) or more may damage the unit. - SD card cover
- Access lamp [ACCESS]
- Card slot
- Photoshot button [
 ]
] - Zoom lever [
 ] (In Motion Picture
- Recording Mode or Still Picture
- Recording Mode) (l 41)/
Thumbnail display switch [ / ]/Volume lever [sVOLr] (In Playback Mode)
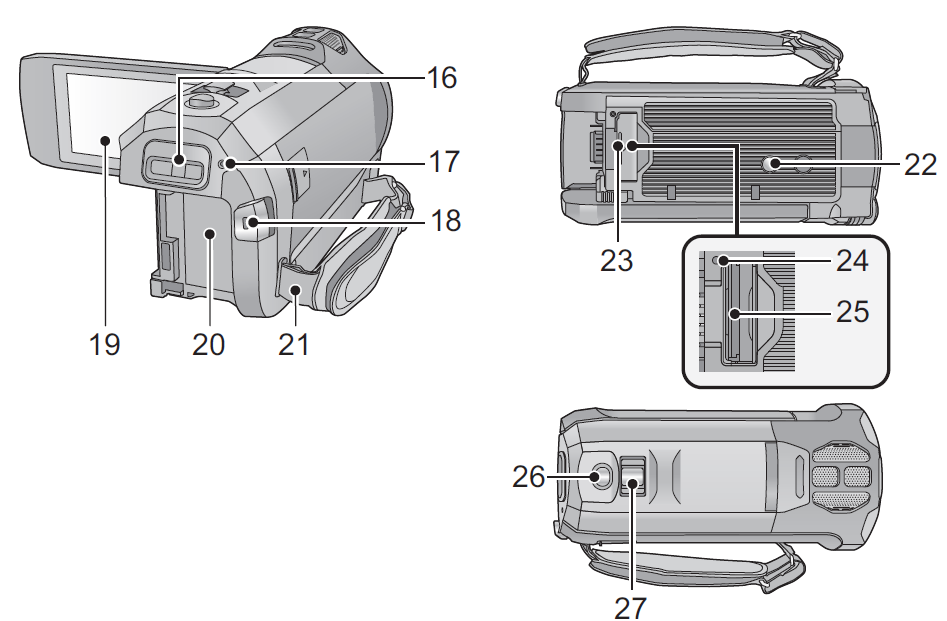
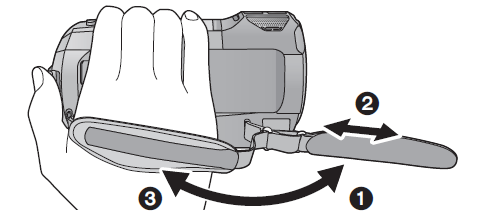
- Grip belt
Adjust the length of the grip belt so that it fits your hand.- Flip the belt.
- Adjust the length.
Replace the belt.
- Headphone terminal [
 ]
]
Excessive sound pressure from earphones and headphones can cause hearing loss.
Listening at full volume for long periods may damage the user’s ears. DC input terminal [DC IN]
Do not use any other AC adaptors except the supplied one.- Wi-Fi button [Wi-Fi]
Wi-Fi Transmitter
Description
The Panasonic is built with a sleek and ergonomic design, making it comfortable to hold and operate. The camera features a manual focus and zoom ring, providing precise control over your shots. The optical image stabilizer helps reduce handshake and blur, ensuring smooth footage even when moving. With its advanced BSI MOS sensor, the HC-V785 delivers vibrant colors and clear details in various lighting conditions.
The camera also includes features like HDR (High Dynamic Range) and a built-in microphone with wind noise reduction, enhancing the overall audio-visual experience. The 3-inch LCD touchscreen allows for intuitive menu navigation and quick access to settings.
Turning the unit on/off
You can turn the unit on and off using the power button or by opening and closing the LCD monitor.
Turning the unit on and off with the power button
Open the LCD monitor and press the power button to turn on the unit.
To turn off the unit
Hold down the power button until the status indicator goes off.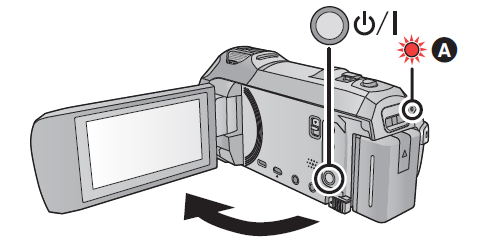
A The status indicator lights on.
Turning the unit on and off with the LCD monitor
The unit is turned on when the LCD monitor is opened, and unit is turned off when it is closed.
During normal use, opening and closing of the LCD monitor can be conveniently used to turn the unit on/off.
- The unit will not turn off while recording motion pictures or connecting to Wi-Fi even if the LCD monitor is closed.
- In the following cases, opening the LCD monitor does not turn on the unit. Press the power button to turn on the unit.
- When the unit is originally purchased
- When you have turned off the unit using the power button
Overheat detection
- When the internal temperature of the unit rises during use, a message will be displayed. When this happens, the unit will turn off automatically a few minutes later.
- Wait until the temperature has dropped before resuming use.
- If you try to use the Wi-Fi function while the internal temperature of this unit is high, a message will be displayed. When this happens, the Wi-Fi function is disabled.
- Wait until the temperature has dropped before resuming use.
Wi-Fi function
Use this unit as a wireless LAN device
When using equipment or computer systems that require more reliable security than wireless LAN devices, ensure that the appropriate measures are taken for safety designs and defects for the systems used. Panasonic will not take any responsibility for any damage that arises when using this unit for any purpose other than as a wireless LAN device.
Use of the Wi-Fi function of this unit is presumed to be in countries where this unit is sold
There is the risk that this unit violates the radiowave regulations if used in countries other than those where this unit is sold, and Panasonic takes no responsibility for any violations.
There is the risk that data sent and received via radio waves may be intercepted
Please note that there is the risk that data sent and received via radio waves may be intercepted by a third party.
Do not use this unit in areas with magnetic fields, static electricity or interference
- Do not use this unit in areas with magnetic fields, static electricity or interference, such as near microwave ovens. Radio waves may not reach this unit.
- Using this unit near devices such as cordless telephones or any other wireless LAN device that use the 2.4 GHz radio wave band may cause a decrease in performance in both devices.
Do not connect to the wireless network you are not authorized to use
When this unit utilizes its Wi-Fi function, wireless networks will be searched automatically. When this happens, wireless networks that you are not authorized to use (SSID*) may be displayed, however do not attempt to connect to the network as it may be considered as unauthorized access.
SSID refers to the name of device that is used to identify a network over a wireless LAN connection. If the SSID matches for both devices, transmission is possible.
Before use
To use a Wi-Fi function with this unit, you need a wireless access point or destination device equipped with a wireless LAN function.
- For the operations and settings of your device such as the smartphone, please read the operating instructions of the device.
This unit is WPS-compatible
WPS (Wi-Fi Protected Setup) is a function that allows you to easily set up a connection with a wireless LAN device and make security-related settings.
- This unit cannot be used to connect to a public wireless LAN connection.
- Use a IEEE802.11b, IEEE802.11g or IEEE802.11n compatible device when using a wireless access point.
- This unit uses the 2.4 GHz frequency band. You cannot establish a wireless LAN connection using the 5 GHz frequency band.
- When using a wireless access point, we strongly recommend that you set a encryption to maintain information security.
- When sending scenes or still pictures, we recommend you use the AC adaptor. If you are using the battery, we recommend you use the fully charged one.
- When sending motion pictures or still pictures on a mobile network or tethering, high packet communication fees may be incurred depending on the details of your contract.
- This unit may not connect to a wireless access point depending on the radio wave condition.
- When motion picture or still picture transmission is not successful, point the Wi-Fi transmitter at the wireless device (smartphone, etc.).
- When the battery indicator is flashing red, the connection with other equipment may not start or the connection may be disrupted.
- The Wi-Fi transmitter may become warm when using the Wi-Fi function; however, this is not a sign of a malfunction.
What you can do with the Wi-Fi function
This unit offers the following Wi-Fi functions when used in combination with another Wi-Fi-compatible device.
[TWIN CAMERA] | You can display the image transmitted from a Wireless Sub Camera connected via Wi-Fi on this unit’sSub Window and record it simultaneously with the Main Camera’s image. |
[Link to Cell] | You canuse a smartphone to remotely control recording and playback on this unit. |
[DLNA Play] | Connecting thisunit to a DLNA (DMR)-compatible TV via Wi-Fi,you can play back scenesand still pictures on the TV. |
[Copy] | By setting up a Wi-Ficommunication between thisunit and a PC, youcan copy scenes and stillpictures recorded with this unit to the PC. |
[History] | Each use of a Wi-Fifunction is storedin the WiFi connection history. Connecting from the history allows you to easily setup a connection using the previous connection settings. |
The following Wi-Fi functions have been terminated. Related menus, etc., will still be displayed, but they can no longer be used.
- [Baby Monitor]
- [Home Cam]
- [Live Cast]
Setup Guide
To set up your HC-V785, follow these steps:
- Insert the battery and charge it if necessary.
- Insert a microSD card for storage.
- Turn on the camera and navigate to the settings menu using the touchscreen.
- Configure Wi-Fi and NFC settings for connectivity.
- Adjust manual focus and zoom settings as needed.
- Set up image stabilization and other advanced features through the menu.
Using a Smartphone as a Wireless Sub Camera

- You need to turn on the Wi-Fi function of your smartphone.
- Install the smartphone application “Image App” on your smartphone.
When connecting a smartphone to this unit as a Wireless Sub Camera for the first time
The QR code is not displayed when [Direct Connection Password] is set to [OFF]. Refer to “Selecting this unit’s SSID and entering a password on the smartphone to set up a connection”
The default setting for [Direct Connection Password] is [OFF].
- Selecting this unit’s SSID and entering a password on the smartphone to set up a connection
(When using the Wi-Fi Setup menu)
Press Wi-Fi button on this unit and touch [TWIN CAMERA].
(When using the recording screen)
Touch the recording screen on this unit and touch .
.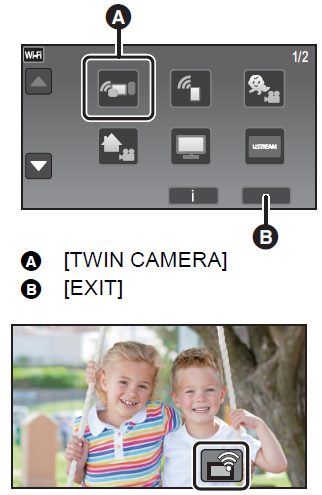
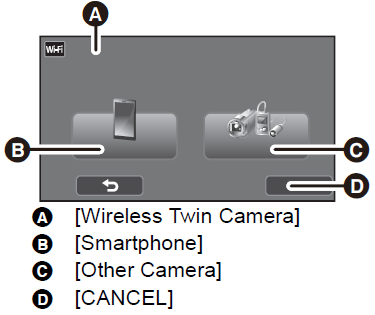
Touch [Smartphone] on the screen of this unit.
_of.png)
- (When [Direct Connection Password] is set to [OFF])
On the smartphone, set the SSID displayed on the screen of this unit.- When using an Android device, perform the following operations:
- Start up the smartphone application “Image App”.
- On the smartphone, select [Wi-Fi], and select the SSID displayed on this unit.*
- When using an iOS device, perform the following operations:
- On the smartphone, select the SSID displayed on this unit from the Wi-Fi setup menu.
- Start up the smartphone application “Image App”.
If this is the first time the smartphone is connecting to this unit, a message will be displayed on the screen of this unit. Touch [YES].
- When the connection is complete, the image being captured by the smartphone will be displayed on the Sub Window of this unit.
(When [Direct Connection Password] is set to [ON])
Touch [Wi-Fi] on the screen of this unit, and on the smartphone, set the SSID displayed on the screen of this unit. - When using an Android device, perform the following operations:
- Start up the smartphone application “Image App”.
- On the smartphone, select [Wi-Fi], and select the SSID displayed on this unit.
- Enter the Password displayed on this unit.
- When using an iOS device, perform the following operations:
- On the smartphone, select the SSID displayed on this unit from the Wi-Fi setup menu.
- Enter the Password displayed on this unit.
- Start up the smartphone application “Image App”.
- When the connection is complete, the image being captured by the smartphone will be displayed on the Sub Window of this unit.
- When using an Android device, perform the following operations:
Scanning a QR code to set up a connection
(When using the Wi-Fi Setup menu)
Press Wi-Fi button on this unit and touch [TWIN CAMERA].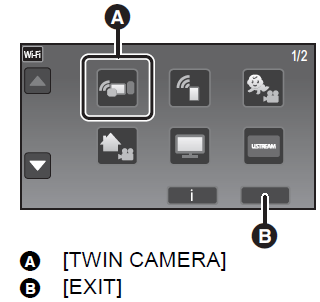
(When using the recording screen)
Touch the recording screen on this unit and touch..png)
Touch [Smartphone] on the screen of this unit.
- Touch [QR code] on the screen of this unit.
- Start up the smartphone application “Image App”.
- On the smartphone, select [QR code] to scan the QR code displayed on the screen of this unit.
- When using an iOS device, perform the following operations:
- Select the option that allows you to install the app on the profile screen of the “Image App”, and follow the on-screen instructions to complete the installation.
- Press the home button to close the displayed screen.
- Touch [NEXT] on the screen of this unit to display its SSID.
- After selecting the network name (SSID) of this unit from the Wi-Fi setup of the smartphone, start up “Image App”.
- When the connection is complete, the image being captured by the smartphone will be displayed on the Sub Window of this unit.
- If the QR code cannot be scanned, refer to “Selecting this unit’s SSID and entering a password on the smartphone to set up a connection”.
- When using an iOS device, perform the following operations:
When connecting for the second time or later
- Touch the recording screen on this unit and touch.
Start up the smartphone application “Image App”.

- This unit and the smartphone will be connected via Wi-Fi.
When the connection is complete, the image being captured by the smartphone will be displayed on the Sub Window of this unit. - If the connection cannot be established or no image appears on the Sub Window, follow the steps below to set up the connection again:
- Close the smartphone application “Image App”.
- Touch the screen of this unit again and touch.
- Touch [Change Device] on the screen of this unit.
After completing the steps above, follow the procedure from Step 2 onwards in “When connecting a smartphone to this unit as a Wireless Sub Camera for the first time”.
- [History] allows you to set up a Wi-Fi connection with the Wi-Fi function settings you have used before.
- This unit and the smartphone will be connected via Wi-Fi.
Terminating the connection
- Touch the recording screen on this unit and touch.
Touch [EXIT] on the screen of this unit.

- The Wi-Fi connection will be terminated.
- Close the “Image App” on the smartphone.
- You can also terminate the connection by pressing the Wi-Fi button on this unit.
If you press the Wi-Fi button during recording pause, a message will be displayed. To terminate the connection, touch [YES].
Troubleshooting
It is not a malfunction in the following cases
A clicking soundis heard when the unit is shaken. |
This sound willno longer be heard when the unitis turned on and setthis unit to the MotionPicture Recording Modeor Still Picture Recording Mode. |
Object seems to be warped. |
|
The lens or LCD monitor fog up. |
|
Power | |
Problem | Check points |
This unit cannotbe turned on.
This unit doesnot stay on long enough.
Battery runsdown quickly. |
|
This unit is turned off automatically. |
|
This unit cannot beoperated though it is turnedon.
This unit does not operate normally. |
1 minute later, turn on the unitagain. (Conducting the above operation while the mediais being accessed may damage the data on the media.)
|
“ERROR OCCURRED. PLEASETURN UNIT OFF, THEN TURN ON AGAIN.” is displayed. |
|
Indication | |
Problem | Check points |
Remaining battery indication is not displayed properly. |
If theremaining battery capacity indication is notdisplayed correctly, fully charge the battery, discharge it and then charge it again. |
Recording | |
Problem | Check points |
The unit arbitrarily stops recording. |
|
Auto Focus function does not work. |
|
Color balance of images is strange when recording in a place such as a gymnasium. |
|
Color or brightness of the image changes, or you may see horizontal bars in the image.
The LCD monitorflickers indoors. |
|
Playback | |
Problem | Check points |
Scenes/still pictures cannotbe played back. |
|
Scenes cannot be deleted. |
|
With otherproducts | |
Problem | Check points |
Even when this unit is correctly connected to a TV, imagesor sounds are not output.
The images are squeezed horizontally. |
|
Even when this unit is connected to the TV by the HDMImicro cable, imagesor sounds are not output. |
|
If the SD card is inserted in another device, it is not recognized. |
|
When connected by the USB cable, thisunit is not detected by the other devices. |
|
VIERA Link doesnot work. | (Setting on thisunit)
(Setting on otherdevices)
|
Cannot copy scenes on the SD card by connecting to other equipment with the USB cable. |
|
With a PC | |
Problem | Check points |
When connected by the USB cable, thisunit is not detected by the PC. |
|
When the USB cable is disconnected, an error message will appear on the PC. |
|
Cannot see the PDFoperating instructions for HD Writer AE 5.2. |
|
About the Wi-Fi function | |
Problem | Check points |
Cannot connect towireless access pointor smartphone. |
|
Cannot operate fromsmartphone using [Linkto Cell]. |
|
When I look at therecording screen with the smartphone, mosaic-like noise appears on the screen and the image movement does not look smooth. |
j Recording mode [1080/60p] for the recording format [AVCHD] j Recording mode [1080/50M] or [1080/28M] for the recording format [MP4/iFrame] |
Cannot use [DLNA Play]. |
|
I have forgotten the password for the Wi-Fi. |
|
Others | |
Problem | Check points |
If the SD card is inserted in this unit, it is not recognized. |
|
If AVCHD scenes do not change smoothly when played back on another device
The images may be still for several seconds at the joins between the scenes if the following operations are performed when multiple scenes have been continuously played back using another unit.
- Just how smoothly the scenes will be played back depends on the playback unit. Depending on the unit used, the images may stop moving and become still for a moment even when none of the following conditions are applicable.
- A continuous recording of motion picture data that exceeds 4 GB may momentarily stop at every 4 GB of data when played back with another device.
- It may not play back smoothly when the editing of scenes was done with the HD Writer AE 5.2,but it will play back smoothly if you set the seamless settings in the HD Writer AE 5.2. Refer to the operating instructions for the HD Writer AE 5.2.
Principal reasons for not playing back smoothly
- When the scenes were recorded on different dates
- When scenes lasting under 3 seconds have been recorded
- When PRE-REC was used for recording
- When the Miniature Effect recording is used
- When the Time Lapse Recording is used
- When deleting scenes
- When recording more than 99 scenes on the same date
Optional accessories
Some optional accessories may not be available in some countries.
Attaching the Conversion Lens/Filter Kit
Attach the Wide Conversion Lens (VW-W4907H: optional) ND filter or MC protector of the Filter Kit (VW-LF49N: optional) in front of the lens.
- You will not be able to use the video light. Set the video light setting to
 ([OFF]) and the [AF ASSIST LAMP] setting to [OFF].
 - When using a Wide Conversion Lens (optional), set [WIDE CONV. LENS SET] to [ON].
Be careful about the following.
- When 2 lens accessories, such as the ND filter and Wide Conversion Lens, are fitted and the zoom lever is pressed toward the W side, the 4 corners of an image will be darkened. (Vignetting)
Attaching the lens cap of the Filter Kit (VW-LF49N: optional)
- When the Filter Kit (VW-LF49N: optional) is used, protect the lens surface while the unit is not used with the lens cap supplied with the Filter Kit.
Attaching the supplied shoe adaptor
You can attach a variety of optional accessories to the shoe adaptor.
When attaching the shoe adaptor
Insert the shoe adaptor into the shoe adaptor mounting part.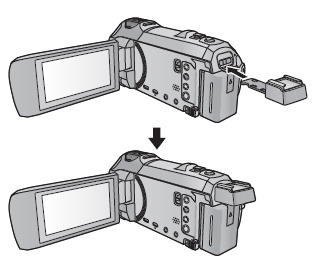
When removing the shoe adaptor
When removing the shoe adaptor, slide the SHOE ADAPTOR RELEASE lever, and remove the shoe adaptor while sliding the lever.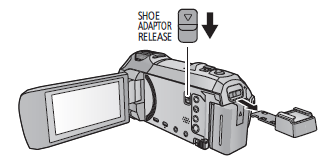
Panasonic High Definition Video Camera HC-V785 Pros & Cons
Pros
- High-quality 1080p full HD video recording
- Powerful 50x optical and 90x intelligent zoom
- Advanced BSI MOS sensor for excellent low-light performance
- Wi-Fi and NFC connectivity for easy sharing
- Manual focus and zoom ring for precise control
Cons
- No 4K resolution capability
- Battery life could be longer
- No external microphone input
- Slightly bulky design compared to newer models
Customer Reviews
Customers have praised the Camera HC-V785 for its excellent image quality, robust zoom capabilities, and user-friendly interface. Many have noted its versatility in capturing both close-up shots and distant subjects with clarity. However, some users have mentioned that the battery life could be improved and that the lack of 4K resolution is a drawback.
Faqs
What is the maximum zoom capacity of the Panasonic?
How do I connect my Panasonic to Wi-Fi?
What type of memory card does the Video Camera use?
Is the Panasonic suitable for low-light conditions?
How long does the battery of the Panasonic last?
Can I stream live video using the High Definition Video Camera?
What are some common issues with the Panasonic and their solutions?
Leave a Comment