Panasonic Lumix Lens Camera H-H025GK Guide
Content
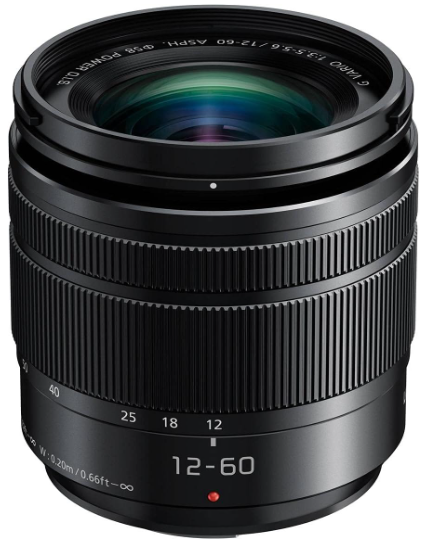
Introduction of Panasonic Lumix Lens Camera H-H025GK
The Panasonic Lumix Lens Camera H-H025GK is a compact and powerful camera that offers high-quality images and videos. With a 20.3-megapixel sensor, 4K video recording, and a Leica DC Vario-Elmar lens, this camera is perfect for both amateur and professional photographers. The estimated price of the camera is around $699.99, and it was launched on February 25, 2021.
Accessories
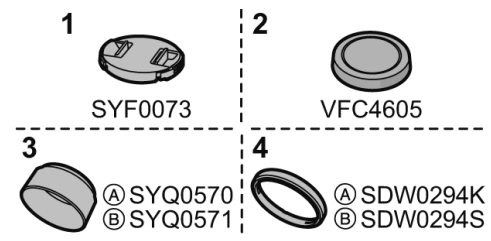
- Lens Cap
- Lens Rear Cap
- Lens Hood
- A: Black, B: Silver
- Decoration ring
- A: Black, B: Silver
(The lens cap, lens rear cap, and decoration ring are attached to the lens at the time of purchase.)
- A: Black, B: Silver
Location of Controls and Components
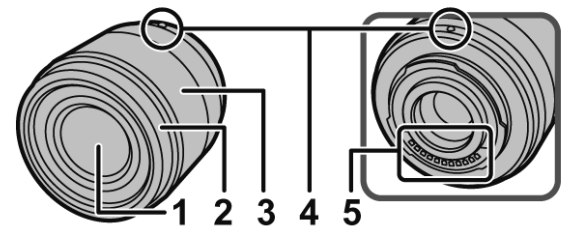
- Lens surface
- Decoration ring
- Remove this cover when using the lens hood.
- Focus ring
- Rotate to focus when taking pictures with manual focus (MF).
- Lens fitting mark
- Contact points
Note
- If you turn off the camera, the aperture will be set to a reduced value.
- When flash recording with a close subject, the light ofthe flash will be blocked by the lens and part of the picture may be dark. Check the distance from the subject when recording.
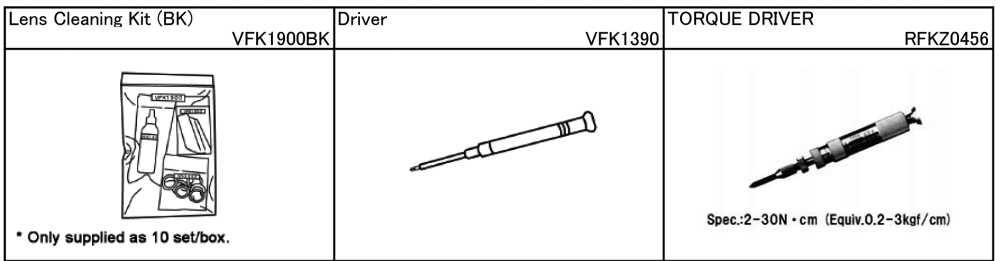
Service Fixture & Tools
Service Fixture and Tools
The following Service Fixture and Tools are used for Checking & Servicing for this unit.
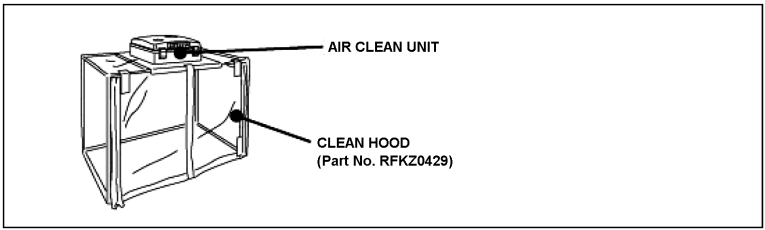
Clean Box
The repair quality is considered, and it is recommended working in the environment of satisfied clean level less than class 10,000 (Federal Standard 209D).
NOTE: Work in the environment of satisfied clean level less than class 10,000 (Federal Standard 209D) for cleaning the inside of the lens.
Service Navigation
About LENS MAIN UNIT (Ref. 209)
- LENS MAIN UNIT (Ref. 209) is not supplied due to difficulty of the transportation issue (Fragile, Dust-free packing), and requires critical lens adjustments. Therefore, any needs of the "LENS MAIN UNIT" (Ref. 209), carefully confirm its performance in advance.
Once "LENS MAIN UNIT" (Ref. 209) is confirmed as defective, place order "LENS Unit" (Ref. 200) and replace SHADING FRAME (Ref. 208), to maintain Serial number of owner's original lens.
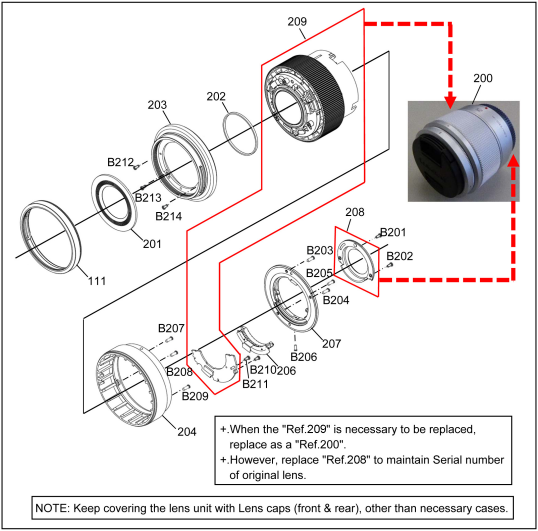
- No adjustment is required when replacing the part mentioned on Fig.1-1. But, when tighten the concerned screws, apply proper torque mentioned on "4. Disassembly and Assembly Instruction" section.
Panasonic Lumix Lens Camera H-H025GK Specifications
| Specification | Value |
|---|---|
| Focal Length | 25 mm (35 mm film camera equivalent: 50 mm) |
| Aperture Type | 7 diaphragm blades/circular aperture diaphragm |
| Maximum Aperture | F1.7 |
| Minimum Aperture Value | F22 |
| Lens Construction | 8 elements in 7 groups (2 aspherical lenses, 1 UHR Lens) |
| In Focus Distance | 0.25 m (0.82 feet) to ∞ (from the focus distance reference line) |
| Maximum Image Magnification | 0.14x (35 mm film camera equivalent: 0.28x) |
| Optical Image Stabilizer | Not available |
| Mount | "Micro Four Thirds Mount" |
| Angle of View | 47° |
| Filter Diameter | 46 mm |
| Max. Diameter | Approx. 60.8 mm (2.39 inch) |
| Overall Length | Approx. 52 mm (2.05 inch) (from the tip of the lens to the base side of the lens mount) |
| Mass (Weight) | Approx. 125 g (0.28 lb) |
Disassembly and Assembly Instructions
Outline
Please be disassembly and assembly with reference to the flow chart and illustrations drawings.
Important
- It is recommended dealing with Clean Box, to keep maintaining the dustproof environment.
- To minimize the possibilities/risk of getting the dust/dirt on the lens surface, keep covering the lens unit with lens caps (front & rear), other than necessary cases.
- Do not touch the surface of the lens glasses with your fingers.
- Blow off the dust on the surface of the lens with a blower brush.
- Use lens cleaning KIT (BK)(VFK1900BK).
NOTE: When installing the screws, be sure to use the torque driver (RFKZ0456) and tighten the screws with specified torque, mentioned on the following.
Caution: Keep covering the lens unit with Lens caps (front & rear), other than necessary cases.
Disassembly Flow Chart
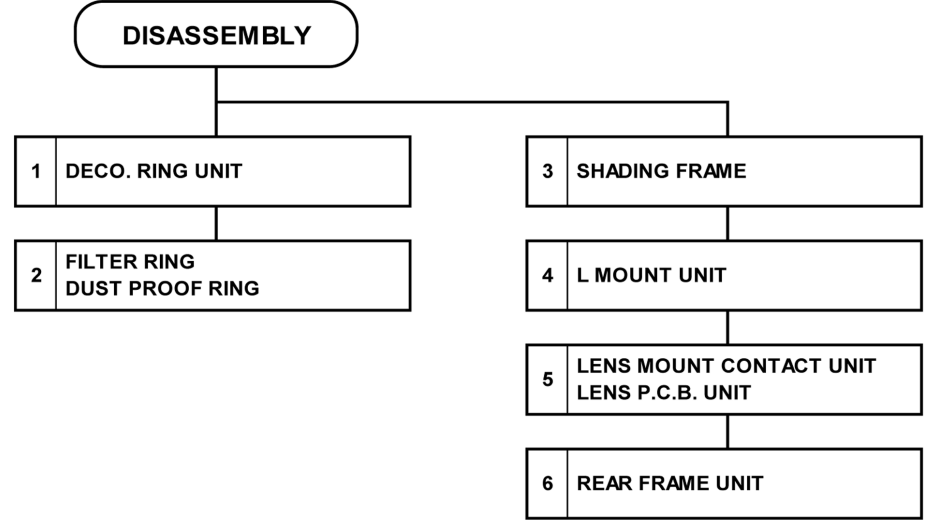
Disassembly procedure
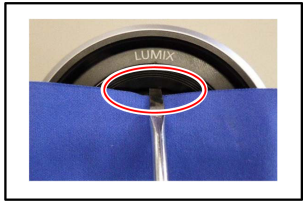
Removal of the Deco. Ring Unit
- Deco. Ring Unit is sticked on the Filter Ring.
- Put the sheet so that the lens glass is fullty covered.
Insert the small flat blade screwdriver to Gap (between the Deco. Ring Unit and lens glass), and peel off the Deco. Ring Unit gently.
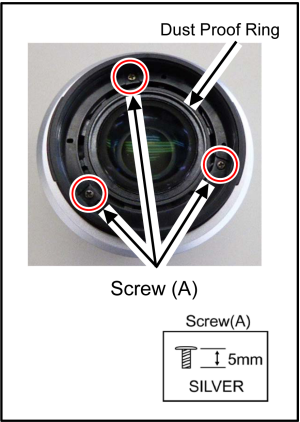
Removal of the Dust Proof Ring and the Filter Ring
- Remove the Dust Proof Ring.
Remove 3 screws (A) and the Filter Ring.
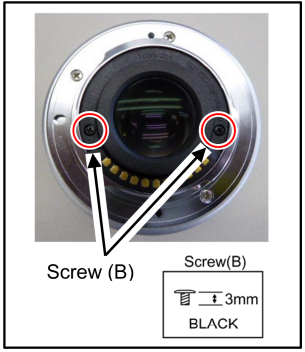
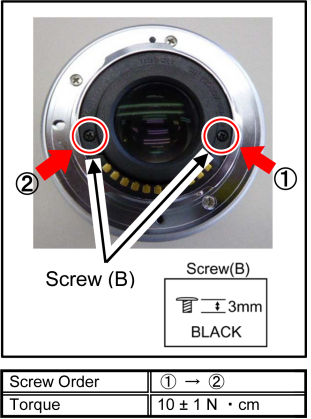
Removal of the Shading Frame
Remove 2 screws (B) and the Shading Frame.
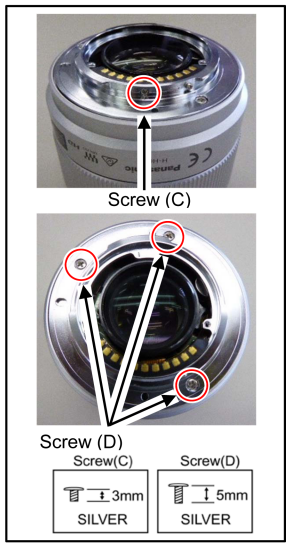
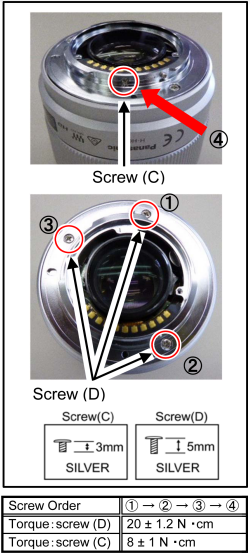
Removal of the L Mount Unit
- Remove 1 screw (C) and 3 screws (D).
Remove the L Mount Unit.
Removal of the Lens P.C.B. Unit and the Lens Mount Contact Unit
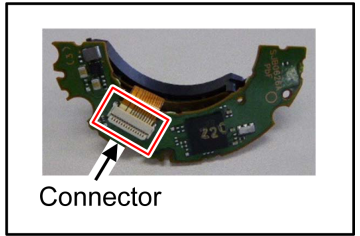
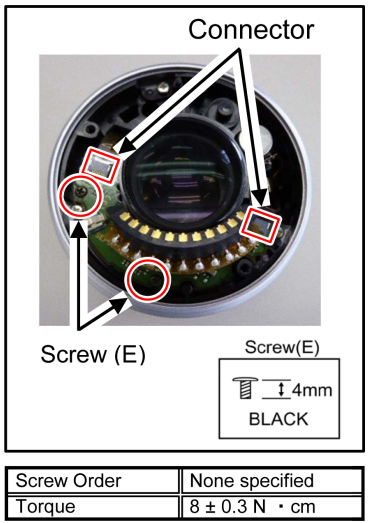
- Remove 2 screws (E) and disconnect 5 connectors.
Remove the Lens P.C.B. Unit and the Lens Mount Connect Unit.
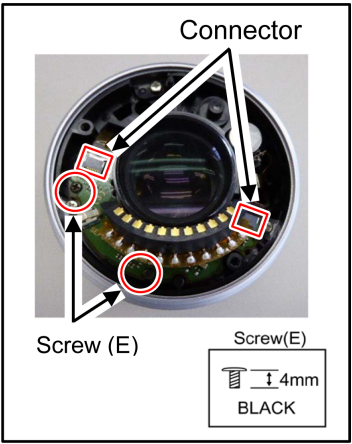
Disconnect a connector of the Lens P.C.B. Unit and remove the Lens Mount Connect Unit.
Removal of the Rear Frame Unit
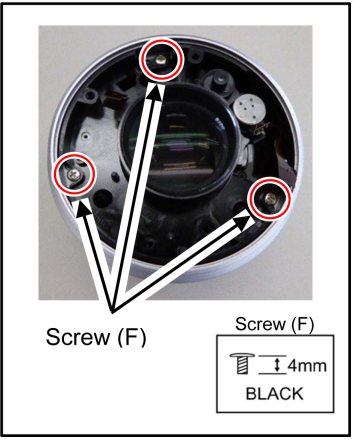
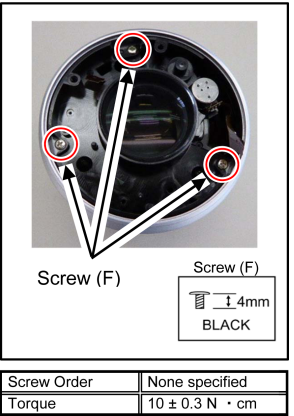
Remove 3 screws (F) and the Rear Frame Unit.
Assembly Flow Chart
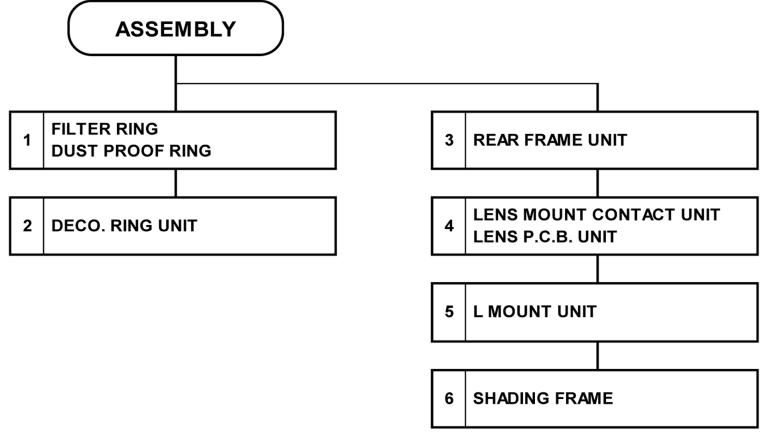
Assembly procedure
Important
- When tightening the screw, use a torque driver (RFKZ0456) by ordering the screwing order with specified torque described in each step.
Mounting that the Filter Ring and the Rear Frame Unit as Lens fitting mark are aligned.
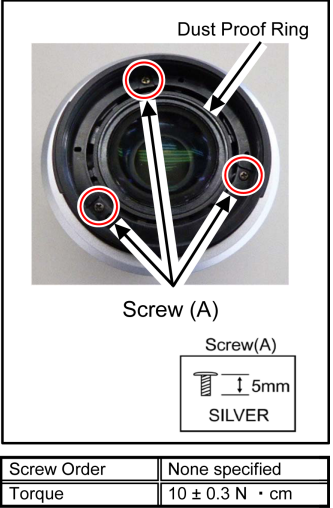
Installation of the Filter Ring Unit and the Dust Proof Ring
- Mounting that the Filter Ring as Lens fitting mark are aligned.
- Tighten 3 screws (A) by using the torque driver with spec-ified torque.
- Install the Dust Prooof Ring.
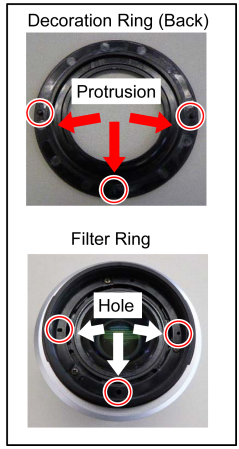
Installation of the Deco. Ring Unit
- Please insert the 3 protrusions of the Deco. Ring Unit back to 3 holes of the Filter Ring.
(Caution)- Use new one, do not use the one which is removed.
- Please remove the old double-stick tape from the Lens Unit.
After installing the Deco. Ring Unit use a soft cloth to Press it into place.
Installation of the Rear Frame Unit
- Install the Rear Frame Unit.
Tighten 3 screws (F) by using the torque driver with specified torque.
Installation of the Lens P.C.B. Unit and the Lens Mount Contact Unit
Connect FPC of the Lens Mount Connect Unit to connector.
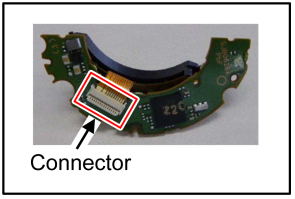
- Installation the Lens P.C.B. Unit with the Lens Mount Connect Unit.
- Connect FPCs to 2 connectors of the Lens P.C.B. Unit.
Tighten 2 screws (E) by using the torque driver with spec-ified torque.
Installation of the L Mount Unit
- Install the L Mount Unit.
Tighten 1 screw (C) and 3 screws (D) in numerical order by using the torque driver with specified torque.
Installation of the Shading Frame
- Install the Shading Frame.
Tighten 2 screws (B) in numerical order by using the torque driver with specified torque.
Description of Panasonic Lumix Lens Camera H-H025GK
The Panasonic Lumix Lens Camera H-H025GK is a versatile camera that offers high-quality images and videos. The 20.3-megapixel MOS sensor and Leica DC Vario-Elmar lens ensure sharp and detailed images, while the 4K video recording capability allows you to capture professional-quality videos. The camera's 5-axis Hybrid O.I.S.+ stabilization system helps to reduce camera shake, making it easier to take clear and steady shots. The touchscreen display and Live View Finder make it easy to frame and review your shots, while the built-in Wi-Fi and Bluetooth connectivity allow you to easily transfer your photos and videos to your smartphone or computer.
Setup Guide
To set up the Panasonic Lumix Lens Camera H-H025GK, follow these steps:
- Charge the battery fully before use.
- Insert the battery and memory card into the camera.
- Turn on the camera by sliding the power switch to the ON position.
- Set the date and time by going to the menu and selecting "Setup".
- Connect the camera to your smartphone or computer using Wi-Fi or Bluetooth.
Maintenance
ABOUT THE LENS
DUST/DIRT ON THE OUTER CASING PART(S)
- Blow off the dust first, then sweep out the dust from narrower spaces with soft cleaning brush.
- Wipe up the Outer casing part with the dry fuzz-free cloth.
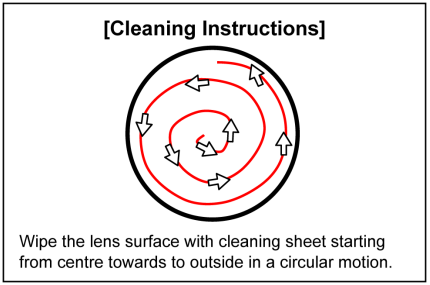
DUST/DIRT ON THE LENS GLASSES
Define the location of the dust/dirt first, whether it is outside lens surface or not.
- When it is outside surface of the lens:
- When the dust and/or dirt gets on the outer side surface of the Lens glasses, order the following procedures.
- Blow off the dust on the Lens glass surface with the Blower, gently. (Do not Blow too strongly.)
Wipe out the dirt on the lens glass surface with Lens cleaning KIT (VFK1900BK) if necessary.
Exploded View and Replacement Parts List
Please click the radio button for "Diagrams II / Parts List" on the menu bar in XML Service Manual. If you want to print, please click the icon button for "Print" on the icon bar and select the item.
Safety Precautions
Information for Your Safety
- Keep the unit as far away as possible from electromagnetic equipment (such as microwave ovens, TVs, video games, radio transmitters, high-voltage lines etc.).
- Do not use the camera near cell phones because doing so may result in noise adversely affecting the pictures and sound.
- If the camera is adversely affected by electromagnetic equipment and stops functioning properly, turn the camera off and remove the battery and/or the connected AC adaptor. Then reinsert the battery and/or reconnect the AC adaptor and turn the camera on. The lens can be used with a digital camera compatible with the lens mount standard for the “Micro Four Thirds System”
- It cannot be mounted on the Four Thirds mount
- The digital camera illustrations in this owner's manual show DMC-G7 as an example.
- The appearance and specifications of products described in this manual may differ from the actual products you have purchased due to later enhancements.
- Micro Four Thirds and Micro Four Thirds Logo marks are trademarks or registered trademarks of Olympus Imaging Corporation, in Japan, the United States, the European Union and other countries.
- Four Thirds and Four Thirds Logo marks are trademarks or registered trademarks of Olympus Imaging Corporation, in Japan, the United States, the European Union and other countries.
- G MICRO SYSTEM is an interchangeable lens type digital camera system of LUMIX based on a Micro Four Thirds System standard.
- Other names of systems and products mentioned in these instructions are usually the registered trademarks or trademarks of the manufacturers who developed the system or product concerned.
Precautions
Lens Care
- Sand and dust can damage the lens. Make sure that no sand or dust gets inside the lens or the terminals when using the lens on a beach, etc.
- The lens is neither waterproof nor splash-proof. If drops of water get onto the lens, wipe the lens with a dry cloth.
- Do not press the lens with excessive force.
- When there is dirt (water, oil, and fingerprints, etc.) on the surface of the lens, the picture may be affected. Lightly wipe the surface of the lens with a soft, dry cloth before and after taking pictures.
- Do not place the lens mount facing downwards. Do not allow the lens contact points to become dirty.
About Condensation (Fogging of the Lens)
- Condensation occurs when there are differences in temperature and humidity as described below. Condensation can cause the lens to become dirty andlead to mold and malfunctioning, so exercise caution in the following situations:
- When the camera is brought indoors from outside during cold weather
- When the camera is brought into an air-conditioned car
- When cold air from an air conditioner is directly blown onto the lens
- In humid places
- Put the camera into a plastic bag to allow it to acclimatize to the surrounding temperature in order to prevent condensation. If condensation occurs, turn the power off and leave it for abouttwo hours. Once the camera acclimatizes to thesurrounding temperature the condensation will go away naturally.
Cautions for use
- Take care not to drop or knock the lens. Also take care not to put a lot of pressure on the lens.
- Take care not to drop the bag that you inserted the lens in as it may strongly shock the lens. The camera may stop operating normally and pictures may no longer be recorded. Also, the lens may be damaged. When using pesticides and other volatile substances around the camera make sure that they do not get onto the lens.
- If such substances get onto the lens they can damage the exterior case or cause the paint to peel. Do not point the lens at the sun or other strong light sources.
- This could cause the lens to collect an excessive amount of light, resulting in fire and malfunction. Do not carry the unit when it is still attached to the camera body.
- Under no circumstances should the unit be stored in any of the following locations since doing so may cause problems in operation or malfunctioning.
- In direct sunlight or on a beach in summer
- In locations with high temperatures and humidity levels or where the changes in temperature and humidity are acute
- In locations with high concentrations of sand, dust or dirt
- Where there is fire
- Near heaters, air conditioners or humidifiers
- Where water may make the unit wet
- Where there is vibration
- Inside a vehicle
- Refer also to the owner's manual of the digital camera.
- Refer also to the owner's manual of the digital camera.
- When the unit is not going to be used for a prolonged period, we recommend storing with a desiccant (silica gel). Failure to do so may result in performance failurecaused by mold, etc. It is recommended that you check the unit's operation prior to use.
- Do not leave the lens in contact with rubber or plastic products for extended periods of time
- Do not touch the lens contact point. Doing so can cause failure of the unit.
- Do not disassemble or alter the unit. Do not use benzine, thinner, alcohol or other similar cleaning agents to clean the lens glass or exterior cabinet.
- Using solvents can damage the lens or cause the paint to peel.
- Wipe off any dust or fingerprints with a soft, dry cloth.
- Use a dry, dust cloth to remove dirt and dust on the focus ring
- Do not use a household detergent or a chemically treated cloth.
Panasonic Lumix Lens Camera H-H025GK Troubleshooting
Here are some common problems and solutions for the Panasonic Lumix Lens Camera H-H025GK:
- Problem: The camera won't turn on.
- Solution: Make sure the battery is charged and properly inserted.
- Problem: The photos are blurry.
- Solution: Make sure the camera is stable and the subject is in focus. Use the 5-axis Hybrid O.I.S.+ stabilization system to reduce camera shake.
- Problem: The camera won't connect to Wi-Fi or Bluetooth.
- Solution: Make sure the camera's Wi-Fi or Bluetooth is turned on and that your smartphone or computer's Wi-Fi or Bluetooth is also turned on. Make sure the camera is within range of your smartphone or computer.
- A sound is heard when the camera is turned on or off.
- A sound is heard from the lens when taking a picture of a bright subject such as when outdoors.
- This is the sound of lens or aperture movement and is not a malfunction.
Pros & Cons
Pros
- 20.3-megapixel MOS sensor
- Leica DC Vario-Elmar lens
- 4K video recording
- 5-axis Hybrid O.I.S.+ stabilization system
- Touchscreen display and Live View Finder
- Built-in Wi-Fi and Bluetooth connectivity
Cons
- No viewfinder
- No external microphone jack
- No weather sealing
Customer Reviews about Panasonic Lumix Lens Camera H-H025GK
Customers have praised the Panasonic Lumix Lens Camera H-H025GK for its high-quality images and videos, compact size, and easy-to-use interface. However, some have criticized it for its lack of a viewfinder, external microphone jack, and weather sealing. Overall, customers have given the camera positive reviews and have recommended it for both amateur and professional photographers.
Most Common Complaints
The most common complaints about the Panasonic Lumix Lens Camera H-H025GK include its lack of a viewfinder, external microphone jack, and weather sealing. Some customers have also reported issues with the camera's Wi-Fi and Bluetooth connectivity.
Faqs
What is the significance of the 25 mm focal length of the Panasonic Lumix Lens Camera H-H025GK?
How does the maximum aperture of F1.7 benefit photographers Panasonic Lumix Lens Camera H-H025GK?
What are the advantages of having 7 diaphragm blades in this Panasonic Lumix Lens Camera H-H025GK?
Why might a photographer need to use Panasonic Lumix Lens Camera H-H025GK minimum aperture value of F22?
Can you explain the Panasonic Lumix Lens Camera H-H025GK construction and its impact on image quality?
What does the minimum focusing distance indicate about this Panasonic Lumix Lens Camera H-H025GK capabilities?
How does the Panasonic Lumix Lens Camera H-H025GK perform in terms of magnification?
Why is optical image stabilization absent in this Panasonic Lumix Lens Camera H-H025GK?
How does the angle of view affect the types of photography suitable for this Panasonic Lumix Lens Camera H-H025GK?
What should users know about Panasonic Lumix Lens Camera H-H025GK filter diameter when purchasing accessories?
Leave a Comment