Patriot Battery Fence Energizer PE10B Instruction Manual

Content

Introduction of Patriot Battery Fence Energizer PE10B
The Patriot Battery Fence Energizer PE10B is a high-voltage electric fence charger designed for agricultural and security purposes. This fence energizer is capable of powering up to 10 miles of fence, making it an ideal choice for large properties and farms. With an estimated price range of $150 to $200, it offers an affordable solution for those in need of a reliable and efficient fence energizer. The PE10B is set to launch in the summer of 2023.
Detailed Specifications
The Battery Fence Energizer PE10B boasts the following key features
- Power output: 0.10 joules
- Fence capacity: up to 10 miles
- Battery type: 12V deep cycle
- Indicators: power, battery, and performance
- Mounting options: wall or ground
- Weatherproof: yes
- Warranty: 1-year limited
Features
Description
The Patriot Battery Fence Energizer is a powerful and versatile solution for managing electric fences. Its 0.10-joule output ensures effective containment and deterrence for animals and intruders. With the ability to cover up to 10 miles of fence line, it is suitable for large properties and farms. The PE10B features user-friendly indicators for power, battery, and performance, making it easy to monitor and maintain. Its weatherproof design ensures durability, while mounting options provide flexibility for installation. The 1-year limited warranty guarantees customer satisfaction and long-term reliability.
Setup of Battery Fence Energizer
To set up the Patriot Battery Fence Energizer , follow these steps
- Choose a location for the energizer, ensuring it's protected from direct sunlight, rain, and excessive moisture.
- Install a 12V deep cycle battery, if not already included.
- Secure the energizer to the wall or ground using the provided mounting hardware.
- Connect the fence wire to the energizer's output terminal, ensuring a secure and proper connection.
- Turn on the energizer and monitor the indicators to ensure proper operation and power output.
Instructions for PE2, PE5 and PE10
Installation
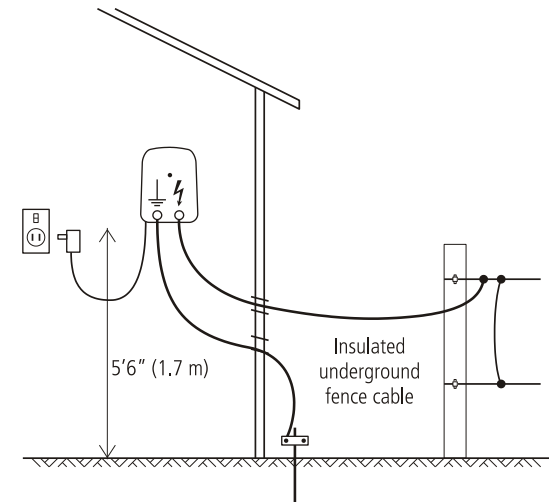
Indoors/dry locations with AC 120 V line connection
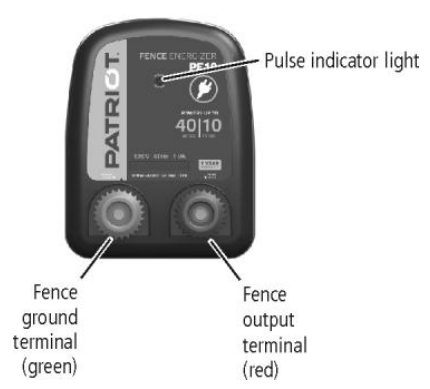
- Connect the Fence ground terminal (green) to a separate ground system that is at least 33’ (10 m) away from other ground systems.
- Connect the Fence output terminal (red) to the fence.
Operation
- Plug the unit into the AC 120 V power supply.
- Turn on the AC 120 V power supply switch. The pulse indicator light flashes each time the unit pulses.
Instructions for PE5B and PE10B
Installation and operation
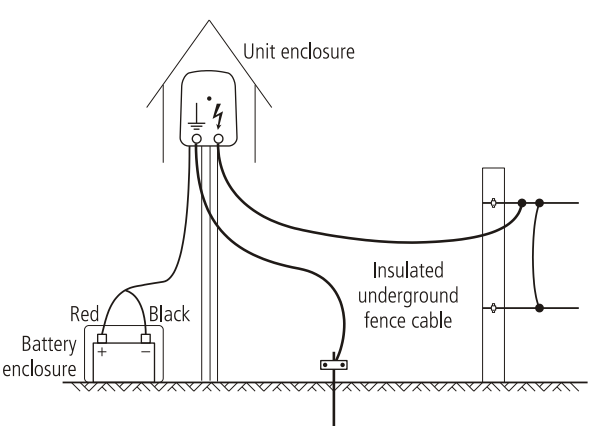
DC 6 V/12 V battery connection
- Connect the Fence ground terminal (green) to a separate ground system that is at least 33’ (10 m) away from other ground systems.
- Connect the Fence output terminal (red) to the fence.
- Connect the unit to a 6 V/12 V battery using the battery leads. Attach the + (red) clip to the positive terminal of the battery, and the – (black) clip to its negative terminal.
- The pulse indicator light flashes each time the unit pulses.
- To prevent damage caused by stock interference and bad weather, house the battery and the unit in protective enclosures.
Battery information
Use a 6 V/12 V rechargeable lead-acid battery.
Do not dispose of the battery in a landfill or in a fire.
In the event of a spill or leakage from a lead-acid battery
- Contain small spills with dry sand, earth and vermiculite. Do not use combustible materials. If possible, carefully neutralise spilled acid with soda ash, sodium bicarbonate, lime, etc.
- Wear acid-resistant clothing, boots, gloves and a face shield.
- Do not let acid get into the sewage system.
- Neutralised acid must be managed in accordance with approved local, state and federal requirements. Consult your state environmental agency and/or federal EPA.
Battery charging
Warning
- Do not attempt to recharge a non-rechargeable battery.
- When recharging a battery, ensure that there is adequate ventilation to allow gases to disperse.
- The battery must be disconnected from the unit before connecting it to a battery charger.
Regular recharging of the battery is essential. Use a suitably rated battery charger and refer to the battery manufacturer’s recommendations.
Building an electric fence
Note: This product has been designed for use with electric animal fences.
For information about building an electric fence, refer to the Patriot website www.patriotglobal.com.
Grounding a fence
All-live fence - For most soil types
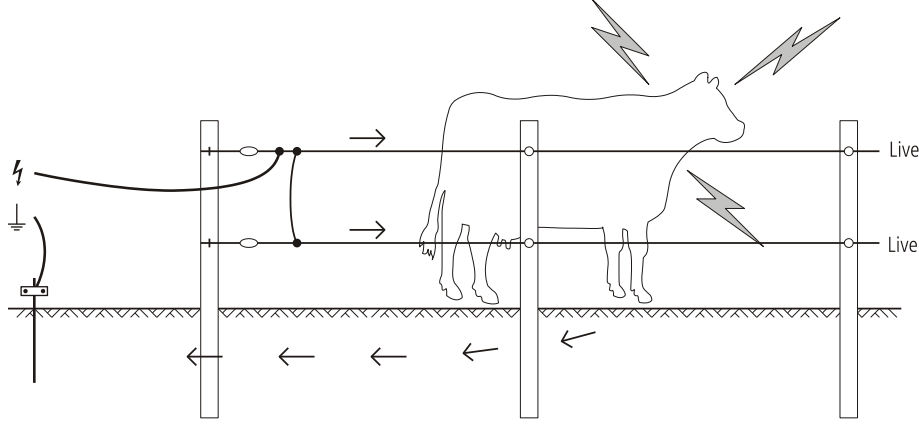
The animal receives a shock when it completes a circuit between the fence and the ground system. The fence above has all live wires and requires conductive soils.
Ground wire return fence - For dry, sandy or frozen ground conditions, where soil conductivity is low.
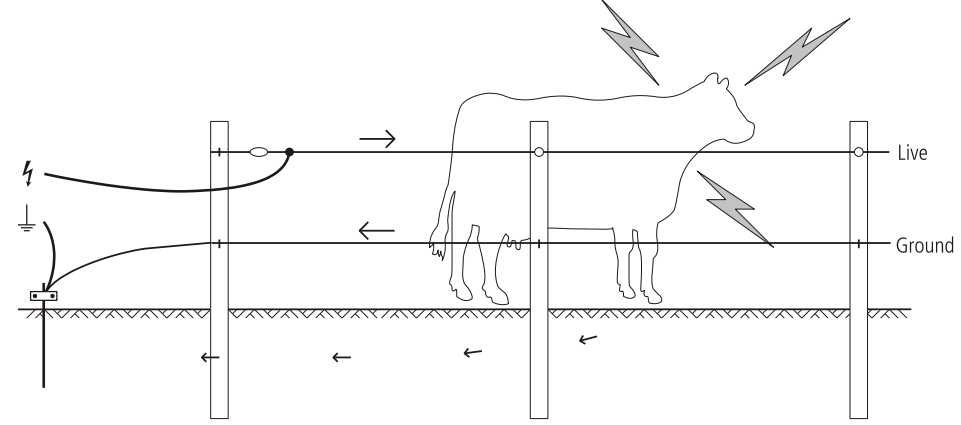
The animal receives a shock when it completes a circuit between a live wire and a ground wire. The fence above has both live wires and ground wires (not insulated to the post). The ground wire is connected back to the grounding system.
Installing a ground system
Select a suitable site for the ground system. The site needs to be
- At least 33’ (10 m) from other ground systems (e.g. telephone, AC 120 V power or the ground system of another unit).
- Away from stock or other traffic that could interfere with the installation.
- At a site that can be easily observed for maintenance.
- Ideally at a site that has damp soil (e.g. a shaded or swampy location).
Note: The site for the ground system does not need to be directly adjacent to where the unit is installed.
Drive a single ground rod into the soil. Use insulated cable to connect the ground rod to the unit’s Fence ground terminal. Ensure that there is a good electrical connection at both ends.
Temporary fence construction for DC units only
Temporary fence components
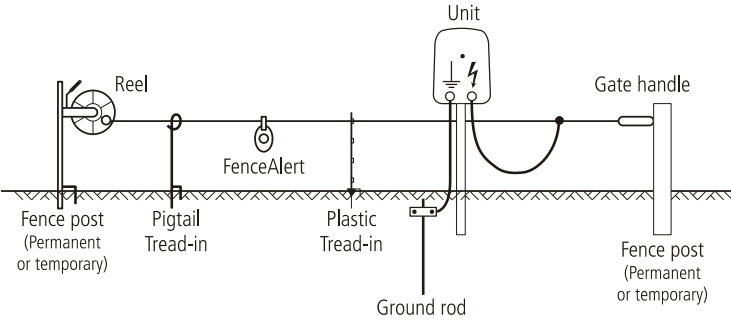
Recommended wire spacing

Safety considerations
Warning
- PE5B and PE10B only - Do not connect to AC 120 V operated equipment.
- PE5B and PE10B only - The unit must be located in a shelter, and the cable must not be handled when the temperature is below 5 °C.
- PE2, PE5 and PE10 only - To reduce the risk of electric shock, the unit has a polarized plug (one blade is wider than the other). This plug will fit in a polarized outlet one way. If the plug does not fit fully in the outlet, reverse the plug. If it still does not fit, contact a qualified electrician to install the proper outlet. Do not change the plug in any way.
- Disconnect the unit from the supply before installation or performing any work on the fence.
- Read all the safety considerations carefully.
- Check your installation to ensure that it complies with all local safety regulations.
- Do not connect simultaneously to a fence and to any other device such as a cattle trainer or a poultry trainer. Otherwise, lightning striking your fence will be conducted to all other devices.
Notes
- This product has been designed for use with electric animal fences.
- Keep these instructions in a handy location.
Safe electric fence construction
Warning! Read before use.
An electric fence can be hazardous when there is a risk of entrapment or entanglement, or other hazards exist. Serious injury or death may result. Take all steps to avoid the risk of entrapment or entanglement.
Hazards
- Do not climb through or under an electric fence. If it is necessary to cross an electric fence use a gate or speciallydesigned crossing point.
- Do not allow young or infirm persons to use this unit without supervision. Do not allow young children to play with this unit or near an electric fence or electrified wires.
- Do not electrify barbed wire.
- Do not support off-set electrified wires less than 6‛ (150 mm) from a barbed wire fence.
- Do not electrify any fence construction which could lead to entanglement of persons or animals. We recommend for instance, that no more than one electrified off-set wire be supported on either side of a barbed wire or mesh fence.
- Do not supply an electric fence from two units.
- Do not allow electrified wires from two units on the same or adjacent properties to be less than 8’ (2.5 m) apart.
- Do not place the unit’s ground electrode within 33’ (10 m) of any part of a power supply ground system or telecommunications ground system.
- Do not run electric fence wires above or close to overhead power or communication lines.
Duty to the public
A warning sign shall be fitted to every point where persons may gain ready access to the conductors. Where an electric animal fence crosses a public pathway, a non-electrified gate shall be incorporated in the electric animal fence at that point or a crossing by means of stiles shall be provided. At any such crossing, the adjacent electrified wires shall carry warning signs.
Any part of an electric animal fence that is installed along a public road or pathway shall be identified at frequent intervals by warning signs securely fastened to the fence posts or firmly clamped to the fence wires.
- The size of the warning sign shall be at least 4x8‛ (100x200 mm).
- The background colour of both sides of the warning sign shall be yellow. The inscription on the sign shall be black and shall be either or the substance of ‚CAUTION: Electric fence‛.
- The inscription shall be indelible, inscribed on both sides of the warning sign and have a height of at least 1‛ (25 mm).
Definition of special terms
- Unit/Charger/Energizer: An appliance that is intended to periodically deliver voltage impulses to a fence connected to it.
- Fence: A barrier for animals or for the purpose of security, comprising one or more conductors such as metal wires, rods or rails.
- Electric fence: A barrier which includes one or more electric conductors, insulated from ground, to which electric pulses are applied by a unit.
- Ground electrode: Metal structure that is driven into the soil near a unit and connected electrically to the Fence ground terminal of the unit, and that is independent of other grounding arrangements.
- Connecting lead: An electric conductor, used to connect the unit to the electric fence or the ground electrode.
Requirements for electric animal fence
- Electric animal fences and their ancillary equipment shall be installed, operated and maintained in a manner that minimises danger to persons, animals or their surroundings.
- This unit is not intended for use by persons (including children) with reduced physical, sensory or mental capabilities, or lack of experience and knowledge, unless they have been given supervision or instruction concerning use of the unit by a person responsible for their safety.
- Children should be supervised to ensure that they do not play with the unit.
- Electric animal fence constructions that are likely to lead to the entanglement of animals or persons shall be avoided.
- An electric animal fence shall not be supplied from two separate units or from independent fence circuits of the same unit.
- For any two separate electric animal fences, each supplied from a separate unit independently timed, the distance between the wires of the two electric animal fences shall be at least 8’ (2.5 m). If this gap is to be closed, this shall be effected by means of electrically non-conductive material or an isolated metal barrier Barbed wire or razor wire shall not be electrified by a unit.
- A non-electrified fence incorporating barbed wire or razor wire may be used to support one or more offset electrified wires of an electric animal fence. The supporting devices for the electrified wires shall be constructed so as to ensure that these wires are positioned at a minimum distance of 6‛ (150 mm) from the vertical plane of the non-electrified wires. The barbed wire and razor wire shall be grounded at regular intervals. Go to www.patriotglobal.com for information about grounding.
- A distance of at least 33’ (10 m) shall be maintained between the unit’s ground electrode and any other grounding system connected parts such as the grounding system for the power supply or the telecommunication system.
- Connecting leads that are run inside buildings shall be effectively insulated from the grounded structural parts of the building. This may be achieved by using insulated high voltage cable.
- Connecting leads that are run underground shall be run in conduit of insulating material or else insulated high voltage cable shall be used. Care must be taken to avoid damage to the connecting leads due to the effects of animal hooves or vehicle wheels sinking into the ground.
- Connecting leads shall not be installed in the same conduit as the AC supply wiring, communication cables or data cables.
- Connecting leads and electric animal fence wires shall not cross above overhead power or communication lines.
- Crossings with overhead power lines shall be avoided wherever possible. If such a crossing cannot be avoided it shall be made underneath the power line and as nearly as possible at right angles to it.
- If connecting leads and electric animal fence wires are installed near an overhead power line, the clearances shall not be less than those shown in the table below.
Minimum clearances from power lines for electric animal fences
| Power line voltage | Clearance |
|---|---|
| ≤1000 V | 10' (3 m) |
| >1000 V to ≤33,000 V | 13' (4 m) |
| >33,000 V | 27' (8 m) |
If connecting leads and electric animal fence wires are installed near an overhead power line, their height above the ground shall not exceed 10’ (3 m). This height applies to either side of the orthogonal projection of the outermost conductors of the power line on the ground surface, for a distance of
- 6’6‛ (2 m) for power lines operating at a nominal voltage not exceeding 1000 V.
- 50’ (15 m) for power lines operating at a nominal voltage exceeding 1000 V.
Electric animal fences intended for deterring birds, household pet containment or training animals such as cows need only be supplied from low output units to obtain satisfactory and safe performance. In electric animal fences intended for deterring birds from roosting on buildings, no electric fence wire shall be connected to the unit’s ground electrode. Ensure that all line-operated, ancillary equipment connected to the electric animal fence circuit provides a degree of isolation between the fence circuit and the supply mains equivalent to that provided by the unit. Protection from the weather shall be provided for the ancillary equipment unless this equipment is certified by the manufacturer as being suitable for use outdoors.
Troubleshooting of Battery Fence Energizer PE10B
For common issues with the Patriot Battery Fence Energizer, consider the following solutions
- Low power indicator: Check the battery level and ensure a proper connection to the fence wire.
- Intermittent power: Ensure the battery is fully charged and replace it if necessary.
- No power output: Verify that the energizer is turned on, check the battery connection, and inspect the fence wire for damage or loose connections.
Pros & Cons of Patriot Battery Fence Energizer
Pros
- Powerful output for large fences
- User-friendly indicators
- Weatherproof and durable design
- Affordable pricing
Cons
- May require occasional battery replacement
- Limited warranty length
Customer Reviews
Customers have praised the Battery Fence Energizer PE10B for its power, reliability, and ease of use. Most users have reported successful installations and effective containment of animals, with minimal issues or complications. The user-friendly indicators and weatherproof design have been well-received, making it a top choice for those in need of a dependable fence energizer.
Faqs
Is there any weather in which the Patriot PE10B Fence Energizer cannot be used?
Which kinds of fences can the PE10B Energizer power efficiently?
How do I troubleshoot if my Patriot PE10B isn't functioning?
Can I connect more than one Patriot PE10B unit to make my electric fence longer?
Why is the LED indicator on my Patriot PE10B not flashing, and what should I do?
How should the PE10B Energizer be set up and grounded correctly to effectively manage animals?
Which kind of battery is needed for the Patriot PE10B Energizer, and how often does it need to be changed?
How can I make sure the Patriot PE10B keeps its charge and performs well?
What upkeep schedules are suggested for the Patriot PE10B in order to guarantee its longevity?
What is covered by the Patriot PE10B Battery Fence Energizer warranty, and how long is it valid for?
Leave a Comment
