Philips Norelco MG5750 Trimmer User Manual | Specs & Features
Content

Introduction of Philips Norelco MG5750 Trimmer
MG5750 Trimmer is a versatile and high-performance grooming tool designed for men who want a precise and thorough beard, mustache, and hair trim. Launched in 2021, this trimmer is available at an estimated price of $60 to $80, making it an affordable and valuable investment for your grooming needs.
Detailed Specifications
The Philips Norelco Trimmer boasts several key features, including a powerful motor that delivers 5,000 cutting actions per minute, self-sharpening steel blades that last up to 2 years, and 18-length settings ranging from 1/64 to 1/2 inch. The Philips Norelco MG5750 Trimmer also features a vacuum system that captures up to 90% of cut hair, a rechargeable battery that provides up to 70 minutes of runtime, and a convenient LCD display that shows battery status and selected length setting.
General description
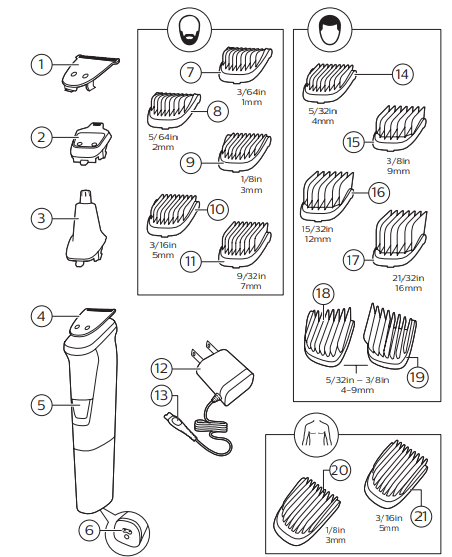
- Extra-wide hair trimmer
- Precision trimmer
- Nose trimmer
- Full-size hair trimmer
- On/off button
- Socket for small plug
- Stubble guard 3/64in. (1mm)
- Stubble guard 5/64in. (2mm)
- Beard guard 1/8in. (3mm)
- Beard guard 3/16in. (5mm)
- Beard guard 9/32in. (7mm)
- Power plug
- Small plug
- Hair guard 5/32in. (4mm)
- Hair guard 3/8in. (9mm)
- Hair guard 15/32in. (12mm)
- Hair guard 21/32in. (16mm)
- Fading hair guard 5/32in.-3/8in. (4-9mm)
- Fading hair guard 5/32in.-3/8in. (4-9mm)
- Body guard 1/8in. (3mm)
- Body guard 3/16in. (5mm)
Not shown: cleaning brush, pouch
Description of Philips Norelco Trimmer
The Philips Norelco Trimmer is a powerful and easy-to-use grooming tool that caters to all your facial hair needs. Its high-quality steel blades provide precise and smooth cuts, while the vacuum system ensures minimal mess and clean-up. The trimmer's ergonomic design and lightweight feel make it comfortable to hold and maneuver, and its various length settings allow for customized and tailored styles. The LCD display is a convenient feature that adds to the user-friendly experience of the trimmer.
Setup of Philips Norelco Trimmer
To operate the Philips Norelco Trimmer, follow these steps
- Charge the trimmer for at least 8 hours before the first use.
- Select your desired length setting by turning the zoom wheel.
- Press the power button to turn on the trimmer.
- Use the trimmer on your facial hair, moving it in the opposite direction of hair growth.
- Rinse the trimmer under running water and dry it thoroughly after use.
Charging
- When the product has charged for 1 hour, it has a cordless operating time of up to 3 hours.
- Charging, recharging or using the product at temperatures below 40°F (4,5°C) or higher than 95°F (35°C) adversely affects the lifespan of the battery.
If the product is subjected to a major change in temperature, pressure or humidity, let the product acclimatize for 30 minutes before use.
- Make sure the product is switched off.
- Insert the small plug into the product and put the power plug in any 120V AC outlet.
- After charging, remove the power plug from the wall outlet and pull the small plug out of the product.

Note: An adapter plug may be necessary for cord usage in some foreign countries. Use an attachment plug adapter of the proper configuration for power outlet
Quick charge
After approx. 5 minutes of charging, the product contains enough power for one cordless trimming session.
Using the product
Always check the product and all accessories before using. Do not use the product or any accessory if it is damaged, as this may cause injury. Always replace a damaged part with one of the original type.
Note: This product can be used without cord or directly from the power outlet.
Note: Switch off and clean the product and attachments after each use.
- Use this product for its intended household use as described in this manual.
- For hygienic reasons, the product should only be used by one person.
- Trimming is easier when the skin and hair are dry.
- Be careful when trimming without a guard as when the product is turn on it will trim every hair it touches.
Detaching and attaching cutting elements
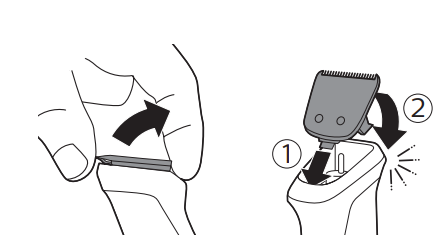
- To detach a cutting element, push upwards against the teeth of the cutting element and take it off the handle .
- To attach a cutting element, insert the lug of the cutting element into theguiding slot at the front and push the back of the cutting element onto the product (‘click‘).
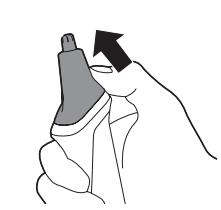
Detaching the nose trimmer
Place your finger on the arrow at the back of the attachment and push it off the handle in the direction of the arrow.
Attaching and detaching guards
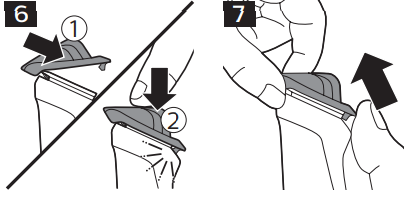
- To attach any type of guard onto a cutting element, slide the front part of the guard onto the teeth of the cutting element. Then push down the center of the guard with your fingers or the palm of your hand (‘click‘) (Fig. 6).
- To detach any type of guard from the cutting element, carefully pull its back part off the product and then slide it off the cutting element (Fig. 7).
Note: When trimming for the first time, start by using the guard with the maximum trimming length setting to familiarize yourself with the product
Switching the product on and off
Press the on/off button once to turn the product on or off (Fig. 8).

Attachments for use on beard
Full-size hair trimmer
Use the full-size hair trimmer without a guard to trim hair close to the skin (to a length of 1/32in./0.5mm) or to create clean lines around your beard, neck and sideburns.
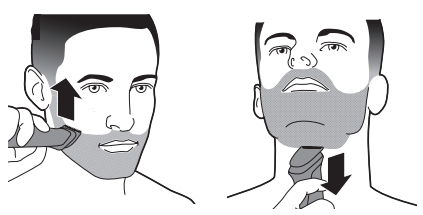
- To trim hair close to the skin, place the flat side of the cutting element against your skin and make strokes against the direction of hair growth (Fig. 9).
- For contouring, hold the cutting element perpendicular to the skin and move it upwards or downwards with gentle pressure (Fig. 10).
Beard guards
Attach a beard guard to the full-size hair trimmer to trim your beard and mustache evenly. The product comes with 5 beard guards. The hair length settings are indicated on the guards. The settings correspond to the remaining hair length after trimming
| Guard | Inch | mm |
|---|---|---|
| Stubble guard | 3/64 inch | 1mm |
| Stubble guard | 5/64 inch | 2mm |
| Guard | Inch | mm |
|---|---|---|
| Beard guard | 1/8 inch | 3mm |
| Beard guard | 3/16 inch | 5mm |
| Beard guard | 9/32 inch | 7mm |
- Attach the guard to the full-size hair trimmer.
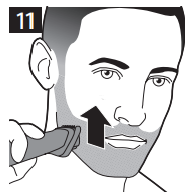
- To trim the most effective way, move the guard against the direction of hair growth (Fig. 11). Make sure the surface of the guard always stays in contact with the skin.
Attachments for use on body
- Use the green body guards to trim body hair.
- When you trim for the first time, use the 5mm/3/16in. body guard to familiarize yourself with the product.
- Make sure hair is clean and dry as wet hair tends to stick to the body and, when trimming sensitive areas, always use a body guard.
- Since all hairs do not grow in the same direction, you may want to try different trimming positions (i.e. upwards, downwards, or across). Practice is best for optimum results.
- Always make smooth and gentle movements and be sure the surface of the guard always stays in contact with your skin.
- When too many hairs have accumulated on the product, blow the hairs out before use, for best trimming results.
Bodyguards
Attach a body guard to the full-size hair trimmer to trim hairs below the neckline. The product comes with 2 body guards. The hair length settings are indicated on the guards. The settings correspond to the remaining hair length after trimming.
| Guard | Inch | mm |
|---|---|---|
| Body guard (green) | 1/8 inch | 3mm |
| Body guard (green) | 3/16 inch | 5mm |
- Attach a body guard to the full-size hair trimmer (see ‘Attaching and detaching guards’).
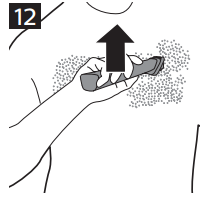
- To trim in the most effective way, stretch the skin with your free hand and move the guard against the direction of hair growth (Fig. 12). Make sure the surface of the guard always stays in contact with the skin.
Attachments for use on head
Extra-wide hair trimmer
Use the extra-wide hair trimmer without a guard to clip the hair on your head very close to the skin (1/32in./0.5mm) or to contour the neckline and area around the ears.
- To contour the hairline around the ears, comb the hair ends over the ears.
- Tilt the product in such a way that only one edge of the cutter blades touches the hair ends when you shape the contours around the ears.
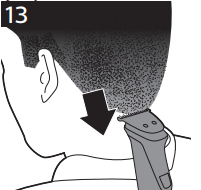
- To contour the nape of the neck or sideburns, turn the product and make downward strokes (Fig. 13).
- Move the product slowly and smoothly following the natural hairline.
Hair guards
Attach a hair guard to the extra-wide hair trimmer to evenly trim the hairs on your head. The product comes with 4 hair guards. The hair length settings are indicated on the guards. The settings correspond to the remaining hair length after trimming.
| Guard | Inch | mm |
|---|---|---|
| Hair guard | 5/32 inch | 4mm |
| Hair guard | 3/8 inch | 9mm |
| Hair guard | 15/32 inch | 12mm |
| Hair guard | 21/32 inch | 16mm |
- Attach a guard to the extra-wide hair trimmer.
- Move the trimmer slowly over the crown from different directions to achieve an even result. Make sure the surface of the guard always stays in contact with the skin.
- Always move the trimmer against the direction of hair growth (Fig. 14). Press lightly.
- Make overlapping passes over the head to ensure that all hair that should be cut has been cut.
Fading hair guard
Attach the fading hair guards to the extra wide hair trimmer to trim the hair around the ears with a faded result. The product comes with 2 guards. Use both guards to trim hair around both ears. Choose a hair guard based on the preferred trimming direction of back to front or front to back. Always make sure that you hold the side of the guard with the short teeth closest to your ear.
| Guard | Inch | mm |
|---|---|---|
| Fading hair guards | 5/32 inch - 3/8 inch | 4-9mm |
- Attach the guard to the extra-wide hair trimmer to trim the hair around the ear. Then attach the other guard to trim the hair around the other ear.
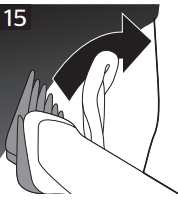
- Place the product on your hair at the back or front of your ear, depending on the trimming direction you prefer. Always make sure that the side of the guard with the short teeth is closest to your ear.
- Move the trimmer slowly around the ear, while holding it steady (Fig. 15). For best results, move the trimmer against the direction of hair growth (back to front).
Precision attachments for use on face
Precision trimmer
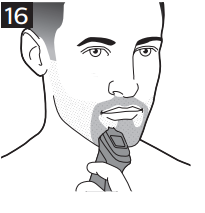
Use the precision trimmer to create fine lines and contours around your facial style, close to the skin (to a length of 1/32in./0.5mm). Hold the precision trimming head perpendicular to the skin and move the trimming head upwards or downwards with gentle pressure (Fig. 16).
Nose trimmer
Use the nose trimmer to trim your nose hair and ear hair.
- Make sure nasal passages are clean. Make sure outer ear channels are clean and free from wax.
- Do not insert the tip more than 3/16in./5mm.
- Always clean the attachment after each use.
Trimming nose hair
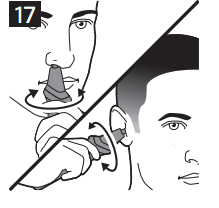
Gently move the tip in and out of nose while turning it around to removeunwanted hairs (Fig. 17).
Trimming ear hair
- Slowly move the tip round the ear to remove hairs that stick out beyond the rim of the ear.
- Gently move the tip in and out of the outer ear channel to remove unwanted hairs (Fig. 17).
Cleaning
- Do not rinse the handle under the tap, only the attachments can be rinsed under the tap.
- Never use scouring pads, abrasive cleaning agents or aggressive liquids such as gasoline or acetone to clean the product.
- Never dry the trimmer teeth with a towel or tissue, as this may damage the trimmer teeth.
Cleaning after every use
- Turn off the product and disconnect from the power outlet.
- Remove any guard (see ‘Attaching and detaching guards’) or cutting element (see ‘Detaching and attaching cutting elements’) from the product.
- Remove any hairs that have accumulated in the hair chamber with the cleaning brush supplied.
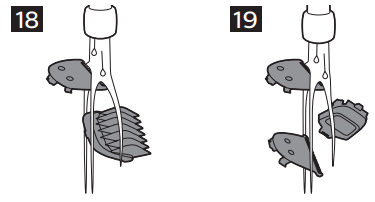
- Clean the cutting element and guard under a warm tap (Fig. 18). The handle is not suitable for cleaning under the tap.
- Carefully shake off excess water and let all parts air dry completely.
Thorough cleaning
- Turn off the product and disconnect from the power outlet.
- Wipe the handle of the product with a dry cloth.
- Remove any guard (see ‘Attaching and detaching guards’) or cutting element (see ‘Detaching and attaching cutting elements’) from the product.
- Remove any hairs that have accumulated in the hair chamber with the cleaning brush supplied.
- Remove any hairs that have accumulated in the cutting elements and/or guards with the cleaning brush supplied.
- Clean the cutting elements under a warm tap (Fig. 19). The handle is not suitable for cleaning under the tap.
- Clean the guards under a warm tap (Fig. 20).
- Carefully shake off excess water and let all parts air dry completely.
Cleaning the nose trimmer
Clean the nose trimmer immediately after use and when a lot of hair or dirt has accumulated on the nose trimmer head.
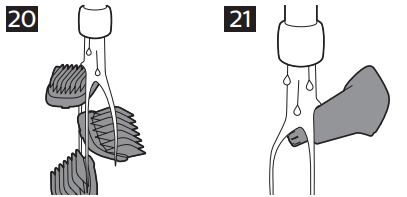
- Rinse the nose trimmer head with hot water (Fig. 21).
- Turn on the product and rinse the nose trimmer head once more to remove any remaining hairs. Then turn off the product again. For a thorough clean, immerse the nose trimmer head in a bowl with warm water for a few minutes and then turn on the product to remove stubborn hair/debris. Hold the appliance upside down and make sure the handle does not get wet during this process.
- Carefully shake off excess water and let all parts air dry completely.
Troubleshooting of Philips MG5750 Trimmer
If the Philips MG5750 Trimmer encounters any issues, try these solutions
- The trimmer won't turn on: Make sure the trimmer is fully charged or use it with the power cord.
- The blades are not cutting properly: Clean the blades with a brush and rinse them under running water.
- The vacuum system is not capturing hair: Ensure the vacuum chamber is not full and clean it after use.
- The LCD display is not working: Make sure the trimmer is turned on and the display is not obstructed.
Warranty of Norelco MG5750 Trimmer
Philips North America LLC warrants this new product (except cutters and guards) against defects in materials or workmanship for a period of four years from the date of purchase, and agrees to repair or replace any defective product without charge.
Pros & Cons of Philips Trimmer
Pros
- Powerful motor and self-sharpening steel blades for precise cuts.
- Vacuum system for minimal mess and easy clean-up.
- Ergonomic design and lightweight feel for comfortable use.
- Various length settings for customized styles.
- Rechargeable battery for cordless use and convenience.
Cons
- The vacuum system may not capture all hair, depending on the length and thickness.
- The trimmer may require frequent cleaning for optimal performance.
- The charging time may be lengthy compared to the runtime.
Customer Reviews of Philips Norelco MG5750 Trimmer
Customers have praised the MG5750 Trimmer for its powerful motor, self-sharpening steel blades, and vacuum system. However, some have noted that the trimmer may require frequent cleaning and that the charging time may be lengthy compared to the runtime. Overall, the Philips Norelco Trimmer has received positive feedback for its precision, efficiency, and user-friendly design.
Faqs
What various attachments are available for the Philips Norelco MG5750 Trimmer?
After using, how should the Philips Norelco MG5750 Trimmer be cleaned?
How long can the Philips Norelco MG5750 Trimmer's battery survive between charges?
When the Philips Norelco MG5750 Trimmer is charging, is it still functional?
If the Philips Norelco MG5750 Trimmer won't turn on, what should I do?
Is noise produced by the Philips Norelco MG5750 Trimmer during operation normal?
How often should I change the Philips Norelco MG5750 Trimmer's blades?
Can sensitive skin be used with the Philips Norelco MG5750 Trimmer?
How do I change the Philips Norelco MG5750 Trimmer's length settings?
Is there a warranty for the Philips Norelco MG5750 Trimmer?
Leave a Comment
