Potensic A20 Mini Drone User Manual | Installation & Charging
Content
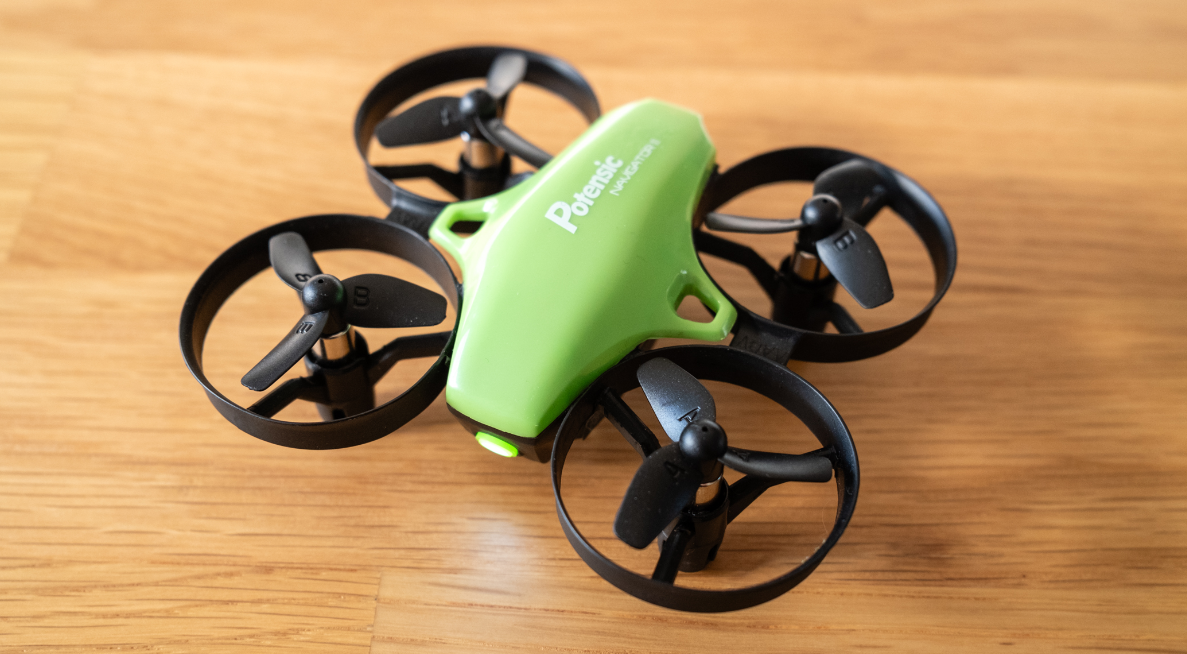
Potensic A20 Mini Drone
The Potensic Mini Drone is a fantastic choice for those looking to get started in the world of drones. This compact and lightweight drone is easy to use, making it perfect for both kids and adults. With an estimated price of around $30, this drone is an affordable way to test the waters of drone flying. The Potensic Mini Drone was launched in 2019 and has been a popular choice ever since.
Detailed Specifications
The A20 Mini Drone has several key features that make it an excellent choice for beginners. These include:
- A 6-axis gyro that provides stable and smooth flying
- Altitude hold function that keeps the drone steady at a certain height
- One-button takeoff and landing for easy operation
- Three-speed modes that allow for gradual learning and development
- A compact and lightweight design that is perfect for indoor flying
- A 2.4GHz remote control that provides a stable connection and anti-interference
- A built-in 2MP camera that allows for photo and video taking
- A low battery alarm that reminds you to land the drone when the battery is low
- A 3.7V 350mAh battery that provides around 10-15 minutes of flying time
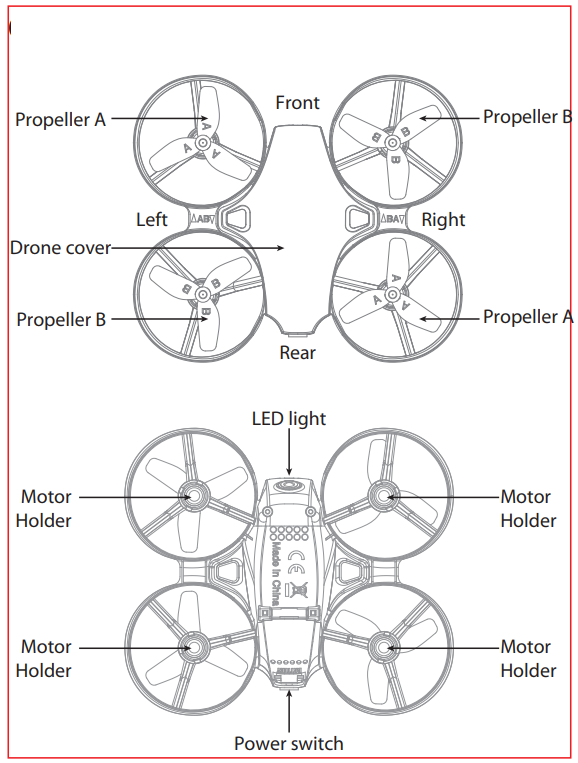
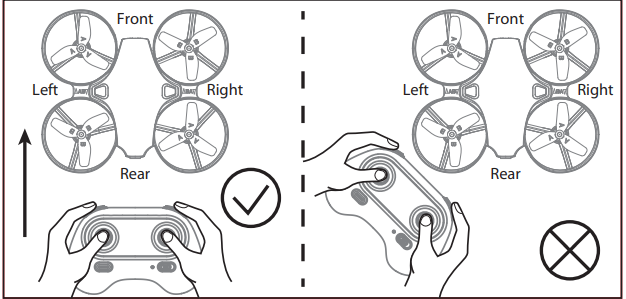
Overview of drone and transmitter Drone
| Main Parameter | |||||||
Weight of drone |
25.8g | The main motor |
0615x4 | ||||
Propeller diameter |
Ø32mm | Remote control mode |
2.4Ghz | ||||
The drone battery | 3.7Vx180mAh | Flying distance | 10~15 m | ||||
The charging time of the drone battery | 40 mins | ||||||
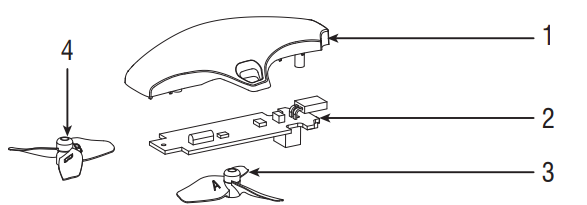
Exploded View | |||||||
NO. | Name | NO. | Name | ||||
1 | Drone cover | 7 | Counterclockwise Motor | ||||
2 | Receiver Board | 8 | LED light | ||||
3 | Propeller A | 9 | Light shade | ||||
4 | Propeller B | 10 | Battery cover | ||||
5 | Forward motor | 11 | Drone bottom | ||||
6 | Rehearsal motor | 12 | Drone battery | ||||
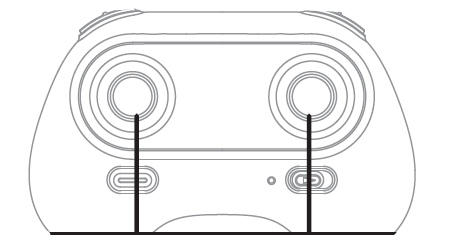
Transmitter
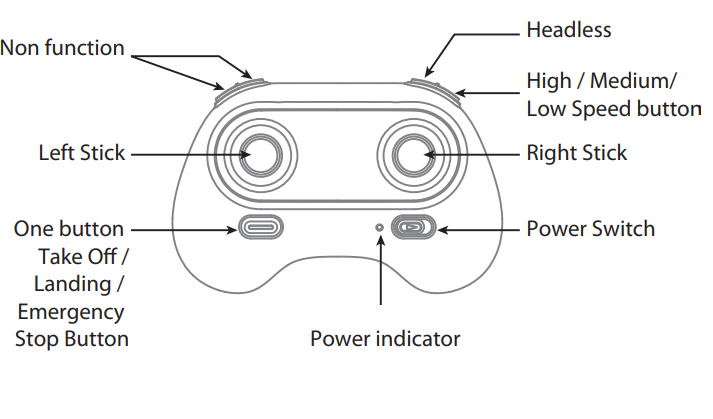
Brief Introduction to Button Functions
Left Stick | Move the Stick to forward / backward/left / right to fly the drone up / down / turn left / turn right. |
Right Stick | Move the Stick to forward / backward / left / right the drone forward/backward/left / right. |
Power Switch | Pull right the power switch key to power on the transmitter, power off when returns. |
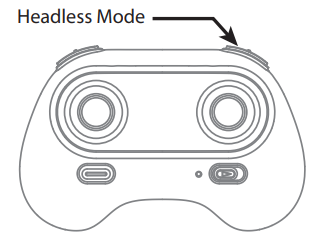
Headless Mode | Press the key to enter the headless mode; Press again to exist. |
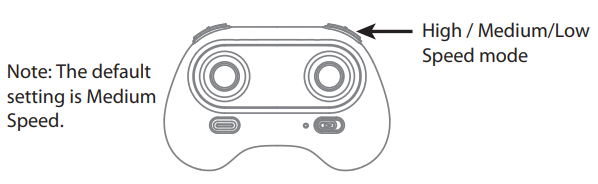
High / Medium/ Low Speed Button | Press the key to switch to High /Medium/ Low Speed. |
Take Off / Landing /Emergency Stop Button | After frequency pairing, press once and the drone will take off automatically. Press again and the drone will and automatically. Press and hold the button for more than 1 second for an emergency landing. The drone propellers will stop and land. |
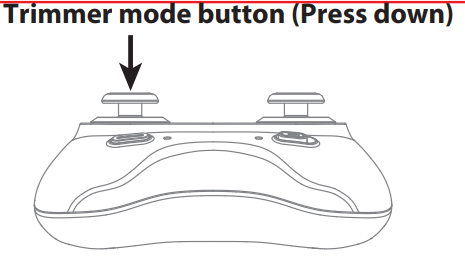
Trimmer Mode Button | Press this button and move the backward/leftright stick to the required trimmer direction, then it will adjust the direction accordingly. Release the stick-to-end trimmer mode. |
Setup of A20 Mini Drone
Setting up the Potensic Mini Drone is easy. Simply insert the batteries into the remote control, charge the drone's battery, and turn on the remote control and the drone. Connect the drone to your smartphone using the Wi-Fi connection, and you're ready to start flying. To ensure a stable connection, make sure that there are no other Wi-Fi devices nearby. To take off, simply press the one-button takeoff button, and the drone will hover in place. You can then use the remote control to guide the drone in any direct.
Transmitter Battery Installation
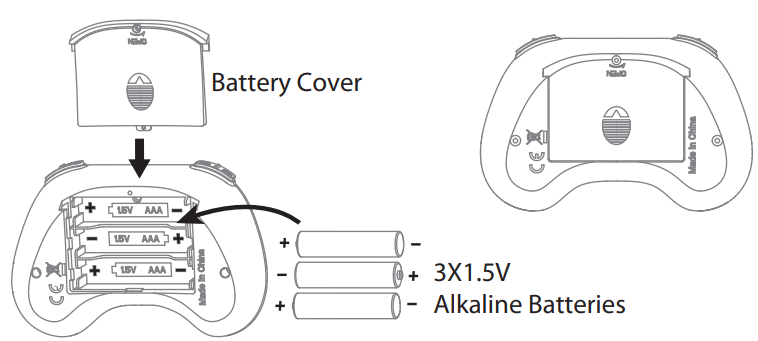
Open the battery cover of the transmitter, insert 3 AAA batteries following the polarity indicators ( Picture below, battery is not included) and then close it.
Notice
- Make sure the electrodes are correct.
- Do not mix new with old batteries.
- Do not mix different kinds of batteries.
- Do not charge the non-rechargeable battery.
Parts installation
Charging Instruction for Drone Battery
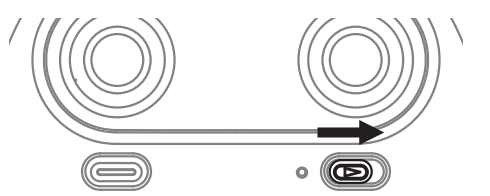
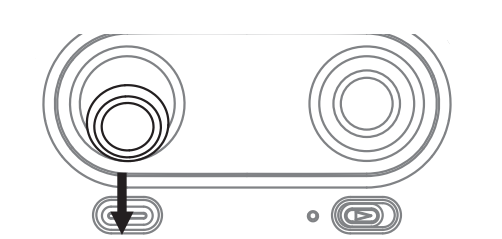
- Connect the drone battery with USB cable first and then choose one of the chargers as below shown to connect with USB plug.
- The red USB indicator light keeps bright when charging and the light turns green when fully charged.
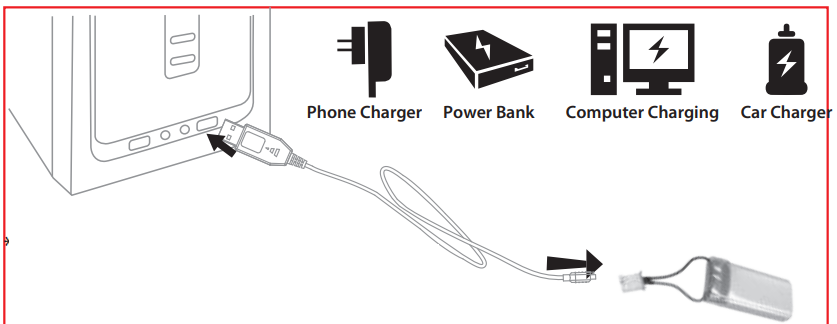
* For faster charging, it is recommended to use an adapter with 5V 2A output current (not included) to charge the battery
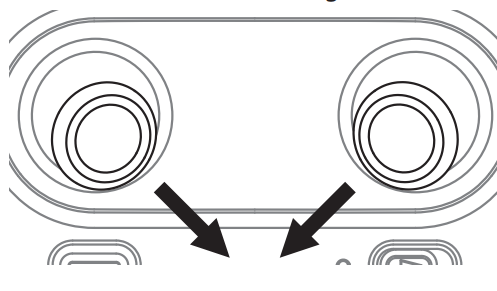
Assemble/Disassemble the Propellers
To disassemble, gently lift the propeller upward. (Picture 1) To install the propeller, align and snap on the propeller blade to the motor. (Picture 2)
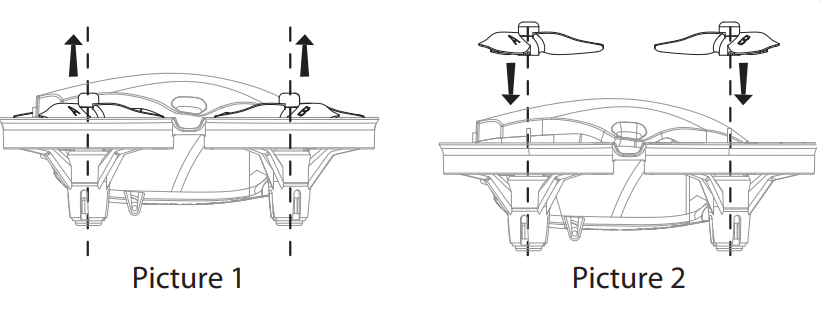
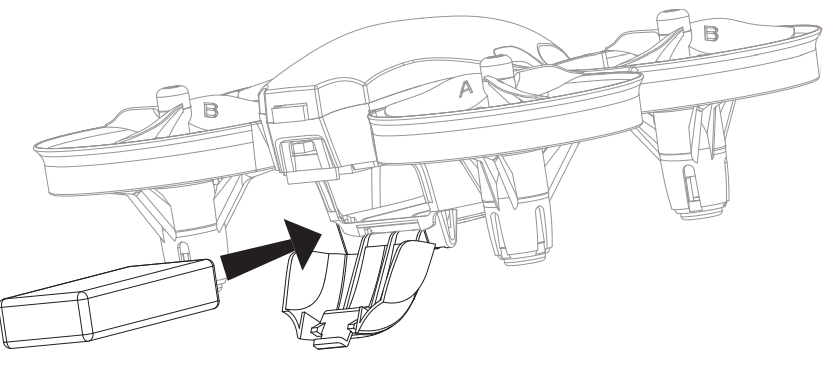
Diagram of battery loading and unloading
Buckle down the battery cover, put the battery into the drone, and then buckle up the battery cover .

Precautions before flying
- Make sure the transmitter and the battery of the drone are fully charged.
- Before starting, please confirm that the left stick of the transmitter is in the middle position.
- Please follow the correct steps to turn on the drone/transmitter. Before flight, turn on transmitter and then the the drone. After flight, turn off the drone and then transmitter. Turning ON/OFF incorrectly may cause the drone to lose control.
- Make sure to correctly install the battery, motor, etc.
- Improper operation may cause drone crash, which may cause a motor defect, prevent you from flying, and other issues. Please go to the local distributor to buy new parts for replacement so that the drone will return to its best
Flight steps
Syncing Frequencies
Turn on the drone. The drone body lights will flash rapidly at first. When it flashes slowly, indicating entering frequency pairing.
Turn on the transmitter and the power indicator light on it flashes rapidly.
Pull the left stick to the lowest position and then release. The power indicator on the transmitter will turn a solid color and the transmitter will beep, indicating successful frequency pairing
Take Off
After calibration successfully, press this button, the drone will fly up and keep flying at an altitude of approximately 1.2 meters automatically.
Landing
Press it to land the drone automatically. (In this mode, DO NOT touch the left stick, otherwise it might not work).
Emergency Landing
in an emergency situation, such as if it is about to hit people or obstacles, press the Take Off/ Landing / Emergency Stop Button and hold it for more than 1 second. The propellers will stop immediately and the drone will fall.
Tip: Do not activate this function unless in emergency situation. Because the drone will fall when the motors stop working.

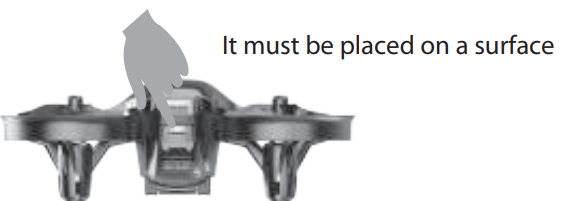
Calibration (This action is used in case of flight abnormality) Push the right stick as picture shown after successful frequency pairing(DO NOT push the left stick before it) . Please loose it when the drone front body light flash 3 times and turn a solid color, indicatingthat calibration is completed.
Tips: Crashing the drone may cause the connection to fail, making the drone hard to control. If this occurs, try repairing and calibration. It must be placed on a surface!
Unlocking/locking the motor
Unlock the motor: Move the left stick and right stick at the same time 45 degrees inward. Lock the motor: When the motor is working, it could be used to stop the motor urgently (Move the left stick and right stick at the same time 45 degrees inward).
Flight Control
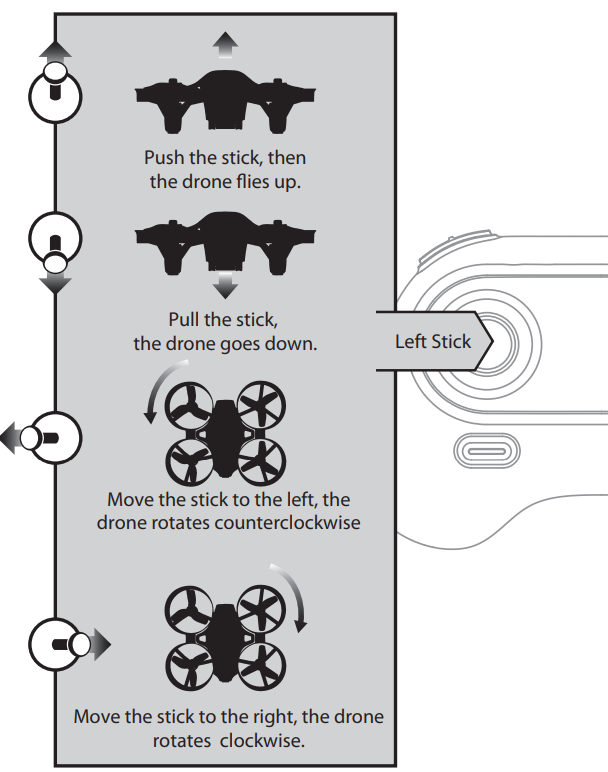
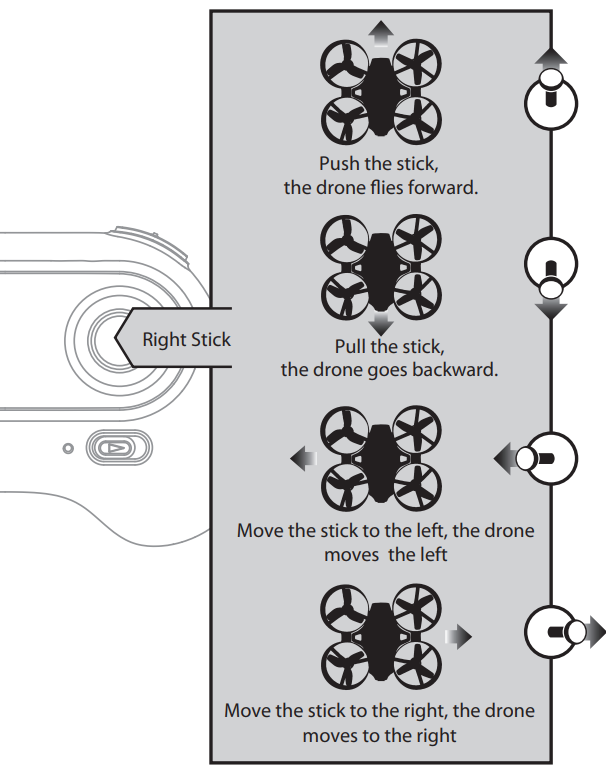
- Forward and backward trimmer
When flying, if the drone tilts forward, press down the trimmer button, and push the right stick backward. Otherwise, push forwards. - Left/Right Rotates Trimmer
When flying, if the drone head rotates to the left, press the trimmer button, and push left stick to the right. Otherwise, push to the left. - Left/Right Tilts Trimmer
When flying, if the drone tilts to the left, press the trimmer button, and push the right stick to the right. Otherwise push to the left.
Functions Mode
Altitude Hold Mode
intelligent flight control system calculates the hovering position, makes it easier for beginners to control. Release the stick, the drone will keep hovering, capturing clear aerial photos & videos.
Note: If there's propeller or motor is damaged, the constant height function will not work. Due to atmospheric pressure instability or unsuitable weather, the high altitude hold function will not work either.
High / Medium/Low Speed Mode Switch
- Low-Speed Mode(Mode 1)
It's suitable for the beginners to operate in calm weather, with no breeze. - Medium speed Mode(Mode 2)
It's suitable for those practicing (hobbyists) to operate, with or without breeze. - High-Speed Mode(Mode 3)
It's suitable for the professionals in most outdoor wind conditions.
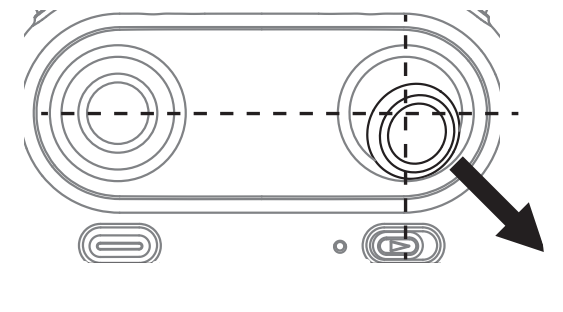
Headless Mode
The default setting is NOT Headless Mode.
Under headless mode, the users can operate the drone without worrying about the orientation (left is left and right is right all the time, regardless of where your drone is pointing at).Headless Mode is designed for beginners, users who fly the drone in daylight or at far distances, or those with difficulty identifying the drone orientation.
You can activate the headless mode function before taking off or in flight. Flying under headless mode, your drone direction should be aligned with you. DO NOT change the direction of your transmitter, keep it flying in front of you at all the times. (See below picture).
WARNING: THE DRONE SHOULD BE IN FRONT OF YOUR TRANSMITTER BEFORE ENTERING THIS MODEL. OR THE DRONE MIGHT LOSE CONTROL OR FLY AWAY.
* Press headless mode button to activate the function, at this time the LED light on the rear of the drone keeps shining three times and stops for 1s; To exit the Headless Mode, press the button again, at this time the LED light on the rear of drone will turn a solid color.
Low Battery Alarm
When the transmitter has a low battery, the transmitter will beep to remind the user to land the drone as soon as possible and replace the batteries. Or the drone might be out of control. When the drone has a low battery, the LED light on the rear of drone will keep shiny for once and stop for 1 second. Then please land the drone as soon as possible and replace the battery.
Out of Range Alarm
When the drone is out of range or almost at the max remote control distance, the LED light on the rear of drone will keep shiny for twice and stop for 1 second. Then please fly the drone back to suitable range assoon as possible or it may be out of control.
Detailed Description
The Potensic Mini Drone is a fantastic choice for those looking for a user-friendly and affordable drone. Its compact and lightweight design makes it perfect for indoor flying, while its stable and smooth flying ensures that even beginners can operate it with ease. The three-speed modes allow for gradual learning and development, while the altitude hold function ensures that the drone stays steady at a certain height. The built-in 2MP camera is an excellent feature that allows for photo and video taking, while the low battery alarm reminds you to land the drone when the battery is low. Overall, the Potensic A20 Mini Drone is an excellent choice for beginners and experienced drone flyers alike.
Troubleshooting
| No. | Problem | Problem Cause | Solution |
|---|---|---|---|
| 1 | The transmitter indicator light is off | 1. Low battery. | 1. Replace the transmitter battery. |
| 2. The battery positive pole and negative pole are in reverse order. | 2. Install the battery in accordance with the user manual. | ||
| 3. Poor Connection | 3. Clean the dirt between the battery and the battery slice. | ||
| 2 | Fail to pair the drone with transmitter | 1. Indicator light is off. | 1. The same as above 1.2.3. |
| 2. There is interfering signal nearby. | 2. Turn off and turn on the drone and transmitter again. | ||
| 3. Mis-operation. | 3. Operate the drone step by step in accordance with the user manual. | ||
| 4. The electronic component is damaged for frequent crash. | 4. To buy spare parts from local seller and replace damaged parts. | ||
| 3 | The drone is under-powered or can not fly. | 1. The propeller deformed seriously. | 1. Replace the propeller. |
| 2. Low battery. | 2. Recharge the drone battery. | ||
| 3. Incorrect installation of propeller. | 3. Install the propeller in accordance with the user manual. | ||
| 4 | The drone could not hover and tilts to one side. | 1. The propeller deformed seriously. | 1. Replace propeller. |
| 2. The motor holder deformed. | 2. Replace the motor holder. | ||
| 3. The gyro did not reset after violent crash. | 3. Put the drone on the flat ground for about 10s or restart the drone to calibrate again. | ||
| 4. The motor is damaged. | 4. Replace motor. | ||
| 5 | The drone indicator light is off. | 1. Low battery. | 1. Recharge the drone battery. |
| 2. The battery is expired or over-discharge protection. | 2. Buy a new battery from local seller to replace the battery or charge the battery in accordance with the use manual. |
Pros & Cons
Pros
- User-friendly and easy to use
- Compact and lightweight design
- Stable and smooth flying
- Three-speed modes for gradual learning and development
- Built-in 2MP camera for photo and video taking
- Affordable price
Cons
- Short flying time of around 10-15 minutes
- Limited range of around 50 meters
- No obstacle avoidance feature
- May be too basic for experienced drone flyers
Customer Reviews of Potensic A20 Mini Drone
Customers love the A20 Mini Drone for its user-friendly design and stable flying. Many have praised the drone's compact and lightweight design, making it perfect for indoor flying. However, some have noted that the flying time is quite short, and the range could be improved. Overall, the Potensic A20 Mini Drone is a popular choice for those looking to get started in the world of drones.
Faqs
Is it possible to operate the Potensic A20 Mini Drone inside?
How can I adjust the A20 Mini Drone's speed settings?
In the event that the A20 drone wanders or fails to hover properly, what should I do?
Is it possible to use the Potensic A20 Mini Drone outside in windy weather?
My Potensic A20 Mini Drone won't take off; why?
What is the Potensic A20 Mini Drone's flight range?
If the A20 Mini Drone and the remote lose contact, how can I sync them?
How do you replace the propellers on a Potensic A20?
What is the lifespan of the Potensic A20 battery and how may its life be prolonged?
How long is the Potensic A20 Mini Drone's warranty?
Leave a Comment