How to Use: Pro-Lift Router Adjustment System User Guide
Content
Introduction of Pro-Lift Router Adjustment System
The Pro-Lift Router Adjustment System is the ultimate solution for precise and easy bit height adjustment on your router table. This innovative system is designed to provide quick and tool-free height adjustments, making it a must-have for any woodworking enthusiast. The estimated price of the Pro-Lift Router Adjustment System is $150, and it is now available for purchase.
Pro-Lift Router Detailed Specifications
The Pro-Lift Router Adjustment System boasts the following key features:
- Quick and tool-free height adjustments
- Patented cam-lock lever for precision and security
- Compatible with most routers on the market
- Anodized aluminum construction for durability and corrosion resistance
- Easy-to-read height scale for accurate adjustments
- Router mounting plate levelers to ensure a flat and stable work surface
- Double-sealed ball bearings for smooth and precise operation
- Dust collection port to keep your work area clean
Assembly Instructions of Adjustment System
- Install the middle spreader bolt
- Install a 1/4-20 x 1-1/4" cap screw into the housing's middle hole, as shown.
- Keep turning in the bolt until you see the housing spread apart a little. In step 3 you will spread the housing until your router motor drops into place.
WARNING: SPREADER GAP NOT TO EXCEED 3/8"!
Install the housing clamping bolts
Install the (2) 1/4-20 x 1-1/4" cap screws, lock washers, and cross dowels, as shown. Only finger start the bolts at this time.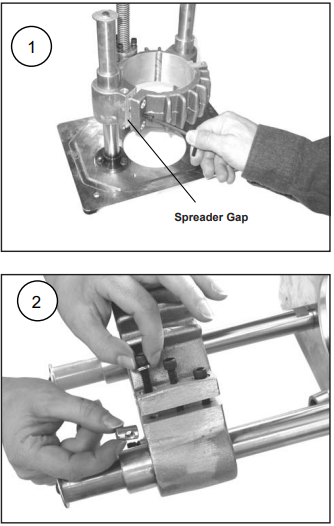
Note: the cross dowels must first be installed into the hole. DO NOT TIGHTEN THESE BOLTS YET!
- Install your router motor
- Slowly tighten the middle bolt to spread apart the housing until your router drops into the housing.
- Do not overspread the housing! Spreader gap must NOT exceed 3/8". Important: Porter Cable routers have (4) locating pins.
- Align these pins with the grooves machined into the ProLift housing (and motor adapters).
- See the Router Adapter Appendix if your router motor is NOT the Porter Cable model 7518/19 (4.2" motor diameter).
Remove the cap screw from the middle hole after your router is positioned in the housing.
WARNING: No portion of the router's power cord and related housing must contact any part of the ProLift.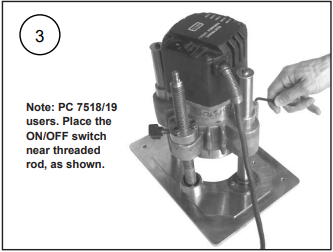
WARNING: SPREADER GAP NOT TO EXCEED 3/8"!
- Tighten the motor housing.
- Make sure the cap screw from the middle hole has been removed.
- Tighten the two bolts securely.
- Retighten after the first hour of use, and again after the next four hours.
- Remove center bolt before tightening housing!
- Adjust the column.
- Now that your router is installed and the motor housing is tight, you must release the tension and misalignments caused by slight variations in router motor diameters.
- Position the router and housing about half way up the threaded rod, as shown. Next, loosen the (3) cap screws with the 5/32" wrench, and then retighten.
Retighten after the first hour of use, and again after the next four hours.
Note: if any of the bolts should ever become detached, be sure to properly reassemble the washers.
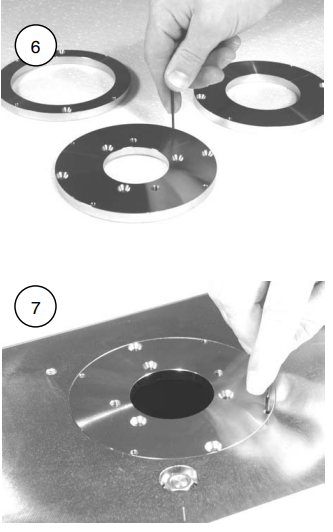
- Install the reduction ring leveling screws.
- The leveling screws require thread lock to prevent unwanted movement.
- Apply thread lock adhesive to completely cover the threads. Use the (12) #8-32 x 5/16" leveling screws (four for each ring) and 5/64" hex wrench.
- Turn the screws until they are flush with the bottom surface of the ring.
Once the thread lock adhesive is set up, adjust the screws to level the reduction rings. Minimum set-up time for the thread lock adhesive is about 10 minutes. It fully cures in 24 hours. If the screws loosen simply reaply the thread lock.
Install the column lock knob.
Use the t-knob with brass stud and spring.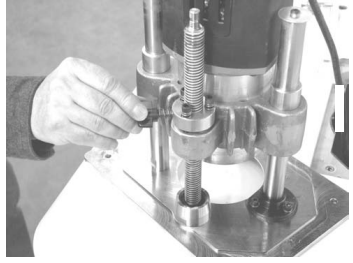
- Install ProLift into your router table.
- Always use the plastic antivibration shim between your ProLift and the router table (leveling screws)
If your ProLift sits proud of your Bench Dog brand router table, be sure that all the leveling screws in the router table are backed off, and that any mounds of material are sanded smooth.

Assemble the fine adjustment tool. Follow the instructions below.
Using Your Pro-Lift Router Adjustment System
The following instructions are not a substitute for knowing how to use your router table. Please, know and understand how to use a router table before using this product.
- Adjusting bit height
This is done from the top. Use the 9/16" deep well socket and speed wrench. Turning the socket clockwise will raise the router.
WARNING: Do not forcefully bottom out Pro Lift. This will damage the product. Using the fine adjuster
Pro Lift allows you to "zero-out" the fine adjuster no matter the height of the bit. To zero out the adjuster, simply take up the socket slack in the direction you're planning to rotate, and then spin the fine adjuster around the socket until the zero lines up with the engraved line on the plate. The socket must not turn during the step. One revolution raises or lowers the lift exactly 1/8". The seven short engravings to the left and right of the zero mark represent .0025".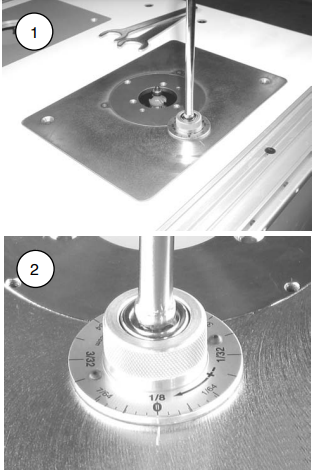
- Changing router bits
Change your router bits from above the router table! Simply raise the bit until the motor protrudes out the top. Remove the router bit reduction ring hold down screws, if installed.
WARNING: Unplug your router before changing router bits! Selecting router bit reduction rings
Pro Lift Ni comes with three steel rings, 2", 2.625", and 3.75". Use the ring that most closely matches your router bit diameter. You must use the (2) ring hold down screws when using the starting pin (included), Porter Cable guide bushing adapter (optional), and zero clearance insert (optional). These screws prevent the rings from lifting or rotating.
WARNING: Confirm that your router bits do NOT contact the reduction rings!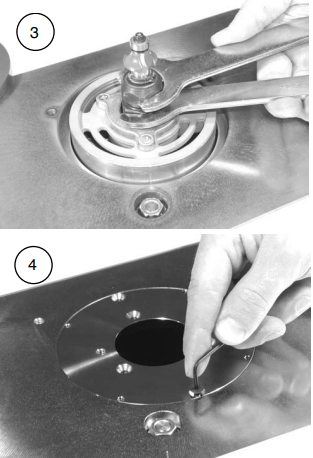
- Using the column lock knob
The column lock is used to preserve your setting from accidental movement, and to prevent back driving during extreme vibration. The column lock will also prevent back driving even if your preload nut is out of adjustment or worn out. Use of the column lock is also recommended when using the tool for extended periods of time at full speed.
WARNING: Always disengage the column lock before attempting to adjust Pro Lift. Using the starting pin
Depending on which reduction ring you have installed, you have up to four locations to install the starting pin. The starting pin acts as a fulcrum for gaining leverage during the beginning of your cut. At the beginning of your cut, before your stock engages the router bit guide bearing, the stock is most vulnerable to catching the bit and being thrown. Use of a starting pin greatly reduces this possibility. Be sure the pin is screwed in tightly before use.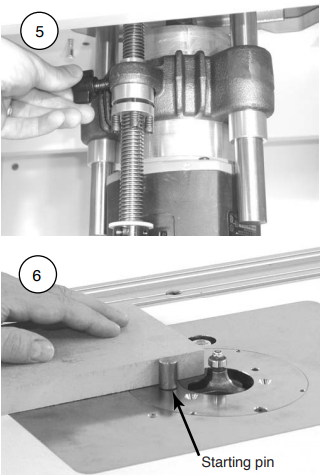
WARNING: Always use ProGuard (sold separately) when freehand routing. Shown without guard for clarity of starting pin location.
Using the Pro Guard option
WARNING: Always use Pro Guard for free hand routing. Pro Guard protects your hands, serves as a starting pin, and has an integrated dust collection port for 2.5" Shop-Vac style hose.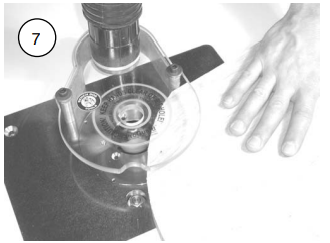
Description of Pro-Lift Router
The Pro-Lift Router Adjustment System is a game-changer for woodworking enthusiasts, providing a quick and easy solution for bit height adjustment on your router table. With its patented cam-lock lever, you can make precise and secure height adjustments in no time, without the need for any tools. The anodized aluminum construction ensures durability and corrosion resistance, while the double-sealed ball bearings provide smooth and precise operation. The system is compatible with most routers on the market and includes router mounting plate levelers to ensure a flat and stable work surface. Additionally, the easy-to-read height scale and dust collection port make your woodworking experience even more enjoyable.
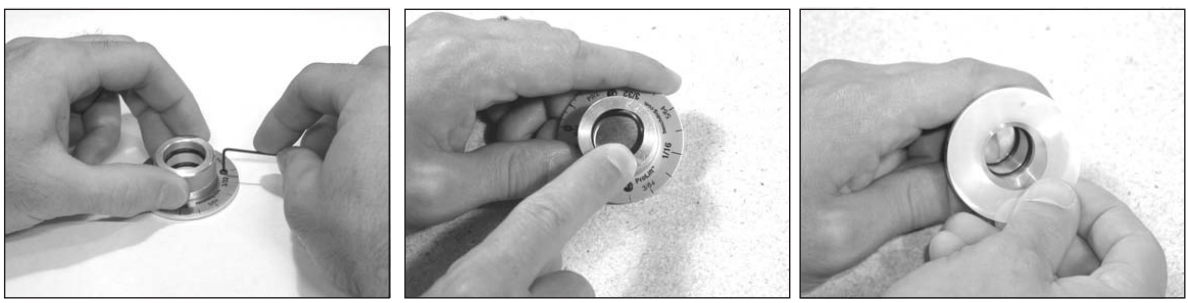
- A. Install graduated dial
Peel away the protective plastic film and attach the dial to the aluminum housing using the (2) small screws and the .050" hex wrench. - B. Install o-rings
Install the (2) o-rings into the inner grooves, as shown. These o-rings hold the adjustment socket in place. You may need a little grease to help the socket into place. - C. Attach the anti-friction ring
Remove the protective paper backing and stick the ring to the bottom of the adjuster, as shown. This will prevent the adjuster from scratching your Pro Lift.
Setup Guide
Setting up the Pro-Lift Router Adjustment System is quick and easy. Here's how:
- Attach the system to your router table using the included hardware.
- Mount your router to the system using the provided brackets and clamps.
- Adjust the height of the router bit using the cam-lock lever and height scale.
- Connect your dust collection system to the port on the side of the system.
- Start routing!
Maintaining Your Pro Lift
- Tighten bolts
During the break in period you must retighten all the bolts after one hour, and again after four more hours of use. Periodically check all bolts to ensure they are tight, especially the (3) column mounting bolts and (2) router motor housing bolts. This should be done at least every 20 hours of use. Grease
At least once a year (more if needed) remove the grease from the columns and acme threaded rod. WD-40 and a brush will make the job easier. Reapply a good quality multi-purpose grease (such as white lithium) to the acme rod and columns. Wipe off excess grease. Keeping up with this step will greatly increase the life of your Pro Lift.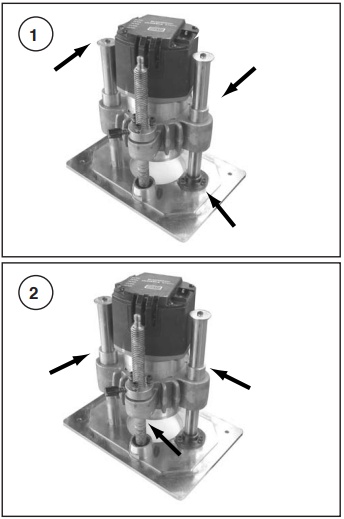
Backlash adjustment
After a fair amount of wear the anti-backlash nut may need adjustment. If your router back drives downward you know it's time to adjust the preload nut. To do so, simply tighten the three preload screws 1/4 turn. Factory setting for the preload nut is 15/32". See the illustration below.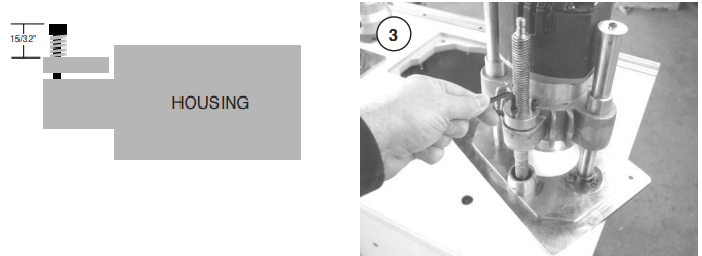
- Clean your router (no photo shown)
Use and air hose or vacuum to keep your router motor as clean as possible. Built up dust and debris is a fire hazard. Never walk away from your router without confirming it's clean and free from dust and debris and the potential for fire. - Dust collection (no photo shown)
Use dust collection. Dust collection in your cabinet and at the fence will dramatically reduce the amount of dust and debris build-up on your Pro Lift. It will also ensure your router runs cooler, and will make maintaining your Pro Lift much easier.
Troubleshooting of Pro-Lift Router
If you experience any issues with your Pro-Lift Router Adjustment System, here are some common problems and solutions:
- The router bit won't stay at the desired height: Check to make sure the cam-lock lever is fully engaged and the bit is not binding or catching on any material.
- The system is not level: Use the router mounting plate levelers to adjust the system until it is level.
- The system is difficult to turn: Make sure the system is not overtightened and that the ball bearings are properly lubricated.
- The dust collection port is not working: Check to make sure the port is properly connected to your dust collection system.
Pro-Lift Warranty
This is a limited two year warranty. It requires the purchaser to contact Bench Dog in writing within 30 days of discovering the defect. Warranty does not apply to defects due directly or indirectly to misuse, abuse, negligence or accidents, repairs or alterations, or due to lack of maintenance. It excludes components and parts not manufactured by Bench Dog, defects caused by failure to provide a suitable installation environment, and damage caused by use for purposes other than those for which the product was designed.
Pros & Cons
Pros
- Quick and easy bit height adjustment
- Tool-free operation
- Compatible with most routers
- Durable and corrosion-resistant construction
- Smooth and precise operation
Cons
- May not fit all router tables
- Slightly more expensive than other adjustment systems
Customer Reviews about Pro-Lift Router Adjustment System
Customers love the Pro-Lift Router Adjustment System, praising its precision, ease of use, and durability. Some common compliments include:
- "This system is a game-changer for router table work."
- "The cam-lock lever makes height adjustments a breeze."
- "The anodized aluminum construction is built to last."
- "I highly recommend this system to any woodworker."
Faqs
How do I install the Pro-Lift Router Adjustment System onto my router table?
What types of routers are compatible with the Pro-Lift Router Adjustment System?
How do I adjust the cutting depth using the Pro-Lift Router Adjustment System?
Can the Pro-Lift Router Adjustment System accommodate different router bit sizes?
What maintenance tasks are recommended to keep the Pro-Lift Router Adjustment System in optimal condition?
How do I troubleshoot common issues such as stiffness or resistance when adjusting the Pro-Lift Router Adjustment System?
Is it possible to retrofit the Pro-Lift Router Adjustment System onto an existing router table?
Can the Pro-Lift Router Adjustment System be used with both handheld and table-mounted routers?
How do I ensure accurate and repeatable depth adjustments with the Pro-Lift Router Adjustment System?
What is the warranty on the Pro-Lift Router Adjustment System?
Leave a Comment