Proxicast Controlling the MSNSwitch MSNTN01 User Guide | Usage & Settings
Content
Introduction of proxycast Control of the MSNSwitch MSNTN01
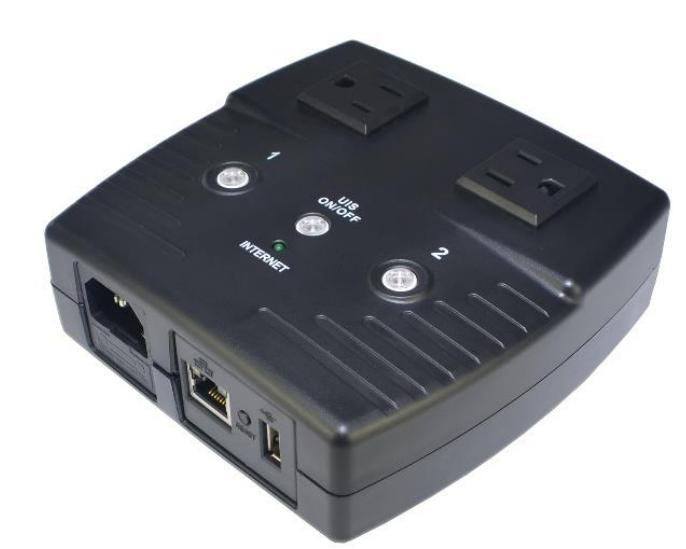
The MSNSwitch from Mega System Technologies, Inc ("MegaTec") is designed to automatically power-cycle any AC-powered device when Internet connectivity is lost. Either of its AC power outlets can also be reset manually or via scheduled actions.
Detailed Specifications
The proxycast is a powerful and versatile MSNSwitch that offers advanced features for seamless connectivity. Key specifications include
- Operating frequency: 2.4GHz
- Data rate: 150Mbps
- Range: Up to 100 meters (line of sight)
- Security: WPA2-PSK encryption
- Power over Ethernet (PoE): Supports IEEE 802.3af PoE
- LED indicators: Power, Ethernet, and wireless status
- Dimensions: 110 x 75 x 25 mm
- Weight: 120g
Description
The proxycast MSNTN01 is a reliable and robust MSNSwitch designed for high-performance networking. It supports 2.4GHz wireless frequency with a data rate of 150Mbps, providing fast and stable connections for all your devices. The MSNTN01 features advanced security with WPA2-PSK encryption to protect your network from unauthorized access. Its compact design, Power over Ethernet (PoE) support, and easy setup make it an ideal solution for a variety of networking applications, including small businesses, home offices, and remote locations.
Setup of Control of the MSNSwitch
To operate, assemble, and configure the MSNTN01, follow the steps below
- Connect the PoE injector to a power source and plug one end of the Ethernet cable into the PoE injector's LAN port.
- Connect the other end of the Ethernet cable to the MSNTN01's PoE port.
- Press and hold the reset button on the MSNTN01 for at least 10 seconds to restore factory defaults.
- Configure the MSNTN01 using the web interface or through a mobile app.
- Connect your devices to the MSNTN01's wireless network or Ethernet ports.
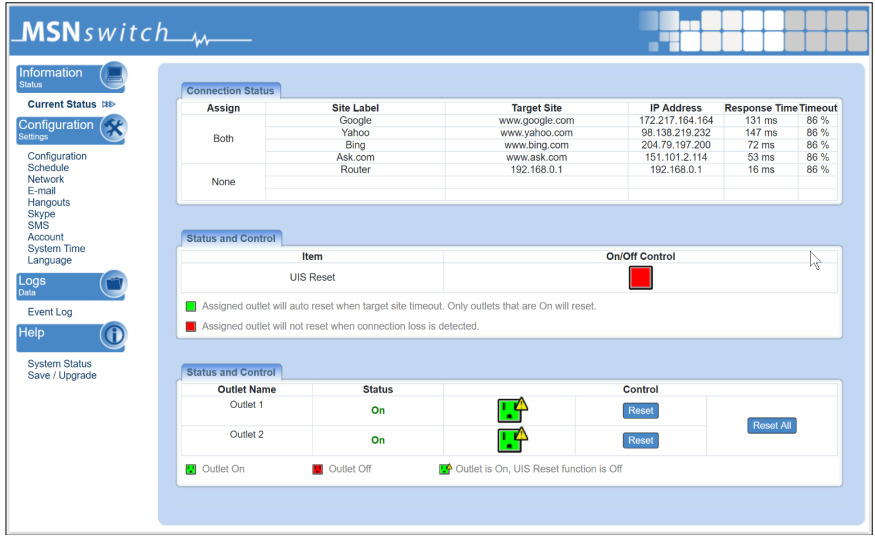
Internal Web Server
Full access to all of the MSNSwitch’s functionality is available via its internal web server pages. To access the web server, enter the MSNSwitch’s IP address into any web browser. The default username for the MSNSwitch is “admin”. The default password for firmware versions prior to MNT.9731 is “admin”. For MNT.9731 and later, the default password is the last 6 characters of the MSNSwitch’s MAC address (upper case). See the MSNSwitch bottom label for the MAC address. If you do not know the IP address of your MSNSwitch, check your DHCP server log or use the Netility utility software to scan for the MSNSwitch
ezDevice Smartphone App
Download and install the free ezDevice app for iOS from the Apple AppStore or for Android from Google Play.
- If possible, connect your smartphone via WiFi to the same LAN as the MSNSwitch. This is the fastest and easiest way to add the MSNSwitch to ezDevice.
- Launch the ezDevice app and create a new account. This same account information will be used for the Cloud4UIS.com web service (see page 5).
- Tap Add Device on the top right of the screen. ezDevice will scan your LAN for the MSNSwitch. If found, tap the + icon to add the MSNSwitch. Enter the Device Key printed on the bottom label of the MSNSwitch. Tap Done to return to the main screen.
- Once the MSNSwitch has been added, return to the main ezDevice screen. Tap the MSNSwitch in the list of devices to change settings.
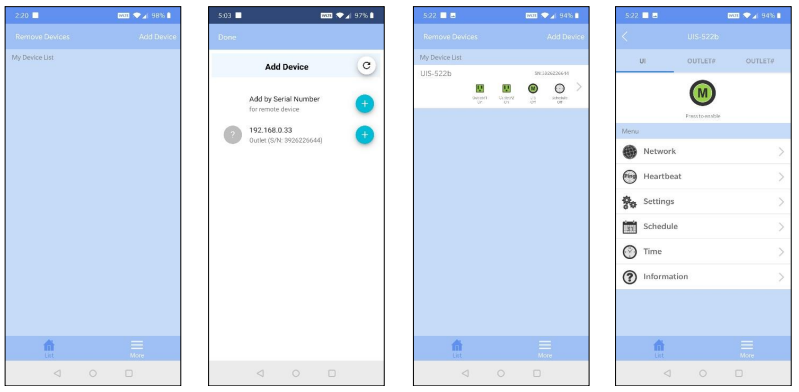
If you cannot connect your phone to your LAN, then choose the Add by Serial Number option under Add Device.

Follow the instructions on the screen. Remove the LAN cable from the MSNSwitch for 1 second, then replace it. Check that the blue UIS button is flashing. This is “Add Mode” which must be active to manually add the MSNSwitch to ezDevice. Enter the MSNSwitch Serial Number and Device Key when prompted.
Cloud4UIS.com Web Service
Open the Cloud4UIS.com web site using any web browser: http://Cloud4UIS.com If you do not yet have an account, create one on the site. If you previously created and account using ezDevice, use the same login credentials for Cloud4UIS.com. The Cloud4UIS service is free. If you used ezDevice to add devices, they will appear in your Cloud4UIS account automatically.
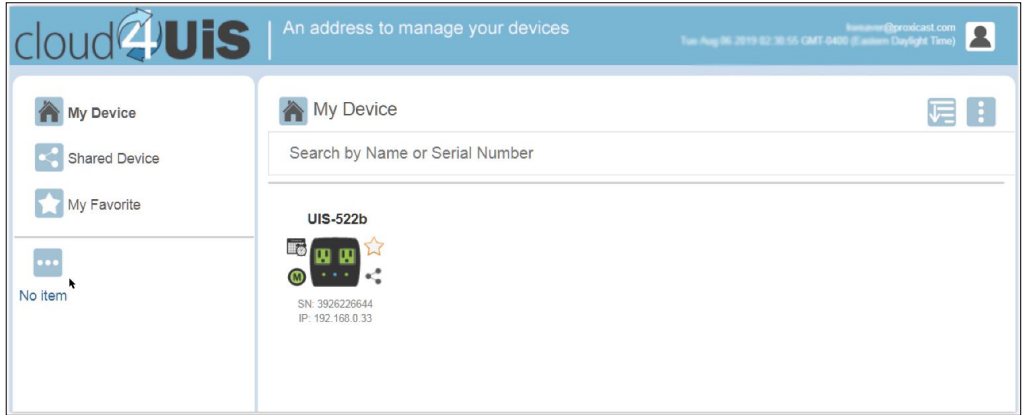
If you are adding a device for the first time, click the vertical dot icon ![]() in the upper right corner and then select the Add icon
in the upper right corner and then select the Add icon![]() to open the Add Device screen.
to open the Add Device screen.

The Add Device screen works the same as it does in the ezDevice smartphone app. If your PC is in the same LAN as the MSNSwitch, you will be able to select it from the list. If your MSNSwitch is not shown, manually enter its serial number to proceed.
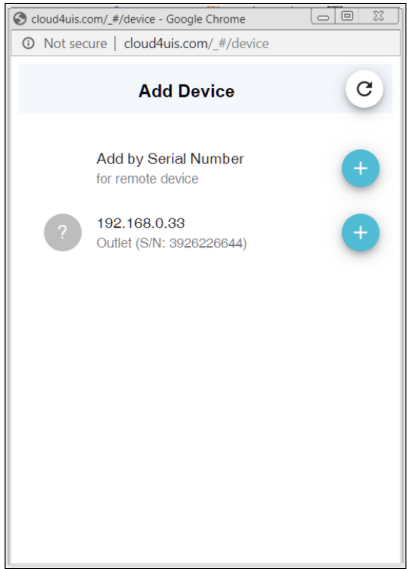
See the ezDevice section on page 3 for instructions on completing the device add procedure. Devices added through Clolud4UIS.com will also be automatically synchronized with the ezDevice app.
Skype
In the MSNSwitch’s web interface, select the Skype menu and enable the Skype function.
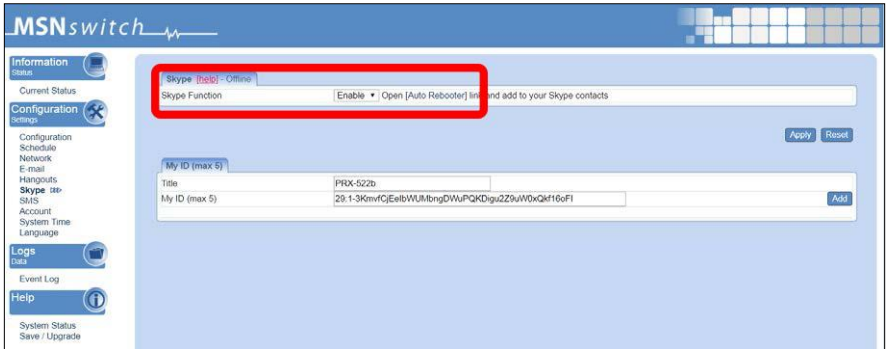
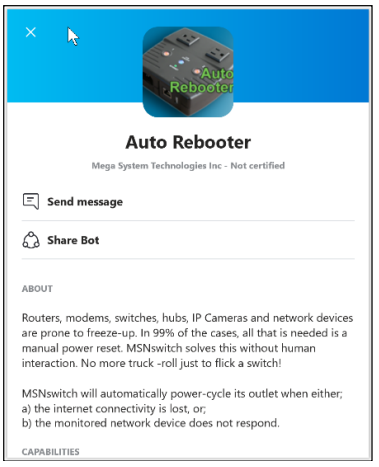
Click the Auto Rebooter link to add the Auto Rebooter robot service to your Skype contacts.
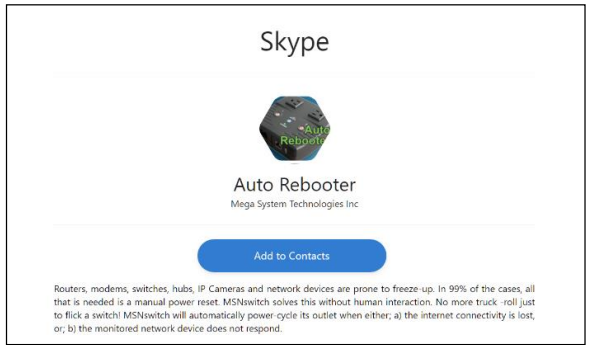
Click the Get Started button to add Auto Rebooter to your contacts and begin a messaging session.
Type HELP to see the available commands. Type Get My ID to retrieve the security ID required to connect with your MSNSwitch.
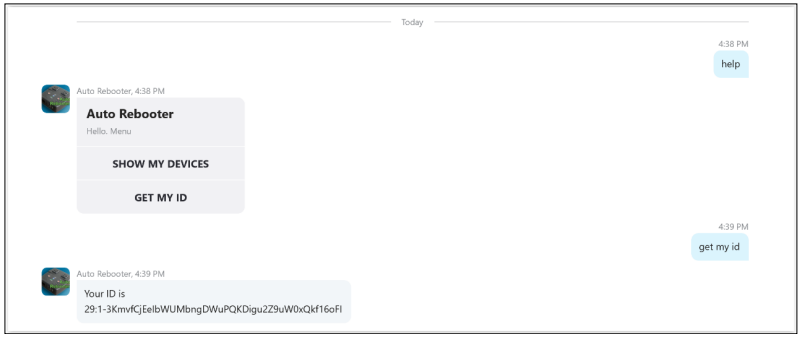
Copy the ID from the Skype response and paste it into the ID field of the MSNSwitch’s web interface. Click ADD to save the settings.
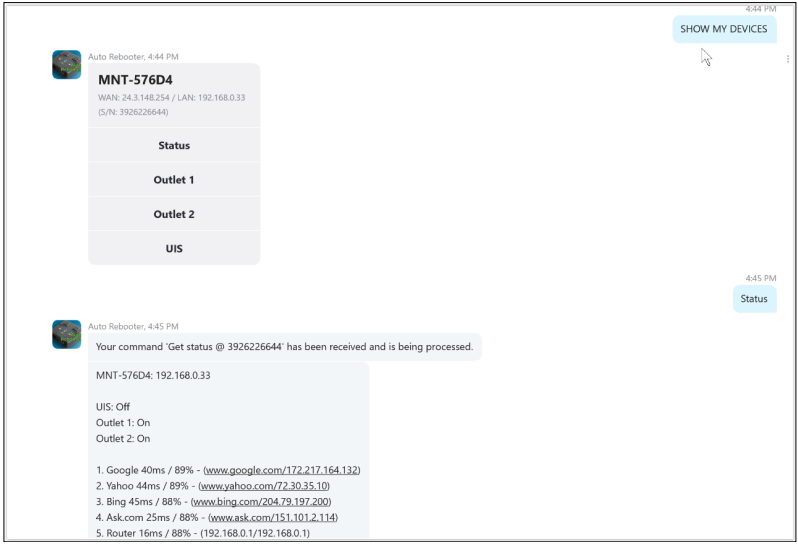
In Skype, enter the command Show My Devices and press Enter. The response will be a menu of your devices and actions you can take. Click any of the menu buttons for more action.
Google Hangouts
- You must first have a Google Hangouts or Gmail account for yourself. You must create a second Google account that the MSNSwitch will use (a unique account for each MSNSwitch you have).
- In the MSNSwitch’s web interface, select the Hangouts menu and enable the Hangouts function. Enter Google credentials for the account you created for the MSNSwitch.
- In the Add Contact Accounts field, enter all of the Google accounts which will be permitted to interact with and control this MSNSwitch. Click Apply to save the settings.
Check the top of the Hangout tab to ensure that the MSNSwitch was successfully able to log into Hangouts. Click the Send Test Message button to send a message to the contact
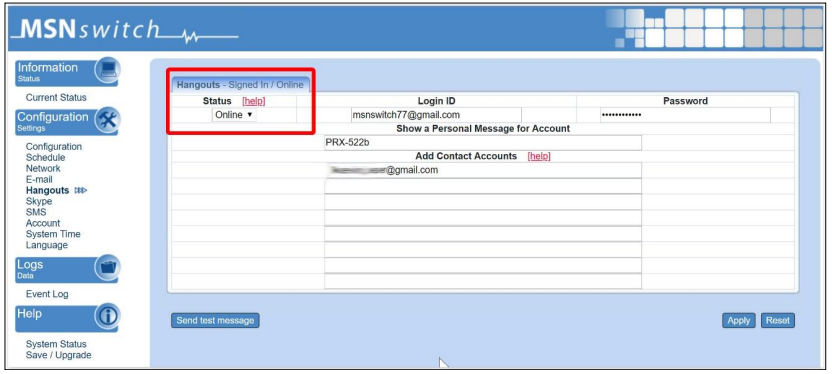
- Open your Google Hangouts account and there should be a test message from your MSNSwitch.
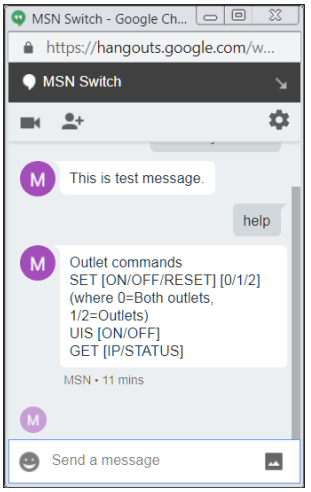
Type HELP to see the full list of available commands.
REST API
For firmware versions MNT.A624 and later only (For earlier firmware versions, please contact Proxicast for additional documentation) Basic functions of the MSNSwitch can be controlled through a series of HTTP Packet Requests.
Generate a Cookie-Token for User Login:
HTTP Packet Request
- "POST /goform/login HTTP/1.1”CRLF
- “Accept: */*”CRLF
- “Accept-Encoding: gzip, deflate”CRLF
- "Content-Type: application/x-www-form-urlencoded"CRLF
- CRLF
- “user=“<Web Account> “&password=“<Web Password>
HTTP Packet Response
- “Pragma: no-cache”CRLF
- “Set-Cookie: WQKJhuEcnAVA3t7WE+ug6A=<token>; HttpOnly; Path=/“CRLF
- “Content-Type: text/html” CRLF
- “Server: GoAhead-Webs”CRLF
- “Location: /index.asp”CRLF
- “Date: Thu Jul 1 01:01:01 2020” CRLF
- “Cache-Control: no-cache” CRLF
- CRLF
NOTE: The generated access token <token> is valid for 24 hours only.
Examples in this section are shown using cURL for Windows. Any software capable of sending and processing HTTP packets can be used.
EXAMPLE: Show Cookie
OUTPUT
- Trying 192.168.0.42…
- TCP_NODELAY set
- Connected to 192.168.0.42 (192.168.0.42) port 80 (#0)
- > POST /goform/login HTTP/1.1
- > Host: 192.168.0.42
- > User-Agent: curl/7.55.1
- > Accept: */*
- > Content-Type: application/x-www-form-urlencoded
- > Content-Length: 26
- >
- upload completely sent off: 26 out of 26 bytes
- HTTP 1.0, assume close after body
- < HTTP/1.0 200 Data follows
- < Server: GoAhead-Webs
- < Date: Wed Dec 9 05:15:42 2020
- Added cookie WQKJhuEcnAVA3t7WE+ug6A="2ZZeUIu0LxPi80nEd" for domain 192.168.0.42, path /, expire 0
- < Set-Cookie: WQKJhuEcnAVA3t7WE+ug6A=2ZZeUIu0LxPi80nEd; HttpOnly; Path=/
- < Pragma: no-cache
- < Cache-Control: no-cache
- < Content-Type: text/html
- < Location: /index.asp
- <
- <html><head>
- <meta http-equiv=Content-Type content='text/html; charset=utf-8'> <script language='JavaScript'> window.top.location.href='/index.asp';
- </script>
- </body></html>
- Closing connection 0
Get the Status of the MSNSwitch
- HTTP Packet Request
- “GET /xml/outlet_status.xml HTTP/1.1"CRLF
- “Accept: */*”CRLF
- “Accept-Encoding: gzip, deflate”CRLF
- "Cookie: WQKJhuEcnAVA3t7WE+ug6A=“<token>CRLF CRLF
HTTP Packet Response
- XML format:
- "<?xml version='1.0'?>"
- "<request>"
- “<site_ip>”{SITE_IP}”</site_ip>”
- “<connect_status>”{CONNECT_STATUS}”</connect_status>” “<outlet_status>”{OUTLET_STATUS}”</outlet_status>”
- “<site_lost>”{SITE_LOST}”</site_lost>”
- “<uis_fun>”{UIS_RESET}”</uis_fun>”
- “<reset_only>{RESET_ONLY}”</reset_only>”
- “<assign>”{ASSIGN}”</assign>”
- “</request>”
XML Description
- SITE_IP: string: Site IP Address.
- CONNECT_STATUS: digit(unit: millisecond): Site response time. OUTLET_STATUS: digit: 0 means Off, 1 means On.
- SITE_LOST: digit: Percent of ping lost.
- UIS_RESET: digit: 0 means Off, 1 means Auto Reset.
- RESET_ONLY: digit: 0 means Disable, 1 means Reset Only.
- ASSIGN: digit: 0 means None, 1 means Outlet1, 2 means Outlet2, 3 means All
EXAMPLE: Get Status
OUTPUT
<?xml version="1.0"?><request><site_label>Google,Yahoo, Bing,Ask.com, Router,,</site_label><site_ip>172.217 .7.196,74.6.143.25,204.79.197.200,199.232.66.114,192.168.0.1,null,null</site_ip><connect_status>21,42, 21,20,1,-1,- 1</connect_status><site_lost>0,0,0,0,0,0,0</site_lost><lost_times>0,0,0,0,0,0,0</lost_times><outlet_stat us>1,0</outlet_status><uis_fun>1</uis_fun><reset_only>0,0</reset_only><assign>3,3,3,3,3,3,3</assign> </request>
Control an Outlet
HTTP Packet Request
- Packet Request
- "GET" <target> "HTTP/1.1"CRLF
- "Host:" <host ip>CRLF
- "Keep-Alive: 300"CRLF
- "Connection: keep-alive"CRLF
- "Authorization:Base" <auth>CRLFCRLF ;auth:encoded account(username:password) with base-64
- IP: The IP Address of the MSNSwitch.
- Auth: user=<Web Account> passwd=<Web Password>
- Action
- target=<0/1/2/3>;
0 means UIS (Auto Reset function),
1 means Outlet1,
2 means Outlet2,
3 means All_Outlets - control=<0/1/2/3>;
0 means Off,
1 means On,
2 means Toggle (supported in next firmware release),
3 means Reset Outlet (applies to Outlets that are On only)
- target=<0/1/2/3>;
- HTTP Packet Response
- XML format
"<?xml version='1.0'?>"
"<request>"
“<outlet_status>”{OUTLET_STATUS}”</outlet_status>”
"<uis_status>”{UIS_STATUS}”</uis_status>”
“</request>” - XML Description
OUTLET_STATUS / UIS_STATUS: 0 means Off, 1 means On
- XML format
Get Last Heartbeat Time
HTTP Packet Request
- Packet Request
- "GET" <target> "HTTP/1.1"CRLF
- "Host:" <host ip>CRLF
- "Keep-Alive: 300"CRLF
- "Connection: keep-alive"CRLF
- "Authorization:Base" <auth>CRLFCRLF ;auth:encoded account(username:password) with base-64
- IP: The IP Address of the MSNSwitch.
- Auth: user=<Web Account> passwd=<Web Password>
HTTP Packet Response
- XML format:
- “<?xml version='1.0'?>”
- “<request>”
- “<heartbeat>”YYYY/MM/DD HH:MM”</heartbeat>”
- “</request>
Netility Utility
- MegaTec provides a software utility for Windows and MAC called Netility that scan your LAN for compatible devices and allows you to change some configuration settings and upgrade firmware without accessing the internal web server pages.
Connect the MSNSwitch to the same Ethernet LAN as your PC. Open Netility and it will scan the LAN for any MegaTec devices and list them in its main window.
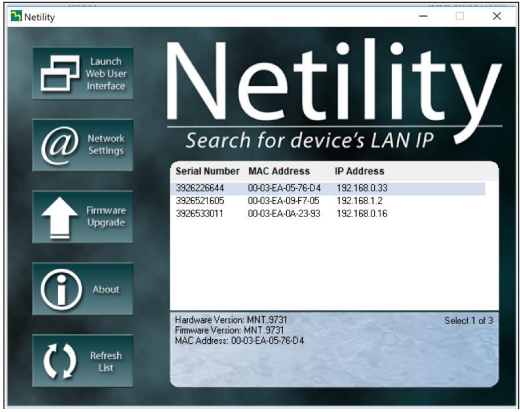
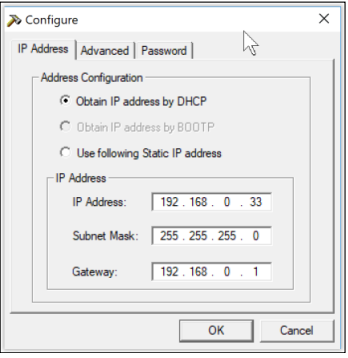
- The Network Settings button allows you to configure the IP address and related network parameters of the MSNSwitch as well as set the password. The Launch Web User Interface will open the MSNSwitch’s internal web server in your default browser.
Updating Firmware
- Download the latest MSNSwitch firmware from the Download page at:
- Be sure to download the correct file for your MSNSwitch model. Also download and review the firmware Release Notes for important information on the changes and new features.
- MSNSwitch firmware is delivered as a compressed .ZIP file – extract the .BIN file from the zip archive. The .BIN file is the actual firmware image file you need to use.
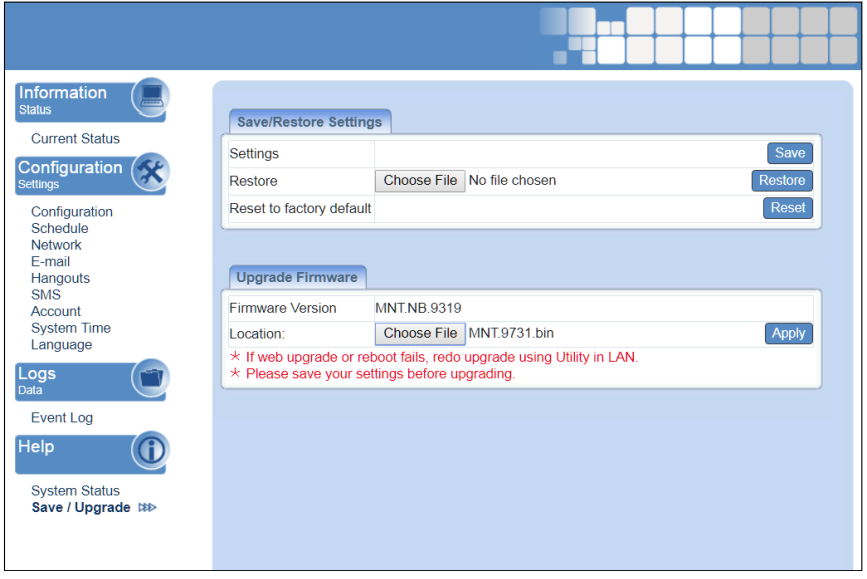
Using the Web Interface
- Log into the MSNSwitch’s web interface and select the Save/Upgrade menu. Click the Choose File button to locate the .BIN file you downloaded above. Then click the Apply button to begin the update process. Do not power off the MSNSwitch or remove its Ethernet connection until the process is complete.
- Once the upgrade is complete and the web page refreshes to show the new firmware version number, we strongly recommend performing a factory reset from this screen to ensure that all new firmware parameters are properly initialized. You should also clear your web browser cache, then reconfigure your MSNSwitch as needed.
Using Netility
- Launch the Netility software
- Select the device you wish to upgrade and click the Firmware Update button. Select the . BIN file downloaded earlier and begin the firmware update process.
- Do not power off the MSNSwitch or remove its Ethernet connection until the process is complete.
- Once the upgrade is complete and the web page refreshes to show the new firmware version number, we strongly recommend performing a factory reset from this screen to ensure that all new firmware parameters are properly initialized. You should also clear your web browser cache, then reconfigure your MSNSwitch as needed.
Troubleshooting
Here are some common issues and their solutions:
- If the MSNTN01 is not powering on, check the PoE injector and Ethernet cable connections.
- If the wireless network is not visible, ensure the MSNTN01 is configured correctly and the wireless network name (SSID) is enabled.
- If the connection is slow or unstable, check the distance between the devices and the MSNTN01, and ensure there are no interferences.
- If the security settings are not working, double-check the encryption type and password.
Pros & Cons of proxycast Control of the MSNSwitch
Pros
- High-performance networking with fast data rates and stable connections
- Advanced security features to protect your network
- Compact design and PoE support for easy installation
- Easy setup and configuration through a web interface or mobile app
Cons
- Limited range compared to some other MSNSwitches
- No built-in cooling fans, which may cause overheating in some environments
Customer Reviews of Control of the MSNTN01
The proxycast has received positive reviews from customers who appreciate its high-performance networking, advanced security features, and easy setup. Common complaints include limited range and occasional overheating, but these issues are relatively rare and do not significantly impact the overall performance of the proxycast Control of the MSNSwitch MSNTN01.
Faqs
How should the MSNSwitch MSNTN01 be originally configured?
Is it possible for me to operate the MSNSwitch MSNTN01 when I'm not at home?
What installation requirements does the MSNSwitch MSNTN01 have?
Which standard troubleshooting procedures can be used to fix connectivity problems on the MSNSwitch MSNTN01?
How can I restore the factory settings of the MSNSwitch MSNTN01?
How can I upgrade the MSNSwitch MSNTN01's firmware?
What safety measures are recommended for the MSNSwitch MSNTN01?
How can I set up the MSNSwitch MSNTN01 for automatic reboots and network monitoring?
Which routers and modems are compatible with the MSNSwitch MSNTN01?
Which warranty does the MSNSwitch MSNTN01 come with?
Leave a Comment