Qual Gear TV Wall Mount TM-020-BLK Instruction Manual
Content
Introduction
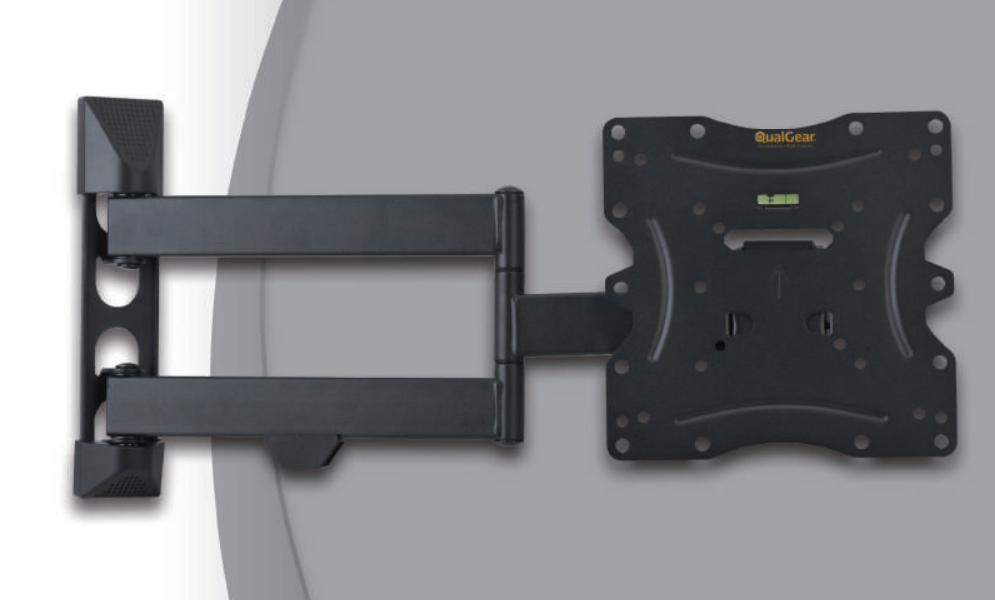
The Qual Gear TV Wall Mount TM-020-BLK is a versatile and durable mounting solution designed to securely hold flat-screen TVs ranging from 32 to 70 inches. With a robust construction and a sleek black finish, this mount supports up to 150 pounds, ensuring stability and safety for your television. Its full-motion design allows for easy tilting and swiveling, providing optimal viewing angles in any room. Priced at $49.99, the TM-020-BLK is an excellent choice for enhancing your home entertainment setup.
Specifications
- Supported TV sizes: 37-70 inches
- Weight capacity: Up to 110 lbs
- VESA compatibility: 100x100, 200x100, 200x200, 300x200, 300x300, 400x200, 400x300, 400x400 mm
- Tilt adjustment: -15° to +15°
- Swivel adjustment: ±45°
- Level adjustment: ±3°
- Material: High-grade steel
- Color: Black
- Included hardware: Wall anchors, screws, and Allen wrench
For Most 23" to 42" Flat Screen TVs and Monitors
CAUTION!
Do not exceed the maximum rated weight specified. Otherwise, serious injury or property damage may occur.
VESA
75x75 | 100x100 | 200x100 | 200x200
NOTE: Please read the entire installation manual before you start installation and assembly.
WARNING
- Do not begin to install your QualGear product until you have read and understood all the instructions and warnings contained in this installation manual.
- This product should only be installed by someone of good mechanical aptitude, has experience with basic building construction, and who fully understands these instructions.
- This product was designed to be installed and utilized only as specified in this manual. Improper installation of this product may cause damage or serious injury. QualGear is not liable for the improper use or installation of its products.
- Make sure that the supporting surface will safely support the combined load of the equipment and all attached hardware and components.
- Always use an assistant or mechanical lifting equipment to safely lift and position the equipment.
- Tighten screws firmly, but do not over-tighten. Over-tightening can damage the items, greatly reducing their holding power.
- ALL QUALGEAR products are intended for indoor use only and any outdoor use voids the limited warranty.
- ALL QUALGEAR products are designed and tested for residential use only and any commercial use voids the limited warranty. For warranty information, please visit http://www.qualgear.com/warranty.php.
- If mounting to wooden studs, make sure that mounting screws are anchored into the center of the studs. Use of an edge-to-edge stud finder is highly recommended.
- Never exceed the maximum rated weight specified in this manual.
- All bolts and screws must be used at the designated points in the installation instructions to prevent property damage and/or personal injury.
- DO NOT install near air conditioner vents or where there is excessive dust or smoke.
- When drilling holes in the wall, it is very important to take care of electrical cables, water, or gas pipes in the wall.
This product was designed to be installed on the following wall construction only:
WALL CONSTRUCTION
- Wooden Stud: Included
- Wooden Beam: Included
- Solid Concrete: Included
- Brick: Included
- Other: Contact Qualified Professional
Parts Checklist
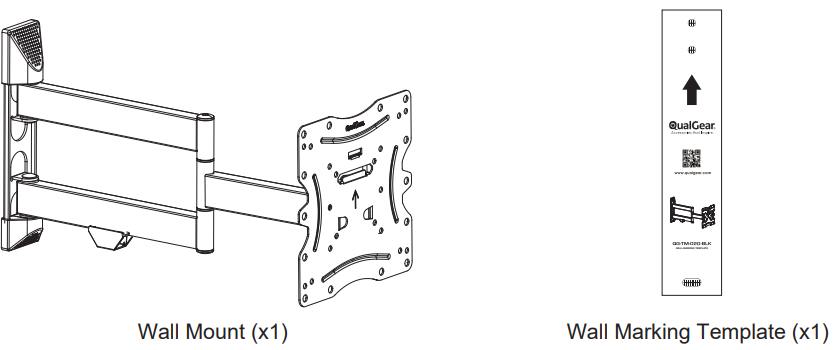
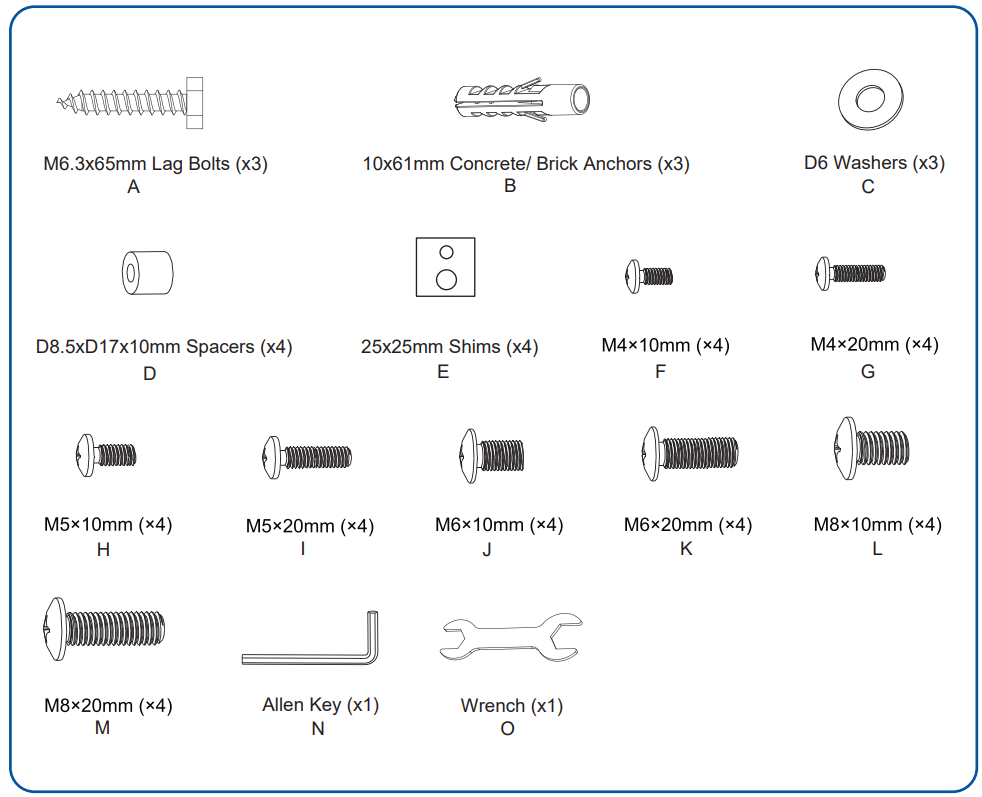
IMPORTANT: Before starting installation, please check that all parts shown in this checklist are included. If any parts are missing or damaged, contact your local distributor for replacement parts and do not start assembly and installation until you receive all the parts.
Hardware Package
Description
The Qual Gear TV Wall Mount TM-020-BLK boasts a modern and sleek design that complements any home decor. The mount is constructed from high-grade steel, ensuring it can support heavy TVs without compromising on stability. It offers a full range of motion with tilt, swivel, and level adjustments, allowing you to find the perfect viewing angle. The slim profile keeps the TV close to the wall, creating a clean and minimalist look. The mount also includes cable management features to keep your cables organized and hidden from view.
Installation Instructions
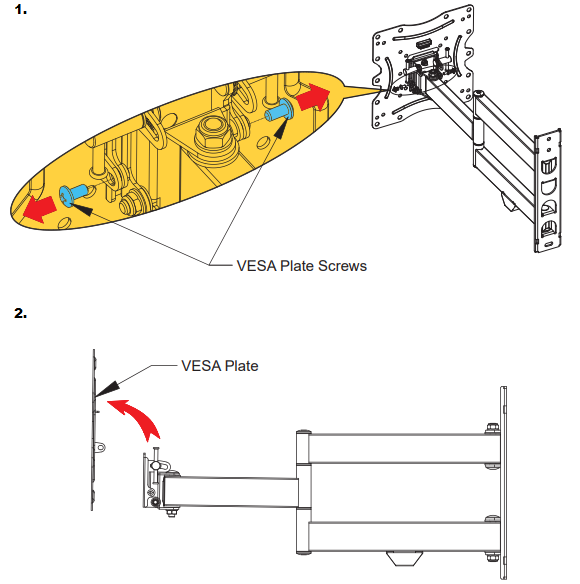
Remove the VESA Plate
- Loosen and remove the VESA plate screws on the VESA plate as shown above.
Lift and remove the VESA plate from the mount.
WARNING
- Make sure that mounting screws are anchored into the center of the studs. The use of a stud finder is highly recommended.
- Installers are responsible to provide hardware for other types of mounting situations.
- Installers must verify that the supporting surface will safely support the combined TIPweight of the equipment and all attached hardware and components.
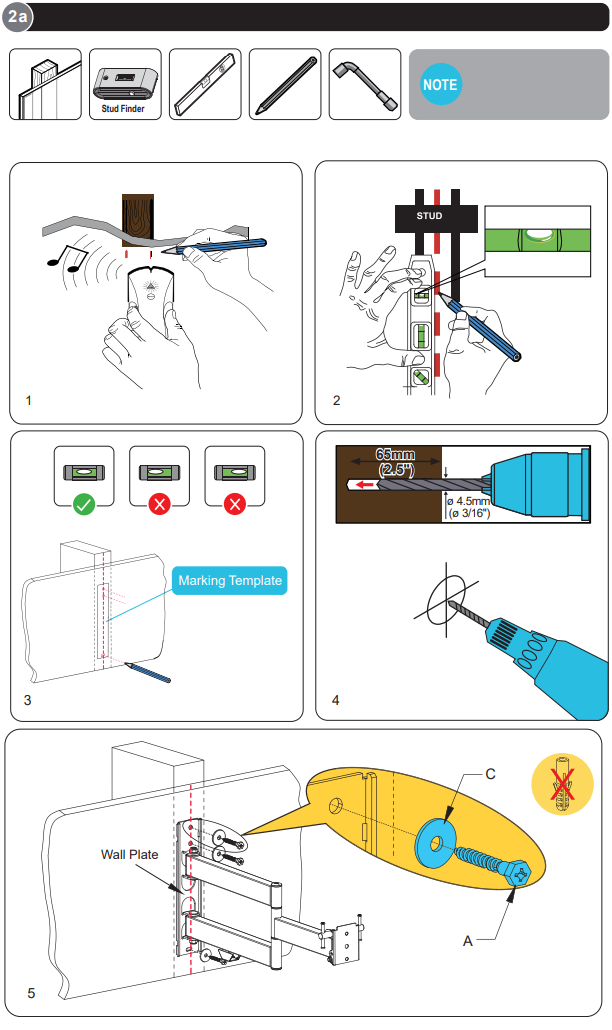
Mounting to a Wooden Stud Wall
NOTE
For concrete or brick wall mounting, follow Step 2b.
- Using an edge-to-edge stud finder, find the edges of the stud.
- Using a level, mark the centerline of the stud.
- Using the marking template provided, mark three holes for drilling on the centerline of the stud.
- Using a power drill and 3/16" drill bit, drill pilot holes of 3/16" (4.5mm) diameter and at least 2.5" (65mm) depth at the marked locations in the previous step.
Mount the wall plate and tighten with the provided lag bolts (A) and D6 washers (C) using a socket wrench.
Mounting to a Concrete or a Brick Wall
- Hold the marking template provided against the wall where you want to install the TV, mark three holes for drilling.
- Using a power drill and a 3/8" masonry drill bit, drill mounting holes of 3/8" (10 mm) diameter and 2.7" (70 mm) depth at the marked locations in the previous step.
WARNING: Installers must verify that the supporting surface will safely support the combined weight of the equipment and all attached hardware and components. Place concrete anchors (B) in each hole. Tap each anchor flush with the wall using a hammer. Mount the wall plate and tighten with the provided lag bolts (A) and D6 washers (C) using
a socket wrench.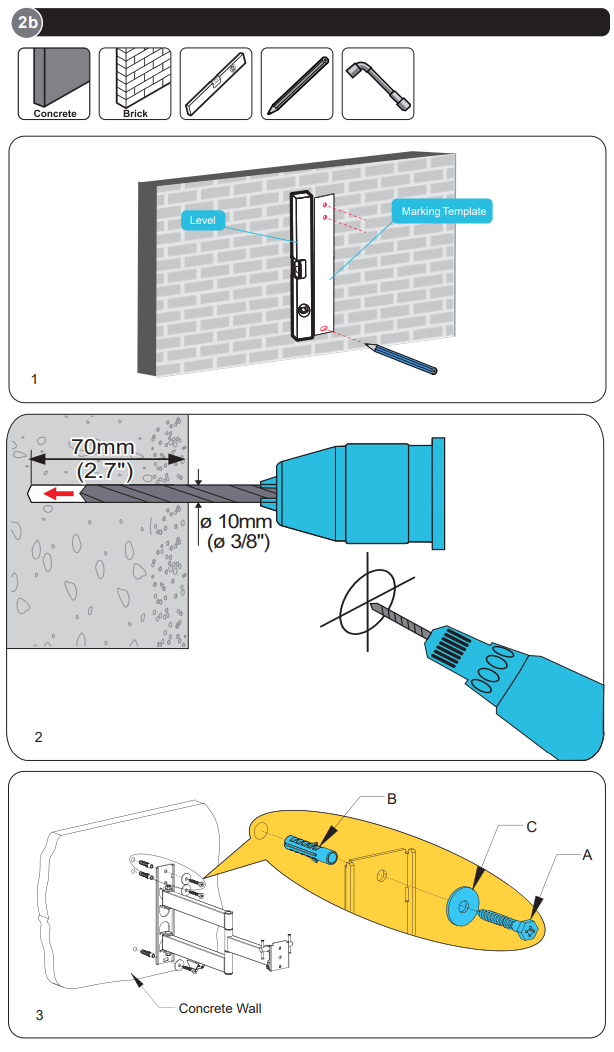
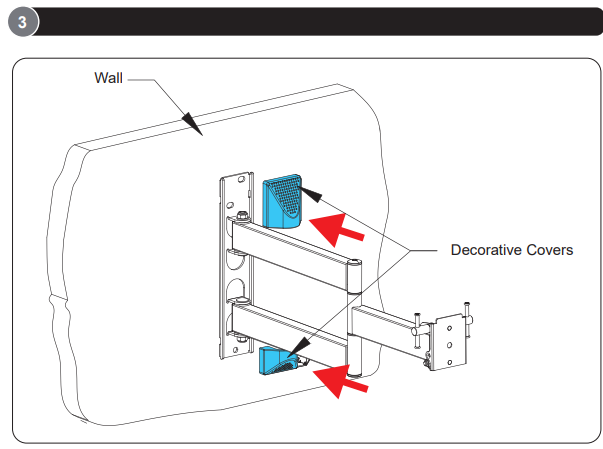
Installing the Decorative Covers
Insert the decorative covers along the wall plate rail until they fit snuggly onto the wall plate.
Installing the VESA Plate onto the TV
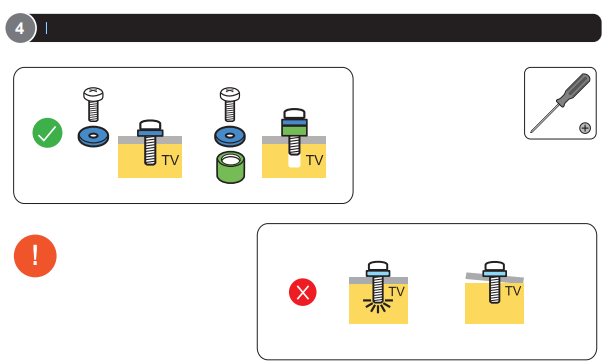
NOTE: Select the proper screw by hand-tightening screws to check thread depth for your TV.
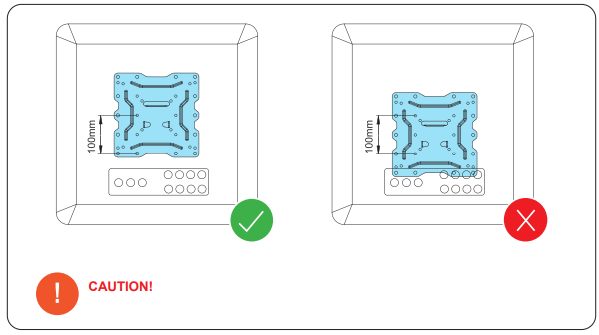
CAUTION! To avoid blocking the input panel on the back of the TV, move the VESA plate up or down to select a different mounting position.
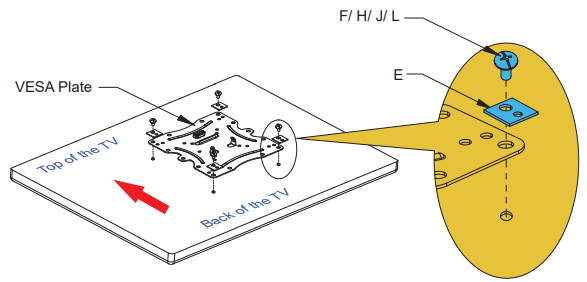
Flat Back Panel
Choose the appropriate screws according to the type of your TV, and add shims (E) if necessary, attach the VESA plate to the back of the TV and tighten screws using a screwdriver.
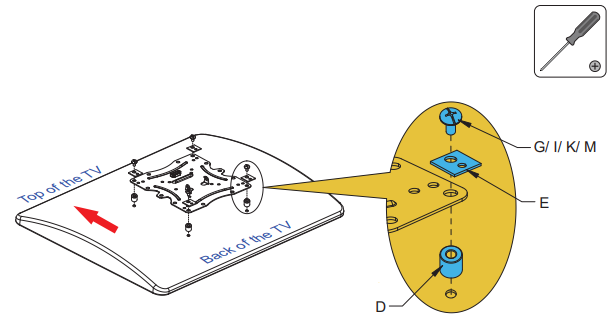
Curved Back Panel
Choose the appropriate screws according to the type of your TV, add shims (E) and spacers (D) if necessary, then attach the VESA plate to the back of the TV and tighten screws using a screwdriver.
NOTE Tighten all screws but do NOT over tighten.
Hanging the TV onto the Wall Mount
HEAVY!
Use an assistant for this step.
Using an assistant, hang the TV onto the wall bracket as shown above.
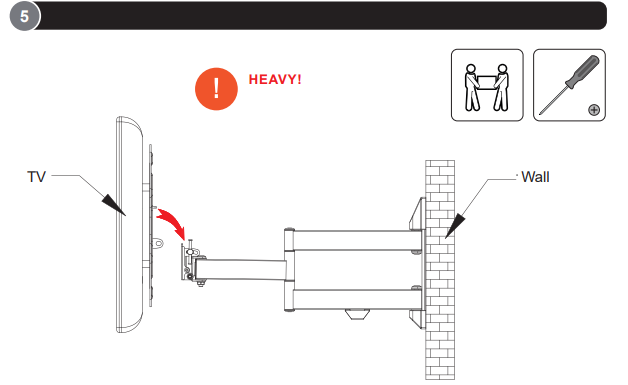
While holding the TV securely by an assistant, ensure the VESA plate screws are tightened by using a screwdriver.

Cable Management
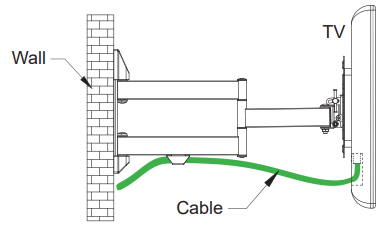
Connect the cables to your TV, and run the cables through the cable clip.
NOTE
Leave slack in the cables for cantilever arm movement.
Adjusting the TV
NOTE: Tighten all bolts and screws after adjusting the TV.
- Tension was preset at the factory.
- To adjust tension, loosen or tighten arm adjustment bolts using allen key (N) and wrench (O).
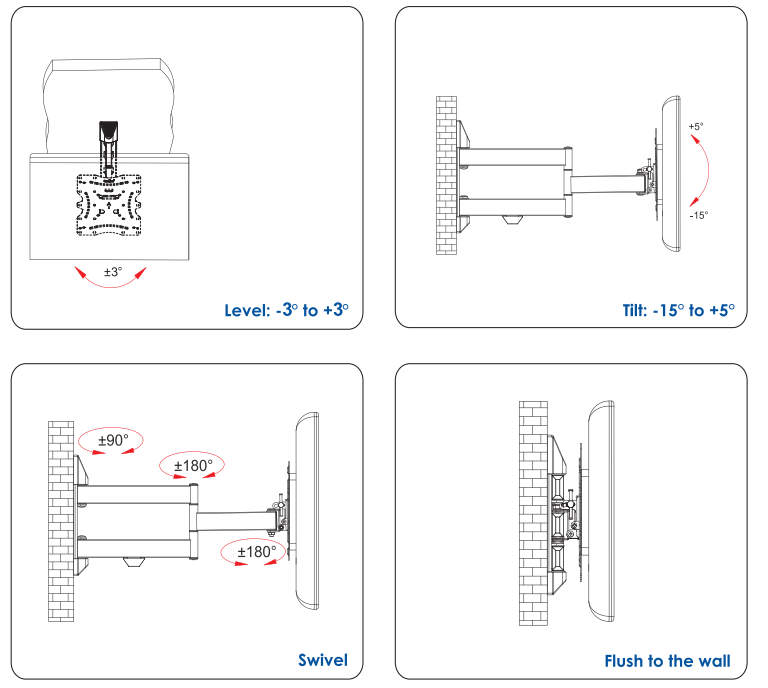
TV or monitor can be adjusted to the desired location by tilting and swiveling the bracket.

Setup Guide
To set up the Qual Gear TV Wall Mount TM-020-BLK,
- Start by locating the wall studs and marking the spot where you want to install the mount.
- Use the included wall anchors and screws to secure the mount to the wall.
- Next, attach the VESA plate to the back of your TV using the provided screws.
- Align the VESA plate with the mount and gently push the TV into place.
- Adjust the tilt, swivel, and level as needed to achieve your desired viewing angle.
- Ensure all connections are secure before releasing the TV.
Adjustments
To level the TV, loosen the locknut slightly, level the TV, and tighten the locknut.
Maintenance
Please check that the TV wall mount is secure and safe to use at regular intervals. If you have any questions regarding any of the instructions or warnings, please contact your local distributor (OR) contact.
Qual Gear TV Wall Mount TM-020-BLK Troubleshooting
If your TV is not level,
- Check if the level adjustment has been properly set.
- Ensure all screws and bolts are tightened securely.
For issues with swivel or tilt,
- Verify that the movement mechanisms are not obstructed by cables or other objects.
In case of instability,
- Re-check the weight capacity and ensure it matches your TV's weight.
- Always follow safety precautions when installing heavy objects to avoid injury or damage.
Warranty
1-Year Limited Warranty
Pros & Cons
Pros:
- Sturdy and durable construction
- Full range of motion for optimal viewing angles
- Slim profile for a minimalist look
- Cable management features for organized setup
- Wide VESA compatibility
- Affordable pricing
Cons:
- Limited to TVs up to 70 inches
- Some users may find the installation process complex
- No additional features like motorized adjustments
Customer Reviews
Customers have praised the Qual Gear TV Wall Mount TM-020-BLK for its ease of installation and sturdy build. Many have appreciated the full range of motion and the slim profile that keeps their TV close to the wall. However, some users have noted that the instructions could be clearer, and a few have experienced minor issues with leveling the TV.
Common Complaints
Some common complaints include difficulties in aligning the VESA plate with the mount and minor issues with achieving perfect level adjustments. However, these issues are generally resolved by following the user manual or seeking additional support from Qual Gear.
Faqs
What is the weight capacity of the Qual Gear TV Wall Mount?
What are the supported TV sizes for this wall mount?
Does the Qual come with cable management features?
How do I adjust the tilt, swivel, and level of the Qual Gear?
Is theTV Wall Mount TM-020-BLK compatible with all VESA patterns?
What tools are included with the Qual Gear?
Can I install the Wall Mount on a drywall without studs?
How can I ensure my TV is perfectly level on the TM-020-BLK?
Leave a Comment
