Razer Goliathus Chroma MouseMat RZ02-025001 User Guide
Content
Introduction
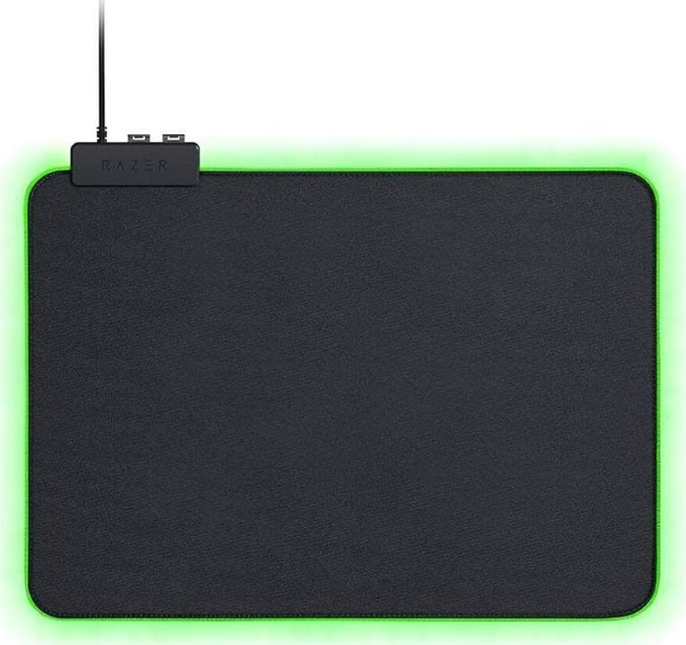
The Razer Goliathus Chroma soft gaming mouse mat is now Powered by Razer Chroma. Featuring multi-color lighting with inter-device color synchronization, the bestselling mat has an optimized micro-textured cloth surface to allow for both speed and control playstyles—providing ultimate precision no matter what game you play. Optimized for all sensors, playstyles and sensitivity settings, you get total tracking responsiveness and performance. Priced at approximately $59.99, it combines functionality with aesthetic appeal for gamers seeking an edge.
PACKAGE CONTENTS
- Razer Goliathus Chroma
- Important Product Information Guide
SYSTEM REQUIREMENTS
- HARDWARE REQUIREMENTS
PC with a free USB port - RAZER SYNAPSE 3 REQUIREMENTS
Windows 7 64-bit (or higher)
Internet connection
500 MB of free hard disk space
REGISTRATION
Register your product online at https://razerid.razer.com/warranty to get real-time information on your product’s warranty status. If you haven’t registered for a Razer ID yet, register now at https://razerid.razer.com to get a wide range of Razer benefits.
TECHNICAL SUPPORT
- 6 months limited manufacturer’s warranty.
- Free online technical support at https://support.razer.com
TECHNICAL SPECIFICATIONS
- Powered by Razer Chroma lighting with 16.8 million customizable color options
- Micro-textured surface balanced for speed and control
- Razer Synapse 3 (Beta) enabled
- Non-slip rubber base Cable catch
APPROXIMATE SIZE & WEIGHT
- Length: 255 mm / 10.05 in
- Width: 355 mm / 13.99 in
- Height: 3 mm / 0.12 in
- Weight: 230 g / 0.51 lbs
DEVICE LAYOUT
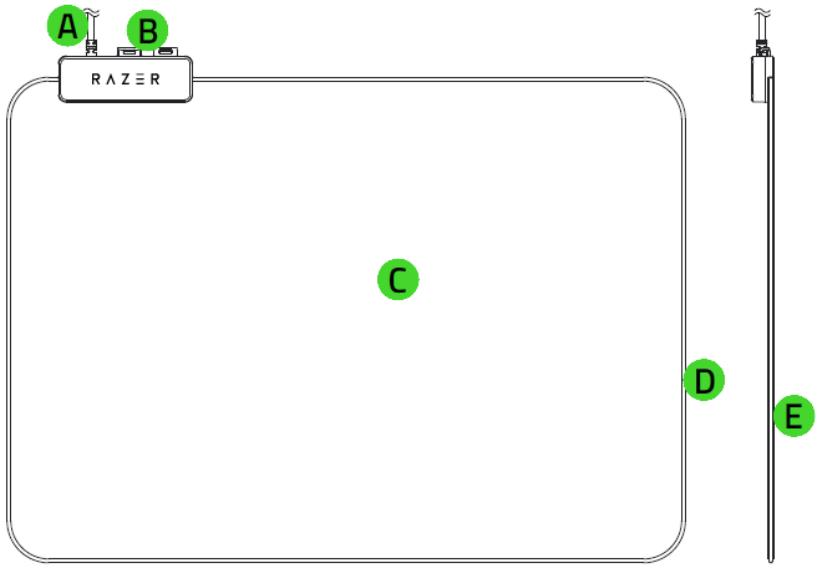
- USB cable connector
- Mouse cable catch
- Cloth surface
- Chroma light tube
- Non-slip rubber base
Description
The Razer Goliathus Chroma MouseMat boasts a micro-weave cloth surface that provides a precise and smooth glide for your mouse. The non-slip rubber base ensures that the mousepad stays in place even during intense gaming sessions. The product's design is sleek and modern, making it a stylish addition to any gaming setup.
The Chroma lighting system allows for extensive customization, enabling users to personalize their gaming environment with a wide range of colors and effects. This feature integrates seamlessly with other Razer Chroma-enabled devices, creating a unified and immersive gaming experience.
INSTALLING RAZER SYNAPSE 3 FOR YOUR RAZER GOLIATHUS CHROMA
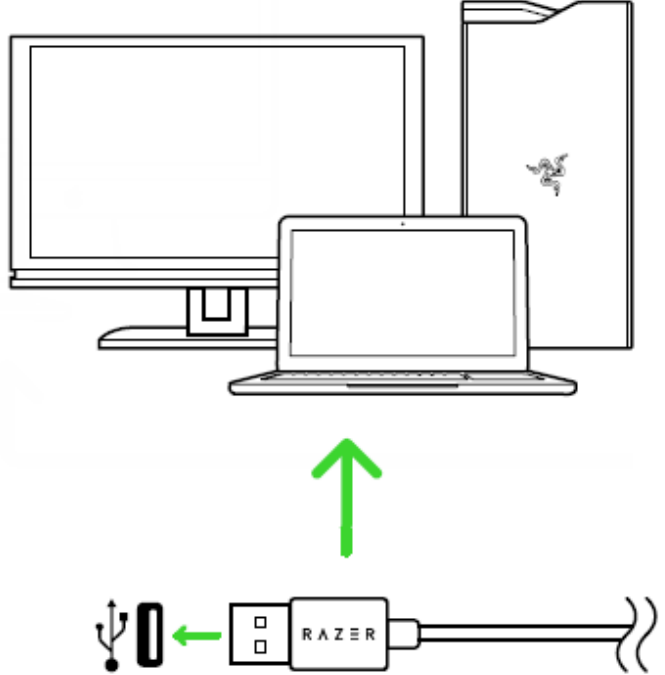
- Step 1: Make sure your Razer device is connected to the USB port of your computer.
- Step 2: Install Razer Synapse 3 when prompted* or download the installer from https://razer.com/synapse
- Step 3: Create your Razer ID or log in using an existing account.
*Applicable for Windows 8 or later.
CONFIGURING RAZER GOLIATHUS CHROMA VIA RAZER SYNAPSE 3
Disclaimer: The features listed here require you to log in to Razer Synapse. These features are also subject to change based on the current software version and your Operating System.
SYNAPSE TAB
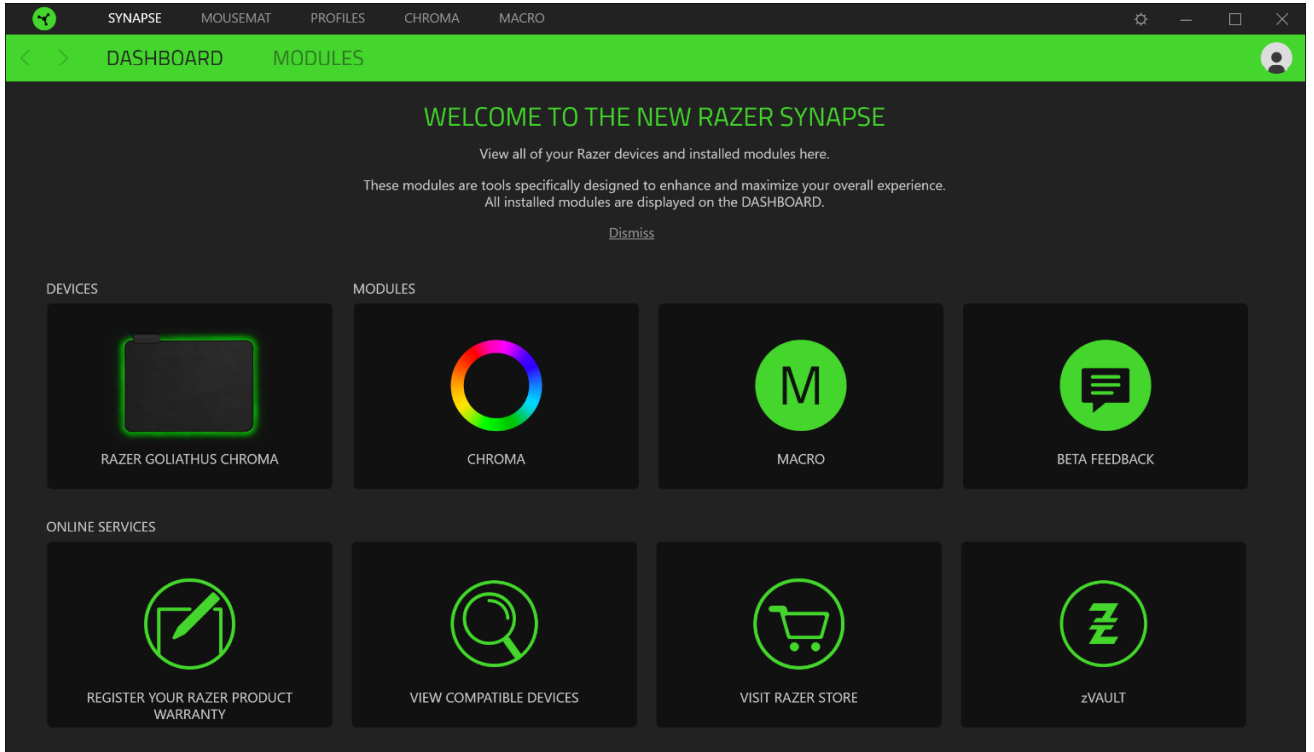
The Synapse tab is your default tab when you first launch Razer Synapse 3. This tab allows you to navigate the Dashboard subtab.
Dashboard
The Dashboard subtab is an overview of your Razer Synapse 3 where you can access all your Razer devices, modules, and online services.
MOUSE MAT TAB
The Mouse Mat tab is the main tab for your Razer Goliathus Chroma. From here, you can change your device’s settings such as Profiles and lighting. Changes made under this tab are automatically saved to your system and cloud storage.
Lighting
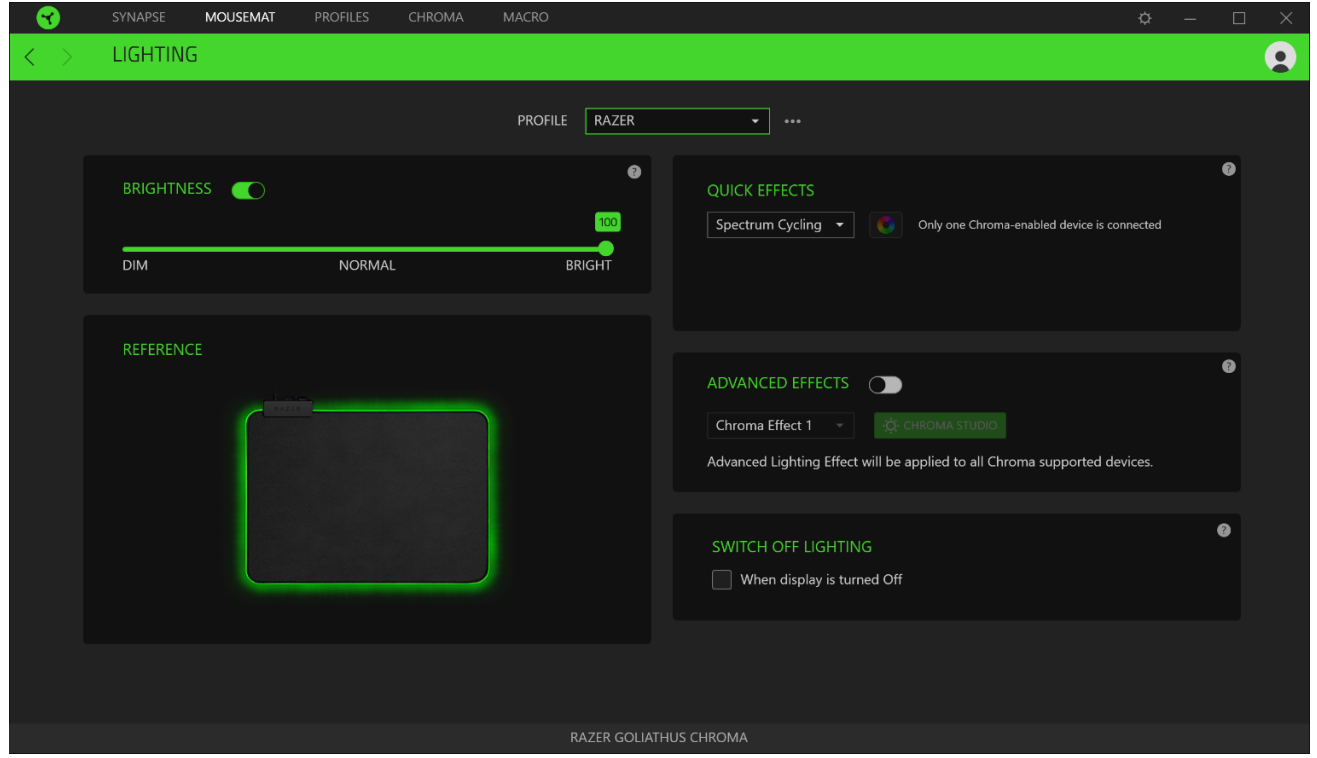
The Lighting subtab enables you to modify your Razer device’s profile and light settings.
Profile
Profile is a data storage for keeping all your Razer peripheral’s settings. By default, the profile name is based on your system’s name. To add, rename, duplicate, or delete a profile, simply press the Miscellaneous button (![]() ).
).
Brightness
You can turn off your Razer device’s lighting by toggling the Brightness option or increase/decrease the luminance using the slider.
Switch Off Lighting
This is a power saving tool which allows you to disable your device’s lighting in response to your system’s display turning off and/or automatically power down when your Razer Goliathus Chroma has been idle for a set amount of time.
Quick Effects
A number of quick effects can be selected and applied to your mouse mat’s lighting, as listed here:
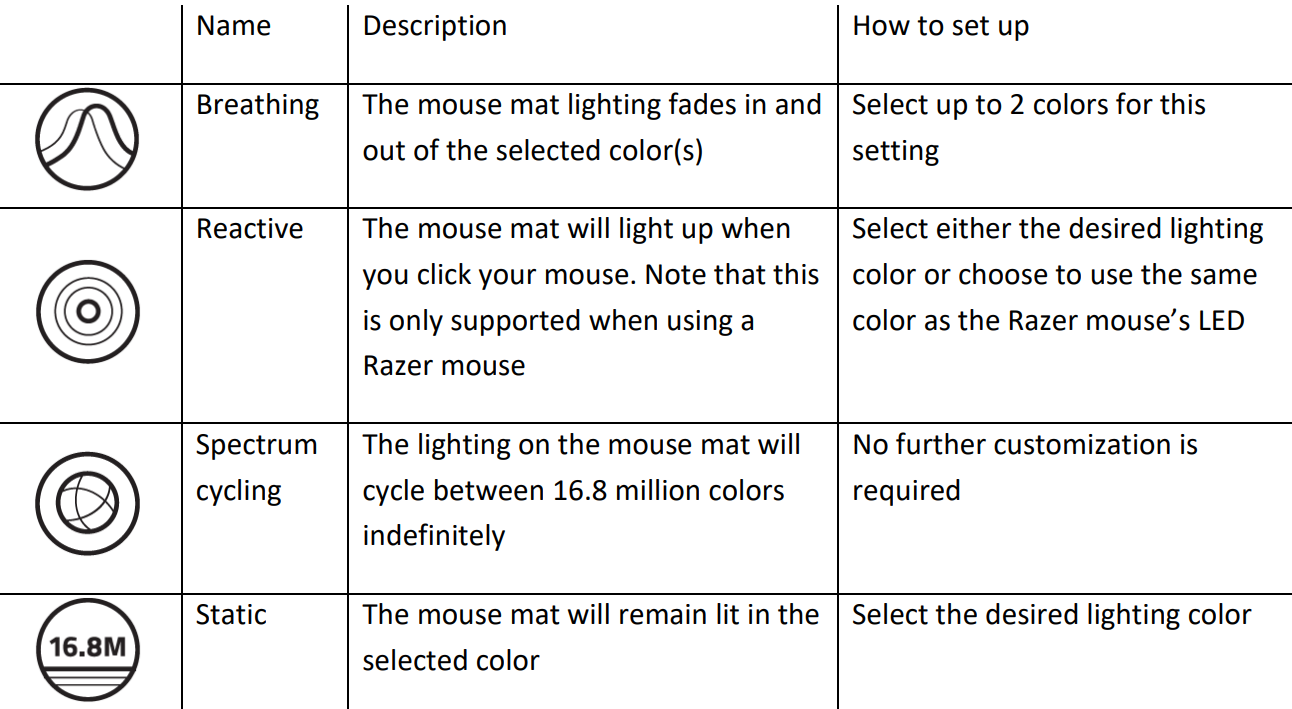
If you have other supported Razer Chroma-enabled devices, you can synchronize their quick effects with your Razer device by clicking the Chroma Sync button (![]() ).
).
Advanced Effects
The Advanced Effects option allows you to choose a Chroma Effect you want to use on your Razer Chroma-enabled peripheral. To start making your own Chroma Effect, simply press the Chroma Studio button (![]() ). Click here to learn more about the Chroma Studio
). Click here to learn more about the Chroma Studio
PROFILES TAB
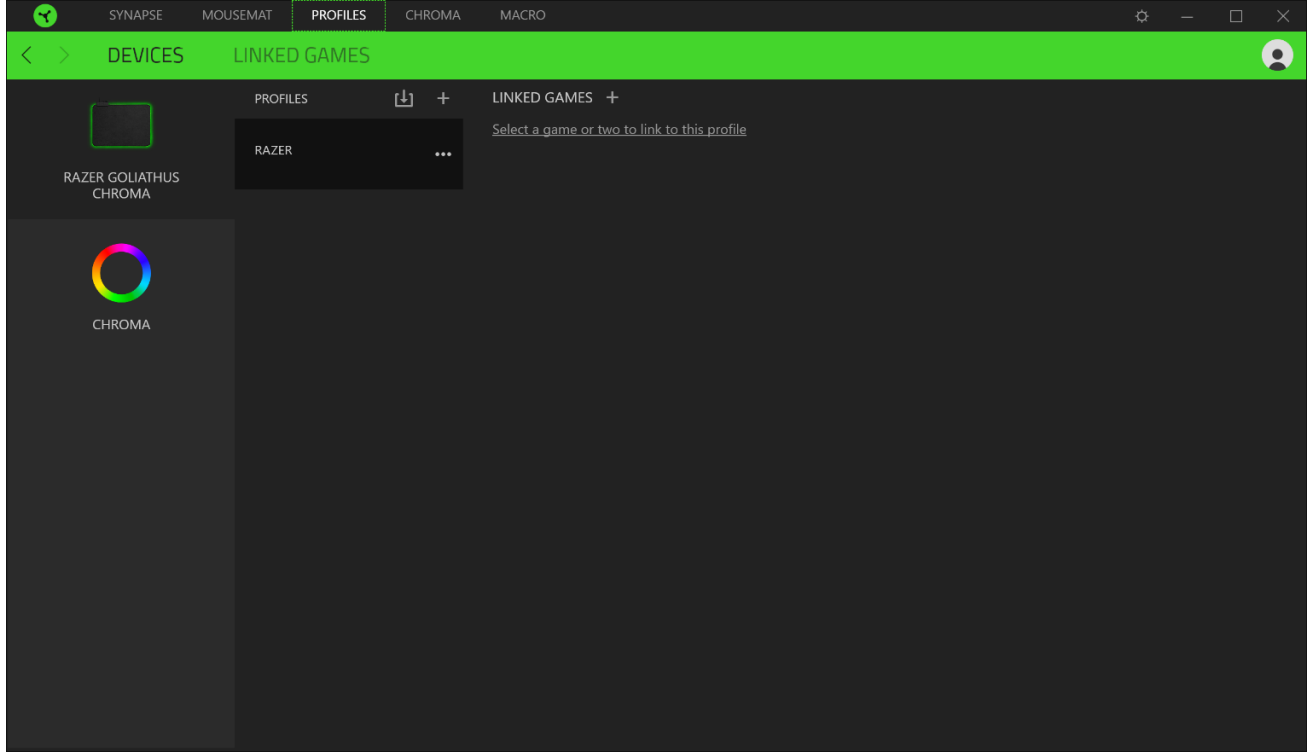
The Profiles tab is a convenient way of managing all your profiles and linking them to your games and applications.
Devices
View which Razer device is using a specific profile using the Devices subtab. To create a new profile within the selected device, simply click the add button (![]() ). To rename, duplicate, or delete a profile, simply press the Miscellaneous button (
). To rename, duplicate, or delete a profile, simply press the Miscellaneous button (![]() ). Each profile can be set to automatically activate when you run an application using the Link Games option.
). Each profile can be set to automatically activate when you run an application using the Link Games option.
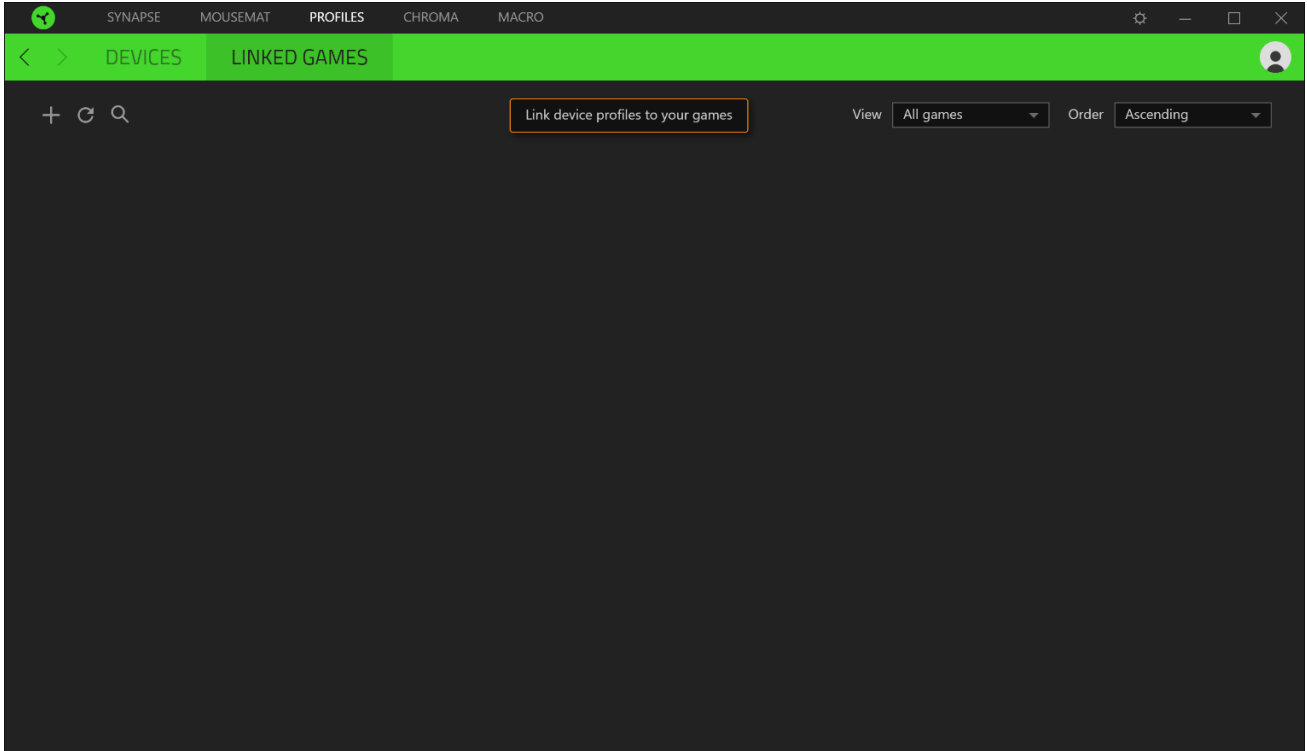
Linked Games
The Linked Games subtab gives you the flexibility to add games, view peripherals that are linked to games, or search for added games. You can also sort games based on alphabetical order, last played, or most played. Added games will still be listed here even if it is not linked to a Razer device.
CHROMA TAB
The Chroma tab enables you to either create advanced lighting effects through the Studio subtab or enable/disable third party integrated apps to all Razer Chroma-enabled devices for a truly immersive lighting and gaming experience.
Studio
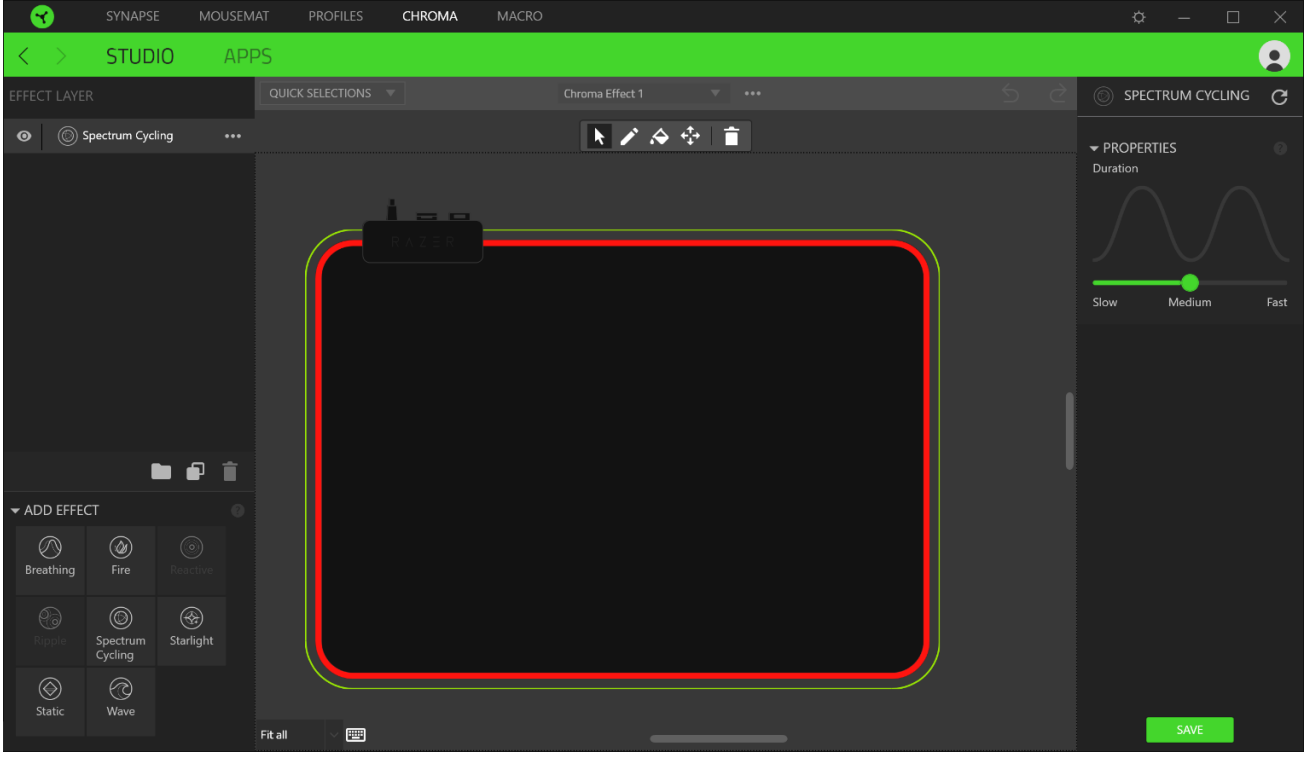
The Studio subtab enables you to create and edit your own Chroma Effects which you can apply to all supported Razer Chroma-enabled devices. This tab can also be accessed under the Dashboard’s Chroma module.
To add, rename, duplicate, or delete a Chroma Effect, simply click the Miscellaneous button (![]() ). To revert the selected layer to its original setting, click the Reset button (
). To revert the selected layer to its original setting, click the Reset button (![]() ). And to apply and save a modified layer, click the Save button (
). And to apply and save a modified layer, click the Save button (![]() ).
).
Quick Selections
The Quick Selections menu are a preset of lighting regions which you can use to easily customize your Razer device. Alternatively, you can individually select an LED by clicking on the area or select multiple LEDs by using click and drag.
Effect Layer
Lighting effects are arranged in layers wherein the topmost layer takes priority. . You can group multiple lighting effects by clicking the Add Group button (![]() ) and dragging the layers you want to group to the newly added folder, duplicate a layer by clicking the Copy button (
) and dragging the layers you want to group to the newly added folder, duplicate a layer by clicking the Copy button (![]() ), or delete a layer by clicking the Trash button (
), or delete a layer by clicking the Trash button (![]() ). Some layers may have overlapping effects so you may need to arrange layers in a specific order.
). Some layers may have overlapping effects so you may need to arrange layers in a specific order.
Add Effect
All supported quick effects are listed under the Add Effect option which you can click to insert onto the Effect Layer. Quick Effects can be edited on the Chroma Studio by allowing you to change its preset color, properties, and playback options.
Apps
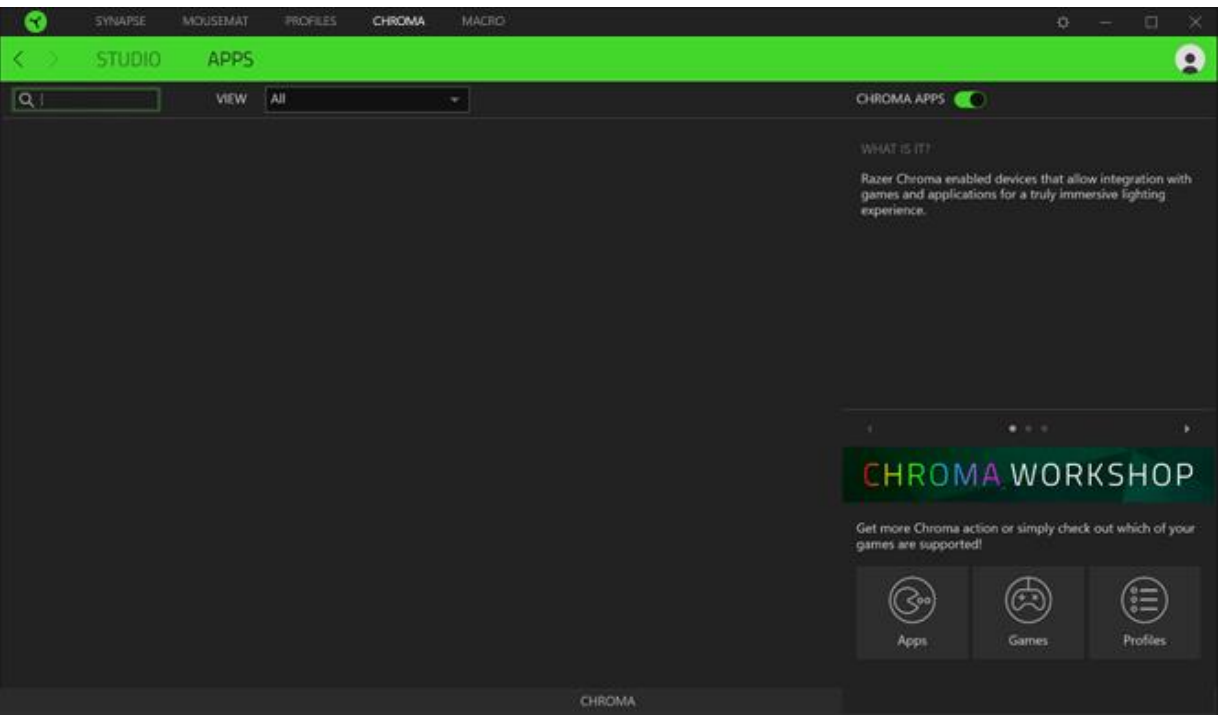
The Apps subtab is where you can enable or disable third party integrated apps for your Razer Chroma-enabled peripherals. The Apps tab can also direct you to the Chroma Workshop where you can download these third-party apps.
MACROS TAB
If you need to accurately execute a series of complex commands then you need a Macro. A macro is a set of recorded keystrokes, button presses, and cursor movements. The Macros tab allows you to create, edit, and organize these macros so that you can assign them to your mouse buttons. You can also share macros with others using the import button (![]() ) and export button (
) and export button (![]() ).
).
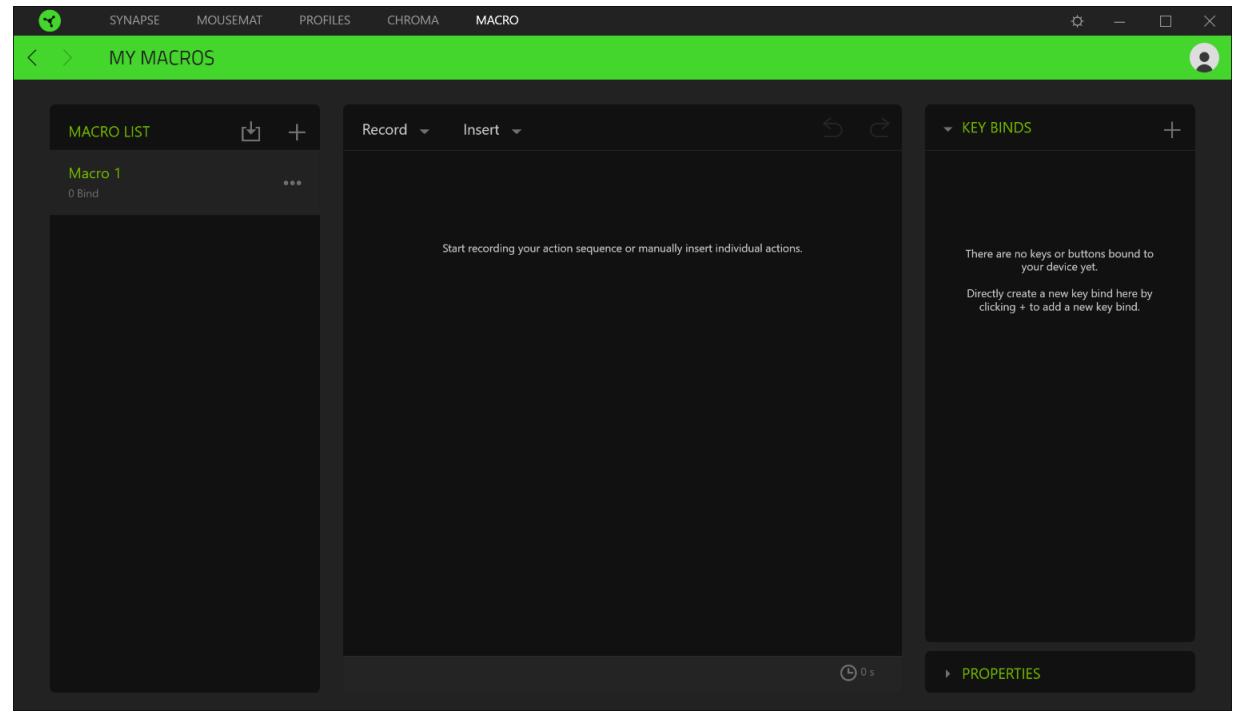
There are also other options available in the macro section such as creating a new macro by clicking the add button (![]() ), delete the current macro by clicking the trash button (
), delete the current macro by clicking the trash button (![]() ), and duplicate the current macro using the copy button (
), and duplicate the current macro using the copy button (![]() ).
).
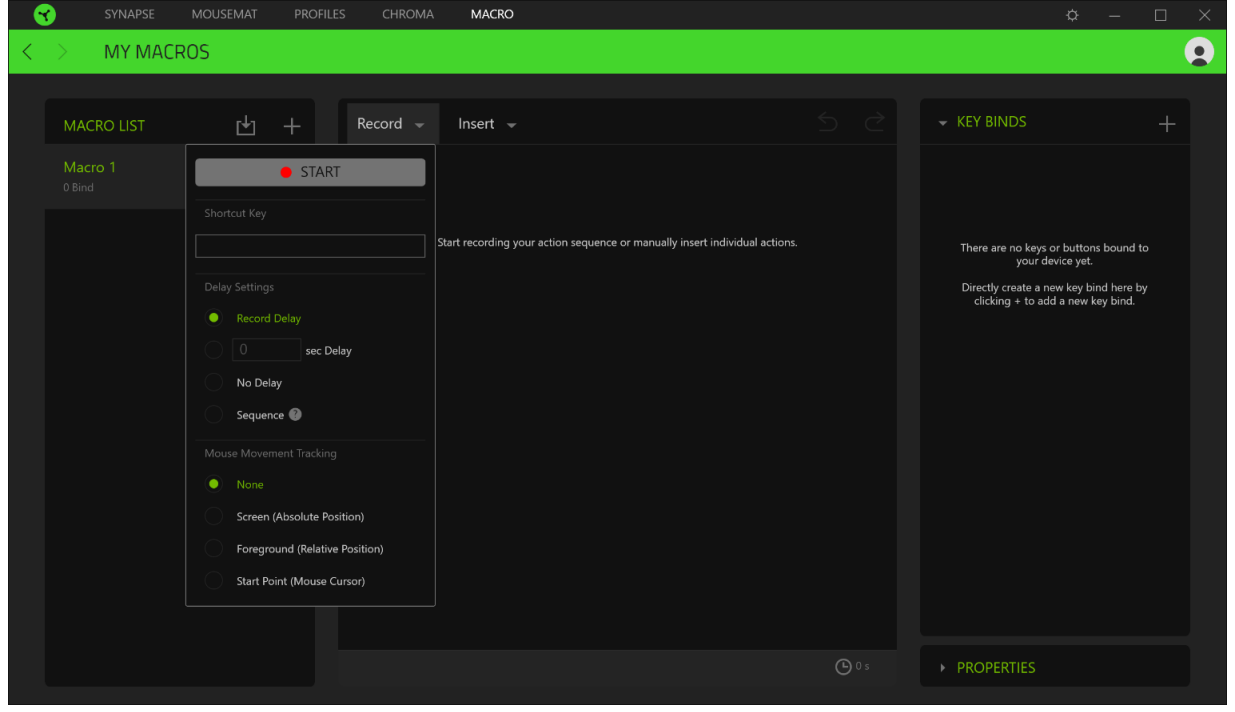
To create a macro, simply select a macro name to store your commands, then click the Record menu. Assign a key or button for the macro on Shortcut Key field, select a delay, and select if you want to include mouse movement tracking. Once you have chosen the settings for the macro, click the Start button (![]() ). After a brief countdown, all your keystrokes and button presses will be recorded on the macro screen. When you are done recording your macro commands, click on the Stop button (
). After a brief countdown, all your keystrokes and button presses will be recorded on the macro screen. When you are done recording your macro commands, click on the Stop button (![]() ) to end the session.
) to end the session.
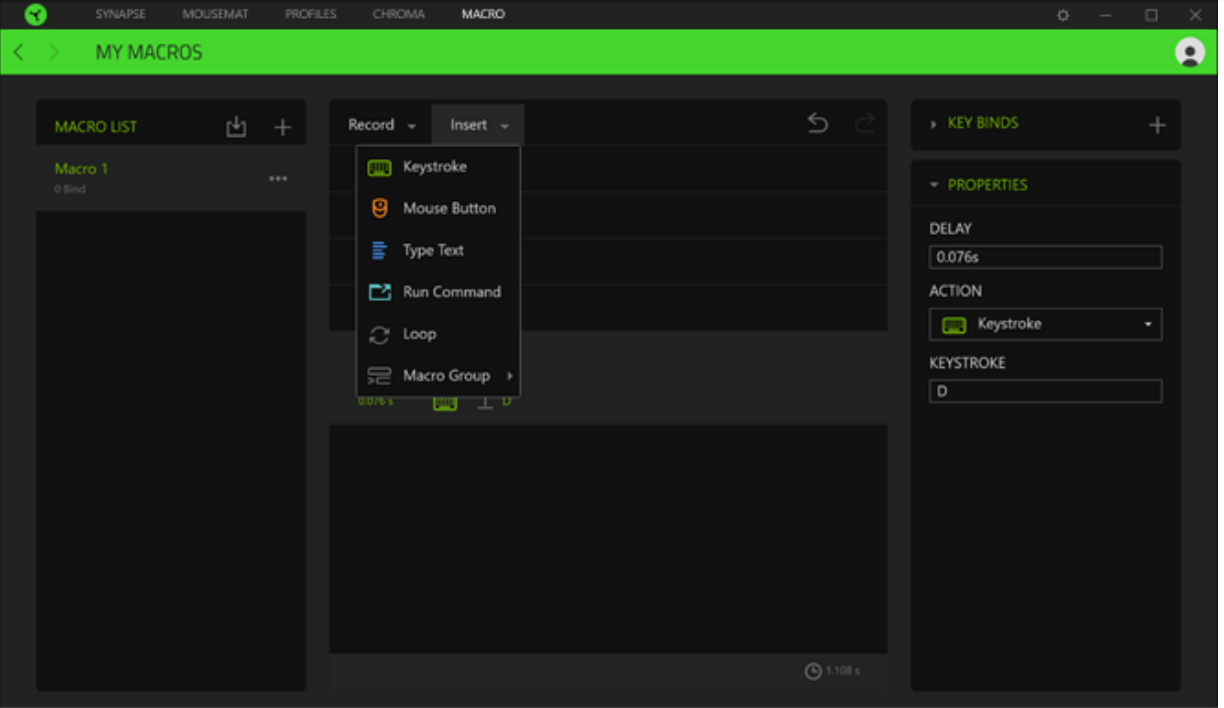
Once you have recorded a macro, you may edit the commands you have entered by selecting each command on the macro screen. Each keystroke or button press is arranged sequentially with the first command shown at the top of the screen. The Insert menu allows you to put in additional keystrokes, button presses, type texts, run commands, loop a set of commands, or insert an entire macro group.
Key Binds
The Key binds option allows you to view the Shortcut Keys for the selected macro.
Properties
The Properties option enables you to individually edit commands, adjust their delay, change actions, and also change the total duration of the macro so that it executes faster or slower.
SETTINGS WINDOW
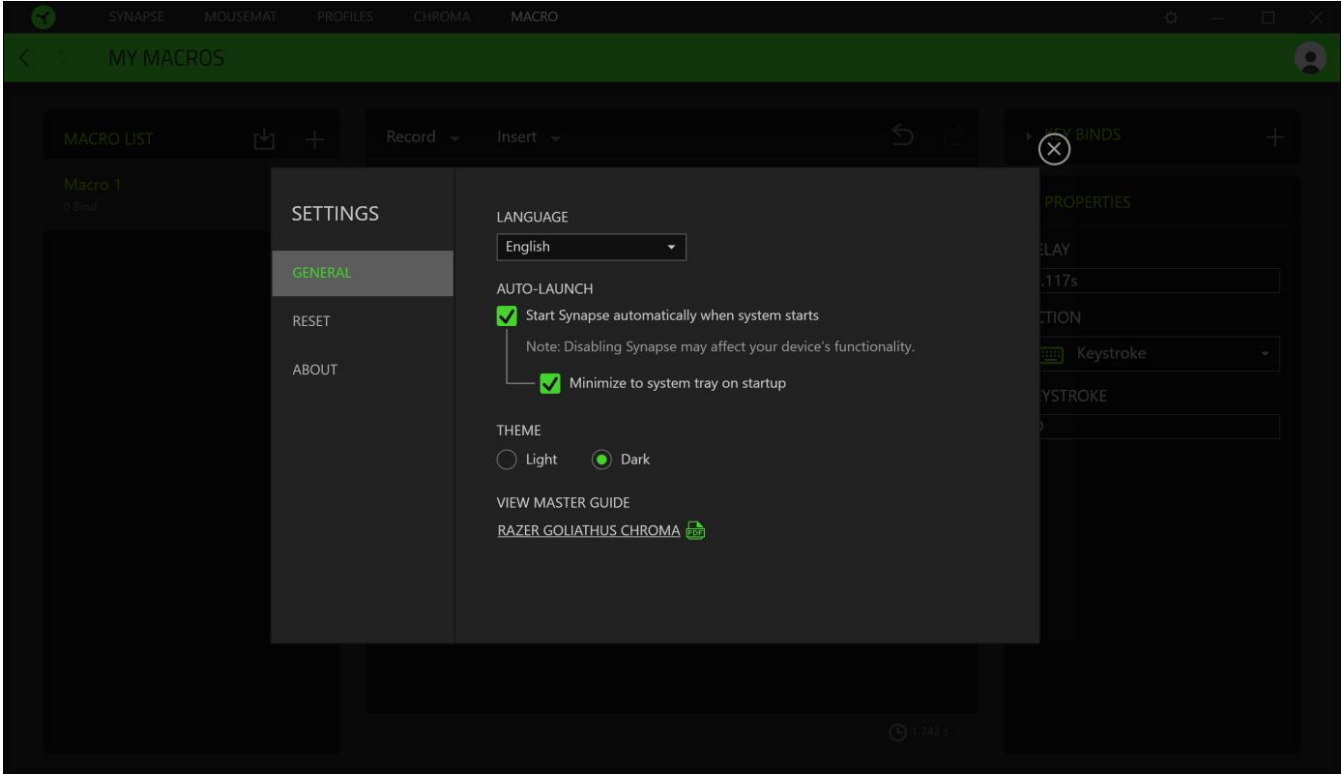
The Settings window, accessible by clicking the (![]() ) button on Razer Synapse 3, enables you to configure the startup behavior, change language, view your Razer device’s master guide, or perform factory reset on any connected Razer device.
) button on Razer Synapse 3, enables you to configure the startup behavior, change language, view your Razer device’s master guide, or perform factory reset on any connected Razer device.
General tab
The default tab of the Settings window, The General tab enables you to change the software’s display language and start-up behavior, or view the master guide of all connected Razer devices.
Reset tab
The Reset tab allows you to perform a factory reset on all connected Razer devices with on-board memory. All profiles stored on the selected device’s on-board memory will be erased.
Note: Performing a factory reset on devices without on-board memory will only create a new profile for your device on Razer Synapse 3 using the default settings.
About tab
The About tab displays brief software information, its copyright statement, and also provides relevant links for its terms of use. You may also use this tab to check for software updates, or as a quick access to Razer’s social communities.
Setup Guide
- Unpack the mousepad and remove any protective coverings from the surface.
- Place the mousepad on a flat, stable surface.
- Connect your Razer mouse to your computer and ensure it is paired with the Razer Synapse software.
- Open Razer Synapse and navigate to the Chroma section to customize the lighting effects of your Goliathus Chroma MouseMat.
- Adjust the lighting settings according to your preferences and sync it with other Chroma-enabled devices if desired.
SAFETY AND MAINTENANCE
SAFETY GUIDELINES
- In order to achieve maximum safety while using your Razer Goliathus Chroma, we suggest that you adopt the following guidelines:
- Should you have trouble operating the device properly and troubleshooting does not work, unplug the device and contact the Razer hotline or go to support.razer.com for support.
- Do not take apart the device (doing so will void your warranty) and do not attempt to operate it under abnormal current loads.
- Keep the device away from liquid, humidity or moisture. Operate the device only within the specific temperature range of 0°C (32°F) to 40°C (104°F). Should the temperature exceed this range, unplug and/or switch off the device in order to let the temperature stabilize to an optimal level.
MAINTENANCE AND USE
The Razer Goliathus Chroma requires minimum maintenance to keep it in optimum condition. Once a month we recommend you unplug the device from the computer and clean it using a soft cloth or cotton swab to prevent dirt buildup. Do not use soap or harsh cleaning agents.
CAUTION: Do not fold, roll, or compress the mouse mat as doing so may damage the product and void the warranty.
Troubleshooting
If you encounter issues with your Razer Goliathus Chroma MouseMat, here are some common problems and solutions:
- Lighting not working: Ensure that the mousepad is properly connected to your computer via Razer Synapse. Check for firmware updates and restart the software.
- Mousepad slipping: Clean the non-slip base of the mousepad and ensure it is placed on a smooth, dry surface.
- Surface wear: Avoid using harsh chemicals or abrasive cleaners on the surface. Instead, use a soft cloth and mild soap solution.
PRODUCT WARRANTY
For the latest and current terms of the Limited Product Warranty, please visit https://razer.com/warranty
Pros & Cons
Pros
- Precision Surface: The micro-weave cloth surface offers smooth and consistent mouse movement.
- Customizable Lighting: Integrate with Razer's Chroma ecosystem for personalized lighting effects.
- Durable Construction: High-quality materials ensure long-lasting use.
- Stable Base: A non-slip rubber base keeps the mousepad in place during gaming sessions.
Cons
- Size Limitations: May be too large for smaller desks or gaming setups.
- Lighting Dependency: Requires connection to a computer for Chroma features to function fully.
- Cleaning Challenges: The micro-weave surface can be tricky to clean if not done carefully.
Customer Reviews
Customers have praised the Razer Goliathus Chroma MouseMat for its excellent tracking performance and vibrant Chroma lighting. Many users appreciate the durable construction and stable non-slip base. However, some reviewers have noted that the large size can be inconvenient for smaller workspaces, and cleaning the surface requires care to avoid damage.
Faqs
How do I customize the lighting on my Razer?
Is the Razer Goliathus Chroma MouseMat compatible with all Razer mice?
How do I clean the Razer Goliathus Chroma MouseMat?
Can I use the Razer Goliathus without connecting it to my computer?
What are the dimensions of the Razer Goliathus Chroma MouseMat?
Does the Chroma have built-in cable management?
How do I troubleshoot issues with my Chroma MouseMat's lighting?
Is the Razer suitable for all types of mice?
Can I adjust the brightness of the Chroma lighting on my Razer Goliathus Chroma MouseMat?
Leave a Comment
