Razor Tricycle PowerRider 360 Owner Manual
Content
Introduction of Razor Tricycle PowerRider 360
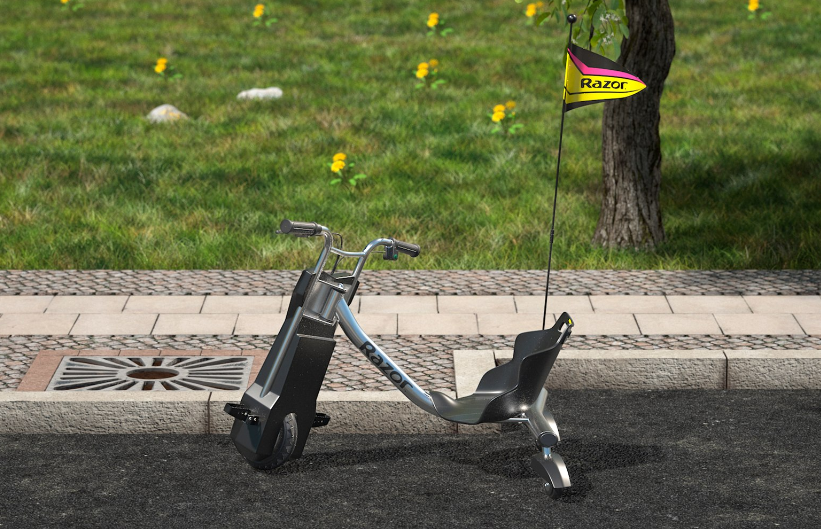
The Razor Tricycle PowerRider 360 is a unique and exciting toy for children who love adventure and action. This innovative tricycle combines the classic design of a tricycle with modern features such as high-performance wheels, a 360-degree spinning motion, and a sleek, stylish design. With an estimated price range of $100 to $150 and a launch date of August 2021, the PowerRider 360 is perfect for kids who want to take their riding experience to the next level.
Detailed Specifications
The Razor Tricycle PowerRider 360 boasts several impressive features that make it stand out from other tricycles. These include:
- High-impact pneumatic front wheel for a smooth and stable ride
- Dual rear wheels with 360-degree spinning motion for exciting tricks and stunts
- A sturdy steel frame that can support up to 160 pounds
- Comfortable, cushioned seat for a comfortable ride
- Adjustable handlebars to accommodate riders of different heights
BEFORE YOU BEGIN
Remove contents from box and check parts against parts diagram found on page 13. Remove the separators that protect the components from damage during shipping. Inspect the contents of the box for scratches in the paint or dents that may have occurred during shipping. Because the PowerRider 360˚ was partially assembled and packed at the factory there should not be any problems, even if the box has a few scars or dents.
Estimated Assembly and Set-Up Time
Allow up to 15–20 minutes for assembly.
WARNING: DO NOT USE NON-RAZOR PRODUCTS WITH YOUR POWERRIDER 360˚.
The PowerRider 360˚ has been built to certain Razor design specifications. The original equipment supplied at the time of sale was selected on the basis of its compatibility with the frame, fork and all other parts. Certain aftermarket products may not be compatible and will void your warranty.
PRODUCT I.D. CODE
- Underneath Frame
- Charger
- UPC Side of Box (not shown)
Required Tools
- 5 mm Allen wrench (Included)
- 8 mm/10 mm/14 mm/17 mm wrenches (Not included)
- Phillips screwdriver (Not Included)
- Valve Extender (Located in the right handlebar grip)
Bicycle tire pump for Schrader valves, with pressure gauge (Not Included)

Attaching the Frame
Required Tools: Two (2) 5 mm Allen wrenches
- Using two (2) 5 mm Allen wrenches, remove the coupling bolt on the end of the frame and discard the plastic insert. Remove the coupling bolt in the middle of the frame.
- Insert the rear frame into the frame assembly. Securely tighten the (long) coupling bolt on the rear frame using two (2) 5 mm Allen wrenches.
Securely tighten the (short) coupling bolt in the middle of the frame using two (2) 5 mm Allen wrenches.
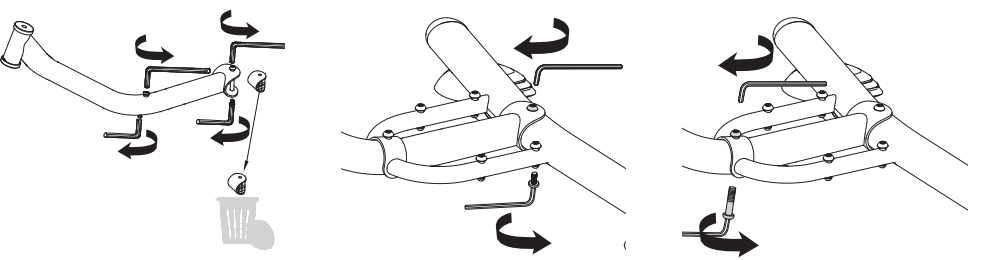
Note: The coupling bolts on the frame are different lengths.
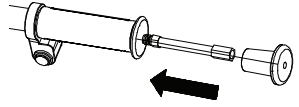
Attaching the Front Fork
Required Tools: 5 mm Allen wrench
- Using a 5 mm Allen wrench, remove the steering bolt from the frame assembly.
- Insert the front fork into the frame assembly.
Be sure to properly align the slot on headtube with the pin on the front fork as shown.
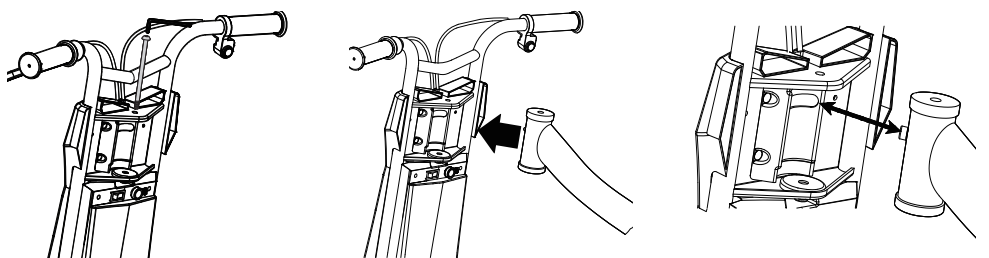
Reinsert the steering bolt and secure using a 5 mm Allen wrench.
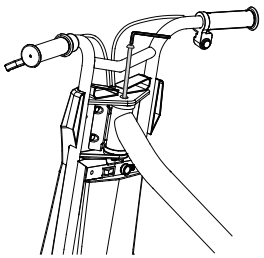
WARNING: Failing to properly tighten the steering bolt that attaches the front fork assembly to the frame assembly can cause you to lose control and fall.
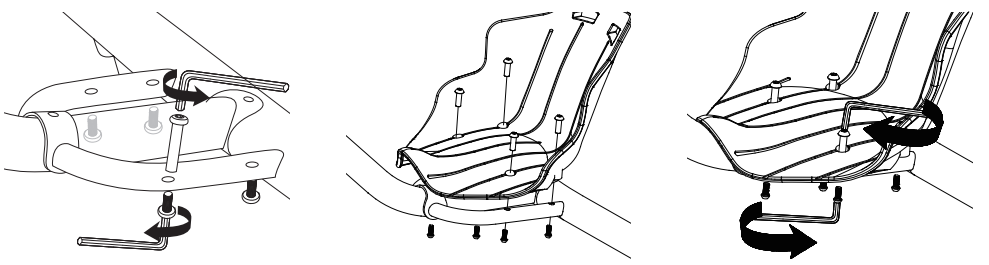
Attaching the Seat
Required Tools: Two (2) 5 mm Allen wrenches
- Using two (2) 5 mm Allen wrenches, remove the four (4) coupling bolts from the rear frame.
- Align the four (4) holes in seat with the four (4) holes in frame. Insert the coupling bolts through the top and bottom of the frame.
Tighten the coupling bolts using two (2) 5 mm Allen wrenches.
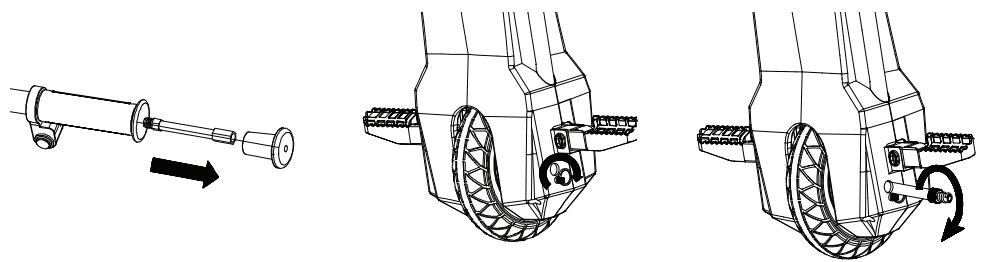
Inflating the Front Tire
The tire is inflated when shipped, but it invariably loses some pressure between the point of manufacturing and your purchase. Always inflate tire to the correct PSI before first time use.
- Remove valve extender from right handlebar grip.
- Open the round cover located on the chain cover by sliding the cover upward.
Align the opening in the drive sprocket with the valve stem. Thread the valve extender completely onto the valve stem.
- Attach the pump and inflate to 36 PSI.
- Remove valve extender immediately after inflating.
Close the cover by sliding the cover downward.
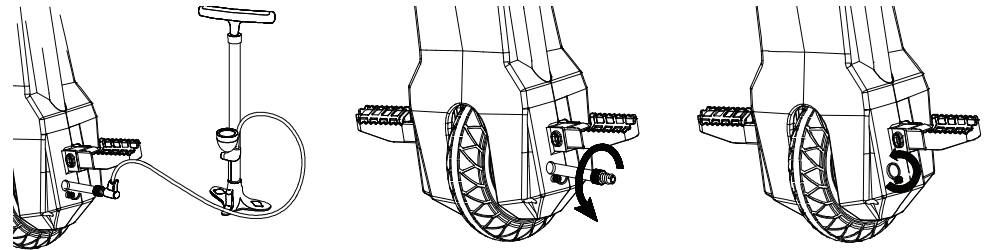
Place the valve extender back into the right handlebar grip.
WARNING: Failure to remove the valve extender after inflating will cause the inner tube and/or adapter to be severed by the front drive sprocket.
Note: If you lose the valve extender, contact customer service, or one can be purchased at almost any auto parts store.
WARNING: Do not over inflate as this could damage tire or wheel
Note: The pressurized air supplies found at gasoline stations are designed to inflate high-volume automobile tires. If you decide to use such an air supply to inflate your PowerRider 360 tire, first make sure the pressure gauge is working, then use very short bursts to inflate to the correct PSI. If you inadvertently over-inflate the tire, release the excess pressure immediately.
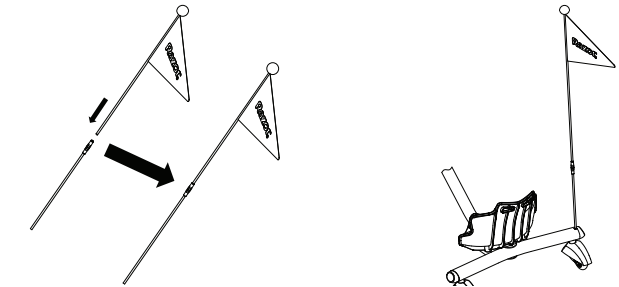
Attaching the Flag
Insert flag into fixed hole located on the rear of the frame.
Unfolding the Foot Pegs
Unfold the foot pegs.
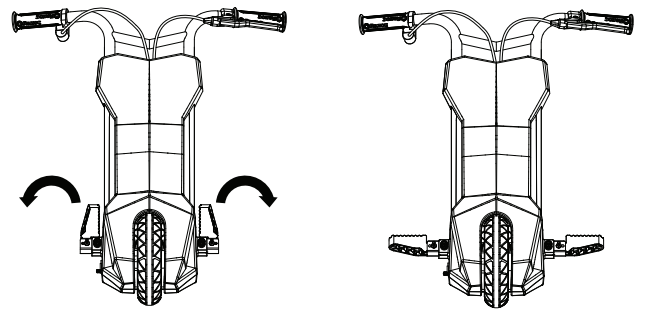
WARNING: When riding, foot pegs must be unfolded and both feet placed securely on pegs.
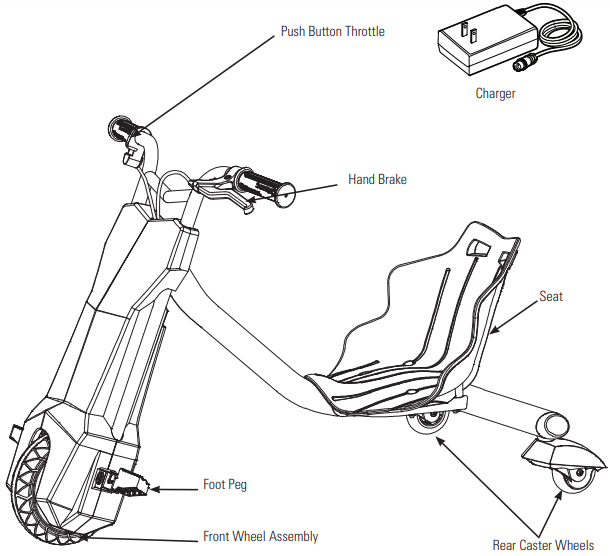
Razor Tricycle PowerRider 360 Description
The Razor Tricycle is a unique and exciting tricycle that offers a one-of-a-kind riding experience. With its high-performance front wheel and dual rear wheels with 360-degree spinning motion, this tricycle is perfect for kids who love adventure and action. The sturdy steel frame and adjustable handlebars ensure a safe and comfortable ride, while the cushioned seat provides extra comfort for longer rides. Whether your child is cruising around the neighborhood or showing off their tricks at the park, the PowerRider 360 is sure to provide hours of fun and excitement.
POWERRIDER 360 parts
Keep your Pocket Mod running for years with genuine Razor parts. Visit our web site or e-mail us for more information on spare part availability.
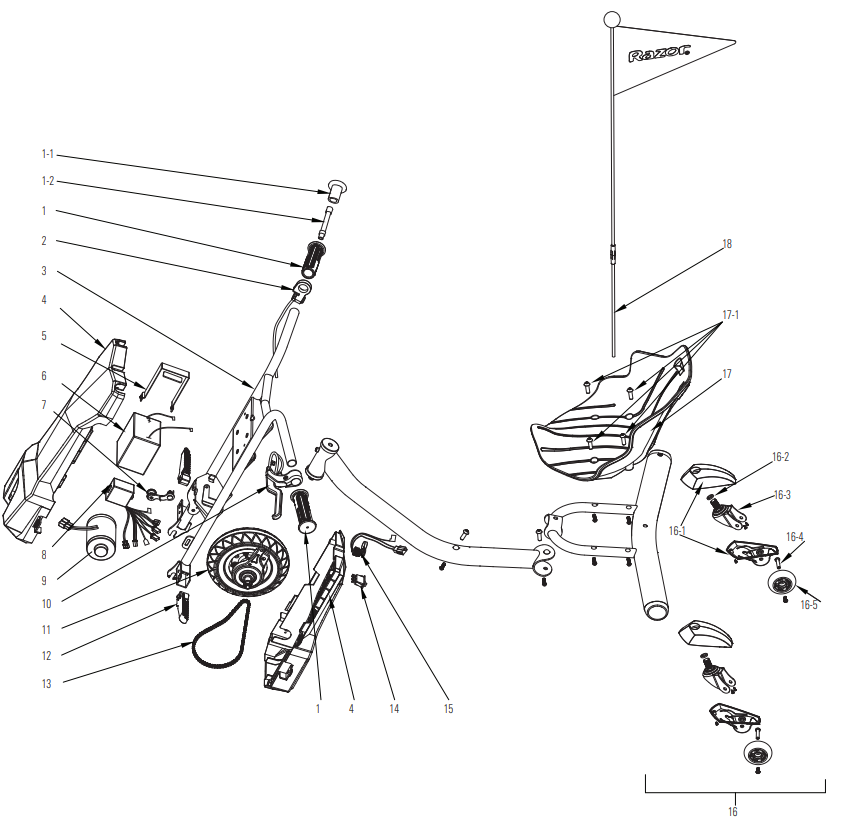
- Handlebar Grips (right/left)
- Handlebar Cap
- Valve Extender
- Push Button Throttle
- Front Fork
- Motor Cover/Chain Guard
- Battery Bracket
- Battery (12V/5Ah)
- Chain Tensioner
- Control Module
- Motor (12V/100W)
- Brake Lever Assembly
- Front Wheel Complete
- Foot Pegs
- Chain
- On/Off Switch
- Charge Port
- Rear Wheel Complete
- Rear Wheel Caster Cover
- Spring Washer
- Caster
- Axle Bolts
- Wheel
- Seat
- Seat Coupling Bolts (x4)
- Flag
Setup Guide
Setting up the Razor Tricycle PowerRider 360 is easy and straightforward. Simply follow these steps:
- Unbox the tricycle and remove all packaging materials.
- Inspect the tricycle to ensure that all parts are present and in good condition.
- Assemble the tricycle by following the instructions in the user manual. This typically involves attaching the handlebars, seat, and wheels.
- Check the air pressure in the front wheel and adjust as necessary.
- Adjust the handlebars to the desired height and secure them in place.
CHARGING THE BATTERY
Your PowerRider 360 may not have a fully charged battery; therefore it is a good idea to charge the battery prior to use.
- Initial charge time: 12 hours.
- Recharge time: up to 12 hours, even if the light turns green. Recommended maximum charging time is 24 hours.
- Always charge the battery immediately after riding.
- Fully charge battery before storing for extended periods of time.
- Unplug charger from the wall outlet when not in use.
- Failure to recharge battery periodically may result in a battery that will not accept a charge.
- Make sure power switch is turned OFF when unit is not in use. If the power switch is left on for an extended period of time, the battery may reach a stage at which it will no longer hold a charge.
- To ensure long battery life, never store the product in freezing or below freezing temperatures! Freezing will permanently damage the battery.
- Run time: Up to 30 minutes of continuous ride time. Run time may vary depending on riding conditions, rider weight, climate and/or proper maintenance.
- Constant stopping and starting may shorten ride time.
Average battery life for a properly maintained unit is approximately 250 charge/discharge cycles.
Note: Make sure power is turned OFF when unit is not in use. If the power switch is left on for an extended period of time, the battery may reach a stage at which it will no longer hold a charge.
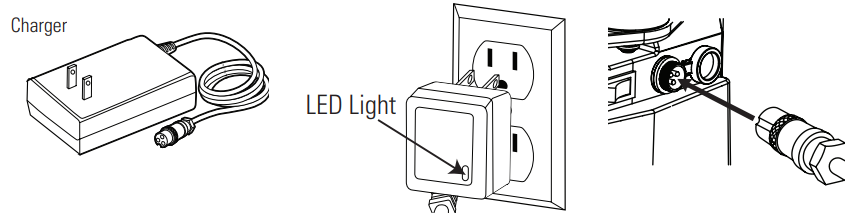
Note: Charger may look different than the pictures above.
- Plug the charger into wall outlet. The light on the charger should be green.
Note: If green light (LED) does not turn on, try a different outlet - Make sure the power switch is in the “OFF” position. Plug the charger into the charger port on the product. The light on the charger should turn red during charging. The light will turn green when charging is complete.
WARNING: Use ONLY with the recommended charger. Batteries are only to be charged under adult supervision. The charger is not a toy. Always disconnect the charger before wiping down and/or cleaning the PowerRider 360 with a damp cloth.
- The charger supplied with the PowerRider 360 should be regularly examined for damage to the cord, plug, enclosure and other parts.
- In the event of such damage, the PowerRider 360 must not be charged until it has been repaired or replaced.
- Chargers have built-in over-charge protection to prevent battery from being over-charged.
- Charger may get warm during use. This is normal for some chargers and is no cause for concern. If your charger does not get warm during use, it does not mean that it is not working properly.
- Wall outlet: Green
- Wall outlet and Unit: (Charging)
- Red Charging complete: Green
Note: Continue charging unit even if light turns green prior to 12 hours.
WARNING: Battery charge can deplete over time. Periodically recharge battery when not in use.
PRE-RIDE CHECKLIST
- Loose Parts
Check and secure all fasteners before every ride. There should not be any unusual rattles or sounds from loose parts or broken components. If you are not sure, contact customer service. - Wheels
Practice drift riding only in wide open areas clear from curbs, parking blocks and other obstacles. Impacting the wheels against any hard surface can damage the wheels. Wheels are not covered under your limited warranty. - Frame, Fork and Steering Wheel
Check for cracks or broken connections. Although broken frames are rare, it is possible for an aggressive rider to run into a curb or wall and wreck, bend or break a frame. Get in the habit of inspecting the PowerRider 360 before every ride. - Safety Gear
Always wear proper protective equipment, such as an approved safety helmet. Elbow pads and kneepads are recommended. Always wear shoes (lace-up shoes with rubber soles), never ride barefooted or in sandals, and keep shoelaces tied and out of the way of the wheels, motor, and drive system.
Razor Tricycle PowerRider 360 Usage
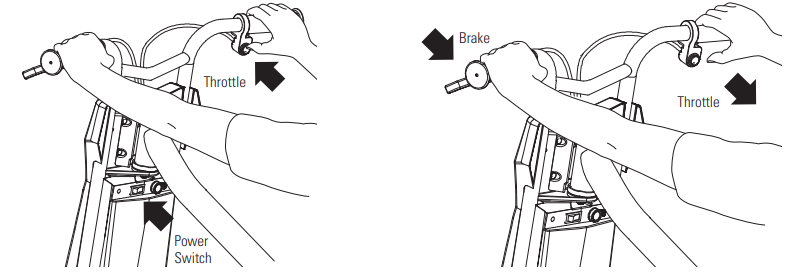
Starting the PowerRider 360
To start the unit, turn the power switch “ON”. Place both hands on the handlebars and press the push button throttle.
Note: Keep both feet on the foot pegs when unit is in motion.
Stopping the PowerRider 360
To stop the unit, release the push button throttle and apply the brake until the unit comes to a complete stop.
REPAIR AND MAINTENANCE
Turn power switch “OFF” before conducting any maintenance procedures.
Chain and Front Tire Replacement
Required Tools: Phillips screwdriver, 10 mm wrench, two (2) 8 mm wrenches, 14 mm
Disassembly
- Using a Phillips screwdriver, loosen the two (2) screws located on each side of the motor cover/chain guard.
- Using a Phillips screwdriver, loosen the six (6) screws to remove the motor cover/chain guard.
Remove the cable cap at the end of the cable. (Do not lose.)
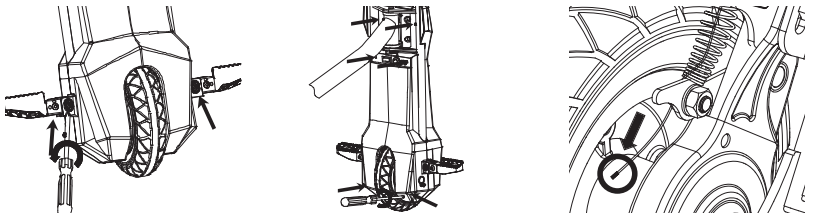
- Using a 10 mm wrench, loosen the brake cable anchor bolt and disconnect the cable.
- Using two (2) 8 mm wrenches, remove the brake housing anchor from the fork and brake plate. Keep the bolt, washer and nuts together.
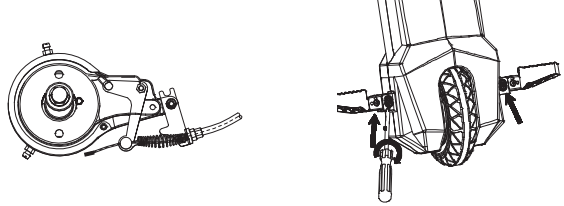
Using 14 mm and 17 mm wrenches, loosen the axle locknuts. Push down and remove the wheel from the fork. Remove the chain from the front sprocket.
Reassembly
- Install the chain onto the front wheel sprocket. Slip the wheel axle into the fork slot and through the wheel (note the sequence of the hardware pictured to the right). Push the chain tensioner down to create slack in the chain. Hand tightened the front axle locknuts.
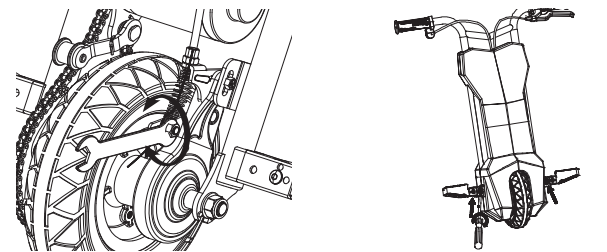
- Verify the chain is properly installed on each sprocket and that the tensioner is correctly positioned at the bottom of the chain.
Install the brake housing anchor on the front and brake plate using the bolt, washer and nut. Do not tighten.
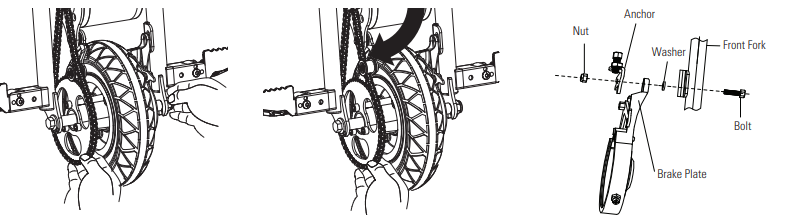
- Thread the brake cable through the brake adjuster barrel, through the large spring and into the small hole in the side of the anchor bolt. Position the cable in the original location (as indicated by the slight kink in the cable) and tighten securely. Reattach the cable cap to the end of the cable
Replace the motor cover/chain guard. Refer to steps 1 and 2..
Note: Front wheel hardware sequence
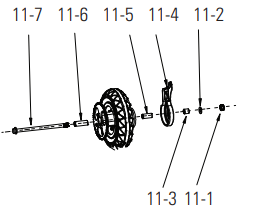
- Right Side (Throttle)
11-7 Axle Bolt
Fork
11-6 Spacer (long) - Left Side (Brake)
11-1 Locknut
11-2 Washer
Fork
11-3 Spacer (short)
11-4 Brake Plate
11-5 Spacer (short)
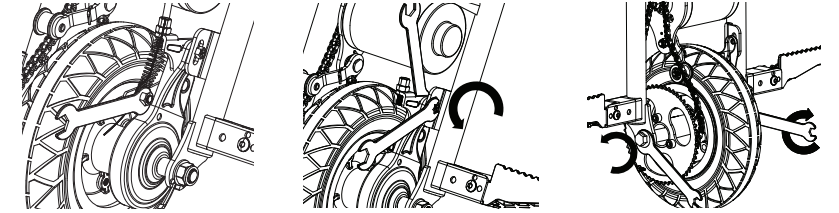
Adjusting the Brake
Required Tools: Phillips screwdriver, 10 mm wrench
- To adjust the brake cable tension, thread the brake lever adjuster in or out 1/4 to 1/2 turn until the desired brake adjustment in attained. Most adjustments are complete at this step. If the brake still needs further adjustment, proceed to the following steps.
- Using a Phillips screwdriver, loosen the two (2) screws on the foot pegs.
Using a Phillips screwdriver, loosen the six (6) screws to remove the motor cover/chain guard.

- If the brake is too tight or too loose, use a 10 mm wrench to loosen the nut on the brake cable for additional adjustment. Securely tighten the nut when finished.
Replace the motor cover/ chain guard. Refer to steps 2 and 3 above.
Troubleshooting
| Problem | Possible Cause | Solution |
|---|---|---|
| Product does not run | Undercharged battery. | Charge the battery for at least 12 hours before first use and after each use. |
| Charger is not working. | - Check all connectors to ensure the charger is tightly plugged into the charging port and wall outlet.<br>- Contact Razor Customer Service for a replacement charger. | |
| Product was running but suddenly stopped | Loose wires or connectors. | Check all wires and connectors to ensure they are tight and secure. |
| Short run time | Undercharged battery. | Charge the battery for at least 12 hours before first use and after each use. |
| Battery is old and will not accept full charge. | Replace the battery with a Razor replacement battery. Note that average battery life is 1 to 2 years depending on use and conditions. | |
| Product runs sluggishly | Riding conditions are too stressful. | Use only on solid, flat, clean, and dry surfaces. Avoid steep hills and towing objects. |
| Product is overloaded. | Ensure the load does not exceed the maximum weight limit and check the air pressure of the front wheel. Only one rider should use the product at a time. | |
| Sometimes the product doesn’t run, but other times it does | Loose wires or connectors. | Check all wires and connectors to ensure they are secure. |
| Motor or electrical switch damage. | Contact your local Razor authorized service center for diagnosis and repair, | |
| Product makes loud noises or grinding sounds | Chain is too dry. | Apply a lubricant such as 3 in 1™ or Tri-Flow™ to the chain. |
Razor Tricycle PowerRider 360 Warranty
The manufacturer warranties this product to be free of manufacturing defects for a period of 90 days from date of purchase. This Limited Warranty does not cover normal wear and tear, tires, tubes, cables, or any damage, failure or loss caused by improper assembly, maintenance, storage or use of the Razor PowerRider 360.
Pros & Cons
Pros
- High-performance wheels for a smooth and stable ride
- 360-degree spinning motion for exciting tricks and stunts
- Sturdy steel frame that can support up to 160 pounds
- Comfortable, cushioned seat for a comfortable ride
- Adjustable handlebars to accommodate riders of different heights
Cons
- May be difficult for younger children to maneuver
- May not be suitable for off-road use
- Some users have reported issues with the 360-degree spinning motion
Customer Reviews about Razor Tricycle PowerRider 360
Customers who have purchased the Razor Tricycle PowerRider 360 have generally been very positive about their experience. Many have praised the high-performance wheels and 360-degree spinning motion, while others have appreciated the sturdy steel frame and comfortable seat. However, some users have reported issues with the 360-degree spinning motion, noting that it can be difficult to control at times.
Faqs
How do I assemble the Razor Tricycle PowerRider 360?
What is the recommended age range for the PowerRider 360?
Does the PowerRider 360 come with a warranty?
How do I perform a quick stop on the PowerRider 360?
What do I do if I need replacement Razor Tricycle PowerRider 360?
How do I maintain the Razor Tricycle PowerRider 360?
How do you inflate the front wheel on the PowerRider 360?
What is the battery life expectancy Razor Tricycle PowerRider 360?
Can the Razor Tricycle PowerRider 360 be used on all types of surfaces?
How do I charge the Razor Tricycle PowerRider 360?
Leave a Comment