
Setup: Remington Power Series Aqua Rotary Shaver PR1355 User Manual
Content
Remington Power Series Aqua Rotary Shaver PR1355
Introduction
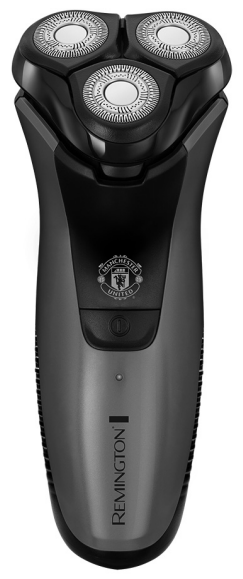
The Remington Power Series Aqua Rotary Shaver PR1355 is a premium electric shaver designed for men who demand a close, comfortable shave in any environment. Featuring advanced Aqua technology, this shaver is 100% waterproof, making it ideal for use in the shower or with shaving foam for a smoother experience. With a powerful rotary system and a 40-minute cordless runtime, the PR1355 delivers reliable performance for both quick touch-ups and detailed grooming sessions.
Key benefits include its Manchester United edition design, three flexing heads with ComfortPivot and ActiveContour technology for a closer shave, and easy cleaning under running water. The shaver is perfect for travelers, busy professionals, and anyone seeking a versatile, high-performance grooming tool. The Remington Power Series Aqua Rotary Shaver PR1355 is widely available online and in major retailers, with an estimated price range of €40–€60, offering excellent value for its features and build quality.
Specifications of the Remington Power Series Aqua Rotary Shaver PR1355
- Model: PR1355 (Manchester United Edition)
- Type: Rotary electric shaver
- Waterproof: Yes (IPX7 rated, suitable for shower use)
- Battery: Rechargeable lithium-ion, 40-minute runtime
- Charging Time: Approx. 1 hour
- Shaving Heads: 3 flexing heads with ComfortPivot and ActiveContour
- Cleaning: Rinseable under running water
- Use: Dry or wet (with foam or gel)
- Weight: Lightweight, ergonomic design
- Warranty: 2-year manufacturer warranty
Compared to similar models, the Remington Power Series Aqua Rotary Shaver PR1355 stands out for its durability, ease of cleaning, and Manchester United branding, making it a top choice for fans and performance seekers alike.
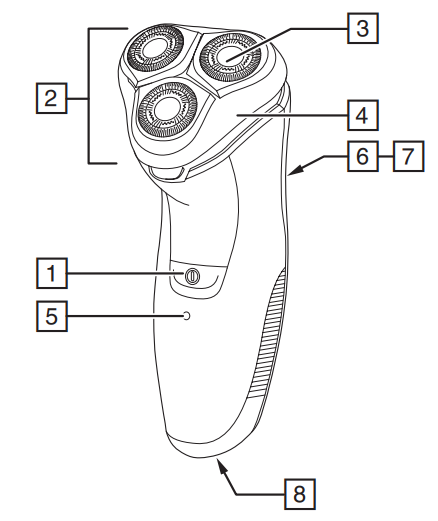
PARTS
- On/off switch
- Pivoting head and cutter assembly
- Flexing heads
- Hairpocket
- Charging indicator light
- Low/Full/Charging indicator light
- Detail trimmer
- Trimmer release button
- Power port
Not shown:- Adaptor
- Cleaning brush
- Head guard
- Face towel
GETTING STARTED
It is recommended that you use your new shaver daily for up to four weeks to allow time for your beard and skin to become accustomed to the new shaving system.
CHARGING YOUR SHAVER
- Ensure the appliance is turned off.
- Connect the shaver to the adaptor and then to the mains.
- Charge for at least 24 hours when using for the first time.
- Allow 4 hours for a full charge.
- When charging, the green indicator light will show solid. When fully charged, the green indicator light will turn off.
- To preserve the life of your batteries, let them run out every 6 months, then recharge for 24 hours.
- The shaver automatically adjusts to a mains voltage between 100V and 240V.
INSTRUCTIONS FOR USE
SHAVING
- Make sure your shaver is properly charged.
- Switch the shaver on.
- Stretch the skin with your free hand so the hairs stand upright.
- Only apply light pressure on the shaving head while shaving (pressing too hard can damage the heads and make them vulnerable to breakage).
- Use short, circular strokes.
TRIMMING
- Slide the trimmer button to release the detail trimmer.
- Hold the trimmer at a right angle to your skin.
- Place the trimmer at the desired trim line for a quick, easy, professional trim.
- To retract the trimmer, push down until it locks into position.
TIPS FOR BEST RESULTS
- Ensure your skin is dry. Always hold the shaver at right angles to the skin so that all three heads are touching the skin with equal pressure.
- Use moderate to slow stroking movements. The use of short circular motions in stubborn areas may obtain a closer shave, especially along the neck and chin line.
- DO NOT press hard against the skin in order to avoid damage to the rotary heads.
SHAVING WITH SHAVING GEL
- Follow the same instructions as dry shaving, noted above in the Shaving section, if using with gel.
- Caution: After use with shaving gel, please rinse the head and cutters under warm water to clean away any excess gel and debris.
CARE FOR YOUR SHAVER
Care for your appliance to ensure a llong-lastingperformance. We recommend you clean your appliance after each use.
Ensure the appliance is switched off and unplugged from the mains before cleaning.
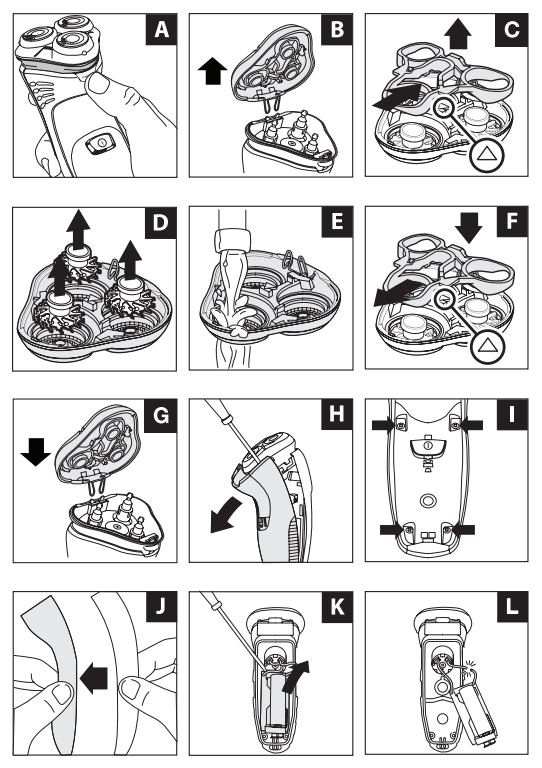
- Open the shaver head by pressing the release button (Fig. A).
- Empty out any hair clippings.
- Pull the shaver head upwards to remove it from the body (Fig. B).
- Locate the centre arrow and slide the retainer in the opposite direction to release it. Once released, lift it out of the shaver head (Fig. C). Make a note of the correct orientation of the retainer to make refitting easier.
- Carefully brush away any hhairfrom the cutters.
- For a more thorough cleaning, lift out the three cutters (Fig. D).
- Wash the shaving head ununderunning water (Fig. E). Allow to dry thoroughly.
- Carefully refit the three cutters.
- Refit the retainer. Locate the centre arrow and slide the retainer in the same direction as the arrow until it clicks into place (Fig. F).
- Once the shaver head is assembled, align the spring hinge with the slot at the back of the hair pocket and press it into place (Fig. G). Finally, close the head assembly.
TRIMMER
Lubricate the teeth of the trimmer every six months with a drop of sewing machine oil.
REMOVING THE RECHARGEABLE BATTERY
We strongly recommend that a professional remove the rechargeable battery. Parts of the shaver case, and tools have sharp edges and may cause injury if not handled correctly.
- The rechargeable battery must be removed from the appliance before it is scrapped.
Disconnect the charging adapter before removing the battery.
- Run the shaver until the motor stops.
- Unplug the shaver.
- Using a small screwdriver, pry the front cover from the shaver (Fig. H).
- Remove the rear cover (Fig. I).
- Remove the 4 screws located on the front of the shaver (Fig. J).
- Pry the battery carrier and circuit board from the shaver body, then cut the wires (Fig. K- L).
- Used batteries must be removed from the appliance and disposed of at an appropriate official recycling/collection point.
- Do not attempt to operate the shaver once you have opened it.
Troubleshooting Common Issues with the Remington Power Series Aqua Rotary Shaver PR1355
- Shaver won’t turn on: Ensure the battery is charged. Check for any loose connections.
- Poor shaving performance: Clean the shaving heads and replace them if worn.
- Water leakage: Do not submerge the charging base. Only the shaver head is waterproof.
- Error codes: None displayed; contact support if issues persist.
Preventive measures include regular cleaning and avoiding use while charging. The Remington Power Series Aqua Rotary Shaver PR1355 comes with a 2-year warranty. For support, visit Remington’s official website or contact customer service.
Pros and Cons of the Remington Power Series Aqua Rotary Shaver PR1355
Pros
- 100% waterproof for wet and dry use
- 40-minute cordless runtime
- ComfortPivot and ActiveContour technology for a close shave
- Easy to clean under running water
- Manchester United edition design
ConsThe chargingg base is not waterproof
- Replacement heads may be costly
- Not as powerful as some premium competitors
The Remington Power Series Aqua Rotary Shaver PR1355 offers excellent value for money, especially for fans of Manchester United and those seeking a reliable, versatile shaver.
Customer Reviews for the Remington Power Series Aqua Rotary Shaver PR1355
Customers consistently rate the Remington Power Series Aqua Rotary Shaver PR1355 highly, with an average of 4.5 stars. Users praise its waterproof design, comfortable shave, and ease of cleaning. Common complaints include the need for frequent cleaning and the cost of replacement heads. Many recommend it for daily use and travel, noting its durability and performance. The Manchester United branding is a popular feature among fans.
Faqs
How do I set up the remington Power Series Aqua Rotary Shaver PR1355 for the first time?
What should I do if my remington Power Series Aqua Rotary Shaver PR1355 is not charging or shows no indicator light?
Can I use the remington Power Series Aqua Rotary Shaver PR1355 in wet conditions or with shaving gel?
How do I properly clean and maintain the remington Power Series Aqua Rotary Shaver PR1355 to ensure optimal shaving performance?
What are the key features of the remington Power Series Aqua Rotary Shaver PR1355 that improve the shaving experience?
How long does the battery last on a full charge for the remington Power Series Aqua Rotary Shaver PR1355?
How can I replace the inner cutters and blades on the remington Power Series Aqua Rotary Shaver PR1355?
Is the remington Power Series Aqua Rotary Shaver PR1355 compatible with international voltages?
More remington manuals
- Setup: Remington Beard Boss Styler MB4128 User Manual
- Setup: Remington QuickCut Hair Clippers HC4255 User Manual
- Setup: Remington MyGroom Rotary Shaver R0050 User Manual
- Setup: Remington Heritage Hair Clipper HC9105 User Manual
- Setup: Remington G2 Graphite Series Personal Groomer PG2000 User Manual
- Setup: Remington Heritage Foil Shaver HF9050 User Manual
Leave a Comment