
Setup: Remington G2 Graphite Series Personal Groomer PG2000 User Manual
Content
Remington G2 Graphite Series Personal Groomer PG2000
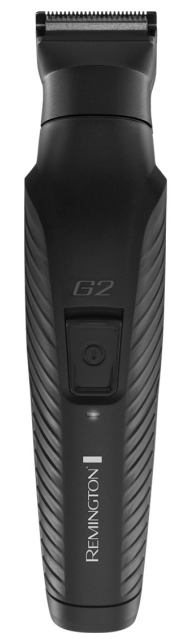
Introduction: The Ultimate Multi-Grooming Solution
The Remington G2 Graphite Series Personal Groomer PG2000 is a versatile, high-performance grooming kit designed for men who value precision, comfort, and convenience. Featuring graphite-coated blades for a smooth glide and self-sharpening comfort tip blades, this multi-groomer delivers consistent, irritation-free results for beard, hair, and body grooming. With five interchangeable attachments, the Remington G2 Graphite Series Personal Groomer PG2000 offers up to 10 different styling options, making it ideal for achieving rugged stubble, a full beard, or a clean-cut look. Its cordless design provides up to 40 minutes of runtime, perfect for travel or daily use. The kit also includes a storage pouch, washable heads, and a nose/ear/eyebrow trimmer, ensuring all your grooming needs are covered. Priced affordably at under £20 in the UK, the Remington G2 Graphite Series Personal Groomer PG2000 is a budget-friendly choice for students, professionals, and anyone seeking reliable, multi-purpose grooming tools.
Specifications: Technical Details & Features
- Graphite-coated blades for smooth, comfortable trimming
- Self-sharpening comfort tip blades for long-lasting performance
- 30mm main blade for hair and beard trimming
- Five attachments for 10 different grooming styles
- Cordless operation with up to 40 minutes of runtime
- 16-hour charging time
- Washable heads for easy cleaning
- Adjustable comb with multiple length settings
- Nose, ear, and eyebrow trimmer included
- Storage pouch for portability
- On/Off switch and charging indicator light
- Charging connector included
Compared to similar multi-groomers, the Remington G2 Graphite Series Personal Groomer PG2000 stands out for its graphite-coated blades, self-sharpening feature, and comprehensive attachment set, offering better value for money and versatility.
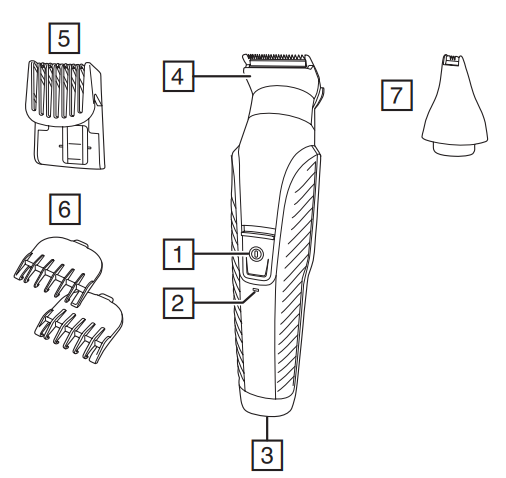
PARTS
- On/Off switch
- Charging indicator light
- Charging connector
- Wide trimmer
- Adjustable comb
- Attachment guide combs
- Nose, ear, eyebrow trimmer
Not shown- Adaptor
- Storage pouch
CHARGING YOUR APPLIANCE
Before using your trimmer for the first time, charge it for 16 hours.
- Ensure the product is switched off.
- Connect the charging adaptor to the product and then to the mains.
- When charging, the charge indicator light will light up.
- Run time from a fully charged battery is up to 40 minutes.
- Your trimmer cannot be overcharged. However, if it is not going to be used for an extended period of time (2-3 months), unplug it from the mains and store.
- To preserve the life of your batteries, let them run out every 6 months, then recharge for 16 hours.
ATTACHMENTS
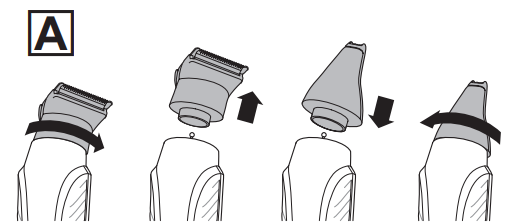
TO FIT AND REMOVE ATTACHMENTS (FIG. A)
Ensure that the device is switched off before fitting or removing attachments.
- To remove, rotate the attachment anti-clockwise until it unlocks and then lift it off.
- To fit, place the desired attachment on top of the device and rotate the attachment clockwise to lock it into place.
FITTING AND REMOVING FIXED GUIDE COMBS To Fit
- Hook the front of the guide comb over the teeth of the wide trimmer.
- Press the back of the guide comb down until it clicks into place.
To Remove
- Lift the tab on the back of the guide comb upwards until it comes free from the wide trimmer head.
FITTING AND REMOVING THE ADJUSTABLE COMB
- To fit, line up the rails on the comb with the slots on the sides of the groomer and slide the comb downwards onto the groomer.
- To adjust, press and hold the adjustment button on the back of the comb and slide the comb up or down. Release the button to lock the comb at that position. The length of the cut is indicated by the scale on the side of the trimmer.
- To remove, press and hold the adjustment button and push the comb up and off the groomer.
INSTRUCTIONS FOR USE
- Comb facial hair with a fine comb before you start trimming.
- Comb your hair in the direction that it grows so that the hairs are at their maximum height and facing in the same direction.
- Since all hairs do not grow in the same direction, you may want to try different trimming positions (i.e. upwards, downwards or across) for better results.
- Hair should be dry and free from any waxes or lotions.
- If hair builds up during use, switch the unit off, remove any attachment in use and clean any excess hair clippings from the attachment and groomer.
- After trimming, lightly go over the trimmed areas with the foil to get a smooth , clean finish.
3-DAY STUBBLE, AND BODY HAIR MAINTENANCE
Attachments
- Wide trimmer with 1.5 mm fixed comb or 3 mm fixed comb3-day
stubble look:
- Let your stubble grow to a length that is slightly longer than the look you are trying to achieve.
- Fit the 1.5 mm fixed comb to the wide trimmer attachment.
- Run your trimmer through your beard against the direction of hair growth.
- Tidy the edges of the stubble using the precision trimmer attachment.
- For more control over the length of your stubble, you can use the adjustable comb and trim your stubble down in increment,s, starting at a longer length setting until you get the desired look.
Body hair maintenance
- Let your hair grow to a length that is slightly longer than the look you are trying to achieve.
- Fit the 3 mm fixed comb to the wide trimmer attachment.
- Run your trimmer through your body hair against the direction of hair growth.
HAIR CLIPPING
Attachments
Wide trimmer with adjustable comb
Step 1: Nape of the neck
- Fit the wide trimmer and adjustable comb.
- Set the adjustable comb to the desired length.
- Hold the clipper with the blade teeth pointing upwards. Begin starting at the centre of the head at the base of the neck.
- Slowly lift the clipper, working upwards and outwards through the hair, trimming just a little at a time.
Step 2: Back of the head
- With the comb set at 12mm or 18mm, cut the hair at the back of the head.
Step 3: Side of the head
- Adjust the comb to a shorter length setting for the areas around the ears.
- Increase the length setting on the adjustable comb to gradually transition the length of hair on the side of the head to the longer hair on the top of the head.
Step 4: Top of the head
- Adjust the comb to the longer length settings (up to 20 mm),, then cut the hair on top of the head against the direction in which the hair normally grows.
- Always work from the back of the head.
Trim the sideburns
- To trim the sideburns, adjust the comb to the desired length setting, or use one of the fixed guide combs.
SHORT/LONG BEARD TRIMMING
Attachments
Wide trimmer with adjustable comb
- Fit the wide trimmer and adjustable comb.
- Set the adjustable comb to the desired length.
- Start trimming under the chin , following the line of the jaw.
- Work upwards towards the ear and upper beard line.
CONTOUR EDGING AND CLOSE HAIR CUTTING
Attachments
- Wide trimmer
Contour edging:
- Hold the device with the cutting blade (teeth) facing you and at 90 degrees to the skin.
- Start with the edge of the beard/moustache line and, with the blade resting lightly against the skin, use slow, controlled movements to create contoured lines.
Close hair cutting:
- Use the fingers of one hand to lift the hair at the base of your head up off your neck.
- Your index finger should be covering the roots of the hairs you are lifting to prevent them from being accidentally cut.
- Hold the trimmer to the base of your neck with the blade facing up. Move the trimmer up the neck until it touches your index finger, which is protecting the hair roots.
- Move your trimmer slowly and keep the hair roots at the base of your head out of the way of the trimmer.
DETAILED NOSE, EYEBROW AND EAR HAIR TRIMMING
Attachments
- Nose, ear and eyebrow trimmer
Nose and ear:
- Fit the nose, ear and eyebrow trimmer.
- Insert the attachment gently into the nostril or ear.
- Gently move the attachment in and out while rotating the groomer at the same time.
- Don’t insert the attachment more than 6 mm into the nostril or ear.
- Wash the attachment after each use.
Eyebrow:
- Carefully guide the attachment to remove any stray or longer hairs from theeyebroww.
- To completely removhairrs, let the attachment touch the skin, and then move over the desired area.
CARE FOR YOUR GROOMER
Care for your product to ensure long-lasting performance. We recommend that you clean your groomer after each use.
AFTER EACH USE
- Brush any accumulatedhairs from the groomer and attachment heads.
- The easiest and most hygienic way to clean the groomer is by detaching the head from the groomer's body and rinsing the head with warm water.
- The groomer's body should not be rinsed.
- Place one or two drops of cutter oil or sewing machine oil on the blades.
- Turn the clipper on to distribute the oil evenly, and wipe off any excess oil.
BATTERY REMOVAL
We strongly recommend that a professional remove the rechargeable battery. Parts of the shaver case, and tools have sharp edges and may cause injury if not handled correctly.
- The rechargeable battery must be removed from the appliance before it is scrapped.
Disconnect the charging adapter before removing the battery.
- Ensure that the battery is fully discharged. To do this, operate the shaver until it stops.
- Unplug the trimmer.
- Using a suitable tool, carefully pry apart the front and rear halves of the case at the joint line.
- Cut the tabs holding the battery to the circuit board.
- Used batteries must be removed from the appliance and disposed of at an appropriate official recycling/collection point.
- Do not attempt to operate the shaver once you have opened it
Troubleshooting: Common Issues & Solutions
- Device not turning on: Check if the battery is charged. If not, charge for at least 16 hours.
- Blades not cutting smoothly: Clean the blades and ensure they are properly attached. If the issue persists, the blades may need replacement.
- Attachments not fitting: Ensure the device is switched off and rotate the attachment correctly.
- Charging indicator not lighting up: Check the charging connector and power source.
For warranty and support, register your product online within 28 days of purchase for an extra year guarantee. Contact Remington customer service for further assistance.
Pros & Cons: Balanced Assessment
Pros
- Graphite-coated blades for smooth, comfortable trimming
- Self-sharpening blades for long-lasting performance
- Multiple attachments for versatile grooming
- Affordable price point
- Washable heads for easy maintenance
ConsThe
- 40-minute runtime is shorter than some competitors
- 16-hour charging time is relatively long
- Basic design with limited advanced features
The Remington G2 Graphite Series Personal Groomer PG2000 offers excellent value for money, especially for those seeking a reliable, multi-purpose grooming tool without breaking the bank.
Customer Reviews: User Feedback & Testimonials
Customers praise the Remington G2 Graphite Series Personal Groomer PG2000 for its smooth glide, comfortable trimming, and versatile attachments. Many users highlight its affordability and ease of use, with a typical star rating of 4.2 out of 5. Common complaints include the shorter battery life and longer charging time. Most reviewers recommend it for everyday grooming and travel, noting that it "does the job" for basic needs. Frequent mentions include the nose trimmer and adjustable comb as standout features.
More remington manuals
- Setup: Remington G3 Graphite Series Personal Groomer PG3000 User Manual
- Setup: Remington MyGroom Rotary Shaver R0050 User Manual
- Setup: Remington G4 Graphite Series Personal Groomer PG4000 User Manual
- Setup: Remington Beard Boss Styler MB4128 User Manual
- Setup: Remington G4 Graphite Series Personal Groomer PG4005 User Manual
- Setup: Remington Power Series Aqua Rotary Shaver PR1355 User Manual
Leave a Comment